Как хостить телеграм-бота (и другие скрипты на Python) на Repl.it бесплатно 24/7
Очень часто возникающий вопрос: где можно разместить скрипты на Python, Flask-приложение, телеграм или дискорд ботов?
Один из вариантов — на своем компьютере при наличии внешнего IP-адреса и опыта в настройке проброса портов на роутере. Или другие сервисы, как правило, требующие платной подписки.
Цель этот статьи — подробная инструкция, как сделать хостинг Python-скриптов бесплатно и доступным 24/7 на примере телеграм-бота
Шаг 0 — регистрация бота
Существует огромное количество туториалов, как получить токен, поэтому все по-простому. Находим в телеграм BotFather, регистрируем нового бота, выбираем ему имя, получаем токен вида: 127466748171:HJfwijfw88jf32lc9FHjwpfkfgwerhjf
Он нам понадобится в дальнейшем

Шаг 1 — регистрируемся на Repl.it
Создаем новый проект на Python
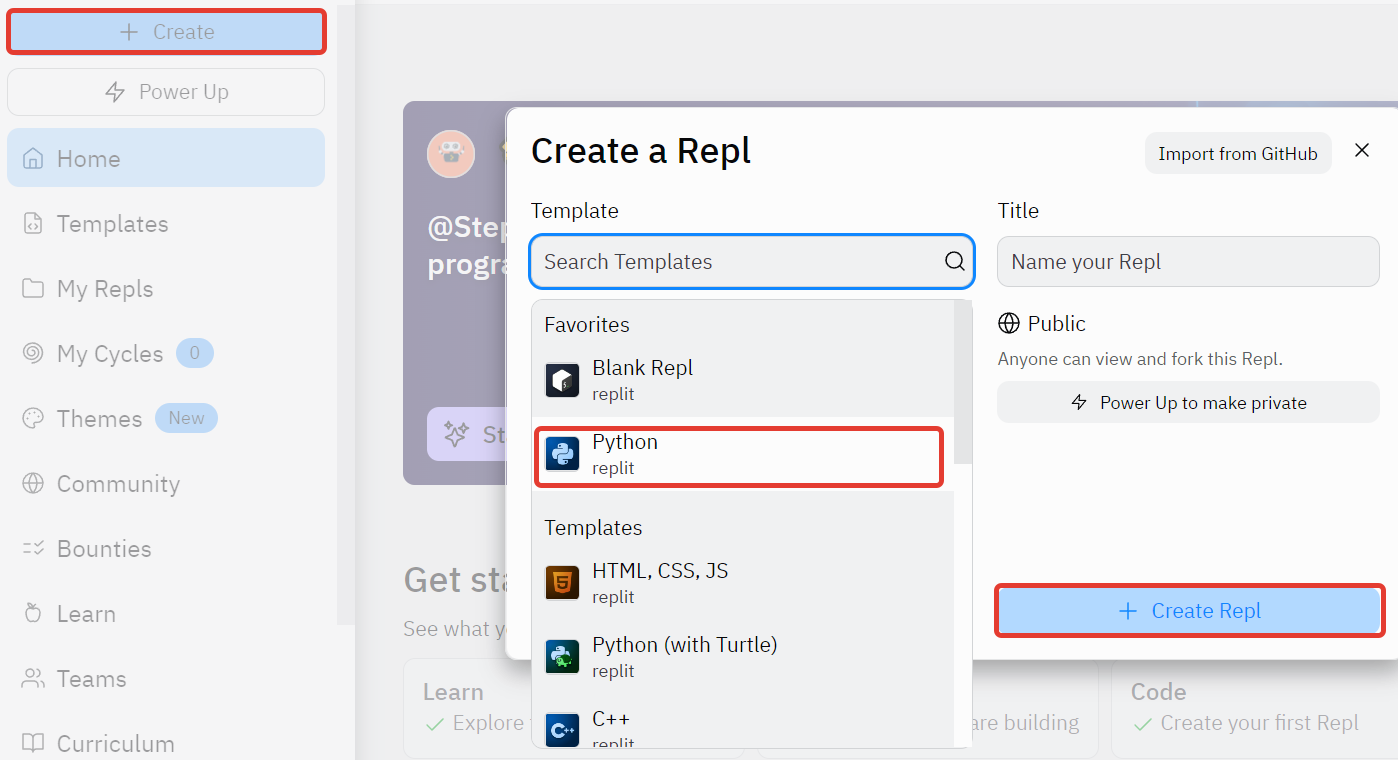
Шаг 2 — Пишем код бота
В проекте будет создан файл main.py. В нем размещаем код бота:

Тут стоит обратить на установку модуля pytelegrambotapi: импортируем сначала pip и потом выполняем его через: pip.main([‘install’, ‘pytelegrambotapi’]).
В этом случае при запуске никаких дополнительных действий для установки не потребуется
Шаг 3 — Создаем Flask-сервер
Создаем в проекте еще один файл background.py В нем будет запущен Flask-сервер, который будет принимать запросы от сервиса мониторинга и использоваться для поддержания работоспособности скрипта на ReplIt.
Flask — модуль на python для разработки веб-приложений. Мы создадим «шаблон» сервера, в котором только одна страница, необходимая для нашей задачи.
Все дело в том, что в бесплатном режиме запущенный скрипт на Replit будет остановлен спустя некоторое время (10-30 мин) после закрытия вкладки браузера.
Однако, если к веб-серверу был сделан запрос, таймер сбрасывается и скрипт продолжает работать.
Важно, что сервер запускается в файле не напрямую, а в отдельном потоке t = Thread(target=run). Это обеспечит возможность одновременной работы Flask-сервера и телеграм-бота.

Запуск Flask-сервера
После запуска в верхнем правом углу появилась ссылка (она потребуется чуть позже) по которой можно увидеть результат работы Flask-сервера (в нашем случае сообщение I’m alive).
На этом этапе у нас работает эхо-телеграм-бот и веб-сервер, доступный из вне по адресу вида: YOUR_REPL.your_nickname.repl.co
Однако, спустя 10-30 минут после закрытия вкладки браузера скрипт будет остановлен. Вся хитрость в том, что если «кто-то» будет периодически открывать ссылку, ведущую на страницу нашего веб сервера скрипты будут продолжать работать бесконечно долго.
Шаг 4 — настраиваем службу мониторинга
Для того, чтобы скрипт работал постоянно, воспользуемся сервисом UpTimerRobot. Он будет раз в 5 минут создавать запрос к нашему web-серверу и продлевать время его работы. Регистрация не представляет трудности, поэтому перейдем к следующему этапу.
После входа в личный кабинет, создаем новый монитор

Создание монитора в UpTimerRobot
В настройках нового монитора нужно указать название и ссылку, которую мы получили при запуске скрипта выше. Время опросы указываем — каждые 5 минут.
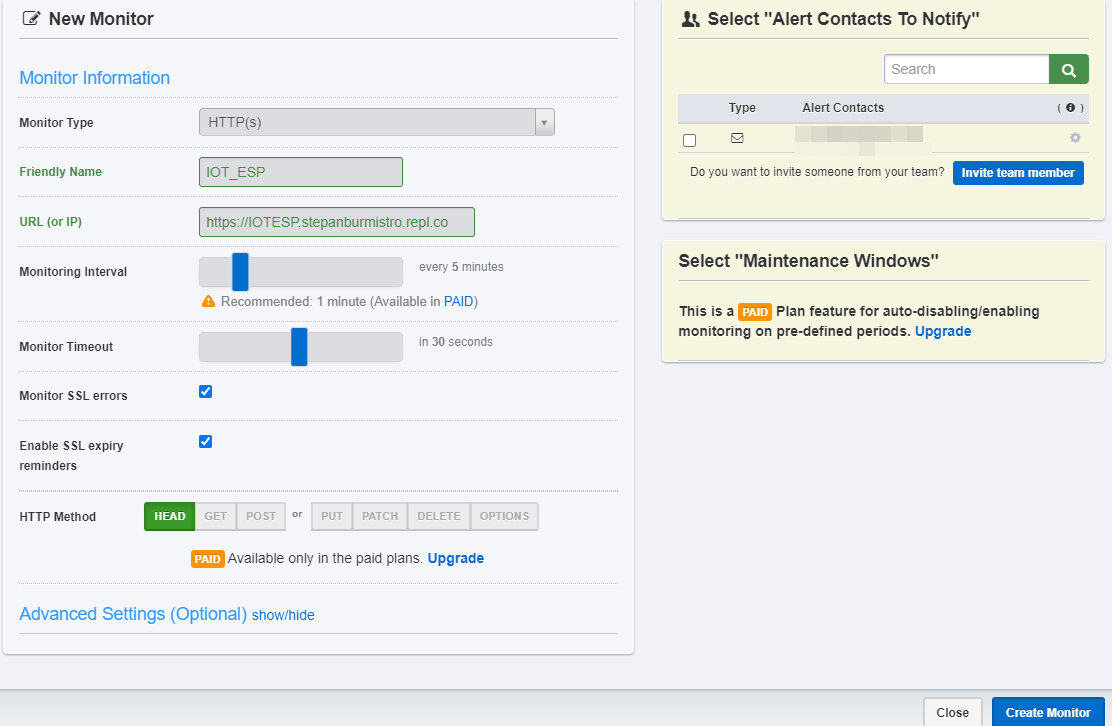
Сохраняем монитор и возвращаемся в ReplIt. В консоле сервера видим входящие обращения от службы мониторинга

Это значит, что все получилось и наш скрипт будет работать 24/7. Можно работать над ним и развивать проект!
How to Deploy a Telegram Bot with Flask, pyTelegramBotAPI, Gunicorn and PostgreSQL to Heroku

Over the course of several months, I have been building Telegram bots as a hobby and also for clients but so far, I had no reason to build a bot that will make use of Webhooks, PostgreSQL and Flask framework.
Previously, most of my Telegram bots were built as a single python file connected to a Google Spreadsheet as a database and deployed to Heroku as explained in my previous guide — “How to Deploy a Python Script or Bot to Heroku in 5 Minutes”.
Building a Telegram bot with Flask, Gunicorn and a database like PostgreSQL is a different ball game and it becomes more interesting when you add Heroku deployment to the mix.
When I was done building my last Telegram bot project and was ready to deploy it, I couldn’t find any comprehensive guide or tutorial that explained everything I needed to add and configure in order to successfully deploy my Bot; there was no single documentation where I could find all the needed information in one place, most of the tutorials out there are geared towards the deployment of a flask website and not a telegram bot living in a “flask container”.
Anyways, I was able to pull it off after hours of trials and figuring things out on my own but you don't have to go through that stress because I have made this guide for you and I hope it will be enough for you to successfully deploy your awesome Telegram Bot to Heroku.
In this step-by-step guide, I will show you how to deploy a Telegram Bot with Flask, pyTelegramBotAPI, Gunicorn, and PostgreSQL to Heroku.
In this guide, I am using Flask 1.1.2 and pyTelegramBotAPI to build the bot. For some reason, Flask 2.0+ has an issue with SQLAlchemy with throws an error (please don't ask me why!), but after some research, I found a solution that involves downgrading my Flask to 1.1.2+ version.
So, you might need to change your Flask version in your requirements.txt file but don’t worry about this if you are able to make your Flask + telegram bot work successfully with your Database even with a newer version of Flask.
That said, let’s move on with our Telegram Bot with Flask and PostgreSQL deployment to Heroku.
I will try to make the steps as simple as possible but I will assume you are familiar with Python & Git (I am assuming your project is a git repository) and you have built a Telegram bot with Flask, PostgreSQL, and pyTelegramBotAPI.
Tip: You can activate git in your project folder by running the command git init in your terminal.
Let’s Get Started:
Steps we follow here:
- Install Heroku CLI
- Create a new Heroku app
- Install required Packages (Gunicorn & PythonDecouple)
- Create configurations
- Create a database on Heroku
- Setup Environment variables
- Database Configuration
- Bot Deployment
- Database migration
- Troubleshooting
- Testing
1. Install Heroku CLI
You need to install the Heroku CLI on your computer for easy deployment and troubleshooting, the CLI comes with some nice features that will be helpful to you on your deployment journey.
To install the Heroku CLI on your Computer follow the procedure here for all OS https://devcenter.heroku.com/articles/heroku-cli
You can skip this step if you already have Heroku installed on your computer.
2. Create a new Heroku app
Go to the Heroku website (heroku.com), log in and create a new App; choose a meaningful name for your App.
3. Install required Packages (Gunicorn, FlaskSqlAlchemy, psycopg2 & PythonDecouple)
- Gunicorn is a Python WSGI HTTP Server for UNIX. The Gunicorn server is broadly compatible with various web frameworks such as Flask. You can install Gunicorn by using:
- I assume you already have Flask SQLAlchemy installed in your project and you are already using it to connect your bot to your PostgreSQL database.
if you don’t have it, you can install it by using the command below and check it’s documentation for how to implement it in your app.
These two packages will be responsible for your web server and database connection respectively.
- Python Decouple helps you to organize your settings so that you can change parameters without having to redeploy your app using the environment variables. it’s my favorite tool for handling .env file.
if you don’t have it, you can install it by using the command below and check it’s documentation for how to implement it in your app.
- Another important package you will need is called “psycopg2”. Psycopg is the most popular PostgreSQL database adapter for the Python programming language.
if you don’t have it, you can install it by using the command below and check it’s documentation for how to implement it in your app.
4. Create configurations
Before you can deploy an app to Heroku, you need to add two important configuration files which are the Procfile & requirements.txt file
Procfile Setup
Open your project in your favorite code Editor or Navigate to your project directory and create a file named Procfile
Next, using any code editor like VSCode or TextEdit, open the Profile, and replace any text already prevalent with:
Tip: The line above is designating which python script you want to be able to execute through the webserver. In this above example, the “app” by the left of “app:app” is the name of the python file in which I have my Telegram bot, so my telegram bot python file is named “app.py”.
if your bot python file is named something else, please change it to the correct one. For example, if your python file is named “bot.py” you will have:
Note: There should be no suffix like “.txt” at the end of your Procfile name, it’s just Procfile
Requirements.txt File Setup
The requirements.txt file makes it easier for Heroku to install the correct versions of the required Python libraries (or “packages”) to run your Python code.
We are going to tell Heroku packages to install using our requirements.txt
Open Your project folder On your Command Line Interface (CLI) inside your environment use the following command:
this should automatically generate a requirements.txt file for you with all dependencies and libraries used in your App listed in the file.
runtime.txt File Setup
The runtim.txt file allows you to specify the Python version that you are using in your application, this is useful to ensure compatibility and avoid python version problems. Below is an example:
change this to your own Python version.
5. Create a database on Heroku
Now, it is almost time to deploy our Telegram bot to Heroku but before that, we need to configure some important things especially a database.
To do this, Open Your project folder On your Command Line Interface (CLI) inside your environment use the following command:
Once you execute all the commands above, your local app should be linked to your remote Heroku git repository and a PostgreSQL database should have been created for your app.
Now, log in to your Heroku dashboard, click on the Settings menu and then on the button Reveal Config Vars: by default you should have DATABASE_URI configuration created after installing Postgres to Heroku. You can also add all the environment variables here.
6. Setup environment variables
If your bot uses a .env file or if it relies on variables found through Python’s os.environ, you must set them as well in order for your script to work. Typically a Telegram bot requires a token from Bot Father, this is where you add the token.
Just use Heroku’s config:set
this will set my TOKEN environment variable to that value.
7. Database Configuration
Well, I had to figure out this part the hard way, after my initial deployment, I was having issues with the bot, it kept crashing especially when it comes to database migration until I found the issue which is definitely not my fault.
I was fortunate enough to find this stackoverflow answer and this answer that solved it.
The problem is that SQLAlchemy 1.4 removed the deprecated postgres dialect name, the name postgresql must be used instead now. The dialect is the part before the :// in the URL. SQLAlchemy 1.3 and earlier showed a deprecation warning but still accepted it.
To fix this, rename postgres:// in the URL to postgresql:// .
This error currently shows up when working with Heroku, which uses postgres in the DATABASE_URL they provide, which you probably use for SQLALCHEMY_DATABASE_URI . To work around this until they update it, update the variable in the Heroku dashboard to use postgresql .
Use the above snippet in your code and set SQLALCHEMY_DATABASE_URI = uri
8. Bot Deployment
Right now, we have our environment variables setup, we have our database configured and we have all configuration files in place; the next thing is to now deploy our app to Heroku.
follow the steps below to deploy your app.
From your terminal, you can see your app deployment process and you can see it when the deployment process is completed.
But wait, we are not yet done!
9. Database migration
Right now, your flask app and Telegram bot have been deployed to Heroku but your database is not yet completely set up.
In order to use a database, you need to create the database tables and you can easily do this through the Heroku CLI. follow the procedures below to create your database tables so that your bot can save data into the database.
from your terminal, execute:
If you didn’t get an error, then your database is configured properly!
10. Troubleshooting
Truth is, even though I have outlined all the necessary steps here, your deployed app may not work for one reason or the other. On this note, I will share some common issues and troubleshooting tips here.
- App crashing error
the first thing to do if your app is not working (http://heroku-app.heroku.com) is to go to your CLI and check the logs using
This command will show you the error log and you can read through it to find out what is making the app crash. When you are done, press Ctrl+C to return to the prompt.
- Database error
db is not located in app in your application. Find where it's defined and import it from there or check the name of your app file, it could be “bot.py”.
- Create a virtual env and install all packages. Ensure you have psycopg2 and gunicorn
- Debug = True. You need to set Debug = False in your Flask Application when deploying to Heroku; Heroku usually does not allow you to run a production app in debug mode and it can cause your app to crash.
- Flask Server Port
As you should know, Telegram bots do not work with the default port “5000” that comes with Flask, It works with ports 443, 80, 88 or 8443.
I was getting some server errors and my app was crashing due to this port issue until I was able to detect it and fix it. So, below is a perfect Flask server configuration that will save you a lot of time. Just use the host and port as specified below and you will be fine.
11. Testing
At this stage, if everything has gone well, your Telegram bot should be working perfectly.
You can open your Telegram App and send a message to your bot and it should respond within few seconds.
Conclusion
If you followed the simple steps in this article, you should be able to successfully deploy your Telegram Bot with Flask, pyTelegramBotAPI, Gunicorn, and PostgreSQL to Heroku using the Command-Line and the Heroku interface.
If you liked this article please share it with your network and don’t forget to follow me for more great articles and tutorials.