Установка Python в Windows 10
Язык программирования Python становится все более популярным среди начинающих и опытных разработчиков. Это гибкий и универсальный язык, он отлично подходит для написания скриптов, автоматизации, анализа данных, машинного обучения и бэкенд разработки.
В этом туториале мы установим Python в Windows.
Примечание: если вы хотите узнать, как работать с Windows PowerShell, пакетными менеджерами, а также установить и настроить Python в Windows с помощью интерфейса командной строки, то рекомендуем ознакомиться с этим мануалом.
Если вам нужен Python для веб-разработки, Microsoft рекомендует устанавливать его с помощью подсистемы Windows для Linux.
Требования
Для выполнения этого мануала вам понадобится компьютер с установленной Windows, права администратора и подключение к сети.
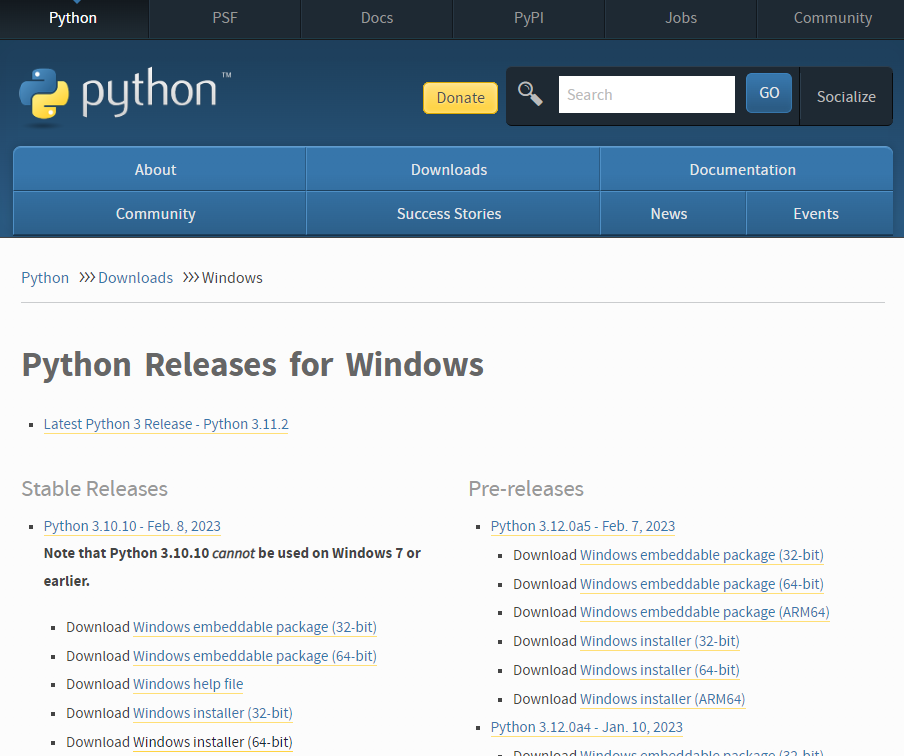
1: Загрузка установщика Python
Найдите стабильный релиз Python 3. В этом туториале мы будем работать с Python версии 3.10.10.
Затем нажмите на соответствующую ссылку для вашей системы, чтобы загрузить исполняемый файл : Windows Installer (64-bit) или Windows Installer (32-bit).
2: Запуск исполняемого файла установщика
После загрузки установщика дважды нажмите на файл .exe, например python-3.10.10-amd64.exe, чтобы запустить инсталлер Python.
Далее установите флажок на “Install launcher for all users checkbox”, чтобы все пользователи компьютера имели доступ к лаунчеру Python.
Установите флажок на “Add python.exe to PATH”, что позволит пользователям запускать его из командной строки.

Если вы только начинаете работать с Python и хотите поставить его со стандартными функциями, нажмите “Install Now” и перейдите к этапу 4 — Проверка установки Python. Чтобы установить дополнительные и расширенные функции, нажмите “Customize Installation”.
Дополнительные функции включают общие утилиты и ресурсы для Python, вы можете установить их все, даже если не планируете их использовать.
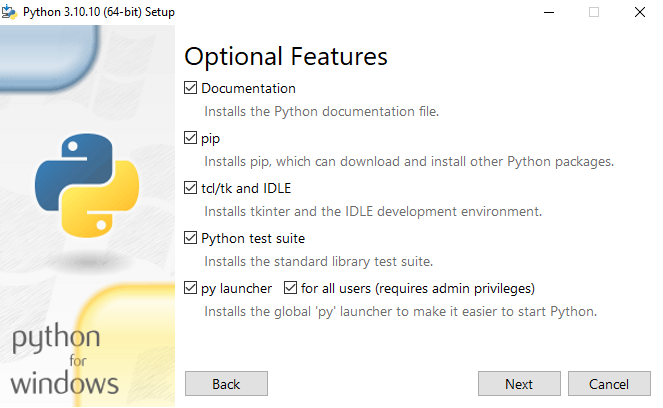
Выберите нужные вам из следующих опций:
- Documentation: рекомендуется выбрать
- pip: рекомендуется, если вы хотите устанавливать пакеты Python (например NumPy или pandas)
- tcl/tk and IDLE: если вы планируете использовать IDLE или работать с мануалами, для которых он нужен
- Python test suite: рекомендуется установить, если вы используете python для тестирования и обучения
- py launcher и for all users: позволяет запускать Python из командной строки
Теперь нажмите “Next”.
Откроется диалоговое окно “Advanced Options”.

Выберите параметры, которые вам нужны:
- Install for all users: рекомендуется, если на этом компьютере несколько пользователей
- Associate files with Python: эта опция связывает все типы файлов Python с лаунчером или редактором
- Create shortcuts for installed applications: создать ярлыки для приложений Python
- Add Python to environment variables: включить запуск интерпретатора Python
- Precompile standard library: не требуется, это может замедлить установку
- Download debugging symbols и Download debug binaries: рекомендуется только в том случае, если вы планируете создавать расширения на C или C++
Запишите каталог установки Python, вам понадобится обратиться к нему позже.
Чтобы начать установку, нажмите “Install”.
После завершения инсталляции появится уведомление “Setup was successful”.

3: Добавление Python в переменные среды (опционально)
Пропустите этот этап, если во время установки вы выбрали “Add Python to environment variables”.
Если вы хотите получить доступ к Python через командную строку, но не добавили Python в переменные среды во время установки, то вы можете сделать это вручную.
Прежде чем начать, найдите каталог установки Python в вашей системе. Ниже приведены примеры путей к директории по умолчанию :
- C:\Program Files\Python310: если во время установки вы выбрали “Install for all users”, то каталог будет общесистемным.
- C:\Users\8host\AppData\Local\Programs\Python\Python310: если во время инсталляции вы не выбрали “Install for all users”, то каталог будет находиться в пути пользователя Windows.
Обратите внимание: если вы поставили другую версию, то имя папки будет отличаться, но все равно будет начинаться с Python.
Перейдите в меню “Пуск” и в строке поиска введите advanced system settings.
Нажмите “View advanced system settings”.
В диалоговом окне “System Properties” перейдите на вкладку “Advanced” и нажмите “ Environment Variables ”.
Дальнейшие действия зависят от того, как вы установили Python:
- Если во время инсталляции вы выбрали “Install for all users”, выберите “Path” в списке “System Variables” и нажмите “Edit”.
- Если во время установки вы не выбрали “Install for all users”, выберите “Path” в списке “User Variables” и нажмите “Edit”.
Нажмите “New” и введите путь к директории Python, затем нажимайте “OK”, пока все диалоговые окна не будут закрыты.
4: Проверка установки Python
Проверить, что Python успешно установлен, можно через командную строку либо через приложение Integrated Development Environment (IDLE), если вы установили его.
Перейдите в “Пуск” и введите cmd в строке поиска. Нажмите “Command Prompt”.
Введите следующую команду в командной строке:
Также вы можете проверить версию Python, для этого запустите приложение IDLE. Перейдите в меню “Пуск” и введите python в строке поиска, а затем выберите IDLE, например IDLE (Python 3.10, 64-bit).
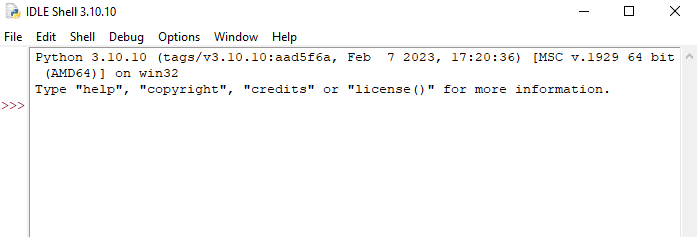
Вы можете начать кодить на Python через IDLE или выбрать другой редактор.
Подводим итоги
Мы установили Python на компьютер под Windows, теперь у вас всё готово для начала программирования и обучения на Python. Далее вы можете написать свою первую программу.
How to install Python on Windows 10 correctly
Let’s explore Python and Pip in this post and learn «How to install python on windows 10 properly«. We will discuss the latest version available today for Python (3.9.1) and pip (20.2.3). Also, I will explain how to modify and uninstall Python software. In case either additional feature needs to add/remove or you want to get rid of the old python version.
I am confident, even if you are new to Python, you will be able to install it easily, following this post step by step. So let’s deep dive in.
What are Python and pip
Python is a simple, Object-oriented, interpreted, high-level programming language with dynamic semantics. Due to its non-complicated syntax and fast edit-test-debug cycle, the Programmer community loves it. Python also reduces the cost of software management due to its simple nature.
Pip is a package manager for python, it allows you to install and manage additional libraries and dependencies that are not distributed or part of the standard library.
Linux users can check out my post on «How to install the latest Python in Linux».
Pre-requisite to install python on Windows 10
- Windows 10 machine
- Internet connection
- Approx. 200MB of disk space (varies according to features and options selected).
Let’s find out the steps to install Latest Python and pip —
How to install Python on Windows 10 using GUI
Step1- Python and pip download
You can download the latest python version 3.9.1 for windows or your respective operating system from python.org website. 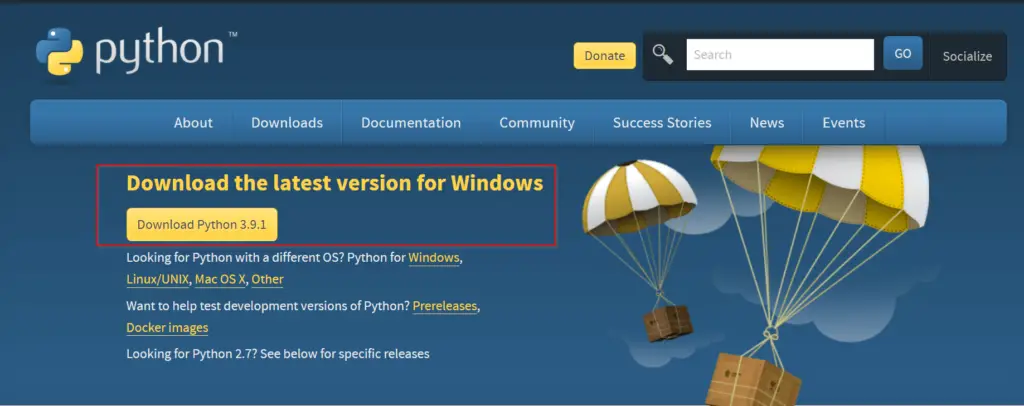
Otherwise, you can simply click on the below-mentioned button to download python for windows 10.
Click here to download an older release of Python like 3.8 or 2.7, for your project. Once you click on this link, scroll down and select your old python version as shown in the image. 
You don’t need to download pip separately as it’s part of Python 3.9.1 software. You will know it while following this post further.
Step2- Run Python 3.9.1 (64-bit) installer
Once your download completes, visit your «download» directory. Then double click python-3.9.1-amd64 file to start the python setup wizard. 
Step3- Choose «Install Now» or «Customize» installation
At this point, You will get two installation options —
- Install Now — This option is helpful if you are a newbie. Just select «Install now» and it will install Python 3.9 with default settings. Python default installation directory would be «C:\users\»your-username»\AppData\Programs\Python\Python39». It will also install IDLE, pip, documentation and shortcuts.
- Customize installation — If you are a pro and need to know, what all features will be installed with python. Also, in case you already have python installed and want to test the latest version. Using the Customize installation option, you can choose a different installation folder and can keep both python versions.
Keep following this post, if you want to see options covered in Customize installation. 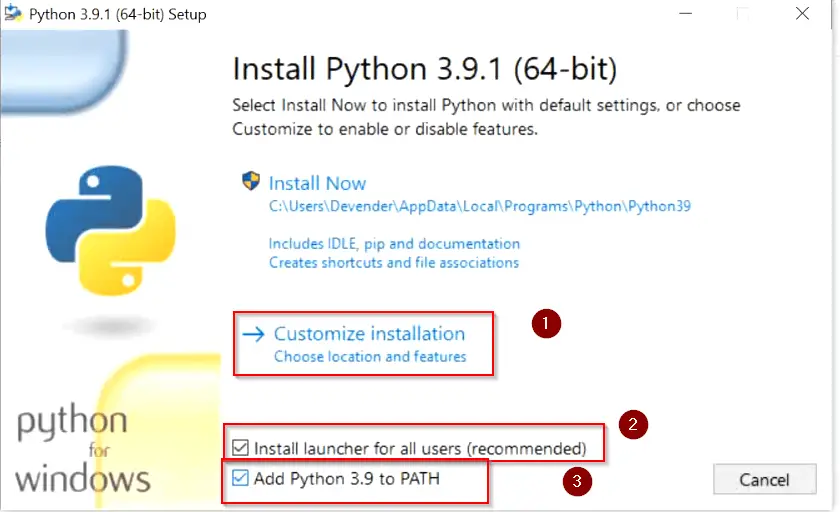
- «Install launcher for all users (recommended)» — Select this check box and it will make a python launcher shortcut for all user profiles exist in your machine. Whomsoever will login to your system will be able to use python 3.9.
- Add python 3.9 to path — Select this check box to add Python and pip » Path Variables » in the system environment automatically. If you will not select this option now, you need to add the path variable manually later after installation. My recommendation is to select it here itself .
So let’s click on «Customize installation» and check both the boxes as shown in the image.
Step4- Add or remove «Optional Features«
- Documentation:- Selecting this box will install all the Python documentation and manuals.
- pip:- As I informed you in Step 1 download section . Pip is already part of python 3.9. Select this check box, If you want to install pip automatically with Python 3.9 (which I strongly recommend).
- tcl/tk and IDLE:- Selecting this check box will install Tkinter and the IDLE development environment. You don’t need to install it separately then.
- Python test suite:- Installs the standard library suite.
- py launcher for all users (requires elevation):- Installs the global ‘py launcher‘ for all users. It requires admin rights (elevation) to perform it. Because it will allow all users to launch python easily from their user profiles.
Choose your required optional features and click Next. I will suggest you to keep all options checked. 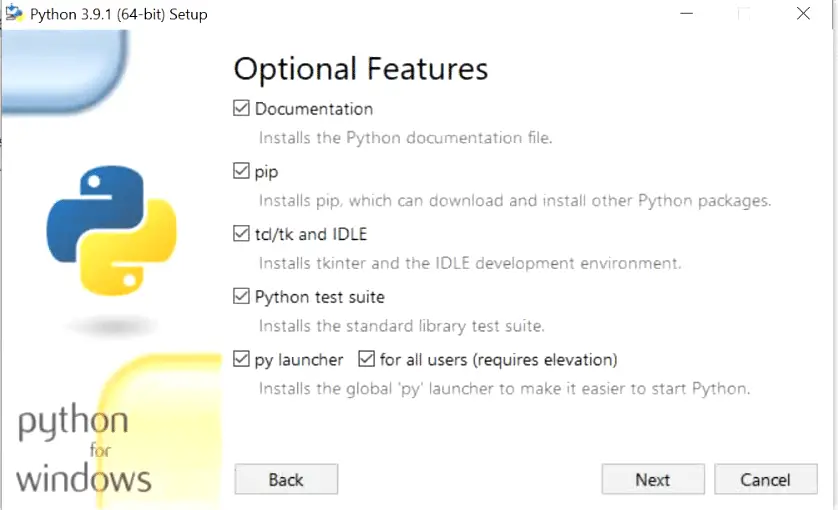
Step5- Choose «Advanced Options» of python 3.9
These are the advanced options available, which are self-explanatory.
- Install for all users — Python 3.9 will install for all users in your machine. In my case, I am the only user. So this option really doesn’t matter much for me.
- Associate files with Python (requires the py launcher) — Link associated files to the py launcher
- Create shortcuts for installed applications — Create shortcuts icons for Python, pip and installed optional features.
- Add python to environment variables — Add environment variable for python and pip
- Precompile standard library — Adds precompiled libraries.
- Download debugging symbols — You can download and install the debugging symbol, which attaches additional information to the symbol table.
- Download debug binaries (requires VS 2017 or later) — To install required and dependent debugging binaries.
If you are a pro and know your required options. Select those options as per your need. In case you are a newbie, you can proceed with default selected options as shown in the image.
Click Install — 
Step6 (optional)- Select custom install location folder
If you already have Python version installed and want to keep it safe. Also, you want to install a newer python version for testing. To make this happen, On Step 5 , click Browse — Select your destination installation folder — click OK and click Install.

Step7- Allow Python 3.9.1 to make changes
Choose «Yes» to allow Python 3.9 to make changes to your system. 
Step8- Let Python 3.9 and pip setup complete
Sit back and relax. Python and pip installation will take some time to complete. 
Step9- Select «Disable path length limit»
At this point, Python and pip have been installed successfully in windows 10. But you need to select «Disable path length limit» here. Because it allows python to bypass the 260 characters «MAX_PATH» limitation. Basically, it means, if the number of characters exceeds 260 in your installation directory path. Python will not be able to add it to the path variable. It’s a limitation of Windows 10.
Select «Disable path length limit» — then Allow Python 3.9 in user access control and Select Close.

How to Check Python and Pip version on Windows 10
Follow below mentioned steps to check python and pip version. Additionally, it will also validate path variable is added properly in system environment.
Step10- Validate Python and pip versions
- Open elevated command prompt «as administrator» by typing «cmd» in search bar of windows 10.
- Run python or py (short form) command to check Python version. You can see it’s version 3.9.1 installed in my case. You will see your installed version.
- To check Python-pip version, type pip —version command. it will show you the pip version. it’s pip 20.2.3 in my case.
Running pip and python version command successfully also validates, that your python and pip path variables are added successfully in Windows 10. Check out this post, if you are still getting ‘pip’ is not recognized as an internal or external command, operable program or batch file.
Step11- Launch Python alternative method
- Type «Python» in the search bar of windows 10. Click «open«.
- (optional) If you will check bullet 3 in the image, I have shown you that if you need open or check Python manuals or documentation. You select one of them and open. Additionally, you can open IDLE from the search bar.
- After opening, it will take you to python 3.9 window. Enjoy and start your python projects.
How to install python on windows 10 (command line)
Although preferred and recommended option to install Python and pip in windows 10 is through GUI. But in case you want to learn python 3.9 version installation from the command line. Follow these simple steps —
- Open elevated command prompt by typing «cmd» in search bar.
- Go to your Downloads directory and Run «Python-3.x.x exe» as shown. In my case, it’s Python 3.9.1-amd64.exe. Below mentioned are the arguments and options used in the command —
- /quiet — means no interactive wizard.
- InstallAllUsers=1 — Install for all users
- PrependPath=1 — Install Python variable path
- Include_test=0 — Don’t include or install test suite
0 — means disable (don’t install)
1 — enable (install)

For example —
Just wait for a couple of minutes and latest python will install. Enjoy..
How to repair or modify Python in windows 10
There are some scenarios when you are not confident about additional features and options. Later you realize that you need that feature or advance option as shown in step4 and step5 in this post during installation. Then you don’t need to worry, it’s easy to add or remove features and advance options even after installation is done.
- You need to type «Control Panel» in the windows search bar. Click Open.
- Select «uninstall a program«
- Select «Python 3.9.1» or your version and click «Change«.
- Select «Modify» and press Next. You can also repair your installation using this wizard, in case installation issues.
Select Features and advanced option as per your need and complete installation. Refer Step4 and Step5 for further reference as shown in «How to install Python on Windows 10 using GUI» section.
How to uninstall Python in windows 10
If you have installed the latest Python and pip version by following this post. Now you want to get rid of your old Python version. Follow these simple steps to remove or uninstall Python in Windows 10.
Step1. Open Control panel from search bar
To start the uninstallation process of older Python and pip software from your windows 10. You need to type » Control Panel » in the windows search bar. Click Open.

Step2. Select «Uninstall a program«

Step3. Select Python and click «Uninstall or change a program».
- Wait for uninstallation progress bar to complete and click «Close«.

Step 3.2 (optional) — Once python uninstallation completes and if you can see Python Launcher also.
- Then, Just select «Python launcher» and click «Uninstall«.
- Select «Yes» in «uninstall python launcher» dialogue box as shown in image.
- Permit in allow » User access control » box and uninstallation of Python will be done.
Hurray, You have got rid of old version of Python.
Video tutorial
If you don’t like reading, watch this tutorial to know «How to Install Python on Windows 10«. Also «Uninstallation of Python from windows 10«.
Conclusion
Congrats!! Now you know approximately everything on how to install, modify and uninstall Python in windows 10. Also, you must have a good idea of pip installation with Python3 . Nowadays, Microsoft also recommends installing development software on WSL (windows subsystem for Linux) .
If you like this post, you can share it on your social media wall to help others.
Frequently Asked Questions:-
Is Python EXE safe?
Yes, Python exe is completely safe. Make sure you download it from python.org website or from legitimate source only. Then you should be good with the installation. In case you have not installed it and still, you can see in your system. Go to control panel — click on «Uninstall a program» — Then check for Python software installation. If it is visible there and you don’t want, you can uninstall it. If you don’t found it in programs, then it may be a virus or malware. Scan your system and remove it.
Is Python free to download?
Yes, Python is free opensource software. You can download and install it in your system from https://www.python.org/downloads/ website.
How do I run Python on Windows 10 from the command line?
Open elevated command prompt — type py or python and hit enter.
Can I learn Python by myself?
Yes, it’s one of the easy languages with no complex syntax. There are many websites with free tutorials. Checkout free Python tutorials.
Why Python is not working?
May be either python is not installed or you have not set up Python path variable in the system environment.
Учебник по установке Python

Если вам не нужно изменять путь, вам не нужно контролировать задачу пути, если у вас есть установка по умолчанию. Выберите первую напрямую.
Прежде всего, я решил изменить путь здесь, я выбираю второй

третий шаг,
Здесь есть 6 вариантов, соответствующий знак следующего
Рекомендуется проверить все, 6 вариантов здесь

Четвертый шаг,
Здесь есть 7 вариантов, соответствующий знак следующего
Выберите по умолчанию здесь, нажмите «Установить

Позже установка файлов

Пятый шаг,
Нажмите отключить предел длины пути.

Затем выберите Close

Шаг 6
Обратите внимание, что если вы второй шаг ✔ Добавьте eython 3.8 в путь, вам не нужно работать следующим образом
Этот шаг является операцией, когда вы не нажимаете на переменную среды пути
Переменная среда конфигурации
Справа -Напишите этот компьютер> атрибут

Нажмите «Настройки Advanced System»> «Выберите« Дополнительно »> Нажмите« Переменные среды »>« Нажмите путь »

Найдите путь сценариев в положении положения интерпретатора Python

Нажмите, чтобы построить> Введите переменную среды выше> нажмите OK
How to obtain pre-built *debug* version of Python library (e.g. Python27_d.dll) for Windows
Firstly, I should state that my current development environment is MSYS + mingw-w64 + ActivePython under Windows 7 and that on a normal day I am primarily a Linux developer. I am having no joy obtaining, or compiling, a version of the Python library with debug symbols.
I need both 32bit and 64bit debug versions of the Python27.dll file, ideally. I want to be able to embed Python and implement Python extensions in C++, and be able to call upon a seamless debugging facility using the gdb-7.4 I have built for mingw-w64, and WingIDE for the pure Python side of things.
Building Python 2.7.3 from source with my mingw-w64 toolchain is proving too problematic — and before anyone flames me for trying: I acknowledge that this environment is unsupported, but I thought I might be able to get this working with a few judicious patches (hacks) and:
make OPT=’-g -DMS_WIN32 -DWIN32 -DNDEBUG -D_WINDOWS -DUSE_DL_EXPORT’
I was wrong. I gave up at posixmodule.c since the impact of my changes became uncertain; ymmv.
I have tried building with Visual C++ 2010 Express but being primarily a Linux developer the culture-shock is too much for me to bear today; the Python project does not even import successfully. Apparently, I need Visual C++ 2008, yet I am already convinced I don’t want to go down this road if at all possible.
It’s really surprising to me that there is not a zip-file providing the requisite .dlls somewhere on the Internet. ActiveState should really provide these as an optional download with each release of ActivePython that they make — perhaps that’s where the paid support comes in ;-).
What is the best way to obtain the Python debug library files given my environment?