PHP Script
Use this dialog to configure running and debugging of single PHP files locally using a PHP console.
Configuration area
In this area, specify the script to run or debug and the parameters to process it with, if applicable.
In this field, specify the location of the file to run or debug. Type the path to the file manually or click Browse and select the desired location in the Choose PHP File dialog that opens.
In this field, type the list of arguments to be passed to the PHP script, same way as if you were entering these parameters in the command line.
If necessary, click and type the desired switches in the Arguments dialog. Type each argument on a new line. As you type, they appear in the Arguments field with spaces as separators.
Command Line area
In this area, customize the behavior of the current PHP interpreter by specifying the options and arguments to be passed to the PHP executable file.
The list contains all the currently configured local and remote PHP interpreters. Choose one of the configured PHP interpreters from the list, or click and define a new interpreter as described in Configure local PHP interpreters and Configure remote PHP interpreters.
In this field, specify the options to be passed to the PHP executable file. They override the default behavior of the PHP interpreter or ensure that additional activities are performed.
If necessary, click and type the desired options in the Command Line Options dialog. Type each option on a new line. When you close the dialog, they are all displayed in the Command line options field with spaces as separators.
Custom working directory
In this field, specify the location of the files that are outside the folder with the script and are referenced in your script through relative paths. Type the path manually or click the Browse button and select the desired folder in the dialog that opens.
This setting does not block the script execution because the script location is always specified through a full path.
In this field, specify the environment variables be passed to the built-in server. See Environment Variables in Apache for details.
Docker Compose area
This area only appears if you select a Docker Compose-based remote interpreter in the Interpreter field. Here, you can add some Docker Compose commands with options to the run configuration.
Commands and options
You can use the following commands of the Docker Compose Command-Line Interface:
up: Builds, creates, starts, and attaches to containers for a service.
run: Runs a one-time command against a service.
exec: Runs arbitrary commands in your services.
Use this field to preview the complete command string.
For example, the up —build exec —user jetbrains combination in the Commands and options field produces the following output in the preview:
Debug area
Use the controls in this area to configure behaviour of the debugging tool.
Break at the first line
Select this checkbox to have the debugging tool stop at the first line of the source code.
Common settings
When you edit a run configuration (but not a run configuration template), you can specify the following options:
Specify a name for the run configuration to quickly identify it among others when editing or running.
Allow multiple instances
Allow running multiple instances of this run configuration in parallel.
By default, it is disabled, and when you start this configuration while another instance is still running, PhpStorm suggests stopping the running instance and starting another one. This is helpful when a run configuration consumes a lot of resources and there is no good reason to run multiple instances.
Store as project file
Save the file with the run configuration settings to share it with other team members. The default location is .idea/runConfigurations . However, if you do not want to share the .idea directory, you can save the configuration to any other directory within the project.
By default, it is disabled, and PhpStorm stores run configuration settings in .idea/workspace.xml .
Toolbar
The tree view of run/debug configurations has a toolbar that helps you manage configurations available in your project as well as adjust default configurations templates.
Create a run/debug configuration.
Delete the selected run/debug configuration. Note that you cannot delete default configurations.
Create a copy of the selected run/debug configuration. Note that you create copies of default configurations.
The button is displayed only when you select a temporary configuration. Click this button to save a temporary configuration as permanent.
Move into new folder / Create new folder. You can group run/debug configurations by placing them into folders.
To create a folder, select the configurations within a category, click , and specify the folder name. If only a category is in focus, an empty folder is created.
Then, to move a configuration into a folder, between the folders or out of a folder, use drag or and buttons.
To remove grouping, select a folder and click .
Click this button to sort configurations in the alphabetical order.
Before launch
In this area, you can specify tasks to be performed before starting the selected run/debug configuration. The tasks are performed in the order they appear in the list.
Click this icon to add one of the following available tasks:
Run External tool : select to run an external application. In the dialog that opens, select one or multiple applications you want to run. If it is not defined in PhpStorm yet, add its definition. For more information, see External tools and External Tools.
Run Another Configuration : select to execute another run/debug configuration and wait until it finishes before starting the current configuration. If you want to run several configurations in parallel, use a compound run/debug configuration.
Launch Web Browser : select this option to have a browser started. In the dialog that opens, select the type of the browser and provide the start URL. Also, specify if you want the browser be launched with JavaScript debugger.
Run File Watchers : select this option to have PhpStorm apply all the currently active File Watchers.
Run Grunt task : select this option to run a Grunt task.
In the Grunt task dialog that opens, specify the Gruntfile.js where the required task is defined, select the task to execute, and specify the arguments to pass to the Grunt tool.
Specify the location of the Node.js interpreter, the parameters to pass to it, and the path to the grunt-cli package.
Run gulp task : select this option to run a Gulp task.
In the Gulp task dialog that opens, specify the Gulpfile.js where the required task is defined, select the task to execute, and specify the arguments to pass to the Gulp tool.
Specify the location of the Node.js interpreter, the parameters to pass to it, and the path to the gulp package.
Run npm script : select this option to execute an npm script.
In the NPM Script dialog that opens, specify the npm run/debug configuration settings.
If the Check errors checkbox is selected, the compiler will show all the errors and the run configuration will not start.
If the Check errors checkbox is cleared, the compiler will show all the detected errors but the run configuration still will be launched.
Run Phing target : add this task to execute the specified Phing target prior to running or debugging. To appoint a Phing target, click Browse and select the desired target in the dialog that opens.
Generate CoffeeScript Source Maps : select this option to generate the source maps for your CoffeeScript sources. In the dialog that opens, specify where your CoffeeScript source files are located.
Upload files to Remote Host : select this option to have the application files automatically uploaded to the server according to the default server access configuration .
Run Remote External Tool : adds a remote SSH external tool.
Click this icon to remove the selected task from the list.
Click this icon to edit the selected task. Make the necessary changes in the dialog that opens.
Click these icons to move the selected task one line up or down in the list. The tasks are performed in the order that they appear in the list.
Select this checkbox to show the run/debug configuration settings prior to actually starting the run/debug configuration.
Activate tool window
By default this checkbox is selected and the Run or the Debug tool window opens when you start the run/debug configuration.
Otherwise, if the checkbox is cleared, the tool window is hidden. However, when the configuration is running, you can open the corresponding tool window for it yourself by pressing Alt+4 or Alt+5 .
Phpstorm как запустить php скрипт

На данный момент, PhpStorm – одна из лучших IDE для разработки на языке PHP, которая предоставляет множество возможностей для разработчика, такие как запуск PHP-скриптов, благодаря возможности подключения внешнего интерпретатора PHP и отладку через расширение Xdebug.
В этой статье мы рассмотрим возможность подключения интерпретатора PHP, отладчика Xdebug к PhpStorm и использование встроенного в IDE web-сервера.
Начнем с установки отладчика Xdebug в PHP.
Установка Xdebug
Первым делом скачаем и установим сам интерпретатор PHP по ссылке: http://php.net/downloads.php
Далее нужно произвести начальную настройку PHP и прописать в переменную окружения PATH путь к интерпретатору. Чтобы не повторяться, весь необходимый порядок действий мной описан в этой статье: Установка Composer и снятие ограничения количества обращений к GitHub
Теперь можно перейти к установке отладчика Xdebug, для которого существует специальный помощник, значительно упрощающий процедуру установки. Для его использования перейдем по ссылке: https://xdebug.org/wizard.php
На этой странице, необходимо ввести в поле ввода информацию об установленном PHP-интерпретаторе, которая генерируется с помощью PHP-функции phpinfo(). Вводить нужно весь скопированный текст со страницы.
Или, введя в консоль команду php -i, которая генерирует информацию о PHP.
Копируем полученную информацию, нажимаем кнопку Analyse my phpinfo() output и получаем инструкцию по установке Xdebug.
В зависимости от вашей версии PHP и пути установки инструкция может отличаться от моей:
- Скачиваем библиотеку Xdebug для PHP версии 5.6.19 по ссылке: php_xdebug-2.4.0-5.6-vc11-nts.dll
- Перемещаем её в папку C:\php\ext
- В файл C:\php\php.ini находим секцию Dynamic Extensions и добавляем следующую строку:
Подключение интерпретатора PHP к PhpStorm
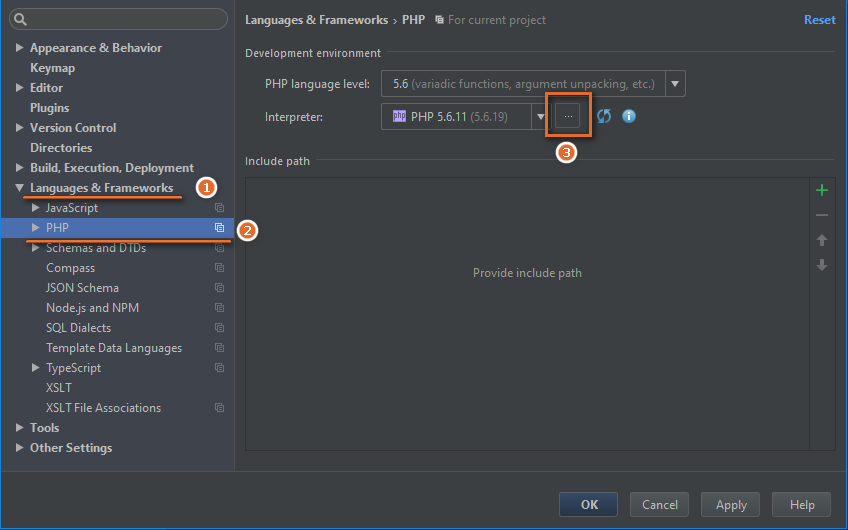
Теперь перейдем в PhpStorm и откроем настройки комбинацией клавиш Ctrl+Alt+S.
Далее, в секции Languages & Frameworks выберем пункт PHP. В этой секции необходимо назначить интерпретатор для IDE в пункте Interpreter нажав на кнопку …
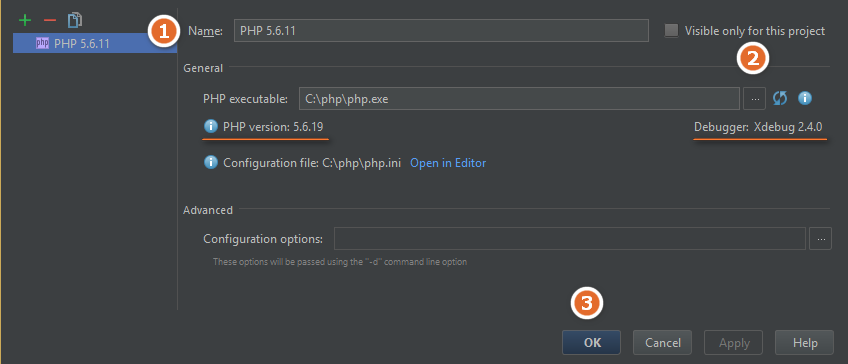
В открывшемся окне, в поле Name вводим любое имя для удобства дальнейшей идентификации, например: PHP 5.6.11.
В поле PHP executable указываем путь до интерпретатора, например: C:\php\php.exe. Обратите внимание на появившуюся версию PHP и дебагера, что свидетельствует о правильности установки.
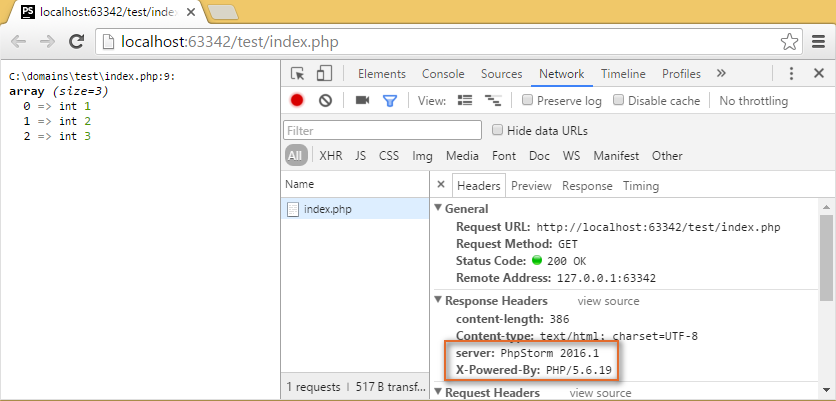
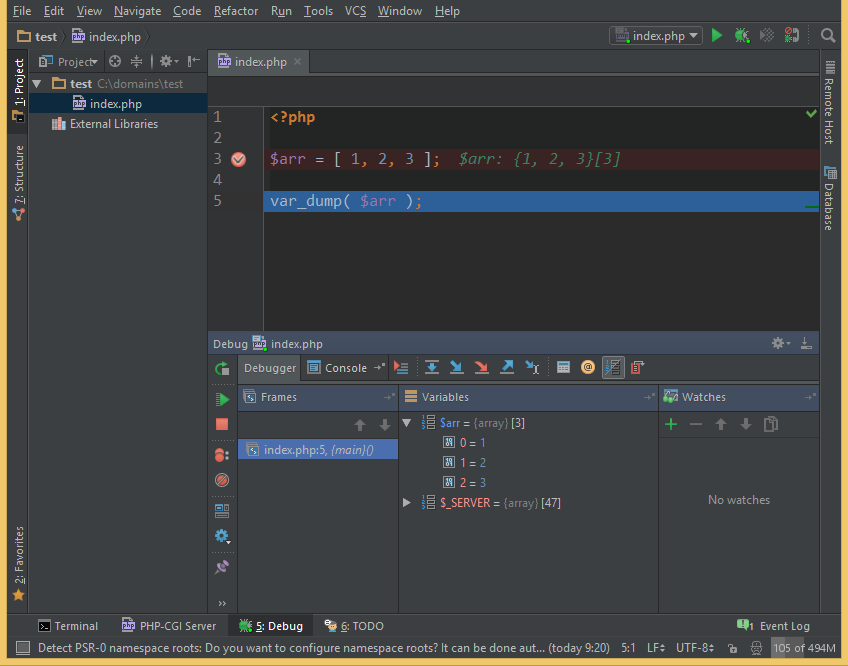
Чтобы убедиться в том, что правильно отрабатывает подключенный интерпретатор PHP, создадим в PhpStorm новый проект, добавим к нему файл index.php и запишем в этот файл, например, функцию var_dump([ 1, 2, 3 ]) с переданным в неё массивом.
Нажав правой кнопкой мыши на этом файле, выберем Open in Browser -> Default.
На странице мы видим характерный вывод var_dump(), который генерируется с помощью Xdebug. И, если посмотреть на заголовки ответа через консоль разработчика, то мы увидим, что всё работает верно:
Начальная настройка Xdebug и установка его под линукс описана в статье Установка модуля Xdebug для PHP под Ubuntu Linux
Работа с отладчиком Xdebug в PhpStorm
Прежде чем приступит к отладке PHP-скриптов с помощью Xdebug произведем необходимую настройку в файле php.ini. В секции Dynamic Extensions после подключения расширения Xdebug добавим следующие настройки:
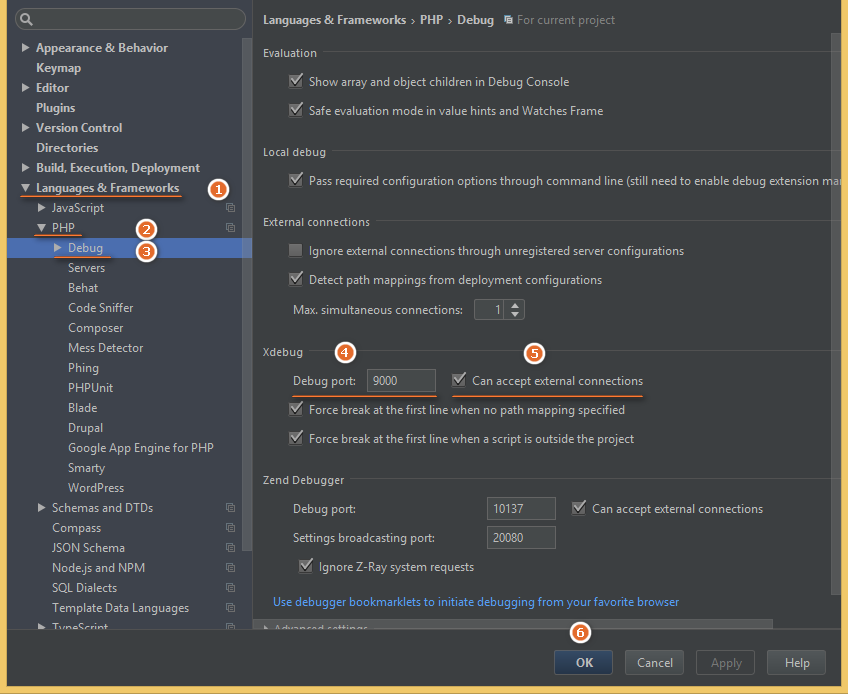
Теперь зайдем в PhpStorm и откроем настройки. Перейдем в Languages & Frameworks -> PHP -> Debug. В секции Xdebug убедимся, что установлены следующие настройки:
Чтобы проверить, что все действия были проведены верно, добавим в уже имеющийся в проекте файл index.php следующий код:
И поставим точку остановки на переменной $arr.
Теперь запустим отладку этого скрипта, нажав правую кнопку мыши и выбрав пункт Debug ‘index.php’. Если все было сделано правильно, то в PhpStorm появится вывод дебага, как показано на скриншоте.
В итоге, мы получили мощный и удобный инструмент для отладки PHP-скриптов с подключенным интерпретатором PHP, а также возможность запускать скрипты через встроенный в PhpStorm локальный web-сервер.
My PhpStorm Development Setup
In this post I detail how I set up PhpStorm for productive PHP development.
Opening PhpStorm editor from the command line
Before we can configure PhpStorm to open from the terminal we need to launch it using the desktop icon and select new project and create an empty project.
This opens the editor window and displays the application menu.
Using the application menu select tools > create command line launcher to open the command line launcher input box.
Type in /usr/local/bin/pstorm which is the path of the PhpStorm executable on your system.
Click the OK button.
Quit the PhpStorm application.
Now you can go to any project folder in the terminal and type pstorm . to launch the editor window in the scope of your project.
Note: The symlink /usr/local/bin/pstorm is automatically created by the PhpStorm installation
To find the path on your system use the bash command below:
Setting up the editor UI
The first thing I like to do is to get rid of as much UI clutter and use keyboard shortcuts to access editor features. To that end I turn off most of UI elements.
To be able to setup the editor we need to open a php project first so the editor launches. If you don’t have a php project yet, just clone one from Github or let the editor open a tutorial php project that comes bundled with the editor.
Below are the steps to take to turn off the UI elements:
To hide the toolbar, using the menu navigate to view > appearance > toolbar and uncheck the toolbar
To hide the toolbar window bars, using the menu navigate to view > appearance > toolbar window bars and uncheck the toolbar
To hide the navigation bar, using the menu navigate to view > appearance > navigation bar and uncheck the navigation bar
To hide the status bar, using the menu navigate to view > appearance > status bar and uncheck the status bar
I keep the editor tab bar visible to be able to tab between open documents, however the tab bar can be turned off as well.
Configuring the editor tab bar settings
To configure how the tabs in the editor tab bar behave:
open editor tabs settings box by navigating from the menu to window > editor table > configure editor tabs .
Here you can choose your settings.
Accessing the PhpStorm settings dialog
The settings dialog is where you can find and configure all the PhpStorm settings.
The dialog can be opened by typing the cmd+, (command+comma) shortcut.
Once opened you can navigate to the setting you want to change using the directory structure.
You can also search for a setting which will make it easier to locate the setting.
Changing Font and Appearance of project directory navigation side panel
If navigation panel is closed, you can open it with cmd+1 keyboard shortcut to see the effects if the setting change.
Open settings dialog with cmd+, shortcut
Select Appearance & Behaviour > Apperance in left pane of the dialog
Make the following changes in the right pane of the dialog:
Check the use custom font checkbox
select font (e.g. Monospaced)
Check the show tree indent guides checkbox
Note changing the font size will also increase the size of the tab bar tabs
Show whitespaces in the editor window
To make white spaces visible in the editor document window:
Open the settings dialog with cmd+,
select editor > general > appearance setting in the left pane.
check the show whitespaces check box in the pane on the right side.
Changing the default document font settings
To change the font settings of documents opened in the editor, follow these steps
Open the settings dialog with cmd+,
Select the Font setting under the Editor folder in the left pane.
Change the default settings as desired in the setting pane on the right side.
Click OK to save the new settings.
Documents opened after the changes will now use the new settings.
Configure changing the font size using the mouse wheel
Open the settings dialog with cmd+,
select editor > general setting in the left pane.
Check the change font size with command-mouse wheel checkbox in the setting pane on the right side.
Now you can change font size by holding down the cmd key and using the mouse wheel to zoom in and out.
Turn off code folding
select editor > general > code folding setting in left pane
uncheck the show code folding outline checkbox in right pane
uncheck all checkboxes under fold by default section so that code in any language is never folded
User customized settings configuration files
Any changed settings will be located in a related file at the General location:
For my specific installation this is the
/Library/Application Support/JetBrains/PhpStorm2020.2/options/ directory
As an example the xml file
/Library/Application Support/JetBrains/PhpStorm2020.2/options/editor.xml contains my customized settings below:
Editing, Adding and Removing keymaps (keyboard shortcuts)
Keymaps are the PhpStorm keyboard shortcuts.
We can edit these keymaps and the resulting settings will be saved as a file where the local user settings are saved for the version of PhpStorm that you have.
The General location will be at:
Currently the keymaps file for my version of PhpStorm is located at:
Copy default macos keymaps before making changes
open settings (cmd+,)
select keymap from the left pane to display the keymaps pane on the right
The keymaps pane dropdown defaults to the PhpStorm default macOS keymaps
using the dropdown you can select another editors keymaps such as sublime (macOS) to use the sublime text default macOS keymaps
Click on the settings wheel next to the dropdown
Select duplicate to copy the default PhpStorm macOS keymaps
Type in mykeymaps and hit enter to name the duplicate keymaps and create the xml file at
Now we should see that a child keymap named mykeymaps is hanging off of the a parent macOS keymaps in dropdown, with mykeymaps as the default selection.
If we edit, add or remove keymaps while the mykeymaps is selected, we override its parent macOS keymaps, without changing the default macOS keymaps.
The changes will be added to the mykeymaps.xml .
We can click on the search icon in the keymaps panel on the right to pop up a keyboard shortcuts search
We can then press the shortcut keys on the keyboard and the commands that the shortcut applies to will be displayed in the search area.
We can double click on shortcut to pop up the shortcut editor box where we can edit or remove the shortcut.
Add custom user keymap for the terminal panel
Open settings (cmd+,)
Expand Tool Windows folder
Double click Terminal selection to open the shortcut settings box for the Terminal
Select remove opt+F12
Click the OK button to remove the existing short cut that conflicts with the MacOS shortcut
Double click Terminal selection to open the shortcut settings box for the Terminal
Click add keyboard short cuts
Using the keyboard type cmd+3 and then do not type on keyboard before next step
Click the OK button to add the new short cut
Add custom user keymap for the file structure popup
Open settings (cmd+,)
Type file structure in the search box
Under Main men > navigate double click File Structure selection
Using the keyboard type cmd+4 and then do not type on keyboard before next step
Click the OK button to add the short cut
Add custom user keymap for the Find Window
Open settings dialog using cmd+,
Click keymap in the left pane
Type find in the search box in the left pane to find the keymap setting for the find window
Double click on it and select remove shortcut to remove the current mapping, which is cmd+3 that we mapped to the terminal window shortcut
Double click on it again and select add keyboard shortcut
Type cmd+9 on the keyboard and then click OK with the mouse.
You may get a warning prompt that that cmd+9 keymap is assigned to version control. I just ignore and override the warning since I dont use the editors source control features.
Finally click OK to close the settings dialog and save the new setting.
Shortcut listing
All the essential shortcuts that I use are listed below:
keyboard shortcuts to enable searching for everything
- open preferences dialog box
- open global search box
I use the three common shortcuts below:
Double click shift key (the search by all tab is selected when search box opens)
cmd+o (the search by class tab is selected when search box opens)
cmd_sh+o (the search by file tab is selected when search box opens)
Once opened, we can use the tab key to navigate between the search by all, by class, by file, by symbols or by actions tabs
Setting search scopes: When searching using the global search box (regardless of the selecting class, file or other search tabs) we can change the scope of the search. The search scope to use can be selected using the dropdown on the right side in the global search box. The scope can be changed to encompass just the project files or search the project and composer packages in the vendor directory or search everywhere in the system or other available search scopes including custom search scopes that we can create.
- opens recent files box/toggle to last file
- pop up breadcrumb menu
- toggle\focus project sidebar
- toggle favorites sidebar
- Opening the file structure popup (search class methods and properties in file)
cmd+4 (added custom user keymap)
- toggle the problems panel
- toggle the find window
cmd+9 (added custom user keymap)
This is generally first opened from the Find in path dialog using the cmd+enter shortcut while in the dialog.
- Open the Find in path dialog (find in files)
The find in path dialog box has tabs to search by project, by directory or by selected search scope.
Setting search scopes: When the search by scope tab is selected, a dropdown is displayed that allows the search scope to be selected. Just like the global search box, the scope can be changed to encompass just the project files or search the project and composer packages in the vendor directory or search everywhere in the system or other available search scopes including custom search scopes that we can create.
When we type in our search term the search results will be automatically displayed.
While the search results are displayed we can use the cmd+enter shortcut to open up the search results in in the Find Window bottom panel in the main editor. cmd+9 will toggle the find window for when we want to close it temporarily and open it back up again.
The find window displays the directory hierarchy of the files that have matching results results in the left pane and displays the selected file contents in the right pane.
keyboard shortcuts for running commands
- toggle the terminal panel
cmd+3 (added custom user keymap)
- toggle the debug panel
- open run command box (can type in a command to execute such as node or npm)
Double click ctrl key
keyboard shortcuts for file operations
- open find bar
- open find and replace bar
- save current file modifications
- close current document tab
To Close all tabs right click on any tab and select close all
- save all modified files
- reformat file
- comment/uncomment line(s)
Run\Debug configuration shortcuts
select the debug configuration you want to run using up/down arrow keys and hit enter
- Popup the run configurations context menu
select the run configuration you want to run using up/down arrow keys and hit enter
- Rerun the last debug configuration
will run the last debug configuration that was run using ctrl+opt+d
- Rerun the last run configuration
will run the last run configuration that was run using ctrl+opt+r
Closing pop ups opened by keyboard shortcuts
You can use the escape key to close any settings dialog, search box or pop up window opened by a keyboard shortcut
You can also close any of these pop ups by using the enter key to confirm a selected item.
The enter key can also be used to confirm a selected item in the project explorer side panel, when the panel is open.
Creating new file using breadcrumbs
PhpStorm creating and opening files and directories using breadcrumb menu:
- pop up the breadcrumb menu
- navigate the bread crumb menu
left or right arrow keys
- open a file or directory selected in the breadcrumb menu or sub menu
- create new file\directory\class\etc when breadcrumb menu or sub menu item is selected
Set PHP Composer package manager path
It is assumed we have PHP and Composer installed globally and the composer executable renamed from composer.phar to composer and moved a location that is in the system path.
PhpStorm auto detects your local composer installation, however you can manually set it:
from the application menu select tools > composer > init composer
select composer executable
type composer in text box
PhpStorm will auto detect the composer executable if its location is found in the Path environment variable.
You can find out the actual composer path using the which composer bash command
Aside: Installing and configuring XDebug
Skip this section, if you have the XDebug php extension installed.
We need to run a local XDebug server using our local PHP interpreter to communicate with the PhpStorm debugger.
Below are steps to install and configure XDebug:
You should see the location printed:
Loaded Configuration File: /usr/local/etc/php/7.4/php.ini
Add the following settings at top of the php.ini file
By default, XDebug listens on port 9000 but php-fpm running on my machine uses that port number so I change it to 9001.
You must include the absolute path to the extension. It is /usr/local/lib/php/pecl/20190902/ on my machine. To find the path on your machine see my other blog post on configuring VSCode for Laravel development.
The full list of configuration properties is listed below:
Set PHP CLI path including XDebug extension path
Make sure to install and configure the PHP XDebug extension before this section
This is setup only for PHP script debugging. further configuration needed for Laravel debugging.
open preferences dialog using cmd+,
select languages & frameworks > php
click browse button for the CLI interpreter to open a edit box
click the + button to open the select cli intrepreter dropdown
select the other local . dropdown selection to open the cli interpreters dialog box
paste in the parent directory of the PHP CLI ( /usr/local/bin ) into the PHP Executable text box
The path pasted into the text box will automatically change to the PHP CLI Path ( /usr/local/bin/php ) and you will see the version of the CLI displayed below the text box.
you can use the which php bash command to find the path to the PHP executable
Also if XDebug was installed and configured for that version of the PHP interpreter, then the XDebug version will also be shown under the text box.
Otherwise install and configure XDebug as outlined in the previous section. Once configured PhpStorm should automatically detect it.
Give this configuration a name (defaults to PHP) click OK which closes the cli interpreters dialog box and adds the interpreter configuration.
This puts us back in the Preferences dialog where we should see the configured interpreter selected in the CLI interpreter drop down.
Finally we need to configure the debugger server port that PhpStorm runs to communicate with XDebug. This must be exactly the same port number as the xdebug.remote_port = 9001 setting specified in the php.ini file.
By default, XDebug listens on port 9000 but php-fpm running on my machine uses that port number so I change it to 9001.
So select Debug node under the Php node which is the currently selected node in left pane (i.e. select languages & frameworks > php > Debug )
In the right side setting pane, in the Debug Port field in the XDebug section, set the port number to 9001 .
This will be the XDebug server port through which the PhpStorm debugger will communicate with XDebug.
If we need to use a proxy server to connect multiple editors to XDebug server we need to add the export environment variable export XDEBUG_CONFIG=»idekey=PHPSTORM» in our bash shell configuration file. This environment variable is required for XDebug to know that it is communicating with the our PhpStorm debugger. The value of idekey does not need to be PHPSTORM it can be any unique value that distinguishes between the multiple editors. We can even use different editors for instance VSCode and PhpStorm.
Test that the interpreter and XDebug are working:
Create a index.php script in the project folder
set a breakpoint on the second line
From the application menu select run > debug to debug the script
You should hit the breakpoint. Then use the debug buttons on the left to resume the execution of the script or to step into the script.
Should be able to debug otherwise will get error if PHP interpreter not installed
Configure XDebug for Laravel debugging
We can configure PhpStorm to debug our Laravel application in three ways.
One way is that we can can run the Laravel artisan server and configure PhpStorm server connection settings to launch the debugger and connect to the Laravel server.
Another way is we can use Laravel Valet to have the application always running at a .test domain and configure PhpStorm server connection settings to launch the debugger and connect to the Nginx server that is run by Valet, using the Valet domain and port settings.
The final way is to debug using PHPUnit, which will be described in the PHPUnit section.
Opening the debug configurations dialog using the application menu
Open the Laravel project that you want to debug in PhpStorm
From application menu select run > edit configurations to open run/debug configuration dialog box
This dialog allows us to add php script, php unit or php server configurations to run or debug PHP scripts, unit tests and web applications.
We will configure a web server configuration in the sections below to run\debug Laravel applications
Opening the debug configurations dialog using the context menu
Open the Laravel project that you want to debug in PhpStorm
use ctrl+opt+d keyboard shortcut to open the debug configurations context menu.
use the up\down arrow key to select the edit configurations . item
hit enter to open the Run\Debug configuration dialog
- Popup the debug configurations context menu
Debugging using php artisan serve command
Once the run/debug configuration dialog box is opened, you should see two predefined configurations in the left pane. One for running PHP scripts and another for running PHPUnit.
There is also a templates node that when expanded shows all the available configuration templates.
Click the plus button to add a new debug configuration
select php web page configuration template from the dropdown
This will add a new php web page debug configuration settings left pane.
Type in a name for this configuration in the right side pane. I type the Laravel project name.
The server dropdown in the right side panel will need to select a server that we must setup.
click on button next to the server drop down in the right side panel which pops up a servers dialog to configure a PHP server that PhpStorm will try to connect to, to establish a debug session.
The first time we are configuring PhpStorm for debugging, there wont be any configured servers so click the plus sign to add a new server configuration
give the server the name laravel
debugger drop down should have xdebug selected if XDebug was installed and configured.
Click OK to close the dialog and go back to the run\debug configuratoions dialog
The server laravel that we just setup should be selected in the server dropdown
set a start URL to / which is the url route for the controller action we want to debug
select default browser chrome in the dropdown
click OK to save the configuration and close the run\debug configuratoions dialog
From the terminal start the Laravel server by running the artisan command:
php artisan serve
Launching the PhpStorm debugger
Now that the server configuration is setup, we can launch the PhpStorm debugger to debug the application.
You should be able to set a breakpoint in the controller action that responds tp the root / route and run debug and break in the controller action.
From the application menu select run > debug to start debugging.
PhpStorm launches the configured browser and navigates to the configured URL / using the configured host and port.
It also appends the XDEBUG_SESSION_START query string parameter to indicate to the XDebug extension running in the server pipeline that this is the start of a debug session. The value of the parameter is a dynamic session id automatically generated by PhpStorm for the debug session. It will change every time we stop and re-run the debugger to start a new debug session.
The session id can be any value so for instance when debugging using the VSCode editor I always have it set to XDEBUG_SESSION_START=VSCODE .
XDebug then writes a XDEBUG_SESSION=13537 cookie to the browser in the response. The value is the session id that was generated by PhpStorm and passed to XDebug using the XDEBUG_SESSION_START query string parameter.
This cookie will be sent back to the server on subsequent requests that will indicate to XDebug to maintain the debug session until the debugger is stoped.
At this point the breakpoint should be hit.
If you also do debugging using VSCode, you may have to manually delete any remaining XDEBUG_SESSION=<debugsessionid> cooke left over from the last PhpStorm debug session.
Debugging using Laravel Valet
Since our project is called blog Valet serves it at http://blog.test .
From application menu select run > edit configurations to open run/debug configuration dialog box again.
click on button next to the server drop down in the right side panel which pops up the servers dialog to add a Valet server connection configuration:
click the plus sign to add a new server configuration named valet that runs on port 80 and host set to blog.test just like we did before to add the Laravel server connection configuration in the previous section.
Click OK to close the servers dialog and go back to the run/debug configuration dialog.
Then in the debug configuration named blog that we setup in previous section, change the server selection in the dropdown to valet if not already changed.
Now just like previous section from the application menu select run > debug to start debugging.
Since Valet is serving our app we don’t need to start a server with artisan this time.
PhpStorm should launch the browser and go to http://blog.test/?XDEBUG_SESSION_START=<debugsessionid> .
We should hit any breakpoint we setup in the controller action that responds to the root / route.
Issue with breaking in the Laravel Valet server before the controller action
When we debug with Valet there is an issue where when we launch the debugger we breaking in the Laravel valet server.php file before getting to the controller action.
The debugger stops in the
/.composer/vendor/laravel/valet/server.php file in my Valet composer installation on the line:
If we hit the resume debugging button we will continue executing as normal.
Setup PHPUnit for running or debugging Laravel tests
Open your Laravel project in PhpStorm
Just as we did in the previous section From application menu select run > edit configurations to open run/debug configuration dialog box again.
select the PHPUnit node in the left pane and click the plus sign to add a new PHPUnit configuration.
In the right side panel:
Give the configuration a name. I give the name test
select the Define in the configuration file radio button under the test server section
Check the use alternative configuration file checkbox
Browse to your Laravel project root directory and select the phpunit.xml file
The preferred debug engine dropdown should have XDebug selected if XDebug was installed and configured as specified in previous sections.
click OK to save the configuration and close the dialog
To run or debug tests use the run > run or run > debug menu items from the PhpStorm application menu. This will run all the tests.
To run individual or sets of tests, the test results node can be expanded to show more granular tests that can be executed by right clicking on the node.
When using the run > debug menu, any breakpoint set in the test code or application code will be hit.
Note: when debugging the tests and the test complete, the test results will be in the console panel of the debugger window.
Debugging or Running a PHP Script
set breakpoint in the script document
click in the script document
select ctrl+opt+d to pop up the debug menu
with the up/down arrow key select the script file in the menu
hit enter key to start debugging the script.
To run the script instead of debugging the script use ctrl+opt+r
Debugging or Running a PHP Script from the command line
When we execute the script through PhpStorm by using the debug or run commands, PhpStorm runs the configured PHP interpreter with the XDebug settings in the PHP.ini file.
However we can also run the script using the command line instead of through PhpStorm debug command.
In this case we need to pass the XDebug settings either by command line params or by setting the XDEBUG_CONFIG environment variable.
Debug the script by using the debug options of the PHP CLI:
Or set the XDEBUG_CONFIG environment variable.
If multiple editors are running an XDebug session connecting through a proxy to the XDebug server, we need to also set an idekey setting as well In this scenario the XDebug server needs to know which editors debugger server port 9001 it should connect to based on the unique idekey value that is sent to XDebug (via command line flags or via env variables read by the editor) from each machine that is running the editor during the initial connection when the debugger starts.
Setting to surround selected text option
This configuration can be found at Editor > General > Smart Keys in the preferences dialog ( cmd+, )
Check the Surround selection on tyoping quote or brace checkbox to enable this if disabled.
PHP Editor Tips
general tips
Type cmd+downarrow to go to end cmd+uparrow to go beginning of document
To edit using multiple cursors hold down the command key and click in locations you want the cursor.
To duplicate text click on line or select one or more lines and type cmd+d (partial selection on the first and last line works the same)
To move one or more lines select the lines and type sh+opt+uparrow to move up and sh+opt+downarrow to move down (partial selection on the first and last line works the same)
To delete a whole line place cursor on the line and type cmd+backspace (partial selection on one or more lines works the same)
php tips
To insert the fully qualified namespace for a class name type in class name and hit tab key
Run a PHP script directly in PhpStorm
Right click in the editor, choose Run (or press ctrl+shift+f10) for command line script execution. If you want to test it on a web server, use Open in Browser from the same menu (you must have browser and server with mappings properly configured for this).
On top of @CrazyCoder’s solution, in version 2016.3 I came across this issue where I just saw 2 icons like this,

You should hit the 2nd one!
IF you hit the 2nd (like me) next thing I know, it opened in a browser tab. It is a configuration to open in an embeded web server.
So I wanted to delete this configuration and start a new one. So, I found the entry to through this drop down in the top right corner,

While picking Edit Configuration, I could change the test configuration.
Hope that helps someone like me, although clearly not the initial poster.