Where is PHP.ini In WordPress – How To Locate and Edit PHP.ini
WordPress websites require a good degree of customizations and maintenance work. Whether you want to speed up your WordPress site, tighten its security, or just develop a custom feature, you often need to access the files that make up your WordPress installation and edit them directly.
The php.ini is one such important file in your WordPress installation that you’ll often need to edit to improve your site’s functionality and performance.
But where is php.ini in WordPress? This is one such question you’ll find yourself asking when maintaining your WordPress website.
A lot of WordPress tutorials on the internet tell you to edit your php.ini file and add some custom code in there.
And that’s when it gets complicated. If you’ve never done that before or when you don’t have any idea about what a php.ini file does, where it’s located, and how to edit it, following any such tutorial becomes out of the question.
This is one of many situations when many people get frustrated with WordPress and start considering WordPress alternatives for their website.
Here, we’ve compiled this comprehensive guide for you that will help you locate the php.ini file in WordPress and explain how to edit it along with the most common configurations you’re often required to do.
1. What is PHP.INI and What Does It Do?
To follow any WordPress tutorial, it’s absolutely necessary to understand the ins and outs of WordPress, how all the files are structured, and what’s their purpose.
Maintaining your WordPress site becomes a breeze when you understand these technicalities.
So, what is php.ini?
The php.ini file is the default configuration file for PHP. It’s where you change the default settings of PHP and is often loaded to run applications that require PHP.
And since PHP is the core language of WordPress, this is one of the most important files in your WordPress installation.
Whenever PHP is initiated, it looks for the php.ini file to look for any changes in the default functionality of PHP.
2. Why Do You Need To Edit php.ini in WordPress?
Now, let’s come to the next important question before we answer “where is php.ini in WordPress?”
Why do you need to edit php.ini when working with WordPress?
Php.ini has some important settings and configurations related to maximum file size upload, file timeouts, resource limits, and maximum execution time. You may need to change the default settings of these to improve your site’s performance.
You’ll also use this file to enable or disable file extensions in PHP. For example, if you’re getting this error in WordPress that says “Your Php is missing the MySQL extension”, you may need to edit the php.ini file to enable the MySQL extension and configure it properly if other workarounds and solutions don’t work.
And in that case, you’ll need to locate and edit your php.ini file.
3. Where is php.ini in WordPress?
Now, for the most important question of this post: where is php.ini located in WordPress?
The answer, unfortunately, is a bit more complex than you hoped for.
It actually depends on your server environment and your system. Depending on that, there are different ways to access your php.ini file and edit it.
However, there is one simple solution to find the php.ini file that works in every case, regardless of your server, production environment, or local environment.
If for any reason, that method doesn’t work for you, you’ll have to look for the php.ini file based on your system.
Finding php.ini in WordPress using the phpinfo.php file – The Simplest Way To Find The File
The simplest way to find the location of your php.ini file is to create a phpinfo.php file and place it in the root directory of your WordPress installation.
How do you do it exactly? Let me explain step-by-step.
Step 1: Open a text editor like Notepad, Brackets, etc and add the following code in it:
Rename the file to phpinfo.php. The filename doesn’t matter. What matters is that it should end with .php and should have the code mentioned above in it.
Step 2: Place the file in your root directory. If you’re in a local environment, you can simply copy-paste the file.
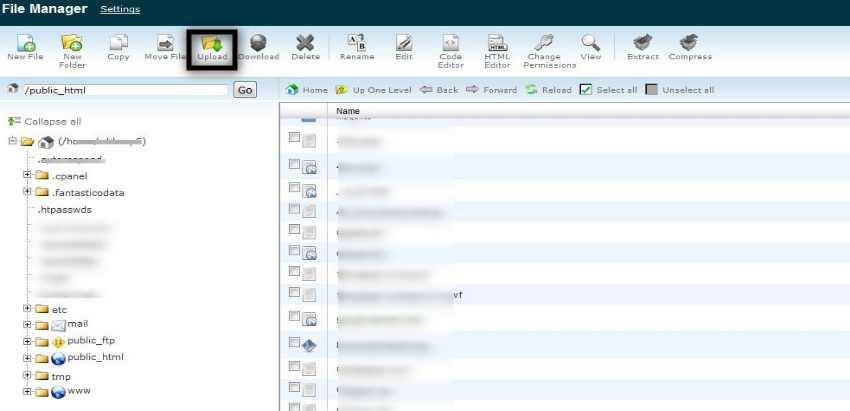
If you’re in a live environment, on the other hand, you’ll need to use the File Manager app of your cPanel to upload the file in your root directory or use an FTP client to upload it.
Step 3: Open the file in your browser by typing in your website address in the address bar followed by the file name. So, it should look like this:
Doing so opens a page that displays information about your PHP installation. You can find all information from this page including the file path of the PHP.ini file.
To find the file path of PHP.ini file, look for the field titled Configuration File Path or Loaded Configuration File. The file path of php.ini should be listed in one of these.
Where is PHP.ini in localhost
If for some reason, the above method doesn’t work for you, you’ll have to find the location of the php.ini file using other methods. If you’re in a local environment, the location of the php.ini file depends on the software you’re using.
Here, we’ve listed two of the most popular programs used for local WordPress installation.
Where is PHP.ini in WAMP
If you’re using WAMP for your local WordPress installation, you can easily find the location of php.ini by right-clicking on the program icon and navigating to PHP > php.ini.
That’s it. It’s very easy to find php.ini in WAMP.
Where is PHP.ini in XXAMP
If you’re using XXAMP, it’s a bit tricky to find the php.ini file there. Open the XXAMP program and click on Config next to the Apache Module. And there, you’ll find the php.ini option in the menu that pops up.
Where is PHP.ini in Linux
If you’re on Linux, find the php.ini file by typing the code below in the terminal:
php -i | grep “Loaded Configuration File”
You should see an output like this:
Loaded Configuration File => /usr/local/lib/php.ini
If it doesn’t show up, try switching “Loaded Configuration File” with “Configuration File”.
Where is PHP.ini on Live Server
If you’re on a live server, it mostly depends on your hosting service. However, here is where the php.ini file is living in most cases:
From your cPanel, open the File Manager app and open your root directory. It should be one level down your public_html folder. And that’s where you’ll find the little guy.
Where is PHP.ini on Shared Server
If you’re using shared hosting, you can’t edit the php.ini file, unfortunately. There is, however, a workaround to edit PHP functionality.
You’ll need to edit your .htaccess file to be able to customize the default setting of PHP.
Here is how you add the code in .htaccess file:
php_value name value
The name parameter represents the name of the PHP property you want to change while value here represents the value of the property you want to set.
For example, if you want to change the size of maximum file upload, this is the code you would put:
php_value upload_max_filesize 8MB
That’s it! So, now that you’ve hunted down the php.ini file, time to edit it.
4. The Most Common Configurations for php.ini in WordPress
Here are some common configurations WordPress users often change to optimize their site’s performance.
Though there are many commands in the php.ini file, we can’t change all of them. But there are some that we can. Below are those that we can change, what they do, and the code we’ll write to change those.
Max Execution Time
This is the time needed to execute scripts or the time needed by the server to run commands. By default, this value is quite low and if you try to upload big files to the server, it will lead to some kind of error.
To optimize WordPress, change the default configuration and increase the time limit, like so:
Memory Limit
Memory_limit is the command that limits the memory usage of PHP in WordPress. It relates to the memory needed to upload files and run commands. It should be more than the size of the file you upload.
The recommended value is 128 MB.
Change the configuration in php.ini file to:
Upload Max File size
When uploading media in WordPress, you often see this file size limit mentioned there. This is how you can increase the limit to fix errors of memory limit exhausted.
Summary: Where is php.ini in WordPress
For optimum performance of your WordPress site, it’s often required to edit your php.ini file. This post has summarized what a php.ini file is, why there is a need to edit it, how to find it and the most common configurations required to edit it.
Need a professional WordPress developer to take care of cumbersome tasks for you? Click here to discuss the feasibility of WordPress Development Services for your business.
Read Also
Maria Ilyas
A writer by profession, Maria Ilyas is an eCommerce and digital marketing enthusiast and is always digging into the latest marketing trends, best practices, and growth strategies.
Related Blogs
 How to Integrate a Request for Quote Functionality on Your B2B Store?
The whole idea behind B2B eCommerce is to deliver a no-rep shopping experience to buyers – an experience …
Want to increase sales in your eCommerce business? Product Bundling is a proven tactic that can take your …
In the modern world, technological advancements are closer than before. A significant chunk of the reasoning lies within …
Leave a Comment
A full-service development agency, we build technology solutions customized for the specific needs of our clients to help them overcome challenges and grow their bottom lines.
Where is PHP.ini in WordPress?
There are many commands in the php.ini file, by changing each command changes happen in WordPress. Therefore we need to know where is PHP.ini in wordpress.
As you probably know WordPress is developed by the powerful programming language of PHP. In this article, we would like to talk about the php.ini file and where is PHP.ini in WordPress?
Therefore, one of the most important files you may come across in the hosting panel is the php.ini file. There are many commands in the php.ini file, by changing each command a lot of things change in WordPress.
First, let us discuss where you can actually find the php.ini file in the server, Linux, XAMPP and etc. Then, we will recommend a few configurations for the php.ini file.
Where is PHP.ini in WordPress?
The first question we answer is where to find the php.ini file?
It doesn’t matter if WordPress is on a live server or a local server. The best way to find the location of this file is to create a PHP file.
It doesn’t matter what name you use for this file. You only need to use the .php extension for it.
Then copy and paste the code below into the created file:
Finally, once the file is saved, open it in the browser. After running the file, you should be able to see the information of php.ini file.
The location of php.ini should be visible in the Configuration file path or in the Loaded Configuration File.
In normal circumstances, the file will be placed in the first location. Otherwise, if the PHP is installed as a module, it will be in the second location.
Creating the .php file may not always work and you have to use other methods to find the location of the php.ini file.
Where is PHP.ini in WAMP?
If you have WordPress installed locally on your computer, you can find the file via the program you are using. Although, the location of php.ini is different in each program. Below, we discuss different programs and where to find the php.ini in each of them.
If you are using the WAMP, then finding the php.ini is an easy task. Simply, right-click on the icon of the program and from the appeared menu click on PHP. In the opened menu you will be able to see the php.ini. This is all you need to do to find the php.ini file in the WAMP server.
Where to Find PHP.ini in XAMPP?
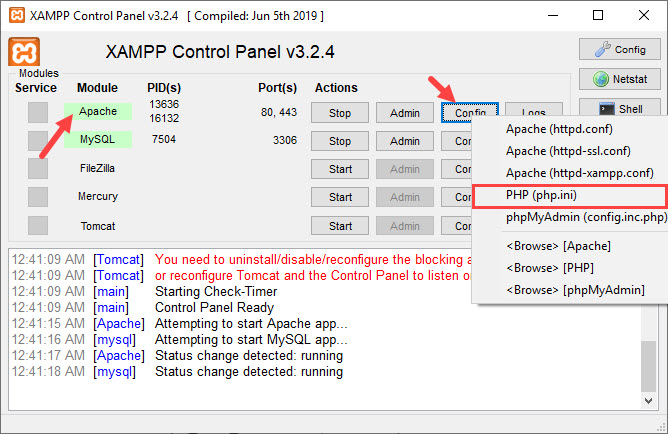
Finding php.ini in the XAMPP server is a bit different. Open the program and click on Config next to the Apache module. From the opened menu click on PHP(php.ini).
Where to Find PHP.ini in Linux?
If you are a Linux user, to find the php.ini file, type the code below in the Linux terminal:
The output you receive should be like below:
Normally, the php.ini file is located in the Loaded Configuration File. If you couldn’t find it there, simply change the path to Configuration File.
Where is PHP.ini in cPanel?
As mentioned above, it doesn’t matter if you have WordPress installed locally or on a live server.
In any case, there are multiple ways of finding the php.ini file in WordPress. Follow the steps below if you have WordPress installed on a live server and have access to the cPanel:
- Login to your hosting panel
- Open File Manager
- Php.ini file is located in the Root directory
Don’t forget that the root directory is in the public_html folder. Simply click on it from the left-hand side menu.
What are the Recommended Configurations for PHP.ini in WordPress?
There are some recommended configurations for the php.ini that makes the WordPress run better. Other than php.ini configurations there are other options that we will mention down below:
PHP.ini
Copy and paste the following code in the PHP.ini file:
.htaccess file
Copy and paste the line below into the .htaccess file. This file can be found in the root directory of your website. Often, it is hidden. Therefore, use an FTP client like FileZilla to show the hidden files.
wp-config.php file
Copy and paste the line below in the wp-config.php file to eliminate the run-time limit. Or if it is already in the file, change the value to 60.
PHP.ini Configurations You Can Change
There are many commands in the php.ini file. Some of them can be changed. Below are those that we can change. Knowing what each of them does is very important.
Memory_limit
As you can probably tell by its name, memory_limit is the command to limit the memory usage of PHP in WordPress.
The value you define for the memory_limit must be more than the file you are trying to upload. This is the memory needed to upload files and run commands. The recommended value is 128 MB.
Max_execution_time
The time needed to execute every script is defined by this command. In other words, the time the server needs to run the commands.
For example, if you are uploading a fairly big size to the server, it will take more than a few seconds. Therefore, you must remove the execution time or increase it.
Post_max_size
This command defines the maximum data a post can have. To eliminate the limitation change the value to 0. By using the POST method you can call the post from the server.
Upload_max_filesize
This command defines the maximum file you are allowed to upload on WordPress. You have probably seen the limited upload number displayed in the WordPress gallery. This command defines that limitation.
If the memory limit exhaust error occurred, you must eliminate this command or increase it.
Max_input_time
This command defines the seconds required for each data to be analyzed. Data like POST and GET.
The time begins exactly when the command requests PHP from the server and it ends when the command starts. The default value is -1. To eliminate this limitation, set the value to 0.
WordPress Troubleshooting: Where Is php.ini?

Sajal Soni Last updated Dec 30, 2020
In this quick article, we’ll discuss the different options that you can use to locate the php.ini file in WordPress. It’s good to know where it is, since you’ll sometimes need to modify some settings in that file.
For example, you may have seen this error in your WordPress site:
“uploaded file exceeds the upload_max_filesize”
This tells you that the file you are trying to upload in WordPress exceeds the configured file size in the php.ini configuration file. So you might need to increase this maximum size in the php.ini file.
Having said that, if you know the location of the php.ini configuration file, it also allows you to configure a lot of other options related to PHP.
What Is the php.ini File?
First of all, you should know that WordPress is built on the PHP programming language. Every time a WordPress page is loaded, PHP has to run on the server. And when PHP is run, it looks for a php.ini file in some specific locations and loads it. This file configures how PHP works and has a big impact on PHP software like WordPress.
It’s certainly possible that you’ve never needed to modify php.ini. PHP can run happily with the settings provided in the default php.ini file, since PHP ships with these default recommended settings. In fact, there are no critical configuration parameters that you must set in order to run PHP.
However, the php.ini file provides a couple of important settings that you want to make yourself familiar with. In fact, for PHP developers, it’s inevitable that you’ll encounter it sooner or later.
How to Locate the php.ini File in WordPress
In this section, we’ll see how to find the php.ini file, which is loaded when you run WordPress. This can be tricky—the location of the php.ini file vastly varies by the environment you’re running PHP with.
The best way to know the location of the php.ini file is to use the phpinfo() function. It will tell you where php.ini is located, and it will also output all the important PHP configuration information.
You can run phpinfo() by creating a .php file and calling that function. Go ahead and create the phpinfo.php file with the following contents and place it in your document root.
Now upload this file to the root directory of your WordPress installation. Next, run the https://your-wordpress-site.com/phpinfo.php URL in your browser, and you should see the output of phpinfo() . Look for the following section.

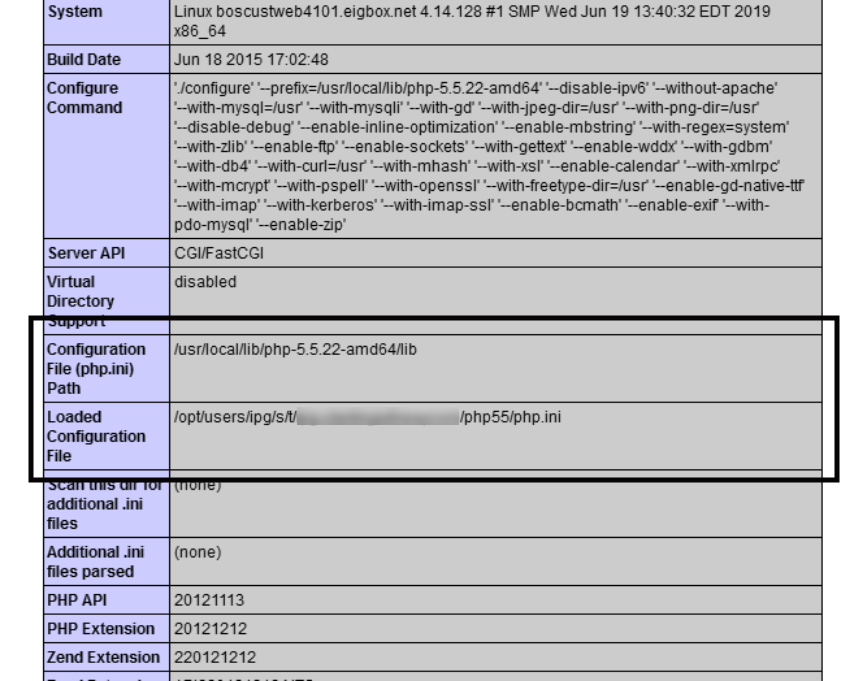
As you can see, there are two sections. The first one, Configuration File (php.ini) Path, indicates the default path of the php.ini file in your system. And the second one, Loaded Configuration File, is the path from where the php.ini file is being loaded when PHP is run.
So you can edit the php.ini file indicated in the Loaded Configuration File section, and that should work in most cases. Once you’ve identified the php.ini file location, don’t forget to delete the phpinfo.php file from your site.
If you don’t have access to the location of the php.ini file, you could try the solution described in the next section.
Locate the php.ini File With cPanel
In this section, we’ll see how you could edit the php.ini file to your WordPress with the help of cPanel. Of course, you need to have cPanel access on your host to use this option!
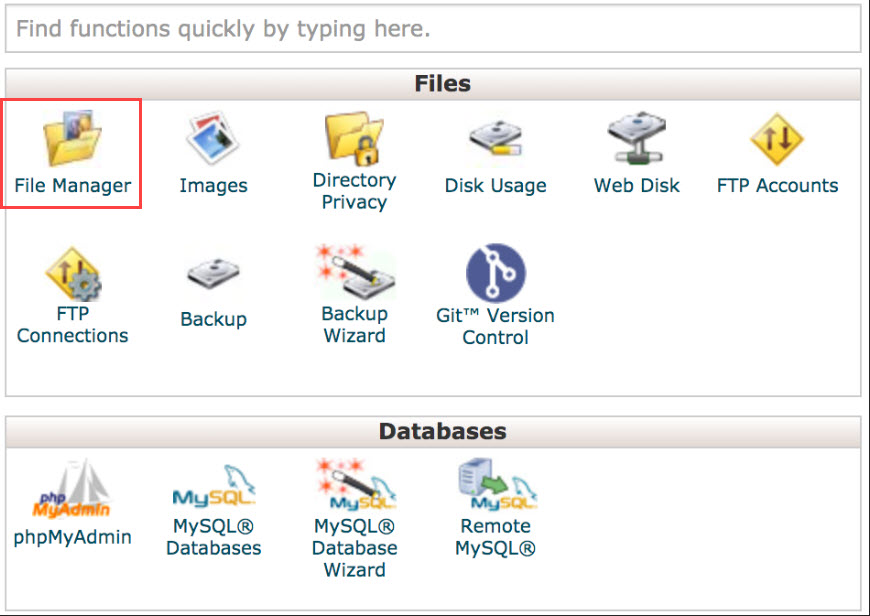
Go ahead and log in to your cPanel. On your dashboard, you should be able to see the following options.

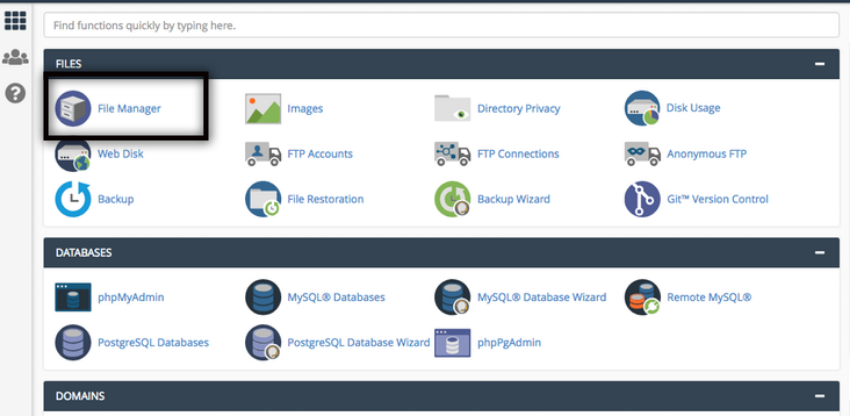

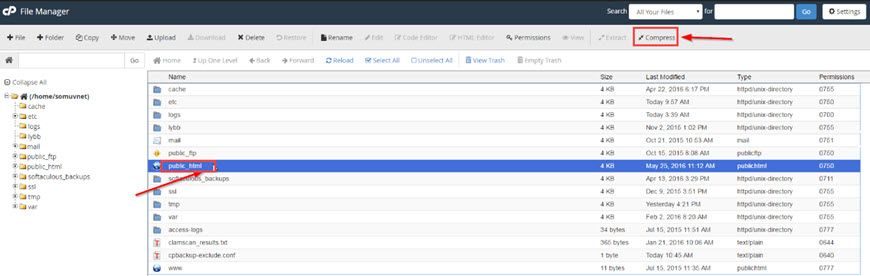
Next, click on the File Manager link on your dashboard, and that should take you to the screen which lists files on your server. Navigate to the root WordPress installation directory. It should display a list of files, as shown in the following screenshot.

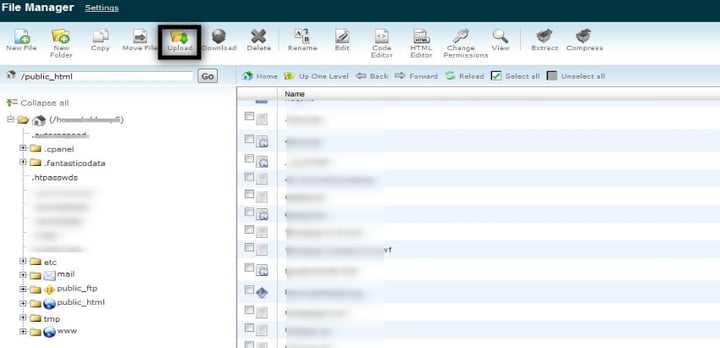
Now, try to find the php.ini file in the list, and if it doesn’t exist, you could create a new file under the document root.
How to Fix the upload_max_filesize Error
In this section, we’ll see how to fix the upload_max_filesize error. Once you’ve found the location of the php.ini file for your WordPress site, you just need to change the following settings in that file.
If you’re editing the existing php.ini file, you just need to change the values as per your requirements. On the other hand, if you’ve created a new file, you’ll need to add it.
With these changes in place, you should not get the file size error anymore, as we’ve increased the file size limit significantly. Of course, you could adjust the above settings as per your requirements.
And with that, we’ve reached the end of this article.
Conclusion
Today, we discussed how you could find the php.ini file in your WordPress installation. Along with that, we also discussed how to change settings in that file. Feel free to post your queries using the feed below. And check out some of our other useful WordPress troubleshooting resources!
Useful WordPress Troubleshooting Resources
Here’s a list of tutorials and other resources to help you troubleshoot problems with WordPress.
How Do I Know php.ini Location?
If you’re dealing with WordPress, sooner or later you have to ask yourself this question. Although not directly connected to WordPress, php.ini is one of the most important configuration files on your server because it is responsible for configuring your PHP installation, and in such a way your WordPress site and knowing php.ini location is important.
The most frequent parameter that you might need to change is upload_max_filesize. By default it’s 2Mb, which can be quite low. Other popular ones include register_globals, safe_mode, and max_execution_time. You can also use this file to enable or disable extensions of your PHP installation.
Depending on your system and server environment there are different places and ways you can find the php.ini location.

What’s php.ini Location?
Whether you’re working on localhost, or on a live server, the easiest and proven way to locate your php.ini file is to create a PHP file with a single line of code in it, and view the output.
- Create a file (name it however you want, in our case it’s ‘test.php’), and make sure it ends with .php extension.
- Put this line of code in it:
- Open the file via your browser. For example if you placed it into your root folder, run http://mywebsite.com/test.php.
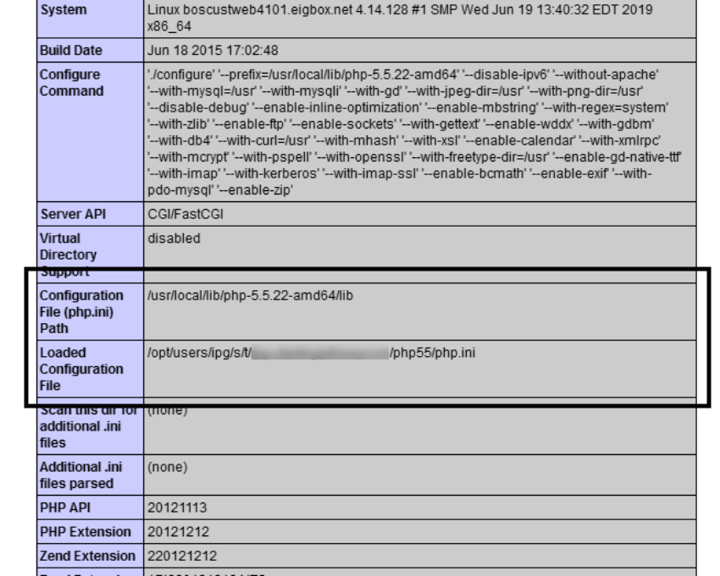
You should see something like this:
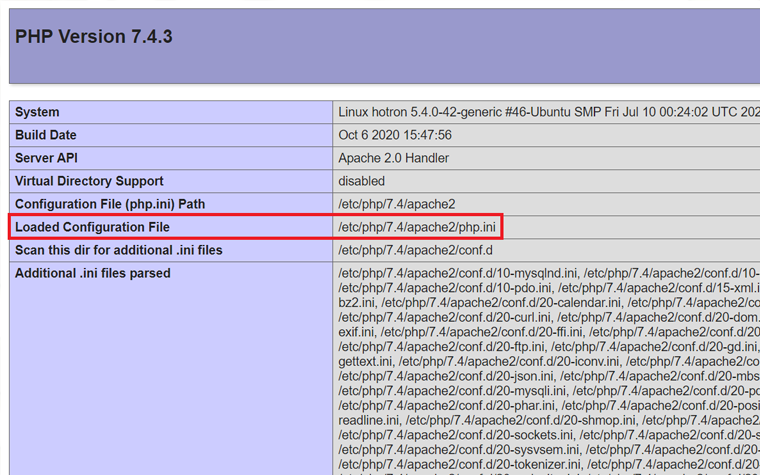
Your php.ini file should be located either in the ‘Configuration File Path’ section, or like in my case in ‘Loaded Configuration File’ section. The first location is the default one, the second location applies in case your PHP installation is used as a module.
Other solutions
If in some cases creating a php file and inserting a single line of code doesn’t work for you, there are some other ways to find php.ini.
Local server
If you’re working locally, finding php.ini would depend on the server environment you’re using. Let’s go quickly through some of the most popular ones.

Left click on your WAPM server icon, then go to PHP -> php.ini. Easy? Easy.
XAMPP
XAMPP is a bit different beast, but also can be tamed without much difficulty. Run your XAMPP installation, right click the ‘Config’ button (in front of the Apache module) and here it is, our little guy:

Linux
If you’re on Linux, run the following command in the terminal:
It should output something like this:
In most cases the php.ini would be located in the ‘Loaded Configuration File’, but if it’s not there, replace the ‘Loaded Configuration File’ string with ‘Configuration File’.
Live server
The location of php.ini mostly depends on the hosting you’re using, but we’ll cover here some of the most common scenarios.
cPanel
Open your file manager, and navigate to the root directory. Our little guy should be sitting at the bottom.

If you don’t know how to find your root folder, simply go one level up your main public_html directory.
Shared Hosting
Unfortunately, if you’re on a shared hosting, you cannot access your php.ini file. The workaround would be to specify the needed configuration settings in your .htaccess file in the following pattern:
The name here represents the name of the PHP property you need to change. The same applies to the value. For example this line changes the maximum uploaded file size to 8 Mb:
Restart after the changes
If you made at least one change to php.ini file, you have to restart your server, otherwise the changes won’t apply. If you’re on Linux write the following command:
If you’re using XAMPP, go to the main dashboard, click the ‘stop’ button in front of the ‘Apache’ module, and then click the ‘start’ button again.
Final words
As you can see, finding php.ini can be both tricky and easy at the same time. I’ve tried to cover the most common solutions and server environments, and hope this guide would help you to finally locate this file. If you know any other ways to find php.ini, feel free to share your thoughts in the comments below.
It is a file that defines the work of all programs which demand PHP. It contains default configurations and controls such important things as resource limits and upload size.
As was previously said – it contains very important configurations for the apps that work on PHP. If you want to change some of them – you will need phph.ini.
Well, first of all, it will probably be upload_max_filesize. The default value for it (2Mb) is commonly too small and website owners make it bigger. Besides that, chances are you would like to change the values of register_globals, safe_mode, and max_execution_time.
Read Also
Don’t miss out these all-time favourites
- The best hosting for a WordPress website. Tap our link to get the best price on the market with 82% off. If HostPapa didn’t impress you check out other alternatives. — to get your template up and running within just 6 hours without hassle. No minute is wasted and the work is going. — to download unlimited number of WordPress themes, plugins, ppt and other products within one license. Since bigger is always better. is the ultimate solution that includes full template installation & configuration, content integration, implementation of must-have plugins, security features and Extended on-page SEO optimization. A team of developers will do all the work for you. — to get the most essential plugins for your website in one bundle. All plugins will be installed, activated and checked for proper functioning. — to create amazing visuals. You’ll get access to Depositphotos.com to choose 15 images with unlimited topic and size selection. — to get the absolute trust of your website visitors. Comodo Certificate is the most reliable https protocol that ensures users data safety against cyber attacks. — to increase UX of your site and get a better Google PageSpeed score.
I like to create websites from the ground up, coding them carefully with HTML and CSS. Sometimes even the best and professionally created templates need some coding tricks. And here is my Quora account.
Get more to your email
Subscribe to our newsletter and access exclusive content and offers available only to MonsterPost subscribers.