Laravel optimization commands
Laravel ships with a set of commands that optimize the framework for better performance. This article explains how the commands work, where the cache files are stored, and in what order they should run during deployment.
Side note: The intention of this article was to explain the somewhat confusing optimization commands that shipped with Laravel prior to version 5.1. With Laravel 5.1, released in June 2015, the commands and their logic have been cleaned up, and the article has been updated to reflect the changes.
Storage paths for optimizations
The optimization files generated by the artisan optimization commands are written to the bootstrap/cache/ directory. This directory should be writable by the web server (PHP) process.
artisan optimize (deprecated)
The optimize command is no longer needed due to recent improvements to the PHP op-code caching. The Laravel documentation advices you to remove all references to this command from your deployment scripts as it will be removed in a future Laravel release (though it’s still present in Laravel 8). The following explanation of the command is kept as a reference.
php artisan optimize creates a compiled file of commonly used classes in order to reduce the amount of files that must be loaded on each request. The file is saved to, or overwrites, bootstrap/cache/compiled.php , which needs to be writable by the web server (PHP process).
You can specify additional classes to be included in the file by adding them to config/compile.php .
The compiled file is only created on production environments, unless the —force flag is used.
artisan optimize also creates bootstrap/cache/services.json which is used to optimize the loading of service providers. (The command does no longer compile views.)
php artisan clear-compiled reverses the process by deleting bootstrap/cache/compiled.php and bootstrap/cache/services.json .
NB! The ouput of artisan optimize may depend on your configuration files, e.g. the providers array from config/app.php . During deployment, run this command after php artisan config:cache .
artisan config:cache
php artisan config:cache combines all your configurations into one file for faster loading. The cache file is saved to bootstrap/cache/config.php . The command clears the old cache before creating a new one.
php artisan config:clear reverses the process by deleting bootstrap/cache/config.php .
artisan route:cache
php artisan route:cache creates a route cache file for faster route registration. The cache file is saved to bootstrap/cache/routes.php . The command clears the old cache before creating a new one.
php artisan route:clear deletes the cache file.
artisan view:clear
Laravel compiles view files the first time they’re rendered by the framework, e.g. the first time a user visits your web app or site. The compiled file is named by calculating the SHA-1 hash of its path (not its content).
artisan view:clear clears all compiled view files from storage/framework/views/ .
Writing your own custom Laravel Artisan Command

We have been using many artisan commands in our day to day work . Laravel provides many artisan commands to make our life easier . From creating model to controller , request and many other with options for generating related materials like
php artisan make:model Hello -mcr
Above commands will generate model, migration, resource controller for your model Hello .
Easy-peasy right ? �� With a line of command we have our model, migration and resource controller ready . There are many other helpful commands which Laravel provides out of the box for you . You can list out all the commands using :
php artisan list
In addition to that, you can found many plugins out there to extend your artisan commands experience ��.
Today , we will be creating a simple custom artisan command which will clean up our cache, route, view with a line of command . We do have all the mention features already in laravel , we will be utilizing that in our artisan command . Let’s get started . ��
Getting Started
First, let’s hit a command to generate the blueprint for our artisan command . Enter the below command on your terminal .
php artisan make:command CleanUpCommand
Now , you will find your command on app/console/commands/ . We will start coding our artisan command right away but first please do read Laravel documentation about creating commands . I won’t be summarizing how exactly does artisan command works. This is all well documented on Laravel official website .
We will be using bunch of already made commands like :
- php artisan view:clear
- php artisan route:clear
- php artisan cache:clear
- php artisan config:clear
- php artisan clear-compiled
First let’s declare a protected variable with arrays of commands .
After that, let’s inject our composer on our constructor .
After initializing the composer , let’s start the main functionality we were talking about .
We have written complete function for our command . The first two line of code will do the job like :
composer dumpautoload
In second line of code , we are just calling the artisan commands for each item from our array from the class .
php artisan view:clear
In the third part of code , we are using exec() function to execute the external command which will truncate our log file .
At the end , we are imploding the output (messages) . The final thing to do is give a signature and description for our command .
Our command is ready . All we need is to register our commands on App\Console\kernel.php file . We just need to add our command in protected $commands array .
The final code :
Finally , we have our command ready ��. If you run php artisan list , we will see our command listed there .
Let’s run our command �� and test it out .
php artisan kiranti:cleanup
Conclusion
This is just a simple demonstration for a command but you can play around and make something useful . We have covered a lot of topic in this article . Hope this help you understand commands and let you create your own . Happy coding ��

Working with Laravel without PHP Artisan would be no so efficient. Laravel delivers us list of mostly used commands by daily developer’s activities. You need to know this list and use the commands to speed up your efficiency in coding.
Some of the php artisan commands are shown in action in my laravel project where I build book management rest api. It’s good to you to verify in practice what commands are especially used.
Displaying list of PHP Artisan commands
In order to run the Artisan lists of commands you need to type … the command:
As a result of running the command you should be able to see the view like below:

Full list of php artisan commands list with examples will be presented below.
You can use this place to come back and find the right command for you.
Artisan commands list with examples
clear-compiled
Every time you run project or different commands the laravel framework generates some cache files in bootstrap/cache folder. These files are compiled.php and services.php. Both of them keeps list of mostly used classes/services needed by your project configuration.
Running the command removes all the files from cache folder:
You should get information “The compiled services file has been removed.”
serve
In developer environment we sometimes need to verify changes we made as fast as possible. We need to run the whole project without any additional configuration setup. At this point, the serve command is helpful, which runs the entire project as a local server under the port 8000.
In order to see the website you need to type in your web browser the address http://localhost:8000

make:auth
Using the make:auth command you can generate working mechanism with logging, registration, routes, generated views and auth controller.
What exactly we achieve using the command is seven created files and one modified (routing):
- HomeController.php
- home.blade.php
- login.blad.php
- register.blade.php
- email.blade.php
- reset.blade.php
- app.blade.php
- web.php
Home controller is very simple and the only responsibility of it is to run home template and secure access using auth middleware:
class HomeController extends Controller
{
/**
* Create a new controller instance.
*
* @return void
*/
public function __construct ( )
{
$this -> middleware ( ‘auth’ ) ;
}
/**
* Show the application dashboard.
*
* @return \Illuminate\Http\Response
*/
public function index ( )
{
return view ( ‘home’ ) ;
}
}
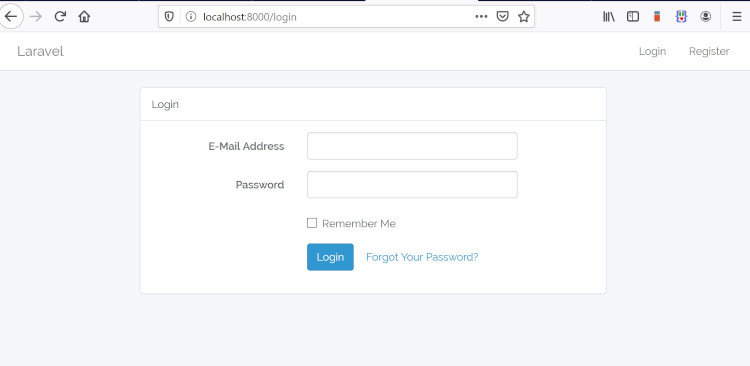
When you run locally laravel application you will see beautiful html layouts with blade templates for logging:
and for registering as a result you should see:
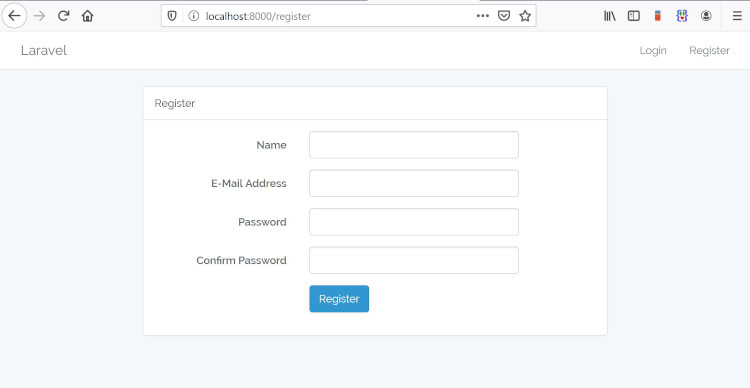
The last change is in web.php file. Our command automatically generated code responsible for handling home routing and currently the file looks like:
Route :: get ( ‘/home’ , ‘HomeController@index’ ) -> name ( ‘home’ ) ;
If you want you can remove the line with main routing to default welcome page into home page that we created.
When you run default migrations calling php artisan migrate and you go through registering process you can even logged into home page.
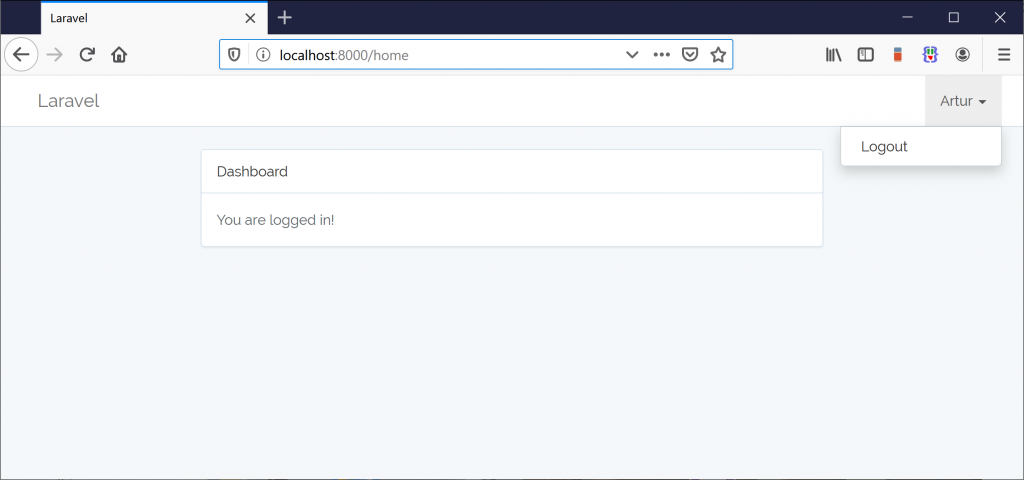
I like the idea without any coding I can achieve lots of working codes both on controller and view sides.
make:command
When you want to automate some activities around artisan command line tool you can do it creating you own command. The syntax for creating the command is very simple:
Here GetPageTitle is a name of php class that will handle the new command. The class extend Command class:
class GetPageTitle extends Command
{
/**
* The name and signature of the console command.
*
* @var string
*/
protected $signature = ‘command:name’ ;
/**
* The console command description.
*
* @var string
*/
protected $description = ‘Command description’ ;
/**
* Create a new command instance.
*
* @return void
*/
public function __construct ( )
{
parent :: __construct ( ) ;
}
As you can see we have one method handle() that defines how our command works and two fields $signiture and $description.
The description field is obvious because this is just a description of a command. You can type here any descriptive information.
Definately $signiture field is the most interesting because here we can define in general case three things:
- name of the command that we use in command line
- command arguments
- command options
In our command for getting title of a website the signature might look like:
The url is an argument that we can pass to the command and limittitleto is and option that we can pass number of first letters that we want to get from the title page. We can call this command using the syntax:
The final implementation of command class is:
class GetPageTitle extends Command
{
/**
* The name and signature of the console command.
*
* @var string
*/
protected $signature = ‘page:title
/**
* The console command description.
*
* @var string
*/
protected $description = ‘Command that fetches title from given url’ ;
/**
* Create a new command instance.
*
* @return void
*/
public function __construct ( )
{
parent :: __construct ( ) ;
}
/**
* Execute the console command.
*
* @return mixed
*/
public function handle ( )
{
// Get all
//$arguments = $this->arguments();
//$options = $this->options();
//
// Get single Parameters
$url = $this -. argument ( ‘url’ ) ;
$limititleto = $this -. option ( ‘limititleto’ ) ;
// function to get title from url given as input argument
// and limit this to the first $limititleto chars
// the logic of the function is not so important here
$title = fetchPageTitle ( $url , $limittitleto ) ;
More details about creating own commands in php artisan command line tool you get get from official Laravel website here.
make:controller
This is very handy command that helps us to create any controller’s class. With one line of code we receive full Http directory structure with the class:
As a parameter you should use your controller name. Here we used BookController.
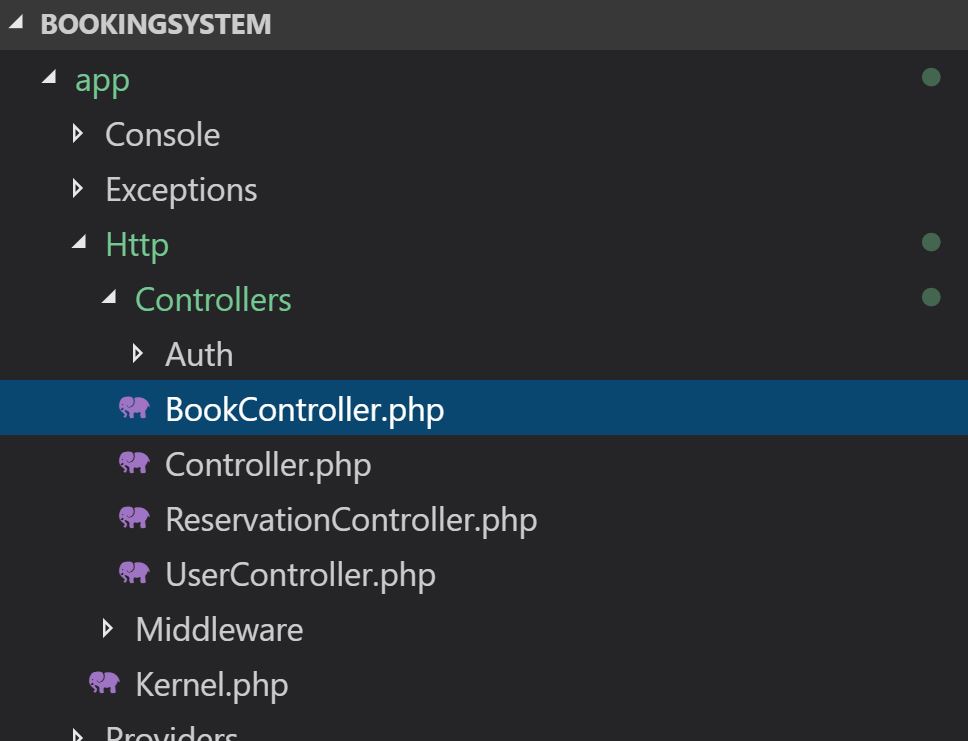
As a result we get empty BookController class like:
class BookController extends Controller
{
//
}
make:event
Laravel framework supports events driven architecture as default. You can create as many events in the systems as you want. You can create synchronous and asynchronous events.
Like always in order to create the template code we can use artisan. In our case generating new event is possible by running the command:
We need to pass as a parameter name of event that we want to create. Here I typed the name EbookWasDownloaded that should suggest that user downloaded ebook from our website.
How the code of the event looks like ? Well, we can see that new folder Events is created under app and inside we have one file EbookWasDownloaded.php. Inside the file we have small class with default constructor and one method broadcastOn.
use Illuminate\Broadcasting\Channel ;
use Illuminate\Queue\SerializesModels ;
use Illuminate\Broadcasting\PrivateChannel ;
use Illuminate\Broadcasting\PresenceChannel ;
use Illuminate\Foundation\Events\Dispatchable ;
use Illuminate\Broadcasting\InteractsWithSockets ;
use Illuminate\Contracts\Broadcasting\ShouldBroadcast ;
class EbookWasDownloaded
{
use Dispatchable , InteractsWithSockets , SerializesModels ;
public $ebook_id ;
/**
* Create a new event instance.
*
* @return void
*/
public function __construct ( $ebook_id )
{
//
$this -> ebook_id = $ebook_id ;
}
/**
* Get the channels the event should broadcast on.
*
* @return Channel|array
*/
public function broadcastOn ( )
{
return new PrivateChannel ( ‘channel-name’ ) ;
}
}
I have injected into the constructor $ebook_id variable that we may want to pass to store it in the event for any purposes. You can pass any variable, object you want to keep.
How can we call/dispatch the event ? We can do this very simply in controller side from any actions like below:
use App\Events\EbookWasDownloaded ;
use Illuminate\Http\Request ;
class HomeController extends Controller
{
public function download ( $ebook_id )
{
event ( new EbookWasDownloaded ( $ebook_id ) ) ;
// some login to fire download
}
}
Here we can see that event is fired by calling the helper event with one parameter that is an instance of our event class. Find the section make:listener to know how to listen dispatched events.
make:migration
Let’s say you want to add a new column to existing table. You can do this running the command:

This will create migration file name directly like you put in the command plus prefix with current date. The file will be created with with two empty methods up and down that you need to fill on your own.
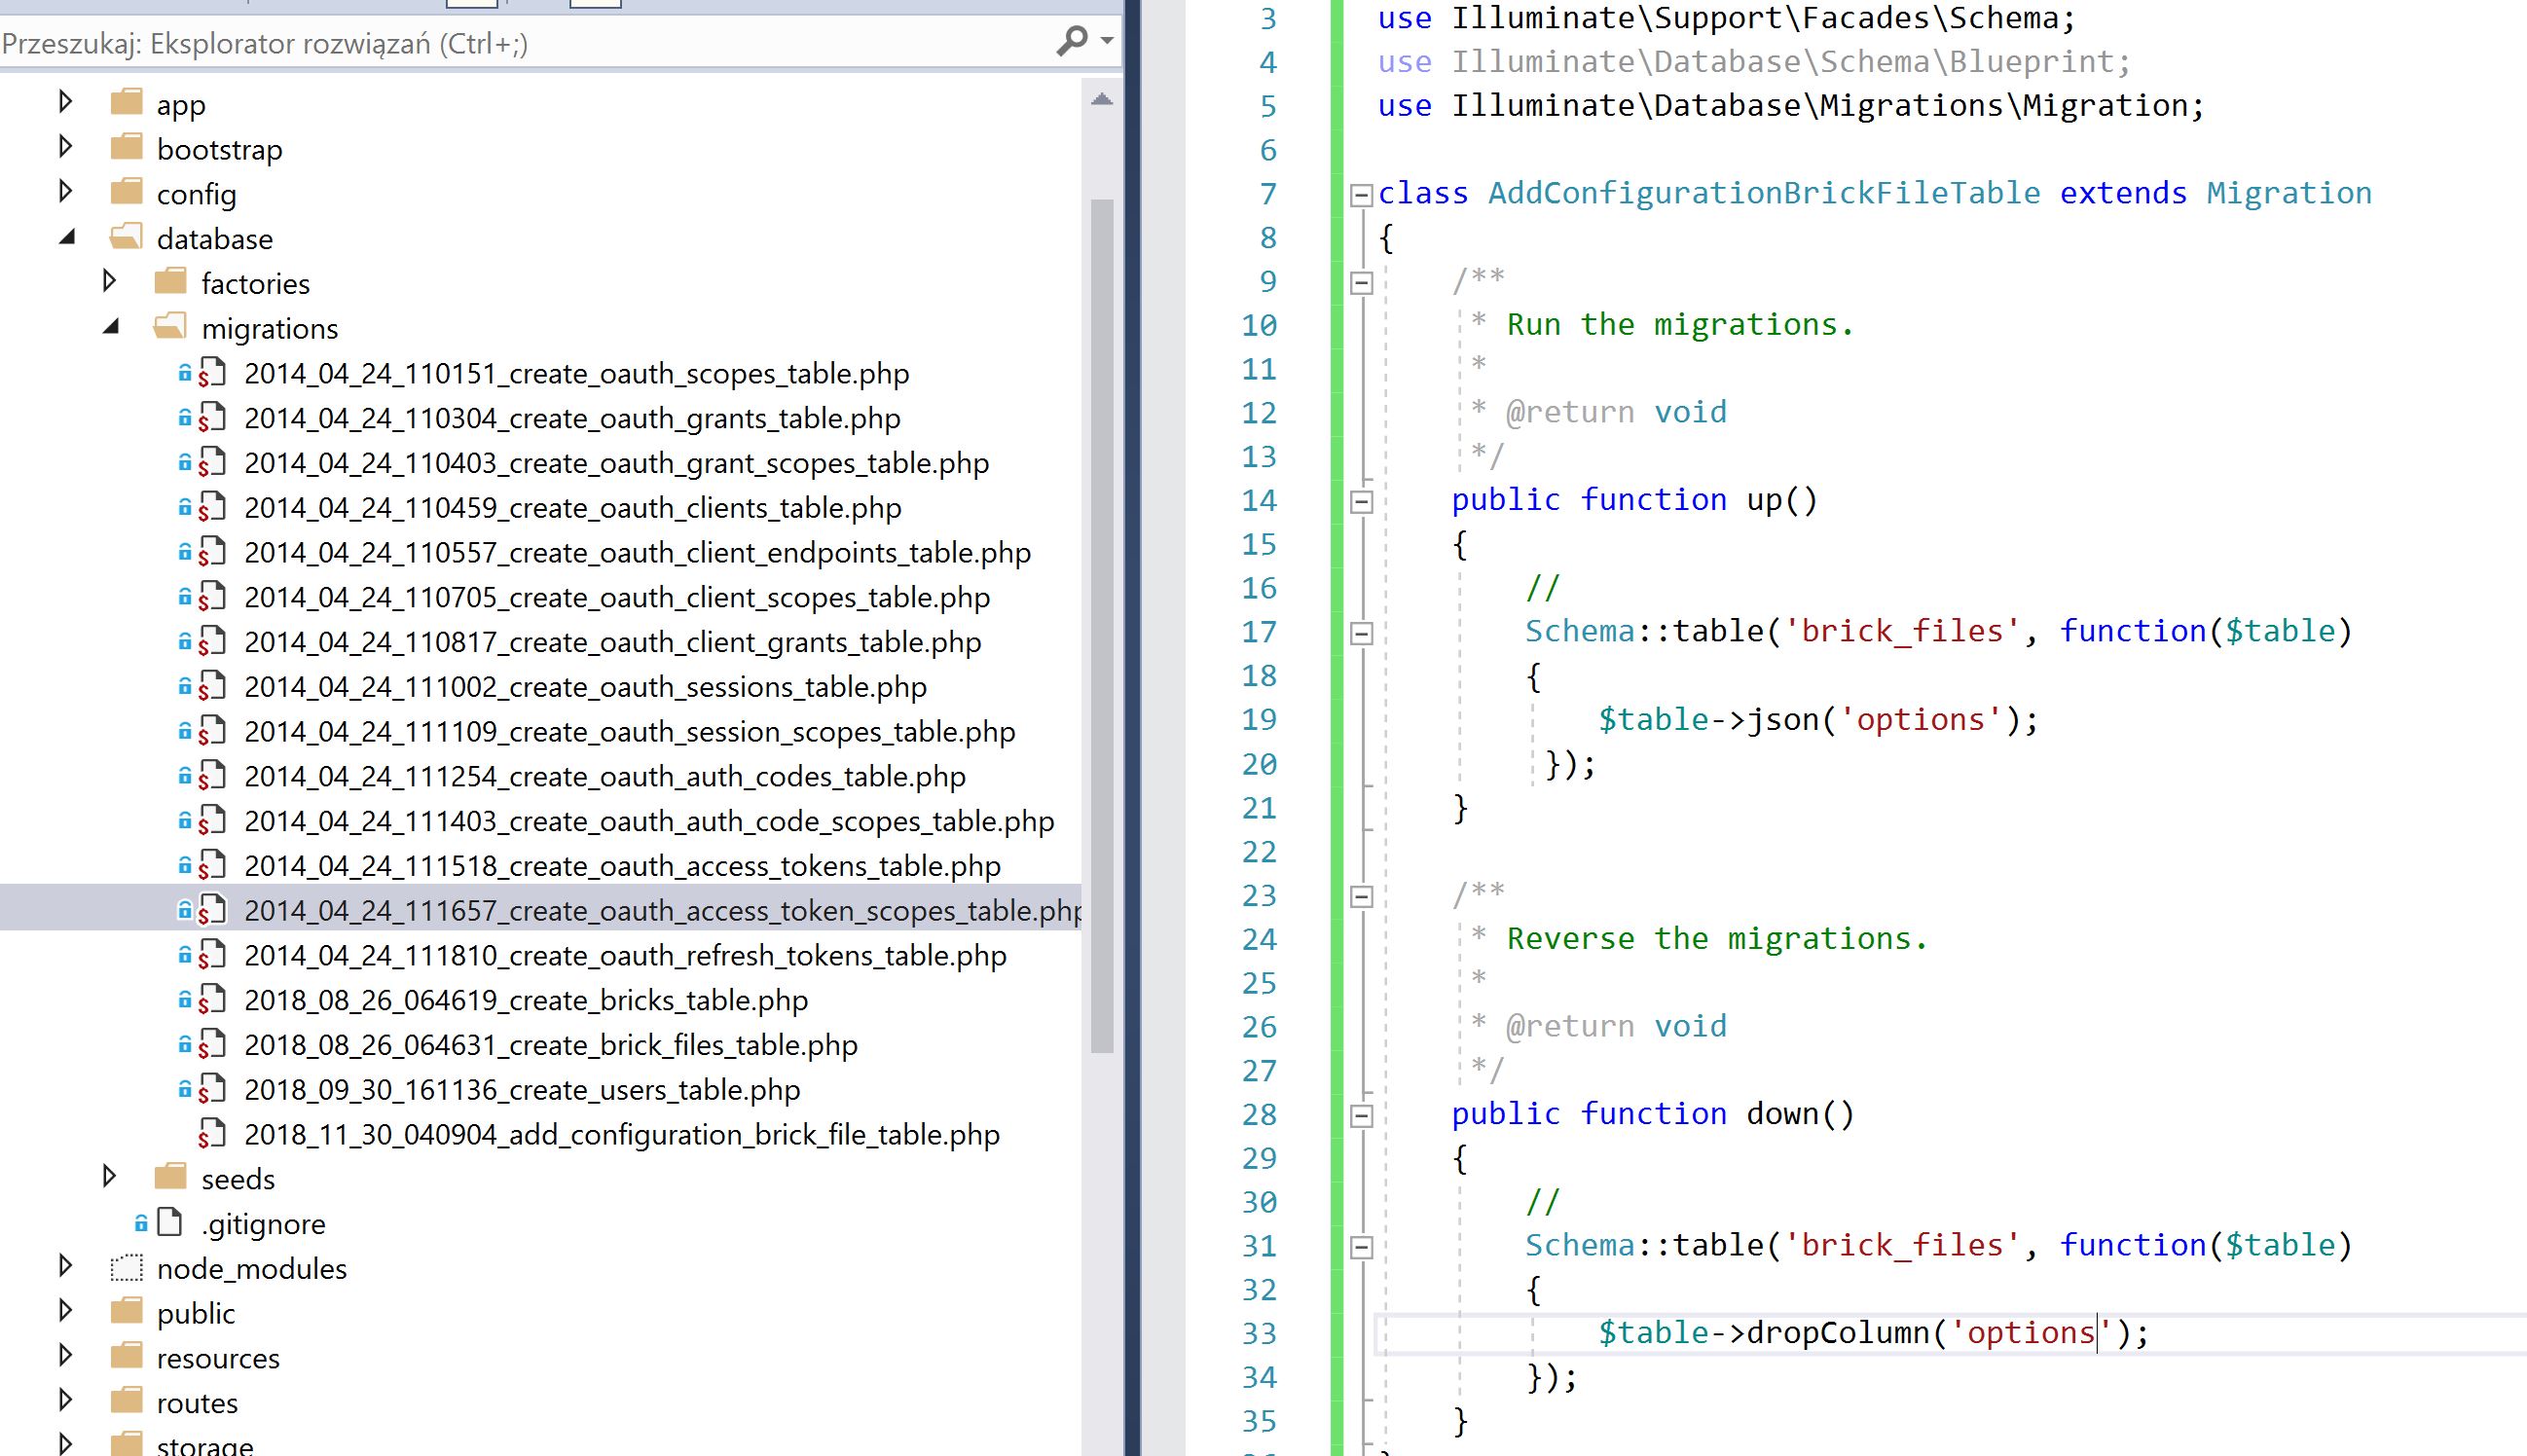
Full list of available column types you can find under the link: laravel migration column types
make:model
In Laravel we have concept of models. They are kind of DTO objects between database side and high level business objects in controllers side (like domain objects used by different servicses/providers).
This small mapping object are ready to use under the command make:model where you only need to put the model name as parameter:
As a result the command will create for us a new file under the main app directory named Book.php. You should have the same result like in the picture:
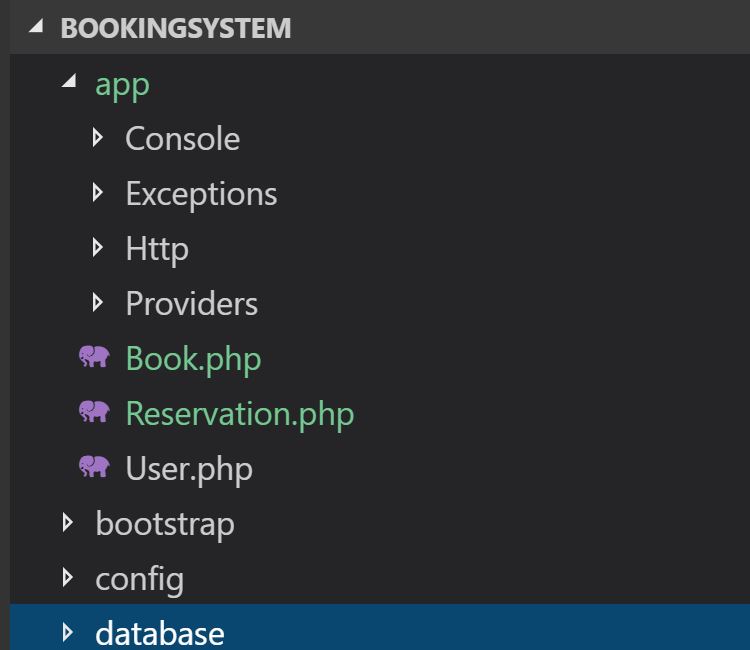
Newly created file is rather empty and you are obliged to fill the two arrays your field/column names from the table that you generate model for:
namespace App ;
use Illuminate\Database\Eloquent\Model ;
class Book extends Model
{
use Notifiable ;
/**
* The attributes that are mass assignable.
*
* @var array
*/
protected $fillable = [ ‘id’ , ‘title’ , ‘isbn’ , ‘year’ , ‘return_date’ , ‘borrow_data’ , ‘is_available’ , ‘created_date’ , ] ;
/**
* The attributes that should be hidden for arrays.
*
* @var array
*/
protected $hidden = [ ] ;
}
I filled first of the arrays $fillable with some columns names that fits to book model.
migrate
This command is relatively simple and rather usefull. Using it this way:
as a result you can easily make all migrations into database.

In the example we added new column named options so after running the comand you will see that new column is added into database:
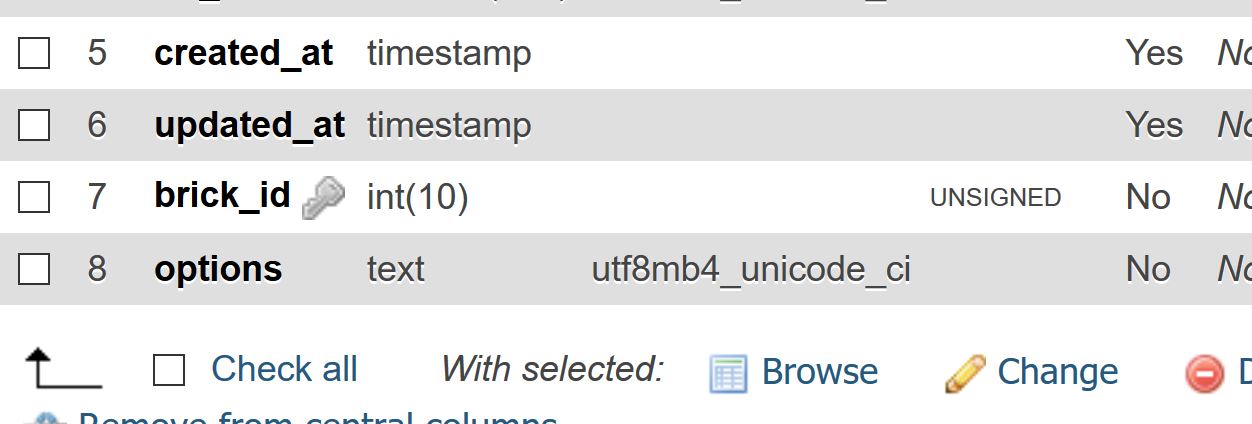
migrate:rollback
It sometimes happens that you made mistake or you want to verify your application with previous version of database structure. It is possible to do by the command migrate:rollback. The command goes one step backward in migration list. When you run the command you will see such result in your console:

migrate:status
Migrate status command gives very important information about state of running migrations. It coresponds with commands migrate:rollback and just migrate, because when you run the command you need to know if they failed or approved. So the migrate:status command shows you the current state:
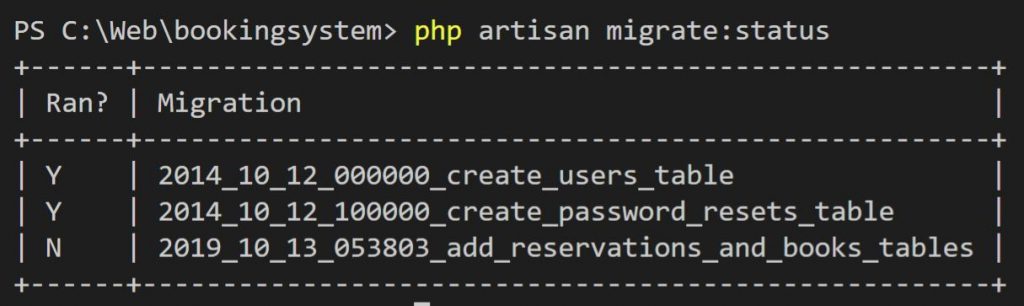
In Ran column you have presented information Yes or No that means migrations were applied or not. Consequently we have first two migrations successfully applied. The latest migration is waiting to be run.
Laravel Artisan Cache Commands Explained
Often times, when you are in the middle of developing a Laravel application, you may find that the changes you made in your code are not reflecting well on the application when testing.
Usually, the case is most likely caused by caching applied by the Laravel framework.
Here are some of the common commands you can run in your terminal to alleviate the issue.
❗️ Make sure you are running them in the context of your application. Meaning, your terminal is currently in the same directory as your Laravel application.
1. Configuration Cache
Caching configuration helps with combining all of the configuration options for your application into a single file which will be loaded quickly by the framework.
Clearing Configuration Cache
However, if you notice changes to the configuration values in .env file is not reflecting on your application, you may want to consider clearing the configuration cache with the following command:
Exit fullscreen mode
If you want to quickly reset your configuration cache after clearing them, you may instead run the following command:
Exit fullscreen mode
Caching your configuration will also help clear the current configuration cache. So it helps save your time without having to run both commands.
2. Route Caching
Caching your routes will drastically decrease the amount of time it takes to register all of your application’s routes. When you add a new route, you will have to clear your route cache for the new route to take effect.
Clearing Route Cache
The following command will clear all route cache in your application:
Exit fullscreen mode
To cache your routes again, simply run the following command:
Exit fullscreen mode
Again, running the above command alone is enough to clear your previous route cache and rebuild a new one.
3. Views Caching
Views are cached into compiled views to increase performance when a request is made. By default, Laravel will determine if the uncompiled view has been modified more recently than the compiled view, before deciding if it should recompile the view.
Clearing View Cache
However, if for some reason your views are not reflecting recent changes, you may run the following command to clear all compiled views cache:
Exit fullscreen mode
In addition, Laravel also provides an Artisan command to precompile all of the views utilized by your application. Similarly, the command also clears the view cache before recompiling a new set of views:
Exit fullscreen mode
4. Events Cache
If you are using Events in your Laravel application, it is recommended to cache your Events, as you likely do not want the framework to scan all of your listeners on every request.
Clearing Events Cache
When you want to clear your cached Events, you may run the following Artisan command:
Exit fullscreen mode
Likewise, caching your Events also clear any existing cache in the framework before a new cache is rebuilt:
Exit fullscreen mode
5. Application Cache
Using Laravel’s Cache is a great way to speed up frequently accessed data in your application. While developing your application involving cache, it is important to know how to flush all cache correctly to test if your cache is working properly.
Clearing Application Cache
To clear your application cache, you may run the following Artisan command:
Exit fullscreen mode
This will clear all the cache data in storage which are typically stored in /storage/framework/cache/data/ . The effect is similar to calling the Cache::flush(); Facade method via code.
❗️ This command will NOT clear any config, route, or view cache, which are stored in /bootstrap/cache/ directory.
6. Clearing All Cache
Laravel provides a handy Artisan command that helps clear ALL the above caches that we have covered above. It is a convenient way to reset all cache in your application, without having to run multiple commands introduced before.
To clear all Laravel’s cache, just run the following command:
Exit fullscreen mode
As you can read from the terminal feedback, all cache types that existed in your Laravel application will be cleared entirely, except Events cache.
❗️ The Compiled services and packages files removed! can be run individually via $ php artisan clear-compiled command. It is used to remove the compiled class file in the framework.
�� Bonus
If the above Laravel’s Artisan commands don’t seem to resolve the issue you are facing, you may need to look at other related environments in your project that may be causing it.
When building a Laravel project, it is common to employ the Composer Dependency Manager for PHP, as well as NPM for any JavaScript library that might be needed in your project. We just have to take note that both package managers are using some form of caching for performance improvements.
Clearing Composer Cache
Sometimes, a new package you just installed via Composer doesn’t appear to be working at all. Or a new project you just cloned from a repository doesn’t seem to be running correctly.
Such issues are usually caused by classmap error from a newly installed library class, or the cached version of a particular library does not match with the ones required by the project codebase you just cloned. In such a situation, you need to update the PHP autoloader by running the following command:
Exit fullscreen mode
As well as any of the following variations(they all achieve the same purpose of deleting all content from Composer’s cache directories):