A quick guide to configuring PHP on PhpStorm
![]()
JetBrains makes awesome software, once you learn how to use it it’s very powerful and makes for a great ally in the war against, uhh. Code?
The problem is, their documentation isn’t the best, and the forums online are more or less always answering a very specific question. This took me a little while to figure out when I was first setting up PhpStorm, so I’m sure someone else will come across this issue as well.
I won’t be walking you through the downloading and installation process because if you can’t figure that out, there’s not much I can teach you. I will start right after installation, when you come across something similar to this screen
From here you are going to click on “Create New Project” and you will be brought to this screen where you won’t continue any further
Once you’ve reached the screen above it is time to download a tool called XAMPP, which is a web server solution. This means that you can write code in PHP and open it up in your browser of choice with PhpStorm. So I want you to visit the XAMPP download page and select your OS and once again I can’t really teach you how to download things…
So you should see this page
Go through the installer, and accept all of the default settings, and once you get to the end, click run XAMPP Control Panel. This window will be brought up for you
If the installation was completed properly, you will hit start Apache, and start MySql. Don’t worry if your Control Panel looks a little bit different, as long as you can start Apache and MySql.
Your test server is officially running. Congratulations, you’re a real genius. If you try to run your code in PhpStorm, you’ll be met with a “Bad Gateway” error. This means you don’t have your PHP configured on PhpStorm, which means it has no clue what you’re saying. Computers need programs called interpreters to read code to them, and interpret what you’re trying to do into lower-level languages.
So now you need to point your PhpStorm to the php.exe file in your XAMPP folder, which if you listened to me and are on Windows, should be located at c:\XAMPP. If the XAMPP folder is not there, you need to find it and follow the rest of this tutorial with the proper path in mind.
We are going to bring up our PhpStorm again and click on the three dots next to the entry field “CLI Interpreter”
In the next window you will be navigating to xampp>php>php.exe and it will look something like this
First you will navigate to xampp under C:\
Then you will find PHP, and about halfway through that file is php.exe.
Click “OK” and then you will click apply on the remaining window and now you are able to run your PHP code on a localhost! Congratulations, you’re seriously brilliant.
If you got PHP up and running on your IDE, but realized you know nothing about dependencies in Web Development then check out this post about just that!
Настройка PHPStorm для работы с Laravel
Laravel — это замечательный фреймворк, который имеет широкий функционал, и много реализаций, облегчающих жизнь программисту. Однако, обратной стороной этого удобства является сложность в чтении кода для IDE. В результате чего, IDE не может проанализировать код должным образом, и построить полное автодополнение кода. Потому, для того, чтобы было удобно работать с Laravel в PHPStorm-е, его необходимо дополнительно настроить.
В этой статье будет рассмотрено:
Предварительная настройка IDE
В каждом новом проекте, который я начинаю в PHPStorm-е, начальные шаги одинаковые: выбор интерпретатора PHP, указание пути к composer-у, NodeJs и JavaScript
Выбор версии PHP и настройка пути к интерпретатору
Настройка версии PHP и интерпретатора находится на вкладке File | Settings | Languages & Frameworks | PHP 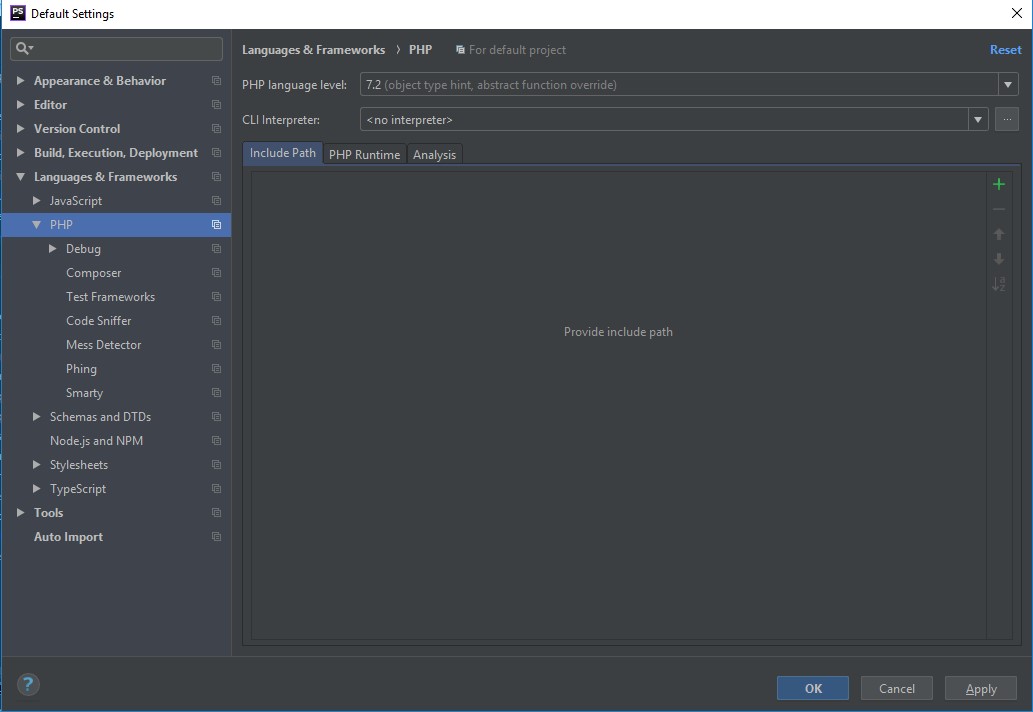
В открывшемся окне, будет доступно 2 изменяемые графы:
PHP Language Level — это версия PHP, по которой IDE будет проверять синтаксис вами написанного кода. И в случае несоответствия синтаксису выбранной версии, прямо в IDE вам будет подсвечена ошибка.
CLI interpriter — это путь к интерпретатору PHP.
Если вы ранее не добавляли интерпретаторы, то вам ничего не будет доступно, потому, сейчас его нужно добавить, нажав, справа от выбора интерпретатора, кнопку поиска (2) 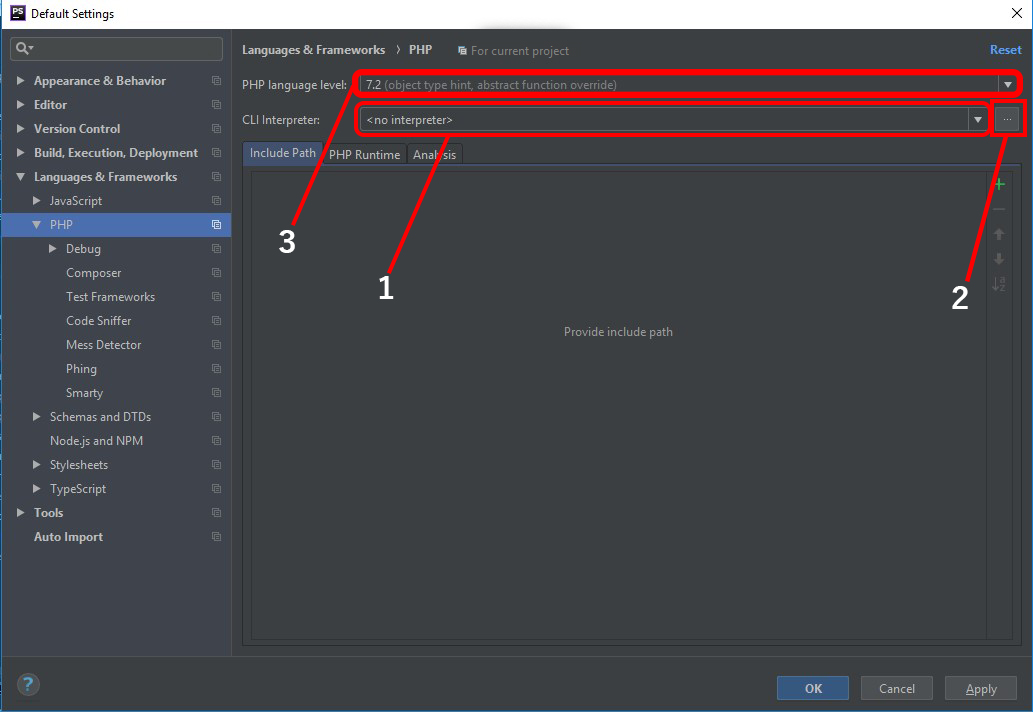
После нажатия по (2) кнопке, то появится меню: 
Нажав на (1) кнопку, будет предложено на выбор 2 варианта:
From Docker, Vagrant, VM, Remote — в случае, если вы хотите указать удалённый интерпретатор (Docker, Vagrant)
Local Path to Interpreter — чтобы указать локальную версию (как в моём случае)
А в PHP executable нужно прописать путь к php.
Я пользуюсь Laragon, потому мой путь выглядит PATH_TO_LARAGON\bin\php. \php.exe ,
В случае OpenServer, путь будет выглядеть примерно: PATH_TO_OS\modules\php\. \php.exe
Указание путь к composer
Путь к composer-у указывается на вкладке File | Settings | Languages & Frameworks | PHP | Composer
В этом меню нужно переключить опцию в composer.phar, и в этой графе (1) указать путь к исполняемому файлу composer. 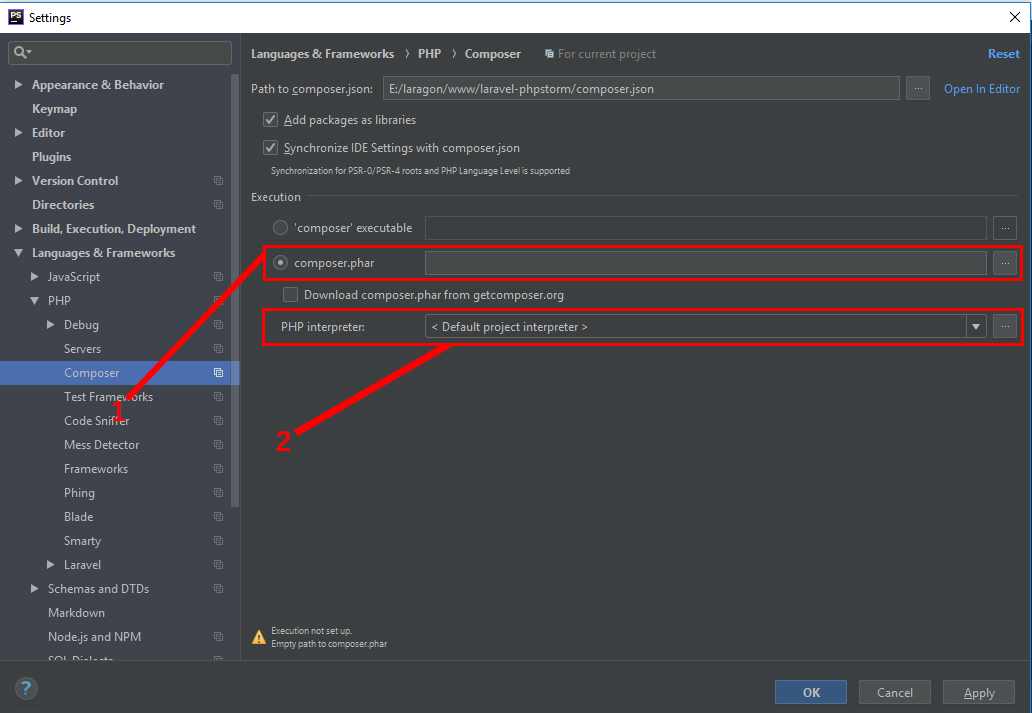
И выберите итерпретатор, созданный шагом ранее
У меня, путь к composer-у выглядит так: E:\laragon\bin\composer\composer.phar
NodeJs
NodeJs, его пакетный менеджер, NPM, будет хорошим помощником в подключении всех фронтенд-библиотек. Потому, во-первых, нужно указать путь к самому NodeJs, а во вторых, нужно настроить всё так, чтобы синтаксис Vue-шаблонов был понятен для самой IDE.
В меню File | Settings | Languages & Frameworks | Node.js and NPM, аналогично предыдущим пунктам, нужно указать путь к nodeJs (после его указания, автоматически должен подключиться NPM) 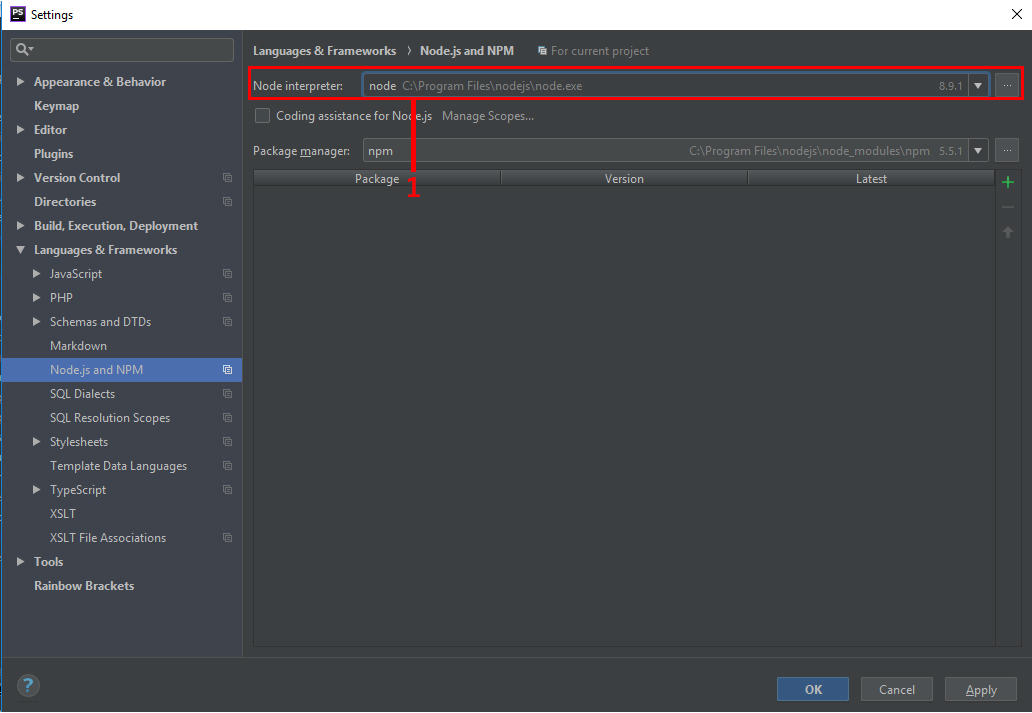
JavaScript
Ввиду того, что Vue использует новые ES6 синтаксис для написания шаблонов, то необходимо в самой IDE переключить на поддержку этого синтаксиса на вкладке File | Settings | Languages & Frameworks | JavaScript, выбрав ECMSScript 6 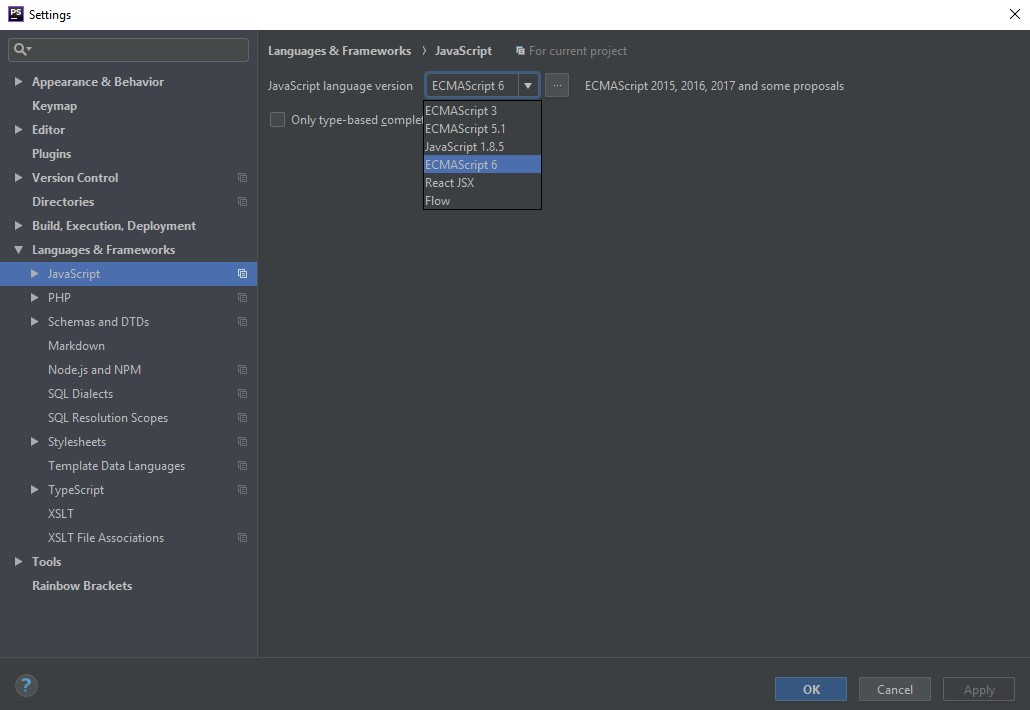
Настройка Laravel
Теперь, осталось провести некоторые настройки, относящиеся к Laravel.
Установка Laravel плагина
Теперь нужно установить Laravel-плагин в PHPStorm. Плагины устанавливаются на вкладке File | Settings | Plugins.
Для поиска плагина, в строку поиска нужно вписать laravel 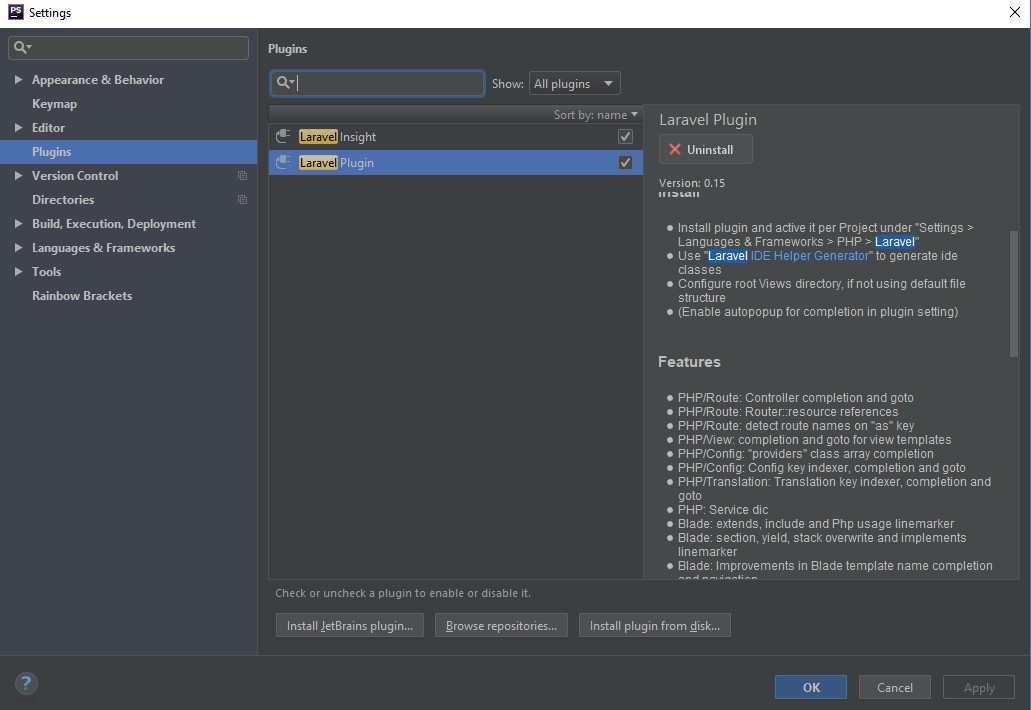
И выбрать интересующий нас Laravel Plugin, который добавляет автодополнение в маршрутах, видах, конфигах.
Когда он будет установлен, появится новая вкладка File | Settings | Languages & Frameworks | PHP | Laravel 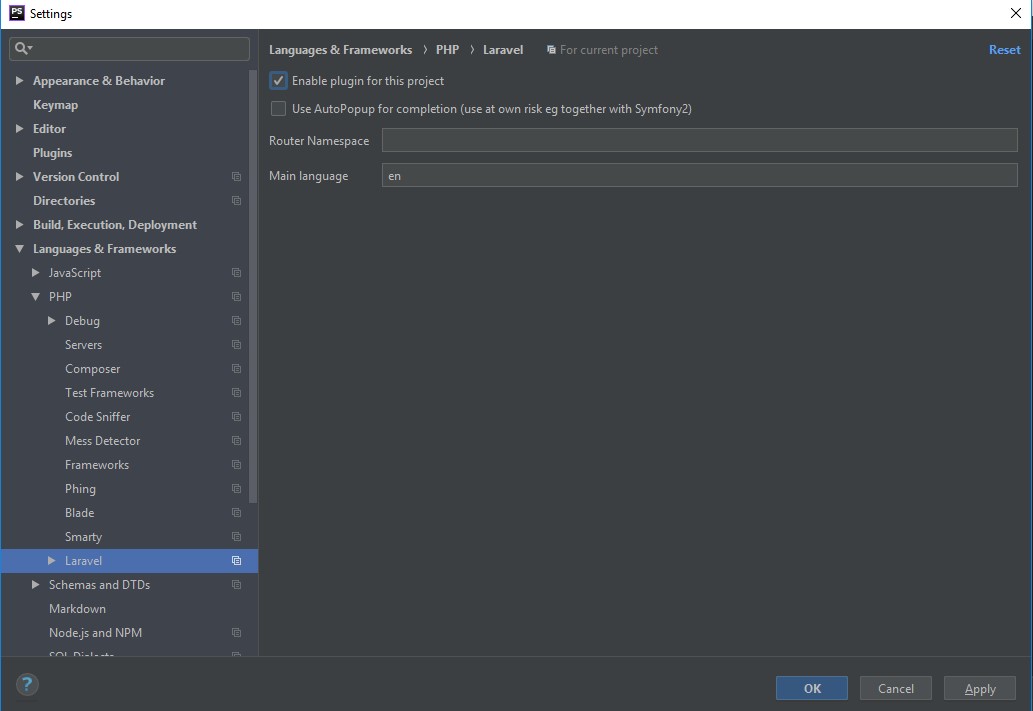
На которой, нужно поставить галочку на Enable plugin for this project
Настройка VueJs
Для VueJs, аналогично Laravel, так же существует свой отдельный плагин. Чтобы его установить, нужной на вкладке File | Settings | Plugins найти Vue и установить 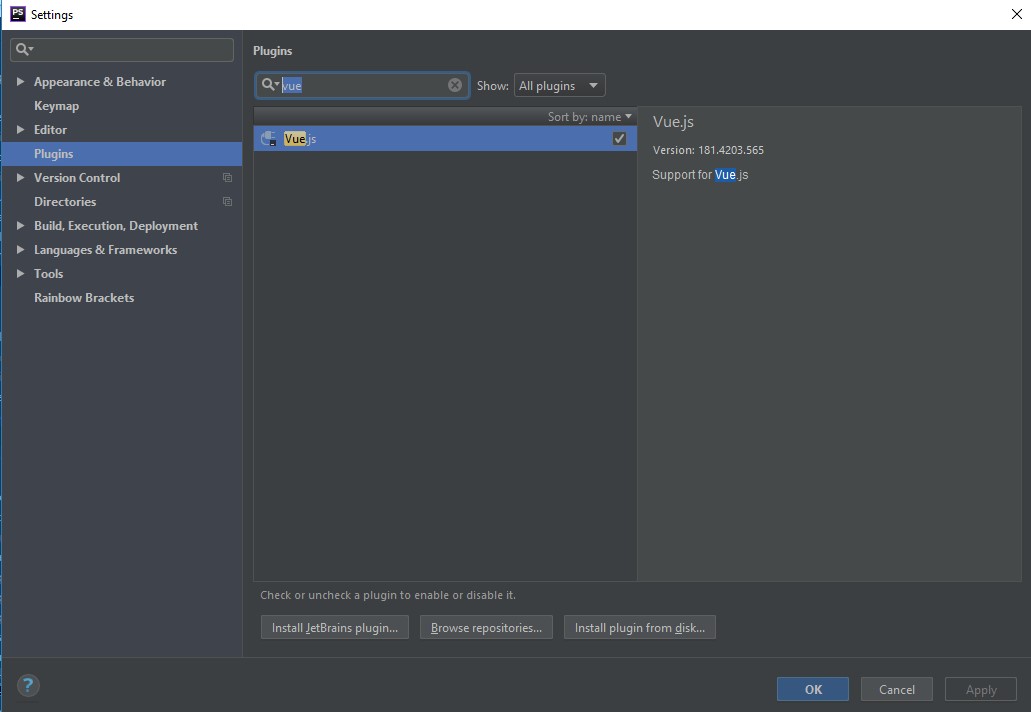
Подключение нужных библиотек, последние шаги настройки
Сейчас мы уже имеем проект, с которым можно работать. Однако, по-прежнему, нету автокомплита методов в маршрутах, миграциях, Eloquent, ввиду особенной структуры фреймворка. Для решения этой проблемы, нужно скачать библиотеку laravel ide-helper, которая сгенерирует дополнительные мета-файлы для IDE.
Установка IDE-helper
Для установки IDE-helper-а, воспользуемся composer-ом (Tools > Composer > Manage Dependencies)
И в строку поиска, введём: barryvdh/laravel-ide-helper 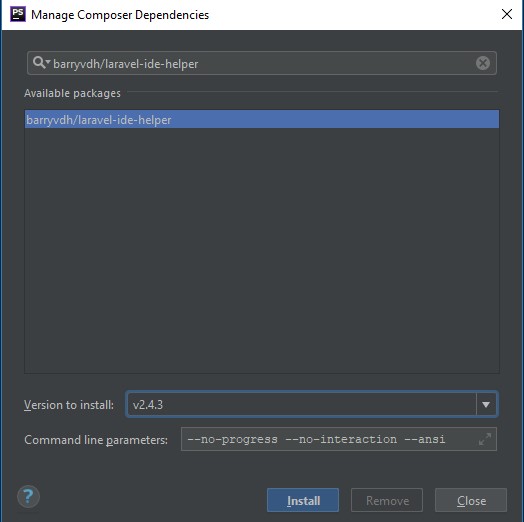
Установив эту библиотеку, нужно добавить в файл config/app.php, в массив providers: Barryvdh\LaravelIdeHelper\IdeHelperServiceProvider::class
На этом этапе, уже можно запустить ide-helper, и получить желаемый эффект автокомплита. Но, сделав так в данный момент, эта библиотека возьмёт дефолтные настройки, в которых отключена генерация Fluent-методов. Потому, прежде, скопируем конфиг ide-helper.php с папки vendor/barryvdh/laravel-ide-helper/config, в локальную папку config.
И уже в локальном файле, нужно изменить значение include_fluent на true .
Теперь достаточно выполнить команду artisan ide-helper:generate
После чего, появится новый файл _ide_helper.php , который PHPStorm успешно проанализирует, и мы получим желаемое автодополнение: 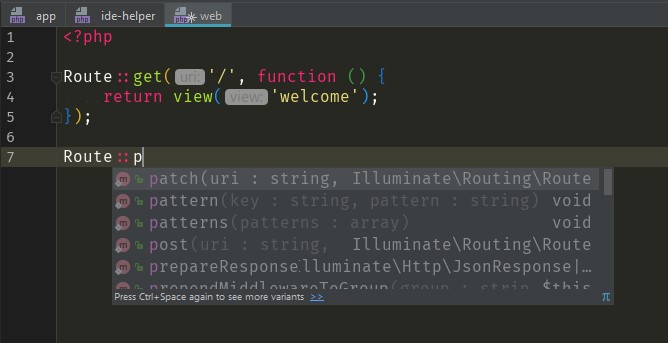
Автодополнение команд artisan
Сложно заполнить все команды artisan, а постоянно отвлекаться на поиск команд не продуктивно. Благо, в PHPStorm предусмотрена возможность созданий автодополнения команд (File | Settings | Tools | Command Line Tool Support).
Artisan — это команда, основана на консоле symfony, зная это, добавим команду: 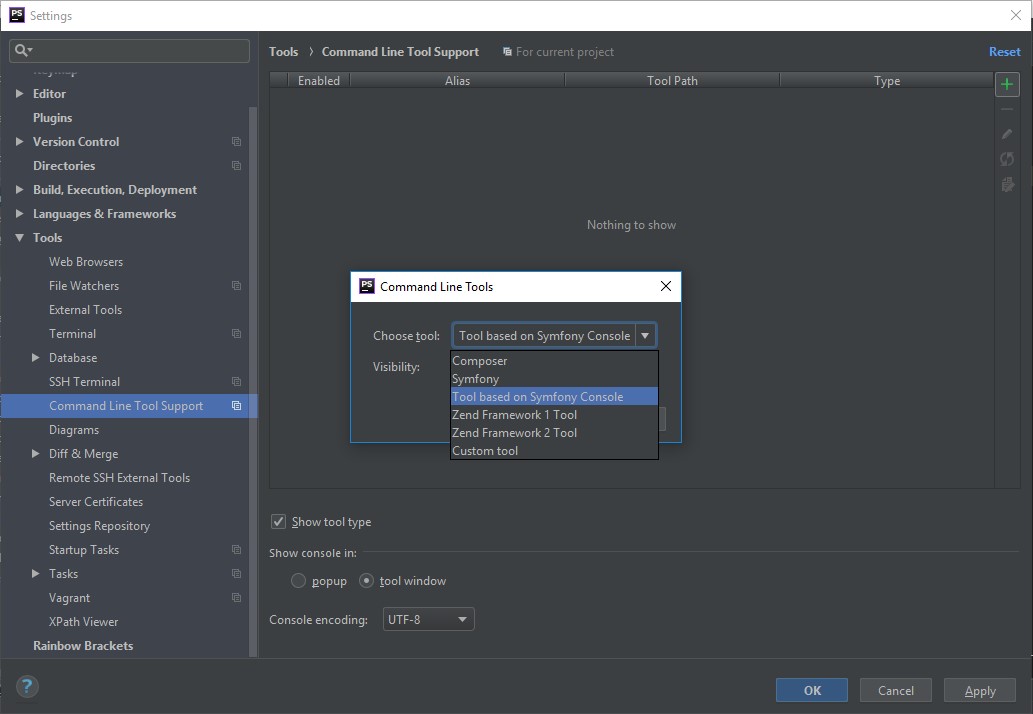
Откроется меню, в котором нужно указать:
alias — с какого имени начинаются команды (можно указать a , и вызывать a make:controller .
Path to PHP executable — наш ранее добавленный интерпретатору
Path To Script — путь к artisan-файлу проекта 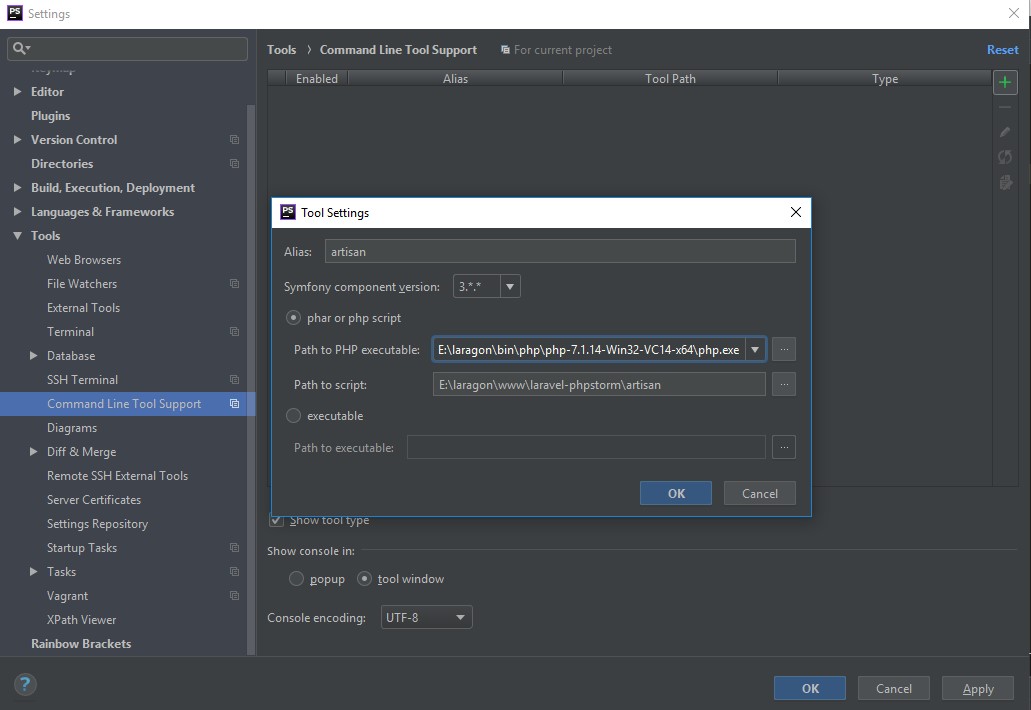
В результате, должны получить информацию о том, что команды добавлены: 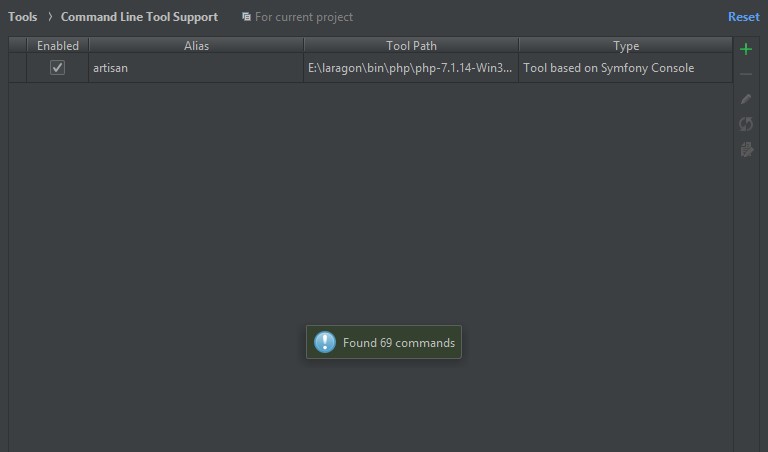
И сейчас, если открыть консоль: Tools > Run Commands 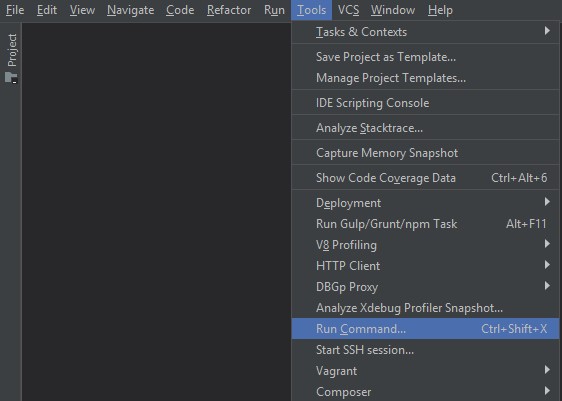
И все команды, которые начинаем с artisan будут подсвечены возможным дополнением 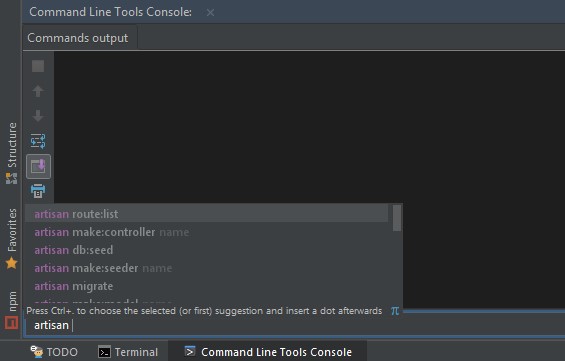
Резюме
Итого, в этой статье была рассмотрена настройка laravel в phpstorm, установка плагинов, так же было показано, как работать с Laravel IDE-helper, настраивать composer и включать автодополнение phpstorm artisan команд
А ещё, рекомендую просмотреть статью, в которой я показываю процесс установки и настройки крутой темы оформления Monokai для PHPStorm, которая тебе точно придётся по вкусе, дорогой разработчик.
Quick start guide
PhpStorm is an Integrated Development Environment for PHP developers built on top of the IntelliJ IDEA platform.
Supported languages
With PhpStorm, you can develop applications in PHP 5.3 , PHP 5.4 , PHP 5.5 , PHP 5.6 , PHP 7 , PHP 7.1 , PHP 7.2 , PHP 7.3 , PHP 7.4 , PHP 8.0 , PHP 8.1 , and PHP 8.2 . See Supported PHP versions for details. In addition, it fully supports HTML5, CSS, JavaScript, and XML: support for these languages is handled via plugins that are bundled in the IDE and are enabled by default. Support for other languages can be added via plugins: in the Settings dialog ( Ctrl+Alt+S ), go to Plugins to find out more or set them up during the first IDE launch.
Supported platforms
PhpStorm is a cross-platform IDE that works on Windows , macOS , and Linux .
System requirements
2 GB of free RAM
8 GB of total system RAM
Multi-core CPU. PhpStorm supports multithreading for different operations and processes making it faster the more CPU cores it can use.
SSD drive with at least 5 GB of free space
Officially released 64-bit versions of the following:
Microsoft Windows 10 1809 or later
Windows Server 2019 or later
macOS 10.15 or later
Any Linux distribution that supports Gnome, KDE , or Unity DE.
PhpStorm is not available for the Linux distributions that do not include GLIBC 2.27 or later.
Pre-release versions are not supported.
Latest 64-bit version of Windows, macOS, or Linux (for example, Debian, Ubuntu, or RHEL)
You do not need to install Java to run PhpStorm because JetBrains Runtime is bundled with the IDE (based on JRE 17).
Configuring PHP environment
PhpStorm is a smart IDE, but first you need to inform it which PHP environment we use, where PHP components are stored, and how they are configured.
If you work with a local Web server, follow the Install an AMP package procedure to prepare your environment.
If you work in a Docker container , see Docker Support in PhpStorm.
In this Quick Start Guide , we will set up a pre-configured project in a Docker environment.
Before you start
Install Docker for your operating system.
In PhpStorm, in the Settings dialog ( Ctrl+Alt+S ), go to Build, Execution, Deployment | Docker and select how to connect to the Docker daemon.
Depending on your operating system, do the following:
Select TCP socket .
Set Engine API URL to tcp://localhost:2375 .
In the General section of Docker for Windows settings, enable Expose daemon on tcp://localhost:2375 without TLS .
Leave the Certificates folder field empty.
If you are using Docker Toolbox, use the following configuration options instead:
Set Engine API URL to https://192.168.99.100:2376
Set Certificates folder to <your_home_directory>\.docker\machine\machines\default .
Select Docker for Mac .
Select Unix socket .
Step 1: Open a project in PhpStorm
Everything you do in PhpStorm is done within the context of a project. It serves as a basis for coding assistance, bulk refactoring, coding style consistency, and so on.
In this Quick Start Guide , we provide a workshop project that already contains a docker-compose.yml file with the pre-configured environment. The project is available on GitHub at https://github.com/JetBrains/phpstorm-workshop.
Start the Workshop project in PhpStorm
On the PhpStorm Welcome screen, click New Project .
Select PhpStorm Workshop Project from the list on the left, provide the project location in the Location field, and click Create .
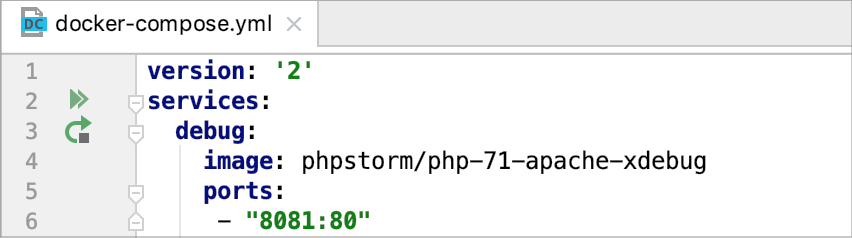
Open docker-compose.yml in the editor and update the XDEBUG_CONFIG variable with the value depending on your operating system. This is necessary for Web Debugging.
Use the host.docker.internal value, which refers to the remote host, that is, the machine Docker is running on. It will automatically resolve to the internal address of the host, letting you connect to it from the container.
The corresponding part of the docker-compose.yml file should look as follows:
Use your local machine’s hostname. To obtain it, execute the hostname command in Terminal.
The corresponding part of the docker-compose.yml file should look as follows:
In the same docker-compose.yml file, uncomment the appropriate line for the sftp service depending on your operating system. This is necessary for deployment to work correctly.
Click in the editor gutter to start all required Docker containers.
Alternatively, open the built-in PhpStorm Terminal ( Alt+F12 ) and execute the docker-compose up command.
Step 2: Explore the user interface
The main PhpStorm window is divided into several logical areas:
Menus and toolbars that help us execute various commands.
Navigation bar for navigating through the project.
Status bar with various information about the entire PhpStorm, the current project or a file in the editor, warnings, and error messages.
The Editor where you actually write your code. It has tabs for easy navigation between opened files.
Numerous Tool Windows that perform different functions: help you explore and navigate through the project and file structures, view search and inspection results, run, debug, and test applications, work in interactive consoles, and more.
Step 3: Code with smart assistance
PhpStorm takes care of the routine so that you can focus on the important. Use numerous PhpStorm coding capabilities to create error-free applications without wasting precious time. In the base project, you can interactively try these features on a number of PHP files with code examples and guidelines.
Code completion
Code completion is a great time-saver regardless of the type of the file you’re working with. There are two types of code completion in PhpStorm: basic and type-matching.
Basic completion Ctrl+Space shows the code completion options for the current context and displays the members of the current type in bold:
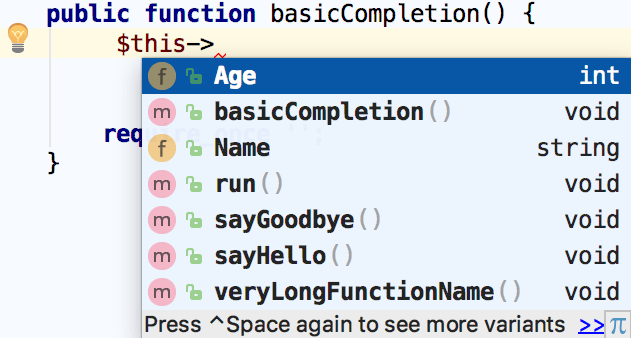
To have more variants shown, press Ctrl+Space again.
To try basic code completion , open workshop/02_Editing/01_Completion/1.1_Basic_Completion.php in your project and follow the instructions in the comments.
Smart type-matching completion Ctrl+Shift+Space analyzes the context you’re currently working in and offers more accurate suggestions based on that analysis filtering the list of functions and variables to match the expression type.
To try smart code completion , open workshop/02_Editing/01_Completion/1.3_Type_hinting.php in your project and follow the instructions in the comments.
Intention actions
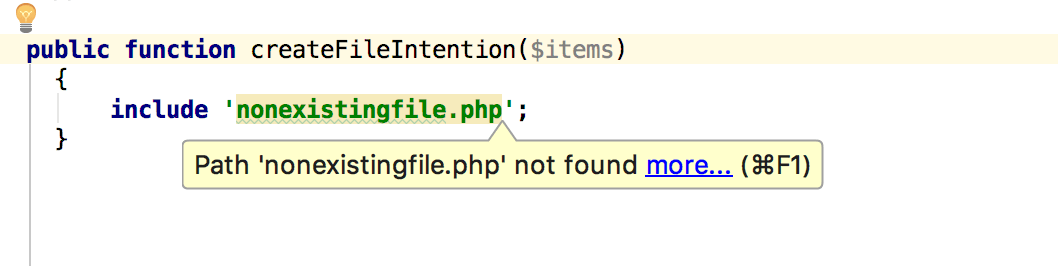
PhpStorm keeps an eye on what you are currently doing and makes smart suggestions, called intention actions, to save more of your time. Intention actions let you apply automatic changes to the code that is correct (in contrast to code inspections that provide quick-fixes for code that may be incorrect ).
Your code references a file that does not exist? Not a problem with PhpStorm. Press Alt+Enter and choose Create file <filename> :
To view the full list of available intention actions, in the Settings dialog ( Ctrl+Alt+S ) go to Editor | Intentions .
To try various intention actions , open workshop/02_Editing/05_Intentions/5.1_Intentions.php in your project and follow the instructions in the comments.
Step 4: Keep your code neat
PhpStorm monitors your code and tries to keep it accurate and clean. It detects potential errors and problems and suggests quick-fixes for them.
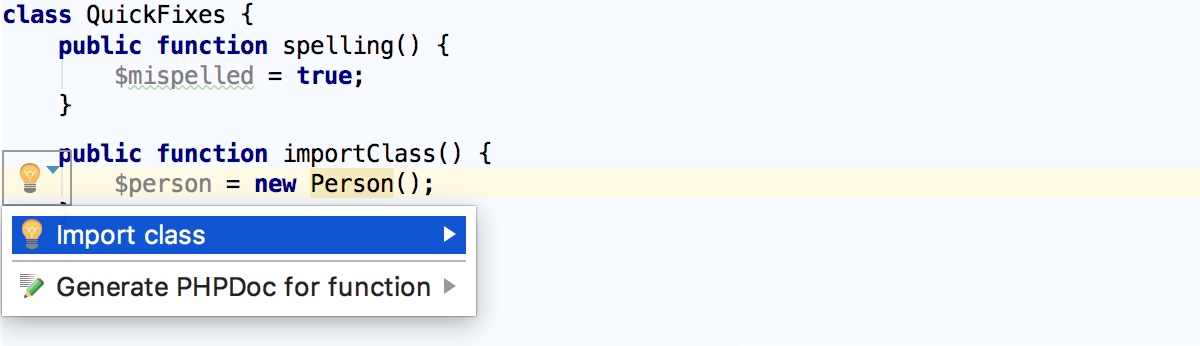
Every time PhpStorm finds unused code, an endless loop, hidden upper scope, an assignment operator = in a conditional expression, and many other things that probably require your attention, you’ll see a light bulb. Click it, or press Alt+Enter , to apply a fix.
You forgot a use statement?
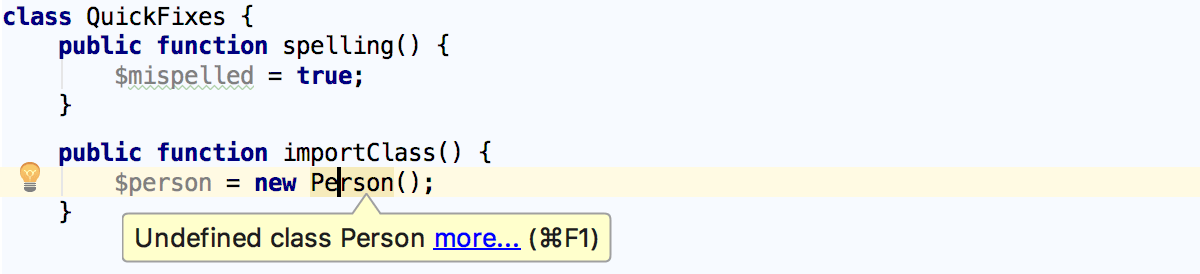
Press Alt+Enter and click Import class :
In the list, click the class to import:
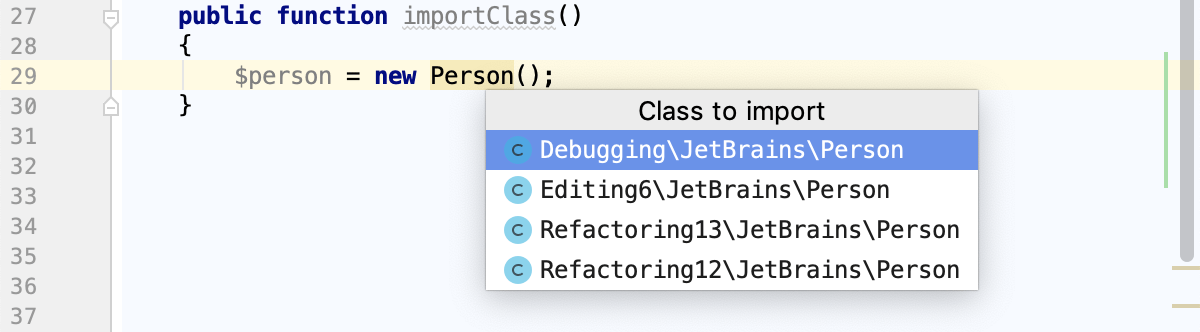
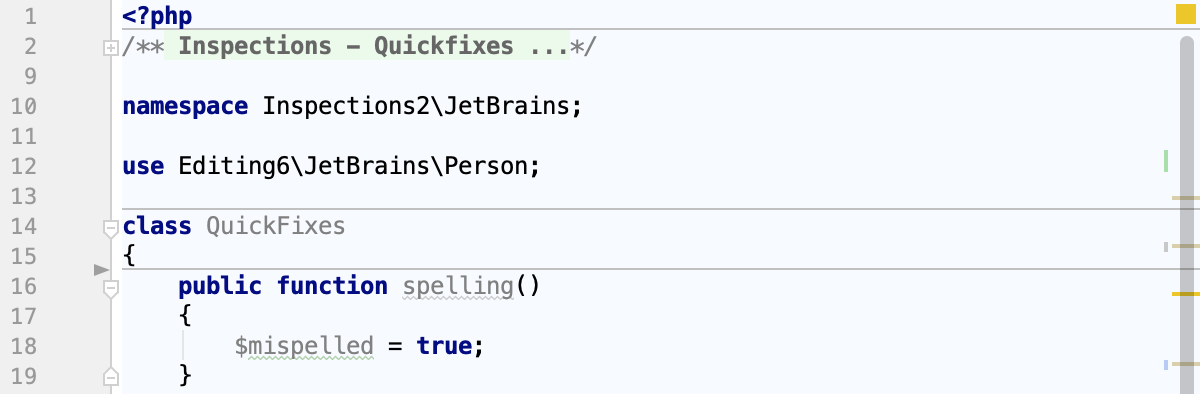
PhpStorm imports the selected class and adds a use statement:
Try more live examples from workshop/03_Inspections/02_Quick_Fixes.php .
To view the full list of available inspections, in the Settings dialog ( Ctrl+Alt+S ) go to Editor | Inspections . You can disable some of them, or enable others, plus you can adjust the severity of each inspection. You decide whether it should be considered an error or just a warning.
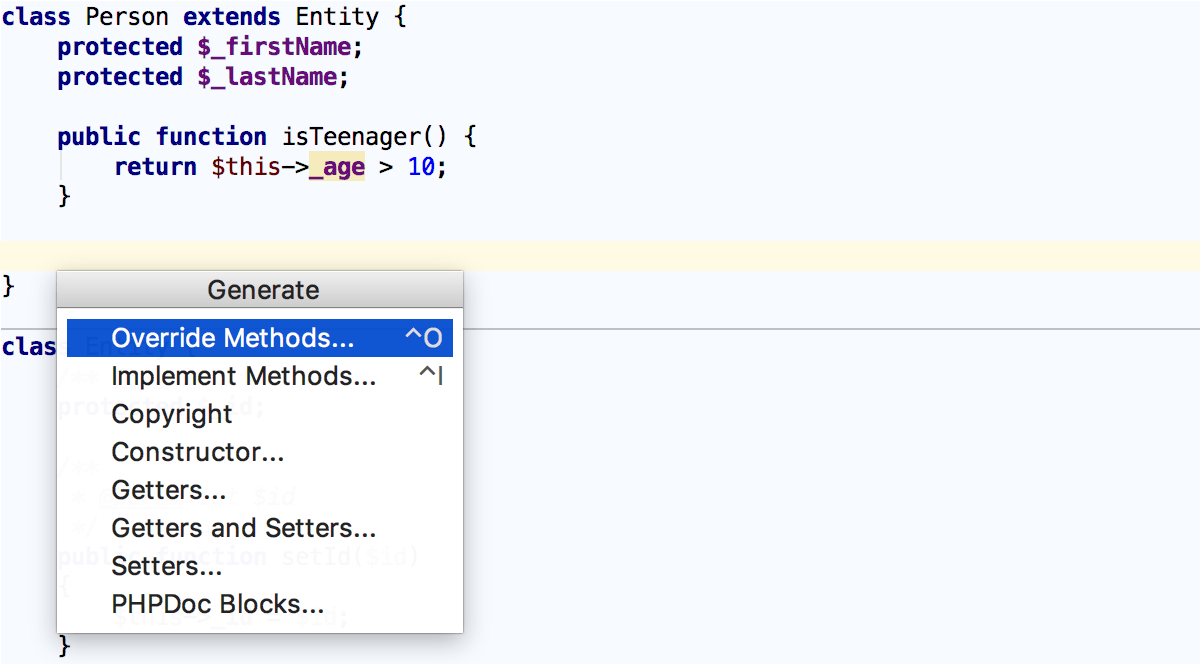
Step 5: Generate some code
Writing code can be a lot easier and faster with the code generation options available in PhpStorm. The Code | Generate menu (or just Alt+Insert ) will help you with generating constructors, getters/setters, PHPDoc comments as well as suggest overriding/implementing some methods Ctrl+O / Ctrl+I . Try more live examples in workshop/02_Editing/06_Generate_code/6.1_Generate_Code.php .
Use live templates (choose Code | Insert Live Template or press Ctrl+J ) to produce entire code constructs. To view the list of available ready-to-use live templates, in the Settings dialog ( Ctrl+Alt+S ) go to Editor | Live templates .
If you see that you need something important for your development, extend this set of templates with your own ones. Try live examples from workshop/04_Live_Templates/01_Code_Expansion/1.1_Code_Expansion.php and workshop/04_Live_Templates/02_Creating_Live_Templates .
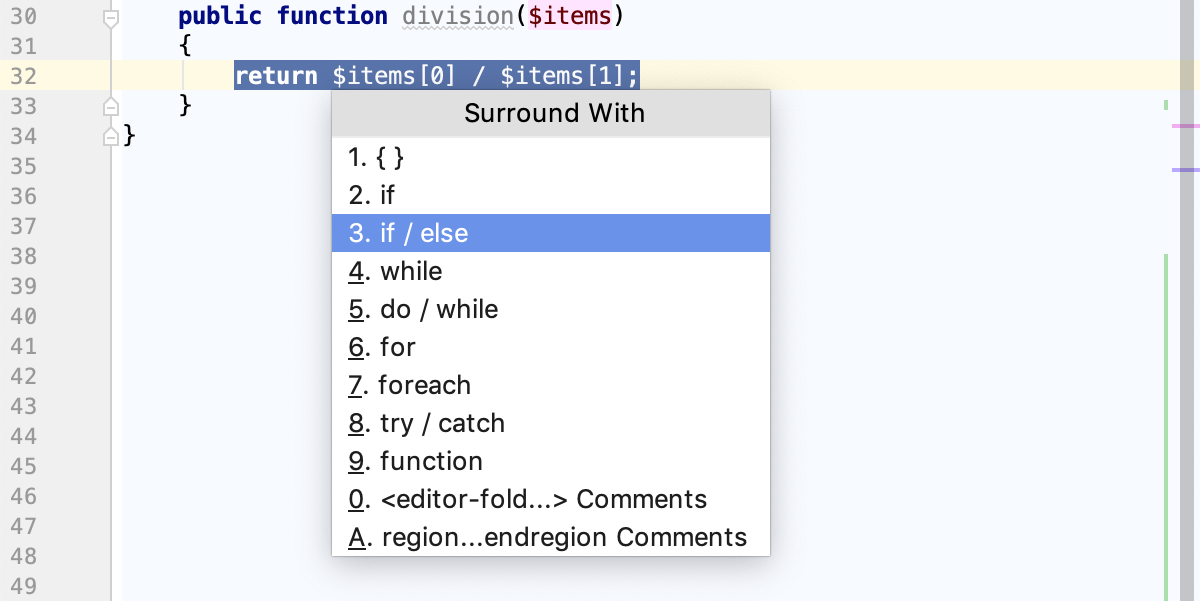
Also, consider surrounding your code with complete constructs. Choose Code | Surround With or press Ctrl+Alt+T , then choose the required statement from the popup menu. Try more live examples in workshop/04_Live_Templates/03_Surround_Templates/3.1_Simple_template.php .
Step 6: Find your way through
When your project is big, or when you have to work with the code written by someone else, it’s vital to be able to quickly find what you are looking for and dig into the code. This is why PhpStorm comes with a set of navigation features that will help you find your way through code.
Basic search
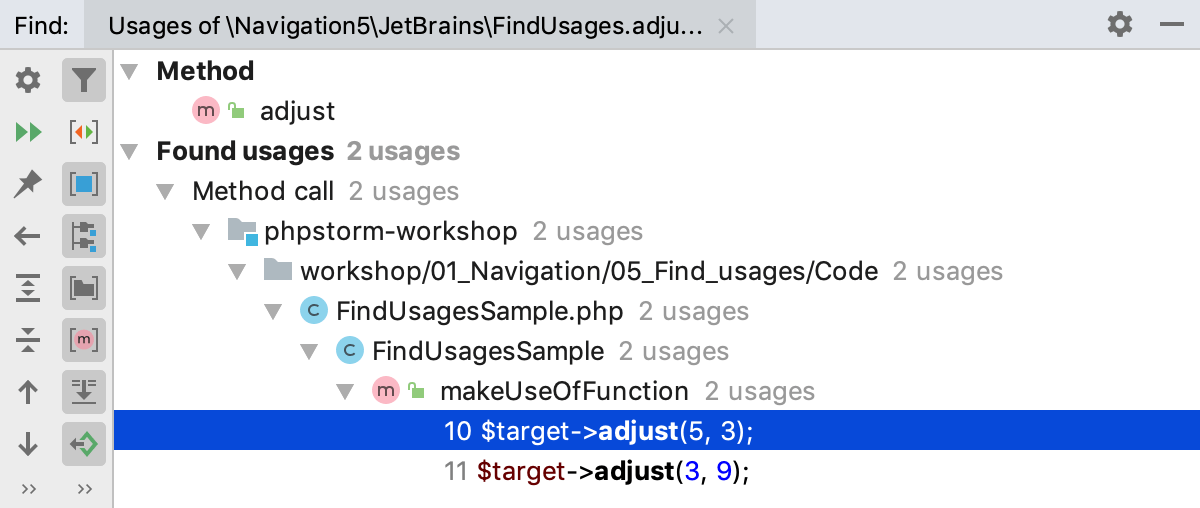
To find where a particular symbol is used in your project, PhpStorm suggests full-scale search via Find Usages Alt+F7 :
You can also search only in the current file Ctrl+F , or within a directory, any arbitrary scope, or the entire project Ctrl+Shift+F .
To try basic search , open workshop/01_Navigation/05_Find_usages/5.2_Find_Usages.php or workshop/01_Navigation/05_Find_usages/5.1_Highlight_Usages_in_File.php in your project and follow the instructions in the comments.
Project navigation
You can tell a lot just looking at your File Structure, with its imports or call hierarchies, and possibly use it to navigate through your code with the help of powerful navigation actions.
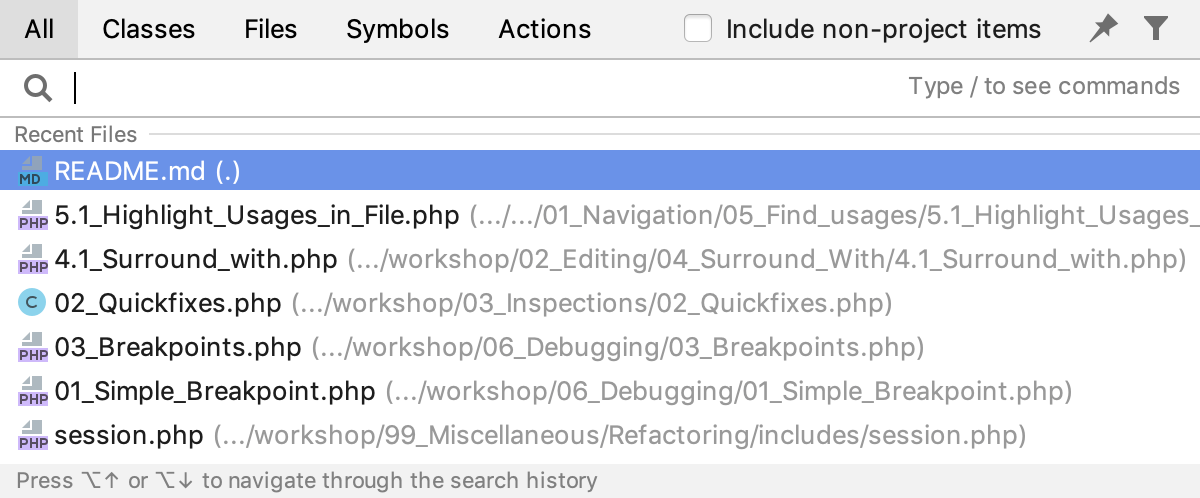
Search Everywhere lets you search for classes, file, symbols and menu actions all at once as well as navigate to them. To launch Search Everywhere , click the magnifying glass icon ![]() in the upper-right corner of the PhpStorm window or press Shift twice. If you do not specify any search pattern, PhpStorm shows a list of recent files where you can navigate to the relevant item by clicking it:
in the upper-right corner of the PhpStorm window or press Shift twice. If you do not specify any search pattern, PhpStorm shows a list of recent files where you can navigate to the relevant item by clicking it:
To search for something specific, type a search pattern. Note that besides symbols, Search Everywhere can find actions:

In the Search Everywhere mode, PhpStorm even accepts CamelHumps and recognizes middle matches.
To try various ways to use Search Everywhere , open workshop/01_Navigation/01_Navigate_to_something_you_know/1.6_Search_everywhere.md in your project and follow the instructions.
Of course navigation to a Class Ctrl+N , a File Ctrl+Shift+N , or a Symbol Ctrl+Alt+Shift+N by its name is also at your disposal, see Searching Everywhere.
Go To Declaration ( Ctrl+B , Ctrl+Click ) brings you to the location where a particular symbol is first declared. This type of navigation works from any place in the source code, even from another class or comment. To try navigating through Go to Declaration , open workshop/01_Navigation/02_Navigate_to_Declaration/2.1_Go_to_declaration.php in your project and follow the instructions in the comments.
Go to Implementation Ctrl+Alt+B brings you to the implementation of a particular class. If there are several implementations, PhpStorm shows them in a list where you can select the relevant one to navigate to. To try navigating through Go to Implementation , open workshop/01_Navigation/04_Navigate_class_hierarchies/4.1_Go_to_Implementation.php in your project and follow the instructions in the comments.
Navigate through the timeline
PhpStorm automatically keeps track of the changes you make to the source code, the results of refactoring, and so on in the Local History. Contrary to traditional Version Control Systems, Local History is always enabled. To view it for a file or a folder, choose File | Local History | Show History from the main menu. Here you can review the changes, revert them (), or create a patch ():
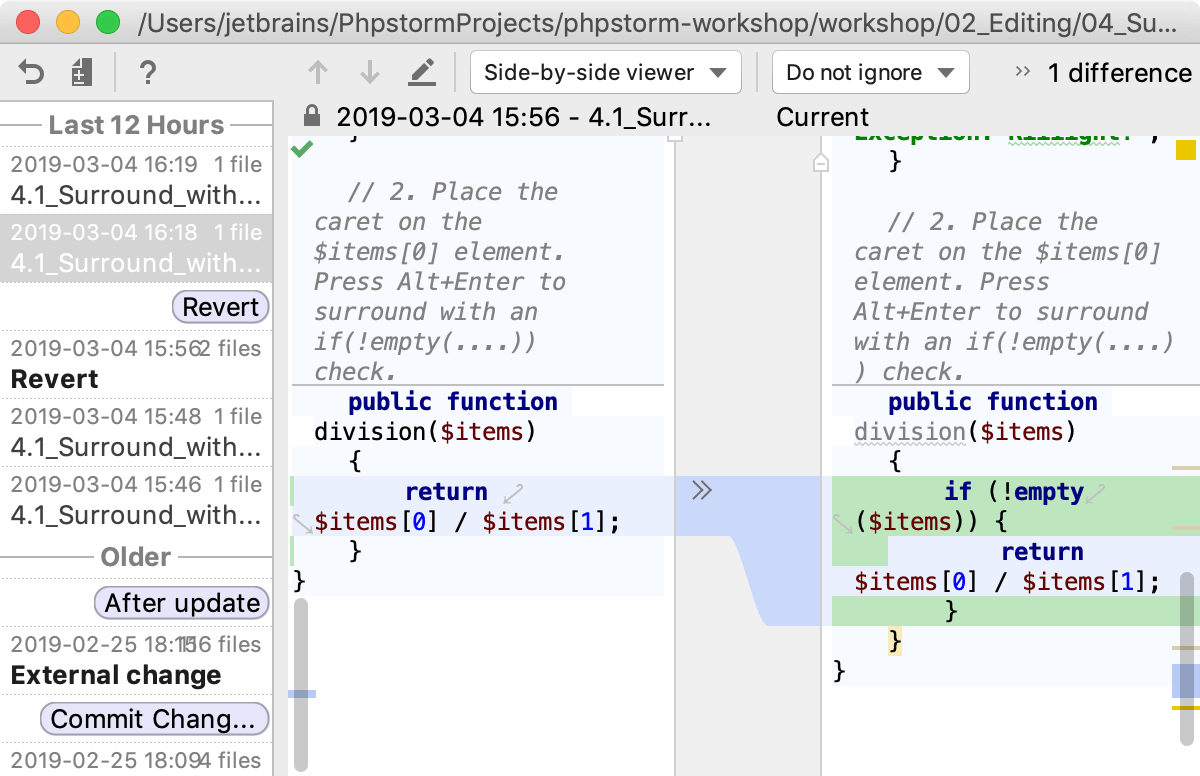
To try using Local History yourself, open workshop/09_Version_Control/07_Local_History.php in your project and follow the instructions in the comments.
Step 7: Debug your application
Does your application do exactly what it is intended to? If it does not, you will have to do some debugging to find out what causes the problem. Luckily, our sample project already has Xdebug installed and configured.
Configure the PHP interpreter
In our project, the Docker environment already contains a PHP interpreter, and you only need to tell PhpStorm where it is located.
In the Settings dialog ( Ctrl+Alt+S ), go to the PHP page.
Select PHP 7.1 with Xdebug from the CLI Interpreter list.
Set breakpoints
Debugging starts with placing breakpoints at which program execution will be suspended, so you can explore program data. Just click the gutter of the line where you want the breakpoint to appear:

To play with breakpoints yourself, open workshop/06_Debugging/03_Breakpoints.php in your project and follow the instructions in the comments.
Start debugging
In the Project tool window, select workshop/06_Debugging/03_Breakpoints.php and choose Debug | 03_Breakpoints.php from the context menu:
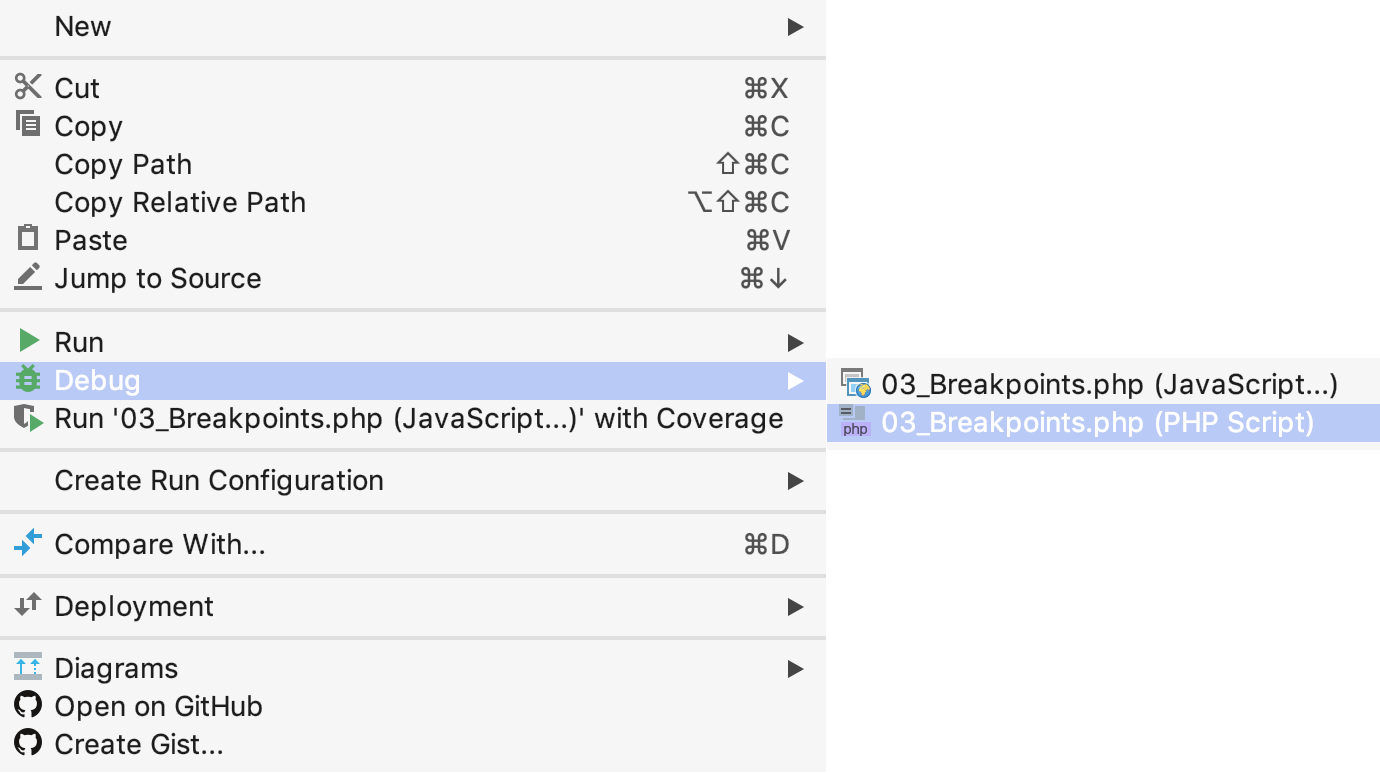
PhpStorm starts a debugging session and opens the Debug tool window where you can step through the suspended program, view variable values, evaluate expressions, and much more. Try more live examples from workshop/06_Debugging/05_Debug_Tool_Window.php .
See Zero-configuration debugging for alternative debugging scenarios.
Step 8: Test your code
PhpStorm integrates with the most popular PHP test frameworks: such as PHPUnit, Behat, PHPSpec, and Codeception.
Write your tests
Navigate to the class to test and press Ctrl+Shift+T . From the popup list, choose Create New Test… :

In the dialog that opens, all the fields are filled in so just click OK . PhpStorm generates a test class <class_to_test>Test and opens it in the editor. Write your tests as required.
To try writing tests yourself with PhpStorm coding assistance, open workshop/08_Testing/01_Writing_Tests.php and follow the instructions in the comments.
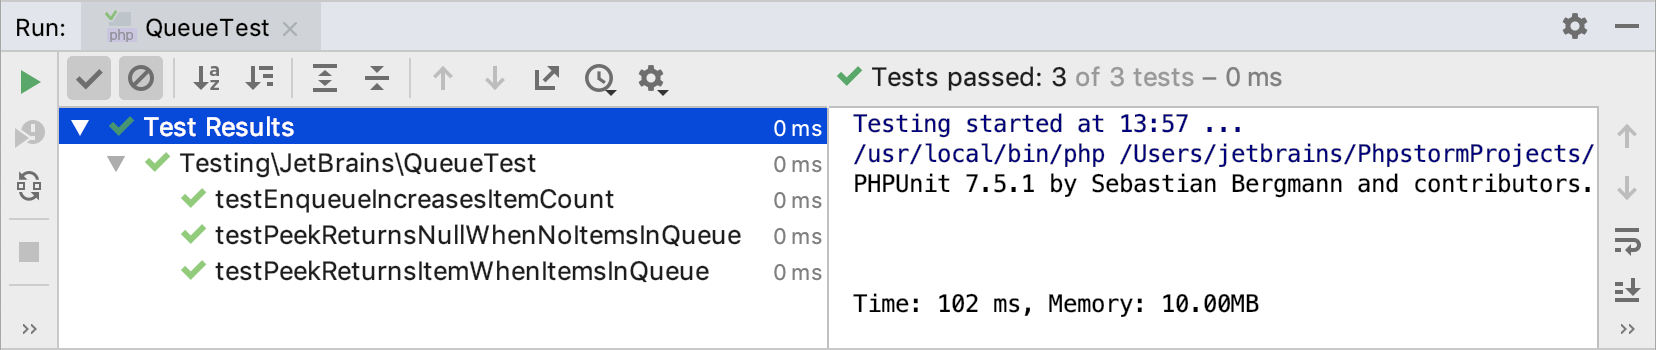
Launch the test
Open the file with your tests in the editor or click it in the Project tool window and choose Run <class_to_test>Test . This launches the PHPUnit run configuration that PhpStorm has generated for you automatically. You can also create a run configuration ( Run | Edit Configurations ) of the Behat , PHPSpec , or Codeception type, select it from the list on the toolbar, and then click . PhpStorm shows the results in the Test Runner tab of the Run tool window.
Step 9: Keep your source code under Version Control
If you are keeping your source code under version control, you will be glad to know that PhpStorm integrates with many popular version control systems: Git (or GitHub), Mercurial, Perforce, and Subversion. To specify credentials and any settings specific to a particular VCS, in the Settings dialog ( Ctrl+Alt+S ) go to Version Control .
The Git menu will give you a clue about what commands are available. For example, you can see the changes you’ve made, commit them, create changelists and much more from the Git popup view ( Git | Show Git Log or Alt+9 ).
Step 10: That’s it! Go ahead and develop with pleasure!
We hope this brief overview of essential PhpStorm features will give you a quick start. There are many important features that make a developer’s life easier and more fun, and their source code neater and cleaner. Take these first few steps now, and then dig deeper when you feel the time is right. Enjoy PhpStorm!
With any questions visit our PhpStorm Discussion Forum, twitter, and blog, where you can find news, updates, and useful tips and tricks. Also, don’t hesitate to report any problems to our support team) or the PhpStorm issue tracker.
Как запустить php в phpstorm

На данный момент, PhpStorm – одна из лучших IDE для разработки на языке PHP, которая предоставляет множество возможностей для разработчика, такие как запуск PHP-скриптов, благодаря возможности подключения внешнего интерпретатора PHP и отладку через расширение Xdebug.
В этой статье мы рассмотрим возможность подключения интерпретатора PHP, отладчика Xdebug к PhpStorm и использование встроенного в IDE web-сервера.
Начнем с установки отладчика Xdebug в PHP.
Установка Xdebug
Первым делом скачаем и установим сам интерпретатор PHP по ссылке: http://php.net/downloads.php
Далее нужно произвести начальную настройку PHP и прописать в переменную окружения PATH путь к интерпретатору. Чтобы не повторяться, весь необходимый порядок действий мной описан в этой статье: Установка Composer и снятие ограничения количества обращений к GitHub
Теперь можно перейти к установке отладчика Xdebug, для которого существует специальный помощник, значительно упрощающий процедуру установки. Для его использования перейдем по ссылке: https://xdebug.org/wizard.php
На этой странице, необходимо ввести в поле ввода информацию об установленном PHP-интерпретаторе, которая генерируется с помощью PHP-функции phpinfo(). Вводить нужно весь скопированный текст со страницы.
Или, введя в консоль команду php -i, которая генерирует информацию о PHP.
Копируем полученную информацию, нажимаем кнопку Analyse my phpinfo() output и получаем инструкцию по установке Xdebug.
В зависимости от вашей версии PHP и пути установки инструкция может отличаться от моей:
- Скачиваем библиотеку Xdebug для PHP версии 5.6.19 по ссылке: php_xdebug-2.4.0-5.6-vc11-nts.dll
- Перемещаем её в папку C:\php\ext
- В файл C:\php\php.ini находим секцию Dynamic Extensions и добавляем следующую строку:
Подключение интерпретатора PHP к PhpStorm
Теперь перейдем в PhpStorm и откроем настройки комбинацией клавиш Ctrl+Alt+S.
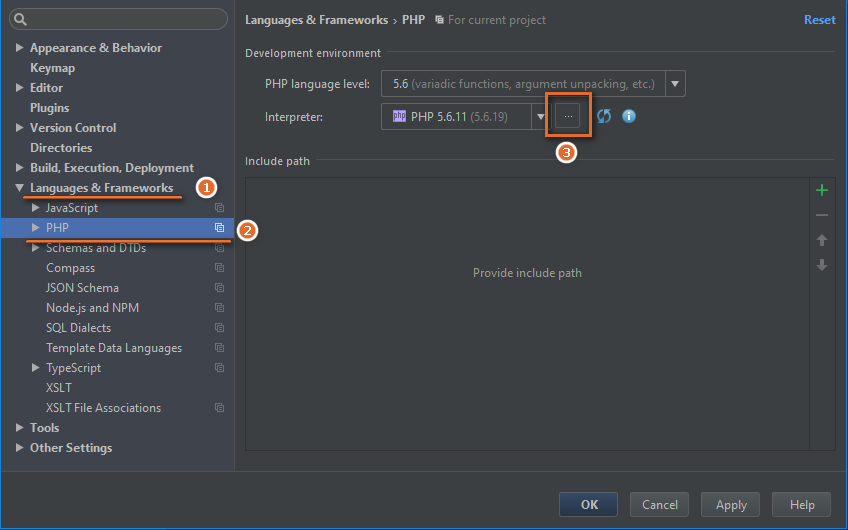
Далее, в секции Languages & Frameworks выберем пункт PHP. В этой секции необходимо назначить интерпретатор для IDE в пункте Interpreter нажав на кнопку …
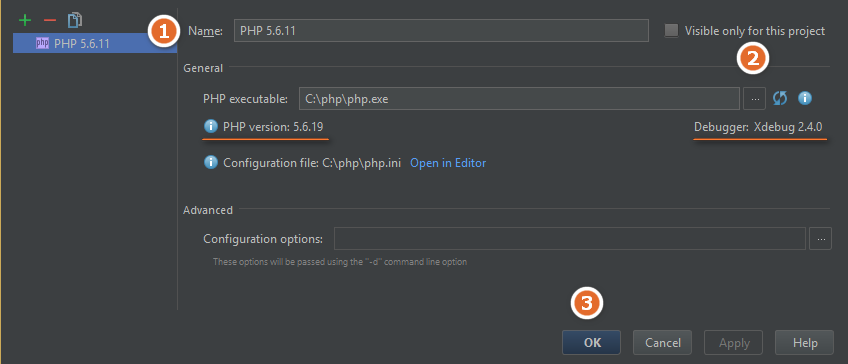
В открывшемся окне, в поле Name вводим любое имя для удобства дальнейшей идентификации, например: PHP 5.6.11.
В поле PHP executable указываем путь до интерпретатора, например: C:\php\php.exe. Обратите внимание на появившуюся версию PHP и дебагера, что свидетельствует о правильности установки.
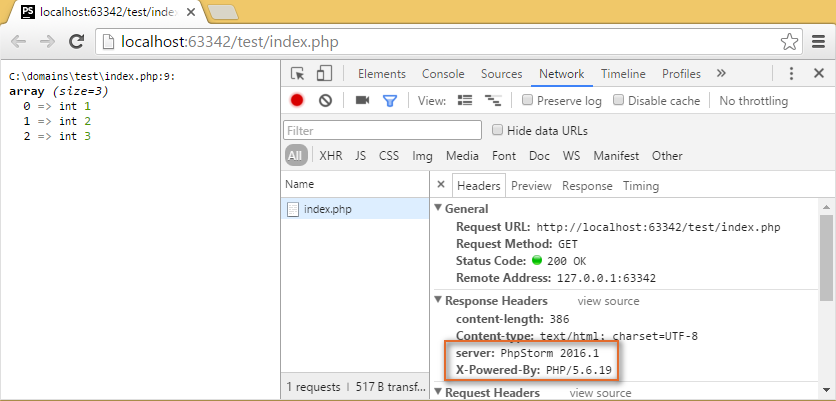
Чтобы убедиться в том, что правильно отрабатывает подключенный интерпретатор PHP, создадим в PhpStorm новый проект, добавим к нему файл index.php и запишем в этот файл, например, функцию var_dump([ 1, 2, 3 ]) с переданным в неё массивом.
Нажав правой кнопкой мыши на этом файле, выберем Open in Browser -> Default.
На странице мы видим характерный вывод var_dump(), который генерируется с помощью Xdebug. И, если посмотреть на заголовки ответа через консоль разработчика, то мы увидим, что всё работает верно:
Начальная настройка Xdebug и установка его под линукс описана в статье Установка модуля Xdebug для PHP под Ubuntu Linux
Работа с отладчиком Xdebug в PhpStorm
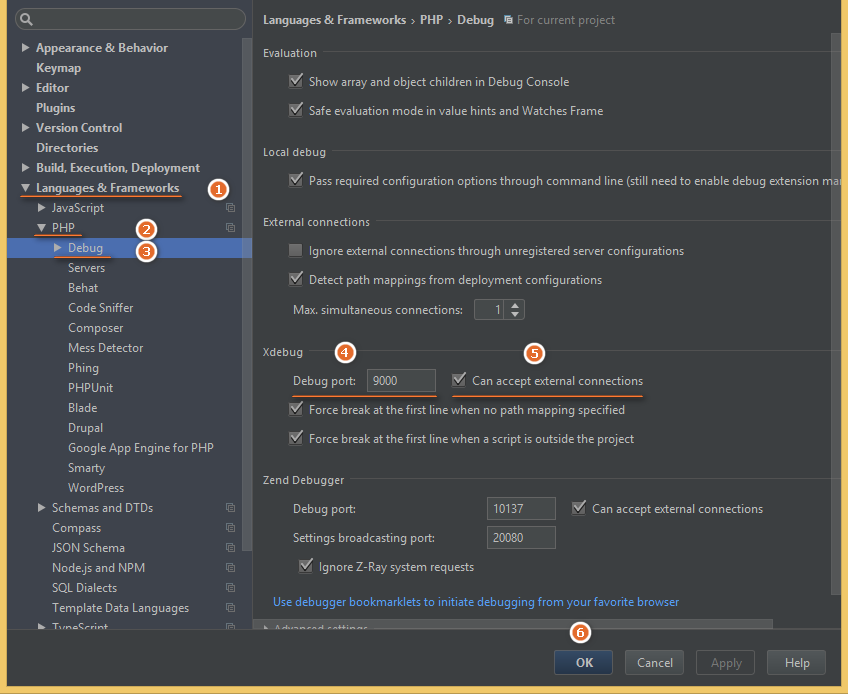
Прежде чем приступит к отладке PHP-скриптов с помощью Xdebug произведем необходимую настройку в файле php.ini. В секции Dynamic Extensions после подключения расширения Xdebug добавим следующие настройки:
Теперь зайдем в PhpStorm и откроем настройки. Перейдем в Languages & Frameworks -> PHP -> Debug. В секции Xdebug убедимся, что установлены следующие настройки:
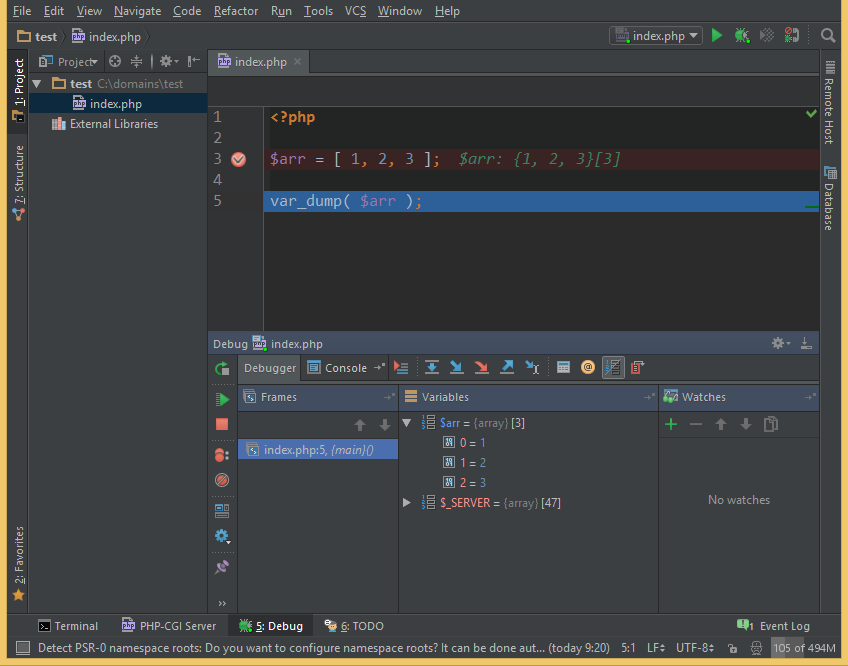
Чтобы проверить, что все действия были проведены верно, добавим в уже имеющийся в проекте файл index.php следующий код:
И поставим точку остановки на переменной $arr.
Теперь запустим отладку этого скрипта, нажав правую кнопку мыши и выбрав пункт Debug ‘index.php’. Если все было сделано правильно, то в PhpStorm появится вывод дебага, как показано на скриншоте.
В итоге, мы получили мощный и удобный инструмент для отладки PHP-скриптов с подключенным интерпретатором PHP, а также возможность запускать скрипты через встроенный в PhpStorm локальный web-сервер.