PHP Registration Form
Summary: in this tutorial, you’ll learn how to create a PHP registration form from scratch.
Introduction to PHP registration form
In this tutorial, you’ll create a user registration form that consists of the following input fields:
- Username
- Password
- Password confirmation
- Agreement checkbox
- Register button

When a user fills out the form and click the Register button, you need to:
-
& validate the user inputs.
- If the form data is not valid, show the form with the user inputs and error messages.
- If the form data is valid, insert the new user into the users database table, set a flash message, redirect the user to the login.php page and display the flash message. Note that you’ll learn how to build a login form in the next tutorial.
Setup project structure
First, create a project root folder, e.g., auth .
Second, create the following folders under the project root folder e.g
The following describes the purpose of each folder:
| Folder | Purpose |
|---|---|
| config | Store the configuration file such as database configuration |
| public | Store the public files accessed directly by the users |
| src | Store the source files that should not be exposed to the public |
| src/inc | Store the commonly included files such as the header and footer of a page |
| src/libs | Store the library files, e.g., validation, sanitization, etc. |
Remove the public from the URL
First, create register.php in the public folder. To access the register.php page, you need to use the following URL:
To remove the public from the above URL, you can use the URL Rewrite module of the Apache Web Server. To do it, you need to use a .htaccess file.
Second, create .htaccess file in the project root folder ( auth ) and use the following code:
The above directives instruct Apache to remove the public from the URL. If you open the URL http://localhost/auth/register.php , you’ll see an error.
To fix the error, you’ll need another .htaccess file in the public folder.
Third, create another .htaccess in the public folder and use the following directives:
Now, you can access the register.php page without using the /public/ in the URL like this:
Create the registration form
First, create a registration form in the register.php file:
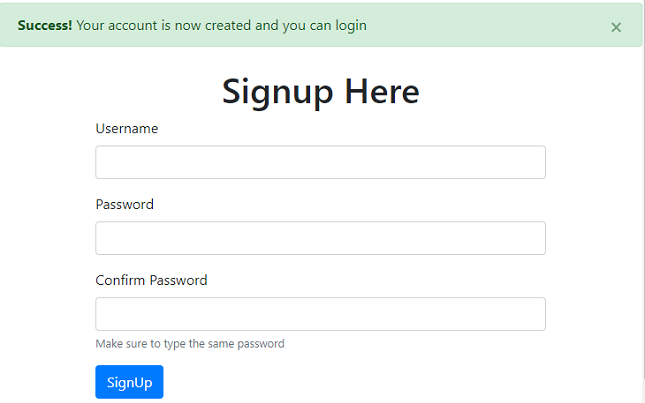
If you access the URL http://localhost/auth/register.php , you’ll see a user registration form.
Make the registration form more organized
First, create the header.php file in the src/inc folder and copy the header section of the register.php file to the header.php file:
Second, create the footer.php file in the src/inc folder and copy the footer section of the register.php file to the footer.php file:
Third, include the header.php and footer.php files from the inc folder in the register.php file. Typically, you use the require or include construct.
However, you may want to include the header.php and footer.php files in other files, e.g., login.php . Therefore, the title of the page should not be fixed like this:
To make the <title> tag dynamic, you can create a helpers.php file in the src/libs folder and define the view() function that loads the code from a PHP file and passes data to it: </code> more dynamic, you can define a new function called <code>view()</code> that loads the code from a file and passes data to it:</p>
This view() function loads the code from a file without the need of specifying the .php file extension.
The view() function allows you to pass data to the included file as an associative array. In the included file, you can use the keys of elements as the variable names and the values as the variable values. Check out the variable variables for more detail.
For example, the following uses the view() function to load the code from the header.php file and makes the title as a variable in the header.php file:
Since the header.php file accept the title as a variable, you need to update it as follows:
In this new header.php file, the title variable will default to Home if it is not set.
To use the view() function in the register.php , the register.php must include the helpers.php .
To centrally include the files, you can create a bootstrap.php file in the src folder. The bootstrap.php will include all the necessary files. And you include the bootstrap.php file in the register.php file.
The boostrap.php file will be like this:
And the register.php file will look like the following:
Process the registration form submission
The registration form submits to register.php using the HTTP POST method. To process the form data, you can check if the HTTP request is POST at the beginning of the register.php file like this:
Since the above code can be used on other pages, you can define the is_post_request() function in the helpers.php file to encapsulate it:
Similarly, you can also define the is_get_request() function that returns true if the current HTTP request is GET:
And at the beginning of the register.php file, you can use the is_post_request() function as follows:
Sanitize & validate user inputs
To sanitize & validate user inputs, you can use the sanitize() and valdiate() functions developed in the sanitizing and validating input tutorial or you can use the filter() function.
To use these functions, you need to:
- First, create the sanitization.php , validation.php , and filter.php files in the src/libs folder.
- Second, add the code to these files (please look at the code in the end of this tutorial).
- Third, include these files in the bootstrap.php file.
The bootstrap.php file will look like the following:
The following shows how to use the filter() function to sanitize and validate the user inputs:
In the filter() function, you pass three arguments:
- The $_POST array stores the user inputs.
- The $fields associative array stores the rules of all fields.
- The $messages is a multidimensional array that specifies the custom messages for the the required and same rules of the password2 and agree fields. This argument is optional. If you skip it, the filter() function will use default validation messages.
If the form is invalid, you need to redirect the users to the register.php page using the post-redirect-get (PRG) technique. Also, you need to add the $inputs and $errors arrays to the $_SESSION variable so that you can access them in the GET request after redirection.
If the form is valid, you need to create a user account and redirect the users to the login.php page using the PRG technique. To show a message once across pages, you can use the session-based flash messages.
Manage flash messages
To manage flash messages, you use the flash() function defined in the flash message tutorial:
- First, create a new file flash.php in the src/libs folder.
- Second, add the code to the flash.php file.
- Third, include the flash.php file in the bootstrap.php .
To create a flash message in the register.php file, you call the flash() function:
To show all the flash messages, you call the flash() function without passing any arguments:
For example, you can show the flash messages in the header.php file:
Set the error CSS class
When a form field has invalid data, e.g., wrong email address format, you need to highlight it by adding an error CSS class.
The following defines the error_class() function in the src/libs/helpers.php file, which returns the ‘error’ class if the $errors array has an error associated with a field:
Redirect
After users register for accounts successfully, you need to redirect them to the login page. To do that, you can use the header() function with the exit construct:
The following defines a function called redirect_to() function in the helpers.php file to wrap the above code:
If the form data is invalid, you can redirect users back to the register.php page. Before doing it, you need to add the $inputs and $errors variables to the $_SESSION variable so that you can access them in the subsequent request.
The following defines the redirect_with() function that adds the elements of the $items array to the $_SESSION variable and redirects to a URL:
Notice that the redirect_with() function calls the redirect_to() function to redirect users to a URL.
The following shows how to use the redirect_with() function that adds the $inputs and $errors array and redirect to the register.php page:
If you want to set a flash message and redirect to another page, you can define a new helper function redirect_with_message() like this:
Note that the flash message’s name starts with the flash_ and is followed by a unique id returned by the uniqid() function. It’ll look like this:
We use a generated name for the flash message because it’s not important in this case. And we’ll display all the flash messages anyway.
For example, you can redirect users to the login page with a success message like this:
Flash session data
To get data from the $_SESSION and remove it immediately, you can define a helper function session_flash() :
The session_flash() function accepts a variable number of keys. It’s also known as a variadic function.
If a key exists in the $_SESSION variable, the function adds the value of that key to the return array and unsets the value. Otherwise, the function will return an empty array for that key.
The following uses the array destructuring to get the $inputs and $errors from the $_SESSION variable and unset them using the session_flash() function:
The boostrap.php function is updated to include the call to session_start() function and the flash.php file:
Note that you need to call the session_start() function to start a new session or resume an existing one to manage the session data.
The complete register.php file
The following shows the complete register.php file:
To separate the logic and view parts, you can create a new file register.php in the src folder and add the first part of the public/register.php file to it:
And the following shows the public/register.php file:
Since the register_user() function doesn’t exist, you need to define it. Before doing that, you need to create a new database and the users table.
Create a new database and the users table
We’ll use MySQL to store the user information. To interact with MySQL, you can use any MySQL client tool such as phpmyadmin or mysql.
First, create a new database called auth in the MySQL database server:
Second, create a new table called users to store the user information:
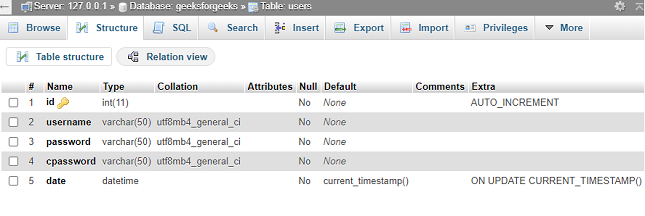
The users table has the following columns:
- id is the primary key. Since the id is an auto-increment column, MySQL will increase its value by one for each new row. In other words, you don’t need to provide the id when inserting a new row into the table.
- username is a varying character column with the NOT NULL and UNIQUE constraints. It means that there will be no two rows with the same username.
- email column is like the username column, which is NOT NULL and UNIQUE .
- password column a varying column and not null.
- is_admin is a tiny integer column. Its default value is zero. If is_admin is zero, the user is not the admin. If the is_admin is 1, the user is an admin which has more privileges than regular users.
- created_at is a timestamp column that MySQL will update it to the current timestamp when you insert a new row into the table.
- updated_at is a datetime column that MySQL will update it to the current timestamp automatically when you update an existing row.
Connect to the MySQL database
First, create a new file database.php file in the config folder and add the following database parameters to the file:
Second, create the connection.php file in the src/libs folder.
Third, define the db() function that connects the database once and returns a new PDO object. The db() function uses the database configuration defined in the config/database.php file.
In the db() function, the $pdo is a static variable. When you call the db() function for the first time, the $pdo variable is not initialized. Therefore, the code block inside the if statement executes that connects to the database and returns a new PDO object.
Since the $pdo is a static variable, it’s still alive after the function db() function completes. Therefore, when you call the db() function again, it returns the PDO object. In other words, the function doesn’t connect to the database again.
Since creating a connection to the database is expensive in terms of time and resources, you should connect to the database once per request.
Define the register_user() function
First, create a new file called auth.php in the src folder.
Second, define the register_user() function that inserts a new user into the users table:
When storing a password in the database, you never store it in plain text for security reasons. Instead, you should always hash the password before storing it.
To hash a password, you use the built-in password_hash() function:
For example, if the password is Password1 , the password_hash() function returns the following hash:
The PASSWORD_BCRYPT argument instructs the password_hash() function to use the CRYPT_BLOWFISH algorithm which is very secure.
Since password_hash() is a one-way function, hackers cannot “decrypt” it to the original plain text ( Password1 ). This provides a defense against the passwords being compromised when a database is leaked.
Tutorial to create a login system using HTML, PHP, and MySQL
This is a tutorial for creating a login system with the help of HTML, PHP, and MySQL. Your website needs to be dynamic and your visitors need to have instant access to it. Therefore, they want to log in as many times as possible. The login authentication system is very common for any web application. It allows registered users to access the website and members-only features. It is also helpful when we want to store information for users. It covers everything from shopping sites, educational sites, and membership sites, etc.
This tutorial is covered in 4 parts.
Table of Contents
1) Building a Signup system
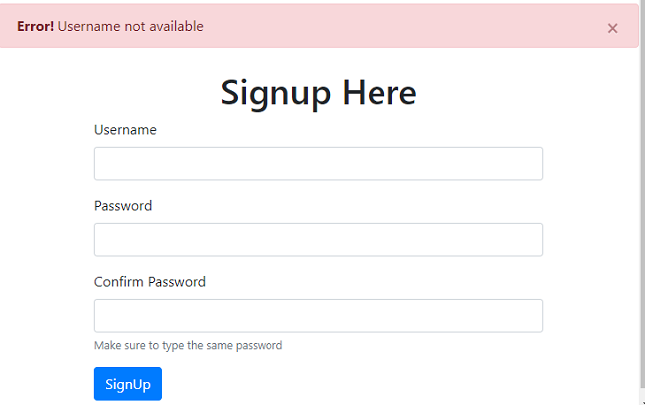
In this part, We will create a signup system that allows users to create a new account to the system. Our first step is to create a HTML registration form. The form is pretty simple to create. It only asks for a name, email, password, and confirm password. Email addresses will be unique for every user. Multiple accounts for the same email address are not allowed. It will show an error message to the users who try to create multiple accounts with the same email address.
Step 1: Creating Registration Form in HTML
We will create a PHP file named register.php with the following code in it. This is a simple HTML form with some basic validation. If you are not familiar with HTML then you can get it from many online sites who give ready-made html5 login form templates.
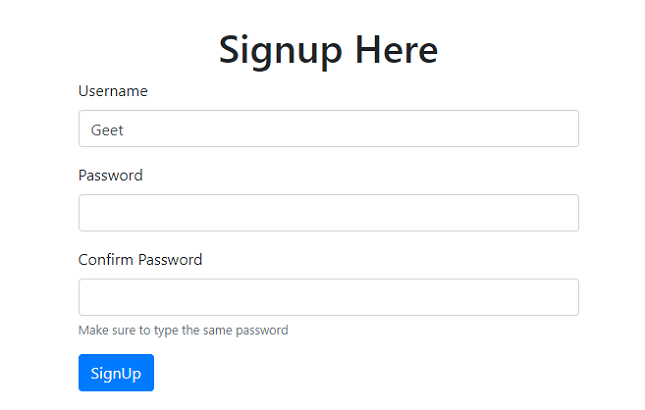
The output of the above HTML form will look like this.

All the input fields are required by adding the «required» attribute which is the default HTML attribute. The use of type=»email» will validate the email address provided by users and gives an error if the email address is not valid. For the registration form, we have used bootstrap for rapid development. If you want to save your time on HTML code you can always use some free html5 templates for your project.
Step 2: Creating the MySQL Database Table
You will need to create a new database with any suitable name you want. After that please execute the below SQL query to create the user’s table inside your newly created MySQL database.
Step 3: Creating Database Configuration File
Now, we have created the users table. Let’s create a new PHP file named config.php to connect with the MySQL database. Paste the following code in the config.php file and change the database name to whatever you choose while creating the database.
Step 4: Creating a Session File
Let’s create a file named session.php. In this file, we will start the session and check if a user is already logged in, if yes then we will redirect the user to welcome.php file.
Step 5: Create Registration Form in PHP
Finally, it’s time to create a PHP code that allows users to register their accounts into the system. This PHP code will alert users with an error if any user is already registered with the same email address.
Replace the following code in the register.php file.
Once user click on submit button it will check if $_SERVER[«REQUEST_METHOD»] == «POST» and $_POST[‘submit’] variable has been set. For security concerns, we always suggest not to store the password as plain text in the database. We have used password_hash() function which creates a new password hash using a strong one-way hashing algorithm.
The above PHP script will validate that no user is registered with the same email address and also validate password. After validation is confirmed we store the user-provided information in the users’ table and alert the user that registration was successful.
2) Building a Login System
In this part, we will create a login form to allow users to access the restricted area of the system. In our case, the restricted area is a welcome page which we will cover in the next part.
Step 1: Creating a Login Form in HTML
Below is the Login Form in HTML. Paste it in a file named login.php
The output of the above code will look like this

Step 2: Creating a Login System in PHP
After creating the login form in HTML, we will write a code to validate login credentials. On form submit we will check that the email and password are filled. If they filled then we will execute a SELECT query to find the record in a database on the basis of email and password. If any record found, then we will store the «userID» in session and the user is redirected to the welcome.php file, otherwise, the user is alerted with an error message.
Let’s replace the following code in the login.php file.
3) Creating a Welcome Page
Below is the code for the welcome.php file. Users will be redirected to this page after a successful login process. We have added some code at the top of the page to check if the user is not logged in, then redirect the user to the login page.
Let’s create a welcome.php file and paste the following code in it.
4) The Logout script
Finally, Let’s create a logout.php file with the following code in it.
Once the user clicks on the Log Out link, the above script, will be called to destroy the session and redirect user to the login.php file.
Conclusion
In this tutorial, I explained how you can create a Login System using HTML, PHP and MySQL. Once you understand how simple it is to create a login system you can add other features like reset password, forgot password, verify email address, edit user’s profile, etc.
Создание регистрации на сайте на PHP + MySQL
Здравствуйте! Сейчас мы попробуем реализовать самую простую регистрацию на сайте с помощью PHP + MySQL. Для этого на вашем компьютере должен быть установлен Apache. Принцип работы нашего скрипта изображен ниже.

1. Начнем с создания таблички users в базе. Она будет содержать данные пользователя (логин и пароль). Зайдем в phpmyadmin (если вы создаете базу на своем ПК http://localhost/phpmyadmin/). Создаем таблицу users, в ней будет 3 поля.
Я создаю ее в базе mysql, вы можете создавать в другой базе. Далее устанавливаем значения, как на рисунке:
Нажимаем «сохранить». Итак, таблица у нас есть.
2. Необходимо соединение с этой таблицей. Давайте создадим файл bd.php. Его содержание:
В моем случае это выглядит так:
Сохраняем bd.php.
Отлично! У нас есть таблица в базе, соединение к ней. Теперь можно приступать к созданию странички, на которой пользователи будут оставлять свои данные.
3. Создаем файл reg.php с содержанием (все комментарии внутри):
4. Создаем файл, который будет заносить данные в базу и сохранять пользователя. save_user.php(комментарии внутри):
5. Теперь наши пользователи могут регистрироваться! Далее необходимо сделать «дверь» для входа на сайт уже зарегистрированным пользователям. index.php (комментарии внутри) :
В файле index.php мы выведем ссылочку, которая будет открыта только для зарегистрированных пользователей. В этом и заключается вся суть скрипта — ограничить доступ к каким-либо данным.
6. Остался файл с проверкой введенного логина и пароля. testreg.php (комментарии внутри):
Ну вот и все! Может урок и скучный, но очень полезный. Здесь показана только идея регистрации, далее Вы можете усовершенствовать ее: добавить защиту, оформление, поля с данными, загрузку аватаров, выход из аккаунта (для этого просто уничтожить переменные из сессии функцией unset) и так далее. Удачи!
Все проверил, работает исправно!
Автор: Стороженко Евгений (отредактировал и опубликовал Максим Шкурупий)
Данный урок подготовлен для вас командой сайта ruseller.com
Источник урока: www.ruseller.com
Автор: Максим Шкурупий
Урок создан: 24 Июля 2009
Просмотров: 10503647
Правила перепечатки
5 последних уроков рубрики «PHP»

Фильтрация данных с помощью zend-filter
Когда речь идёт о безопасности веб-сайта, то фраза "фильтруйте всё, экранируйте всё" всегда будет актуальна. Сегодня поговорим о фильтрации данных.
Контекстное экранирование с помощью zend-escaper
Обеспечение безопасности веб-сайта — это не только защита от SQL инъекций, но и протекция от межсайтового скриптинга (XSS), межсайтовой подделки запросов (CSRF) и от других видов атак. В частности, вам нужно очень осторожно подходить к формированию HTML, CSS и JavaScript кода.
Подключение Zend модулей к Expressive
Expressive 2 поддерживает возможность подключения других ZF компонент по специальной схеме. Не всем нравится данное решение. В этой статье мы расскажем как улучшили процесс подключение нескольких модулей.
Совет: отправка информации в Google Analytics через API
Предположим, что вам необходимо отправить какую-то информацию в Google Analytics из серверного скрипта. Как это сделать. Ответ в этой заметке.
Подборка PHP песочниц
Подборка из нескольких видов PHP песочниц. На некоторых вы в режиме online сможете потестить свой код, но есть так же решения, которые можно внедрить на свой сайт.
Форма регистрации на PHP с использованием базы данных MySQL
Наша задача состоит в том, чтобы создать форму регистрации и обработчик на языке PHP, в которой, если пользователь вводит данные, То данные HTML-формы сохраняются в нашу базу данных MySQL.
Подключаемся к БД
- Для начала создадим нашу базу данных MySQL и таблицу в соответствии с нашими требованиями.
- Мы подключаем нашу базу данных MySQL с помощью функции PHP mysqli_connect(), которая принимает четыре аргумента, то есть наши «имя сервера», «имя пользователя», «пароль» и «базу данных».
Примечание: здесь не используется код CSS, поскольку мы используем Bootstrap в коде PHP ниже. Вы можете применить CSS стили в своих приложениях, если захотите.
Для соединения с БД создадим PHP файл «dbconnect.php», а имя для нашей базы базы данных выберем — «testdatabase».
Таблица «users » создается с помощью инструмента MySQL phpMyAdmin, как показано ниже.
Создаем форму регистрации
теперь, когда мы успешно подключились к нашей базе данных, пора создать форму регистрации для пользователей. Следующий код описывает нашу форму регистрации. Используемое имя таблицы базы данных MySql — «users».
Смотрим результат
- Форма регистрации:
- После успешного входа пользователя:
- После неверного входа пользователя: