Where has config.php gone in Nextcloud?

Hi people, I downloaded the latest 11.2 beta3, and with the help of posts on here got the Nextcloud plugin going up to the point that I can login and save file from within the network. I now need to configure the "config.php" file to allow my phone to access from outside the network.
On previous versions I used to type in the nextcloud jail, "cd /usr/pbi/nextcloud-amd64/www/nextcloud/config/" then added the ip address of my phone by changing the config.php file.
In this latest version of nextcloud 11.2 release P, i’m trying to find the file in both the plugin shell and the jail shell, even the main freenas shell i’m getting this, "No such file or directory".
Howto setup Nextcloud
I currently have Seafile as my primary server to share my files. I also have a additional installation of a caldav and carddav server called baikal. This is fine so far and works but has a lot of different components to maintain. As Nextcloud made some progress I think it is time to take another look at it to find out if I should replace Seafile and the other servers with one Nextcloud installation.
In this post I just show how I setup my own Nextcloud server using HA-Proxy, let’s encrypt and a virtual machine to run it.
Setup overview
As you already might see, this setup gets a bit more complicated than a standard one server setup. Eventually, you may set up all the services on one machine and it should work as well. Using this kind of installation, I do not have to configure all the backup and I use the benefits of the ZFS filesystem of free nas. Another reason is that I do not only serve Nextcloud on my systems but other https based services as well. HA-Proxy does the reverse proxy work and ssl offloading with let’s encrypt and multiple subdomains.
If you prefer an easy setup, there might be different tutorials out there, that help you to set up everything on one machine. Also take a closer look to the official installation manual . In fact this blog post is based on their installation manual.
Preparing the virtual machine
OS installation
Important: if not mentioned otherwise, all commands are executed as root. You may use sudo as well to run these commands.
I do not cover how to set up a database server or a normal virtual machine. There are many good tutorials out there how to setup a basic Debian server. I just mention some steps that I do on my VM after the initial installation. During the setup I only install the basic tools and the ssh server .
One impartant thing is to make sure the IP does not change and is fixed. This can be done by editing /etc/network/interfaces and change the network configuration according to the following information.
After rebooting, the system should be reachable using this IP address. I also make sure I can login using ssh and my local sshkey. For my virtual machines, I set up ntp, zabbix-agent and qemu-guest-agent.
Data share mount
The virtual machine should only contain the application and run the service. The data itself should remain on my freenas instance. In this installation, we’ll use nfs to mount this share to /srv/nextcloud.
Important: Choose a path outside of /var/www/nextcloud for your data to make sure they are not directly accessible through your webserver.
The data folder inside the Nextcloud mount is there to separate potential additional folders that might follow in the future. I do not like to have all stuff in the root of the mount.
The line to mount the share in my /etc/fstab looks somewhat like the example below. The nfs-server on my freenas has an ip restriction for the mount as well. Yea, not the safest way, but ok for my setup.
Reboot the vm to make sure the mount comes back online when booting.
HA-Proxy configuration
The configuration below are the most essential parts I set up to run Nextcloud.
- All traffic comming on port 80 is redirected to 443
- the certificate is specified on the ssl frontend
- If the hostname matches, the traffic gets redirected to the backend
- I add the X-Forwarded headers to the request as I do on all my setups. This should make named virtual hosts work on the target side
- Finally I pass the traffic to the given Nextcloud host on port 80 without ssl
- HA-Proxy checks port 80 every 2 seconds and will fail the route when 3 checks fail and reactivate after 2 successful checks
Database preparation
To setup the database, I just created a new database called nextcloud with the Nextcloud user using phpMyAdmin . All the tables get set up during installation. For this setup we have the following db information:
Nextcloud installation
Getting Nextcloud
First we need to download the latest Nextcloud server package from Nextcloud . We will use the Archive File containing the full package. Unzip the file and move the content to /var/www/nextcloud . Finally run chown to make sure apache is able to change some files on updates or app installation / uninstallation.
Basic packages installation
To run some Nextcloud maintenance tasks, sudo comes in quite handy. So we install it as well.
Next, we are going to set up the easiest possibly way without any complex part on the web server side.
Optional packages
These packages are optional but I like to have some previews and the clamav antivirus integration. So these packages have to be installed as well.
APCu and Redis installation
To get some performance on filelocks and local memory cache, we have to install two things.
- APCu which takes care of the local memory caching
- redis-server that will be used as locking database for file locks
Finally we have to make sure that the user www-data is able to use redis. We do this by adding www-data to the redis group.
php configuration
Now it is time to configure the php installation. These are the options I set on my installation to start with. So far this works quite well. As we use mod_php we have to use nano /etc/php/7.3/apache2/php.ini to edit the right configuration. Do not forget to restart apache after changing these values using systemctl restart apache2
Apache2 configuration
PHP is ready and now we have to make sure apache uses the right path to run Nextcloud from. To do this we use nano /etc/apache2/sites-available/000-default.conf and make the virtual host entry look similar to the configuration below.
There are also the two well known redirects, we have to do here as we run https on the public facing side but the server itself only uses http. The redirects used in the provided .htaccess file do not work using a ssl reverse proxy. If you miss these three entries, Nextcloud will provide you a warning that these entries do not work.
Next we have to make sure all the required modules are enabled. When finished, we restart apache2 to apply all the changes made.
Installation wizard
Reaching this point, it is time to run the installation wizard of Nextcloud. This is quite easy. The screenshot below shows all you have to provide to make it work. You can choose to install the recommended apps or install the needed ones later by hand.
Important: When clicking on Finish setup the installation works but the redirection fails, it is due to the lack of configuration and a wrong https redirect in HA-Proxy. Nextcloud has no idea, that the page should generate https links and redirects.
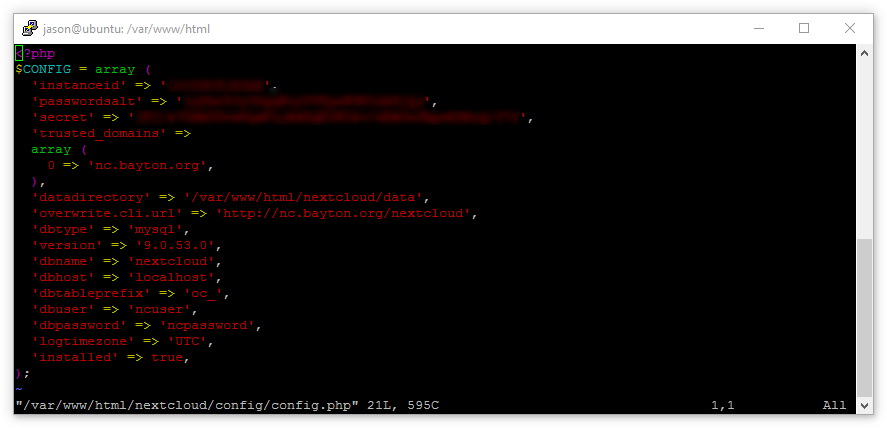
After finishing this first installation step, you should find a new configuration file for Nextcloud at /var/www/nextcloud/config/config.php . I had to modify this file a little bit to use all things and make Nextcloud work as expected.
- I made sure that trusted_domains contained the correct fqdn
- Add overwriteprotocol to make sure Nextcloud uses https links
- Add the memcache.* and redis configuration option to enable the caching on Nextcloud
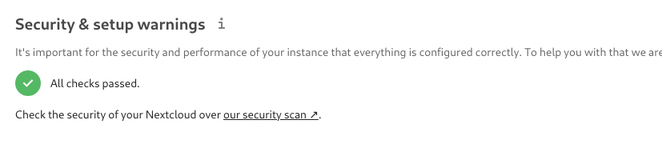
After updating the configuration, you should be able to log in and the application should work. But as soon as you navigate to Administration->Overview , you will have some warning about missing indexes and wrong data types. Run the following commands to fix these issues. There is no problem running them on an empty database. Running them on a large database will take a considerable amount of time.
The overview page should now be presented with a green check mark telling you, that everything is ok. If there are any warnings, solve them before doing anything else.
By now, you have a running installation ready to use. Make sure you test your installation and everything works smoothly. As soon as you confirmed this, you could take a closer look at the steps I took to further tune my setup.
Server tuning
enabling cron to perform background tasks
By default the cron tasks get executed on page loads. This might be ok for your single user little Nextcloud. But as soon as you have more load, this is not a really good idea. The recommended way of running these tasks is using cron.
You can start the editor using the following command.
At the end of the file, just enter the line below to run the tasks. Just make sure the path to the cron.php fits your installation. The line tells cron to run the script every five minutes.
Switching apache from mpm_prefork to mpm_worker
As we know is the mpm_prefork mode of apache2 not the fastes and best way to run php application. It also consumes a lot of resources and does not scale very well. To change this, we switch apache2 to mpm_worker that allows us to handle more requests with less resources.
First we have to install php7.3-fpm as libapache2-mod-php7.3 is not compatible with the mpm_worker configuration. The we have to apply all the php.ini configuration chages from above to the php.ini of the fpm setup.
Following the php.ini changes, we have to configure the worker pool to be able to handle the load. When done, the last step is to restart the fpm service for the changes to take effect.
The options change in the www.conf are the ones below.
Next, apache2 needs to be reconfigured. As I have no users on the host at this time, I just stop apache during the change. After enabling and disabling the components, we start apache again.
Recheck the installation and make sure Nextcloud still works as expected. The server should now be able to handle more requests at the same time.
enabling http/2
Now it is time to allow apache to use the newer http/2 protocol. This makes connections more efficient and reuses open sockets to bundle multiple requests.
Important: This is only available when apache is running mpm_worker or mpm_event !
If everything works as expected, you just have to uninstall the mod_php of apache2. By removing this package, we prevent activating it by accident and we do not have to worry about it anymore.
Database performance
I recommend taking a closer look to your database setup as the Nextcloud database will grow and a badly configured mysql server will slow down the system a lot. Monitor your database and apply settings to optimize the mysql installation.
closing words
I used to know owncloud and had an installation running a few years ago. Sadly it could not keep up and failed syncing my files on a regular bases. This is why I migrated away to seafile. As seafile continues to slow down and had some project issues (e.g. failing background upload on my mobile), I am looking for something different. First I thought Nextcloud is just the new owncloud with all the same issues. In some cases this might be the truth but it made huge progress and transformed to a good and solid solution.
Just a small summary what load I put on the server when my personal test was over:
- 3 PCs all using a Gbit-LAN Connection syncing 300GB of data
- 3 Phones uploading a total of 40GB using the auto upload feature (activating was not easy as the app freezes)
- PCs were downloading the automatically uploaded files of the mobiles as well
- all that happened simultaniously
Learnings so far:
- clamav does take quite a lot of CPU power
- Mysql configuration issues will show up fast
- Having a VM with more cores and memory will help to run everything smoothly
- I do miss a “drive” mount on my windows machine. There is a prototype but it is currently broken
- The foto app misses many many features (e.g. browsing by date / time, virtual albums, sorting)
- The email integration is nice but will not replace my roundcube installation in the near future
Beside the missing “drive” feature on Windows, I do not really miss anything. Instead, I gained many things like the gnome integration on my Linux setups.
I continue to migrate away from seafile to Nextcloud as I can reduce my setup even more by shutting down baikal as well. Nextcloud provides all features (fileshare, file sync, auto upload, contact, shared calendars) I currently need.
Can't find config.php file on docker nextcloud
I just installed nextcloud via Docker but I don’t know how to connect to my nextcloud server from other computers. After googling I learned that I have to edit my /var/www/nextcloud/config.php file but I can’t find it. is there any way that I can find my config.php file so that I can do port forwarding setting? Thank you.
1 Answer 1
For this volume
And nextcloud version 23.0.3 , the config file is in
-
The Overflow Blog
Related
Hot Network Questions
Subscribe to RSS
To subscribe to this RSS feed, copy and paste this URL into your RSS reader.
Site design / logo © 2023 Stack Exchange Inc; user contributions licensed under CC BY-SA . rev 2023.6.7.43483
By clicking “Accept all cookies”, you agree Stack Exchange can store cookies on your device and disclose information in accordance with our Cookie Policy.
Installing Nextcloud on Ubuntu with Redis, APCu, SSL & Apache
In 2016, the self-hosted community witnessed the public launch of Nextcloud, a vastly-improved fork of ownCloud. Having almost finished migrating data on my home server to Nextcloud and experimenting with some of the more optional features such as caching, pretty links, theming and more, I felt it would be a good time to document some of this in one simple-to-follow guide.
1. What is Nextcloud?
As mentioned above Nextcloud is a fork of ownCloud that has becoming the better and faster-developed alternative to the self-hosted cloud storage software of old. If you’re an ownCloud user and have ever been frustrated by the dual licenses, the paid vs free model and – as part of it – lack of some of the better features, Nextcloud have gone completely FOSS (Free and Open-Source Software) following the Red Hat model of charging for enterprise support rather than enterprise features.
Some of the previously enterprise-only features released as part of the standard FOSS Nextcloud installation include FileDrop, an alternative to Dropbox’s “File Requests”, LibreOffice online (Collabora), an alternative to Google Docs or Office Online, two-factor authentication, improved federation and more.
2. In this guide
After completing this guide we’ll have the following:
- A newly installed Nextcloud server
- PHP caching provided by ACPu and Redis for a notable speed increase when navigating even the largest thumbnail-heavy folders
- Pretty links that remove /index.php from the URL
- SSL-enabled with default self-signed certificates and all non-HTTPS traffic redirected
2.1. Installation URL
This guide assumes Nextcloud will be accessed via url.com/nextcloud. If Nextcloud should be accessed on the root of the domain, url.com, keep in mind the following:
- Any vhost entries in Apache configs referring to the directory path /var/www/html should be changed to /var/www/html/nextcloud
- The Nextcloud config.php base URL should be changed from ‘/nextcloud’ to ‘/’
- Lets Encrypt will work, however the .well-known directory will need to be moved out and back in to the nextcloud directory before and after an upgrade respectively to avoid an integrity check error.
3. Environment
For this guide Nextcloud will be installed on a remote Ubuntu VM, however it can equally be installed on a local Ubuntu server, a Raspberry Pi or a Linux Container such as Docker or LXD.
3.1. Hardware
Nextcloud don’t provide a lot of detail for minimum recommended spec, only advising 512MB of RAM. As the server is a full VM and not simply a container, we’ll provide a bit of a buffer to avoid any possible contention.
- 1GHz CPU
- 1GB RAM
- 20GB HDD
20GB of disk will be enough for this guide, but naturally the amount chosen should reflect the amount of data to be stored. Furthermore, if redundancy isn’t offered as standard it’s always a good idea to mirror/RAID the storage area to avoid downtime as best as possible. Typically this is only a consideration required with dedicated servers, but there’s no harm in checking.
3.1.1. Plan backups
No matter what level of redundancy is set up, it’s not a replacement for a good backup strategy. Never assume data is safe in a remote datacentre as usually providers offer no liability or responsibility for lost data should a server fail.
3.1.2. Nextcloud is not a backup solution
Nextcloud is a not a replacement for typical backup solutions or processes but rather a tool for collaboration and sharing. Do not rely on it as the sole solution for protecting your data.
3.2. Software
- Ubuntu server (LTS preferred) with root (sudo) access
- Apache2
- PHP 7
- mySQL / MariaDB
- The latest version of Nextcloud (this guide has been tested as far back as v.9 however)
Besides the above-mentioned packages and their respective dependencies, we should aim to keep the amount of additional software installed to a minimum; the Ubuntu-minimal image is a good place to start here as it requires adding packages after installation rather than sifting through and removing those that aren’t required. From a security perspective this is advised in order to lower to attack surface should an exploit allow a 3rd party to gain shell access to the server – the fewer additional services an attacker can latch onto, the lower the chance of gaining root and doing any real damage. In this case, the VPS provider offers a relatively minimal install, meaning there’s no requirement to upload an Ubuntu-minimal ISO to install from.
Due to the advanced requirements in this guide, root/sudo access to the Ubuntu instance is mandatory.
4. Setting up the environment
For those with a functioning Ubuntu server and required components, please skip to step 4.1.
First we need to spin up a VM or container, examples of which are as follows:
Once the server is setup and we’re logged in, we can continue.
4.1. Update the server & install LAMP, APCu, Redis
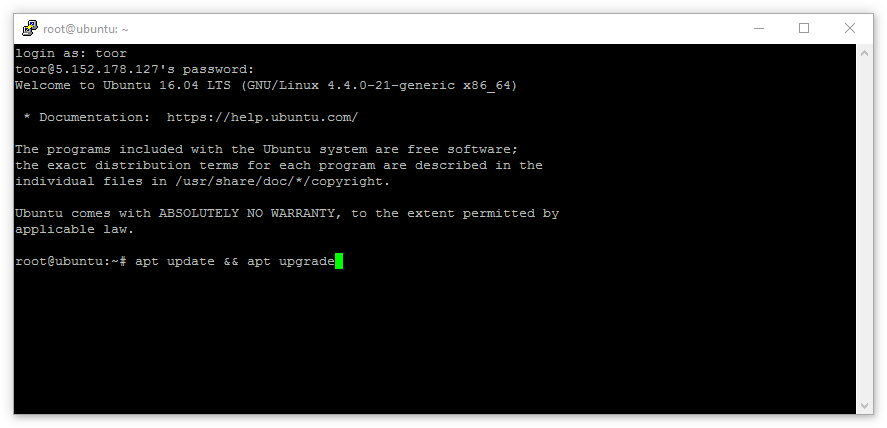
As this is a brand new installation based on images that likely don’t update very often, it’s a good idea to upgrade the server before we begin:
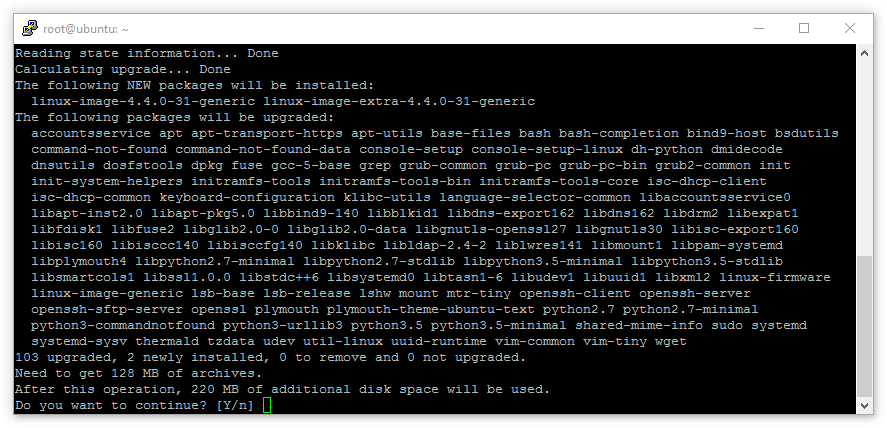
sudo apt update && sudo apt upgrade
When the update has completed, it’ll provide a list of packages to be upgraded. Providing we’re happy with what we see, tap Enter.
With the server updated, if one doesn’t already exist, a non-root user should be created with sudo privileges and the root account should disabled, once complete we’ll now install the required components for Nextcloud:
sudo apt install lamp-server^
4.1.1. Meta packages
The use of ^ (caret) in the package name is important. It suggests that the installed package is a ‘meta-package’, meaning a number of programs that are usually installed together.
This command will install Apache, MySQL and PHP along with several PHP/Apache modules to ensure seamless collaboration between the packages. Once happy with the package selection to be installed, tap Enter.
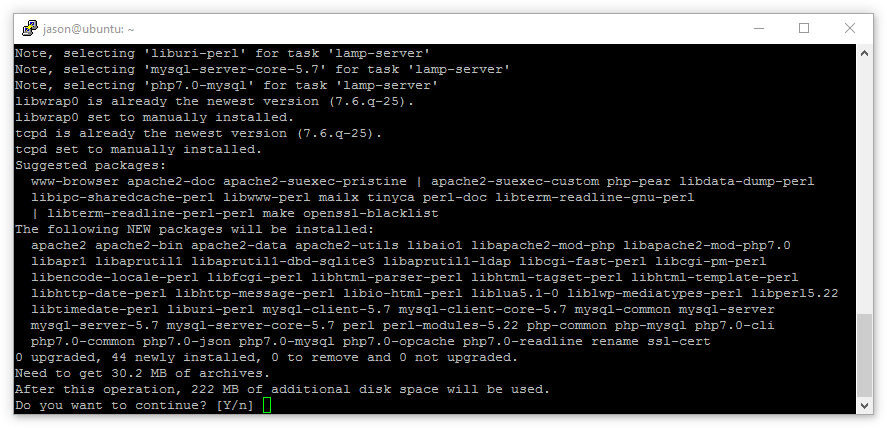
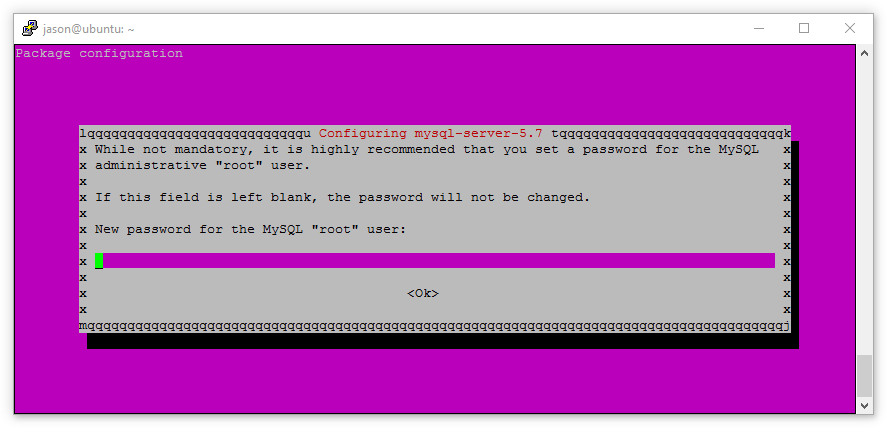
MySQL will request a root user password. Ensure this is strong and keep the password safe; losing it can cause all manner of issues.
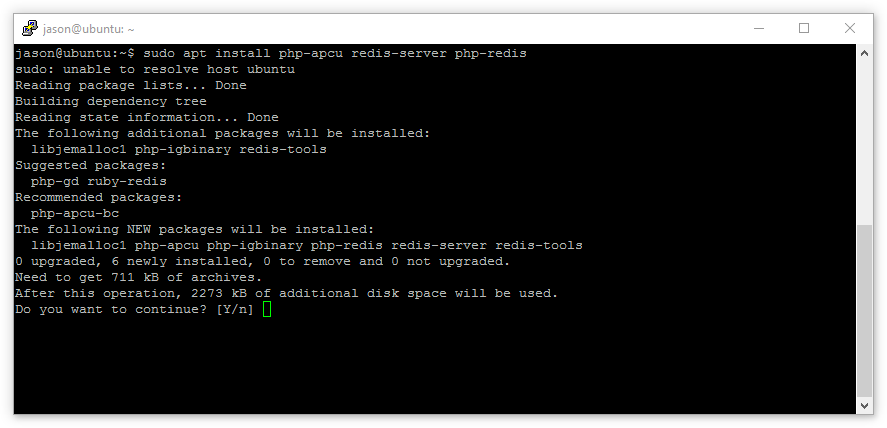
Once installed, we’ll now install APCu and Redis:
sudo apt install php-apcu redis-server php-redis
Confirm the packages to be installed match expectations and hit Enter.
Finally, we’ll install the minimal Nextcloud PHP modules required not to error during installation (more can be enabled later):
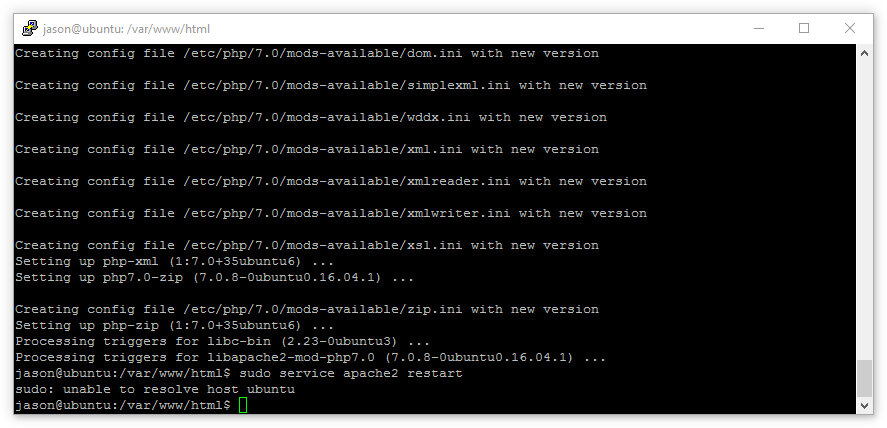
sudo apt install php-zip php-dompdf php-xml php-mbstring php-gd php-curl unzip
And enable a few apache modules to support our configuration:
sudo a2enmod rewrite headers env dir mime
Now we’ll restart Apache:
sudo service apache2 restart
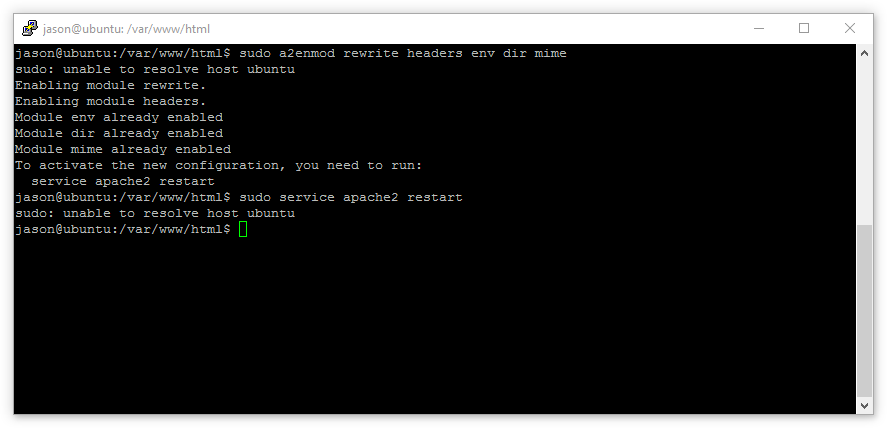
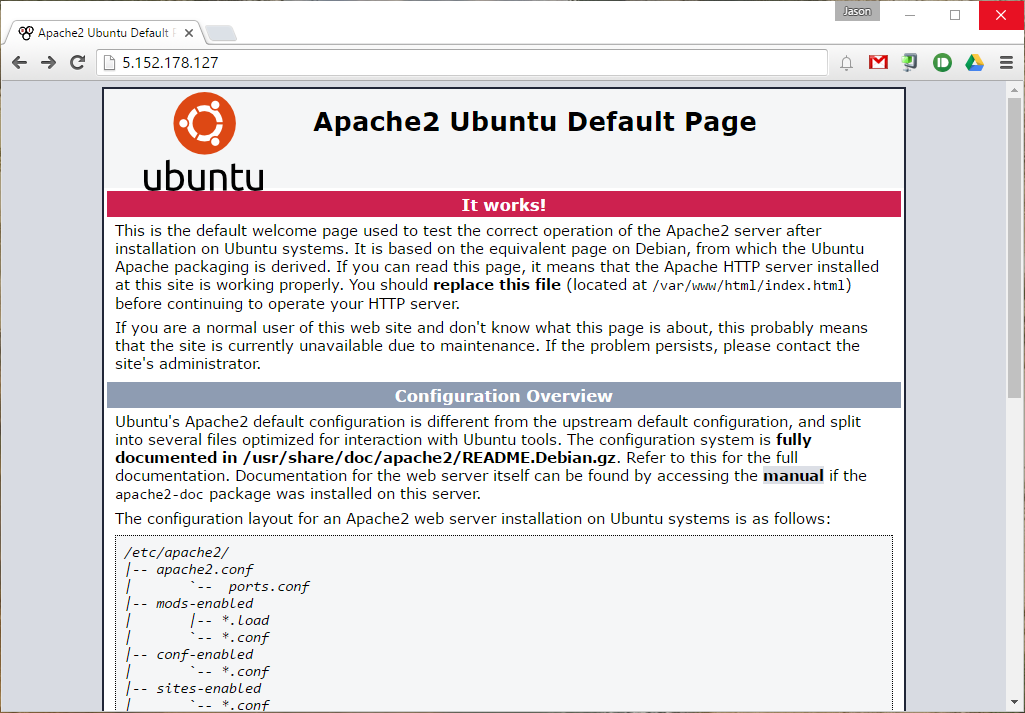
Before moving on check via a browser that Apache is up and running
4.2. Enable SSL
With the server currently running over HTTP port 80, we can now additionally configure SSL to ensure the Nextcloud installation is secure.
4.2.1. Let’s Encrypt
Let’s Encrypt offers completely free SSL certificates for securing websites. The client is entirely command line based offering simple setup and automated renewal via cron.
First, choose a location (such as /home/user/ ), download the Let’s Encrypt client and set it as executable:
sudo wget https://dl.eff.org/certbot-auto && sudo chmod a+x certbot-auto
Next, run the client:
sudo ./certbot-auto —apache —agree-tos —rsa-key-size <strong>4096</strong> —email <strong>user</strong><strong>@domain.org</strong> —redirect -d <strong>nc.domain.org</strong>
Where:
—apache uses the Apache plugin to fully setup and integrate with the existing Apache configuration
—agree-tos simply pre-agrees to the TOS, preventing it popping up during installation
—rsa-key-size defines the length (and therefore security) of the RSA key. Default is 2048.
—email is the email address to register against the certificate (used for reminders by Let’s Encrypt)
—redirect will create both the SSL virtualhost configuration file and add a redirect for HTTP traffic to HTTPs (80 to 443)
-d is the domain to secure
On first run the Let’s Encrypt certbot will install all required dependencies (following approval), however with the added flags above, will not require any further input to set everything up.
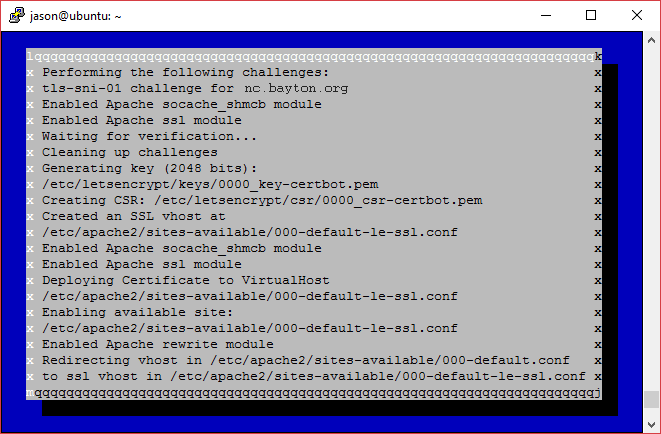
Navigating now to the domain allocated to the server will show an SSL-enabled website! If the browser complains the site is not fully protected at this point, it’s due to the default Apache landing page requesting content over HTTP and not an issue with the certificate.
That’s all there is to it. Let’s Encrypt handles everything from certificate generation to Apache configuration, meaning nothing needs to be done beyond what’s documented above. The manual process (below) is far more involved.
One step from the manual process which is recommended is to add the following snippet to the Let’s Encrypt-created vhost.conf file in the same way as is documented in 4.2.2 below:
The text above may be pasted under the ServerName line in the file located at:
As the certificate currently expires after 90 days by default, to automatically renew the certificate let’s create a cronjob:
This will open the crontab file for the root user (as sudo was used) meaning sudo (and as such, password authentication) won’t need to be used when running the renew command. Add the following line to the crontab file:
0 0 * * 0 <strong>/home/jason/</strong>certbot-auto renew
Edit the area in bold, then Ctrl + X to quit followed by Y to save the file.
Skip 4.2.2 and continue to Installing Nextcloud.
4.2.2. Manual
We’ll begin by enabling the SSL module for Apache:
sudo a2enmod ssl
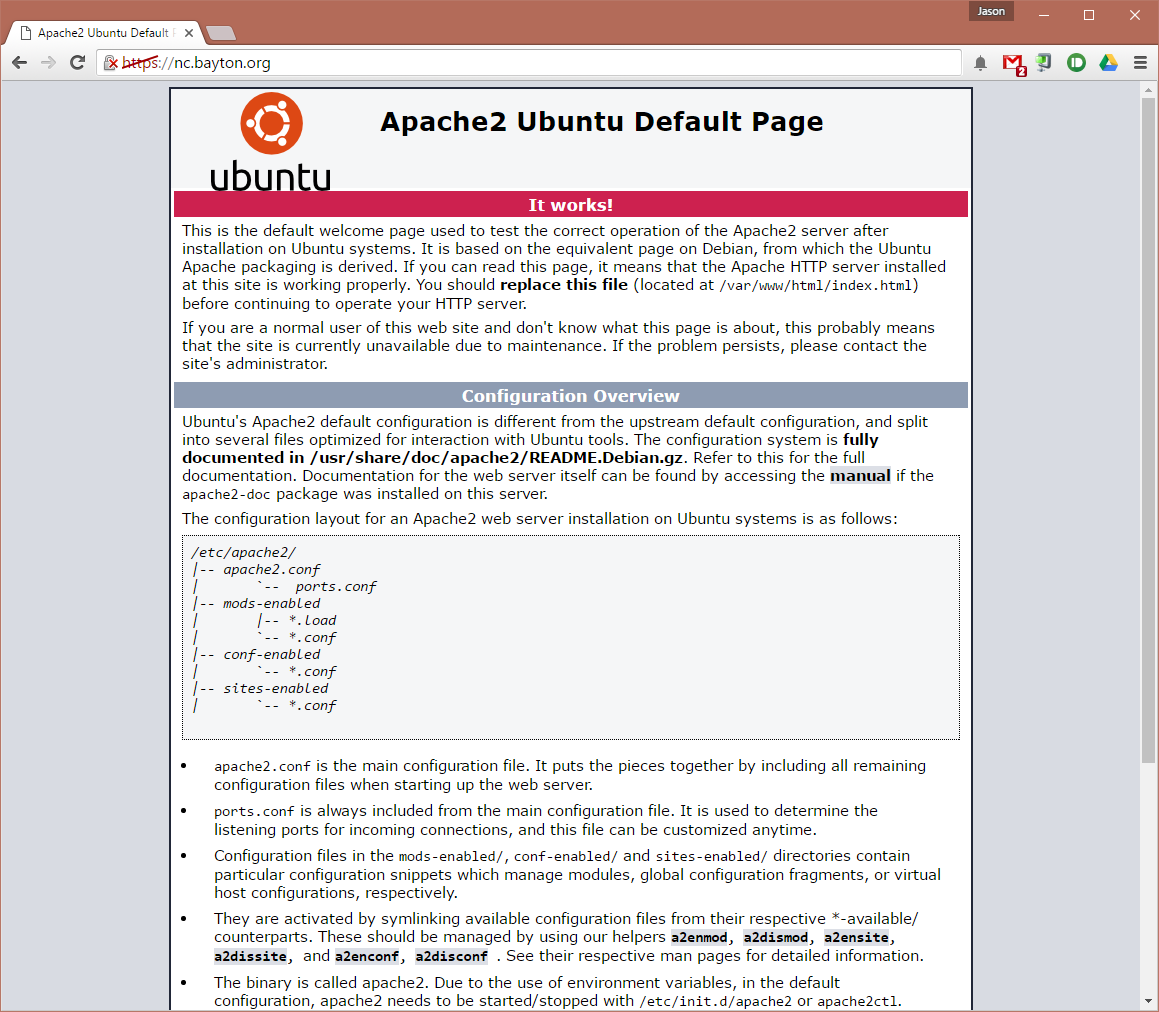
Apache sets up self-signed certificates as part of the installation, so for this guide we’ll use those. They can be replaced at any time with functioning 3rd party certificates by editing the vhost file we’ll create next. It’s highly recommended they’re switched sooner rather than later.
sudo vim /etc/apache2/sites-available/nextcloud.conf
Insert the following (all items in bold can be changed to suit the environment):
Save and quit, then enable the new configuration:
sudo a2ensite nextcloud.conf
Now restart Apache:
sudo service apache2 restart
SSL should now be enabled, allowing us to navigate to https://nc.bayton.org when we install Nextcloud later. Of course the page will show an error as the certificates are not trusted. Let’s Encrypt offer free SSL certificates and Mozilla offer a tool to help correctly set up SSL on the server. Check them out for more information.
Optionally, we can also force a redirect from non-SSL to SSL with the following:
sudo vim /etc/apache2/sites-available/nc-redir.conf
Insert the following (all items in bold can be changed to suit the environment):
Save and quit, then enable the new configuration:
sudo a2ensite nc-redir.conf
Then disable the default configuration:
sudo a2dissite 000-default.conf
Then restart Apache:
sudo service apache2 restart
With that, all traffic will be forced to HTTPS.
5. Install Nextcloud
With the server environment ready (excluding some final NC-related configurations) we’ll move on to installing Nextcloud itself.
5.1. Download Nextcloud
Change to the webroot directory at /var/www/html with cd /var/www/html
Download Nextcloud via command line with sudo wget https://download.nextcloud.com/server/releases/latest.zip
NB: future and previous versions can be obtained from Nextcloud.
Unpack the compressed zip with sudo unzip latest.zip

As shown above with ls there’s now a nextcloud folder situated under /var/www/html/ but currently root owns it. We can change that:
sudo chown -R www-data:www-data /var/www/html/nextcloud
Now the Apache account, www-data, will have write-access to the Nextcloud installation directory.
5.2. Create the Nextcloud database
5.2.1. This is optional
By default, Nextcloud can create a database and database user when supplying the root user and password in the Nextcloud web-based installer. The following steps are intended for either someone who wants to create their own database or does not want to supply Nextcloud with the root account credentials.
Before switching to Chrome to run the web-based installer, we’ll first create a database.
We can open a session with mysql by running the command mysql -u root -p and providing the root password we entered earlier.
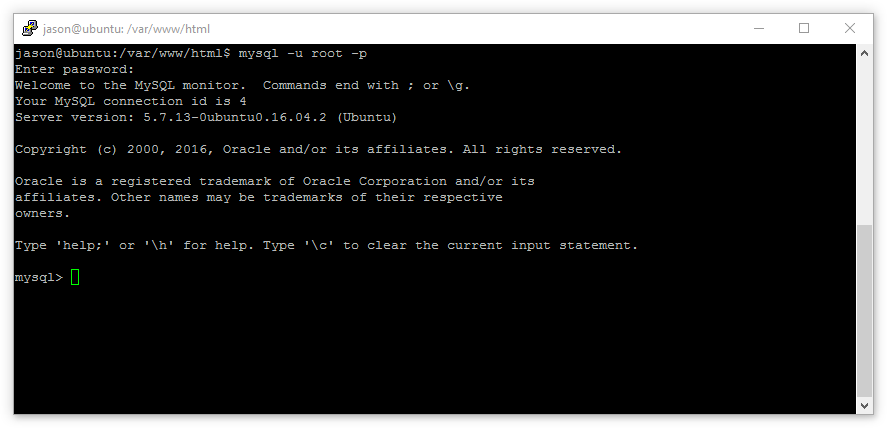
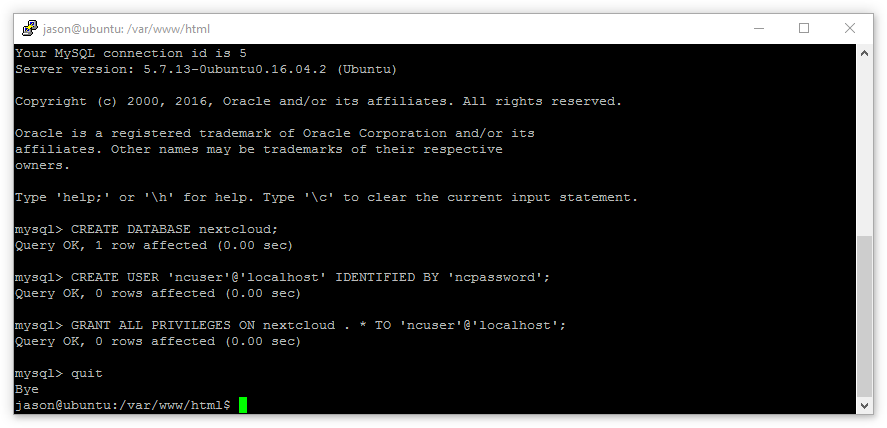
Now we’ll create a dedicated database and user for Nextcloud with the following commands:
Then exit the mysql session with quit
5.3. Install Nextcloud
Open up a browser and navigate to ip-or-hostname/nextcloud. Hopefully by this point a DNS entry has propagated; we’ll navigate to nc.domain.org/nextcloud to continue installation.

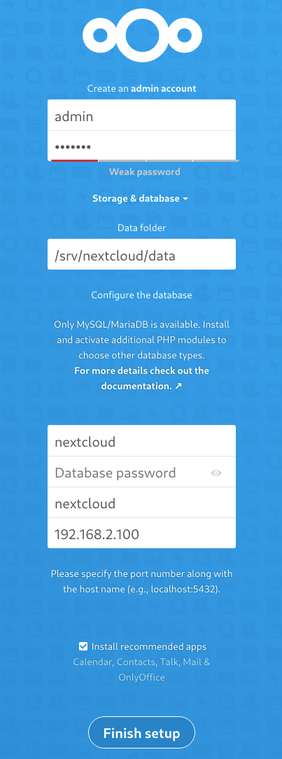
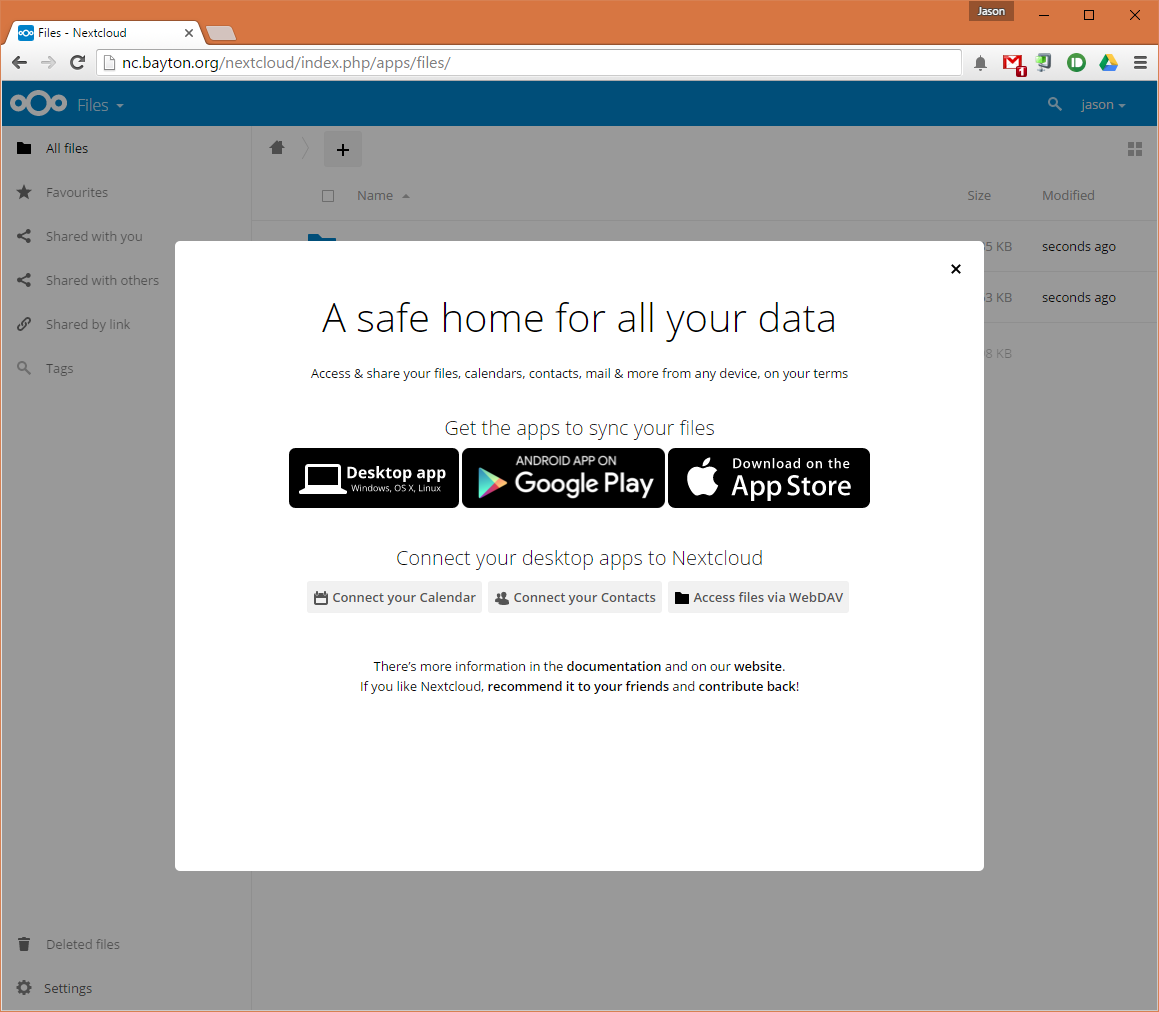
Success! The Nextcloud installation screen is there and showing no errors. Installation from here is simple:
- Provide a username and secure password for the admin account.
- Select a location for the data directory.
- Provide the database user we configured earlier: ncuser
- Provide the database user password: ncpassword
- Provide the database name: nextcloud
- Confirm the database is on localhost (it is).
When selecting a location for the data directory, keeping it in the webroot is really only OK providing .htaccess rules work. If they do not, as is the case at this point due to the way Apache is setup by default, or fail at any point in the future, the data directory will be publicly visible. We don’t want that.
Ideally it’s best practice to situate the data directory outside of /var/www/ in a location inaccessible for guests browsing the website. Where it’s ultimately placed is at the discretion of the administrator, though ensure the user www-data can write to it in its final location with:
sudo chown -R www-data:www-data /path/to/data
Scroll down and click Finish Setup.
6. Configuration
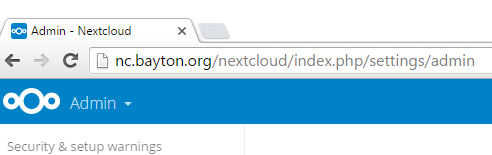
As it stands currently, Nextcloud isn’t very happy.
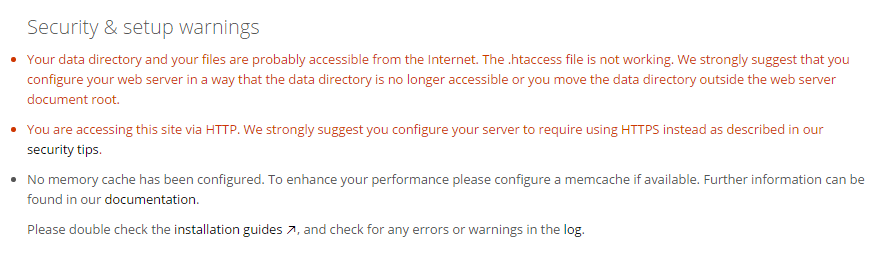
Ignore the HTTP error, this will disappear when we access the site over HTTPS.
6.1. Enable .htaccess
The .htaccess file doesn’t work because we’ve put Nextcloud in the main /var/www/html webroot controlled by the apache.conf file. By default it is set to disallow .htaccess overrides and we’ll need to change that:
sudo vim /etc/apache2/apache2.conf
Save and quit, then restart Apache with:
sudo service apache2 restart
6.2. Enable caching
The difference in speed between a Nextcloud server without cache and one with is huge. Particularly as the file and folder counts increase and more multimedia files make their way onto the server, caching becomes increasingly important for maintaining speed and performance. ACPu will handle a lot of the caching initially, leaving Redis to manage file locking. As the server grows and ACPu demands more resources, we could configure Redis to take a more active role in distributed caching. Having installed both APCu and Redis earlier, we’ll now configure them.
First, open the Redis configuration file at /etc/redis/redis.conf
sudo vim /etc/redis/redis.conf
Now, find and change:
port 6379 to port 0
unixsocket /var/run/redis/redis.sock
unixsocketperm 700 changing permissions to 770 at the same time: unixsocketperm 770
Save and quit, then add the Apache user www-data to the redis group:
sudo usermod -a -G redis www-data
Finally, restart Apache with:
sudo service apache2 restart
And start Redis server with:
sudo service redis-server start
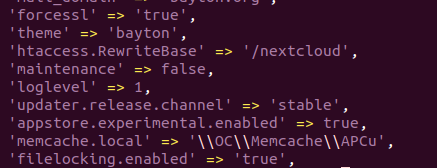
With Redis configured, we can add the caching configuration to the Nextcloud config file:
sudo vim /var/www/html/nextcloud/config/config.php
Add the following:
A reboot may be required before the configuration change takes effect, but before we do we’ll make sure Redis is enabled to start on boot with:
sudo systemctl enable redis-server
Caching is now configured.
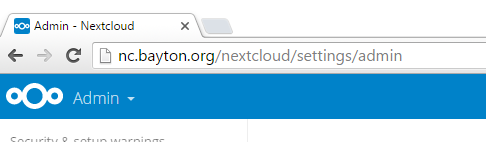
With both of these now resolved, the admin interface is looking a lot healthier:

6.3. Pretty links
Much like theming, pretty links aren’t mandatory, but they add to the overall aesthetics of the server.
Most of the hard work was already done during the setup of the environment with the enabling of mod_env and mod_rewrite , however to complete the removal of index.php in every URL, re-open the Nexcloud config file:
sudo vim /var/www/html/nextcloud/config/config.php
Add ‘htaccess.RewriteBase’ => ‘/nextcloud’, (where nextcloud is the URL location – domain.com/nextcloud – of the installation) below one of the existing configuration options, for example:
Finally, from /var/www/html/nextcloud , run:
sudo -u www-data php occ maintenance:update:htaccess
To (don’t simply refresh the page, remove index.php from the URL and load the page again, otherwise it looks like it doesn’t work):
6.4. Max upload
Until we try to upload files this is easy to miss. By default PHP ships with a file-upload limitation reminiscent of file sizes in the early 2000’s – 2MB. As we’re installing a personal cloud that may hold on to files gigabytes in size, we can change the PHP configuration to allow far more flexibility.
Open the php.ini file (7.0 may need to be replaced with a newer version of PHP, like 7.2):
sudo vim /etc/php/<strong>7.0</strong>/apache2/php.ini
Locate and amend:
The max size can be tweaked to suit, however be sure to always give post_max_size a bit more than upload_max_filesize to prevent errors when uploading files that match the maximum allowed upload size.
sudo service apache2 restart
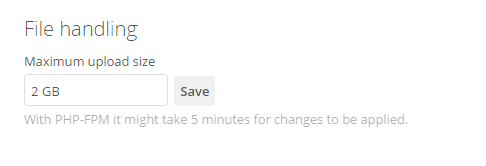
Log into the admin area of Nextcloud, navigate to additional settings and ensure the max upload setting there reflects the change made to the php.ini file (in this example, 2GB):
6.5. Nextcloud 12+ PHP Opcache
From Nextcloud 12, additional configuration is required in order to correctly setup PHP Opcache. The following error displays until this is completed:

Re-open the php.ini file:
sudo vim /etc/php/7.0/apache2/php.ini
At the bottom of the file, add the following, as displayed above:
Save the file and restart Apache:
sudo service apache2 restart
On refreshing the browser, the warning should no longer be there.
6.6. Server-side encryption (optional)
As we’re running our Nextcloud installation on a remote host, far outside the confines of our internal network, it’s a good opportunity to enable server-side encryption. This guarantees that should anyone gain access to the data hosted on the server, file contents won’t be readable.
6.6.1. Encryption can lead to data loss
Encryption is a complex topic and getting this wrong will lead to data loss. Generally, using Nextcloud server-side encryption is not needed or recommended and instead you should strongly consider client-side encryption, or other methods of enforcing OS filesystem encryption instead. Continue at your own risk.
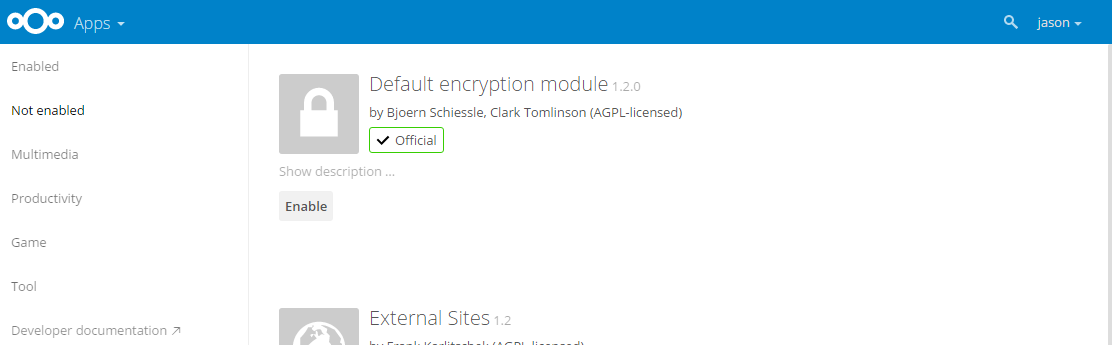
First we’ll enable the default encryption app:
- Click the Files link and switch to Apps
- Click Not enabled from the side-menu
- Click Enable on the Default encryption module
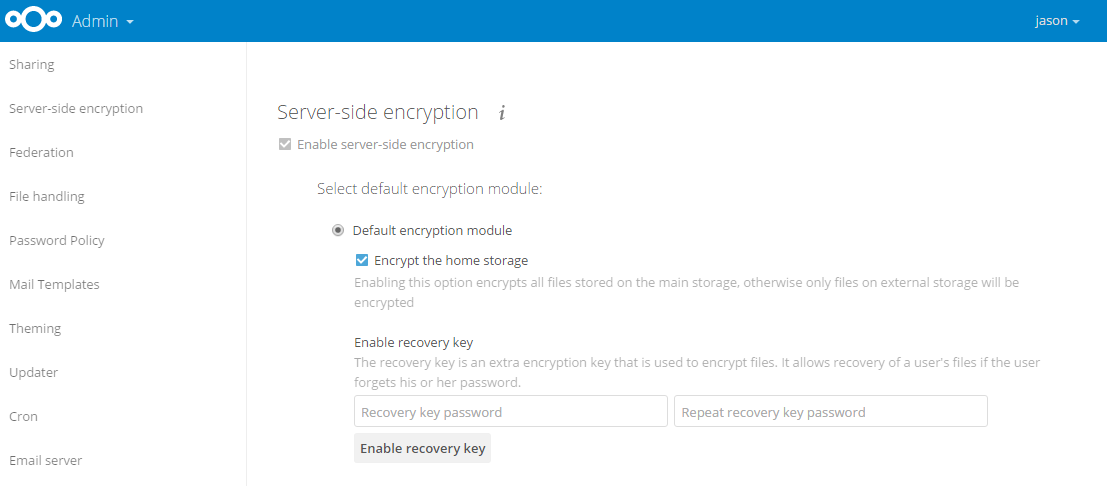
Next we’ll log into the Nexcloud administration area and navigate to Server-side encryption. Click Enable server-side encryption:
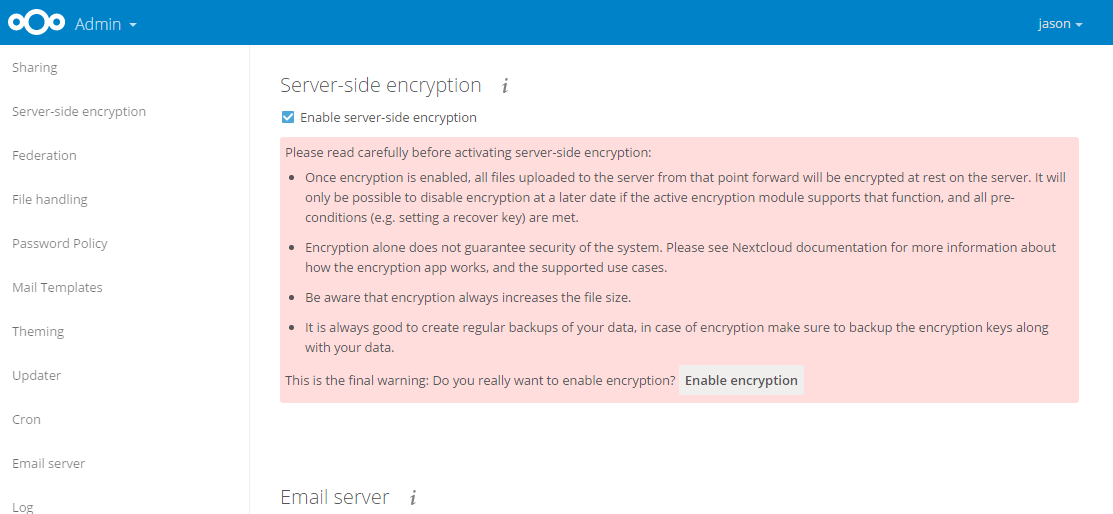
After reading through the warnings, click Enable encryption. We now need to log out and back in:
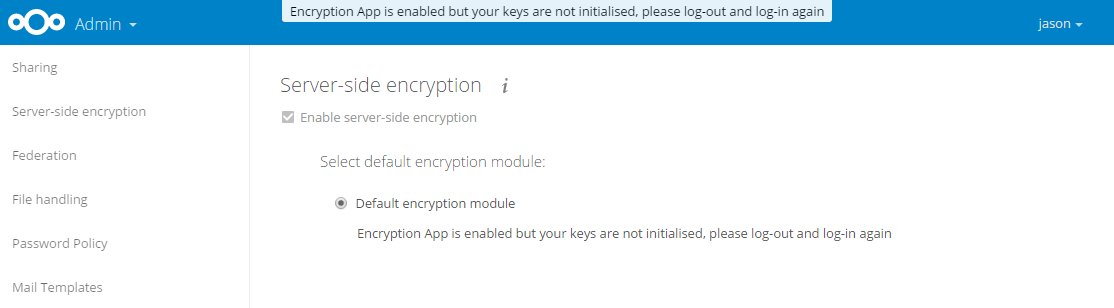
After logging back in and returning to this area, it will be possible to create a global recovery key:
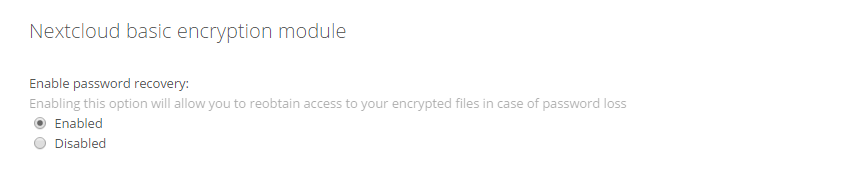
However, if a global recovery key is considered too all-powerful, individual users may also recover encrypted files with their password by setting the following option to Enabled in Personal located when clicking the username in the top-right of the screen:
All data will now be encrypted at rest, as well as protected in transit when using SSL.
7. Conclusion
So following this guide we now have a new server running Nextcloud on Ubuntu supporting both caching and pretty links.
While this is yet another long-winded guide, as usual there’s nothing here I would consider to be overly complex which, for a platform that empowers self-hosting data, is a big plus over other solutions.