ArchPKGs
Complete Guide on llama Installation on Arch-Based Linux (Manjaro/BlackArch)
Quoting from llama 's own profile, it is "Terminal file manager". To install or remove this package ( llama ) from AUR (Arch User Repository) on Arch Linux and Arch-based Linux distros (e.g. Manjaro, EndeavourOS, Anarchy, BlackArch) is pretty easy. This tutorial will cover how to install/update/uninstall the package with either the built-in package manager pacman or an AUR helper (e.g. yay ).
Table of Contents
Install link
There are two common fashions to install llama from AUR. pacman is what you're looking for if you're a seasoned Linux user and have the knowledge of how packages are built. If not, yay is a convenient alternative to install packages without the need to review PKGBUILD and build packages with makepkg on your own.
Install with pacman (Package Manager) link
Install git if it is not installed before.
clone the package’s git repository from source.
cd into the folder.
Use makepkg to build the package, then install it with pacman .
Install with yay (AUR Helper) link
Update link
Just like installing AUR packages, updating them is pretty much the same. Simply pull it from upstream then re-build it. Yet, it is still recommended to upgrade your whole system first with sudo pacman -Syu before updating any packages to avoid breaking your system, since Arch is a rolling-release Linux distro.
Update with pacman (Package Manager) link
Before running the command, make sure you're in the folder of the repository you previously cloned:
pull from the package’s git repository.
Build the package with makepkg , then update it with pacman .
Update with yay (AUR Helper) link
Selecting repository (AUR) to prevent updating the package from another repository:
Remove link
Uninstalling packages is the simplest of these three,just choose whether to remove the dependencies that no longer required by other packages and the configuration files used by the package.
Uninstall with pacman (Package Manager) link
Only purge the package:
To purge the unused dependencies as well:
To purge both the dependencies and the configuration files:
Uninstall with yay (AUR Helper) link
Uninstalling packages on yay is pretty much the same as pacman :
To remove the dependencies that no longer required as well:
To purge both the dependencies and the configurations:
Learn more information about how to install and update AUR packages on Arch Linux, please refer to this tutorial.
Using the Docker Images
The easiest way to get a working copy of LLAMA on any platform is to use the prebuilt LLAMA Docker images. These builds are automatically created and tested from the latest source code and have no external dependencies other than Docker. Docker is kind of like a Linux virtual-machine; you run a Docker “container” on your computer as if it were a totally separate computer, allowing the container to run the same regardless of whether you’re using Windows, Linux, or MacOS.
One difference of convention between VMs and Docker is that you’re usually expected to erase your Docker container as soon as you are done working with it, whereas a VM image might be persisted across multiple use sessions (you’re not forced to use Docker this way, but in general it’s probably useful to remember that Docker containers are supposed to be somewhat more ephemeral than your average VM). You can read plenty more online if you’re interested, but that’s all you need to know to get started.
NOTE that if you are trying to use the LLAMA images on Habanero, you will need to download and run them using Singularity (a container manager like Docker which supports Docker images). Check out the :ref:`instructions for using Singularity with LLAMA images <singularity-llama>`_ as well as the Habanero Singularity cluster job example documentation.
Installing Docker
First, you’ll need to install Docker for MacOS, Windows, or Linux. Follow the official Docker instructions. You might need to disable other VM solutions (like VMWare) for this to work. On Windows, you might be asked whether you want to use Linux or Windows virtual machines; make sure to choose Linux.
On Linux, Docker should run automatically in the background as a daemon process. On Windows or MacOS, you will need to manually start Docker the way you would any other application (though you can set it to start automatically at startup in both cases).
You will interact with Docker through a command line client that communicates with the Docker daemon. What this means is that you will use a terminal to control Docker via textual commands. If you get error messages saying that the daemon isn’t running, you’ll need to manually start (or restart) the daemon as described above. Again, on MacOS and Windows, this would involve finding the program called Docker and launching it in the same way you would any other program. To access the command line interface, you can open:
Terminal.app , iTerm.app , alacritty.app , etc on MacOS
cmd.exe or PowerShell on Windows (Note that on Windows you must not use Bash/Ubuntu/Windows Subsystem for Linux to issue Docker commands; use one of the native windows shells mentioned here)
xterm , alacritty , etc. on Linux
After installing Docker, you can make sure the command line client is installed and the daemon running with:
which should spit out something like:
Docker Cloud
LLAMA software is saved in a Docker image (basically a snapshot of a working Linux server with LLAMA installed) on Docker Cloud. You’ll need to make an account on Docker Cloud and share your username with Stef, who will add you to the list of contributors to the LLAMA Docker image. This will allow you to “pull” (i.e. download) copies of this image to your computer.
Once you’ve been added as a collaborator, you should be able to view the LLAMA repository on Docker Cloud.
Once this is set up, you can log in from the Docker daemon using the command line interface by running docker login and providing your Docker Cloud username and password.
Getting LLAMA Images
If you just want to run the pipeline, you can use the default image and skip ahead to the :ref:`running a LLAMA container <running-a-LLAMA-container>`_ section; LLAMA will automatically be pulled if it has not been downloaded already.
You’ll need to pull LLAMA images from Docker Cloud in order to use them; this is basically like pulling down a hard drive image of a working LLAMA server (the “image”) which Docker can then run as if it were its own seperate server (a “container”, which is the running version of the “image”). You can use the same command to update to the latest LLAMA image.
Choosing the Image
In most cases, you’ll want to use stefco/llama:py37-play as your LLAMA Docker image, though a few other options do exist. You can probably skip to the next section unless you want to use one of those other versions (in which case you can substitute that image name for stefco/llama:py37-play where it appears).
The LLAMA images are named stefco/llama:<TAG> , where <TAG> is one of 3 values (at time of writing) depending on the way the image is configured:
py37 just contains the LLAMA software; it is not configured to communicate with any external services. You will rarely use this as it mainly serves as a base for the other two tags.
py37-play is configured to pull IceCube data and communicate with the LLAMA team Slack. It will not upload results to IceCube Slack or GraceDB unless you configure it to do so, making it relatively safe for experimentation. It does have LIGO authentication software installed, so you can access GraceDB from it by running kinit albert.einstein@LIGO.ORG (with albert.einstein replaced by your LIGO username, of course) followed by ligo-proxy-init -k .
py37-prod is fully configured for automated production use. There’s not really any reason to use this on your laptop unless you know what you’re doing.
Additionally, you can access any successful tagged release of LLAMA by appending a dash followed by the version tag of the source code. For example, if you would like to explicitly use LLAMA version v2.28.8, you would append -v2.28.8 to the end of the image name. The full image name for the py37-play tag (which, again, is most appropriate for personal use) would then be stefco/llama:py37-play-v2.28.8 . If you omit the version, then the latest version will be chosen.
Getting/Updating the Image
You can pull (i.e. download) the latest version of the LLAMA image with:
The image is fairly large (several GB), so this will take a while. Note that this will download the latest version of the image even if you have an older version installed, so you can use this command to update to the latest version. See the previous section for more details on choosing a LLAMA image version.
Removing Images
Images are just starting points for containers; you can redownload them whenever you have a fast internet connection, so feel free to delete them when you need to free up space.
You can list installed images with
Which will print something like the below, with each installed image listed on its own line:
You can delete this by either referencing the TAG or IMAGE ID . For instance, you could delete the above with:
If you’re not running any Docker containers and don’t mind redownloading images, you can also delete all local Docker data with a single command:
(This might take a little while.)
Running a LLAMA Container
You can run an interactive LLAMA session using:
Note that whatever work you do will not be transferred to your host computer unless you share directories between the host and container. If you are creating analysis results that you want to copy to your local system, you can :ref:`mount Docker directories <mount-Docker-directories>`_ from your host machine to your local machine as described in the next section.
The previous command will download the LLAMA Docker image if it is not present locally and start it up. A quick breakdown of what each option is doing:
run tells Docker to create a new container from the specified image and run commands on it.
-it is the same as -i -t ; -i tells Docker to set up an interactive session and -t tells Docker to create a pseudo-TTY (i.e. a terminal) for interaction. In other words, start up a command line in the LLAMA container so that we can use it like a normal server.
—rm tells Docker to delete this container as soon as we exit from the interactive session, throwing out any changes we’ve made to the base image. You almost certainly will want to use —rm every time you docker run .
stefco/llama:py37-play is the name of the container we want to use.
bash is the starting command; you can omit bash , in which case you’ll be thrown into the somewhat less feature-rich default sh shell. (Alternatively, you can specify another shell or command that should run instead of bash.)
You’ll now have an interactive LLAMA prompt in front of you. You can use the :ref:`LLAMA Command Line Interface <LLAMA-Command-Line-Interface>`_ , e.g. by running llama and reading the help documentation, or you can start up ipython and import llama to start using the library directly in iPython.
Mounting Directories
One of the nice things about Docker is that it lets you share and sync directories between host (your computer) and Docker container. This means you can do work in the container in a shared directory, and the output files will appear in the corresponding directory, and the output files will also appear in the corresponding shared folder in your host machine. Directories are only synced this way if you explicitly request it, so it’s easy to avoid unpredictably contaminating your host machine no matter how badly you screw up a container (within reason).
Because paths are specified differently in Windows vs. UNIX-like operating systems, the instructions are slightly different based on the platform, though in both cases you add a -v host_path:container_path flag to a docker run command like the one given previously in :ref:`running a LLAMA container <running-a-LLAMA-container>`_ .
Note that in both cases the directory on the host machine, host_path , must exist on the host machine and must be an absolute path, e.g. /home/stef/dev will work but a relative path like dev will not (at time of writing). container_path should resolve to a a path in an existing directory; if container_path itself already exists, Docker will mount the host volume on top of it, effectively rendering the existing directory inaccessible (which might be desired behavior depending on your use case, but it’s something to be aware of).
Note that, if you have a long-running container that you don’t want to stop (perhaps because you forgot to mount a volume when you created it), you can still mount a volume on it. It’s also possible to specify Docker volumes that persist between containers and are not directly accessible to the host machine; these have higher performance than the shared mounts discussed here and are good for persisting state/transferring data between containers in cases where convenient sharing with the host is not the top priority. Refer to the Docker API for information on how to do this.
Mounting in MacOS/Linux
On MacOS or Linux, you simply specify the host directory to mount followed by a colon and the path on the container. For example, if you’re on MacOS and your username is Stef , you could mount your home directory to /root/stef in the container with -v /Users/Stef/:/root/stef . The example given in :ref:`running a LLAMA container <running-a-LLAMA-container>`_ would look like:
This is the same as the previous example, except now you’ll be able to access and modify the contents of your home directory on your host computer from the container’s /root/stef directory. You can of course use this to save analysis results on your local computer, allowing you to persist your analysis results even after exiting your interactive Docker session (which, as described above, will delete the container automatically when used with the —rm flag).
Mounting in Windows
This is the same as in MacOS/Linux, but the path on the host must include the root volume name (e.g. C: ). You can also use Windows-style back-slash directory separators for the host path, though the container path must still be in UNIX format (forward-slashes). Before you can mount a host directory, however, you’ll have to tell Windows to allow the directory to be mounted. This can be done from the Docker daemon graphical control panel in the system tray:
The Docker daemon settings can be accessed from the system tray on Windows; click on the tray icon and select “settings” from the pop-up menu. 
You can then select the drives you wish to make available to Docker containers from your host machine. If you have a single Windows hard drive where you’re storing your analysis results, you will most likely want to choose C: .
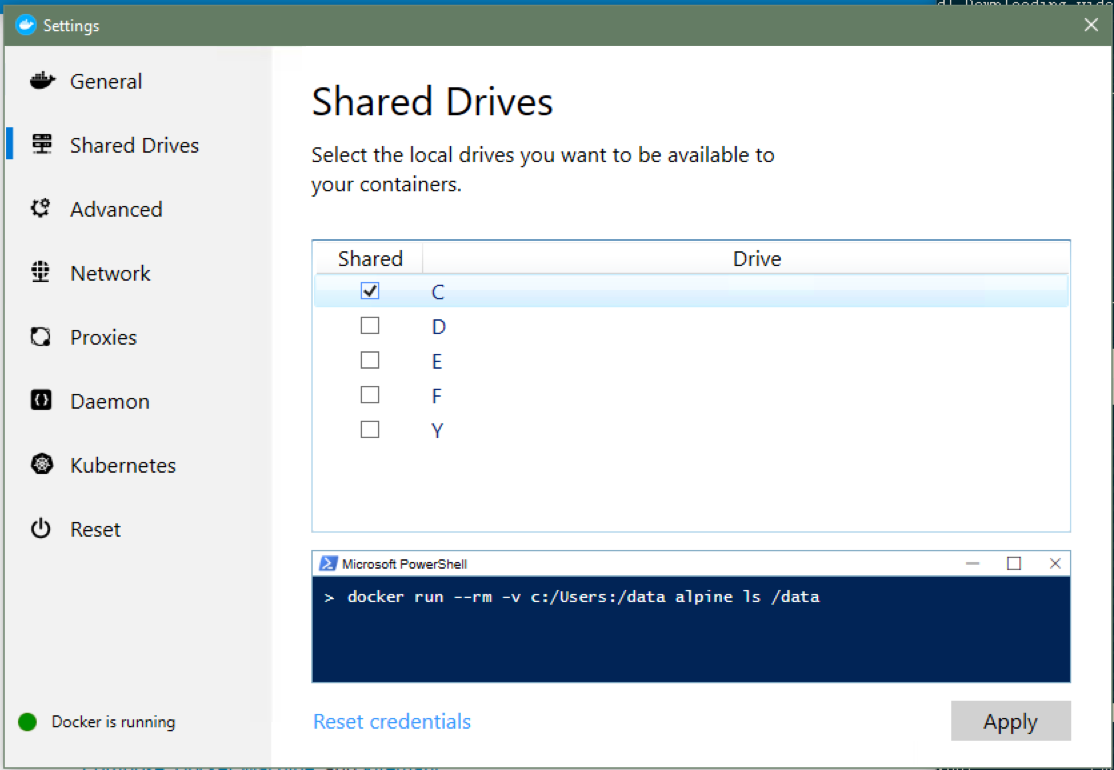
Select the volumes you’d like to make available for sharing and hit Apply when done. 
Now, assuming your windows username is Stef and you want to mount your home directory to /root/stef on the Docker container, you would add the volume mount in the same way as was done in the MacOS/Linux example, though again you’ll use Windows-style path syntax (again, remember to use absolute paths rather than relative paths):
Or, using Windows path style for the host path,
Note that for Windows hosts the first colon is used to represent the local volume, and so the second colon is the one that separates the host path from the container mount path.
Out of Memory/Disk
If you are getting a MemoryError when you run memory-intensive parts of the analysis, you can either add more memory through your Docker settings or add :ref:`swap space <swap-space>`_ to your container; this can be done with the linked instructions within an interactive container session.
You can also increase the amount of disk space available to Docker from the Docker daemon control panel, though you are unlikely to need much space if you are doing one-off activities like processing public events from an observing run.
Running on Habanero
If you’re trying to run on the Habanero cluster, first read the Choosing the Image section to learn how to pick the correct LLAMA image for your job.
Interactive Habanero Jobs
Log in to Habanero using:
Where uni is your Columbia UNI (i.e. username). You’ll be asked for your Columbia password. If you can’t log in this way, ask Zsuzsa whether you have access to Habanero.
When you first log in to Habanero, you will be using a log in node; you are running on a shared server that puts severe limits on how much computing power you can use. You are supposed to use this node only for submitting batch jobs or, if you want to do interactive work (which we will below), for starting an interactive session on a high-powered node.
You can start an interactive session with:
This will take a few seconds to start up. Once it does, you’ll be running on an interactive node with much more available computing power. It’s a good idea to do this pretty much any time you want to do anything on Habanero. Of course, the above command is hard to memorize, so you’ll probably want to add the following to your
/.bashrc with source
/.bashrc . Now, you can start an interactive session simply by running interactive , and it will execute the same command we ran above.
Once you are finished with your interactive session, you can stop it by running exit , and you will be returned to the login node. BEWARE that Habanero likes to boot users out of interactive sessions after a few hours, and that there is no way to log out of an interactive session without killing it. Habanero is designed as a batch-processing cluster; if you need a persistent server, spin one up using DigitalOcean or something like it.
Docker Hub Authentication with Singularity
You’ll probably want to use the private LLAMA Docker images, which have all of the LLAMA software installed and certain authentication credentials pre-configured. To do this, you will need access to the private Docker Hub LLAMA repository. (Note that if you can’t view the previous link, it probably means you need to create Docker Hub login credentials and then ask Stef to add you as a collaborator to that repository.) To provide Docker Hub login credentials to Singularity, you’ll need to set the SINGULARITY_DOCKER_USERNAME and SINGULARITY_DOCKER_PASSWORD environmental variables to your Docker Hub username and password, respectively. The easiest way to do this is to add the following two lines to your
Where, of course, you replace username with your username and password with your password. Reload your
/.bashrc to make these changes take effect with:
Fixing Singularity Cache on Habanero
Unfortunately, Habanero only lets you keep a small amount of data in your home directory. This is a problem for Singularity, which keeps its downloaded data in
/.singularity ; LLAMA’s huge docker images will rapidly use up your space quota, and your attempts to pull images will fail; this is true even if you try to save your downloaded images somewhere with space, since the files will first be downloaded to
The solution to this problem is to make your own directory in our much larger group data volume, /rigel/geco/users , and create a symbolic link pointing from the default
/.singularity path to one stored in your directory on the group volume. First, make your directory in the group volume (if you haven’t already). Run the following, replacing uni with your Columbia UNI:
You’ll get an error if the directory exists or if you are not part of the GECo group on Habanero. If this second case is the issue, bug Zsuzsa to get you in the group.
Now, you might already have a
/.singularity directory set up; if that’s the case, you can go ahead and remove it, since it generally only contains cached data.
Next, make a new Singularity directory in you /rigel/geco directory, again replacing «uni« in the below command with your Columbia UNI:
Finally, you can create a symbolic link telling the operating system to use this new directory whenever it wants to use
/.singularity (again, replace uni with your Columbia UNI):
Load Singularity Module
You’ll need to load the Singularity module before you’ll have access to the command line interface. Module loading is Habanero’s way of letting you choose which programs are available; a lot of stuff that’s installed is only available for use by calling module load <modulename> . Let’s load the Singularity module:
Pull LLAMA Image
Now, we’re finally ready to get our LLAMA image. Again, if you need help choosing an image, refer to the Choosing the Image section. Let’s say you want to use the latest version of the play image (used for processing data without pushing it to IceCube or other collaborators), called stefco/llama:py37-play . First, navigate to your personal directory in /rigel/geco (replace uni with your Columbia UNI):
You can now pull the image and save it in Singularity’s format as llama-play.sif using the following command (though be warned, it will take a VERY long time for Singularity to build the image after pulling it):
Again, this command will take a very long time; even after it has finished copying data from Docker Hub, it will spend a while combining the data into a single output image, llama-play.sif . Don’t worry if it seems like it’s frozen; as long as it hasn’t exited with an error, it’s probably running okay.
Once this command finishes, run ls ; you should see your new image, called llama-play.sif . You can run this image using:
Local Installation
These installation instructions are for more advanced users who want to install LLAMA on their local machine without the use of Docker. See :ref:`the developer instructions <developer-instructions>`_ for information on developer dependencies and tools as well as further background documentation.
This section is not guaranteed to be as up-to-date as the Docker instructions because it is subject to more frequent change. The official provisioning/installation procedure can always be recovered from the continuous integration procedures used to create the Docker images.
System Requirements
Make sure you have at least 4GB of memory (physical or virtual; :ref:`swap space <swap-space>`_ is fine) and 15GB of free space on your file system.
Installing Conda
LLAMA depends on LIGO tools that are only distributed via conda , so you’ll need to install an Anaconda python distribution to get up and running ( developer notes on Conda <migrating-to-conda> ): Conda installs are done on a per-user basis, so you won’t need to use sudo for any of the below. Start by installing the latest version of Conda:
Log out and log back in again, then activate conda-forge and install LIGO tools:
Activate the LIGO virtualenv (NOTE: You will need to do this every time you want to use this python setup! Consider putting this command in your .bashrc file.):
Как установить llama.cpp в Gentoo?
кто-нить уже придумал хоть одно разумное применение всяких ии или только вопросы о конце света и «напиши мне код»?
Интересно, благодарю, наступает вечер красноглазого рукоблудия.
Установить в Генту так же как и в любом другом линукс, собрать в своём уютном хомячке по инструкции. Писать для этого ebuild я конечно же не буду.
Одно только «напиши мне код» ускоряет создание всякой прикладной скриптохерни в десятки раз. Ессно копипастить этот код не нужно, но в качестве примера реализации годится.
Надеюсь мелкософт, который вбухал туда 1млрд, будет таким аргументом доволен ))
git clone и собираешь, разве не так?
Пока ты ищешь ему применение и патетически задаёшь риторические вопросы, лично я это применение нашёл, и уже вовсю использую. И так это оказалось удобно что я даже за доступ заплатил.
Да, я использую ЧатГПТ как костыль-подпорку при написании скриптов. Нет, мне не стыдно, я не программист, мне не нравится программировать, написание скриптов вынужденное занятие, с удовольствием бы этого не делал совсем. Обнаружил что ЧатГПТ экономит кучу времени предоставляя готовые для переработки и осмысления примеры, а так же отыскивая фрагменты документации.
написание скриптов вынужденное занятие
Это значит что основная моя деятельность программированием не является, но скрипты нужны для автоматизации например. Ты сам попробуй, ЧатГПТ программиста конечно не заменит, но вот дополнить вполне может, в качестве «умной справки» и подсказчика\советчика. Главное научиться задавать «правильные вопросы» (в которых уже содержится половина ответа, как писал Шекли).
Я не один так ей пользуюсь, мне тоже посоветовали, и мне понравилось. По ощущениям «парное программирование» с этой штукой может скорость создания кода в десятки раз увеличить. Главное побороть снобизм, недоверие и предрассудки на тему «да чего мне там умного этот попугай может насоветовать, он пишет нерабочий код». Ну да, так и есть. Только глядя в примеры «нерабочего» кода «рабочий» создаётся быстрее и эффективнее.
Лично у меня нет задачи писать гениальные и эффективные алгоритмы, у меня задача написать так чтобы эта штука делала то что она делать должна, причём написать быстро, потому что это вспомогательная задача.
если копипастить постоянно то, что он предлагает будет хаос. Я согласен, что он помогает, но на это вбухать 1млрд зеленых?? Неудивительно, что гугел так и не поставил свой бард в приоритет. ПОка что ии игрушка.
Засунули его в бинг типа «у нас есть гопотачат и мы лучше гугла. Гы». На самом деле гугл монстр по сбору информации и никакой бинг его не сделает. Вот доработают бард тогда посмотрим
если копипастить постоянно то, что он предлагает будет хаос
Использование ИИ не отменяет и не запрещает использование собственных мозгов. Речь идёт не о замене человеческих мозгов на машинные, речь об их совместном использовании. И вот тогда возникает синергия, которую лично я уже ощутил. Сорян, но твоего интеллекта явно недостаточно для того чтобы оценивать целесообразность вложения миллиарда зелёных.
IMHO деньги вкладывают не зря, «гонка моделей» уже напоминает «Лунную гонку» в космонавтике, и последствия её будут качественными, а не количественными. Как и в результате «Лунной гонки», колонизации не случилось, но во множестве связанных областей произошёл существенный прогресс, например в материаловедении.

Тебе нужен https://github.com/LostRuins/koboldcpp. Это форк твоей ламы, но с web ui. Собирается одним вызовом make.
Модели брать здесь https://rentry.org/nur779. Выбирай формат ggml. Например из раздела Alpaca quantized 4-bit weights (ggml q4_0). Я пробовал 13b и 30b.
Сорян, но твоего интеллекта явно недостаточно для того чтобы оценивать целесообразность вложения миллиарда зелёных.
Натюрлих, куда уж мне убогому )) Хосподя, люди не меняются, всегда надо ощущать превосходство.
Как смотрю тут видео про нацистов и вов одна дочь генерала рассказывает:
Отец всегда говорил этот так приятно — побеждать!!
Натюрлих, как же можно не видеть во всём попытку овладеть и перестать анус ладошкой прикрывать. Хорошо, я извиняюсь, видимо твоего интеллекта достаточно чтобы оценить эффективность вложения миллиарда долларов, прости что усомнился.
Использование ИИ не отменяет и не запрещает использование собственных мозгов.
Человечество с древних времен все строит, строит, строит . вавилонские башни и находит сотни оправданий для чего они нужны.
ИМХО ИИ это очередной «мирный атом».
Для машины со 128гб мозгов какую модель брать? Я статью на хабре читал, но чот не понял с первого раза как циферки в названии с объёмами занимаемого ОЗУ коррелируют. Где количество потоков задаётся я уже нашёл.
А как по мне это вполне может оказаться точкой бифуркации и «технологической сингулярностью». Количественное наращивание сложности и мощностей вполне может внезапно перейти в новое качество. А может и не перейти, но даже в этом случае синергетический эффект будет, просто пока он не особо заметен. Да и нам особо не рассказывают про практические применения. Это не значит что их нет, скорее это означает что там большие деньги и время говорить ещё не настало.
Кстати аналогии про «мирный атом» и «вавилонские башни» я не понял. Предлагается десятками тысяч лет ковырять грунт деревянной сохой с трудом себя прокармливая? В этом счастье? А с «мирным атомом» что не так? Я вот другого столь же эффективного практического способа вырабатывать электроэнергию не знаю. Да, чернобыльфукусима ужасужас, но это локальные беды, а глобально без него никак, вообще никак.
Памяти много не надо. У меня 64 ГБ и модель на 30b влезает. Тут скорее выбирать по соотношению качество/скорость работы. У меня 30b за минуту 80 токенов выдаёт. А модель 13b за 20 секунд.
Кстати как она «вширь» масштабируется? Многопоток сильно влияет? Если у меня 16 реальных камней (32 с гипертредом) эффект будет от них, или частота важнее?
У меня ryzen 5950x 16c/32t. ЦП на полную не прогружает. Где-то на 50% ядра и нагрузка скачет между ядрами.
Сначала пробовал без указания потоков, потом ставил на 16. Но особой разницы не заметил. Пробовал собирать с openblas и cblas.
Если получится хорошо настроить, то поделись. У меня сейчас времени нет разбираться.
Потому как его ныне и не в мирных целях используют.
Как и топоры. Достоевский об этом писал. И даже ножи для бумаги

Не 1млрд, а 10млд.
Видите ли в «шестой палате» (это нынешнее человечество), топоры и ножи используют часто не по назначению.
Что касаемо «мирного атома», то ныне в ФРГ закрыли последние три действующие атомные электростанции.
А вот ядерные боеголовки никто не собирается уничтожать.
Да и «прошлое человечество» использовало их по всякому. Это вообще человечеству присуще как биологическому виду, это не «нынешнее» человечество изобрело.
Но есть и позитивный взгляд. Если построить график «дикости, зверств и ксенофобии» по мере развития человеческой цивилизации, то мы увидим что глобальный тренд идёт в сторону смягчения нравов, а не их ужесточения. Это не отменяет локальных зверств, геноцидов и бомбардировок хиросим с нагасаками, но суть в том что эти события осознаются и оцениваются отдельно, неоднозначно, как исключения, а не нормы. А скажем совсем недавно геноцид завоёванного племени или народа был настолько обыкновенен что воспринимался совершенно естественно.
Так что с одной стороны ядрёны бонбы и хиросимы с нагасаками, а с другой стороны в целом человечество становится добрее и мягче.
Не закрыли, а законсервировали. И подозреваю что причины на то были экономические, а не идеологические. Конечно идеологически это было подано как «победа зелёных» и т.п., но думаю что если разобраться то окажется что в этих районах выгоднее избыточную выработку из Франции покупать чем содержать работающую АЭС.
Сейчас весь OpenAI включая распиаренный ГПТ не на бумаге, но на деле является собственностью майкрософт, инвестировали они не по доброте душевной, а для плясания под их дудку. Впрочем ничего нового, к слову не знаю как сейчас, но всё что генерит ГПТ нельзя использовать кроме как в сугубо личных целях.
Гугл сделал мелкософт во многих направлениях и поэтому было как бы делом чести мелких унизить гугл хоть в чем-нибудь.
то мы увидим что глобальный тренд идёт в сторону смягчения нравов
Я прежде говорил, и теперь говорю, и после буду говорить, что больше тех, которые погибнут, нежели тех, которые спасутся, как волна больше капли.
ОМГ, ну конечно же нельзя. Но можно использовать в качестве инструмента человеком для целей общественных. Я чот никак не пойму, почему настолько простая мысль никак не проникает глубоко в древесину — интеллект искусственный не отменяет и не заменяет интеллект естественный, тут нет ситуации исключения, или\или. Тут конкатенация, «и». «Экспертные системы» используются давно и эффективно, возможность взаимодействовать с ними на естественном языке расширяет её применимость до невероятных пределов, например теперь ей способен пользоваться не обученный тонкостям работы с ЭС человек.
Хватит оценивать технологию по её публичному, цензурированному и кастрированному примеру, фишка не в том что «ОМГ оно пишет код», фишка в другом, «ОМГ оно понимает что я от него хочу без написания запроса на „птичьем“ языке с кучей условий и логических операторов».
Не нужно отказываться думать своей головой и копипастить то что попугай написал, а потом ругаться что попугай тупой и написал плохо. Тупой тут не попугай.
Update:
This guide continues to be up to date, but a new Simplified Install Guide has been created, including text generation web UI one-click installers, llama.cpp, and usage with AMD: https://www.reddit.com/r/LocalLLaMA/wiki/guide
Other useful links
Will this run on my [insert computer specs here]?
The answer is likely yes, using llama.cpp. Please check the system requirements first in the models wiki page, and you can also search this subreddit to see if someone with a similar computer has asked before.
What's a good model for
| Creative Writing | Complex Instructions | Assistant Chatting | Medical Domain | Visual Instruction |
|---|---|---|---|---|
| Guanaco 30B | WizardLM 30B v1.0 | OASST RLHF LLaMA 30B | MedAlpaca 30B LoRA | LLaVA |
| GPT4 x Vicuna 13B | WizardLM 13B v1.0 | Vicuna v1.1 13B | Baize 7B Healthcare | LaVIN |
| AlpacaGPT4 7B | Vicuna Evol-Instruct 7B | Vicuna v1.1 7B | PubMed LLaMA 7B | MiniGPT-4 |
These are example recommendations. All other models are listed in the models wiki page.
Starter Parameter Tips
| Precise | Creative | |
|---|---|---|
| Good for: | factual responses and straightforward assistant answers | chatting, writing stories, and interesting assistant answers |
| temperature | 0.7 | 0.72 |
| repetition penalty | 1.176 | 1.1 |
| top_k | 40 | 0 |
| top_p | 0.1 | 0.73 |
These are examples. Try the different parameters and experiment for your use case.
Q: What is LLaMA?
A: LLaMA (Large Language Model Meta AI) is a foundational large language model designed primarily for researchers. Like other large language models, LLaMA works by taking a sequence of words as an input and predicts a next word to recursively generate text.
Q: Is LLaMA like ChatGPT?
A: No. LLaMA models are not finetuned for question answering. They should be prompted so that the expected answer is the natural continuation of the prompt. Nonetheless, it is possible to chat with LLaMA models in a way similar to ChatGPT but not near the same quality.
Q: What languages does LLaMA support?
A: Primarily English, but it should have limited capabilities for the following languages: bg, ca, cs, da, de, es, fr, hr, hu, it, nl, pl, pt, ro, ru, sl, sr, sv, uk.
Q: I've heard about Alpaca. What is that?
A: That refers to the Stanford Alpaca project, an effort to build an instruction-following LLaMA model from the standard 7B LLaMA model. It has been shown to produce results similar to OpenAI's text-davinci-003. This guide contains instructions on trying out Alpaca using a few different methods.
8-bit Model Requirements
| Model | VRAM Used | Minimum Total VRAM | Card examples | RAM/Swap to Load* |
|---|---|---|---|---|
| LLaMA-7B | 9.2GB | 10GB | 3060 12GB, 3080 10GB | 24 GB |
| LLaMA-13B | 16.3GB | 20GB | 3090, 3090 Ti, 4090 | 32GB |
| LLaMA-30B | 36GB | 40GB | A6000 48GB, A100 40GB | 64 GB |
| LLaMA-65B | 74GB | 80GB | A100 80GB | 128 GB |
* System RAM, not VRAM, required to load the model, in addition to having enough VRAM. NOT required to RUN the model. You can use swap space if you do not have enough RAM.
4-bit Model Requirements
| Model | Minimum Total VRAM | Card examples | RAM/Swap to Load |
|---|---|---|---|
| LLaMA-7B | 6GB | GTX 1660, 2060, AMD 5700 XT, RTX 3050, 3060 | 6 GB |
| LLaMA-13B | 10GB | AMD 6900 XT, RTX 2060 12GB, 3060 12GB, 3080, A2000 | 12 GB |
| LLaMA-30B | 20GB | RTX 3080 20GB, A4500, A5000, 3090, 4090, 6000, Tesla V100 | 24 GB |
| LLaMA-65B | 40GB | A100 40GB, 2×3090, 2×4090, A40, RTX A6000, 8000 | 48 GB |
Installing Windows Subsystem for Linux (WSL)
>>WSL installation is optional.<< If you do not want to install this, you can skip over to the Windows specific instructions below for 8-bit or 4-bit. This section requires an NVIDIA GPU.
On Windows, you may receive better performance when using WSL. To install WSL using the instructions below, first ensure you are running at least Windows 10 version 2004 and higher (Build 19041 and higher) or Windows 11. To check for this, type info in the search box on your taskbar and then select System Information. Alternatively, hit Windows+R, type msinfo32 into the "Open" field, and then hit enter. Look at "Version" to see what version you are running.
Instructions:
Open Powershell in administrator mode
Enter the following command then restart your machine: wsl —install
This command will enable WSL, download and install the lastest Linux Kernel, use WSL2 as default, and download and install the Ubuntu Linux distribution.
3. After restart, Windows will finish installing Ubuntu. You'll be asked to create a username and password for Ubuntu. It has no bearing on your Windows username.
4. Windows will not automatically update or upgrade Ubuntu. Update and upgrade your packages by running the following command in the Ubuntu terminal (search for Ubuntu in the Start menu or taskbar and open the app): sudo apt update && sudo apt upgrade
5. You can now continue by following the Linux setup instructions for LLaMA. Check the necessary troubleshooting info below to resolve errors. If you plan on using 4-bit LLaMA with WSL, you will need to install the WSL-Ubuntu CUDA toolkit using the instructions below.
Extra tips:
To install conda, run the following inside the Ubuntu environment:
To find the name of a WSL distribution and uninstall it (afterward, you can create a new virtual machine environment by opening the app again):
To access the web UI from another device on your local network, you will need to configure port forwarding:
Troubleshooting:
If you will use 4-bit LLaMA with WSL, you must install the WSL-Ubuntu CUDA toolkit, and it must be 11.7. This CUDA toolkit will not overwrite your WSL2 driver unlike the default CUDA toolkit. Follow these steps:
In order to avoid a CUDA error when starting the web UI, you will need to apply the following fix as seen in this comment and issue #400:
If for some reason installing the WSL-Ubuntu CUDA toolkit does not work for you, this alternate fix should resolve any errors relating to that.
You may also need to create symbolic links to get everything working correctly. Do not do this if the above commands resolve your errors. To create the symlinks, follow the instructions here then restart your machine.
Installing 8-bit LLaMA with text-generation-webui
Download the desired Hugging Face converted model for LLaMA here
Copy the entire model folder, for example llama-13b-hf, into text-generation-webui\models
Run the following command in your conda environment: python server.py —model llama-13b-hf —load-in-8bit
Activate conda via powershell, replacing USERNAME with your username: powershell -ExecutionPolicy ByPass -NoExit -Command "& 'C:\Users\USERNAME\miniconda3\shell\condabin\conda-hook.ps1' ; conda activate 'C:\Users\USERNAME\miniconda3' "
Follow the instructions here under "Installation", starting with the step "Create a new conda environment."
Download the desired Hugging Face converted model for LLaMA here
Copy the entire model folder, for example llama-13b-hf, into text-generation-webui\models
Download libbitsandbytes_cuda116.dll and put it in C:\Users\xxx\miniconda3\envs\textgen\lib\site-packages\bitsandbytes\
In \bitsandbytes\cuda_setup\main.py search for: if not torch.cuda.is_available(): return 'libsbitsandbytes_cpu.so', None, None, None, None and replace with: if torch.cuda.is_available(): return 'libbitsandbytes_cuda116.dll', None, None, None, None
In \bitsandbytes\cuda_setup\main.py search for this twice: self.lib = ct.cdll.LoadLibrary(binary_path) and replace with: self.lib = ct.cdll.LoadLibrary(str(binary_path))
Run the following command in your conda environment: python server.py —model llama-13b-hf —load-in-8bit
Note: for decapoda-research models, you must change "tokenizer_class": "LLaMATokenizer" to "tokenizer_class": "LlamaTokenizer" in text-generation-webui/models/llama-13b-hf/tokenizer_config.json
Installing 4-bit LLaMA with text-generation-webui
Continue with the 4-bit specific instructions here
Install Build Tools for Visual Studio 2019 (has to be 2019) here. Check "Desktop development with C++" when installing.
Install Git from the website or simply with cmd prompt: winget install —id Git.Git -e —source winget
Open "x64 native tools command prompt" as admin
Activate conda, replacing USERNAME with your username: powershell -ExecutionPolicy ByPass -NoExit -Command "& 'C:\Users\USERNAME\miniconda3\shell\condabin\conda-hook.ps1' ; conda activate 'C:\Users\USERNAME\miniconda3' "
conda create -n textgen python=3.10.9
conda activate textgen
conda install cuda -c nvidia/label/cuda-11.3.0 -c nvidia/label/cuda-11.3.1
pip install -r requirements.txt
git reset —hard c589c5456cc1c9e96065a5d285f8e3fac2cdb0fd
pip install ninja
python setup_cuda.py install
Download the 4-bit model of your choice and place it directly into your models folder. For instance, models/llama-13b-4bit-128g. The links for the updated 4-bit models are listed below in the models directory section. If you will use 7B 4-bit, download without group-size. For 13B 4-bit and up, download with group-size.
Run the following command in your conda environment: without group-size python server.py —model llama-7b-4bit —wbits 4 —no-stream with group-size python server.py —model llama-13b-4bit-128g —wbits 4 —groupsize 128 —no-stream
Note: If you get the error "CUDA Setup failed despite GPU being available", do the patch in steps 6-8 of the 8-bit instructions above.
Using Alpaca LoRA with text-generation-webui
Make sure to follow the installation instructions for 8-bit LLaMA before using this.
This is to reproduce the Stanford Alpaca results using low-rank adaptation (LoRA). The LoRA model produces outputs comparable to the Stanford Alpaca model, which itself can produce results of similar quality to text-davinci-003. You will need the standard 7B LLaMA model, or the standard model of your choice for the other LoRAs, downloaded and placed inside the models folder before following these steps.
Instructions:
Navigate to the text-generation-webui folder
Re-install the requirements if needed: pip install -r requirements.txt
Navigate to the loras folder and download the LoRA with: git lfs install && git clone https://huggingface.co/tloen/alpaca-lora-7b
Load LLaMa-7B in 8-bit mode only: python server.py —model llama-7b-hf —load-in-8bit
Select the LoRA in the Parameters tab
Notes:
For this LoRA and any other Alpaca LoRA, the prompt must be formatted like this (the starting line must be below "Response"):
Message from the creator:
We're continually fixing bugs and conducting training runs, and the weights on the Hugging Face Hub are being updated accordingly. In particular, those facing issues with response lengths should make sure that they have the latest version of the weights and code.
Tips and Output Settings in text-generation-webui
For a ChatGPT/CharacterAI style chat, pass —chat to server.py. For more info on flags, check here.
Character cards can be used to guide responses toward a desired output and improve results.
For a more creative chat, use: temp 0.72, rep pen 1.1, top_k 0, and top_p 0.73
For a more precise chat, use temp 0.7, repetition_penalty 1.1764705882352942 (1/0.85), top_k 40, and top_p 0.1
The Getting Started page of the wiki has a few extra tips on prompts and parameters.
For a quick reference, here is an example chat with LLaMA 13B:
Other ways to run LLaMA
If you have the hardware, it is recommended to use text-generation-webui for the best user experience.