Как установить kali linux на vmware
This guide is about virtualizing Kali Linux inside of VMware, allowing you to have a Kali VM. This is a great way to use Kali, as it is completely separate from the host, allows you to interact with other VMs (as well as the host, and other machines on the network), and allows you to revert to snapshots.
If you are trying to install VMware on Kali Linux (as a host), please see our guide.
The guide below is what we use to generate our pre-made Kali Linux VMware images. You may alter this to your needs. We always generate the images using the latest version of VMware Workstation, as Player and Fusion don’t have the same level of functionally and controls over settings.
You will need to enable virtualization in your BIOS/UEFI for (e.g. Intel VT-x/AMD-V)
Wizard
Upon starting up VMware Workstation, select “Create a New Virtual Machine”.

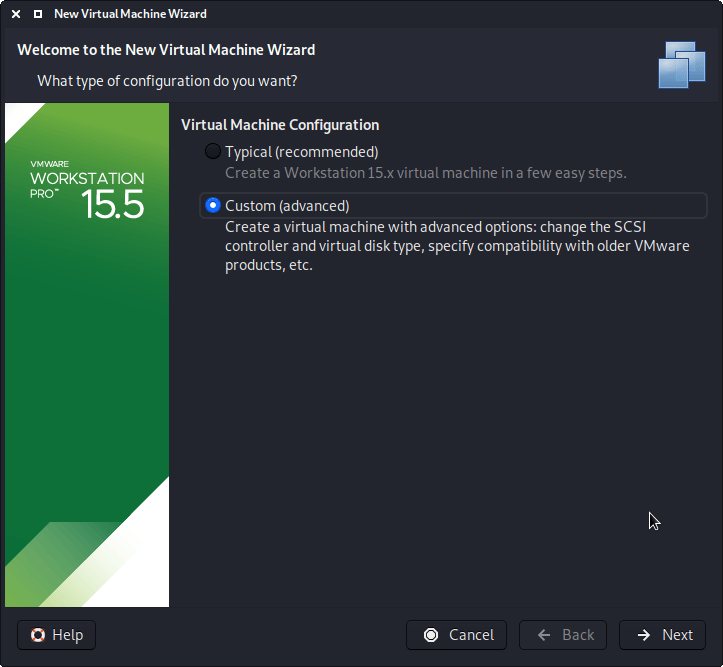
When you have the option, select “Custom (advanced)” for the Virtual Machine Configuration, as this will allow us to have more control over the creation of the VM.
The next screen is “Virtual Machine Hardware Compatibility”, which we use “Workstation 8.x”.
This allows for more users to benefit from Kali Linux out of the box (without having to edit the .vmx file to downgrade). If you are using a later version of VMware than v8, upon start up, VMware will prompt about upgrading the VM. This will remove any limitations caused by older VMware profiles. However, most users do not have their Kali Linux VM using all these extra resources (see screenshot below), so they wouldn’t benefit from having the latest profile, which is why we ship with a older profile.

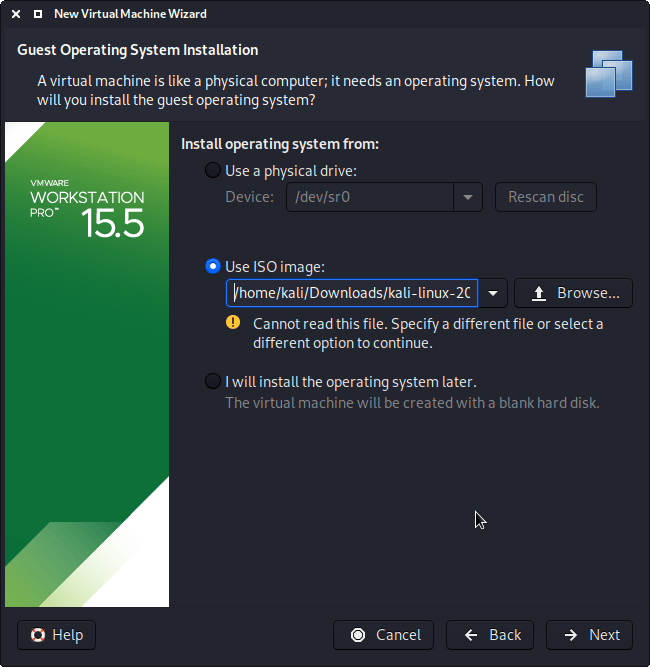
On this screen, we select the Kali Linux image to use to install from. We select “Browse”, and navigate to the location of the ISO that we downloaded. For more information on what image to download, we have written up a guide.
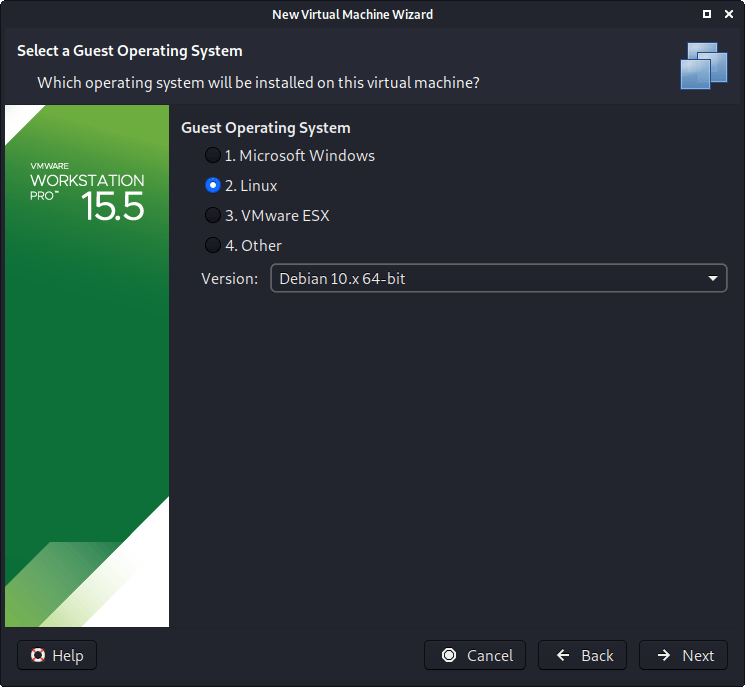
When you see the “Guest Operating System” screen, select “Linux”, and then the latest version of Debian for the version (as Kali is based on Debian). In this example, its Debian 10. We are going to be use the x64 image to install Kali, so we have selected 64-bit.
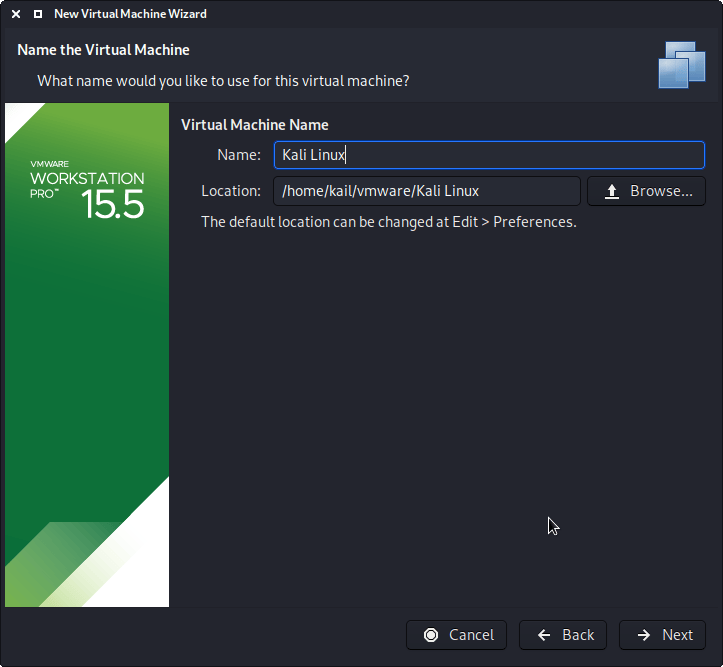
The next screen is “Virtual Machine Name”, which is where you name the VM. This name is also used as the filename (such as the configuration, hard disk and snapshot — which is not changed from this point).
We are keeping it generic in this guide, by using “Kali Linux” (as Kali Linux is a rolling distribution, and we update Kali Linux). However for our releases, we use the version number in the name as it is a fixed release ( kali-linux-YYYY.N-vmware-ARCH . Example: kali-linux-2023.2-vmware-amd64 ).
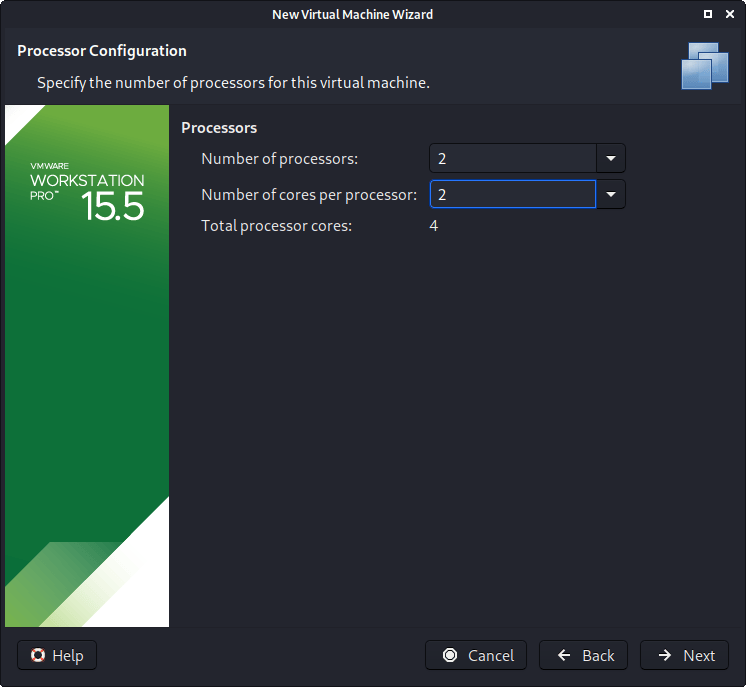
The next screen is “Processors”. Here we can start to define how many resources we give the VM. Kali will be able to perform more tasks simultaneously and quicker if it is allocated more resources. We select “2 processors” and “2 cores per processors”, giving a total of 4 cores. You may wish to use more or less depending on your system requirements.
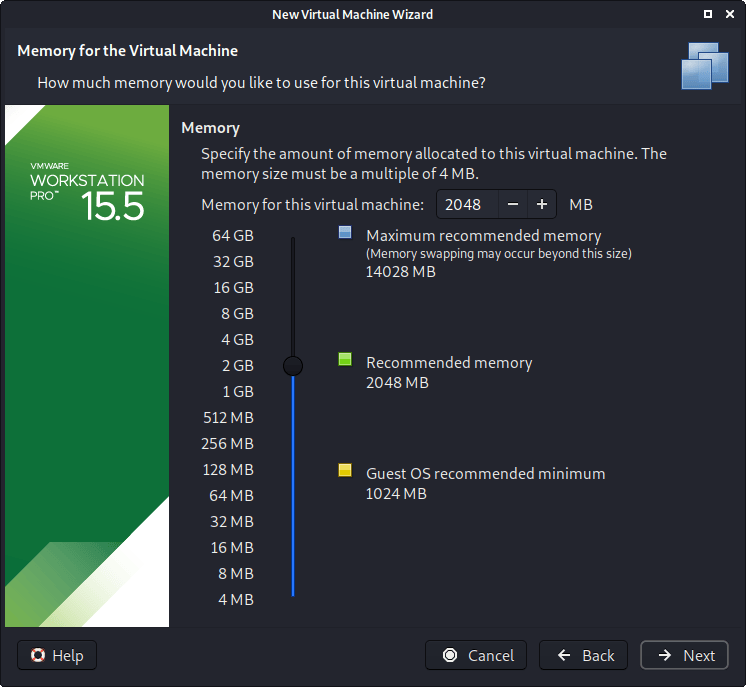
“Memory” is the next section, where we can define how much RAM to use. Again, the higher amount of RAM, the more applications can be open and at increased performance. Various tools inside of Kali can be demanding of resources. When we make the general VMs, we select 2GB (2048 MB) for RAM, but we often increase this for our personal machines as we have high-performing devices with spare RAM which Kali can utilize.
We are then presented with “Network Connection”. We default to using a NAT connection. However, this can easy be altered (even when the VM is powered on). This allows for Kali VM to talk to the Internet, as well as the rest of the LAN connection, without it taking up an additional IP address. The downside to this is it will not be able to receive reverse shells (without port forwarding inside of VMware).

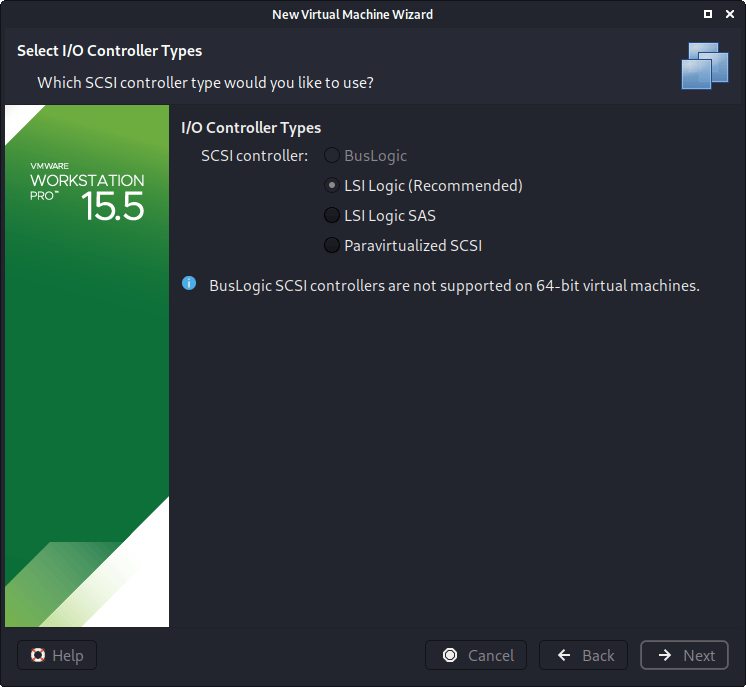
Next is “I/O Controller Types”. We accept the default value of “LSI Logic”.
Next is “Virtual Disk Type”. We accept the default value of “SCSI”

The following screen is “Disk”, which allows us to “create a new virtual disk”

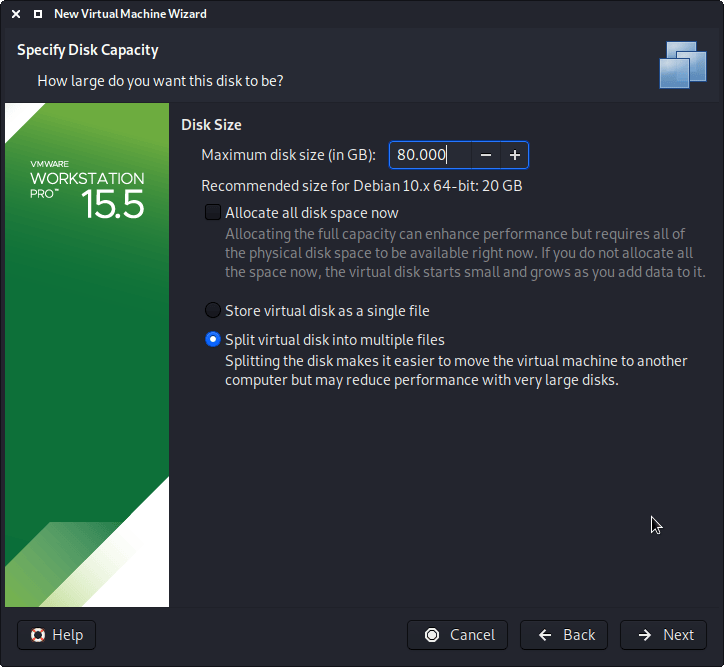
This screen below, “Disk Size”, allows us to define how large the virtual hard disk will be. We use “80 GB” for our VMs.
We also don’t have it in a single file, but instead “Split virtual disk into multiple files”. The VM hard disk will grow over time, to the maximum size, as we do not enable the “Allocate all disk space”.
It is possible to increase/decrease the hard disk after the VM has been created, however, if you have installed Kali, you’ll need to then also grow or shrink the partition for the space to reflect that.
When it comes to the “Disk File” screen, we accept the default value, which has been defined from our VM name earlier in the setup process.

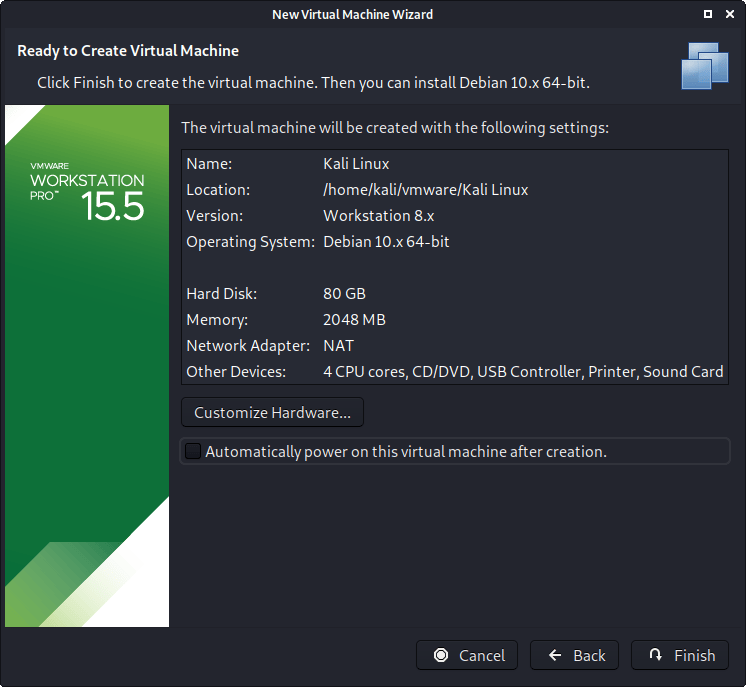
We are then presented the final screen for the VM setup wizard, which gives us an overview of the settings we picked.
We are happy with what’s shown to us, so we then press “Finish”. If you try and “Customize Hardware” at this stage, before the VM is fully created, not every setting is visible.
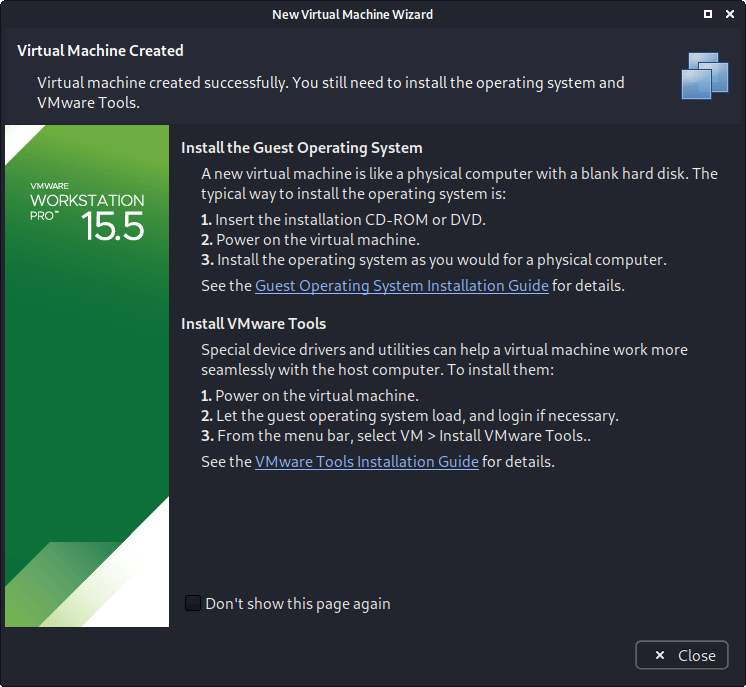
If this is the first time using the wizard, you may have the following prompt explaining how installing “VMware tools” will give you a better experience when using the VM.
After reading and understanding the page, you may wish to tick the “Don’t show this page again”, before pressing close.
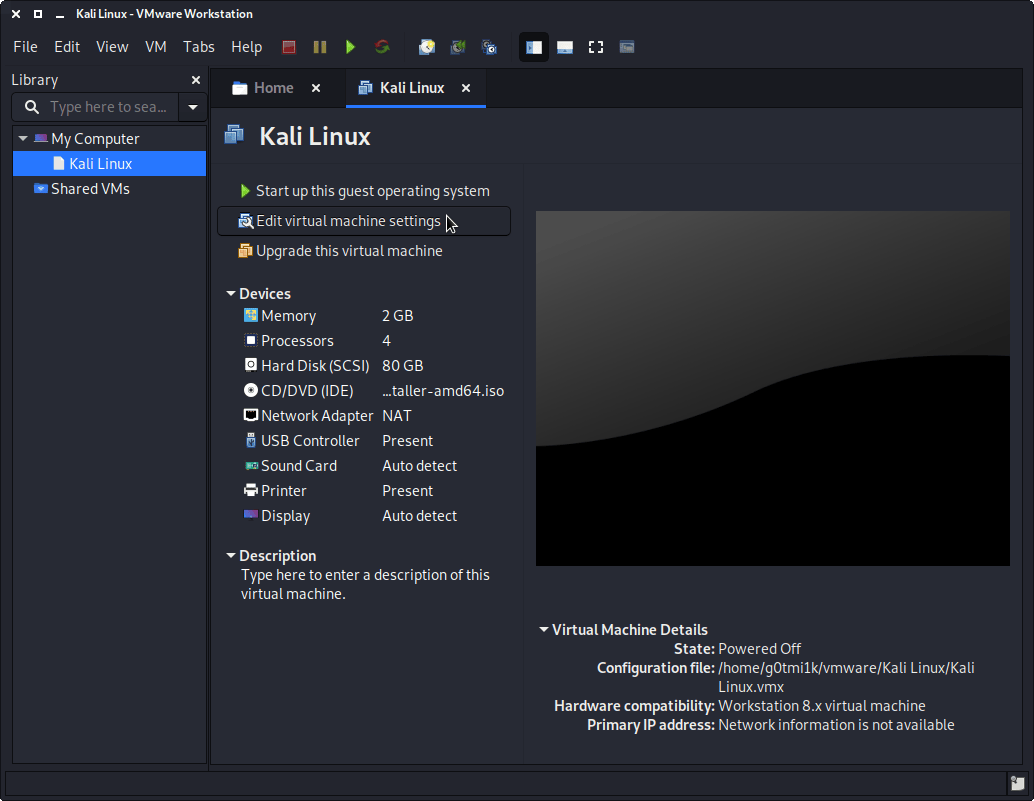
Edit Settings
Before we start up the VM, we now edit its settings, by pressing “Edit virtual machine settings”.
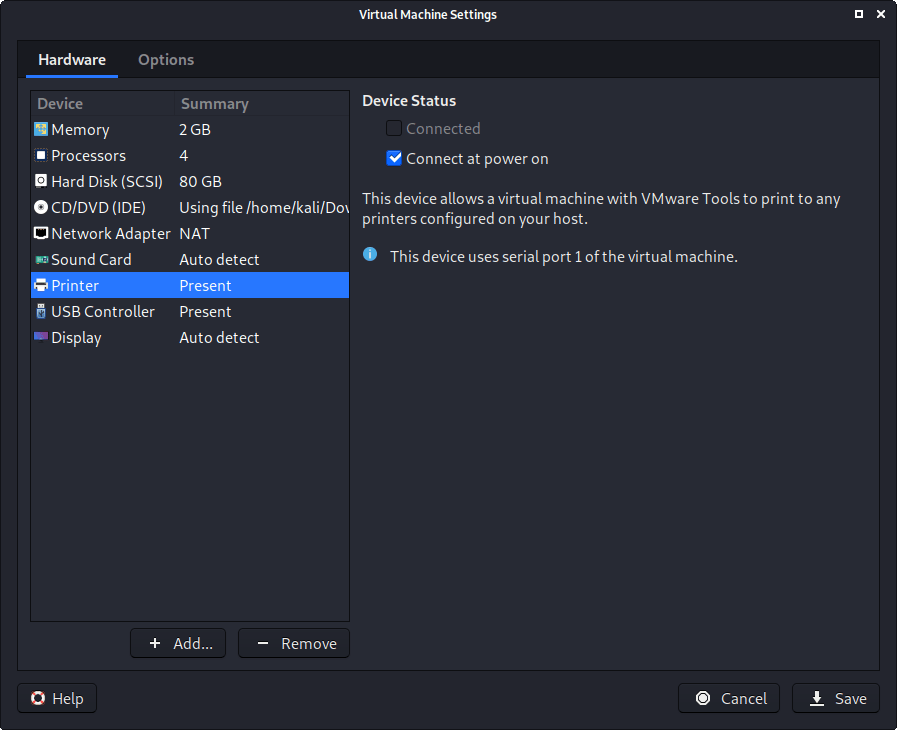
We do not have a use for a printer, so we remove it. Navigate to the “Printer” section, and then press “Remove”.
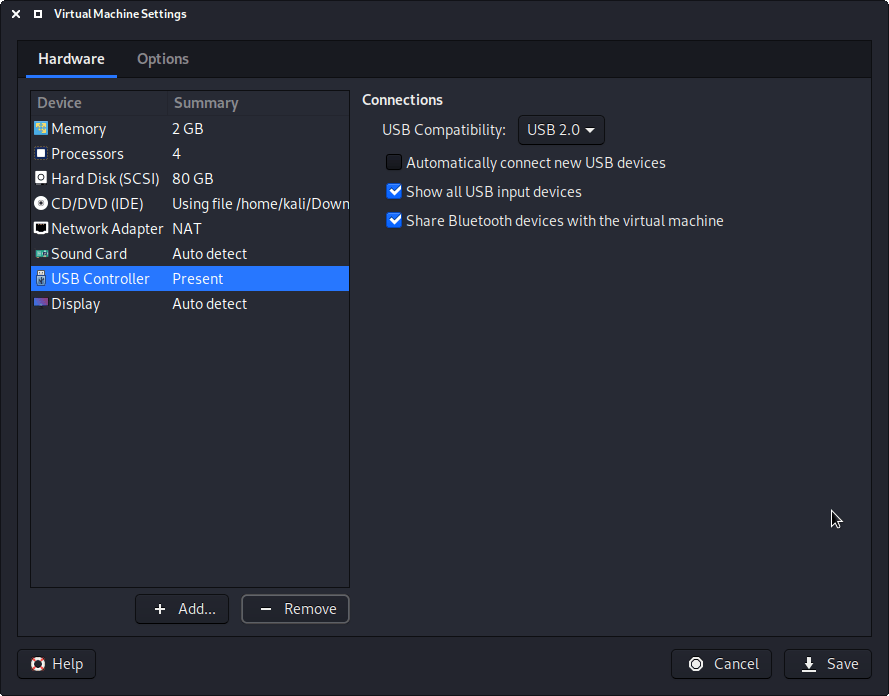
You may wish to edit the “USB” settings to alter how USB devices behave. Here we have disabled “Automatically connect new USB devices” (may not have the option depending on your VMware version) and enabled “Show all USB input devices”.
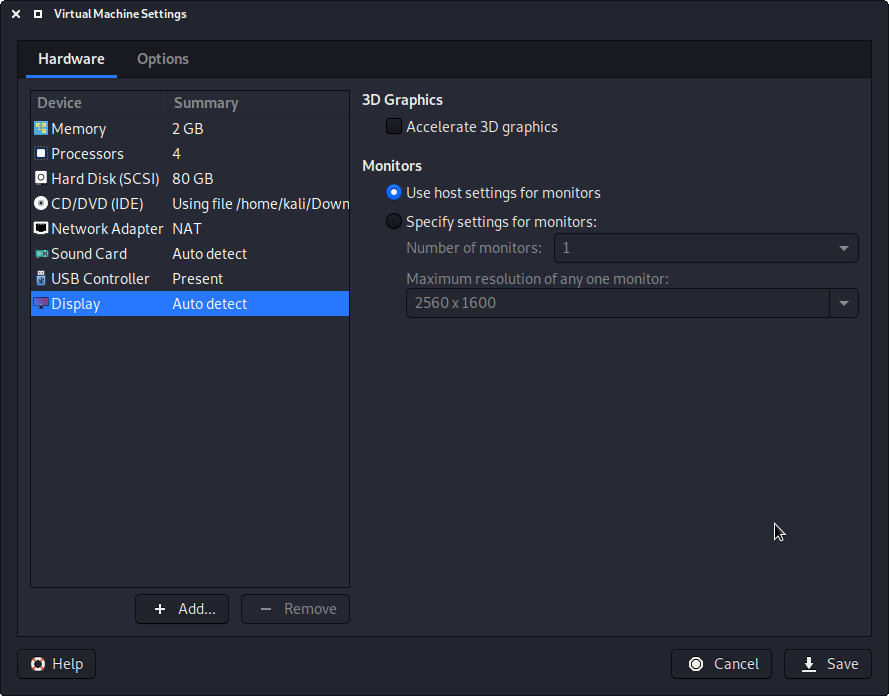
Another item to point out is in the “Display” section. Make sure that “Accelerated 3D graphics” is disabled, as people have reported that causes issues.
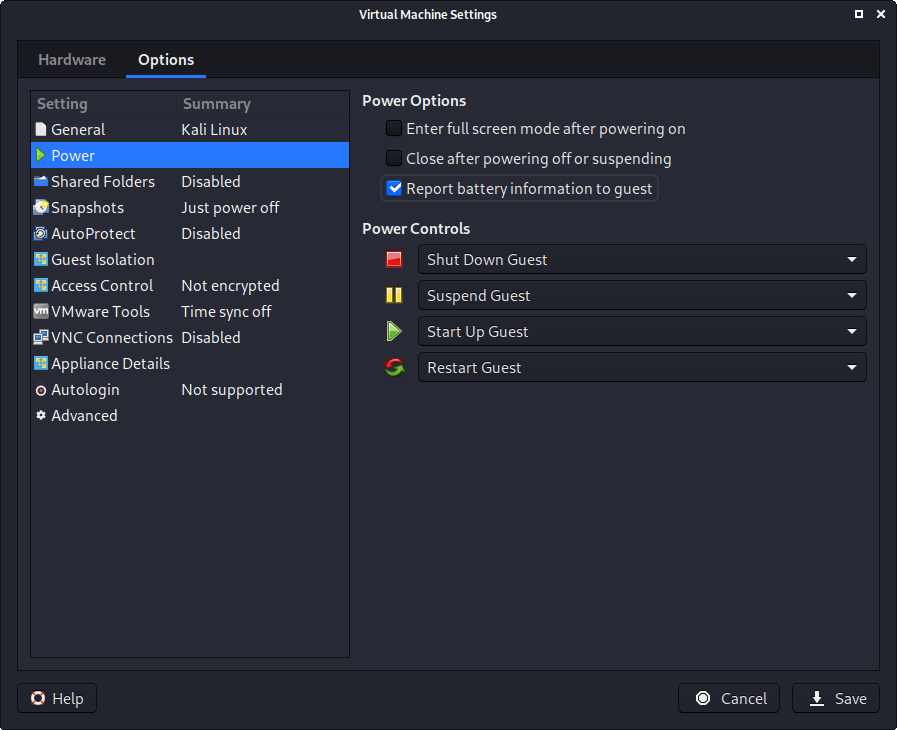
We then move over to the “Options” tab, and move down to “Power”. We choose to enable “Report battery information to guests”, as it is a handy thing for users who use Kali on a laptop/notebook.
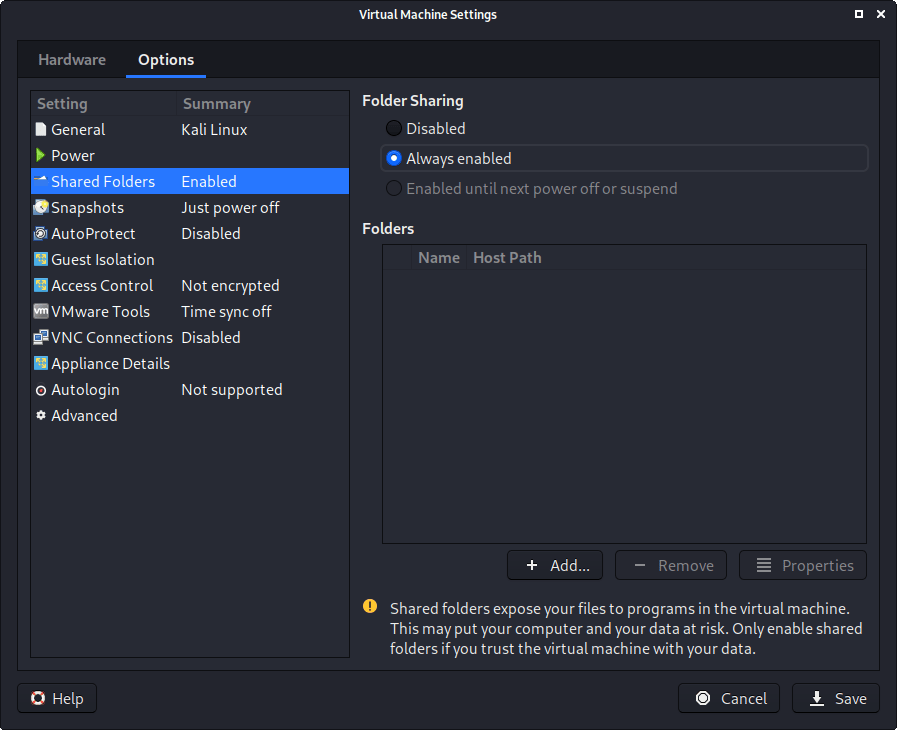
In “Shared folders”, we select “Always enable”. At this stage, do not share any paths, as some users may not wish for it.
The final option we alter is “VMware Tool”, where we enable “Synchronize guest time with host”.

After all this is done, we save, start up the VM, and then continue installing Kali Linux as we normally would for a bare metal install.
During Kali Linux setup process, the install wizard should detect if its inside a VM. If it is, should then automatically install any additional tools (such as open-vm-tools ) to give a better user experience. If you want to manually re-install it, you can see our VMware Guest Tools Guide.
How to Install Kali Linux in VMware
![]()
In this Tutorials, We will Declare How to Install Kali Linux in VMware Workstation 15.5 Pro and how to install VMware Workstation step by step guide. This is a virtual installation method with the help of which you can use Linux along with windows and other operating systems.
What do you need Installation a Kali Linux In VMWare?
- VMware Workstation
- Kali Linux ISO Images
- Minimum 20 GB Disk Space
- Minimum 2 GB RAM
How to Install VMware Workstation?
VMware Workstation is a hosted hypervisor. It only runs on Windows and Linux operating systems and that too in 64-bit operating systems. With the help of this, we can set up virtual machines on a single physical machine And you can execute many of the operating systems on your physical machine with the help of a virtual machine.
VMware Workstation is developed by VMware in May 1999. The first released version is 1.0 and the current version is 15.5.1. VMware Workstation is composed of only C and C++ languages.
You can download VMware from its official website (www.vmware.com). If you want, you can use any version above 12.0 version, I use VMware Workstation Pro 15.5.1 version in these tutorials. This is the latest version to be done so you can download and install it if you want. The installation of this is a very easy step, you can install it by doing next-next, by the way, I have made a video tutorial to help you people. If we go, let’s learn the installation of Kali Linux directly.
How to Download Kali Linux ISO Images?
Go to Kali Linux official website (www.kali.org) and download the latest version according to your system. If your system is 64-bit, then you should only download it and if your system is 32-bit, then you should download it and do not download it anymore.
If you want to know about Kali Linux, then you can read my tutorials, I have defined the live booting process of Kali Linux in this tutorial as well as about Kali Linux. I am going to use 2.0 version of Kali Linux in this tutorial, the latest version of Kali Linux has been released 2020.1a. If you want then you can use it.
How to Install Kali Linux in VMware
Let’s go started
☆ Step 1:-
Open your VMware Workstation 15.5 and click Create a New Virtual Machine button.
☆ Step 2:-
Select what type of configuration do you want? Click Typical (recommended), Create a workstation 15.x virtual machine in a few easy steps and click the next button.
☆ Step 3:-
Select the Installer disc image file (ISO). Click the Browse button and select your operating system and click the next button.
☆ Step 4:-
Select a guest operating system. Which operating system will be installed on this virtual machine, Select gets operating system “Linux” and version “Debian 9.x” and click the next button.
☆ Step 5:-
Enter the Name of the virtual machine (Anything you wish), and select the installation path of the virtual machine and click the next button.
☆ Step 6:-
Enter Specify disk capacity, Recommended size for Debian 9.x: 20GB and select store virtual disk as a single file or split virtual disk into multiple files Anything you wish and click next button.
☆ Step 7:-
Configure your hardware, select the number of the processor: 2 and the number of cores per processor: 2 and total processor cores: 4. If you want good performance, you should take 4 processors from work to work, and at most, you can see according to your PC.
☆ Step 8:-
The virtual machine will be created with the following setting, click Finish to create the virtual machine. Then you can install Debian 9.x.
☆ Step 9:-
Now click Power on this virtual machine. Click on it, your Kali Linux will start booting from your virtual machine.
☆ Step 10:-
Snap Graphical Install “the calmer you become, the more can hear”.
☆ Step 11:-
According to your compatibility, select your language which you want to use in the installation process. The selected languages will also be the default language for the installed system
☆ Step 12:-
The selected location will be used to set your time zone (According to your location) and also, for example, to help select the system location and time. This is a shortlist of location based on the language you selected choose “other” if your location is not listed. You select your location according to your country, I am from India, so I have selected India.
☆ Step 13:-
You can configure your keyword according to your compatibility language, I am choosing American English in this tutorial, you can select it if you want.
☆ Step 14:-
load installer components for CD wait for few minutes.
☆ Step 15:-
Enter the hostname for this system. I have given the name of my system Technical Education, you should keep any name according to you.
☆ Step 16:-
Set up users and passwords, so that your system is safe from any malicious or unqualified access and hit continue button.
☆ Step 17:-
If you choose guided partitioning for an entire disk and will next be asked which disk should be used you will still have a chance later to review and customize to results. Select Guided — use entire disk and click the Continue button.
☆ Step 18:-
note that all data on this disk you select will be crashed, but not before yours have confirmed that you really want to make the changes. Select disk to partition: 21.5G VMware Virtuals.
☆ Step 19:-
This disk can be partitioned using one of several different schemes. If you are unsure, choose the first one. Select Partitioning scheme: All files in one partition(recommended for new users).
☆ Step 20:-
This is an overview of your currently configured partition and mount points. Now click “Finish partitioning and write changes to disk” and click Continue Button to the next step.
☆ Step 21:-
The partition table of the following device is changed. The following partition is going to be formatted. Write the changes to disk? Click “Yes” and hit the continue button.
☆ Step 22:-
Installation of the system “Copying data to disk” Please wait new Minutes.
☆ Step 23:-
Configure the package manager. Use a network mirror? Click “No” and hit the continue button.
☆ Step 24:-
Installation the GROUB boot loader on a hard disk please wait 15–20 Minutes.
☆ Step 25:-
Installation of the GROUB boot loader to the master boot record. Click Yes and Continue.
☆ Step 26:-
Select device for boot loader installation location. Select /dev/sda and click the Continue button.
☆ Step 27:-
Finishing the installation wait a few minutes.
☆ Step 28:-
Congratulation! Installation is Complete, Click Continue.
☆ Step 29:-
Finishing the installation wait for few seconds.
☆ Step 30:-
Enter your Username. Your User name is by default “root”.
☆ Last Step 31:-
Enter your password. No one should enter the same password that you had set at the time of installation, because it will not open by entering the wrong password.
Как установить kali linux на vmware
This guide installs Kali Linux 2022 as a VMware virtual machine and makes the basic configurations needed to run GVM (previously named OpenVAS), Metasploit and Nessus.
Note: there is a more complex but most probably better guide in Virtualized Kali Linux
Download Kali Image
Download Kali prebuilt virtual machine for VMware in the directory where you keep yor virtual machines and extract the image:
Start VMware Player, click on Open a Virtual Machine and select the .vmx file from the Kali’s virtual machine directory. Verify the settings and change them if needed before booting the virtual machine.
These are the changes I’ve made:
- set the memory to 4GB
- set the network to Bridged
- remove the CD/DVD
The images are build with kali:kali default credentials.
Update
Update your new installation with:
Make sure postgresql is running on port 5432, check the file /etc/postgresql/15/main/postgresql.conf and change the port if it is not 5432.
Metapackages
kali-linux-everything may be too much, there is a complete list of Kali Linux Metapackages but I have used only some of those :
- kali-tools-vulnerability : Vulnerability assessments tools
- kali-tools-web : Designed doing web applications attacks
- kali-tools-database : Based around any database attacks
- kali-tools-wireless : All tools based around Wireless protocols – 802.11, Bluetooth, RFID & SDR
- kali-tools-exploitation : Commonly used for doing exploitation
- kali-tools-sniffing-spoofing : Any tools meant for sniffing & spoofing
- kali-tools-post-exploitation : Techniques for post exploitation stage
To install them use:
Services
Some services are required by multiple tools. I have enabled these to start when the virtual machine boots:
Start them manually now and check their status, it should be Active (running) :
Restart
Before configuring and installing other tools I have restarted the system.
Greenbone Vulnerability Manager (previously named OpenVAS)
It is installed by the kali-tools-vulnerability metapackage or with:
Run the setup using the sudo gvm-setup command.
After a very long time the automatically generated password will be displayed. If you forget it or you want to change it, use:
Install nsis with sudo apt install -y nsis
Check the installation with sudo gvm-check-setup and solve all problems. Most of the time gvm-check-setup will tell you what to do.
To solve the warning: Your password policy is empty I have only uncommented the line !/^.<8,>$/ in /etc/gvm/pwpolicy.conf because this particular virtual machine is not a public accessible / production one anyway.
When there are no errors and warnings connect to the web interface of GVM.
Note: GVM worked OK after a system restart. gvm-stop and gvm-start were not enough.
Metasploit
In the Metasploit Basics post I have a quick start documentation for Metasploit, From the first start to a reverse shell on a vulnerable host.
You can also check Metasploit Unleashed and the official documentation for information on using the Metasploit Framework.
For a target to practice Metasploit Usage framework use Metasploitable 2 from SourceForge. The default login and password is msfadmin:msfadmin and here is a Metasploitable 2 Exploitability Guide on the Rapid7 website.
Before running Metasploit Framework’s tools the database should be created and initialized:
Launch msfconsole and verify database connectivity with db_status then exit the console.
Install Nessus in Kali VM
… using a script
For Nessus 10.4.1 you can use this script to download, check and install it:
… or the manual way
Go to Tenable Nessus Download page, select the last version and Linux — Debian — amd64 platform and click the Download button.
How to Install Kali Linux on VMware VM
Kali is a free Debian-based Linux distribution intended for penetration testing. The first version of Kali Linux was released in 2013 as the rebuild of BackTrack Linux – a previous well-known distribution for security auditing and penetration testing. Some tools that were duplicated or provided similar functionality in BackTrack Linux were removed in Kali Linux. There are more than 600 penetration testing tools included in Kali Linux that can be run as Live DVD without installation as well as be installed on a computer as a desktop OS.
Sometimes you may not have the ability to dedicate the entire computer to running Kali Linux from neither Live DVD nor your internal hard disk as the installed OS. In this case, hardware virtualization technologies can help you – you can install Kali Linux on a VMware VM running on your desktop, laptop, or server. As a result, you can use your physical machine for the usual tasks while simultaneously running a virtual machine with Kali Linux for penetration testing and security auditing of your networks, software, etc. This blog post explores the installation process of Kali Linux on a VMware virtual machine and configuration of a Wi-Fi network adapter.

NAKIVO for VMware vSphere Backup
Complete data protection for VMware vSphere VMs and instant recovery options. Secure backup targets onsite, offsite and in the cloud. Anti-ransomware features.
Downloading the ISO Image
First, open the Kali download page in your browser and select the distribution that can best meet your needs. The installation images are provided in the ISO format for 32bit, 64bit and ARM architecture. You can also select the build with your favorite graphics desktop environment among Gnome, KDE, Xfce, Mate, etc. For the sake of simplicity and consistency in this blog post, let’s download Kali Linux Xfce 64 Bit via HTTP. When the ISO file is downloaded, check the sha256sum to verify the data integrity and ensure that the file is not corrupted.
Creating a New VMware VM
Let’s explore how to install Kali Linux on a VM of the VMware Workstation format due to portability-related reasons – you can install VMware Workstation on a laptop, deploy a virtual machine with Kali Linux, and use this laptop for auditing wireless networks, for example. Kali Linux can also be installed on a VMware ESXi host if needed – the installation process is quite similar. In the current example, VMware Workstation 15 will be used to show the installation and configuration of Kali Linux.
Click File > New virtual machine to open the New Virtual Machine Wizard. Select Custom.
Choose the virtual machine hardware compatibility. If you are not planning to migrate a VM to older versions of VMware Workstation or ESXi servers, select the Workstation 15.x format. In this example the Workstation 14.x format should be selected for better compatibility in case of possible migration.

Select the installer disk image file for guest operating system installation. In this case the downloaded ISO image saved to D:\Install\ISO\kali-linux-xfce-2018.4-amd64.iso should be selected.
Select a guest operating system (OS). Linux Ubuntu 64-bit must be selected for our purposes.

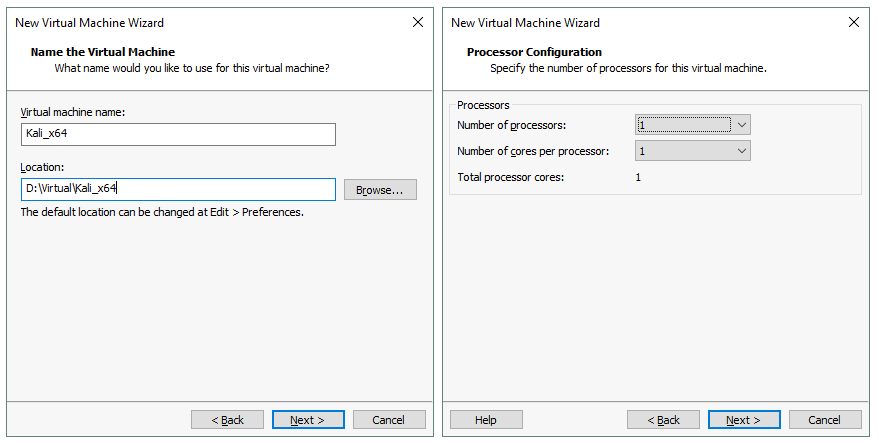
Specify the VM name and location. In the current example, the VM name is Kali_x64 and the VM directory is D:\Virtual\Kali_x64.
Processor configuration. Specify the number of processors and the number of cores per processor for this virtual machine. Using 1 CPU is enough for Kali Linux.
Set memory for the virtual machine. Kali Linux is not a resource-hungry operating system. 2 GB of memory should be more than enough for this VM.
Configure a network type for the VM. Select the Use bridged networking option.

Select the SCSI controller that you will use for connecting a virtual disk to a VM. You can leave the default value as is and click Next to continue.
Select a disk type. You can leave the default recommended value (SCSI).

Select a disk. Click Create a new virtual disk and then click Next.
Specify disk capacity. 20 GB should be enough for the operating system. Select Store virtual disk as a single file if there are no limitations of your file system (such as 4 GB limit of file size for FAT32). Don’t check the box Allocate all disk space now if you don’t want the disk to consume all provisioned disk space now.

Specify where you want to store the virtual disk file. In this example, the file path is D:\Virtual\Kali_x64\Kali_x64.vmdk.
Now everything is ready to create a virtual machine. Check the VM settings, customize hardware if necessary, and click Finish to create a VM.

Deploying Kali Linux on VMware VM
Installing Kali Linux is not difficult, as all installation steps are supplied with useful tips and comments. Let’s review the installation process step by step:
Installing the Operating System
Once you have created a new VM, power on that VM and boot from the ISO image to start Kali installation. When a VM is loaded from the ISO image, you can see a boot menu that allows you to boot from the installation media in a live DVD mode, install the OS in a text mode (you get only a console interface without graphical user interface (GUI) after installation), and install the OS in graphical mode. Select Graphical install from the boot menu and press Enter.

The graphical installation mode looks like a wizard with multiple configuration screens.
Select a language.

Select your location.

Configure a keyboard.

Enter the hostname for this system, for example, k-linux.

Set the domain name, for example, domain.net.

Set up the password for root user. Note that in some distributions of Kali Linux “toor” is the default password for the root user.

Select the partitioning method for your disks. If you want to create a custom partitioning table, select Manual. Selecting Guided – use entire disk should be enough for the first time.

Select your virtual disk to be partitioned.

Select All files in one partition.

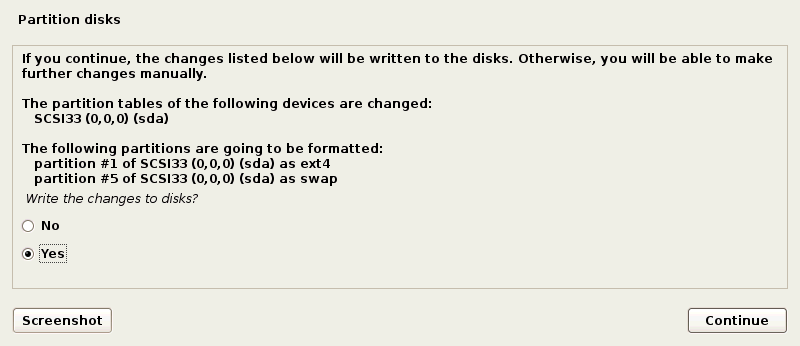
Select Finish partitioning and write changes to disk.

Click Yes to confirm creation of a new empty partition table on the virtual disk for writing changes to disk.
The installation process starts after disk partitioning. Wait until the system installation is finished.
Configure the package manager. Select Yes to use a network mirror.

If you don’t have an HTTP proxy to access the outside networks, leave the field empty and click Continue.

Install the GRUB boot loader on a hard disk – click Yes to do this.

Define the device for boot loader installation. We use /dev/sda.

Installation is complete. After rebooting your VM, enter root as the user name and enter the password you have specified during OS installation.
Installing VMware Tools on Kali Linux VMware VM
Now you have to install VMware Tools, i.e. a set of useful drivers and utilities that improves VM performance and interaction between host and guest (shared clipboard, drag & drop files, USB devices pass-through, etc.).
Make sure that Kali Linux VMware VM installed is running and click VM > Install VMware Tools in the menu bar or the VMware Workstation window. The ISO CD image is now inserted to the virtual CD/DVD drive of the VM. You can see the disc icon on the desktop of the guest OS. Open the terminal (Applications > Terminal Emulator).
Go to the directory of the inserted disc that contains VMware Tools by typing:
cd /media/cdrom
Create a directory on your desktop for extracting files from the archive to that directory.
Extract VMware Tools installation files from the archive by using the following command:
tar -xvzf VMwareTools-10.3.2-9925305.tar.gz -C
tar is the Linux archiver application; x – tells tar to extract files; v – allows the verbose mode to see the output in console; z – tells tar to decompress files from an archive using gzip; f – defines a location of the compressed archive, files from which must be extracted.
Go to the directory where the files have been extracted.
Run the installer of VMware Tools:
./vmware-install.pl
Answer the questions provided by the console installation wizard. Press Enter to use the default values that are shown in [brackets]. When the installation process of VMware Tools is finished, reboot the VM by typing init 6 in the terminal window.
Note: If you have an Internet connection, you can install VMware Tools with your apt-get Linux package manager by typing in the terminal the following command:
apt-get install open-vm-tools-desktop
Answer the questions provided by the installation wizard as mentioned before.
Configuring Screen Resolution
After installing VMware Tools on Kali Linux VMware VM, you can customize the screen resolution of the guest VM window.
Open the terminal.
Type xrandr to view available display modes. The current display mode is marked with the asterisk (*).
Set the custom resolution, for example, 1024×768, instead of the default resolution (800×600):
xrandr -s 1024×768

You can also use GUI. Right click the empty space on your VM desktop, go to Applications > Settings > Display. Change resolution in the drop-down menu, click Apply and Close.
You can also enter a full screen mode of your Kali Linux VMware VM by clicking the Full Screen button in the VMware Workstation interface.
How to Connect a WI-FI Adapter to a VMware VM to Be Used by Kali Linux?
If you want to test Wi-Fi networks, then you need a Wi-Fi network adapter connected to a machine on which Kali Linux is running. It is not possible to connect a built-in wireless network adapter (that is usually connected with a PCI Express interface) of a laptop directly to a virtual machine. In this case, you can only use a bridged network mode, but low level adapter features such as entering to a monitor mode will be disabled. If you use a built-in wireless network adapter in the bridged network mode, a guest OS (Kali Linux in our example) identifies the network adapter as an emulated Ethernet adapter.
As you recall, VMware Workstation and ESXi server provide you with the ability to connect USB devices to a VM in the pass-through mode. In this mode a USB device is attached to a VM similarly as it would be attached to a physical machine. When you attach a USB device to a VM, it is disconnected from a host machine. A USB Wi-Fi adapter is what you need in this situation.
Get the external USB Wi-Fi adapter and insert it into a USB port of your host machine (a machine on which VMware Workstation is installed). Make sure that your Kali VM is running. Don’t connect to any Wi-Fi networks on a host machine. In the VMware Workstation window go to VM > Removable devices > [Your USB Wi-Fi adapter name] > Connect (Disconnect from host).

Type ifconfig to check that your USB Wi-Fi adapter is detected by Kali Linux on VMware VM. In our example a wireless adapter is detected and its network interface is named wlan0.

Turn off the wireless network interface:
ifconfig wlan0 down
Change the MAC address of your wireless network adapter to a custom MAC address, for example, FC:FC:48:0A:0B:FF.
macchanger -m fc:fc:48:0a:0b:ff wlan0
Turn on your wireless network interface.
ifconfig wlan0 up
Check whether the MAC address of your Wi-Fi adapter has been changed by using one of the following commands:
macchanger -s wlan0
ifconfig wlan0

If the MAC address of your network adapter was not changed, check the sequence of commands you have run and try again. You can type macchanger –help to see a list of available options for using the macchanger tool.
After changing the MAC address, you can perform penetration testing and security auditing of Wi-Fi networks.
Switch the Wi-Fi network adapter into a monitor mode.
airmon-ng start wlan0

The airmon-ng utility notifies you if there are processes that could potentially cause trouble. It is recommended to kill such processes by typing the command:
airmon-ng check kill
You can additionally change the mac address of the wlan0mon interface.
ifconfig wlan0mon down
macchanger -m fc:fc:48:0a:0b:ff wlan0mon
ifconfig wlan0mon up
where wlan0mon is the name of the virtual monitoring network interface (formerly known as the mon0 interface in BackTrack Linux).
Now you are ready to run the airodump-ng utility.
airodump-ng wlan0mon

As you can see, the USB Wi-Fi adapter connected to the VM in the pass-through mode works fine. You can see access points and associated clients as well as capture wireless network packets for further analysis in the framework of network audit. Penetration testing and security audits are important but details of this process are out of the scope of this blog post. The emphasis of this article is that your Kali Linux deployed on an isolated VM can operate similarly as Kali Linux deployed on a physical machine.
Conclusion
Creating a VM and the installation process of the Kali Linux operating system is not difficult, and a GUI provides useful understandable tips and comments. The key requirement is to configure a USB wireless network adapter connected to a VM by using a pass-through mode. This enables all hardware-based adapter’s features from an isolated VM with Kali Linux for packet analyzing.
Installing Kali Linux on an ESXi VM is similar to installing Kali on a VMware Workstation VM. You can also use VMware vCenter Converter to convert a VM of the Workstation format to a VM of the ESXi format.

1 Year of Free Data Protection: NAKIVO Backup & Replication
Deploy in 2 minutes and protect virtual, cloud, physical and SaaS data. Backup, replication, instant recovery options.