# Backup using mysqldump
If you need to specify the password on the command line (e.g. in a script), you can add it after the -p option without a space:
If you password contains spaces or special characters, remember to use escaping depending on your shell / system.
Optionally the extended form is:
(Explicity specifying the password on the commandline is Not Recommended due to security concerns.)
# Creating a backup of a database or table
Create a snapshot of a whole database:
Create a snapshot of multiple databases:
Create a snapshot of one or more tables:
Create a snapshot excluding one or more tables:
The file extension .sql is fully a matter of style. Any extension would work.
# Restoring a backup of a database or table
- db_name needs to be an existing database;
- your authenticated user has sufficient privileges to execute all the commands inside your filename.sql ;
- The file extension .sql is fully a matter of style. Any extension would work.
- You cannot specify a table name to load into even though you could specify one to dump from. This must be done within filename.sql .
Alternatively, when in the MySQL Command line tool, you can restore (or run any other script) by using the source command:
# mysqldump from a remote server with compression
In order to use compression over the wire for a faster transfer, pass the —compress option to mysqldump . Example:
Important: If you don’t want to lock up the source db, you should also include —lock-tables=false . But you may not get an internally consistent db image that way.
To also save the file compressed, you can pipe to gzip .
# restore a gzipped mysqldump file without uncompressing
Note: -c means write output to stdout.
# Backup direct to Amazon S3 with compression
If you wish to make a complete backup of a large MySql installation and do not have sufficient local storage, you can dump and compress it directly to an Amazon S3 bucket. It’s also a good practice to do this without having the DB password as part of the command:
You are prompted for the password, after which the backup starts.
# Tranferring data from one MySQL server to another
If you need to copy a database from one server to another, you have two options:
Option 1:
- Store the dump file in the source server
- Copy the dump file to your destination server
- Load the dump file into your destination server
On the source server:
On the destination server, copy the dump file and execute:
Option 2:
If the destination server can connect to the host server, you can use a pipeline to copy the database from one server to the other:
On the destination server
Similarly, the script could be run on the source server, pushing to the destination. In either case, it is likely to be significantly faster than Option 1.
# Backup database with stored procedures and functions
By default stored procedures and functions or not generated by mysqldump , you will need to add the parameter —routines (or -R ):
(opens new window) the creation and change time stamps are not maintained, instead you should dump and reload the contents of mysql.proc .
# Syntax
- mysqldump -u [username] -p[password] [other options] db_name > dumpFileName.sql /// To Backup single database
- mysqldump -u [username] -p[password] [other options] db_name [tbl_name1 tbl_name2 tbl_name2 . ] > dumpFileName.sql /// To Backup one or more tables
- mysqldump -u [username] -p[password] [other options] —databases db_name1 db_name2 db_name3 . > dumpFileName.sql /// To Backup one or more complete databases
- mysqldump -u [username] -p[password] [other options] —all-databases > dumpFileName.sql /// To Backup entire MySQL server
# Parameters
| Option | Effect |
|---|---|
| — | # Server login options |
| -h ( —host ) | Host (IP address or hostname) to connect to. Default is localhost ( 127.0.0.1 ) Example: -h localhost |
| -u ( —user ) | MySQL user |
| -p ( —password ) | MySQL password. Important: When using -p , there must not be a space between the option and the password. Example: -pMyPassword |
| — | # Dump options |
| —add-drop-database | Add a DROP DATABASE statement before each CREATE DATABASE statement. Useful if you want to replace databases in the server. |
| —add-drop-table | Add a DROP TABLE statement before each CREATE TABLE statement. Useful if you want to replace tables in the server. |
| —no-create-db | Suppress the CREATE DATABASE statements in the dump. This is useful when you’re sure the database(s) you’re dumping already exist(s) in the server where you’ll load the dump. |
| -t ( —no-create-info ) | Suppress all CREATE TABLE statements in the dump. This is useful when you want to dump only the data from the tables and will use the dump file to populate identical tables in another database / server. |
| -d ( —no-data ) | Do not write table information. This will only dump the CREATE TABLE statements. Useful for creating "template" databases |
| -R ( —routines ) | Include stored procedures / functions in the dump. |
| -K ( —disable-keys ) | Disable keys for each table before inserting the data, and enable keys after the data is inserted. This speeds up inserts only in MyISAM tables with non-unique indexes. |
# Remarks
The output of a mysqldump operation is a lightly commented file containing sequential SQL statements that are compatible with the version of MySQL utilities that was used to generate it (with attention paid to compatibility with previous versions, but no guarantee for future ones). Thus, the restoration of a mysqldump ed database comprises execution of those statements. Generally, this file
- DROP s the first specified table or view
- CREATE s that table or view
- For tables dumped with data (i.e. without the —no-data option)
- LOCK s the table
- INSERT s all of the rows from the original table in one statement
The presence of the DROP before CREATE for each table means that if the schema is present, whether or not it is empty, using a mysqldump file for its restoration will populate or overwrite the data therein.
The Complete mysqldump Guide (with examples)
![]()
Databases are essential tools to collect and store mountains of data. All complex applications use them to store information.
There are many database solutions out there, but MySQL is one of the most popular. Using MySQL is vital to keeping these databases secure and running smoothly.
Managing and backing up servers and databases can all be done in MySQL.
To help these complex processes run smoothly, utilities have been developed. Mysqldump is one of those tools meant to make the lives of developers easier.
In this guide, we are going to walk you through what utility is, how to use it, identify some common errors, and provide some clear examples along the way so that you will be able to use mysqldump effectively.
What is mysqldump?
MySQL is a database system that has been around for years and continues to be one of the most popular choices for websites. It’s open-source and agile. Developers can use these databases to store anything a website may need. The information stored in online databases can range from consumer info and simple text to picture galleries to network information.
Mysqldump is part of the relational database package for MySQL. It is used to back up all the data in a database into a single text file. These files or “dumps” can be generated for individual databases or a collection of them. The text in the file is displayed as a set of SQL statements that can later be reconstructed into its original state.
The purpose of this tool is to export a database to a backup file or to move the database to another web host. Other delimited text formats like XML and CSV can also be generated with mysqldump. These simple queries make the backup process easier.
The importance of backing up data
Companies that hope to run smoothly need pristine copies of their data at different points in time. Without a backup strategy, there is nothing to protect them in the case of a disaster. The ease in which the data can be lost forever is too much to cope with as data can easily become corrupted or get lost over time. Malicious intent and natural disasters are not a requirement for worst-case scenarios to transpire.
Having backups at periodic intervals gives the company the ability to rewind the clock by reloading the previous database. If something breaks or fails, this acts as a lifeline for the system. The company also has data versioning available. Different versions of the database and product are available to go back to. Critical changes that later prove to break the system can be undone, then you can restore the old versions without the problem.
By backing up everything, migrations to new servers or development environments transpire without the fear that data will be lost.
How to use mysqldump
By using mysqldump, a developer can get a hold of the .sql file that serves as a back up for the entire database. To use the tool, the developer needs access to the server running the instance of MySQL. The required privileges have to be given to export anything. The user credentials for the database will also be needed, including the username and password.
The three ways that mysqldump is used to export data includes:
- Exporting specific tables in a MySQL database
- Exporting single databases
- Exporting the entire MySQL server
Exporting MySQL tables
Make sure you are on a machine that has MySQL installed. You will also need a valid database user with -at minimum- full read access privileges. This should do for basic options, but more advanced commands may require additional privileges. With that in order, launch a terminal where you will send the command to back up the tables.
Match your inputs to conform to the following command structure:
For the live command, replace [options] with the valid option names or flags. These will most likely include -u and -p , which stands for user and password. When using more than one option, be careful of the order they are listed in because they will be processed in order from first to last. Here, [table_name…] will be replaced by the name of the table you are exporting. Different tables must be separated by spaces. The following example is for backing up tables called mystery and cash , and the name of the database is db_cooper .
You will then provide the password for the database user because it is not passed along with the -p flag. The > character indicates the output redirection that will create the dump file. Here, file_name is what the final file will be called.
Exporting a MySQL database
The steps for exporting a database are very close to those for exporting a table. There is just a small change in the format of the command. You will need the same server access and credentials.
Match your inputs to conform to the following command structure:
The database you will export comes after the —databases option. The space character separates multiple databases.
Exporting a MySQL server
The command is very similar for entire servers as well.
Match your inputs to conform to the following command structure:
The command itself is pretty basic, with —all-databases indicating that everything on the server should be dumped. If there are specific requirements, that is where the options come in for the command. Adding -compatible will make the file that gets exported compatible with older MySQL servers or database systems.
Developers using PowerShell on Windows will need to include -result-file as an option. This will specify the file name and make sure that the output is in ASCII format so that it will load correctly later.
Other common options include adding —no-data will only back up the database structure, using —no-create-info backs up the database without any structure.
Importing a mysqldump
Importing a .sql file is straight forward. The only kink is to make sure the target server has a blank database before importing anything.
Match your inputs to conform to the following command structure:
The mysqlimport command will also work on databases you want to restore that already exists on the target machine:
You also have the option to import all databases by running a command that looks like this:
What does the —quick flag do?
Mysqldump can operate in one of two ways.
- The tool can go grab all data at once, buffer it in memory, and then dump it.
- It dumps the tables row by row.
The second method is important when dealing with large tables. By using the —quick flag, mysqldump reads large databases without needing large amounts of RAM to fit the full table into the memory.
This ensures that the databases will be read and copied correctly on systems with small amounts of RAM and large data sets.
Does the “where” clause work with mysqldump?
Yes, this clause works with the command line. This makes it easy to set conditions on the data you need to dump from the database. If there is a large enterprise that has been in business for decades that wants to pull the information after April 27, 2017, then this clause allows that to happen. The where clause passes a string for the condition and grabs the specific records requested.
Troubleshooting common errors
Along the way you may face some MySQL common errors that are -to some degree- easy to mitigate. We will share below some of these errors and how to solve them.
Error 2013: lost connection to mysql server during query when dumping table
To fix this issue, you need to go into the MySQL configuration file and increase some values. When those are added, save and close the file, then restart MySQL for the changes to take effect.
The values you need to adjust are:
- max_allowed_packet
- net_write_timeout
- net_read_timeout
- innodb_buffer_pool_size
The adjustments to the file will be under the [mysqld] and [mysqldump] sections and will look like this:
Error 2020: got packet bigger than ‘max_allowed_packet’ bytes when dumping table
If the database you need to back up is large, and the file size ends up bigger thant the maximum allowed packet size, this error pops up.
This error can be fixed by going into the MySQL configuration file and increasing max_allowed_packet value in the [mysqld] and [mysqldump] sections. Save and close the file when finished, then restart MySQL for the changes to take effect.
The changes will look like this:
Table does not exist (1146), couldn’t execute ‘show create table x’
There may be times when you delete a table during backing up. If this is the case, you can restrict certain tables from the mysqldump command with the —ignore-table option. To identify the table, you will have to state both the database and table names.
By listing the option multiple times, you can ignore multiple tables:
Selecting the database returns ‘unknown database’
This error happens most often when you use the -p flag in the command line with the password and there is a space in between -p and mypassword . If this happens when using "root" as the user with a password of "base-face", there will be an error stating "Unknown database base-face."
The correct input would look like this:
Error 1044 when selecting the database
If the user trying to do the dump doesn’t have the privileges necessary to access the database, this error occurs. Logging into MySQL and assigning those privileges to the user will fix the issue. Enter command:
Then enter the correct password, and proceed to grant privileges to the selected user.
After that, flush the privileges and exit from MySQL by entering the command:
Access denied for user when trying to connect to mysqldump
This error has several possible causes. Here’s three of the most common causes of the issue.
If you are using the wrong command, then this error will appear. The command may be mostly correct but it’s missing a critical ingredient in the mysqldump format. The basic command will look like this:
If you fail to specify a username or password then it will spit back the following message:
Remote host not allowed to connect to database
This error comes up if the backup is trying to be done on a remote server. The configurations for MySQL are set to disallow external connections. Here, the localhost is the only one allowed to make a backup. This is a security measure, so it’s a good measure to have but if you need to change this, go to configurations and change MySQL to allow connections from a remote host.
If you try to use the wrong username and password combination while connecting to the database, this error happens. MySQL can’t verify that the request is authentic and returns the error. You’ll have to make the request again with proper credentials, make sure there aren’t any typos in your original command as that is the easiest mistake to make.
Conclusion
Mysqldump is a useful tool to help back up databases with minimal commands. One command allows the entire database to be spit out into a single text file. The tool is versatile enough to back up the parts of the database that is needed and comes with a variety of options to change the data you need to save.
Резервное копирование MySQL
Как вы знаете, все важные данные ваших сайтов, их настройки, статьи, комментарии и другая информация хранятся в базе данных. Потеря этой информации может иметь очень тяжелые последствия для проекта. Поэтому важно своевременно делать резервные копии базы данных MySQL. Также эти копии могут быть очень полезными при переносе проекта на другой сервер.
В этой инструкции мы рассмотрим как выполняется резервное копирование MySQL или mariadb базы данных, а также как восстановить информацию в базе из копии. Кроме того, мы разберем как настроить автоматическое создание копий через определенный промежуток времени.
Резервное копирование базы данных
Все что вам нужно для резервного копирования MySQL — это доступ к серверу с операционной системой Linux, на котором установлен сервер баз данных, а также имя базы данных и параметры доступа к ней.
Для экспорта информации из базы данных в формате SQL можно использовать утилиту mysqldump. Вот ее синтаксис:
$ mysqldump опции имя_базы [имя_таблицы] > файл.sql
По умолчанию утилита будет выводить все в стандартный вывод, поэтому нам нужно перенаправить эти данные в файл, что мы и делаем с помощью оператора «>». Опции указывают параметры аутентификации и работы, а имя базы и таблицы — данные которые нужно экспортировать. Теперь рассмотрим кратко опции, которые будем использовать:
- -A — копировать все таблицы из всех баз данных;
- -i — записывать дополнительную информацию в комментариях;
- -c — использовать имена колонок для инструкции INSERT;
- -a — включать все возможные опции в инструкцию CREATE TABLE;
- -k — отключает первичные ключи на время копирования;
- -e — использовать многострочный вариант инструкции INSERT;
- -f — продолжить даже после ошибки;
- -h — имя хоста, на котором расположен сервер баз данных, по умолчанию localhost;
- -n — не писать инструкции для создания базы данных;
- -t — не писать инструкции для создания таблиц;
- -d — не записывать данные таблиц, а только их структуру;
- -p — пароль базы данных;
- -P — порт сервера баз данных;
- -Q — брать все имена таблиц, баз данных, полей в кавычки;
- -X — использовать синтаксис XML вместо SQL;
- -u — пользователь, от имени которого нужно подключаться к базе данных.
В большинстве случаев нам достаточно задать имя пользоваться, пароль, а также имя базы данных. Дальше рассмотрим примеры работы с утилитой. Например самая простая команда экспорта базы данных:
mysqldump -u имя_пользователя -p имя_базы > data-dump.sql
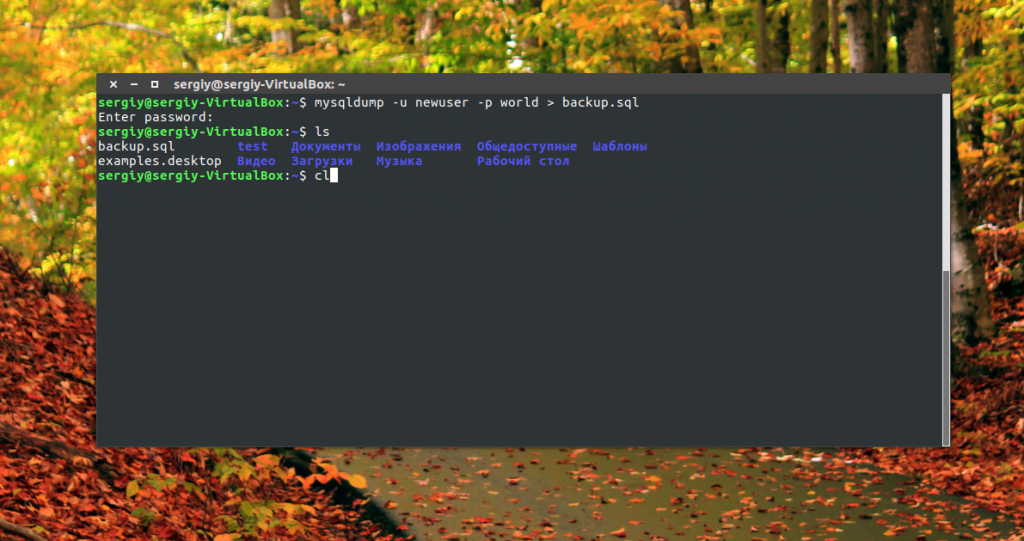
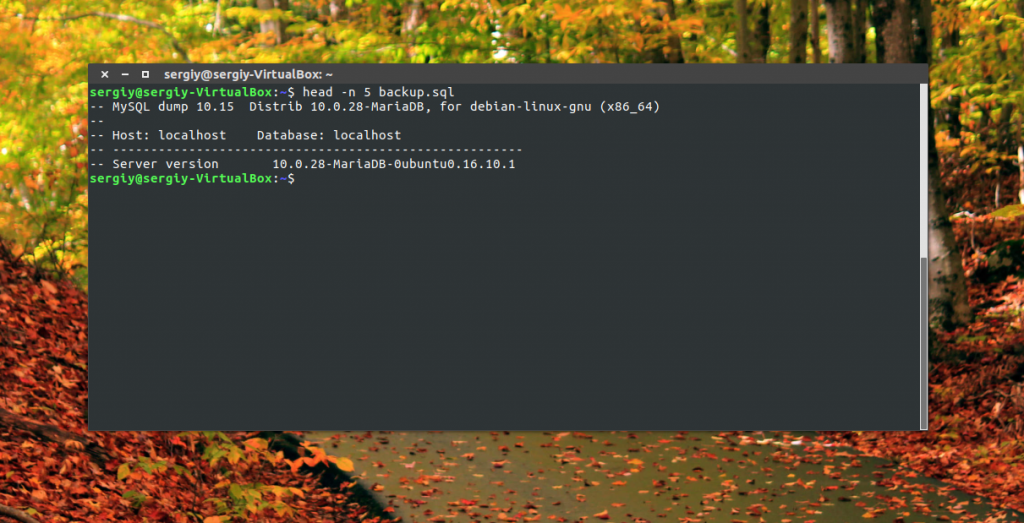
Вам нужно будет ввести пароль пользователя базы данных и больше ничего команда не выведет, поскольку мы отправили все данные в файл, но вы можете посмотреть информацию о резервной копии с помощью такой команды:
head -n 5 data-dump.sql
Но если во время создания копии возникнут какие-либо ошибки, они будут выведены на экран и вы сразу о них узнаете. Более сложный вариант, это выполнить резервное копирование MySQL с другого хоста, если у вас есть к нему доступ:
mysqldump -h хост -P порт -u имя_пользователя -p имя_базы > data-dump.sql
Копирование таблицы MySQL может быть выполнено простым добавлением имени таблицы в конец строки:
mysqldump -u имя_пользователя -p имя_базы имя_таблицы > data-dump.sql
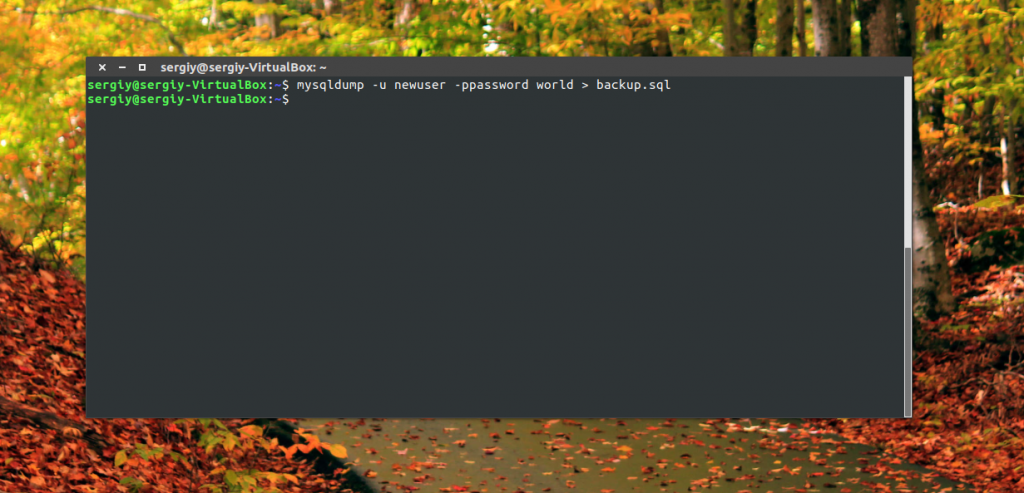
Также, чтобы выполнять автоматическое резервное копирование может понадобиться сразу задать пароль, для этого указывайте его сразу после опции -p, без пробела:
mysqldump -u имя_пользователя -pпароль имя_базы > data-dump.sql
Мы можем делать бэкап вручную время от времени, но это не совсем удобно, поскольку есть другие важные дела. Поэтому используем планировщик cron, чтобы автоматизировать процесс. Тут есть два способа более простой, и более сложный, но точный. Допустим, нам нужно создавать резервную копию каждый день, тогда просто создайте скрипт в папке /etc/cron.daily/ со следующим содержимым:
sudo vi /etc/cron.daily/mysql-backup
!/bin/bash
/usr/bin/mysqldump -u имя_пользователя -pпароль имя_базы > /backups/mysql-dump.sql
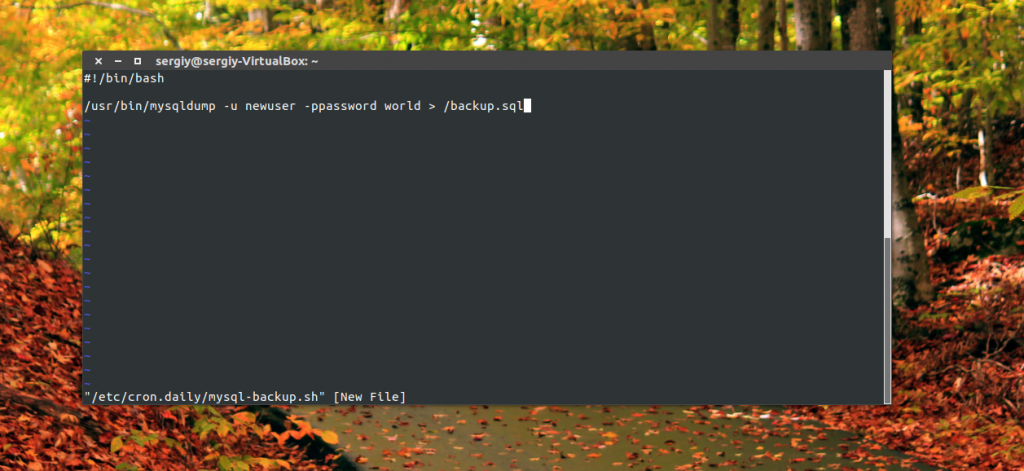
Папку /backups/mysql-dump.sql нужно заменить на свою папку для резервных копий. Осталось дать скрипту права на выполнение:
chmod ugo+x /etc/cron.daily/mysql-backup
Дальше планировщик будет запускать его каждый день и делать копирование базы данных. Но есть еще один, более точный способ, который позволяет указать точное время выполнения. Сначала выполните команду:
Добавьте в открывшейся файл такую строку и сохраните изменения:
30 2 * * * /usr/bin/mysqldump -u имя_пользователя -pпароль имя_базы > /backups/mysql-dump.sql
Команда будет выполняться каждый день, в 2:30, это удобно, поскольку ночью обычно меньше нагрузка на сервер. Как вы поняли, первое число — это минуты, второе — часы, третье день, дальше неделя и месяц. Звездочка значит, что этот параметр не имеет значения.
Восстановление из резервной копии
Восстановить резервную копию mysql или mariadb из существующего SQL файла тоже очень просто. Поскольку использовался синтаксис sql мы просто можем выполнить все команды с помощью стандартного клиента mysql.
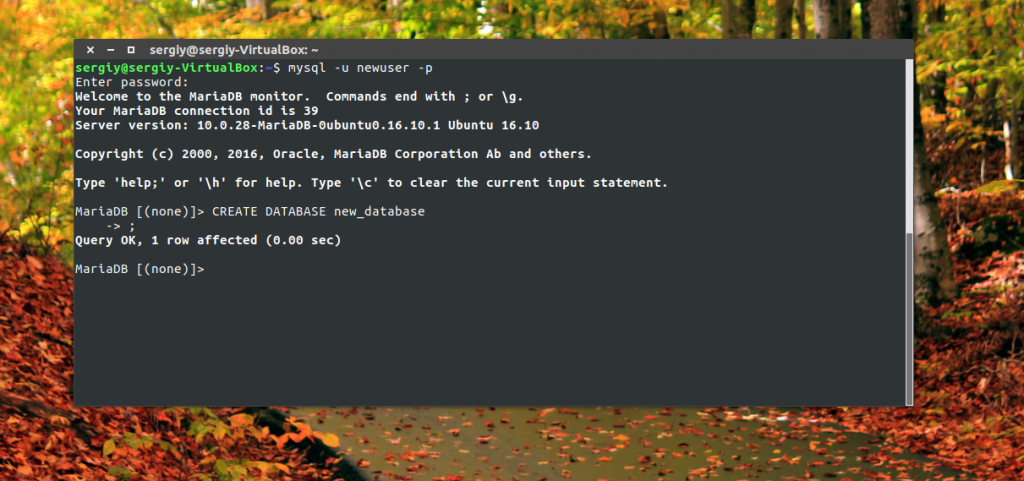
Сначала нужно создать новую базу данных. Для этого авторизуйтесь на mysql сервере с правами суперпльзователя:
Затем создайте новую базу данных, например, с именем new_database, если база данных уже существует, то этого делать не нужно:
mysql> CREATE DATABASE new_database;
Дальше закройте оболочку, нажав сочетание клавиш Ctrl+Q и импортируйте данные из файла командой:
mysql -u пользователь -p база_данных < data-dump.sql
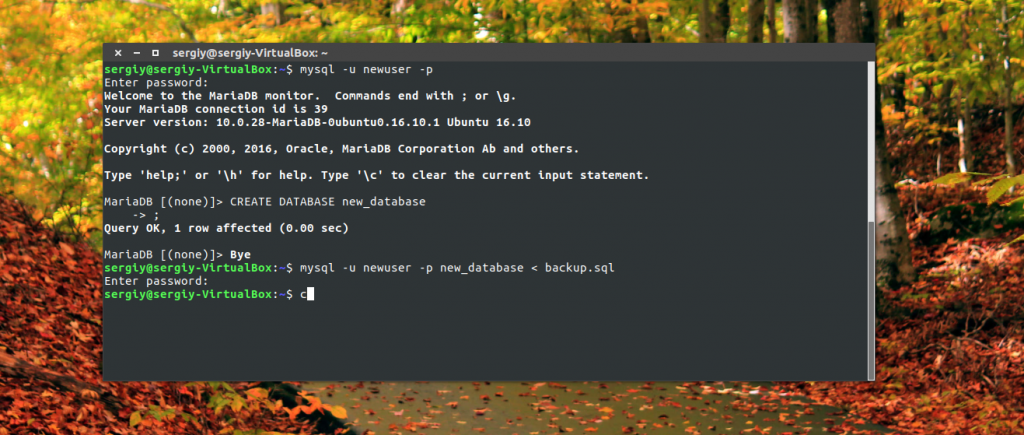
Для экспорта мы направляли данные стандартного вывода в файл, а здесь происходит обратная операция, данные из файла направляются на стандартный ввод программы. Успешно выполненная команда ничего не выведет, и чтобы убедиться что все прошло успешно, просто посмотрите содержимое базы.
Выводы
Теперь вы знаете как выполняется копирование базы данных MySQL, а также как восстановить скопированную информацию. Мы рассмотрели все возможные опции mysqldump чтобы вы могли настроить утилиту так, как вам нужно. Резервное копирование базы данных MySQL это очень важный момент и в определенной ситуации может сохранить много времени, поэтому обязательно настройте у себя на сервере!
Обнаружили ошибку в тексте? Сообщите мне об этом. Выделите текст с ошибкой и нажмите Ctrl+Enter.
Как сделать резервную копию и восстановить базы данных MySQL/MariaDB в Linux
В этой статье показано несколько практических примеров того, как выполнять различные операции резервного копирования баз данных MySQL/MariaDB с помощью команды mysqldump, а также мы увидим, как восстановить их с помощью Команды mysql и mysqlimport в Linux.
mysqldump — это клиентская программа командной строки, которая используется для создания дампа локальных или удаленных баз данных MySQL или коллекций баз данных для резервного копирования в один плоский файл.
Мы предполагаем, что у вас уже установлен MySQL в системе Linux с правами администратора, и мы полагаем, что вы уже немного знакомы с MySQL. .
Если у вас не установлен MySQL или вы не знакомы с MySQL, прочитайте наши статьи ниже.
- Как установить MySQL в дистрибутивах на основе RHEL
- Как установить MySQL на Rocky Linux и AlmaLinux
- Как установить MySQL в Ubuntu Linux
- Как установить MySQL в Debian
- 20 команд MySQL (Mysqladmin) для администрирования баз данных в Linux
- 12 рекомендаций по безопасности MySQL/MariaDB для Linux
Как сделать резервную копию базы данных MySQL в Linux?
Чтобы сделать резервную копию баз данных или баз данных MySQL, база данных должна существовать на сервере базы данных, и у вас должен быть доступ к ней. Формат команды будет.
Параметры указанной команды следующие.
- [username] : допустимое имя пользователя MySQL.
- [пароль] : действительный пароль пользователя MySQL.
- [database_name]: действительное имя базы данных, для которой вы хотите сделать резервную копию.
- [dump_file.sql]: имя файла дампа резервной копии, который вы хотите создать.
Как сделать резервную копию одной базы данных MySQL?
Чтобы сделать резервную копию одной базы данных, используйте следующую команду. Команда создаст дамп структуры базы данных [rsyslog] с данными в один файл дампа с именем rsyslog.sql.
Как сделать резервную копию нескольких баз данных MySQL?
Если вы хотите сделать резервную копию нескольких баз данных, выполните следующую команду. В следующем примере команда выполняет резервное копирование структуры и данных баз данных [rsyslog, syslog] в один файл с именем rsyslog_syslog.sql.
Как сделать резервную копию всех баз данных MySQL?
Если вы хотите сделать резервную копию всех баз данных, используйте следующую команду с параметром –all-database. Следующая команда создает резервную копию всех баз данных с их структурой и данными в файл с именем all-databases.sql.
Как сделать резервную копию только структуры базы данных MySQL?
Если вам нужна только резервная копия структуры базы данных без данных, используйте опцию –no-data в команде. Приведенная ниже команда экспортирует базу данных [rsyslog] Structure в файл rsyslog_structure.sql.
Как сделать резервную копию только данных базы данных MySQL?
Чтобы создать резервную копию данных без структуры базы данных, используйте параметр –no-create-info с командой. Эта команда извлекает базу данных [rsyslog] Data в файл rsyslog_data.sql.
Как сделать резервную копию одной таблицы базы данных?
С помощью приведенной ниже команды вы можете сделать резервную копию одной таблицы или определенных таблиц вашей базы данных. Например, следующая команда делает резервную копию только таблицы wp_posts из базы данных wordpress.
Как сделать резервную копию нескольких таблиц базы данных?
Если вы хотите сделать резервную копию нескольких или определенных таблиц из базы данных, разделите каждую таблицу пробелом.
Как сделать резервную копию удаленной базы данных MySQL
Приведенная ниже команда создает резервную копию базы данных удаленного сервера [172.16.25.126] [галерея] на локальном сервере.
Как восстановить базу данных MySQL?
В приведенном выше руководстве мы увидели, как сделать резервную копию только баз данных, таблиц, структур и данных, теперь мы увидим, как восстановить их, используя следующий формат.
Как восстановить единую базу данных MySQL
Чтобы восстановить базу данных, вы должны создать пустую базу данных на целевой машине и восстановить базу данных с помощью команды msyql. Например, следующая команда восстановит файл rsyslog.sql в базе данных rsyslog.
Если вы хотите восстановить базу данных, которая уже существует на целевой машине, вам потребуется использовать команду mysqlimport.
Таким же образом вы можете восстанавливать таблицы, структуры и данные базы данных. Если вам понравилась эта статья, то поделитесь ею с друзьями.