How to Check and Update Java Version on Ubuntu 22.04?
Java is a general-purpose client-side programming language that serves several functionalities like android application development, game development, web applications development, and many other software products. To build any application, first, we have to install Java on our computer systems. However, some applications are not capable to run on java’s outdated version. So, it’s essential to know which Java version is installed on our operating system and if our machine is running an outdated version of java, then how to update it.
This post will explain how to check and upgrade the Java version on Ubuntu 22.04. So, let’s begin!
How to check Java version on Ubuntu 22.04
Open the terminal on your ubuntu 22.04 operating system and type the below-mentioned command to check which Java version is installed on your machine:
Once you typed the above-given command on the terminal, it will produce the following outcome:
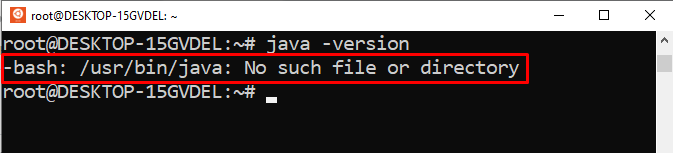
The above snippet shows that Java is not installed on our machine. Now, let’s move one step further to learn how to install/upgrade the Java version on Ubuntu 22.04.
How to Update Java version on Ubuntu 22.04
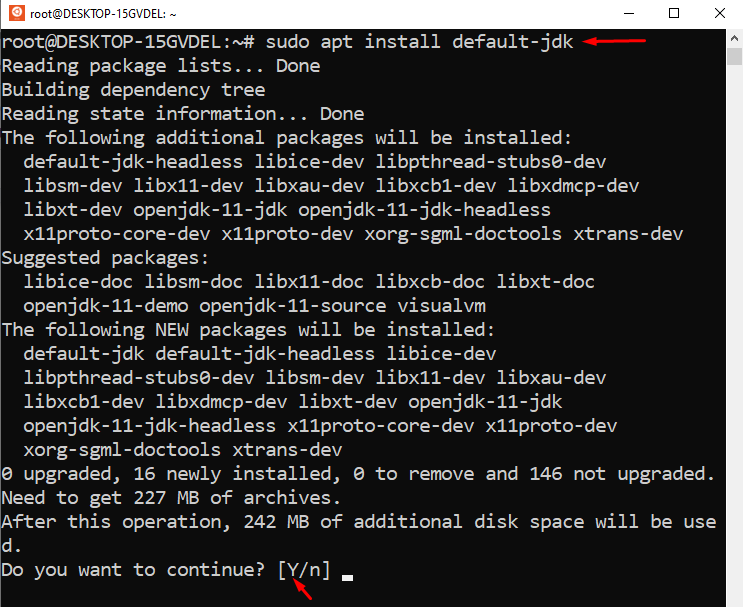
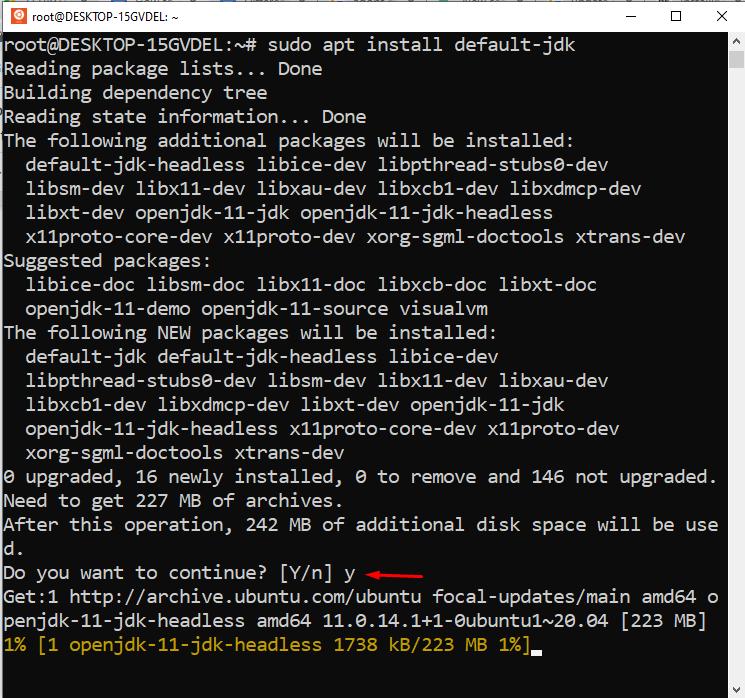
To update the java version or to install the latest java version, firstly you have to upgrade the apt repository. To do so, type the below-given command on the terminal:
Next, run the below-enlisted command to install the default Java Runtime Environment(JRE) on your operating system:
When you execute the above-given command, it will work like this:
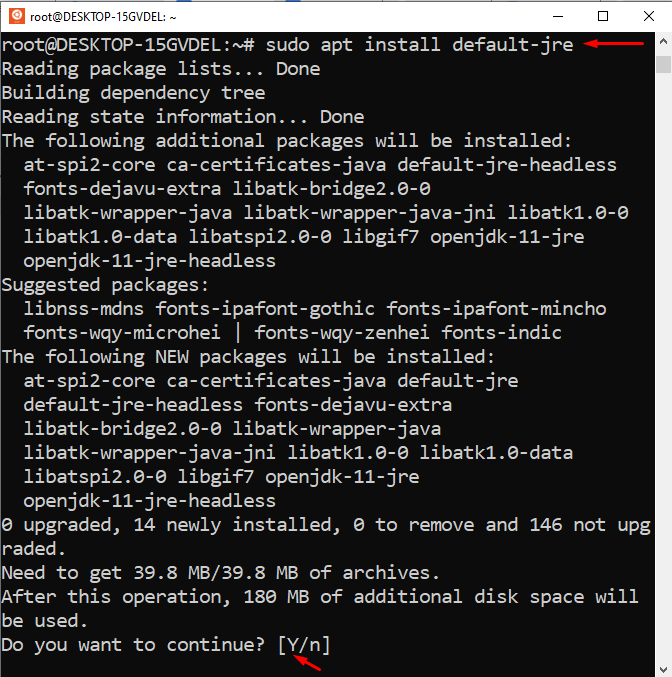
Type “Y” to continue the installation process:
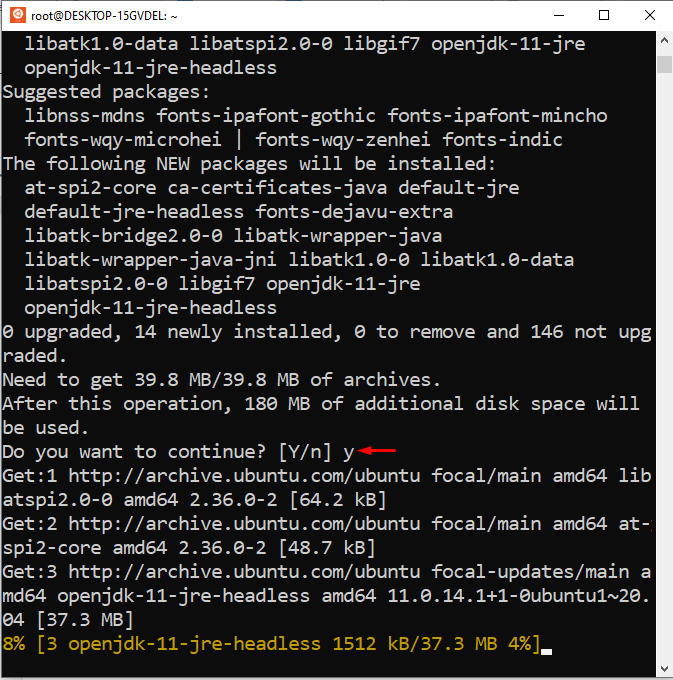
The whole installation process will take a few minutes to install JRE on your system. You can verify the JRE’s installation by typing the following command:
If JRE is successfully installed on your Ubuntu 22.04, then you will witness the result something like this:
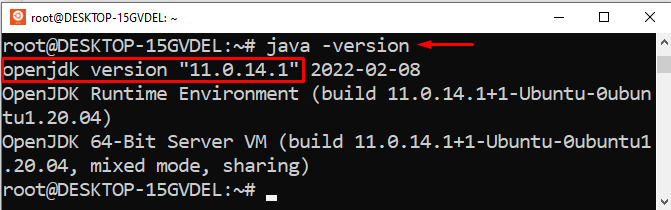
Congratulations! You have successfully installed the latest and updated version of Java on Ubuntu 22.04.
As the JRE’s installation is done, now you can run almost every java software on your machine. However, some java-oriented software may require the Java Development Kit(JDK) to compile/run some particular tasks. In such cases, you can install the JDK by typing the below-given command:
The above-given command will work something like this:
Type “Y” to continue the JDK’s installation process:
Type the below-given command on the terminal of ubuntu 22.04 to verify whether the updated JDK is installed on your machine or not:
You will witness the below-given output:

Congrats! You are running an updated Java version on your ubuntu 22.04.
Conclusion
Open the terminal and type “sudo apt install default-jre” to install JRE, and type “sudo apt install default-jdk” to install JDK on ubuntu 22.04. To check or verify the java version type “java -version” on the terminal of Ubuntu 22.04. This write-up provided a step-by-step guide on how to check, update, and verify the java version on ubuntu 22.04.
About the author

Anees Asghar
I am a self-motivated IT professional having more than one year of industry experience in technical writing. I am passionate about writing on the topics related to web development.
How to upgrade Java on Ubuntu?
I installed Ubuntu on my computer, and now my Java version is not updated. I have Java, so I don’t need to install — just update the current version.
Can someone please tell me the command I have to use to get the current version?
I have tried: apt-get update and apt-get upgrade .
![]()
7 Answers 7
Note: WebUpd8 team’s PPA has been discontinued with effective from April 16, 2019. Thus this PPA doesn’t have any Java files. More information can be found on PPA’s page on Launchpad. Hence this method no longer works and exists because of historical reasons.
if you want java8 :
If you ABSOLUTELY need to have the latest update of java you must manualy install from official source, follow this tuto : http://www.cyberciti.biz/faq/howto-installing-oracle-java7-on-ubuntu-linux/
But I advise you to wait as ppa update
![]()
Found something useful here..
Installing Java with apt-get is easy. First, update the package index:
Check if Java is not already installed:
Then install java jre/jdk :
Note: WebUpd8 team’s PPA has been discontinued with effective from April 16, 2019. Thus this PPA doesn’t have any Java files. More information can be found on PPA’s page on Launchpad. Hence this method no longer works and exists because of historical reasons.
The newest OpenJDK Java packaged for trusty (14.04) right now is 7u55. You can check your Java version with java -version from the command line in Terminal.
How to Upgrade Java on Ubuntu?
Java is a high-level, object-oriented programming language that is widely used for developing desktop, mobile, and web applications. Java, like other applications, offers updated versions regularly. If your system or any programs are Java-dependent, then it is necessary to keep the Java version updated to get the latest features and support.
This post will address the possible methods to upgrade Java on Ubuntu:
- Method 1: Using Apt Package Manager
- Method 2: Using .deb File
Method 1: Using Apt Package Manager to Upgrade Java on Ubuntu
The most common method is to use the “APT” package manager, which allows users to easily upgrade to the latest version of Java by running a few commands in the terminal.
Step 1: Check the Existing Java Version
To check the installed java version in the operating system, run the “java” command with the “version” option:

The output shows that currently, the “1.8.0_352” version of Java is installed in the system.
Step 2: Update the Package Manager
To update the package manager’s list, use the “apt” command with the “update” utility in the following command:

The output shows that the package manager has been updated.
Install the Latest Version (Upgraded)
To install the latest version of OpenJDK, use the “APT” package manager by specifying the “openjdk-19-jdk” command:
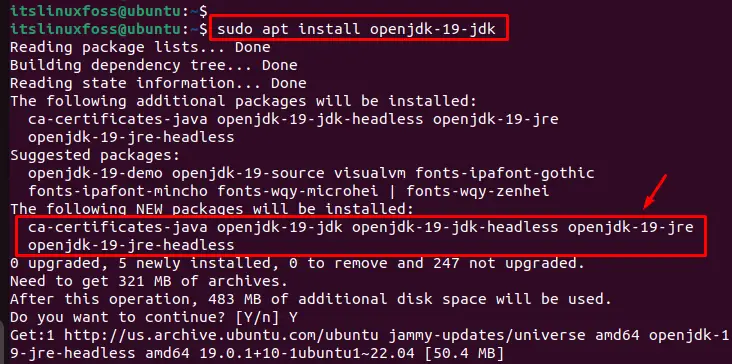
The output shows that the latest version of Java 19 along with dependent files have been installed in the system.
Note: Users can also utilize the “sudo apt upgrade” command to upgrade all installed packages, including Java, in the current system. In addition, Java 19 is the extended version of the Java 17 LTS version.
Verify the Upgraded Java Version
To verify the installed version of Java, specify the “java” command with the “version” option as below:

This command displays the “19.0.1” version of Java that is upgraded on the system.
Method 2: Using the .deb File to Upgrade Java (Manually)
To upgrade Java manually, download the latest version of Oracle JDK from the Official Website and install it on the Ubuntu system. Follow these steps to do this:
Step 1: Download the Latest JDK Version
Go to the Oracle JDK download page and download the upgraded version of the .deb file for Linux:
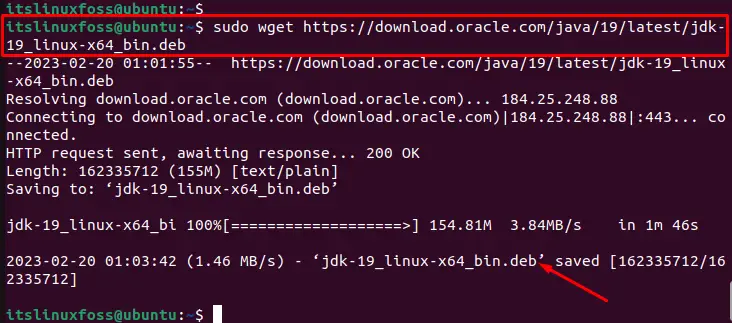
The output shows that the latest version of the .deb file has been downloaded in the system.
Note: Go to the Official Website to have the latest available “.deb” version of Java.
Step 2: Install the Latest Version of OpenJDK
To upgrade Java on Ubuntu, use the .deb package file to install the most recent version of OpenJDK:
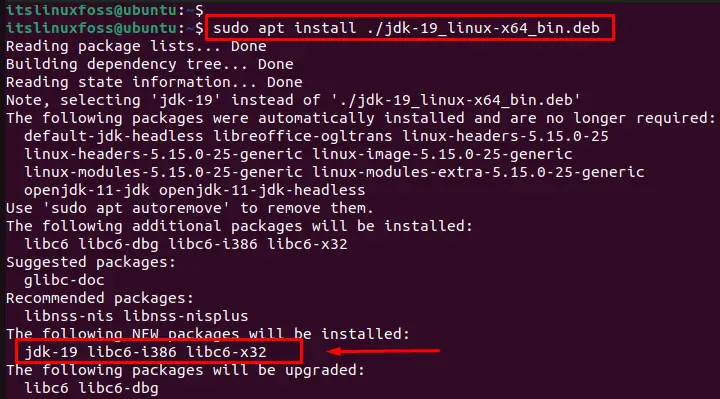
In this way, all dependencies with the latest version of java are installed in the system.
Step 3: Verify Upgraded Version of Java
To verify the upgraded version of Java, utilize the “version” option with the “java” command:

It displays the “19.0.1” version of Java that is currently installed on the system.
Conclusion
To upgrade Java on Ubuntu, use the “$ sudo apt install openjdk-19-jdk” command or download the latest version of Java from the Oracle Website and install it manually on the system. After the upgrade, execute the “java -version” to confirm the installed version of Java.
This article has explained all possible methods to upgrade Java on Ubuntu.
Установка Java JRE / JDK в Linux

Компоненты Java необходимы для запуска множества разнообразных приложений и веб-сайтов, поэтому практически каждый пользователь компьютера сталкивается с надобностью инсталляции этой платформы. Конечно, в разных ОС принцип выполнения поставленной задачи отличается, но у дистрибутивов Linux он всегда примерно один и тот же, а мы бы хотели рассказать как осуществляется установка Java в Ubuntu. Обладателям других сборок нужно будет только повторить приведенные инструкции с учетом синтаксиса системы.
Устанавливаем Java JRE / JDK в Linux
Сегодня мы предлагаем ознакомиться с разными вариантами инсталляции библиотек Java, поскольку все они будут максимально полезны и применимы в определенных ситуациях. Например, если вы не хотите использовать сторонние репозитории или же желаете поставить несколько Джава рядом, тогда нужно задействовать отдельный вариант. Впрочем, давайте детально рассмотрим их все.
Сначала рекомендуется проверить обновления системных хранилищ и узнать текущую версию Java, если она вообще присутствует в ОС. Делается это все через стандартную консоль:
-
Откройте меню и запустите «Терминал».
Способ 1: Официальные репозитории
Самый простой метод — использовать официальное хранилище для загрузки Java, которую туда выгрузили разработчики. От вас требуется прописать всего несколько команд, чтобы добавить все необходимые компоненты.

-
Запустите «Терминал» и напишите там sudo apt-get install default-jdk , а затем нажмите на Enter.
Хоть такой метод достаточно прост, он не подходит для установки самых свежих Джава-библиотек, поскольку они последнее время не выкладываются в официальное хранилище. Именно поэтому мы предлагаем ознакомиться со следующими вариантами инсталляции.
Способ 2: Репозиторий Webupd8
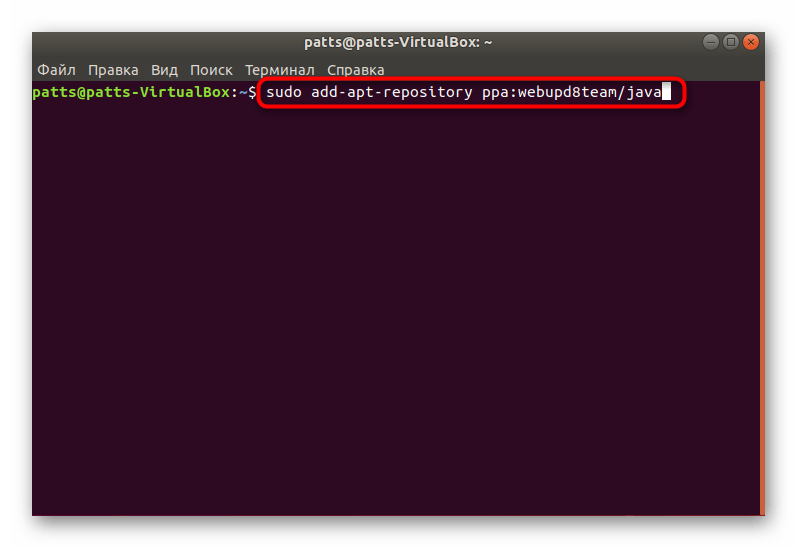
Существует пользовательское хранилище под названием Webupd8, в котором имеется скрипт, сравнивающий текущую версию Java с той, что находится на сайте Oracle. Такой метод инсталляции пригодится тем, кто желает установить сброку новее 8 (последней доступной в репозитории Oracle).
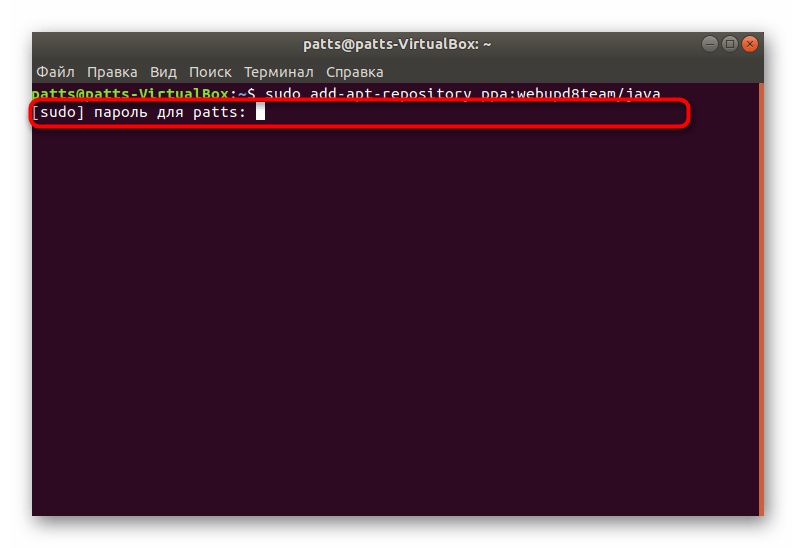
- В консоли введите sudo add-apt-repository ppa:webupd8team/java .
- Обязательно укажите свой пароль.
- Подтвердите операцию добавления, нажав на Enter.
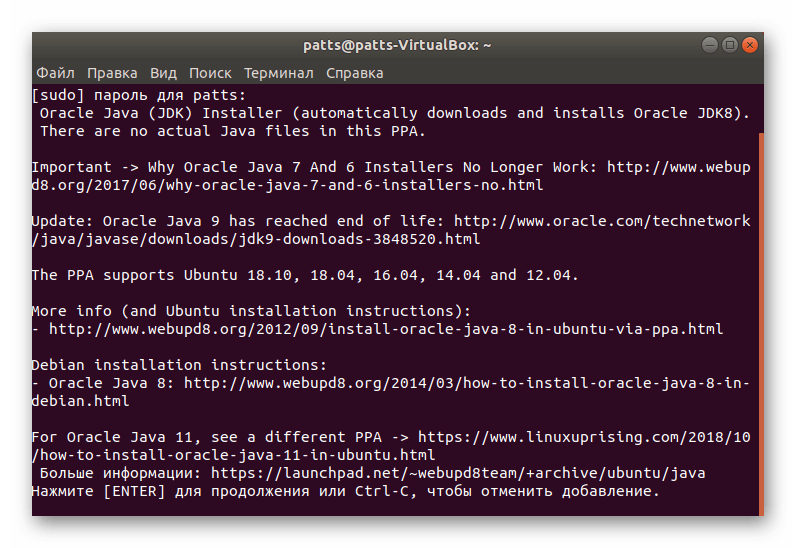
- Ожидайте завершения загрузки файлов, не закрывая «Терминал».
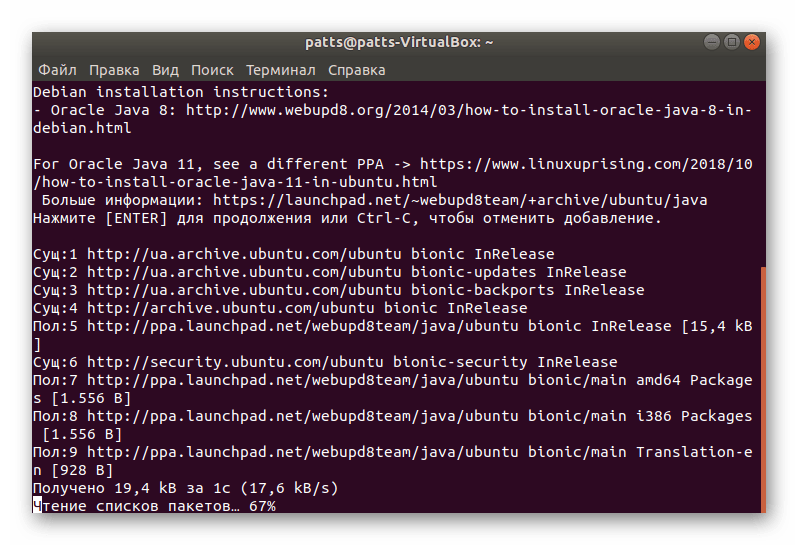
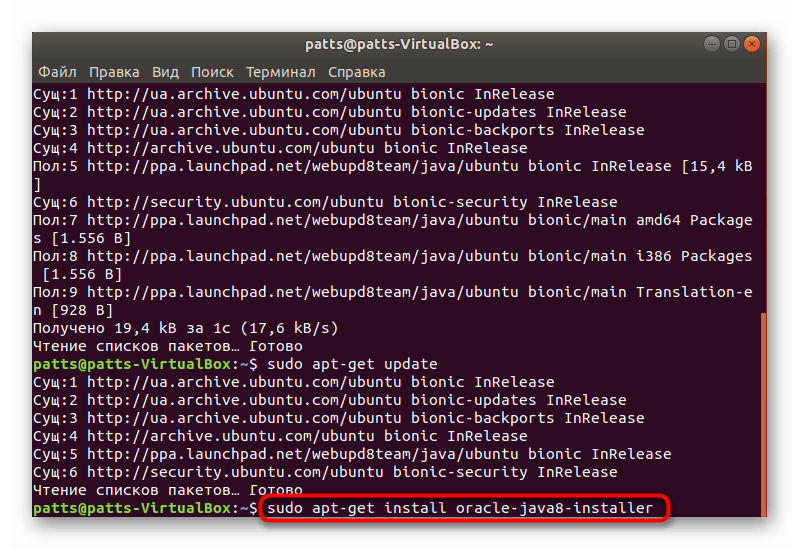
- Обновите системное хранилище командой sudo apt-get update .
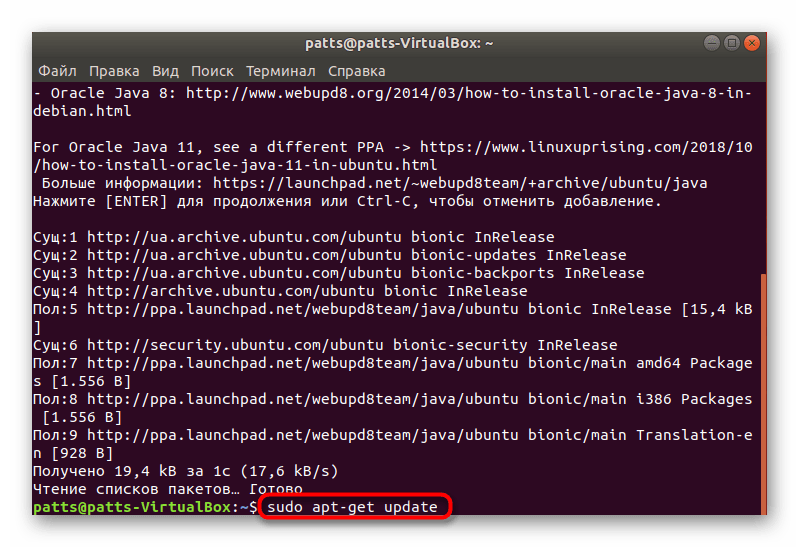
- Теперь следует добавить графический инсталлятор путем ввода sudo apt-get install oracle-java8-installer .
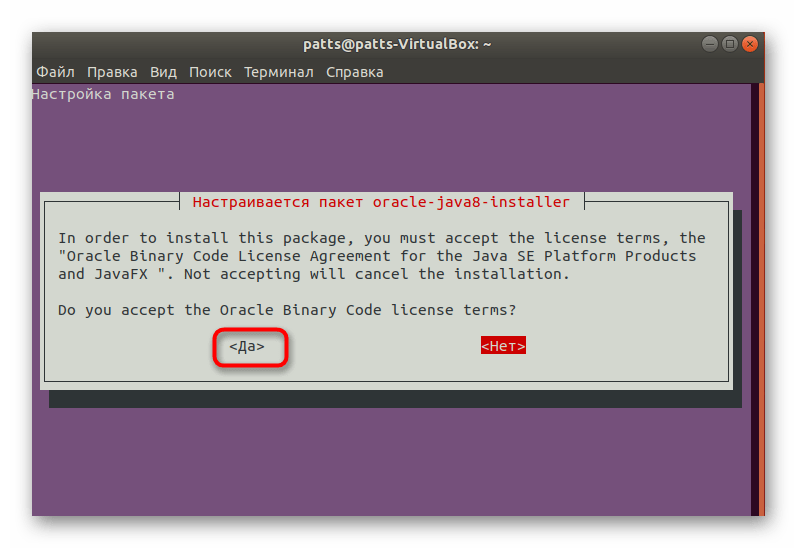
- Примите лицензионное соглашение для настройки пакета.
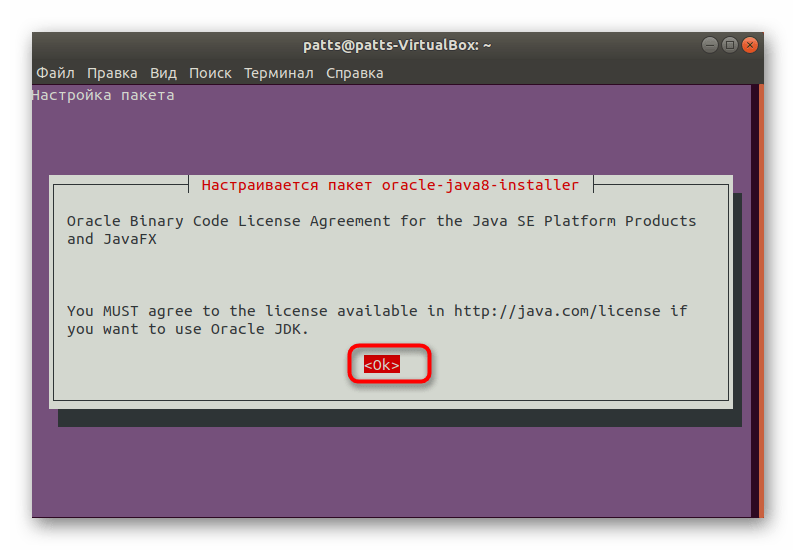
- Согласитесь с добавлением новых файлов в систему.
По окончании процесса вам будет доступна команда для инсталляции абсолютно любых версий — sudo apt-get install oracle-java7-installer , где java7 — версия Java. Например, вы можете прописать java9 или java11 .
Избавиться от ненужных инсталляторов поможет команда sudo apt-get remove oracle-java8-installer , где java8 — версия Java.
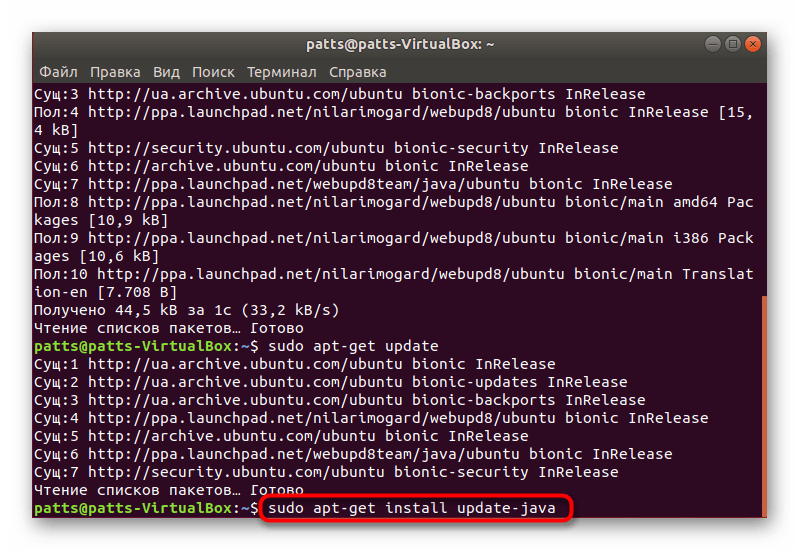
Способ 3: Обновление с помощью Webupd8
Выше мы рассказали об установке сборок путем использования пользовательского хранилища Webupd8. Благодаря этому же репозиторию можно обновлять версию Джава до самой последней как раз путем скрипта сравнения.
- Повторите первые пять шагов из предыдущей инструкции, если вы еще не сделали эти действия.
- Впишите команду sudo update-java , а затем нажмите на Enter.
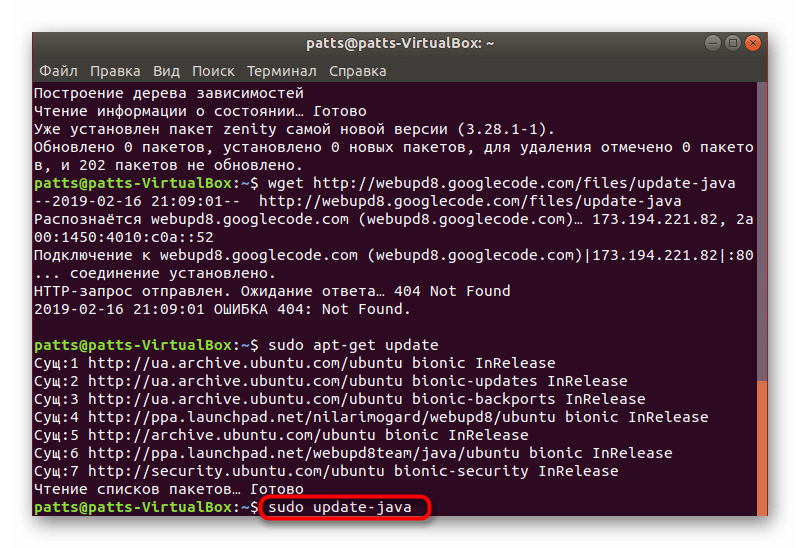
- Используйте команду sudo apt-get install update-java для установки обновлений в случае их нахождения.
Способ 4: Ручная установка
Пожалуй, этот способ самый тяжелый из тех, которые мы рассмотрели в этой статье, однако он позволит получить необходимую версию Java без использования сторонних репозиториев и других дополнительных компонентов. Для осуществления этой задачи вам понадобится любой доступный браузер и «Терминал».
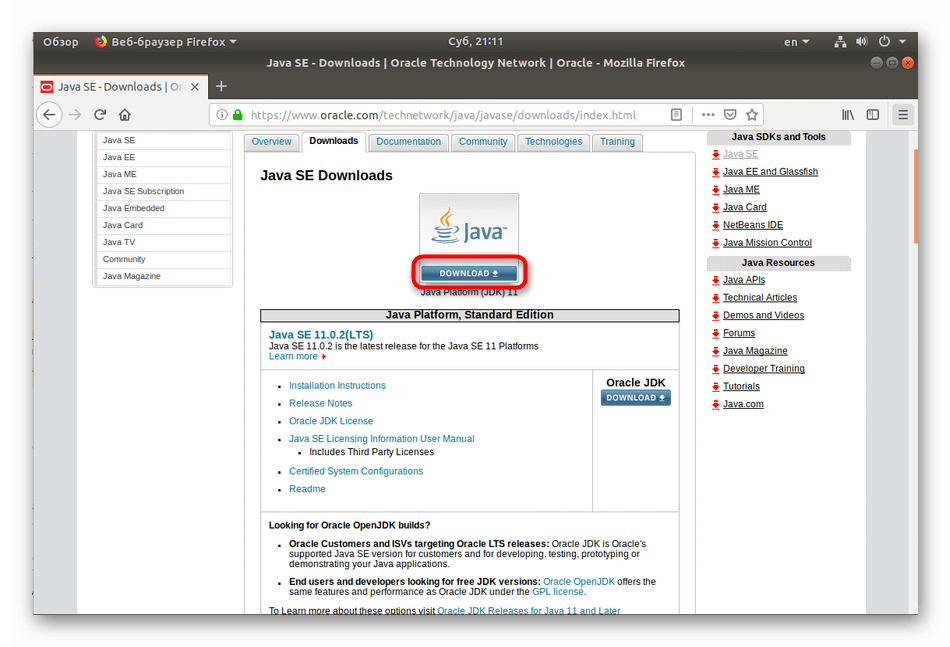
- Через веб-обозреватель перейдите на официальную страницу Oracle для загрузки Джава, где нажмите на «Download» или выберите любую другую необходимую версию.
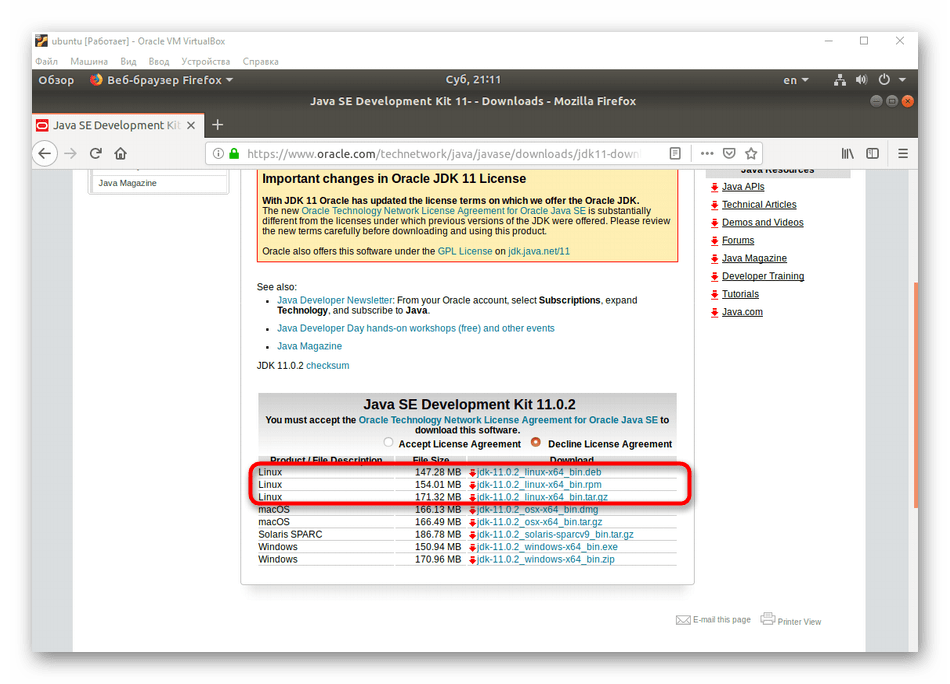
- Ниже находится несколько пакетов с библиотеками. Мы советуем скачать архив формата tar.gz.
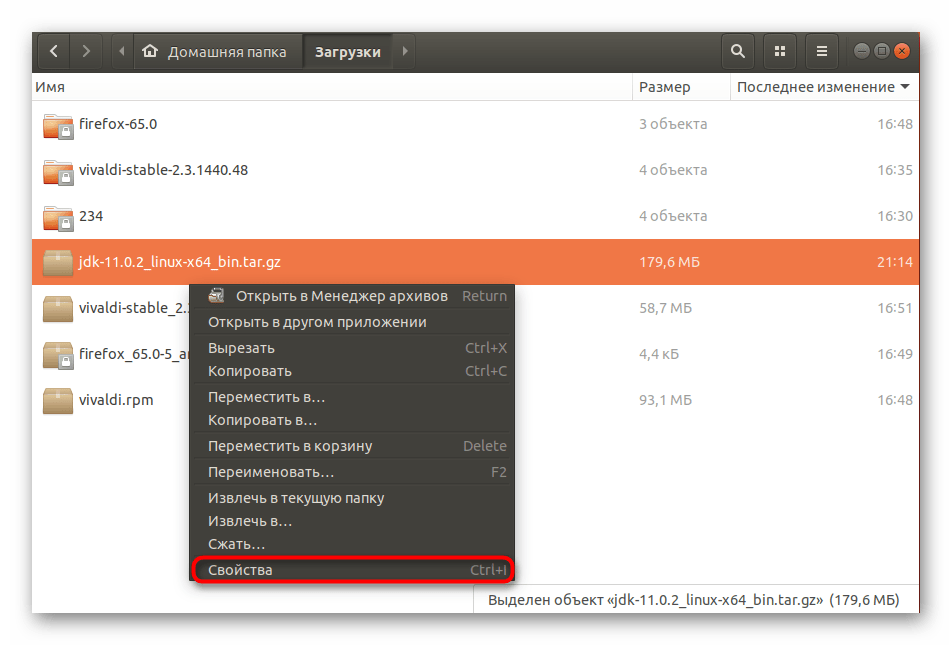
- Перейдите в папку с архивом, щелкните по нему ПКМ и выберите «Свойства».
- Запомните расположение пакета, поскольку вам придется перейти к нему через консоль.
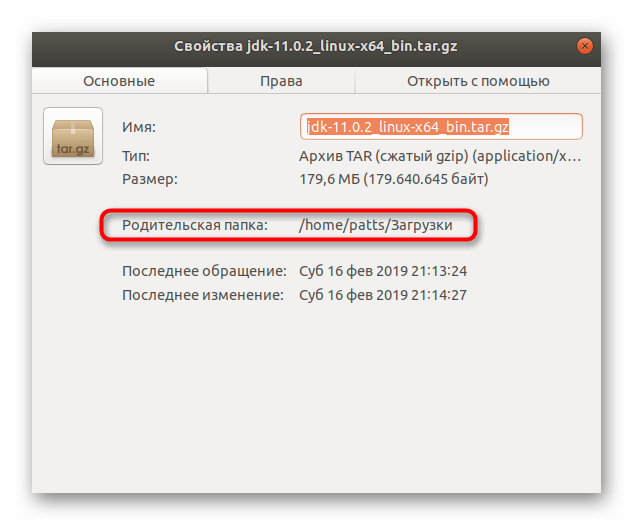
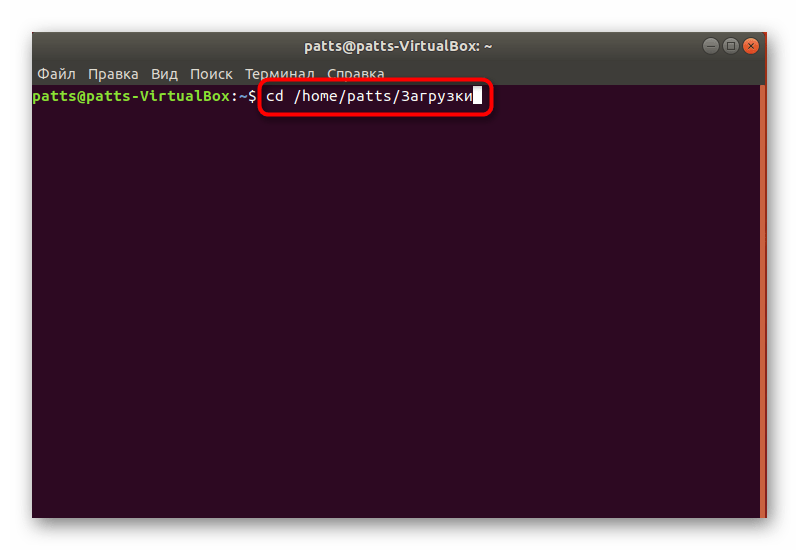
- Запустите «Терминал» и выполните команду cd /home/user/folder , где user — имя пользователя, а folder — название папки хранения архива.
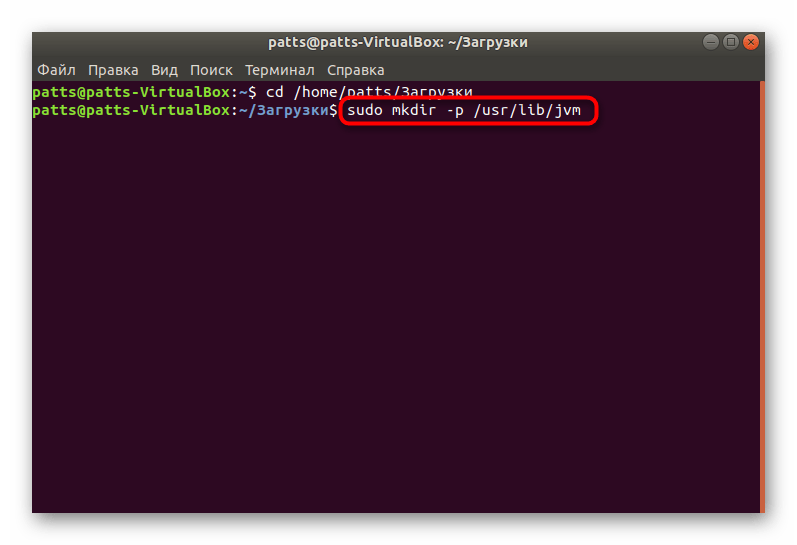
- Создайте папку для распаковки архива. Обычно все компоненты помещаются в jvm. Создание директории происходит путем ввода sudo mkdir -p /usr/lib/jvm .
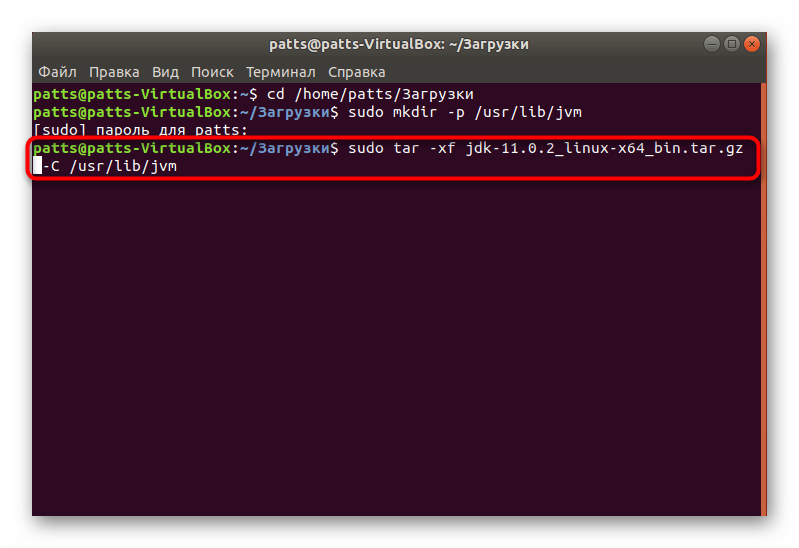
- Распакуйте в созданную папку имеющийся архив sudo tar -xf jdk-11.0.2_linux-x64_bin.tar.gz -C /usr/lib/jvm , где jdk-11.0.2_linux-x64_bin.tar.gz — название архива.
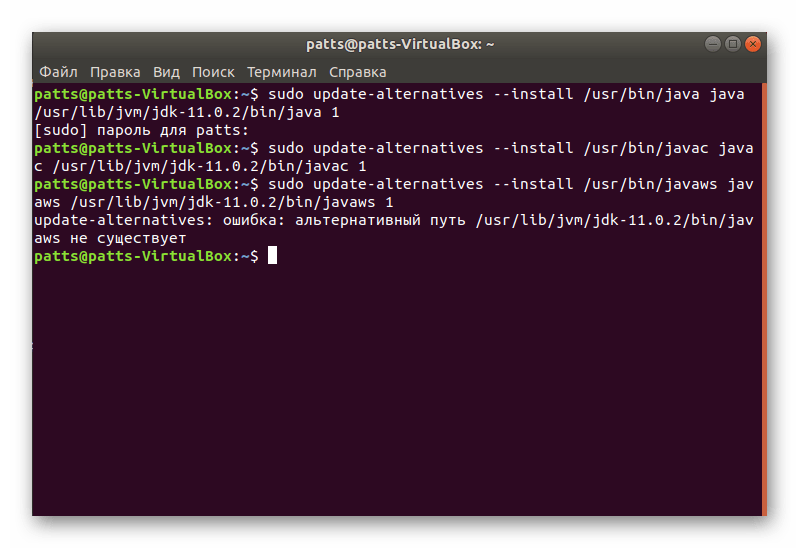
- Для добавления системных путей вам потребуется последовательно ввести следующие команды:
sudo update-alternatives —install /usr/bin/java java /usr/lib/jvm/jdk1.8.0/bin/java 1
sudo update-alternatives —install /usr/bin/javac javac /usr/lib/jvm/jdk1.8.0/bin/javac 1
sudo update-alternatives —install /usr/bin/javaws javaws /usr/lib/jvm/jdk1.8.0/bin/javaws 1
Как видите, методов инсталляции Java в операционную систему Linux существует достаточно большое количество, поэтому каждый пользователь найдет подходящий вариант. Если вы используете специфический дистрибутив и приведенные способы не работают, внимательно изучите отобразившиеся в консоли ошибки и воспользуйтесь официальными источниками для решения проблемы.