Setting Permission with chmod
Change mode so you can set permissions for read, write and execute for the user, members of your group and others. This uses binary values as an argument to set these. There are many common chmod permissions, a few key ones are:
In general, chmod commands take the form:
This adds write permissions to the usergroup members, and removes read and write permissions from the “other” users of the system. Finally the a+x adds the execute permissions to all categories. This value may also be specified as +x. If no category is specified, the permission is added or subtracted to all permission categories.
The -R option applies the modification to the permissions recursively to the directory specified and to all of its contents
chmod — details
If no options are specified, chmod modifies the permissions of the file specified by file name to the permissions specified by permissions.
permissions defines the permissions for the owner of the file (the «user»), members of the group who owns the file (the «group»), and anyone else («others»). There are two ways to represent these permissions: with symbols (alphanumeric characters), or with octal numbers (the digits 0 through 7).
Let’s say you are the owner of a file named myfile, and you want to set its permissions so that: the user can read, write, ande xecute it; members of your group can read ande xecute it; and * others may only read it.
This command will do the trick:
This example uses symbolic permissions notation. The letters u, g, and o stand for «user», «group», and «other». The equals sign («=») means «set the permissions exactly like this,» and the letters «r», «w», and «x» stand for «read», «write», and «execute», respectively. The commas separate the different classes of permissions, and there are no spaces in between them.
Here is the equivalent command using octal permissions notation:
Here the digits 7, 5, and 4 each individually represent the permissions for the user, group, and others, in that order. Each digit is a combination of the numbers 4, 2, 1, and 0:
So 7 is the combination of permissions 4+2+1 (read, write, and execute), 5 is 4+0+1 (read, no write, and execute), and 4 is 4+0+0 (read, no write, and no execute).
These are the examples from the symbolic notation section given in octal notation:
chmod Examples # Set the permissions of file.htm to «owner can read and write; group can read only; others can read only». chmod 644 file.htm
Setting Default permissions for Directory with user groups
How to set rw permission in a directory shared by a group of users
- First all users accessing the directory need to share a group.
- Then change the group permissions of the directory and set to default rwx
Next we can verify:
Examples
To modify existing files in goups use -m switch and to set new default permission with switch -d to the directory for group .
Users, Groups and Permissions in Linux
![]()
So here I am, in my journey to mastery, documenting how I learnt to create users, groups and permissions in Linux in the form of a mini-tutorial.
We’ll be working with Ubuntu installed on a local virtual server — but most commands used will apply to any other Linux distribution. This article also assumes a basic knowledge of Linux commands.
The Linux operating system allows multi-user functionality. This means that multiple users can use the operating system concurrently and independently while sharing system resources.
In this mini-tutorial, we will create 3 groups and 15 users and assign these users across the 3 groups. We will also ensure that users in one group cannot access files in another group unless they are added to that group.
But first, let’s take a look at the different types of user accounts in Linux.
Types of user accounts
There are three basic types of Linux user accounts:
- Root user(administrative): This user account has full access to system-wide resources, in addition to the permission to create, modify and delete users and groups.
- Regular user accounts: These are user accounts with a login shell and home directory that perform tasks for personal use — usually common application tasks that are isolated to the user’s home directory.
- Service accounts: These are accounts assigned to applications but with limited access in order to protect the application from potential attacks while still performing essential functions. They usually will not have a home directory.
Create users
We will need admin privileges to create users — however, using the root user context is generally avoided, for security reasons.
First, create a regular user using the useradd command following this syntax:
TIP: To learn more about a Linux command, run man <command> , for example, man useradd to display a full description of the command.
And then, assign admin privileges to this user as follows:
Now, this admin user has superuser privileges and will not need to type in a password with the sudo command.
Let’s switch to the admin superuser using the following command:
And then create more users with the useradd command:
Do this for the number of users you need to create — 15 users in this case.
View users
All users in the system are stored in the /etc/passwd directory. To view all users, run the following command:
This should output something similar to the following:
Each entry has the following features:
- the username: user1
- the encrypted password: x
- the unique identifier (UID) for the user: 100x
- the user group ID (GID): 100x
- the General Electric Comprehensive Operating Supervisor (GECOS) field — which is empty in this case. (This field contains general information as a string of comma-delimited attributes, for example, full name; phone number; etc)
- the user home directory: /home/user1
- the default login shell for the user: /bin/sh
Delete users
To delete a user, run the command:
This removes all related user data, along with all the files in the user’s home directory -f, —force .
Add users to a group
To add the 15 users to groups, let’s create three different groups — a group for team leads leads , one for developers developers and another for the site reliability engineering team sre — and then add the users to the groups.
Use the groupadd command to create a group with the following syntax:
So for our case, we will create three different groups like so:
Next, add the already created users to each group assuming each user fits the group role, using the gpasswd command with the following syntax:
The gpasswd command allows you to manage the creation of groups and members of groups — the -A flag defines group administrators and the -M flag defines the members of the group as a comma-separated list (see the man pages for more details).
View groups
All groups in the system are stored in the /etc/groups directory. To view all groups, run the following command:
This should give an output similar to:
Next, let’s define the level of access allowed for each group.
Permissions and Ownership
The reason Linux so elegantly supports a multi-user system is as a result of permissions. Permissions grant users the right to access files and directories within the system. In Linux, the basic permissions are:
- Read : the right to open and view the contents of files and directories. Represented by r
- Write: the right to modify the content of a file and to add, remove and rename files within a directory. Represented by w
- Execute: the right to run a script or application. Represented by x
Let’s demonstrate the significance of file permissions; create 3 separate files using the following command:
Run the following command to view the files and the current permissions on each file:
The output of this command should be similar to this:
The parts of the above output relevant to the level of access are the following:
- The first ten characters -rw-r—r— symbolize the file access permissions:
- the first character refers to the file type, where — means a regular file. Other notations are d for a directory, l for a symbolic link, and so on.
- the other nine characters define access permissions to the file type — the first three characters rw- are user permissions, the next three r— are group permissions while the last three r— are permissions for all other users.
- root: the user that owns (created) the file
- root : the group that owns the file
With the above information in mind, we will assign a specific group to its related file.
Assign Group Ownership
We want each file to belong to its own group. To do this, let’s assign group ownership using the chgrp (short for change group) command. The syntax for this command is:
So, for our example, we’ll run the following commands:
Now, when we run the ls -l command, we should get the following output:
Each file now belongs to its respective group. This means that only members of the group that owns the file can have whatever permissions specified; that is, read permission (as demonstrated by the middle three characters r— ). However, all other users outside of the group also have read permissions (as demonstrated by the last three characters r— ).
So, considering we want to restrict file access to only members belonging to the file group, let’s change that.
Modifying permissions
To set or change permissions, use the chmod (short for change mode) command (see the man pages for more details).
When using this command, we specify the following:
- Whom to change permissions for: u for the user(owner), g for thegroup and o for all other users.
- How to change permission: + (plus sign) to add permissions, — (minus sign) to remove permissions or = (equal sign) to leave as is.
- What permission to change: r for read, w for write, x for execute.
Using the information above, let’s take away the read permission for users outside the group and add write and execute permissions to the group as follows:
Run the ls -l command to view the modified permissions. The output should be:
To demonstrate that files belonging to one group cannot be accessed by another group, login as a different user; for example, user5 (who belongs to the developers group), using the following command:
Now, let’s attempt to read a file that does not belong to the developers group. Run the following command to view the leads.txt file:
You should get a warning that says:
This is expected because user5 does not have the permission to read the contents of the leads.txt file since the file belongs to the leads group, and not the developers group.
Conclusion
The information shared in this mini-tutorial is by no means exhaustive of the topic of managing users, groups and permissions in Linux. But this should get any beginner, such as myself, up and running with working in Linux.
PS: I decided to have some fun while learning bash scripting, and wrote scripts create_users.sh and delete_users.sh to automate creating and deleting the users described above. See them here.
— — — — — — — — — Thank you for reading! — — — — — — — — —
File permissions and attributes
File systems use permissions and attributes to regulate the level of interaction that system processes can have with files and directories.
Viewing permissions
Use the ls command’s -l option to view the permissions (or file mode) set for the contents of a directory, for example:
The first column is what we must focus on. Taking an example value of drwxrwxrwx+ , the meaning of each character is explained in the following tables:
| d | rwx | rwx | rwx | + |
| The file type, technically not part of its permissions. See info ls -n «What information is listed» for an explanation of the possible values. | The permissions that the owner has over the file, explained below. | The permissions that the group has over the file, explained below. | The permissions that all the other users have over the file, explained below. | A single character that specifies whether an alternate access method applies to the file. When this character is a space, there is no alternate access method. A . character indicates a file with a security context, but no other alternate access method. A file with any other combination of alternate access methods is marked with a + character, for example in the case of Access Control Lists. |
Each of the three permission triads ( rwx in the example above) can be made up of the following characters:
| Character | Effect on files | Effect on directories | |
|---|---|---|---|
| Read permission (first character) | — | The file cannot be read. | The directory’s contents cannot be shown. |
| r | The file can be read. | The directory’s contents can be shown. | |
| Write permission (second character) | — | The file cannot be modified. | The directory’s contents cannot be modified. |
| w | The file can be modified. | The directory’s contents can be modified (create new files or directories; rename or delete existing files or directories); requires the execute permission to be also set, otherwise this permission has no effect. | |
| Execute permission (third character) | — | The file cannot be executed. | The directory cannot be accessed with cd. |
| x | The file can be executed. | The directory can be accessed with cd; this is the only permission bit that in practice can be considered to be «inherited» from the ancestor directories, in fact if any directory in the path does not have the x bit set, the final file or directory cannot be accessed either, regardless of its permissions; see path_resolution(7) for more information. | |
| s | The setuid bit when found in the user triad; the setgid bit when found in the group triad; it is not found in the others triad; it also implies that x is set. | ||
| S | Same as s , but x is not set; rare on regular files, and useless on directories. | ||
| t | The sticky bit; it can only be found in the others triad; it also implies that x is set. | ||
| T | Same as t , but x is not set; rare on regular files. | ||
See info Coreutils -n «Mode Structure» and chmod(1) for more details.
Examples
Let us see some examples to clarify:
Archie has full access to the Documents directory. They can list, create files and rename, delete any file in Documents, regardless of file permissions. Their ability to access a file depends on the file’s permissions.
Archie has full access except they can not create, rename, delete any file. They can list the files and (if the file’s permissions allow it) may access an existing file in Documents.
Archie can not do ls in the Documents directory but if they know the name of an existing file then they may list, rename, delete or (if the file’s permissions allow it) access it. Also, they are able to create new files.
Archie is only capable of (if the file’s permissions allow it) accessing those files the Documents directory which they know of. They can not list already existing files or create, rename, delete any of them.
You should keep in mind that we elaborate on directory permissions and it has nothing to do with the individual file permissions. When you create a new file it is the directory that changes. That is why you need write permission to the directory.
Let us look at another example, this time of a file, not a directory:
Here we can see the first letter is not d but — . So we know it is a file, not a directory. Next the owner’s permissions are rw- so the owner has the ability to read and write but not execute. This may seem odd that the owner does not have all three permissions, but the x permission is not needed as it is a text/data file, to be read by a text editor such as Gedit, EMACS, or software like R, and not an executable in its own right (if it contained something like python programming code then it very well could be). The group’s permissions are set to r— , so the group has the ability to read the file but not write/edit it in any way — it is essentially like setting something to read-only. We can see that the same permissions apply to everyone else as well.
Changing permissions
chmod is a command in Linux and other Unix-like operating systems that allows to change the permissions (or access mode) of a file or directory.
Text method
To change the permissions — or access mode — of a file, use the chmod command in a terminal. Below is the command’s general structure:
Where who is any from a range of letters, each signifying who is being given the permission. They are as follows:
- u : the user that owns the file.
- g : the user group that the file belongs to.
- o : the other users, i.e. everyone else.
- a : all of the above; use this instead of typing ugo .
The permissions are the same as discussed in #Viewing permissions ( r , w and x ).
Now have a look at some examples using this command. Suppose you became very protective of the Documents directory and wanted to deny everybody but yourself, permissions to read, write, and execute (or in this case search/look) in it:
Before: drwxr-xr-x 6 archie web 4096 Jul 5 17:37 Documents
After: drwx—— 6 archie web 4096 Jul 6 17:32 Documents
Here, because you want to deny permissions, you do not put any letters after the = where permissions would be entered. Now you can see that only the owner’s permissions are rwx and all other permissions are — .
This can be reverted with:
Before: drwx—— 6 archie web 4096 Jul 6 17:32 Documents
After: drwxr-xr-x 6 archie web 4096 Jul 6 17:32 Documents
In the next example, you want to grant read and execute permissions to the group, and other users, so you put the letters for the permissions ( r and x ) after the = , with no spaces.
You can simplify this to put more than one who letter in the same command, e.g:
Now let us consider a second example, suppose you want to change a foobar file so that you have read and write permissions, and fellow users in the group web who may be colleagues working on foobar , can also read and write to it, but other users can only read it:
Before: -rw-r—r— 1 archie web 5120 Jun 27 08:28 foobar
After: -rw-rw-r— 1 archie web 5120 Jun 27 08:28 foobar
This is exactly like the first example, but with a file, not a directory, and you grant write permission (just so as to give an example of granting every permission).
Text method shortcuts
The chmod command lets add and subtract permissions from an existing set using + or — instead of = . This is different from the above commands, which essentially re-write the permissions (e.g. to change a permission from r— to rw- , you still need to include r as well as w after the = in the chmod command invocation. If you missed out r , it would take away the r permission as they are being re-written with the = . Using + and — avoids this by adding or taking away from the current set of permissions).
Let us try this + and — method with the previous example of adding write permissions to the group:
Before: -rw-r—r— 1 archie web 5120 Jun 27 08:28 foobar
After: -rw-rw-r— 1 archie web 5120 Jun 27 08:28 foobar
Another example, denying write permissions to all (a):
Before: -rw-rw-r— 1 archie web 5120 Jun 27 08:28 foobar
After: -r—r—r— 1 archie web 5120 Jun 27 08:28 foobar
A different shortcut is the special X mode: this is not an actual file mode, but it is often used in conjunction with the -R option to set the executable bit only for directories, and leave it unchanged for regular files, for example:
Copying permissions
It is possible to tell chmod to copy the permissions from one class, say the owner, and give those same permissions to group or even all. To do this, instead of putting r , w , or x after the = , put another who letter. e.g:
Before: -rw-r—r— 1 archie web 5120 Jun 27 08:28 foobar
After: -rw-rw-r— 1 archie web 5120 Jun 27 08:28 foobar
This command essentially translates to «change the permissions of group ( g= ), to be the same as the owning user ( =u ). Note that you cannot copy a set of permissions as well as grant new ones e.g.:
In that case chmod throw an error.
Numeric method
chmod can also set permissions using numbers.
Using numbers is another method which allows you to edit the permissions for all three owner, group, and others at the same time, as well as the setuid, setgid, and sticky bits. This basic structure of the code is this:
Where xxx is a 3-digit number where each digit can be anything from 0 to 7. The first digit applies to permissions for owner, the second digit applies to permissions for group, and the third digit applies to permissions for all others.
In this number notation, the values r , w , and x have their own number value:
To come up with a 3-digit number you need to consider what permissions you want owner, group, and all others to have, and then total their values up. For example, if you want to grant the owner of a directory read write and execution permissions, and you want group and everyone else to have just read and execute permissions, you would come up with the numerical values like so:
- Owner: rwx =4+2+1=7
- Group: r-x =4+0+1=5
- Other: r-x =4+0+1=5
This is the equivalent of using the following:
To view the existing permissions of a file or directory in numeric form, use the stat(1) command:
Where the %a option specifies output in numeric form.
Most directories are set to 755 to allow reading, writing and execution to the owner, but deny writing to everyone else, and files are normally 644 to allow reading and writing for the owner but just reading for everyone else; refer to the last note on the lack of x permissions with non executable files: it is the same thing here.
To see this in action with examples consider the previous example that has been used but with this numerical method applied instead:
Before: -rw-r—r— 1 archie web 5120 Jun 27 08:28 foobar
After: -rw-rw-r— 1 archie web 5120 Jun 27 08:28 foobar
If this were an executable the number would be 774 if you wanted to grant executable permission to the owner and group. Alternatively if you wanted everyone to only have read permission the number would be 444 . Treating r as 4, w as 2, and x as 1 is probably the easiest way to work out the numerical values for using chmod xxx filename , but there is also a binary method, where each permission has a binary number, and then that is in turn converted to a number. It is a bit more convoluted, but here included for completeness.
Consider this permission set:
If you put a 1 under each permission granted, and a 0 for every one not granted, the result would be something like this:
You can then convert these binary numbers:
The value of the above would therefore be 775.
Consider we wanted to remove the writable permission from group:
The value would therefore be 755 and you would use chmod 755 filename to remove the writable permission. You will notice you get the same three digit number no matter which method you use. Whether you use text or numbers will depend on personal preference and typing speed. When you want to restore a directory or file to default permissions e.g. read and write (and execute) permission to the owner but deny write permission to everyone else, it may be faster to use chmod 755/644 filename . However if you are changing the permissions to something out of the norm, it may be simpler and quicker to use the text method as opposed to trying to convert it to numbers, which may lead to a mistake. It could be argued that there is not any real significant difference in the speed of either method for a user that only needs to use chmod on occasion.
You can also use the numeric method to set the setuid , setgid , and sticky bits by using four digits.
For example, chmod 2777 filename will set read/write/executable bits for everyone and also enable the setgid bit.
Bulk chmod
Generally directories and files should not have the same permissions. If it is necessary to bulk modify a directory tree, use find to selectively modify one or the other.
To chmod only directories to 755:
To chmod only files to 644:
Changing ownership
chown changes the owner of a file or directory, which is quicker and easier than altering the permissions in some cases.
Consider the following example, making a new partition with GParted for backup data. Gparted does this all as root so everything belongs to root by default. This is all well and good but when it comes to writing data to the mounted partition, permission is denied for regular users.
As you can see the device in /dev is owned by root, as is the mount location ( /media/Backup ). To change the owner of the mount location one can do the following:
Before: drwxr-xr-x 5 root root 4096 Jul 6 16:01 Backup
After: drwxr-xr-x 5 archie root 4096 Jul 6 16:01 Backup
Now the partition can have data written to it by the new owner, archie, without altering the permissions (as the owner triad already had rwx permissions).
- chown always clears the setuid and setgid bits.
- Non-root users cannot use chown to «give away» files they own to another user.
Access Control Lists
Access Control Lists provides an additional, more flexible permission mechanism for file systems by allowing to set permissions for any user or group to any file.
Umask
The umask utility is used to control the file-creation mode mask, which determines the initial value of file permission bits for newly created files.
File attributes
Apart from the file mode bits that control user and group read, write and execute permissions, several file systems support file attributes that enable further customization of allowable file operations.
The e2fsprogs package contains the programs lsattr(1) and chattr(1) that list and change a file’s attributes, respectively.
These are a few useful attributes. Not all filesystems support every attribute.
- a — append only: File can only be opened for appending.
- c — compressed: Enable filesystem-level compression for the file.
- i — immutable: Cannot be modified, deleted, renamed, linked to. Can only be set by root.
- j — data journaling: Use the journal for file data writes as well as metadata.
- m — no compression: Disable filesystem-level compression for the file.
- A — no atime update: The file’s atime will not be modified.
- C — no copy on write: Disable copy-on-write, for filesystems that support it.
See chattr(1) for a complete list of attributes and for more info on what each attribute does.
For example, if you want to set the immutable bit on some file, use the following command:
To remove an attribute on a file just change + to — .
Extended attributes
From xattr(7) : «Extended attributes are name:value pairs associated permanently with files and directories». There are four extended attribute classes: security, system, trusted and user.
Extended attributes are also used to set Capabilities.
User extended attributes
User extended attributes can be used to store arbitrary information about a file. To create one:
Use getfattr to display extended attributes:
Finally, to remove an extended attribute:
Preserving extended attributes
- mv silently discards extended attributes when the target file system does not support them.
To preserve extended attributes with text editors you need to configure them to truncate files on saving instead of using rename(2) .[1]
Tips and tricks
Preserve root
Use the —preserve-root flag to prevent chmod from acting recursively on / . This can, for example, prevent one from removing the executable bit systemwide and thus breaking the system. To use this flag every time, set it within an alias. See also [2].
Как дать права на папку пользователю Linux
Система прав доступа к файлам и папкам в Linux организована очень интересно. Права разделяются на три категории: права владельца, права группы файла и права всех остальных. Прочитать подробнее про права в Linux можно в отдельной статье.
Иногда возникает необходимость дать определенному пользователю или программе возможность доступа к папке. На первый взгляд, это может показаться сложным, но решается все довольно просто. В этой статье мы разберем как дать права на папку пользователю Linux.
Права пользователя на папку Linux
Как я уже сказал, права делятся на три категории для владельца, для группы и для всех остальных. Таким образом, мы можем дать пользователю доступ к папке несколькими способами:
- Изменить права для всех — тогда все пользователи получат доступ к нашей папке, в том числе и нужный пользователь. Но, обычно, так никто не делает, потому что это небезопасно и в производственных системах важные данные могут попасть в чужие руки;
- Изменить владельца папки на нашего пользователя — по умолчанию владелец имеет полные права на папку, то есть запись и чтение. Если мы сделаем владельцем нашего пользователя, то он автоматически получит все права, а другие пользователи по-прежнему не смогут получить доступ к папке. Но такой вариант тоже не совсем правильный, потому что, обычно, у папки уже есть владелец и изменив владельца мы уберем у него доступ;
- Добавить к папке группу и добавить в нее пользователя — самый верный путь. Файл или папка может принадлежать определенной группе пользователей, но только одной, и мы можем установить для этой группы отличающиеся от владельца права. Но в группу можно добавить несколько пользователей, поэтому мы никого не оставляем без доступа. По умолчанию, для всех файлов устанавливается группа владельца, но это можно очень просто изменить.
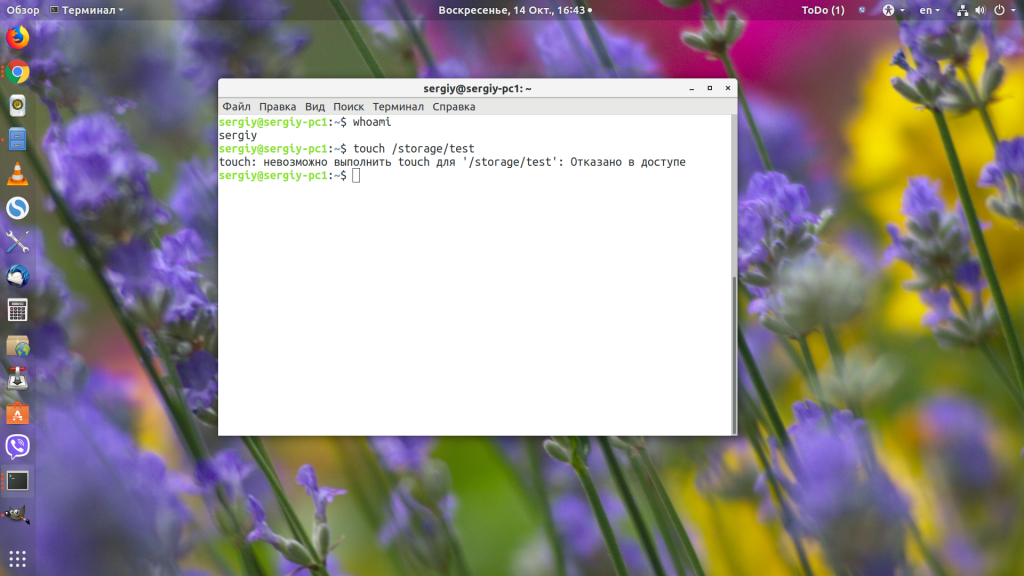
Теперь давайте разберем как это реализуется на практике. Допустим, у нас есть папка /storage, владельцем которой является пользователь /root:
ls -l / | grep storage

У папки такие права, что записывать в нее данные может только root, а другие пользователи могут их только смотреть. Нам надо предоставить к ней доступ на запись и чтение пользователю sergiy. Сейчас у него такого доступа нет:
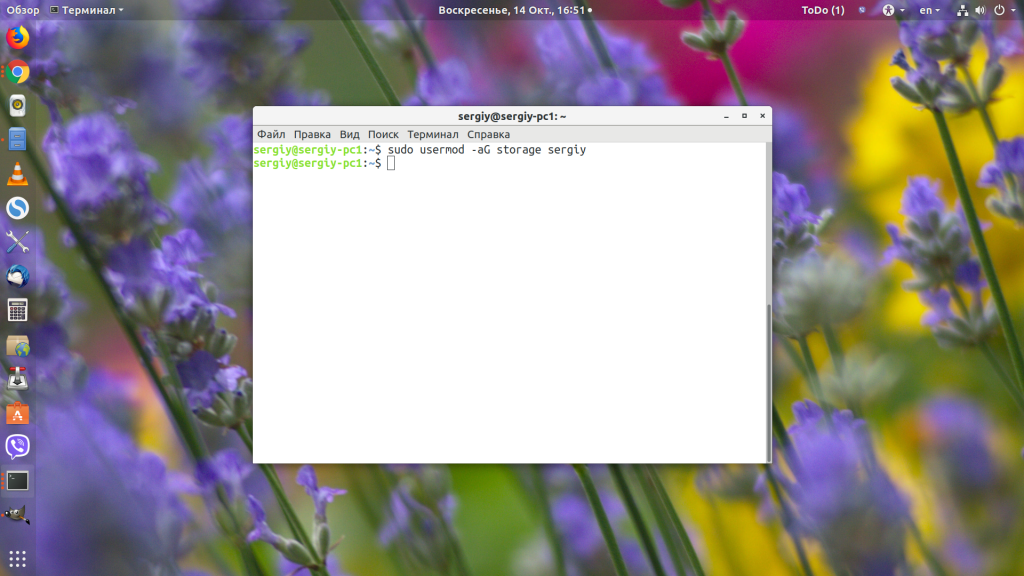
Давайте создадим группу storage и добавим в нее пользователя sergiy:
sudo groupadd storage
sudo usermod -aG storage sergiy

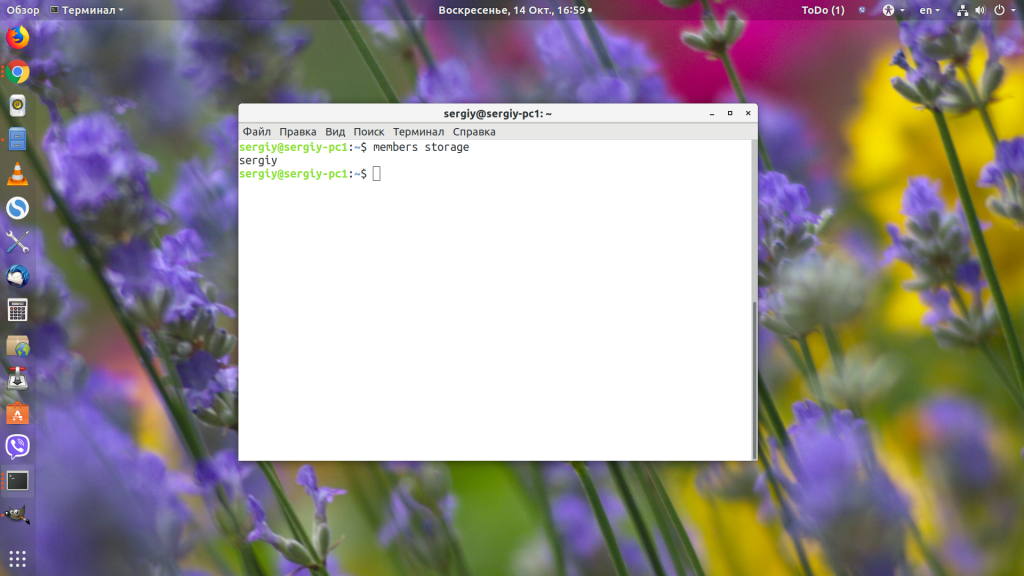
Смотрим список групп нашего пользователя:

После добавления пользователя в группу нужно перелогиниться, чтобы система увидела это изменение. Затем меняем группу нашей папки на storage:
sudo chgrp storage /storage
Если нужно дать права на папку в Linux еще какому-нибудь пользователю, то достаточно добавить его в эту группу. Посмотрим список пользователей группы:
Теперь наша папка выглядит вот так:
ls -l / | grep storage
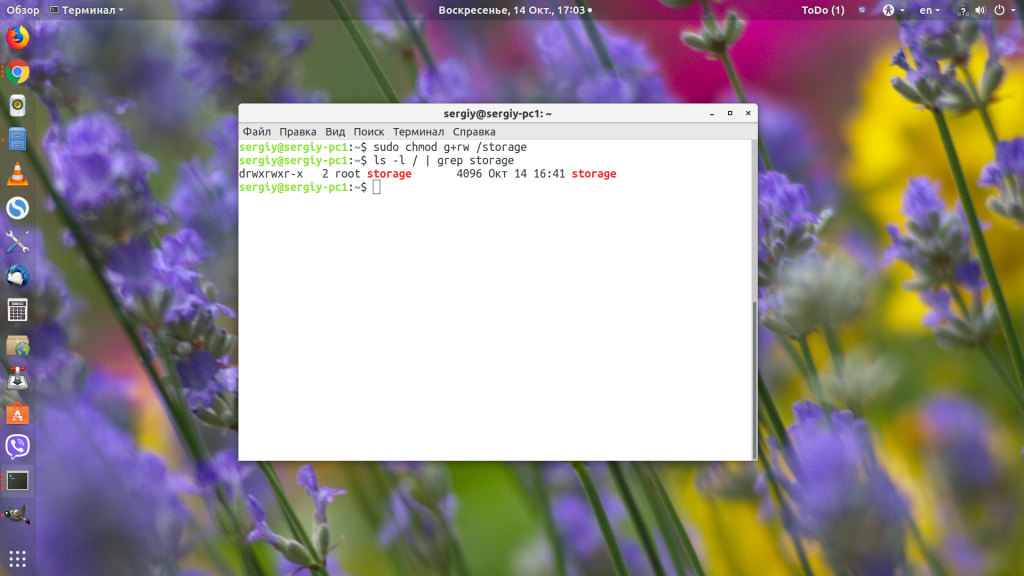
Осталось подправить права для группы, нужно дать разрешение на чтение и запись:
chmod g+rw /storage
Затем пользователь sergiy сможет записывать и читать файлы из этой папки, а все остальные пользователи только читать.

Выводы
В этой небольшой статье мы рассмотрели дать права пользователю linux на доступ к папке. Для серверов это может быть достаточно частой задачей, поскольку пользователи — это не только люди, использующие систему, но и программы, выполняемые от имени того или иного пользователя. А это создает еще одно применение для этой системы прав. Если у вас остались вопросы, спрашивайте в комментариях!
Обнаружили ошибку в тексте? Сообщите мне об этом. Выделите текст с ошибкой и нажмите Ctrl+Enter.