Что такое системный вызов в linux
• Where no kernel version is indicated, the system call appeared in Linux 1.0 or earlier. • Where a system call is marked "1.2" this means the system call probably appeared in a Linux 1.1.x kernel version, and first appeared in a stable kernel with 1.2. (Development of the 1.2 kernel was initiated from a branch of kernel 1.0.6 via the 1.1.x unstable kernel series.) • Where a system call is marked "2.0" this means the system call probably appeared in a Linux 1.3.x kernel version, and first appeared in a stable kernel with Linux 2.0. (Development of the Linux 2.0 kernel was initiated from a branch of Linux 1.2.x, somewhere around Linux 1.2.10, via the Linux 1.3.x unstable kernel series.) • Where a system call is marked "2.2" this means the system call probably appeared in a Linux 2.1.x kernel version, and first appeared in a stable kernel with Linux 2.2.0. (Development of the Linux 2.2 kernel was initiated from a branch of kernel Linux 2.0.21 via the Linux 2.1.x unstable kernel series.) • Where a system call is marked "2.4" this means the system call probably appeared in a Linux 2.3.x kernel version, and first appeared in a stable kernel with Linux 2.4.0. (Development of the Linux 2.4 kernel was initiated from a branch of Linux 2.2.8 via the Linux 2.3.x unstable kernel series.) • Where a system call is marked "2.6" this means the system call probably appeared in a Linux 2.5.x kernel version, and first appeared in a stable kernel with Linux 2.6.0. (Development of Linux 2.6 was initiated from a branch of Linux 2.4.15 via the Linux 2.5.x unstable kernel series.) • Starting with Linux 2.6.0, the development model changed, and new system calls may appear in each Linux 2.6.x release. In this case, the exact version number where the system call appeared is shown. This convention continues with the Linux 3.x kernel series, which followed on from Linux 2.6.39; and the Linux 4.x kernel series, which followed on from Linux 3.19; and the Linux 5.x kernel series, which followed on from Linux 4.20. • In some cases, a system call was added to a stable kernel series after it branched from the previous stable kernel series, and then backported into the earlier stable kernel series. For example some system calls that appeared in Linux 2.6.x were also backported into a Linux 2.4.x release after Linux 2.4.15. When this is so, the version where the system call appeared in both of the major kernel series is listed.
The list of system calls that are available as at Linux 5.14 (or in a few cases only on older kernels) is as follows:
| System call | Kernel | Notes |
| _llseek(2) | 1.2 | |
| _newselect(2) | 2.0 | |
| _sysctl(2) | 2.0 | удалён из Linux 5.5 |
| accept(2) | 2.0 | смотрите замечания по socketcall(2) |
| accept4(2) | 2.6.28 | |
| access(2) | 1.0 | |
| acct(2) | 1.0 | |
| add_key(2) | 2.6.10 | |
| adjtimex(2) | 1.0 | |
| alarm(2) | 1.0 | |
| alloc_hugepages(2) | 2.5.36 | удалён из Linux 2.5.44 |
| arc_gettls(2) | 3.9 | только на ARC |
| arc_settls(2) | 3.9 | только на ARC |
| arc_usr_cmpxchg(2) | 4.9 | только на ARC |
| arch_prctl(2) | 2.6 | x86_64, x86 начиная с 4.12 |
| atomic_barrier(2) | 2.6.34 | только на m68k |
| atomic_cmpxchg_32(2) | 2.6.34 | только на m68k |
| bdflush(2) | 1.2 | Deprecated (does nothing) since 2.6 |
| bind(2) | 2.0 | смотрите замечания по socketcall(2) |
| bpf(2) | 3.18 | |
| brk(2) | 1.0 | |
| breakpoint(2) | 2.2 | только в ARM OABI, определён с префиксом __ARM_NR |
| cacheflush(2) | 1.2 | не для x86 |
| capget(2) | 2.2 | |
| capset(2) | 2.2 | |
| chdir(2) | 1.0 | |
| chmod(2) | 1.0 | |
| chown(2) | 2.2 | See chown(2) for version details |
| chown32(2) | 2.4 | |
| chroot(2) | 1.0 | |
| clock_adjtime(2) | 2.6.39 | |
| clock_getres(2) | 2.6 | |
| clock_gettime(2) | 2.6 | |
| clock_nanosleep(2) | 2.6 | |
| clock_settime(2) | 2.6 | |
| clone2(2) | 2.4 | только на IA-64 |
| clone(2) | 1.0 | |
| clone3(2) | 5.3 | |
| close(2) | 1.0 | |
| close_range(2) | 5.9 | |
| connect(2) | 2.0 | смотрите замечания по socketcall(2) |
| copy_file_range(2) | 4.5 | |
| creat(2) | 1.0 | |
| create_module(2) | 1.0 | удалён из Linux 2.6 |
| delete_module(2) | 1.0 | |
| dup(2) | 1.0 | |
| dup2(2) | 1.0 | |
| dup3(2) | 2.6.27 | |
| epoll_create(2) | 2.6 | |
| epoll_create1(2) | 2.6.27 | |
| epoll_ctl(2) | 2.6 | |
| epoll_pwait(2) | 2.6.19 | |
| epoll_pwait2(2) | 5.11 | |
| epoll_wait(2) | 2.6 | |
| eventfd(2) | 2.6.22 | |
| eventfd2(2) | 2.6.27 | |
| execv(2) | 2.0 | SPARC/SPARC64 only, for compatibility with SunOS |
| execve(2) | 1.0 | |
| execveat(2) | 3.19 | |
| exit(2) | 1.0 | |
| exit_group(2) | 2.6 | |
| faccessat(2) | 2.6.16 | |
| faccessat2(2) | 5.8 | |
| fadvise64(2) | 2.6 | |
| fadvise64_64(2) | 2.6 | |
| fallocate(2) | 2.6.23 | |
| fanotify_init(2) | 2.6.37 | |
| fanotify_mark(2) | 2.6.37 | |
| fchdir(2) | 1.0 | |
| fchmod(2) | 1.0 | |
| fchmodat(2) | 2.6.16 | |
| fchown(2) | 1.0 | |
| fchown32(2) | 2.4 | |
| fchownat(2) | 2.6.16 | |
| fcntl(2) | 1.0 | |
| fcntl64(2) | 2.4 | |
| fdatasync(2) | 2.0 | |
| fgetxattr(2) | 2.6; 2.4.18 | |
| finit_module(2) | 3.8 | |
| flistxattr(2) | 2.6; 2.4.18 | |
| flock(2) | 2.0 | |
| fork(2) | 1.0 | |
| free_hugepages(2) | 2.5.36 | удалён из Linux 2.5.44 |
| fremovexattr(2) | 2.6; 2.4.18 | |
| fsconfig(2) | 5.2 | |
| fsetxattr(2) | 2.6; 2.4.18 | |
| fsmount(2) | 5.2 | |
| fsopen(2) | 5.2 | |
| fspick(2) | 5.2 | |
| fstat(2) | 1.0 | |
| fstat64(2) | 2.4 | |
| fstatat64(2) | 2.6.16 | |
| fstatfs(2) | 1.0 | |
| fstatfs64(2) | 2.6 | |
| fsync(2) | 1.0 | |
| ftruncate(2) | 1.0 | |
| ftruncate64(2) | 2.4 | |
| futex(2) | 2.6 | |
| futimesat(2) | 2.6.16 | |
| get_kernel_syms(2) | 1.0 | удалён из Linux 2.6 |
| get_mempolicy(2) | 2.6.6 | |
| get_robust_list(2) | 2.6.17 | |
| get_thread_area(2) | 2.6 | |
| get_tls(2) | 4.15 | ARM OABI only, has __ARM_NR prefix |
| getcpu(2) | 2.6.19 | |
| getcwd(2) | 2.2 | |
| getdents(2) | 2.0 | |
| getdents64(2) | 2.4 | |
| getdomainname(2) | 2.2 | SPARC, SPARC64; available as osf_getdomainname(2) on Alpha since Linux 2.0 |
| getdtablesize(2) | 2.0 | SPARC (removed in 2.6.26), available on Alpha as osf_getdtablesize(2) |
| getegid(2) | 1.0 | |
| getegid32(2) | 2.4 | |
| geteuid(2) | 1.0 | |
| geteuid32(2) | 2.4 | |
| getgid(2) | 1.0 | |
| getgid32(2) | 2.4 | |
| getgroups(2) | 1.0 | |
| getgroups32(2) | 2.4 | |
| gethostname(2) | 2.0 | Alpha, was available on SPARC up to Linux 2.6.26 |
| getitimer(2) | 1.0 | |
| getpeername(2) | 2.0 | смотрите замечания по socketcall(2) |
| getpagesize(2) | 2.0 | не для x86 |
| getpgid(2) | 1.0 | |
| getpgrp(2) | 1.0 | |
| getpid(2) | 1.0 | |
| getppid(2) | 1.0 | |
| getpriority(2) | 1.0 | |
| getrandom(2) | 3.17 | |
| getresgid(2) | 2.2 | |
| getresgid32(2) | 2.4 | |
| getresuid(2) | 2.2 | |
| getresuid32(2) | 2.4 | |
| getrlimit(2) | 1.0 | |
| getrusage(2) | 1.0 | |
| getsid(2) | 2.0 | |
| getsockname(2) | 2.0 | смотрите замечания по socketcall(2) |
| getsockopt(2) | 2.0 | смотрите замечания по socketcall(2) |
| gettid(2) | 2.4.11 | |
| gettimeofday(2) | 1.0 | |
| getuid(2) | 1.0 | |
| getuid32(2) | 2.4 | |
| getunwind(2) | 2.4.8 | только IA-64; устарел |
| getxattr(2) | 2.6; 2.4.18 | |
| getxgid(2) | 2.0 | только на Alpha; смотрите ЗАМЕЧАНИЯ |
| getxpid(2) | 2.0 | только на Alpha; смотрите ЗАМЕЧАНИЯ |
| getxuid(2) | 2.0 | только на Alpha; смотрите ЗАМЕЧАНИЯ |
| init_module(2) | 1.0 | |
| inotify_add_watch(2) | 2.6.13 | |
| inotify_init(2) | 2.6.13 | |
| inotify_init1(2) | 2.6.27 | |
| inotify_rm_watch(2) | 2.6.13 | |
| io_cancel(2) | 2.6 | |
| io_destroy(2) | 2.6 | |
| io_getevents(2) | 2.6 | |
| io_pgetevents(2) | 4.18 | |
| io_setup(2) | 2.6 | |
| io_submit(2) | 2.6 | |
| io_uring_enter(2) | 5.1 | |
| io_uring_register(2) | 5.1 | |
| io_uring_setup(2) | 5.1 | |
| ioctl(2) | 1.0 | |
| ioperm(2) | 1.0 | |
| iopl(2) | 1.0 | |
| ioprio_get(2) | 2.6.13 | |
| ioprio_set(2) | 2.6.13 | |
| ipc(2) | 1.0 | |
| kcmp(2) | 3.5 | |
| kern_features(2) | 3.7 | только на SPARC64 |
| kexec_file_load(2) | 3.17 | |
| kexec_load(2) | 2.6.13 | |
| keyctl(2) | 2.6.10 | |
| kill(2) | 1.0 | |
| landlock_add_rule(2) | 5.13 | |
| landlock_create_ruleset(2) | 5.13 | |
| landlock_restrict_self(2) | 5.13 | |
| lchown(2) | 1.0 | See chown(2) for version details |
| lchown32(2) | 2.4 | |
| lgetxattr(2) | 2.6; 2.4.18 | |
| link(2) | 1.0 | |
| linkat(2) | 2.6.16 | |
| listen(2) | 2.0 | смотрите замечания по socketcall(2) |
| listxattr(2) | 2.6; 2.4.18 | |
| llistxattr(2) | 2.6; 2.4.18 | |
| lookup_dcookie(2) | 2.6 | |
| lremovexattr(2) | 2.6; 2.4.18 | |
| lseek(2) | 1.0 | |
| lsetxattr(2) | 2.6; 2.4.18 | |
| lstat(2) | 1.0 | |
| lstat64(2) | 2.4 | |
| madvise(2) | 2.4 | |
| mbind(2) | 2.6.6 | |
| memory_ordering(2) | 2.2 | только на SPARC64 |
| membarrier(2) | 3.17 | |
| memfd_create(2) | 3.17 | |
| memfd_secret(2) | 5.14 | |
| migrate_pages(2) | 2.6.16 | |
| mincore(2) | 2.4 | |
| mkdir(2) | 1.0 | |
| mkdirat(2) | 2.6.16 | |
| mknod(2) | 1.0 | |
| mknodat(2) | 2.6.16 | |
| mlock(2) | 2.0 | |
| mlock2(2) | 4.4 | |
| mlockall(2) | 2.0 | |
| mmap(2) | 1.0 | |
| mmap2(2) | 2.4 | |
| modify_ldt(2) | 1.0 | |
| mount(2) | 1.0 | |
| move_mount(2) | 5.2 | |
| move_pages(2) | 2.6.18 | |
| mprotect(2) | 1.0 | |
| mq_getsetattr(2) | 2.6.6 | |
| mq_notify(2) | 2.6.6 | |
| mq_open(2) | 2.6.6 | |
| mq_timedreceive(2) | 2.6.6 | |
| mq_timedsend(2) | 2.6.6 | |
| mq_unlink(2) | 2.6.6 | |
| mremap(2) | 2.0 | |
| msgctl(2) | 2.0 | смотрите замечания по ipc(2) |
| msgget(2) | 2.0 | смотрите замечания по ipc(2) |
| msgrcv(2) | 2.0 | смотрите замечания по ipc(2) |
| msgsnd(2) | 2.0 | смотрите замечания по ipc(2) |
| msync(2) | 2.0 | |
| munlock(2) | 2.0 | |
| munlockall(2) | 2.0 | |
| munmap(2) | 1.0 | |
| name_to_handle_at(2) | 2.6.39 | |
| nanosleep(2) | 2.0 | |
| newfstatat(2) | 2.6.16 | смотрите stat(2) |
| nfsservctl(2) | 2.2 | удалён из Linux 3.1 |
| nice(2) | 1.0 | |
| old_adjtimex(2) | 2.0 | только на Alpha; смотрите ЗАМЕЧАНИЯ |
| old_getrlimit(2) | 2.4 | Old variant of getrlimit(2) that used a different value for RLIM_INFINITY |
| oldfstat(2) | 1.0 | |
| oldlstat(2) | 1.0 | |
| oldolduname(2) | 1.0 | |
| oldstat(2) | 1.0 | |
| oldumount(2) | 2.4.116 | Name of the old umount(2) syscall on Alpha |
| olduname(2) | 1.0 | |
| open(2) | 1.0 | |
| open_by_handle_at(2) | 2.6.39 | |
| open_tree(2) | 5.2 | |
| openat(2) | 2.6.16 | |
| openat2(2) | 5.6 | |
| or1k_atomic(2) | 3.1 | только на OpenRISC 1000 |
| pause(2) | 1.0 | |
| pciconfig_iobase(2) | 2.2.15; 2.4 | не для x86 |
| pciconfig_read(2) | 2.0.26; 2.2 | не для x86 |
| pciconfig_write(2) | 2.0.26; 2.2 | не для x86 |
| perf_event_open(2) | 2.6.31 | Was perf_counter_open() in 2.6.31; renamed in 2.6.32 |
| personality(2) | 1.2 | |
| perfctr(2) | 2.2 | только на SPARC; удалён в 2.6.34 |
| perfmonctl(2) | 2.4 | IA-64 only; removed in 5.10 |
| pidfd_getfd(2) | 5.6 | |
| pidfd_send_signal(2) | 5.1 | |
| pidfd_open(2) | 5.3 | |
| pipe(2) | 1.0 | |
| pipe2(2) | 2.6.27 | |
| pivot_root(2) | 2.4 | |
| pkey_alloc(2) | 4.8 | |
| pkey_free(2) | 4.8 | |
| pkey_mprotect(2) | 4.8 | |
| poll(2) | 2.0.36; 2.2 | |
| ppoll(2) | 2.6.16 | |
| prctl(2) | 2.2 | |
| pread64(2) | Added as "pread" in 2.2; renamed "pread64" in 2.6 | |
| preadv(2) | 2.6.30 | |
| preadv2(2) | 4.6 | |
| prlimit64(2) | 2.6.36 | |
| process_madvise(2) | 5.10 | |
| process_vm_readv(2) | 3.2 | |
| process_vm_writev(2) | 3.2 | |
| pselect6(2) | 2.6.16 | |
| ptrace(2) | 1.0 | |
| pwrite64(2) | Added as "pwrite" in 2.2; renamed "pwrite64" in 2.6 | |
| pwritev(2) | 2.6.30 | |
| pwritev2(2) | 4.6 | |
| query_module(2) | 2.2 | удалён из Linux 2.6 |
| quotactl(2) | 1.0 | |
| quotactl_fd(2) | 5.14 | |
| read(2) | 1.0 | |
| readahead(2) | 2.4.13 | |
| readdir(2) | 1.0 | |
| readlink(2) | 1.0 | |
| readlinkat(2) | 2.6.16 | |
| readv(2) | 2.0 | |
| reboot(2) | 1.0 | |
| recv(2) | 2.0 | смотрите замечания по socketcall(2) |
| recvfrom(2) | 2.0 | смотрите замечания по socketcall(2) |
| recvmsg(2) | 2.0 | смотрите замечания по socketcall(2) |
| recvmmsg(2) | 2.6.33 | |
| remap_file_pages(2) | 2.6 | устарел начиная с 3.16 |
| removexattr(2) | 2.6; 2.4.18 | |
| rename(2) | 1.0 | |
| renameat(2) | 2.6.16 | |
| renameat2(2) | 3.15 | |
| request_key(2) | 2.6.10 | |
| restart_syscall(2) | 2.6 | |
| riscv_flush_icache(2) | 4.15 | только на RISC-V |
| rmdir(2) | 1.0 | |
| rseq(2) | 4.18 | |
| rt_sigaction(2) | 2.2 | |
| rt_sigpending(2) | 2.2 | |
| rt_sigprocmask(2) | 2.2 | |
| rt_sigqueueinfo(2) | 2.2 | |
| rt_sigreturn(2) | 2.2 | |
| rt_sigsuspend(2) | 2.2 | |
| rt_sigtimedwait(2) | 2.2 | |
| rt_tgsigqueueinfo(2) | 2.6.31 | |
| rtas(2) | 2.6.2 | только на PowerPC/PowerPC64 |
| s390_runtime_instr(2) | 3.7 | только для s390 |
| s390_pci_mmio_read(2) | 3.19 | только для s390 |
| s390_pci_mmio_write(2) | 3.19 | только для s390 |
| s390_sthyi(2) | 4.15 | только для s390 |
| s390_guarded_storage(2) | 4.12 | только для s390 |
| sched_get_affinity(2) | 2.6 | Name of sched_getaffinity(2) on SPARC and SPARC64 |
| sched_get_priority_max(2) | 2.0 | |
| sched_get_priority_min(2) | 2.0 | |
| sched_getaffinity(2) | 2.6 | |
| sched_getattr(2) | 3.14 | |
| sched_getparam(2) | 2.0 | |
| sched_getscheduler(2) | 2.0 | |
| sched_rr_get_interval(2) | 2.0 | |
| sched_set_affinity(2) | 2.6 | Name of sched_setaffinity(2) on SPARC and SPARC64 |
| sched_setaffinity(2) | 2.6 | |
| sched_setattr(2) | 3.14 | |
| sched_setparam(2) | 2.0 | |
| sched_setscheduler(2) | 2.0 | |
| sched_yield(2) | 2.0 | |
| seccomp(2) | 3.17 | |
| select(2) | 1.0 | |
| semctl(2) | 2.0 | смотрите замечания по ipc(2) |
| semget(2) | 2.0 | смотрите замечания по ipc(2) |
| semop(2) | 2.0 | смотрите замечания по ipc(2) |
| semtimedop(2) | 2.6; 2.4.22 | |
| send(2) | 2.0 | смотрите замечания по socketcall(2) |
| sendfile(2) | 2.2 | |
| sendfile64(2) | 2.6; 2.4.19 | |
| sendmmsg(2) | 3.0 | |
| sendmsg(2) | 2.0 | смотрите замечания по socketcall(2) |
| sendto(2) | 2.0 | смотрите замечания по socketcall(2) |
| set_mempolicy(2) | 2.6.6 | |
| set_robust_list(2) | 2.6.17 | |
| set_thread_area(2) | 2.6 | |
| set_tid_address(2) | 2.6 | |
| set_tls(2) | 2.6.11 | ARM OABI/EABI only (constant has __ARM_NR prefix) |
| setdomainname(2) | 1.0 | |
| setfsgid(2) | 1.2 | |
| setfsgid32(2) | 2.4 | |
| setfsuid(2) | 1.2 | |
| setfsuid32(2) | 2.4 | |
| setgid(2) | 1.0 | |
| setgid32(2) | 2.4 | |
| setgroups(2) | 1.0 | |
| setgroups32(2) | 2.4 | |
| sethae(2) | 2.0 | только на Alpha; смотрите ЗАМЕЧАНИЯ |
| sethostname(2) | 1.0 | |
| setitimer(2) | 1.0 | |
| setns(2) | 3.0 | |
| setpgid(2) | 1.0 | |
| setpgrp(2) | 2.0 | Alternative name for setpgid(2) on Alpha |
| setpriority(2) | 1.0 | |
| setregid(2) | 1.0 | |
| setregid32(2) | 2.4 | |
| setresgid(2) | 2.2 | |
| setresgid32(2) | 2.4 | |
| setresuid(2) | 2.2 | |
| setresuid32(2) | 2.4 | |
| setreuid(2) | 1.0 | |
| setreuid32(2) | 2.4 | |
| setrlimit(2) | 1.0 | |
| setsid(2) | 1.0 | |
| setsockopt(2) | 2.0 | смотрите замечания по socketcall(2) |
| settimeofday(2) | 1.0 | |
| setuid(2) | 1.0 | |
| setuid32(2) | 2.4 | |
| setup(2) | 1.0 | удалён в 2.2 |
| setxattr(2) | 2.6; 2.4.18 | |
| sgetmask(2) | 1.0 | |
| shmat(2) | 2.0 | смотрите замечания по ipc(2) |
| shmctl(2) | 2.0 | смотрите замечания по ipc(2) |
| shmdt(2) | 2.0 | смотрите замечания по ipc(2) |
| shmget(2) | 2.0 | смотрите замечания по ipc(2) |
| shutdown(2) | 2.0 | смотрите замечания по socketcall(2) |
| sigaction(2) | 1.0 | |
| sigaltstack(2) | 2.2 | |
| signal(2) | 1.0 | |
| signalfd(2) | 2.6.22 | |
| signalfd4(2) | 2.6.27 | |
| sigpending(2) | 1.0 | |
| sigprocmask(2) | 1.0 | |
| sigreturn(2) | 1.0 | |
| sigsuspend(2) | 1.0 | |
| socket(2) | 2.0 | смотрите замечания по socketcall(2) |
| socketcall(2) | 1.0 | |
| socketpair(2) | 2.0 | смотрите замечания по socketcall(2) |
| spill(2) | 2.6.13 | только на Xtensa |
| splice(2) | 2.6.17 | |
| spu_create(2) | 2.6.16 | только на PowerPC/PowerPC64 |
| spu_run(2) | 2.6.16 | только на PowerPC/PowerPC64 |
| ssetmask(2) | 1.0 | |
| stat(2) | 1.0 | |
| stat64(2) | 2.4 | |
| statfs(2) | 1.0 | |
| statfs64(2) | 2.6 | |
| statx(2) | 4.11 | |
| stime(2) | 1.0 | |
| subpage_prot(2) | 2.6.25 | только на PowerPC/PowerPC64 |
| swapcontext(2) | 2.6.3 | только на PowerPC/PowerPC64 |
| switch_endian(2) | 4.1 | только для PowerPC64 |
| swapoff(2) | 1.0 | |
| swapon(2) | 1.0 | |
| symlink(2) | 1.0 | |
| symlinkat(2) | 2.6.16 | |
| sync(2) | 1.0 | |
| sync_file_range(2) | 2.6.17 | |
| sync_file_range2(2) | 2.6.22 | |
| syncfs(2) | 2.6.39 | |
| sys_debug_setcontext(2) | 2.6.11 | только для PowerPC |
| syscall(2) | 1.0 | Still available on ARM OABI and MIPS O32 ABI |
| sysfs(2) | 1.2 | |
| sysinfo(2) | 1.0 | |
| syslog(2) | 1.0 | |
| sysmips(2) | 2.6.0 | только на MIPS |
| tee(2) | 2.6.17 | |
| tgkill(2) | 2.6 | |
| time(2) | 1.0 | |
| timer_create(2) | 2.6 | |
| timer_delete(2) | 2.6 | |
| timer_getoverrun(2) | 2.6 | |
| timer_gettime(2) | 2.6 | |
| timer_settime(2) | 2.6 | |
| timerfd_create(2) | 2.6.25 | |
| timerfd_gettime(2) | 2.6.25 | |
| timerfd_settime(2) | 2.6.25 | |
| times(2) | 1.0 | |
| tkill(2) | 2.6; 2.4.22 | |
| truncate(2) | 1.0 | |
| truncate64(2) | 2.4 | |
| ugetrlimit(2) | 2.4 | |
| umask(2) | 1.0 | |
| umount(2) | 1.0 | |
| umount2(2) | 2.2 | |
| uname(2) | 1.0 | |
| unlink(2) | 1.0 | |
| unlinkat(2) | 2.6.16 | |
| unshare(2) | 2.6.16 | |
| uselib(2) | 1.0 | |
| ustat(2) | 1.0 | |
| userfaultfd(2) | 4.3 | |
| usr26(2) | 2.4.8.1 | только в ARM OABI |
| usr32(2) | 2.4.8.1 | только в ARM OABI |
| utime(2) | 1.0 | |
| utimensat(2) | 2.6.22 | |
| utimes(2) | 2.2 | |
| utrap_install(2) | 2.2 | только на SPARC64 |
| vfork(2) | 2.2 | |
| vhangup(2) | 1.0 | |
| vm86old(2) | 1.0 | ранее «vm86»; переименован в 2.0.28/2.2 |
| vm86(2) | 2.0.28; 2.2 | |
| vmsplice(2) | 2.6.17 | |
| wait4(2) | 1.0 | |
| waitid(2) | 2.6.10 | |
| waitpid(2) | 1.0 | |
| write(2) | 1.0 | |
| writev(2) | 2.0 | |
| xtensa(2) | 2.6.13 | только на Xtensa |
Although slots are reserved for them in the system call table, the following system calls are not implemented in the standard kernel: afs_syscall(2), break(2), ftime(2), getpmsg(2), gtty(2), idle(2), lock(2), madvise1(2), mpx(2), phys(2), prof(2), profil(2), putpmsg(2), security(2), stty(2), tuxcall(2), ulimit(2), and vserver(2) (see also unimplemented(2)). However, ftime(3), profil(3), and ulimit(3) exist as library routines. The slot for phys(2) is in use since Linux 2.1.116 for umount(2); phys(2) will never be implemented. The getpmsg(2) and putpmsg(2) calls are for kernels patched to support STREAMS, and may never be in the standard kernel.
There was briefly set_zone_reclaim(2), added in Linux 2.6.13, and removed in Linux 2.6.16; this system call was never available to user space.
System calls on removed ports
Some system calls only ever existed on Linux architectures that have since been removed from the kernel:
Разбираемся с системными вызовами в Linux с помощью strace

Системный вызов — это механизм взаимодействия пользовательских программ с ядром Linux, а strace — мощный инструмент, для их отслеживания. Для лучшего понимания работы операционной системы полезно разобраться с тем, как они работают.
В операционной системе можно выделить два режима работы:
- Режим ядра (kernel mode) — привилегированный режим, используемый ядром операционной системы.
- Пользовательский режим (user mode) — режим, в котором выполняется большинство пользовательских приложений.
Системные вызовы очень похожи на вызовы функций, в том смысле, что в них передаются аргументы и они возвращают значения. Единственное отличие состоит в том, что системные вызовы работают на уровне ядра, а функции нет. Переключение из пользовательского режима в режим ядра осуществляется с помощью специального механизма прерываний.
Большая часть этих деталей скрыта от пользователя в системных библиотеках (glibc в Linux-системах). Системные вызовы по своей природе являются универсальными, но несмотря на это, механика их выполнения во многом аппаратно-зависима.
В этой статье рассматривается несколько практических примеров анализа системных вызовов с помощью strace . В примерах используется Red Hat Enterprise Linux, но все команды должны работать и в других дистрибутивах Linux:
Для начала убедитесь, что в вашей системе установлены необходимые инструменты. Проверить установлен ли strace можно с помощью приведенной ниже команды. Для просмотра версии strace запустите ее с параметром -V:
Если strace не установлен, то установите запустив:
Для примера создайте тестовый каталог в /tmp и два файла с помощью команды touch :
(Я использую каталог /tmp только потому, что доступ к нему есть у всех, но вы можете использовать любой другой.)
С помощью команды ls проверьте, что в каталоге testdir создались файлы:
Вероятно, вы используете команду ls каждый день, не осознавая того, что под капотом работают системные вызовы. Здесь в игру вступает абстракция. Вот как работает эта команда:
Команда ls вызывает функции из системных библиотек Linux (glibc). Эти библиотеки, в свою очередь, вызывают системные вызовы, которые выполняют большую часть работы.
Если вы хотите узнать, какие функции вызывались из библиотеки glibc, то используйте команду ltrace со следующей за ней командой ls testdir/ :
Если ltrace не установлен, то установите:
На экране будет много информации, но не беспокойтесь — мы это рассмотрим далее. Вот некоторые из важных библиотечных функций из вывода ltrace :
Изучив этот вывод, вы, вероятно, поймете, что происходит. Каталог с именем testdir открывается с помощью библиотечной функции opendir , после чего следуют вызовы функций readdir , читающих содержимое каталога. В конце происходит вызов функции closedir , которая закрывает каталог, открытый ранее. Пока проигнорируйте остальные функции, такие как strlen и memcpy .
Как вы видите, можно легко посмотреть вызываемые библиотечные функции, но в этой статье мы сфокусируемся на системных вызовах, которые вызываются функциями системных библиотек.
Для просмотра системных вызовов используйте strace с командой ls testdir , как показано ниже. И вы снова получите кучу бессвязной информации:
В результате выполнения strace вы получите список системных вызовов, выполненных при работе команды ls . Все системные вызовы можно разделить на следующие категории:
- Управление процессами
- Управление файлами
- Управление каталогами и файловой системой
- Прочие
На этот раз на экране не будет никаких данных — команда ls отработает, как и ожидается, показав список файлов и записав весь вывод strace в файл trace.log . Для простой команды ls файл содержит почти 100 строк:
Взгляните на первую строку в файле trace.log :
- В начале строки находится имя выполняемого системного вызова — это execve.
- Текст в круглых скобках — это аргументы, передаваемые системному вызову.
- Число после знака = (в данном случае 0) — это значение, возвращаемое системным вызовом.
Обратите внимание на ту единственную команду, которую вы вызвали — ls testdir . Вам известно имя каталога, используемое командой ls , так почему бы не воспользоваться grep для testdir в файле trace.log и не посмотреть, что найдется? Посмотрите внимательно на результат:
Возвращаясь к приведенному выше анализу execve , можете ли вы сказать, что делает следующий системный вызов?
Не нужно запоминать все системные вызовы и то, что они делают: все есть в документации. Man-страницы спешат на помощь! Перед запуском команды man убедитесь, что установлен пакет man-pages :
Помните, что вам нужно добавить «2» между командой man и именем системного вызова. Если вы прочитаете в man про man ( man man ), то увидите, что раздел 2 зарезервирован для системных вызовов. Аналогично если вам нужна информация о библиотечных функциях, то нужно добавить 3 между man и именем библиотечной функции.
Ниже приведены номера разделов man :
Для просмотра документации по системному вызову запустите man с именем этого системного вызова.
В соответствии с документацией системный вызов execve выполняет программу, которая передается ему в параметрах (в данном случае это ls ). В него также передаются дополнительные параметры для ls. В этом примере это testdir . Следовательно, этот системный вызов просто запускает ls с testdir в качестве параметра:
В следующий системный вызов stat передается параметр testdir :
Для просмотра документации используйте man 2 stat . Системный вызов stat возвращает информацию об указанном файле. Помните, что все в Linux — файл, включая каталоги.
Далее системный вызов openat открывает testdir . Обратите внимание, что возвращается значение 3. Это дескриптор файла, который будет использоваться в последующих системных вызовах:
Теперь откройте файл и обратите внимание на строку, следующую после системного вызова openat . Вы увидите системный вызов getdents , который делает большую часть необходимой работы для выполнения команды ls testdir . Теперь выполним grep getdents для файла trace.log :
В документации ( man getdents ) говорится, что getdents читает записи каталога, это, собственно, нам и нужно. Обратите внимание, что аргумент для getdent равен 3 — это дескриптор файла, полученный ранее от системного вызова openat .
Теперь, когда получено содержимое каталога, нужен способ отобразить информацию в терминале. Итак, делаем grep для другого системного вызова write , который используется для вывода на терминал:
В аргументах вы можете видеть имена файлов, которые будут выводится: file1 и file2 . Что касается первого аргумента (1), вспомните, что в Linux для любого процесса по умолчанию открываются три файловых дескриптора:
- 0 — стандартный поток ввода
- 1 — стандартный поток вывода
- 2 — стандартный поток ошибок
Теперь вы знаете, какие системные вызовы сделали большую часть работы для команды ls testdir/ . Но что насчет других 100+ системных вызовов в файле trace.log ?
Операционная система выполняет много вспомогательных действий для запуска процесса, поэтому многое из того, что вы видите в файле trace.log — это инициализация и очистка процесса. Посмотрите файл trace.log полностью и попытайтесь понять, что происходит во время запуска команды ls .
Теперь вы можете анализировать системные вызовы для любых программ. Утилита strace так же предоставляет множество полезных параметров командной строки, некоторые из которых описаны ниже.
По умолчанию strace отображает не всю информацию о системных вызовах. Однако у нее есть опция -v verbose , которая покажет дополнительную информацию о каждом системном вызове:
Хорошая практика использовать параметр -f для отслеживания дочерних процессов, созданных запущенным процессом:
А если вам нужны только имена системных вызовов, количество их запусков и процент времени, затраченного на выполнение? Вы можете использовать опцию -c , чтобы получить эту статистику:
Если вы хотите отследить определенный системный вызов, например, open , и проигнорировать другие, то можно использовать опцию -e с именем системного вызова:
А что, если нужно отфильтровать по нескольким системным вызовам? Не волнуйтесь, можно использовать ту же опцию -e и разделить необходимые системные вызовы запятой. Например, для write и getdent :
До сих пор мы отслеживали только явный запуск команд. Но как насчет команд, которые были запущены ранее? Что, если вы хотите отслеживать демонов? Для этого у strace есть специальная опция -p , которой вы можете передать идентификатор процесса.
Мы не будем запускать демона, а используем команду cat , которая отображает содержимое файла, переданного ему в качестве аргумента. Но если аргумент не указать, то команда cat будет просто ждать ввод от пользователя. После ввода текста она выведет введенный текст на экран. И так до тех пор, пока пользователь не нажмет Ctrl+C для выхода.
Запустите команду cat на одном терминале.
На другом терминале найдите идентификатор процесса (PID) с помощью команды ps :
Теперь запустите strace с опцией -p и PID’ом, который вы нашли с помощью ps . После запуска strace выведет информацию о процессе, к которому он подключился, а также его PID. Теперь strace отслеживает системные вызовы, выполняемые командой cat . Первый системный вызов, который вы увидите — это read, ожидающий ввода от потока с номером 0, то есть от стандартного ввода, который сейчас является терминалом, на котором запущена команда cat :
Теперь вернитесь к терминалу, где вы оставили запущенную команду cat , и введите какой-нибудь текст. Для демонстрации я ввел x0x0 . Обратите внимание, что cat просто повторил то, что я ввел и x0x0 на экране будет дважды.
Вернитесь к терминалу, где strace был подключен к процессу cat . Теперь вы видите два новых системных вызова: предыдущий read , который теперь прочитал x0x0 , и еще один для записи write , который записывает x0x0 обратно в терминал, и снова новый read , который ожидает чтения с терминала. Обратите внимание, что стандартный ввод (0) и стандартный вывод (1) находятся на одном и том же терминале:
Представляете, какую пользу может принести вам запуск strace для демонов: вы можете увидеть все, что делается в фоне. Завершите команду , нажав . Это также прекратит сеанс , так как отслеживаемый процесс был прекращен.
Для просмотра отметок времени системных вызовов используйте опцию -t :
А если вы хотите узнать время, проведенное между системными вызовами? Есть удобная опция -r , которая показывает время, затраченное на выполнение каждого системного вызова. Довольно полезно, не так ли?
Заключение
Утилита strace очень удобна для изучения системных вызовов в Linux. Чтобы узнать о других параметрах командной строки, обратитесь к man и онлайн-документации.
System Calls
At a high level system calls are "services" offered by the kernel to user applications and they resemble library APIs in that they are described as a function call with a name, parameters, and return value.
However, on a closer look, we can see that system calls are actually not function calls, but specific assembly instructions (architecture and kernel specific) that do the following:
- setup information to identify the system call and its parameters
- trigger a kernel mode switch
- retrieve the result of the system call
In Linux, system calls are identified by numbers and the parameters for system calls are machine word sized (32 or 64 bit). There can be a maximum of 6 system call parameters. Both the system call number and the parameters are stored in certain registers.
For example, on 32bit x86 architecture, the system call identifier is stored in the EAX register, while parameters in registers EBX, ECX, EDX, ESI, EDI, EBP.
System libraries (e.g. libc) offers functions that implement the actual system calls in order to make it easier for applications to use them.
When a user to kernel mode transition occurs, the execution flow is interrupted and it is transferred to a kernel entry point. This is similar to how interrupts and exceptions are handled (in fact on some architectures this transition happens as a result of an exception).
The system call entry point will save registers (which contains values from user space, including system call number and system call parameters) on stack and then it will continue with executing the system call dispatcher.
During the user — kernel mode transition the stack is also switched from the user stack to the kernel stack. This is explained in more details in the interrupts lecture.
The purpose of the system call dispatcher is to verify the system call number and run the kernel function associated with the system call.
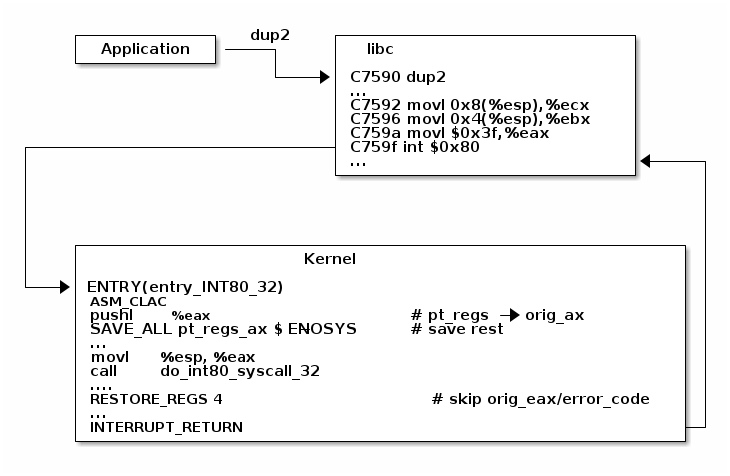
To demonstrate the system call flow we are going to use the virtual machine setup, attach gdb to a running kernel, add a breakpoint to the dup2 system call and inspect the state.
In summary, this is what happens during a system call:
- The application is setting up the system call number and parameters and it issues a trap instruction
- The execution mode switches from user to kernel; the CPU switches to a kernel stack; the user stack and the return address to user space is saved on the kernel stack
- The kernel entry point saves registers on the kernel stack
- The system call dispatcher identifies the system call function and runs it
- The user space registers are restored and execution is switched back to user (e.g. calling IRET)
- The user space application resumes
System call table
The system call table is what the system call dispatcher uses to map system call numbers to kernel functions:
System call parameters handling
Handling system call parameters is tricky. Since these values are setup by user space, the kernel can not assume correctness and must always verify them thoroughly.
Pointers have a few important special cases that must be checked:
- Never allow pointers to kernel-space
- Check for invalid pointers
Since system calls are executed in kernel mode, they have access to kernel space and if pointers are not properly checked user applications might get read or write access to kernel space.
For example, let’s consider the case where such a check is not made for the read or write system calls. If the user passes a kernel-space pointer to a write system call then it can get access to kernel data by later reading the file. If it passes a kernel-space pointer to a read system call then it can corrupt kernel memory.
Likewise, if a pointer passed by the application is invalid (e.g. unmapped, read-only for cases where it is used for writing), it could "crash" the kernel. Two approaches could be used:
- Check the pointer against the user address space before using it, or
- Avoid checking the pointer and rely on the MMU to detect when the pointer is invalid and use the page fault handler to determine that the pointer was invalid
Although it sounds tempting, the second approach is not that easy to implement. The page fault handler uses the fault address (the address that was accessed), the faulting address (the address of the instruction that did the access) and information from the user address space to determine the cause:
- Copy on write, demand paging, swapping: both the fault and faulting addresses are in user space; the fault address is valid (checked against the user address space)
- Invalid pointer used in system call: the faulting address is in kernel space; the fault address is in user space and it is invalid
- Kernel bug (kernel accesses invalid pointer): same as above
But in the last two cases we don’t have enough information to determine the cause of the fault.
In order to solve this issue, Linux uses special APIs (e.g copy_to_user() ) to accesses user space that are specially crafted:
- The exact instructions that access user space are recorded in a table (exception table)
- When a page fault occurs the faulting address is checked against this table
Although the fault handling case may be more costly overall depending on the address space vs exception table size, and it is more complex, it is optimized for the common case and that is why it is preferred and used in Linux.
| Cost | Pointer checks | Fault handling |
|---|---|---|
| Valid address | address space search | negligible |
| Invalid address | address space search | exception table search |
Virtual Dynamic Shared Object (VDSO)
The VDSO mechanism was born out of the necessity of optimizing the system call implementation, in a way that does not impact libc with having to track the CPU capabilities in conjunction with the kernel version.
For example, x86 has two ways of issuing system calls: int 0x80 and sysenter. The latter is significantly faster so it should be used when available. However, it is only available for processors newer than Pentium II and only for kernel versions greater than 2.6.
With VDSO the system call interface is decided by the kernel:
- a stream of instructions to issue the system call is generated by the kernel in a special memory area (formatted as an ELF shared object)
- that memory area is mapped towards the end of the user address space
- libc searches for VDSO and if present will use it to issue the system call
An interesting development of the VDSO is the virtual system calls (vsyscalls) which run directly from user space. These vsyscalls are also part of VDSO and they are accessing data from the VDSO page that is either static or modified by the kernel in a separate read-write map of the VDSO page. Examples of system calls that can be implemented as vsyscalls are: getpid or gettimeofday.
- "System calls" that run directly from user space, part of the VDSO
- Static data (e.g. getpid())
- Dynamic data update by the kernel a in RW map of the VDSO (e.g. gettimeofday(), time(), )
Accessing user space from system calls
As we mentioned earlier, user space must be accessed with special APIs ( get_user() , put_user() , copy_from_user() , copy_to_user() ) that check whether the pointer is in user space and also handle the fault if the pointer is invalid. In case of invalid pointers, they return a non-zero value.
Let’s examine the simplest API, get_user, as implemented for x86:
The implementation uses inline assembly, which allows inserting ASM sequences in C code and also handles access to/from variables in the ASM code.
Based on the type size of the x variable, one of __get_user_1, __get_user_2 or __get_user_4 will be called. Also, before executing the assembly call, ptr will be moved to the first register EAX while after the completion of assembly part the value of EAX will be moved to __ret_gu and the EDX register will be moved to __val_gu.
It is equivalent to the following pseudo code:
The __get_user_1 implementation for x86 is the following:
The first two statements check the pointer (which is stored in EDX) with the addr_limit field of the current task (process) descriptor to make sure that we don’t have a pointer to kernel space.
Then, SMAP is disabled, to allow access to user from kernel, and the access to user space is done with the instruction at the 1: label. EAX is then zeroed to mark success, SMAP is enabled, and the call returns.
The movzbl instruction is the one that does the access to user space and its address is captured with the 1: label and stored in a special section:
For each address that accesses user space we have an entry in the exception table, that is made up of: the faulting address(from), where to jump to in case of a fault, and a handler function (that implements the jump logic). All of these addresses are stored on 32bit in relative format to the exception table, so that they work for both 32 and 64 bit kernels.
All of the exception table entries are then collected in the __ex_table section by the linker script:
The section is guarded with __start___ex_table and __stop___ex_table symbols, so that it is easy to find the data from C code. This table is accessed by the fault handler:
All it does is to set the return address to the one in the field of the exception table entry which, in case of the get_user exception table entry, is bad_get_user which return -EFAULT to the caller.
The Definitive Guide to Linux System Calls
This blog post explains how Linux programs call functions in the Linux kernel. It will outline several different methods of making systems calls, how to handcraft your own assembly to make system calls (examples included), kernel entry points into system calls, kernel exit points from system calls, glibc wrappers, bugs, and much, much more.
Here is a summary of the topics this blog post will cover,
- Hardware and software
- User programs, the kernel, and CPU privilege levels
- Interrupts
- Model Specific Registers (MSRs)
- Using legacy system calls with your own assembly
- Kernel-side: int $0x80 entry point
- Returning from a legacy system call with iret
- 32-bit fast system calls sysenter / sysexit
- __kernel_vsyscall internals
- Using sysenter system calls with your own assembly
- Kernel-side: sysenter entry point
- Returning from a sysenter system call with sysexit
- syscall / sysret
- Using syscall system calls with your own assembly
- Kernel-side: syscall entry point
- Returning from a syscall system call with sysret
- Calling a syscall semi-manually with syscall(2)
- glibc syscall wrapper internals
- vDSO in the kernel
- Locating the vDSO in memory
- vDSO in glibc
- glibc system call wrappers
- CVE-2010-3301
- Android sysenter ABI breakage
What is a system call?
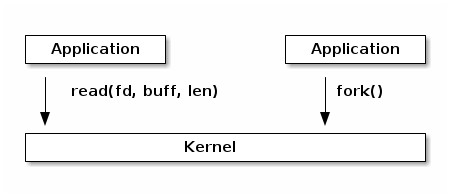
When you run a program which calls open , fork , read , write (and many others) you are making a system call.
System calls are how a program enters the kernel to perform some task. Programs use system calls to perform a variety of operations such as: creating processes, doing network and file IO, and much more.
You can find a list of system calls by checking the man page for syscalls(2).
There are several different ways for user programs to make system calls and the low-level instructions for making a system call vary among CPU architectures.
As an application developer, you don’t typically need to think about how exactly a system call is made. You simply include the appropriate header file and make the call as if it were a normal function.
glibc provides wrapper code which abstracts you away from the underlying code which arranges the arguments you’ve passed and enters the kernel.
Before we can dive into the details of how system calls are made, we’ll need to define some terms and examine some core ideas that will appear later.
Prerequisite information
Hardware and software
This blog post makes the following assumptions that:
- You are using a 32-bit or 64-bit Intel or AMD CPU. The discussion about the methods may be useful for people using other systems, but the code samples below contain CPU-specific code.
- You are interested in the Linux kernel, version 3.13.0. Other kernel versions will be similar, but the exact line numbers, organization of code, and file paths will vary. Links to the 3.13.0 kernel source tree on GitHub are provided.
- You are interested in glibc or glibc derived libc implementations (e.g., eglibc ).
x86-64 in this blog post will refer to 64bit Intel and AMD CPUs that are based on the x86 architecture.
User programs, the kernel, and CPU privilege levels
User programs (like your editor, terminal, ssh daemon, etc) need to interact with the Linux kernel so that the kernel can perform a set of operations on behalf of your user programs that they can’t perform themselves.
For example, if a user program needs to do some sort of IO ( open , read , write , etc) or modify its address space ( mmap , sbrk , etc) it must trigger the kernel to run to complete those actions on its behalf.
What prevents user programs from performing these actions themselves?
It turns out that the x86-64 CPUs have a concept called privilege levels. Privilege levels are a complex topic suitable for their own blog post. For the purposes of this post, we can (greatly) simplify the concept of privilege levels by saying:
- Privilege levels are a means of access control. The current privilege level determines which CPU instructions and IO may be performed.
- The kernel runs at the most privileged level, called “Ring 0”. User programs run at a lesser level, typically “Ring 3”.
In order for a user program to perform some privileged operation, it must cause a privilege level change (from “Ring 3” to “Ring 0”) so that the kernel can execute.
There are several ways to cause a privilege level change and trigger the kernel to perform some action.
Let’s start with a common way to cause the kernel to execute: interrupts.
Interrupts
You can think of an interrupt as an event that is generated (or “raised”) by hardware or software.
A hardware interrupt is raised by a hardware device to notify the kernel that a particular event has occurred. A common example of this type of interrupt is an interrupt generated when a NIC receives a packet.
A software interrupt is raised by executing a piece of code. On x86-64 systems, a software interrupt can be raised by executing the int instruction.
Interrupts usually have numbers assigned to them. Some of these interrupt numbers have a special meaning.
You can imagine an array that lives in memory on the CPU. Each entry in this array maps to an interrupt number. Each entry contains the address of a function that the CPU will begin executing when that interrupt is received along with some options, like what privilege level the interrupt handler function should be executed in.
Here’s a photo from the Intel CPU manual showing the layout of an entry in this array:
If you look closely at the diagram, you can see a 2-bit field labeled DPL (Descriptor Privilege Level). The value in this field determines the minimum privilege level the CPU will be in when the handler function is executed.
This is how the CPU knows which address it should execute when a particular type of event is received and what privilege level the handler for that event should execute in.
In practice, there are lots of different ways to deal with interrupts on x86-64 systems. If you are interested in learning more read about the 8259 Programmable Interrupt Controller, Advanced Interrupt Controllers, and IO Advanced Interrupt Controllers.
There are other complexities involved with dealing with both hardware and software interrupts, such as interrupt number collisions and remapping.
We don’t need to concern ourselves with these details for this discussion about system calls.
Model Specific Registers (MSRs)
Model Specific Registers (also known as MSRs) are control registers that have a specific purpose to control certain features of the CPU. The CPU documentation lists the addresses of each of the MSRs.
You can use the CPU instructions rdmsr to wrmsr to read and write MSRs, respectively.
There are also command line tools which allow you to read and write MSRs, but doing this is not recommended as changing these values (especially while a system is running) is dangerous unless you are really careful.
If you don’t mind potentially destabilizing your system or irreversibly corrupting your data, you can read and write MSRs by installing msr-tools and loading the msr kernel module:
Some of the system call methods we’ll see later make use of MSRs, as we’ll see soon.
Calling system calls with assembly is a bad idea
It’s not a great idea to call system calls by writing your own assembly code.
One big reason for this is that some system calls have additional code that runs in glibc before or after the system call runs.
In the examples below, we’ll be using the exit system call. It turns out that you can register functions to run when exit is called by a program by using atexit .
Those functions are called from glibc, not the kernel. So, if you write your own assembly to call exit as we show below, your registered handler functions won’t be executed since you are bypassing glibc.
Nevertheless, manually making system calls with assembly is a good learning experience.
Legacy system calls
Using our prerequisite knowledge we know two things:
- We know that we can trigger the kernel to execute by generating a software interrupt.
- We can generate a software interrupt with the int assembly instruction.
Combining these two concepts leads us to the legacy system call interface on Linux.
The Linux kernel sets aside a specific software interrupt number that can be used by user space programs to enter the kernel and execute a system call.
The Linux kernel registers an interrupt handler named ia32_syscall for the interrupt number: 128 (0x80). Let’s take a look at the code that actually does this.
From the trap_init function in the kernel 3.13.0 source in arch/x86/kernel/traps.c :
Where IA32_SYSCALL_VECTOR is a defined as 0x80 in arch/x86/include/asm/irq_vectors.h .
But, if the kernel reserves a single software interrupt that userland programs can raise to trigger the kernel, how does the kernel know which of the many system calls it should execute?
The userland program is expected to put the system call number in the eax register. The arguments for the syscall itself are to be placed in the remaining general purpose registers.
One place this is documented is in a comment in arch/x86/ia32/ia32entry.S :
Now that we know how to make a system call and where the arguments should live, let’s try to make one by writing some inline assembly.
Using legacy system calls with your own assembly
To make a legacy system call, you can write a small bit of inline assembly. While this is interesting from a learning perspective, I encourage readers to never make system calls by crafting their own assembly.
In this example, we’ll try calling the exit system call, which takes a single argument: the exit status.
First, we need to find the system call number for exit . The Linux kernel includes a file which lists each system call in a table. This file is processed by various scripts at build time to generate header files which can be used by user programs.
The exit syscall is number 1 . According to the interface described above, we just need to move the syscall number into the eax register and the first argument (the exit status) into ebx .
Here’s a piece of C code with some inline assembly that does this. Let’s set the exit status to “42”:
(This example can be simplified, but I thought it would be interesting to make it a bit more wordy than necessary so that anyone who hasn’t seen GCC inline assembly before can use this as an example or reference.)
Next, compile, execute, and check the exit status:
Success! We called the exit system call using the legacy system call method by raising a software interrupt.
Kernel-side: int $0x80 entry point
So now that we’ve seen how to trigger a system call from a userland program, let’s see how the kernel uses the system call number to execute the system call code.
Recall from the previous section that the kernel registered a syscall handler function called ia32_syscall .
This function is implemented in assembly in arch/x86/ia32/ia32entry.S and we can see several things happening in this function, the most important of which is the call to the actual syscall itself:
IA32_ARG_FIXUP is a macro which rearranges the legacy arguments so that they may be properly understood by the current system call layer.
The ia32_sys_call_table identifier refers to a table which is defined in arch/x86/ia32/syscall_ia32.c . Note the #include line toward the end of the code:
Recall earlier we saw the syscall table defined in arch/x86/syscalls/syscall_32.tbl .
There are a few scripts which run at compile time which take this table and generate the syscalls_32.h file from it. The generated header file is comprised of valid C code, which is simply inserted with the #include shown above to fill in ia32_sys_call_table with function addresses indexed by system call number.
And this is how you enter the kernel via a legacy system call.
Returning from a legacy system call with iret
We’ve seen how to enter the kernel with a software interrupt, but how does the kernel return back to the user program and drop the privilege level after it has finished running?
If we turn to the (warning: large PDF) Intel Software Developer’s Manual we can find a helpful diagram that illustrates how the program stack will be arranged when a privilege level change occurs.
Let’s take a look:
When execution is transferred to the kernel function ia32_syscall via the execution of a software interrupt from a user program, a privilege level change occurs. The result is that the stack when ia32_syscall is entered will look like the diagram above.
This means that the return address and the CPU flags which encode the privilege level (and other stuff), and more are all saved on the program stack before ia32_syscall executes.
So, in order to resume execution the kernel just needs to copy these values from the program stack back into the registers where they belong and execution will resume back in userland.
OK, so how do you do that?
There’s a few ways to do that, but one of the easiest ways is to the use the iret instruction.
The Intel instruction set manual explains that the iret instruction pops the return address and saved register values from the stack in the order they were prepared:
As with a real-address mode interrupt return, the IRET instruction pops the return instruction pointer, return code segment selector, and EFLAGS image from the stack to the EIP, CS, and EFLAGS registers, respectively, and then resumes execution of the interrupted program or procedure.
Finding this code in the Linux kernel is a bit difficult as it is hidden beneath several macros and there is extensive care taken to deal with things like signals and ptrace system call exit tracking.
Eventually all the macros in the assembly stubs in the kernel reveal the iret which returns from a system call back to a user program.
Where INTERRUPT_RETURN is defined in arch/x86/include/asm/irqflags.h as iretq .
And now you know how legacy system calls work.
Fast system calls
The legacy method seems pretty reasonable, but there are newer ways to trigger a system call which don’t involve a software interrupt and are much faster than using a software interrupt.
Each of the two faster methods is comprised of two instructions. One to enter the kernel and one to leave. Both methods are described in the Intel CPU documentation as “Fast System Call”.
Unfortunately, Intel and AMD implementations have some disagreement on which method is valid when a CPU is in 32bit or 64bit mode.
In order to maximize compatibility across both Intel and AMD CPUs:
- On 32bit systems use: sysenter and sysexit .
- On 64bit systems use: syscall and sysret .
32-bit fast system calls
sysenter / sysexit
Using sysenter to make a system call is more complicated than using the legacy interrupt method and involves more coordination between the user program (via glibc ) and the kernel.
Let’s take it one step at a time and sort out the details. First, let’s see what the documentation in the Intel Instruction Set Reference (warning very large PDF) says about the sysenter and how to use it.
Let’s take a look:
Prior to executing the SYSENTER instruction, software must specify the privilege level 0 code segment and code entry point, and the privilege level 0 stack segment and stack pointer by writing values to the following MSRs:
• IA32_SYSENTER_CS (MSR address 174H) — The lower 16 bits of this MSR are the segment selector for the privilege level 0 code segment. This value is also used to determine the segment selector of the privilege level 0 stack segment (see the Operation section). This value cannot indicate a null selector.
• IA32_SYSENTER_EIP (MSR address 176H) — The value of this MSR is loaded into RIP (thus, this value references the first instruction of the selected operating procedure or routine). In protected mode, only bits 31:0 are loaded.
• IA32_SYSENTER_ESP (MSR address 175H) — The value of this MSR is loaded into RSP (thus, this value contains the stack pointer for the privilege level 0 stack). This value cannot represent a non-canonical address. In protected mode, only bits 31:0 are loaded.
In other words: in order for the kernel to receive incoming system calls with sysenter , the kernel must set 3 Model Specific Registers (MSRs). The most interesting MSR in our case is IA32_SYSENTER_EIP (which has the address 0x176). This MSR is where the kernel should specify the address of the function that will execute when a sysenter instruction is executed by a user program.
We can find the code in the Linux kernel which writes to the MSR in arch/x86/vdso/vdso32-setup.c :
Where MSR_IA32_SYSENTER_EIP is defined as a 0x00000176 arch/x86/include/uapi/asm/msr-index.h .
Much like the legacy software interrupt syscalls, there is a defined convention for making system calls with sysenter .
One place this is documented is in a comment in arch/x86/ia32/ia32entry.S :
Recall that the legacy system call method includes a mechanism for returning back to the userland program which was interrupted: the iret instruction.
Capturing the logic needed to make sysenter work properly is complicated because unlike software interrupts, sysenter does not store the return address.
How, exactly, the kernel does this and other bookkeeping prior to executing a sysenter instruction can change over time (and it has changed, as you will see in the Bugs section below).
In order to protect against future changes, user programs are intended to use a function called __kernel_vsyscall which is implemented in the kernel, but mapped into each user process when the process is started.
This is a bit odd; it’s code that comes with the kernel, but runs in userland.
It turns out that __kernel_vsyscall is part of something called a virtual Dynamic Shared Object (vDSO) which exists to allow programs to execute kernel code in userland.
We’ll examine what the vDSO is, what it does, and how it works in depth later.
For now, let’s examine the __kernel_vsyscall internals.
__kernel_vsyscall internals
The __kernel_vsyscall function that encapulates the sysenter calling convention can be found in arch/x86/vdso/vdso32/sysenter.S :
__kernel_vsyscall is part of a Dynamic Shared Object (also known as a shared library) how does a user program locate the address of that function at runtime?
The address of the __kernel_vsyscall function is written into an ELF auxilliary vector where a user program or library (typically glibc ) can find it and use it.
There are a few methods for searching ELF auxilliary vectors:
- By using getauxval with the AT_SYSINFO argument.
- By iterating to the end of the environment variables and parsing them from memory.
Option 1 is the simplest option, but does not exist on glibc prior to 2.16. The example code shown below illustrates option 2.
As we can see in the code above, __kernel_vsyscall does some bookkeeping before executing sysenter .
So, all we need to do to manually enter the kernel with sysenter is:
- Search the ELF auxilliary vectors for AT_SYSINFO where the address of __kernel_vsyscall is written.
- Put the system call number and arguments into the registers as we would normally for legacy system calls
- Call the __kernel_vsyscall function
You should absolutely never write your own sysenter wrapper function as the convention the kernel uses to enter and leave system calls with sysenter can change and your code will break.
You should always start a sysenter system call by calling through __kernel_vsyscall .
So, lets do that.
Using sysenter system calls with your own assembly
Keeping with our legacy system call example from earlier, we’ll call exit with an exit status of 42 .
The exit syscall is number 1 . According to the interface described above, we just need to move the syscall number into the eax register and the first argument (the exit status) into ebx .
(This example can be simplified, but I thought it would be interesting to make it a bit more wordy than necessary so that anyone who hasn’t seen GCC inline assembly before can use this as an example or reference.)
Next, compile, execute, and check the exit status:
Success! We called the exit system call using the legacy sysenter method without raising a software interrupt.
Kernel-side: sysenter entry point
So now that we’ve seen how to trigger a system call from a userland program with sysenter via __kernel_vsyscall , let’s see how the kernel uses the system call number to execute the system call code.
Recall from the previous section that the kernel registered a syscall handler function called ia32_sysenter_target .
This function is implemented in assembly in arch/x86/ia32/ia32entry.S . Let’s take a look at where the value in the eax register is used to execute the system call:
This is identical code as we saw in the legacy system call mode: a table named ia32_sys_call_table which is indexed into with the system call number.
After all the needed bookkeeping is done both the legacy system call model and the sysenter system call model use the same mechanism and system call table for dispatching system calls.
Refer to the int $0x80 entry point section to learn where the ia32_sys_call_table is defined and how it is constructed.
And this is how you enter the kernel via a sysenter system call.
Returning from a sysenter system call with sysexit
The kernel can use the sysexit instruction to resume execution back to the user program.
Using this instruction is not as straight forward as using iret . The caller is expected to put the address to return to into the rdx register, and to put the pointer to the program stack to use in the rcx register.
This means that your software must compute the address where execution should be resumed, preserve that value, and restore it prior to calling sysexit .
We can find the code which does this in: arch/x86/ia32/ia32entry.S :
ENABLE_INTERRUPTS_SYSEXIT32 is a macro which is defined in arch/x86/include/asm/irqflags.h which contains the sysexit instruction.
And now you know how 32-bit fast system calls work.
64-bit fast system calls
Next up on our journey are 64-bit fast system calls. These system calls use the instructions syscall and sysret to enter and return from a system call, respectively.
syscall / sysret
The documentation in the Intel Instruction Set Reference (very large PDF) explains how the syscall instruction works:
SYSCALL invokes an OS system-call handler at privilege level 0. It does so by loading RIP from the IA32_LSTAR MSR (after saving the address of the instruction following SYSCALL into RCX).
In other words: for the kernel to receive incoming system calls, it must register the address of the code that will execute when a system call occurs by writing its address to the IA32_LSTAR MSR.
We can find that code in the kernel in arch/x86/kernel/cpu/common.c :
Where MSR_LSTAR is defined as 0xc0000082 in arch/x86/include/uapi/asm/msr-index.h .
Much like the legacy software interrupt syscalls, there is a defined convention for making system calls with syscall .
The userland program is expected to put the system call number to be in the rax register. The arguments to the syscall are expected to be placed in a subset of the general purpose registers.
This is documented in the x86-64 ABI in section A.2.1:
- User-level applications use as integer registers for passing the sequence %rdi, %rsi, %rdx, %rcx, %r8 and %r9. The kernel interface uses %rdi, %rsi, %rdx, %r10, %r8 and %r9.
- A system-call is done via the syscall instruction. The kernel destroys registers %rcx and %r11.
- The number of the syscall has to be passed in register %rax.
- System-calls are limited to six arguments,no argument is passed directly on the stack.
- Returning from the syscall, register %rax contains the result of the system-call. A value in the range between -4095 and -1 indicates an error, it is -errno.
- Only values of class INTEGER or class MEMORY are passed to the kernel.
This is also documented in a comment in arch/x86/kernel/entry_64.S .
Now that we know how to make a system call and where the arguments should live, let’s try to make one by writing some inline assembly.
Using syscall system calls with your own assembly
Building on the previous example, let’s build a small C program with inline assembly which executes the exit system call passing the exit status of 42.
First, we need to find the system call number for exit . In this case we need to read the table found in arch/x86/syscalls/syscall_64.tbl :
The exit syscall is number 60 . According to the interface described above, we just need to move 60 into the rax register and the first argument (the exit status) into rdi .
Here’s a piece of C code with some inline assembly that does this. Like the previous example, this example is more wordy than necessary in the interest of clarity:
Next, compile, execute, and check the exit status:
Success! We called the exit system call using the syscall system call method. We avoided raising a software interrupt and (if we were timing a micro-benchmark) it executes much faster.
Kernel-side: syscall entry point
Now we’ve seen how to trigger a system call from a userland program, let’s see how the kernel uses the system call number to execute the system call code.
Recall from the previous section we saw the address of a function named system_call get written to the LSTAR MSR.
Let’s take a look at the code for this function and see how it uses rax to actually hand off execution to the system call, from arch/x86/kernel/entry_64.S :
Much like the legacy system call method, sys_call_table is a table defined in a C file that uses #include to pull in C code generated by a script.
From arch/x86/kernel/syscall_64.c , note the #include at the bottom:
Earlier we saw the syscall table defined in arch/x86/syscalls/syscall_64.tbl . Exactly like the legacy interrupt mode, a script runs at kernel compile time and generates the syscalls_64.h file from the table in syscall_64.tbl .
The code above simply includes the generated C code producing an array of function pointers indexed by system call number.
And this is how you enter the kernel via a syscall system call.
Returning from a syscall system call with sysret
The kernel can use the sysret instruction to resume execution back to where execution left off when the user program used syscall .
sysret is simpler than sysexit because the address to where execution should be resume is copied into the rcx register when syscall is used.
As long as you preserve that value somewhere and restore it to rcx before calling sysret , execution will resume where it left off before the call to syscall .
This is convenient because sysenter requires that you compute this address yourself in addition to clobbering an additional register.
We can find the code which does this in arch/x86/kernel/entry_64.S :
USERGS_SYSRET64 is a macro which is defined in arch/x86/include/asm/irqflags.h which contains the sysret instruction.
And now you know how 64-bit fast system calls work.
Calling a syscall semi-manually with syscall(2)
Great, we’ve seen how to call system calls manually by crafting assembly for a few different system call methods.
Usually, you don’t need to write your own assembly. Wrapper functions are provided by glibc that handle all of the assembly code for you.
There are some system calls, however, for which no glibc wrapper exists. One example of a system call like this is futex , the fast userspace locking system call.
futex is intended only to be called by libraries, not application code, and thus in order to call futex you must do it by:
- Generating assembly stubs for every platform you want to support
- Using the syscall wrapper provided by glibc
If you find yourself in the situation of needing to call a system call for which no wrapper exists, you should definitely choose option 2: use the function syscall from glibc.
Let’s use syscall from glibc to call exit with exit status of 42 :
Next, compile, execute, and check the exit status:
Success! We called the exit system call using the syscall wrapper from glibc.
glibc syscall wrapper internals
Let’s take a look at the syscall wrapper function we used in the previous example to see how it works in glibc.
Earlier we showed an excerpt from the x86_64 ABI document that describes both userland and kernel calling conventions.
This assembly stub is cool because it shows both calling conventions. The arguments passed into this function follow the userland calling convention, but are then moved to a different set of registers to obey the kernel calling convention prior to entering the kernel with syscall .
This is how the glibc syscall wrapper works when you use it to call system calls that do not come with a wrapper by default.
Virtual system calls
We’ve now covered all the methods of making a system call by entering the kernel and shown how you can make those calls manually (or semi-manually) to transition the system from userland to the kernel.
What if programs could call certain system calls without entering the kernel at all?
That’s precisely why the Linux virtual Dynamic Shared Object (vDSO) exists. The Linux vDSO is a set of code that is part of the kernel, but is mapped into the address space of a user program to be run in userland.
The idea is that some system calls can be used without entering the kernel. One such call is: gettimeofday .
Programs calling the gettimeofday system call do not actually enter the kernel. They instead make a simple function call to a piece of code that was provided by the kernel, but is run in userland.
No software interrupt is raised, no complicated sysenter or syscall bookkeeping is required. gettimeofday is just a normal function call.
You can see the vDSO listed as the first entry when you use ldd :
Let’s see how the vDSO is setup in the kernel.
vDSO in the kernel
You can find the vDSO source in arch/x86/vdso/ . There are a few assembly and C source files along with a linker script.
The linker script is a cool thing to take a look at.
Linker scripts are pretty useful, but not particularly very well known. This linker script arranges the symbols that are going to be exported in the vDSO.
We can see that vDSO exports 4 different functions, each with two names. You can find the source for these functions in the C files in this directory.
For example, the source for gettimeofday found in arch/x86/vdso/vclock_gettime.c :
This is defining gettimeofday to be a weak alias for __vdso_gettimeofday .
The __vdso_gettimeofday function in the same file contains the actual source which will be executed in user land when a user program calls the gettimeofday system call.
Locating the vDSO in memory
Due to address space layout randomization the vDSO will be loaded at a random address when a program is started.
How can user programs find the vDSO if its loaded at a random address?
If you recall earlier when examining the sysenter system call method we saw that user programs should call __kernel_vsyscall instead of writing their own sysenter assembly code themselves.
This function is part of the vDSO, as well.
The sample code provided located __kernel_vsyscall by searching the ELF auxilliary headers to find a header with type AT_SYSINFO which contained the address of __kernel_vsyscall .
Similarly, to locate the vDSO, a user program can search for an ELF auxilliary header of type AT_SYSINFO_EHDR . It will contain the address of the start of the ELF header for the vDSO that was generated by a linker script.
In both cases, the kernel writes the address in to the ELF header when the program is loaded. That’s how the correct addresses always end up in AT_SYSINFO_EHDR and AT_SYSINFO .
Once that header is located, user programs can parse the ELF object (perhaps using libelf) and call the functions in the ELF object as needed.
This is nice because this means that the vDSO can take advantage of some useful ELF features like symbol versioning.
An example of parsing and calling functions in the vDSO is provided in the kernel documentation in Documentation/vDSO/ .
vDSO in glibc
Most of the time, people access the vDSO without knowing it because glibc abstracts this away from them by using the interface described in the previous section.
When a program is loaded, the dynamic linker and loader loads the DSOs that the program depends on, including the vDSO.
glibc stores some data about the location of the vDSO when it parses the ELF headers of the program that is being loaded. It also includes short stub functions that will search the vDSO for a symbol name prior to making an actual system call.
For example, the gettimeofday function in glibc , from sysdeps/unix/sysv/linux/x86_64/gettimeofday.c :
This code in glibc searches the vDSO for the gettimeofday function and returns the address. This is wrapped up nicely with an indirect function.
That’s how programs calling gettimeofday pass through glibc and hit the vDSO all without switching into kernel mode, incurring a privilege level change, or raising a software interrupt.
And, that concludes the showcase of every single system call method available on Linux for 32-bit and 64-bit Intel and AMD CPUs.
glibc system call wrappers
While we’re talking about system calls 😉 it makes sense to briefly mention how glibc deals with system calls.
For many system calls, glibc simply needs a wrapper function where it moves arguments into the proper registers and then executes the syscall or int $0x80 instructions, or calls __kernel_vsyscall .
It does this by using a series of tables defined in text files that are processed with scripts and output C code.
For example, the sysdeps/unix/syscalls.list file describes some common system calls:
To learn more about each column, check the comments in the script which processes this file: sysdeps/unix/make-syscalls.sh .
More complex system calls, like exit which invokes handlers have actual implementations in C or assembly code and will not be found in a templated text file like this.
Future blog posts will explore the implementation in glibc and the linux kernel for interesting system calls.
Interesting syscall related bugs
It would be unfortunate not to take this opportunity to mention two fabulous bugs related to system calls in Linux.
So, let’s take a look!
CVE-2010-3301
This security exploit allows local users to gain root access.
The cause is a small bug in the assembly code which allows user programs to make legacy system calls on x86-64 systems.
The exploit code is pretty clever: it generates a region of memory with mmap at a particular address and uses an integer overflow to cause this code:
(Remember this code from the legacy interrupts section above?)
to hand execution off to an arbitrary address which runs as kernel code and can escalate the running process to root.
Android sysenter ABI breakage
Remember the part about not hardcoding the sysenter ABI in your application code?
Unfortunately, the android-x86 folks made this mistake. The kernel ABI changed and suddenly android-x86 stopped working.
The kernel folks ended up restoring the old sysenter ABI to avoid breaking the Android devices in the wild with stale hardcoded sysenter sequences.
Here’s the fix that was added to the Linux kernel. You can find a link to the offending commit in the android source in the commit message.
Remember: never write your own sysenter assembly code. If you have to implement it directly for some reason, use a piece of code like the example above and go through __kernel_vsyscall at the very least.
Conclusion
The system call infrastructure in the Linux kernel is incredibly complex. There are many different methods for making system calls each with their own advantages and disadvantages.
Calling system calls by crafting your own assembly is generally a bad idea as the ABI may break underneath you. Your kernel and libc implementation will (probably) choose the fastest method for making system calls on your system.
If you can’t use the glibc provided wrappers (or if one doesn’t exist), you should at the very least use the syscall wrapper function, or try to go through the vDSO provided __kernel_vsyscall .
Stay tuned for future blog posts investigating individual system calls and their implementations.