Lenovo Ideapad 320 disassembly
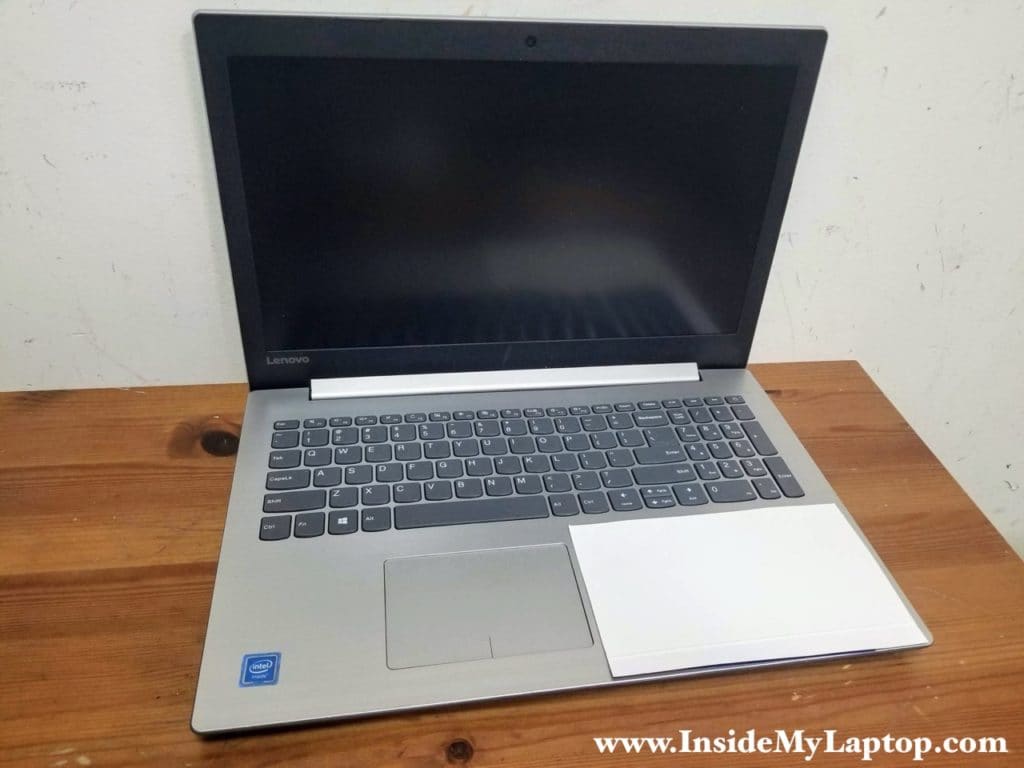
Today I explain how to disassemble a Lenovo Ideapad 320 laptop. In this particular guide I’m taking apart an Ideapad 320-15IAP (type 80XR) – the low end model but it will be very similar for all the following 15″ and 14″ models:
Ideapad 320-15IAP/Ideapad 320-15AST/
Ideapad 320-15ABR/Ideapad 320-15ABR Touch
Ideapad 320-15IKB (with cooling fan)
Ideapad 320-14IAP/Ideapad 320-14AST/
I will link to the service manual pdf at the end of this guide.
This laptop has limited options for RAM upgrade as it has only one memory slot. It will support either 8GB or 16GB depending on the model. The best option to speed up the laptop would be upgrading the standard 2.5″ hard drive with a 2.5″ solid state drive.
For this disassembly you will need only basic tools such as a Phillips screwdriver and case opener tool (or something similar).
Taking apart Lenovo Ideapad 320 base assembly
STEP 1.
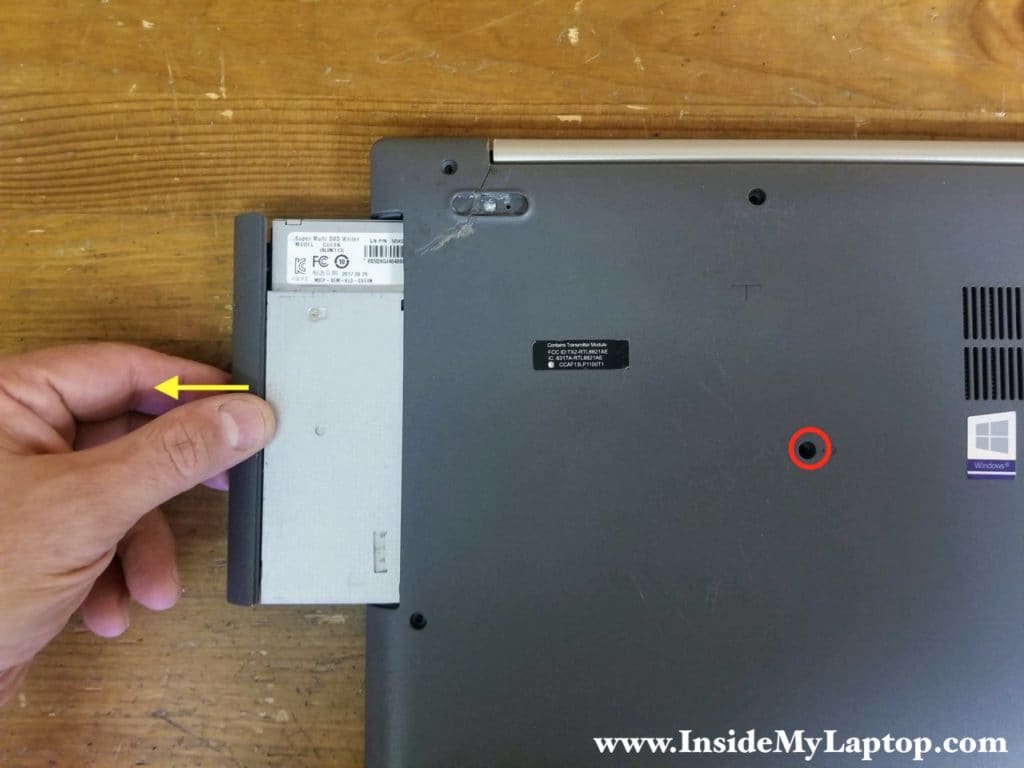
Remove one screw securing the optical drive and pull the drive out.
STEP 2.
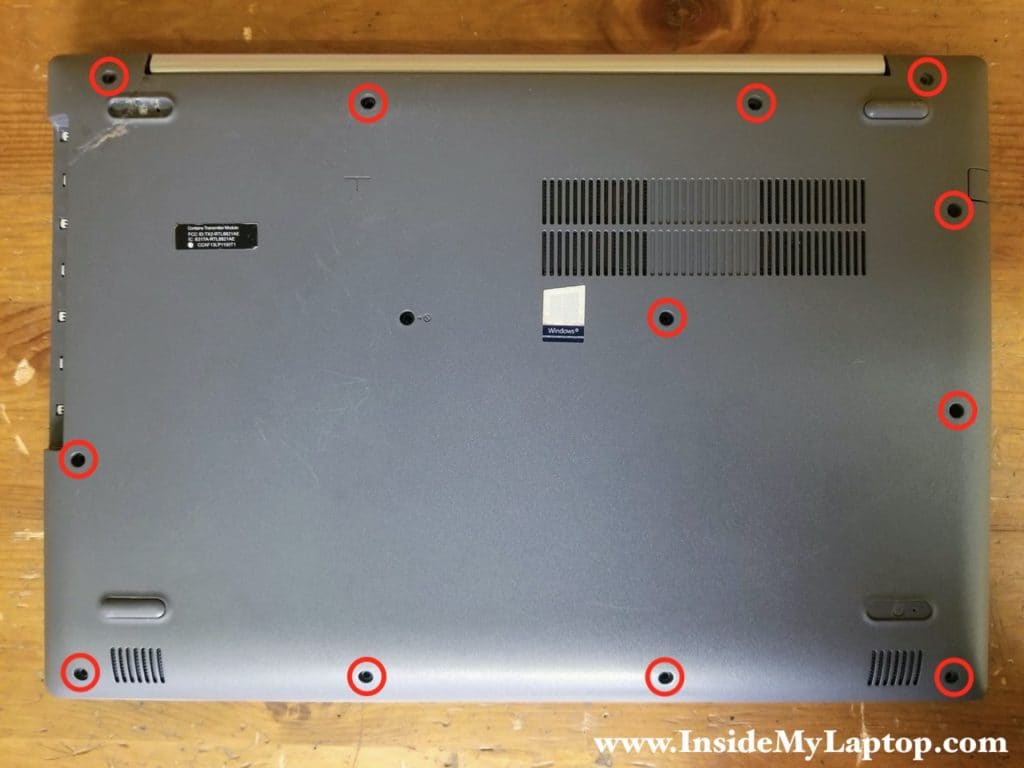
Remove all screws securing the base cover.
STEP 3.
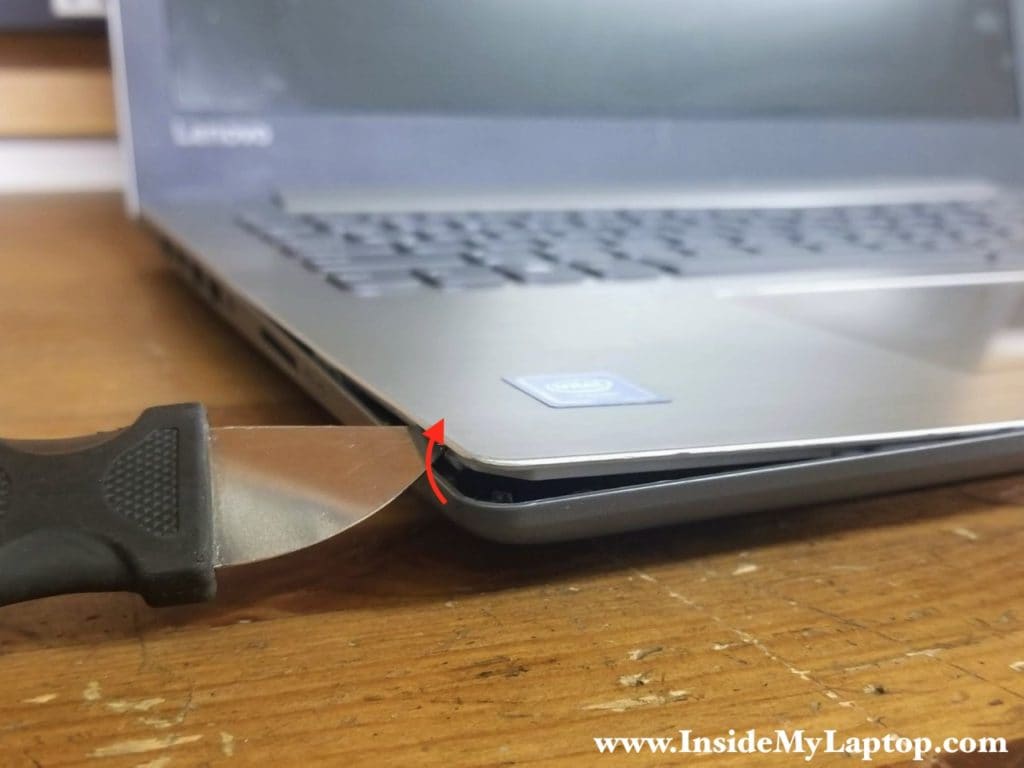
Start separating the top case from the base cover using a thin case opener tool. Move the case opener along the side and pry up the top case. Ideapad 320-15IAP doesn’t even have the cooling fan.
STEP 4.
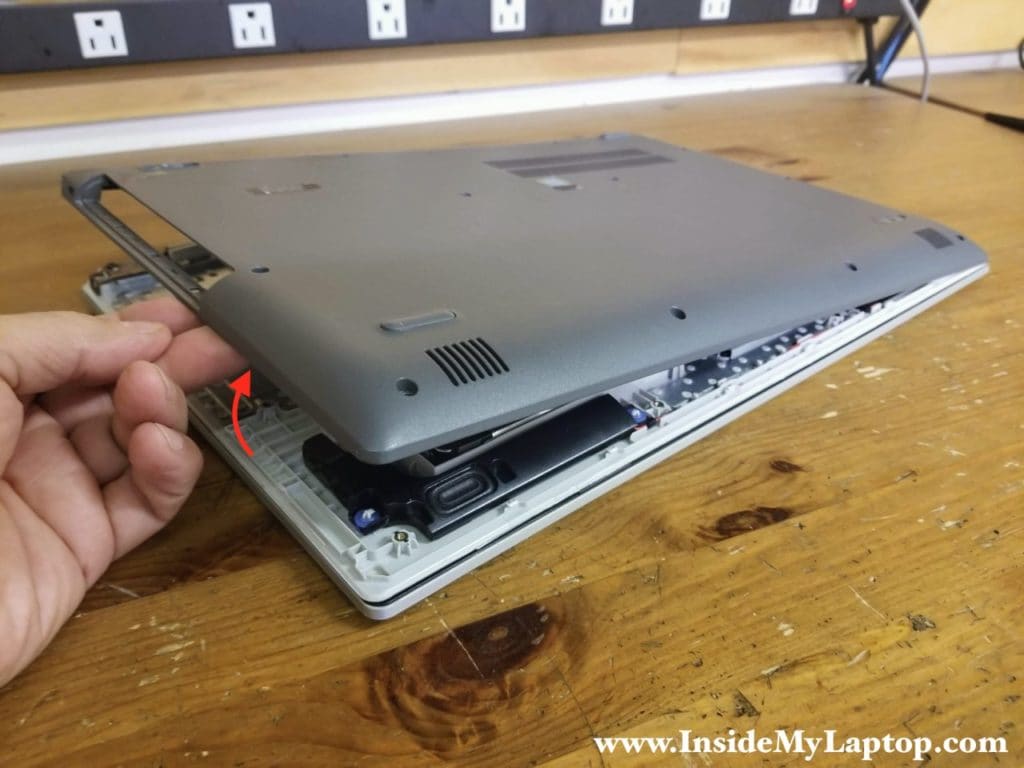
Turn the laptop upside down and continue removing the base cover with your fingers. You’ll have to apply some reasonable force to separate two parts from each other. If it’s getting suck, use the case opener.
Lift up the base cover from the optical drive bay area.
When the base cover removed, you can get an easy access to the battery, hard drive, memory module and other internal components. Ideapad 320-15IAP doesn’t even have the cooling fan.
STEP 5.
Remove four screws securing the battery.

STEP 6.
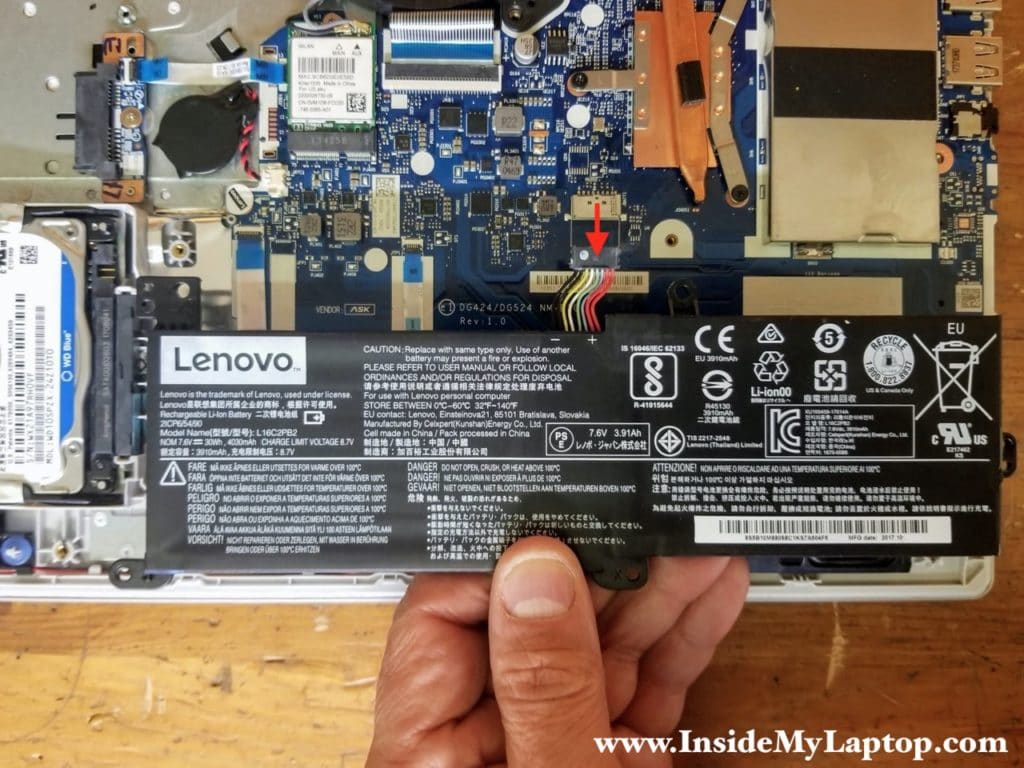
Lift up the battery and disconnect the cable from the motherboard.
Lenovo ideapad 320 battery model: L16C2PB2
STEP 7.
Lift up the hard drive and disconnect it from the SATA connector. If you are upgrading to a SSD, it’s necessary to transfer the mounting bracket to the new drive.
Replacing this regular spinning drive with a 2.5″ solid state drive will improve laptop performance significantly.

STEP 8.
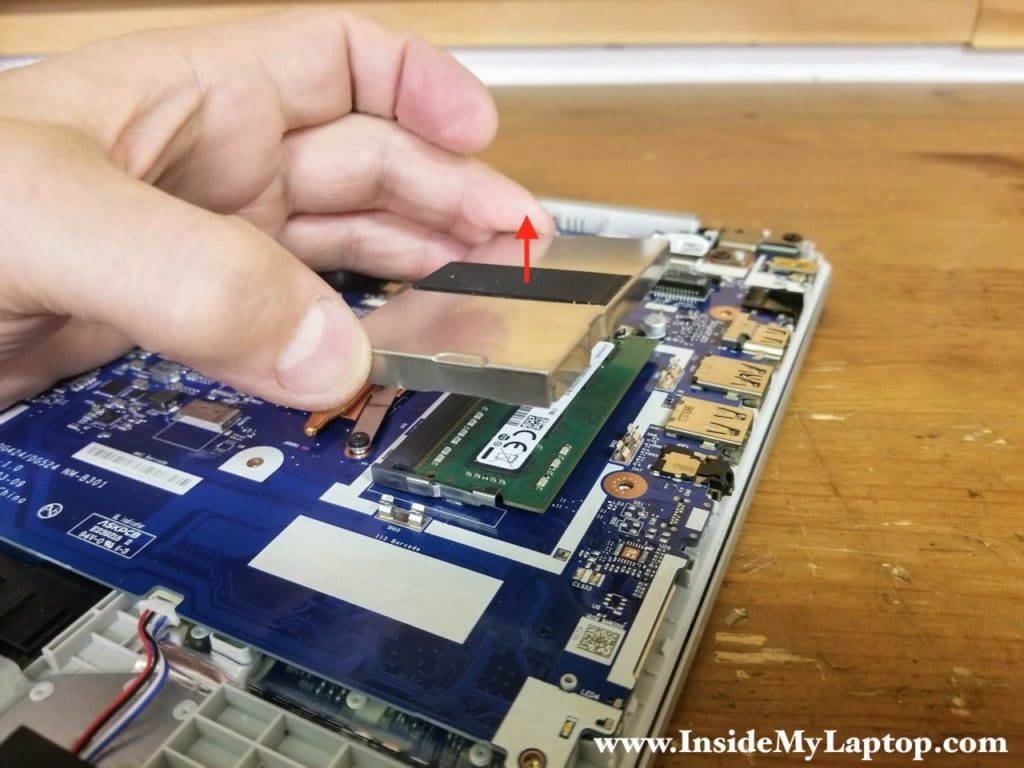
The memory module hidden under the metal cover. Lift up the memory cover to disconnect it from the securing clamps on the motherboard.
This laptop will can handle up to 16GB (2x8GB) DDR3-2600 SODIMM RAM.
STEP 9.
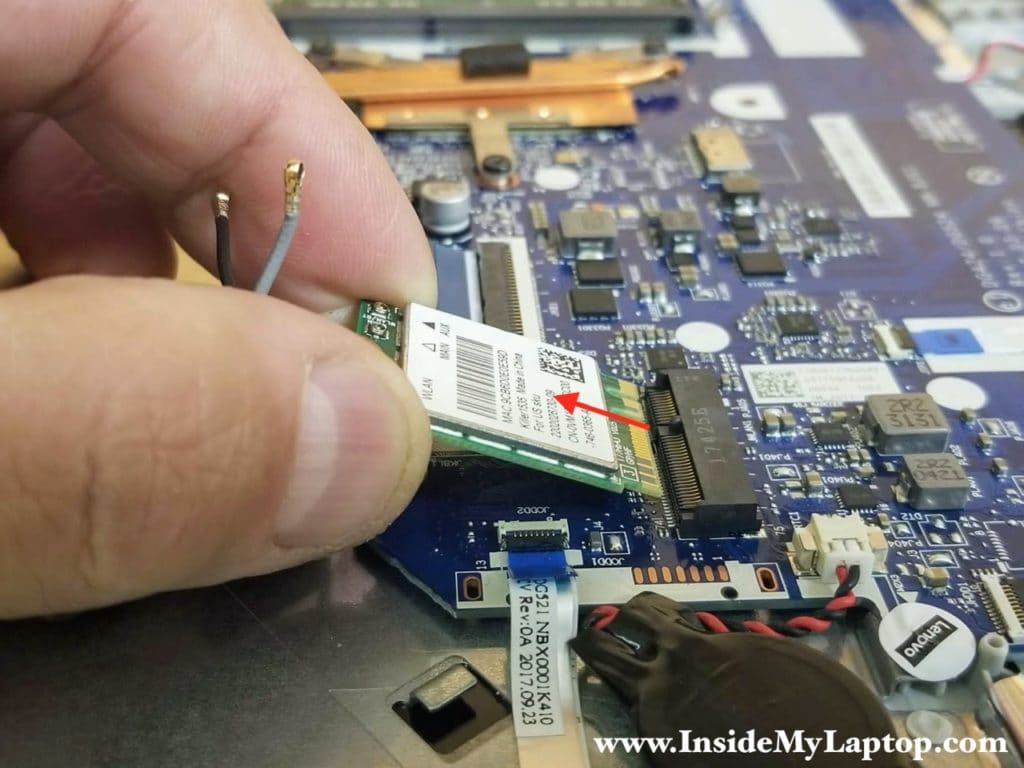
Disconnect both antenna cables from the wireless card.

STEP 10.
Remove one screw securing the wireless card and pull it out.
STEP 11.
Un-route both Wi-Fi antenna cables from the guided path on the side of the heatsink bracket. Disconnect the display cable from the motherboard.

Here’s how to disconnect the display cable. Lift up the locking tab at a 90 degree angle (red arrow). Lift up and pull the display cable out (yellow arrow).

STEP 12.
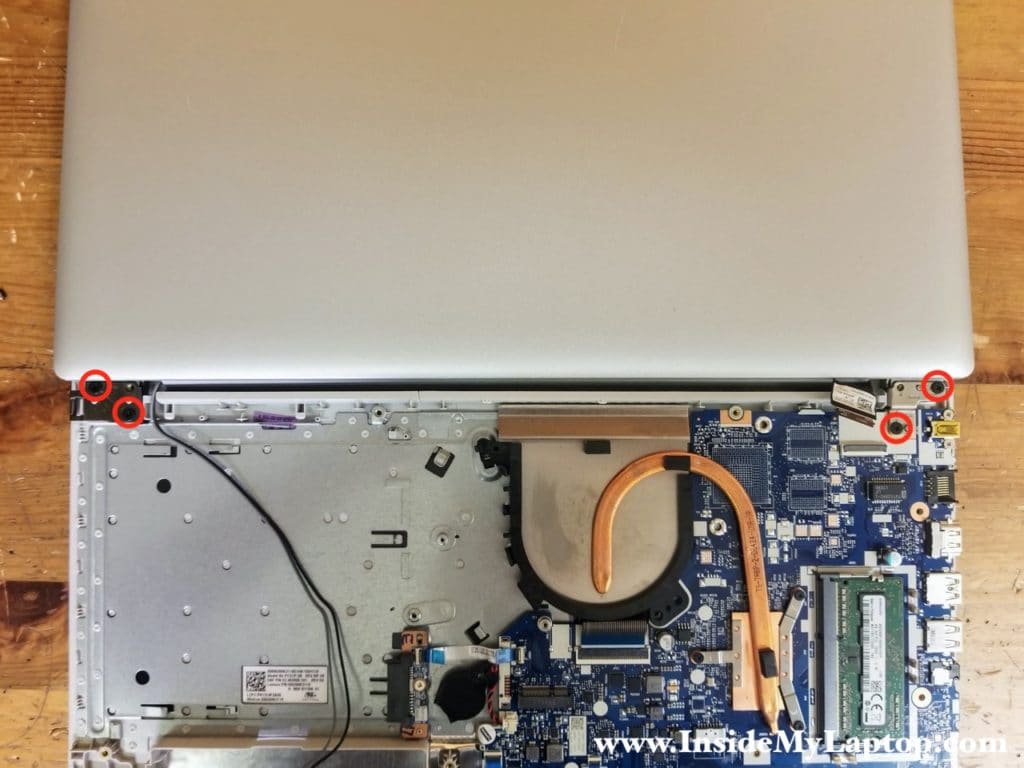
Open the display panel 180 degrees. Remove four screws securing the display panel hinges.
STEP 13.
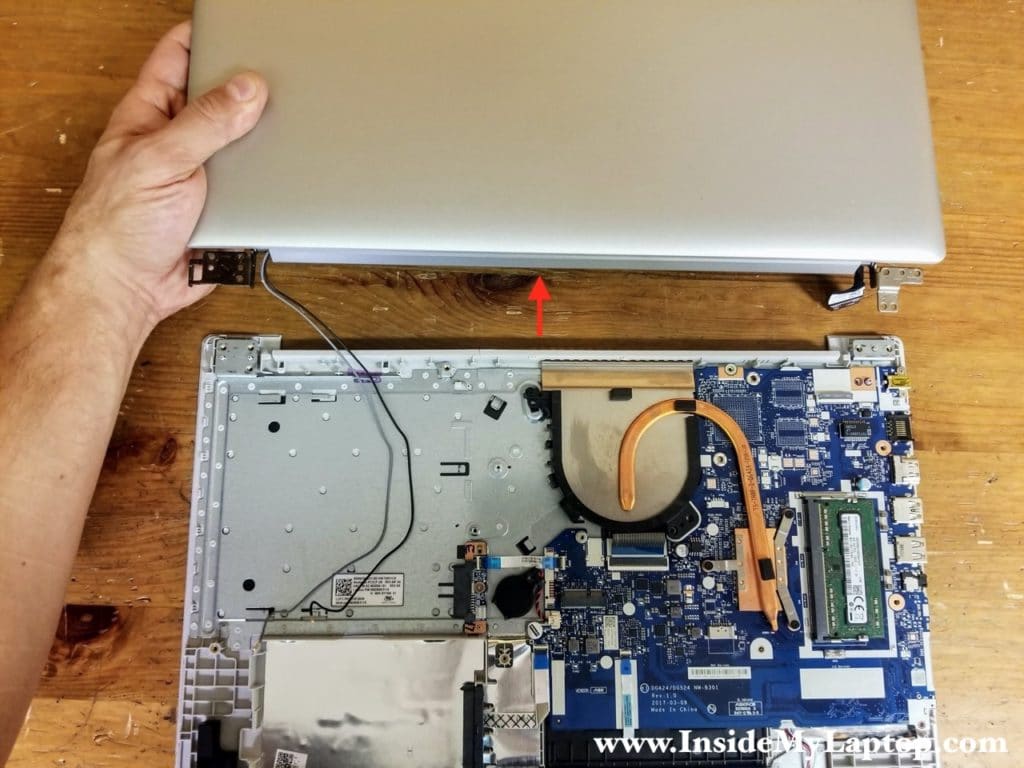
Separate the display panel from the top case assembly.
In the next guide I will explain how to remove and replace the LCD screen. It’s necessary to remove the display panel in order to remove the screen.
STEP 14.
Remove four screws securing the motherboard. One screw on the heatsink is larger than three other screws.
Disconnect the following color-coded cables:
– Keyboard cable (yellow).
– Optical drive connector board cable (orange).
– SATA connector cable (green).
– Touchpad cable (glue).
– Speaker cable (pink).
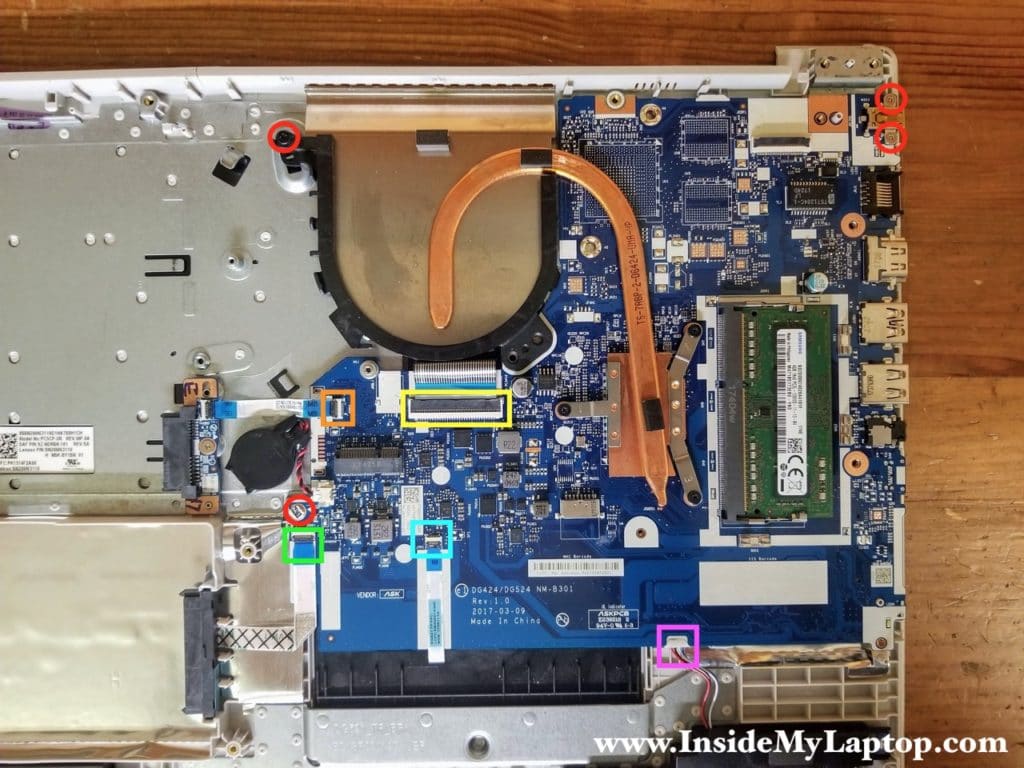
In order to disconnect the keyboard cable it is necessary to unlock the connector first.
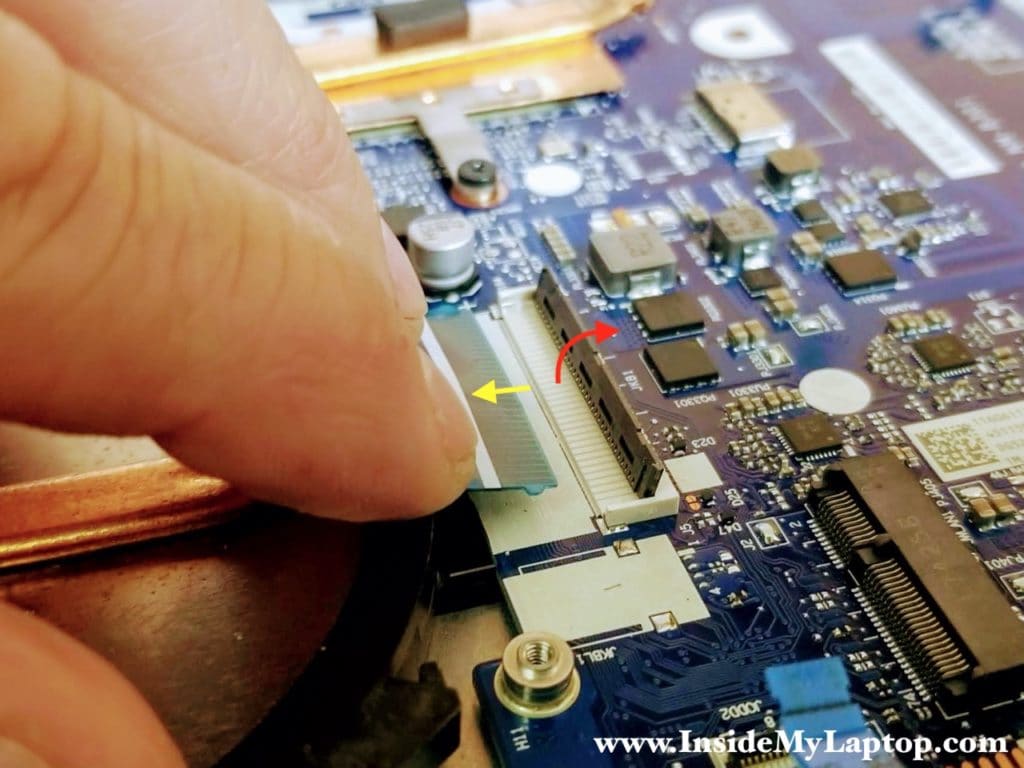
All other cables can be disconnected using the same technique.
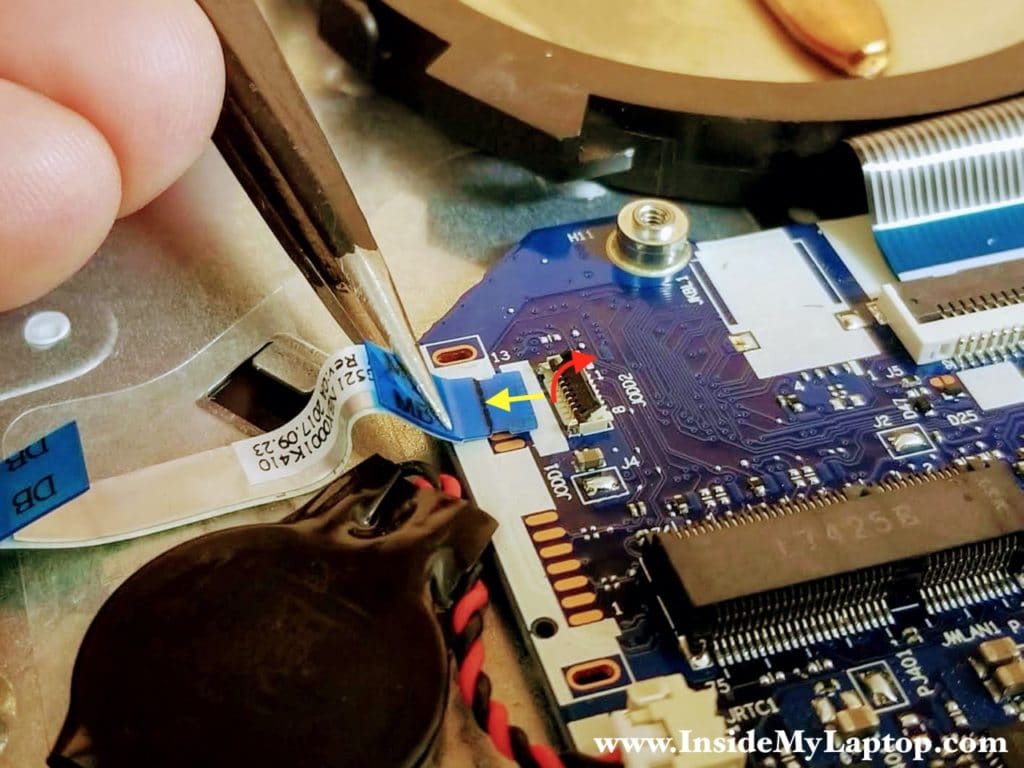
STEP 15.
Lift up the motherboard and separate it from the top case.
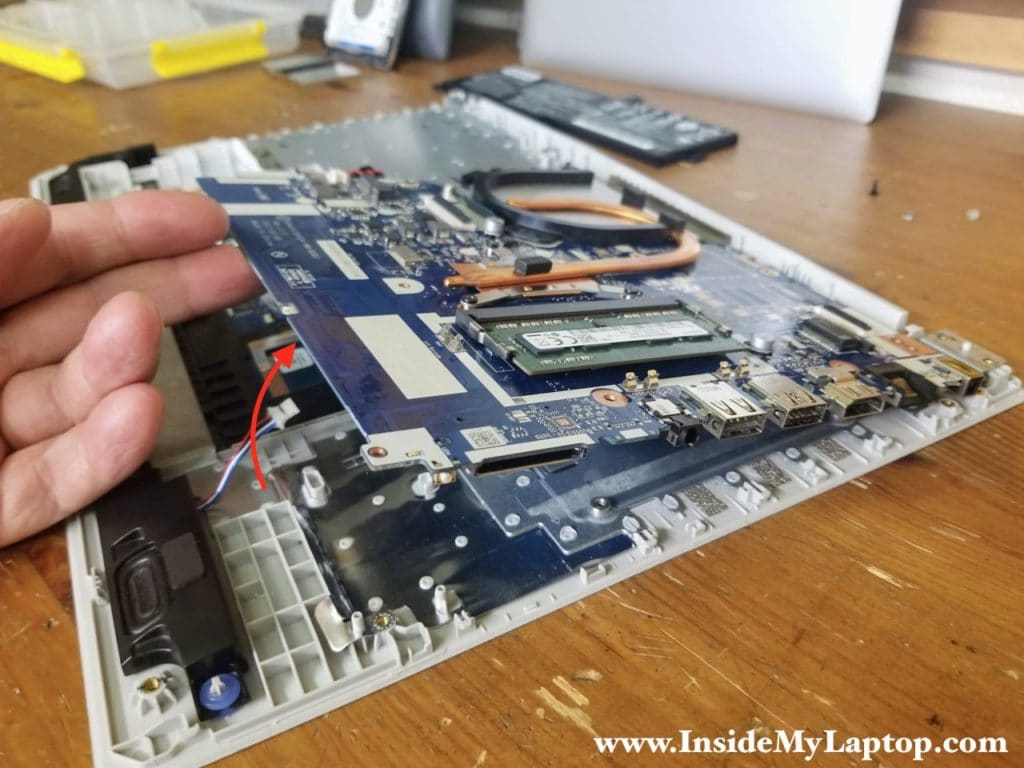
I left the RTC battery connected to the motherboard in order to preserve the BIOS settings.
By the way, disconnecting the RTC battery from the motherboard will not clear the BIOS password. I tried that and it didn’t work for me.
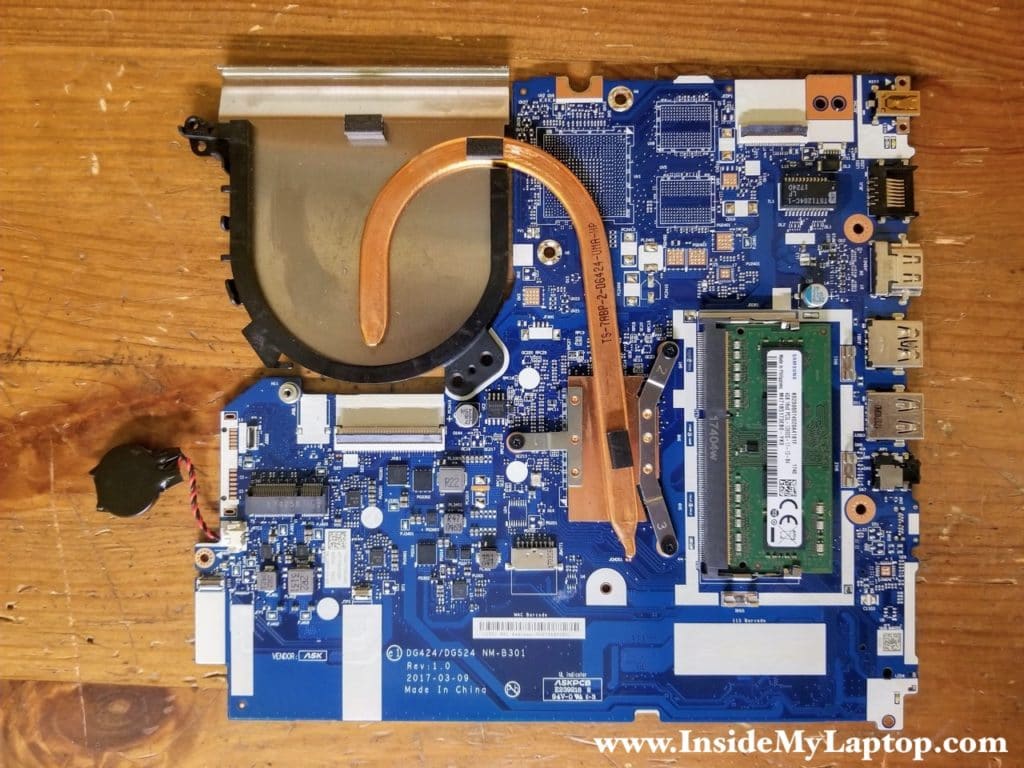
Here’s the other side of the motherboard.


Here’s the top case with the motherboard removed.
Lenovo Ideapad 320 keyboard is permanently attached to the top case and cannot be easily removed even though it’s still possible to replace just the keyboard. The touchpad, on the other hand, is removable.
Lenovo 320-15
If you are making the laptop disassembly for the first time in your life, pay attention to this tutorial — First time repairing.
The article listed the basic precautions necessary tools to disassemble the laptop, as well as recommendations for disassembly and cleaning.
Lenovo 320-15 Series consists of models Lenovo 320E, 320-15ISK, 320-15IAP – All these models have the same disassembly process.
This video shows Lenovo 320-15 disassembling and fan cleaning.
If your laptop is overheating during operation and sharply turning off, this most likely is overheating of the cooling system. The reason for this is the accumulation of dust on the radiator. If not clean the cooling system in a timely manner, it may cause damage to the laptop. You can eliminate this problem by repeating the procedures shown in the video below.
This video shows how you can replace your HDD with another one or SSD in Lenovo 320-15.
All necessary steps presented here in this video guide. From this video you will learn how to replace slow HDD to a fast SSD. Replace the broken HDD to the new one.
This video shows Lenovo 320-15 RAM replacement or upgrading process.
All necessary steps presented here in this video guide. From this video you will learn how to replace the RAM or upgrade to make more memory.
This video shows Lenovo 320-15 battery replacement.
All necessary steps presented here in this video guide. From this video you will learn how to replace the battery in your laptop.
This video shows Lenovo 320-15 CMOS / Bios Reset / Bios battery replacement
If your laptop constantly reset the date and time, you need to change the BIOS battery. This video guide will demonstrate how to do this. When removing the Bios battery is automatically Bios Reset – in many cases, it helps to solve the problem of BIOS errors. If you remove Bios battery for more than 15 minutes, it may help if the laptop does not run, and the problem was in CMOS.
This video shows Lenovo 320-15 wifi module replacement.
All necessary steps presented here in this video guide. From this video you will learn how to replace wlan module in your laptop.
Disclaimer:
This information is provided for informational purposes only. We accept no liability for damage caused to your device while following the video instructions. Also note that if your laptop or any other device is still under warranty period, then in the process of dismantling the guarantee may be canceled because traces remain after disassembly and it violates the terms of the warranty period. Before disassembling, make sure that the warranty on your laptop has been over.
Разборка, чистка, замена клавиатуры Lenovo Ideapad 320 15IAP

Если это видео поможет Вам — поблагодарите автора подпиской на канал и лайком! Делитесь своим мнением в комментариях! Приятного просмотра и Хорошего Вам дня!
В этом видео мы покажем Вам как правильно разобрать, почистить ноутбук Lenovo Ideapad 320-15IAP, а ещё расскажем:
Как заменить кнопку включения в ноутбуке
Что делать если вылетела клавиша на клавиатуре ноутбука
Как вытащить DVD привод из ноутбука
Как снять дивидиром на ноутбуке
Нужно ли чистить DVD
Какие болты раскручивать, чтобы разобрать ноутбук Lenovo Ideapad 320
Как снять нижнюю часть в ноутбуке Lenovo Ideapad 320 15IAP
Как снять нижнюю крышку в ноутбуке
Откуда перо в ноутбуке
Как много мусора может собрать в себе ноутбук
Как обесточить ноутбук Lenovo Ideapad 320 15IAP
Как отключить батарею в ноутбуке Lenovo Ideapad 320
Как извлечь ОЗУ из ноутбук
Как вытащить оперативку из ноутбука Lenovo Ideapad 320 15IAP
Как заменить жёсткий диск в ноуте Lenovo Ideapad 320
Как подключить провода к вайфаю
Как правильно подключить коаксиальные кабели к модулю Wi-Fi
Как заменить батарейку Биос в ноутбуке Lenovo Ideapad
Как снять куллер в ноутбуке
Как заменить кулер в ноутбуке Lenovo Ideapad 320
В какой последовательности раскручивать болты системы охлаждения
Как отключить клавиатуру в ноутбуке Lenovo Ideapad 320 15IAP
Как отключить тачпад в ноутбуке Lenovo Ideapad 320 15IAP
Как отключить матрицу в ноутбуке Lenovo Ideapad 320
Как снять дисплей ноутбука
Как снять матрицу ноутбука
Как снять дисплейный модуль
Как снять материнскую плату в ноутбуке Дутщвщ Швуфзфв 320-15шфз
Как заменить клавиатуру в ноутбуке Lenovo Ideapad 320 15IAP
Как правильно чистить ноутбук
Как очистить материнскую плату от грязи
Как очистить старую термопасту
Как почистить неразборный куллер в ноутбуке
Как правильно чистить кулер ноутбука
Сколько наносить термопасты на процессор и графическую карту
Как подключить все провода обратно
Как собрать ноутбук Lenovo Ideapad 320 15IAP обратно
Как проверить работоспособность клавиатуры без запуска системы
Как увеличить объём оперативной памяти в ноутбуке Lenovo Ideapad 320 15IAP
Как заменить жёсткий диск в ноутбуке Lenovo Ideapad 320 15IAP
Как заменить HDD на SSD в ноутбуке Lenovo Ideapad 320 15IAP
If this video helps you — thank the author by subscribing to the channel and like! Share your opinion in the comments! Enjoy your viewing and have a nice day!
In this video we will show you how to properly disassemble, clean a Lenovo Ideapad 320-15IAP laptop, and also tell you:
How to replace the power button in a laptop
What to do if a key on the laptop keyboard takes off
How to remove a DVD drive from a laptop
How to remove a dividend on a laptop
Do I need to clean DVD
What bolts to unscrew to disassemble a laptop Lenovo Ideapad 320
How to remove the bottom part in a laptop Lenovo Ideapad 320 15IAP
How to remove the bottom cover in a laptop
Where does the pen in the laptop come from?
How much rubbish a laptop can collect
How to power off Lenovo Ideapad 320 15IAP laptop
How to turn off the battery in Lenovo Ideapad 320 laptop
How to remove RAM from a laptop
How to remove the RAM from a laptop Lenovo Ideapad 320 15IAP
How to replace the hard drive in the Lenovo Ideapad 320 laptop
How to connect wires to wifi
How to properly connect coaxial cables to the Wi-Fi module
How to replace the Bios battery in a Lenovo Ideapad laptop
How to remove a cooler in a laptop
How to replace a cooler in a Lenovo Ideapad 320 laptop
In what sequence to loosen the bolts of the cooling system
How to disable keyboard in Lenovo Ideapad 320 15IAP laptop
How to disable touchpad in Lenovo Ideapad 320 15IAP laptop
How to turn off the matrix in a laptop Lenovo Ideapad 320
How to remove a laptop display
How to remove a laptop matrix
How to remove the display module
How to remove the motherboard in a laptop Dutschvsh Shvufzfv 320-15shfz
How to replace the keyboard in Lenovo Ideapad 320 15IAP laptop
How to properly clean your laptop
How to clean the motherboard from dirt
How to clean old thermal paste
How to clean a non-separable cooler in a laptop
How to properly clean your laptop cooler
How much thermal paste to apply to processor and graphics card
How to connect all wires back
How to put the Lenovo Ideapad 320 15IAP laptop back
How to check if the keyboard works without starting the system
How to increase the amount of RAM in a laptop Lenovo Ideapad 320 15IAP
How to replace the hard drive in Lenovo Ideapad 320 15IAP laptop
How to replace HDD with SSD in Lenovo Ideapad 320 15IAP laptop
VIDEOMiN .NET
02:11 
04:24 
04:13 
03:09 
03:31 
02:32 
04:41 