BIOS не даёт… А загрузиться с USB ну очень надо
Забакапившись и лишний раз удостоверившись, что у меня есть все необходимые драйвера, я втыкнул флешку и нажал RESET. Ноут как ни в чём не бывало перегрузился, полностью игнорируя директиву сделать это с помощью external device. Чистая установка Win7 на VAIO VGN-A170 обещала быть нескучной.
Несколько следующих попыток загрузиться как с помощью уже знакомой из предыдущего абзаца флешки, так и с помощью провалились. Никаких болванок или уже готовых установочных/загрузочных CD у меня не оказалось. Ждать, пока откроется магазин, где можно приобрести пустой диск не хотелось, а тут одна мелочь вдруг вспомнилась: ноутбук читает DVD, а записывать может только CD — дистрибутив не влезет… И всё равно, после того как потыкавшись по сайту производителя, который так и не порадовал обновленным биосом, сдаваться было рано. В голове почему-то всплыла известная картинка: жабка душит недоумевающую цаплю, которая пытается её проглотить. Люблю её.
Ноутбук, BIOS которого не позволяет использовать USB порты для загрузки, как оказалось не такая уж и редкость, но тем не менее, на тематических форумах поддержки разных производителей ничего полезного встретить не удалось, и большинство рекомендаций сводились к тому, что или следует внимательно искать такую опцию в биосе, или использовать флешку определенного объема, ну или тарабанить ноут в СЦ. Но всё же поиск привел меня к Elmar Hanlhofer и его сайту www.plop.at , где и была обнаружена искомая строка USB boot without BIOS support , кстати, далеко не единственная в списке возможностей Plop Boot Manager.
Boot Manager можно установить в начальные сектора жесткого диска, не повредив существующие разделы. Таким образом загрузчик может работать и тогда, когда операционной системы нет.
Совсем не обязательно устанавливать Boot Manager на жесткий диск, поскольку его с некоторыми ограничениями можно запустить с дискеты, CD или USB.
Некоторые опции Boot Manager (например, загрузка с USB) могут быть добавлены в меню уже используемого системой загрузчика. На текущий момент поддерживаются: LiLo, Syslinux, Grub, Grub4Dos, Grub2, Windows boot.ini, Windows BCD.
В доступном для скачивания архиве находится целый набор: сборки программы для Windows и Linux, необходимый инструментарий для записи загрузчика непосредственно в биос компьютера (не забывайте, что эксперименты с последним могут закончится плачевно) и подробная инструкция.
Чтобы свести свои риски к минимуму я выбрал вариант, при котором Boot Manager встраивается как опция к существующему загрузчику. Запустил под администратором:
plpbt-5.0.14/Windows/InstallToBootMenu.bat
И, сразу после ребута, наконец, получил возможность загрузиться со своей флешки.
Теги: boot from usb-flash, bypass bios restrictions, бутаемся с usb, обход ограничений биос
Данная статья не подлежит комментированию, поскольку её автор ещё не является
В разделе на вопрос хочу установить windows 7 с флешки но что-то не идет. при установки windows 7 пишет start booting from USB device заданный автором Ѐита Прокудина лучший ответ это
1) Открываем образ Windows программой UltraISO, заходим в меню Самозагрузка — Записать образ Жесткого диска.
2) Вставляем флешку в USB-порт (она должна появиться вверху) . Выбираем ее. Выбираем в пункте Метод записи USB-HDD и жмем Записать.
3) Выскакивает предупреждение об уничтожении информации, жмем Да. Ждем, когда завершится запись (от 5 до 20 минут) .
4) Заходим в BIOS со вставленной флешкой и ставим загрузку в первую очередь с USB-HDD.
5) Если все сделали правильно, то после рестарта компьютера, если вставлена флешка с записанным образом, загрузка пойдет с нее безусловно, то есть без фразы «Press any key to boot from. «.
6) Сама по себе установка мало чем отличается от установки с загрузочного DVD-диска, но есть один момент. Когда завершится копирование и распаковка файлов, и компьютер в первый раз пойдет на перезагрузку, нужно снова идти в BIOS и ставить обратно приоритет загрузки (по умолчанию с жесткого диска) или вытащить флешку. Иначе, возможно, загрузка снова пойдет с флешки.
Ответ от Agecobi akakizo [новичек]
используй driverplus.ru
Ответ от Загадочный человек [гуру]
Прожги образ на болванку и установи нормально.
Ответ от Ёергей Алексеевич Пр. [гуру]
Не правильно созданная флешка. «Правильность» зависит в какой системе вы создаёте флешку. Я всегда советую делать загрузочную флешку для установки windows 7 специальными утилитами. Можете почитать как это делаю я на форуме tortila.net Есть специальная тема, там всё подробно в картинках.
Можно сделать на только загрузочную флешку, а так же устанавливать windows 7 с внешнего USB HDD.
(вместо @ поставить точки)
При попытке установить операционную систему с флеш-накопителя пользователь может столкнуться с появлением на экране надписи «Start booting from USB device…», после чего система зависает и далее ничего не происходит. Обычно это связано с ситуацией, когда загрузочная флешка с операционной системой не была корректно создана пользователем, потому система испытывает проблемы в установке новой версии ОС с данного устройства. В данном материале я расскажу, в чём суть проблемы «Start booting from USB device», каковы её причины, и как исправить появление надписи на вашем ПК.
Экран с застывшей надписью «Start booting from USB device…» выглядит примерно так
В переводе данный текст звучит как «Начало загрузки с устройства USB…» , обычно появляясь при загрузке установочной версии ОС Windows с ЮСБ-устройства.
Причинами «зависания» надписи «Start booting from USB device» обычно являются некорректно созданная установочная флешка, а также неверно указанные настройки в БИОСе пользовательского ПК.

Как исправить «Start booting from USB device»
Для устранения ошибки «Start booting from USB device» рекомендую выполнить следующее:
- Проверьте, загрузочное ли ваше ЮСБ-устройство . Для этого рекомендую использовать программный инструмент «MobaLiveCD», который проверит загрузочный статус вашей флешки. Данная программа не требует установки, работает сразу после запуска, довольно легка и удобна в использовании.
Способ 1. Для работы с «MobaLiveCD » скачайте и запустите данную программу с правами администратора. На главном экране кликните на кнопку «Run the Live USB», укажите программе путь к вашей флешке. Если программа спросит вас « Do you want to create a hard disk image for your virtual machine?» — выберите «No». Программа произведёт эмуляцию запуска системы с вашей флешки, и вы воочию увидите результат.

Для выхода с программы нажмите клавиши Ctrl+Alt.

Чтобы проверить файловую систему вашей флешки подключите её к компьютеру, в проводнике кликните на флеш-накопителе правой клавишей мыши, в появившемся меню выберите «Свойства».
- Попробуйте изменить значение некоторых параметров БИОСа . Перейдите в ваш БИОС, и поменяйте значение опции «Legacy» с «Enabled» на «Disabled» (или наоборот). Сохраните настройки, перезагрузите компьютер, и попробуйте вновь установить систему с флеш-накопителя;
Способ 2. Если предыдущий способ не помог исправить Start booting from USB device, попробуйте выполнить следующее. Перейдите в БИОС, во вкладке «Boot» установите значение параметра «Secure Boot» на «Disabled» (если появится предупреждение, смело жмите на «Ок»). Появится дополнительная опция «ОS Mode Selection», выберите здесь «UEFI and Legacy OS» (если появится предупреждение, тогда вновь нажимаем на «ОК»). Вновь жмём на F10, затем на «Yes», дожидаемся перезагрузки ноутбука.
Затем вновь переходим в БИОС, во вкладке «Boot» выбираем опцию «Boot device priority», в первом пункте выбираем нашу флешку как загрузочное устройство. Вновь жмём на F10 и «Yes». Перезагружаем наш ПК и пробуем загрузиться с нашего флеш-накопителя.
При попытке загрузить ноутбук появляется сообщение о сбое загрузки: «Default Boot Device Missing or Boot Failed» . Чаще всего такая ошибка может возникать после аварийного выключения ПК. Наш небольшой обзор решений позволит быстро справиться с проблемой и восстановить работоспособность машины.
Сбой загрузки “Default Boot Device Missing or Boot Failed”
В основном эта ошибка выскакивает в моделях Lenovo и Acer и указывает на то, что настройки загрузки слетели. Первым делом проверьте, стоит ли по умолчанию в BIOS загрузка с HDD. Проверяется это в опции “Boot Device Priority”. Возможен момент, что с первого раза в биос не пустит, пробуйте войти несколько раз. Оптимальным решением будет вынимание батареи на плате для сброса – это такая маленькая плоская батарейка. В других случаях причина кроется в использовании базовой системы UEFI вместо стандартного в BIOS. Нам необходимо переключиться.
- Перезагружаем компьютер.
- После его включения нажимаем кнопку «F2».
- Попадаем в Биос.
- Заходим в последнюю вкладку «Boot»
- Первую строку «Boot Mode» переключаем на «Legacy» , а «Boot Priority» на «LegacyFirst» .
- Далее идем во вкладку Exit, где подтверждаем режим “Load Default Settings” через “Yes”.
- Выходим из Биоса, сохранив изменения в “Exit Saving Changes”.
Если все сделано правильно, то должно запуститься. Если запуска все равно нет, тогда попробуйте вставить установочный образ WIndows, прописать загрузку с носителя и войти там в режим восстановления запуска Win.
Что делать, если не запускается Bios?
Если же БИОС вообще не загружается, тогда следует применить сторонний софт. Тут нам поможет утилита Rufus . Это приложение позволит восстановить загрузочные файлы, чтобы мы смогли произвести нормальный запуск операционной системы на ноутбуке с неисправностью. Нужно скачать Rufus на сторонний компьютер, запастись флешкой и скачать Bios для вашей модели.
Порядок действий следующий.

Отдельным моментом является прошивка вашего BIOS в режиме Crisis Recovery Mode. Процесс этот достаточно непростой и может слететь серийник, что связано с гарантией, лучше пусть этим занимаются специалисты.
Проблема Default Boot Device Missing or Boot Failed решается только в Биосе, надеюсь вы поняли что там делать. После исправления она не будет препятствовать загрузке операционной системы. Напоследок немного видео, по правильной настройке загрузки:
Привет друзья! Сегодня я расскажу о том как в БИОС настроить загрузку с флешки, и что делать если эта самая флешка не отображается в настройках BIOSа. Я уже писал статью о том , но сегодня я хочу более подробно написать о том как загрузится с USB накопителя , предварительно настроив БИОС.
Для чего это нужно? Ну если Вы это читаете, то я думаю вы уже знаете для чего оно Вам. Ну а если нет, то раскрою Вам секрет, можно создавать загрузочные флешки и устанавливать с них операционные системы или запускать другие образы загрузочных дисков, например . Это очень удобно, флешки более устойчивые к механическим повреждениям по сравнению с дисками, да и объем памяти у них может быть больше.
Прежде чем приступить к написанию инструкции обязательно прочитайте статью, в ней написано как войти в БИОС.
Значит так, Вы уже создали загрузочную флешку и готовы загрузится с нее. Первым делом нам нужно настроить систему так, что бы наш флеш накопитель стоял на первом месте, и система вначале стартовала с него. Тут есть один прикол, через который возникают вопросы типа а в настройках BIOS не отображается флешка.
В БИОС нет загрузки с флешки?
Все очень просто, когда USB устройство не подключено к компьютеру, то оно и не будет отображаться в вариантах загрузки.
Выставляем загрузку с флешки в BIOS
Делаем так: подключаем флешку, заходим в БИОС (если не знаете как читайте статью выше, обычно это клавиши DELETE или F2 ). И переходим на страницу с настройкой порядка загрузочных устройств. Я просто покажу скриншоты. Помните, то у Вас все может выглядеть иначе, и пункты меню могут называться иначе. Ищите пункт со словом “Boot” .


Если флешка подключена, то мы увидим ее в списке.

Теперь нам нужно установить флешку на первое место в списке загрузки. Нажимаем для этого “Enter” и выбираем “” .
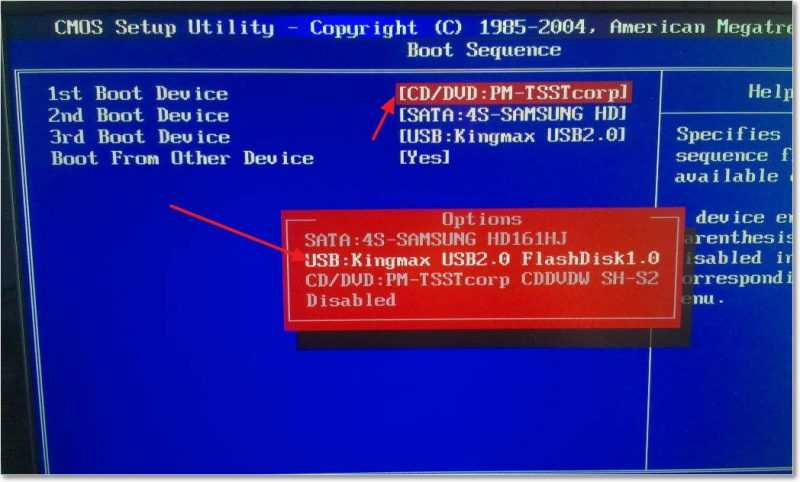
Сохраняем все наши изменения нажатием на F10 и перезагружаем компьютер. Если все сделано правильно и USB накопитель создан правильно, то начнется загрузка и USB накопителя. Действительно может быть что USB не отображается в настройке, то то скорее всего потому что у Вас старый компьютер и он не поддерживает эту функцию.
После скучного рассказа о настройке БИОСа я хотел бы Вам посоветовать задуматься о безопасности вашего дома или офиса и видеонаблюдение на мой взгляд это самое лучшее средство защиты. Тем более что с новыми технологиями можно установить IP видеокамеры, которые дадут Вам много новых и современных возможностей. Например создание сети с нескольких камер и даже трансляцию виде в интернет.
Fix «Default Boot Device Missing or Boot Failed» Error
Default Boot Device Missing error is a startup error that often irritates many. If you are one of them, you are not going to get irritated after finding the right and tested solution in this guide.

Theo Lucia
Apr 10, 2023 • Filed to: Recover Files • Proven solutions
You might have run into a situation when your computer suddenly stops recognizing a hard disk drive. In this case, you often see Default Boot Device Missing error. At one moment you feel that there is an issue with the hard disk drive. But the problem persists even after replacing the hard drive.
On the other hand, you might think that there is a problem with the BIOS chip. But It is something different. Now, what is the real issue and how to fix the issue is explained in this guide.
Part 1: What does a “Default Boot Device Missing” error mean?
Default Boot Device Missing error is a startup error that you might see on your laptop or computer especially if you are using the Lenovo brand. The thing is, when you turn ON your PC you will see “Default Boot Device Missing” instead of the Windows loading screen. It is a boot error. This means your system is unable to boot or will not load Windows boot files.
Part 2: What Are the Reasons for Boot Failed or Missing Error?
Well there are many reasons, the most common are
- There can be damaged, misconfigured, or corrupt BIOS that is responsible for this.
- Incorrect boot sequence is one of the prominent reasons for the error.
- SATA cable/Connector can be damaged or defective.
- RAW or Unsupported Format drive.
- There can be missing boot files.
- The power supply is insufficient.
Part 3: How to Fix Default Boot Device Missing or Boot Failed
When it comes to fixing errors, there are many solutions. Let us go through various tested and trusted solutions to fix the issue.
Solution 1: Try to recover data first
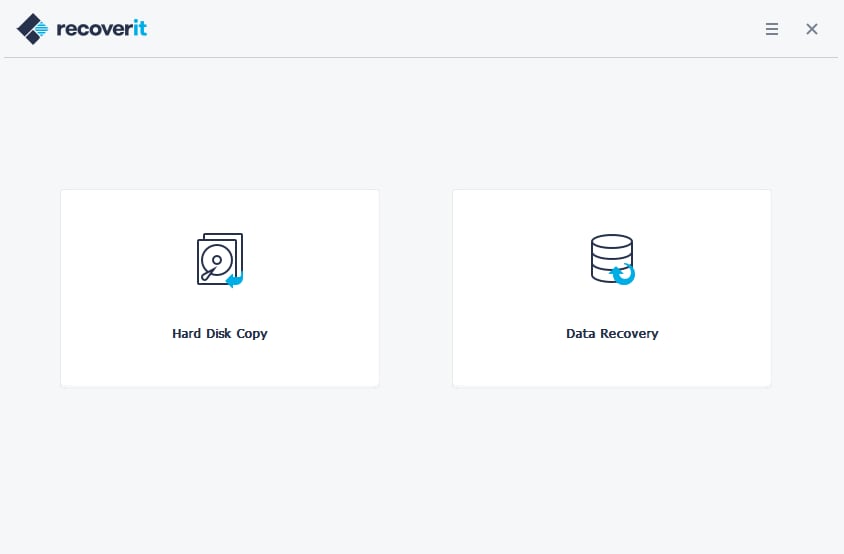
The first thing to go for is to preserve your data. After all, this is the one that you are in dire need of. For recovering your data Wondershare Recoverit data recovery software is the one you must go with.
It is one of the trusted data recovery software that allows you to recover your deleted files, photos, videos, audios, emails, and more. It lets you easily restore your data from PC, laptop, Mac, hard disk drive, USB, SD card, and other storage media. It is capable of supporting 1000+ file formats.
All you need to do is to follow some simple steps.
Step 1: Select Data Recovery Mode
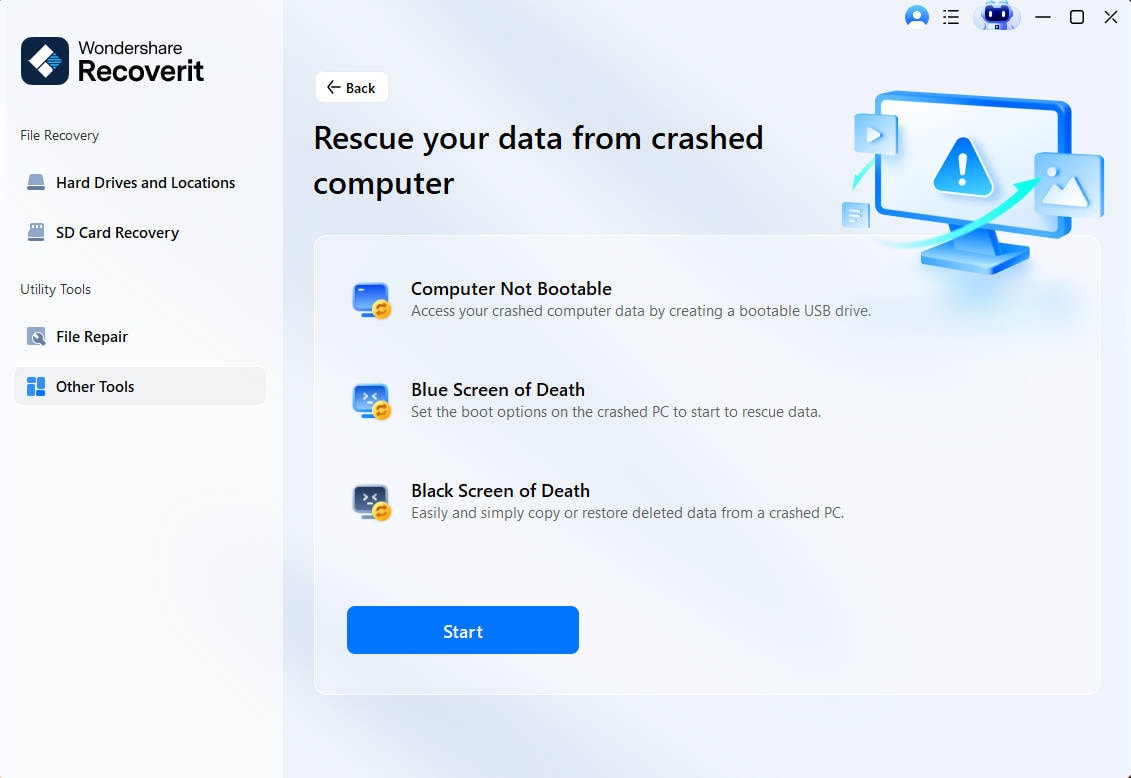
Install Wondershare Data recovery on some other system for creating a bootable drive. Now launch Recoverit and select “System Crash data recovery”. Once selected, click on “Start”
Step 2: Select Bootable Drive
Select a bootable drive from CD, DVD, or USB and click on “Create”.

Now go with the “Format” option.
This will begin the process of creating a bootable drive
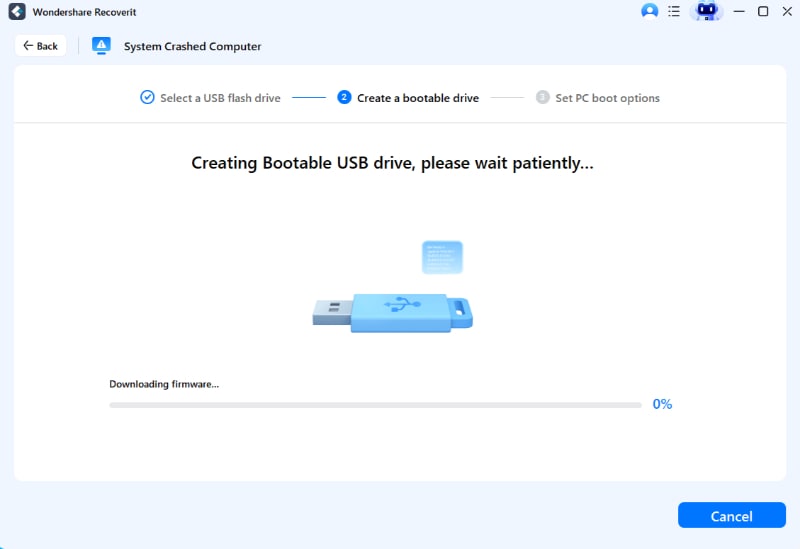
Avoid ejecting the drive during the process. You will be notified once the process is completed.
Step 3: Change the Boot Sequence of Computer
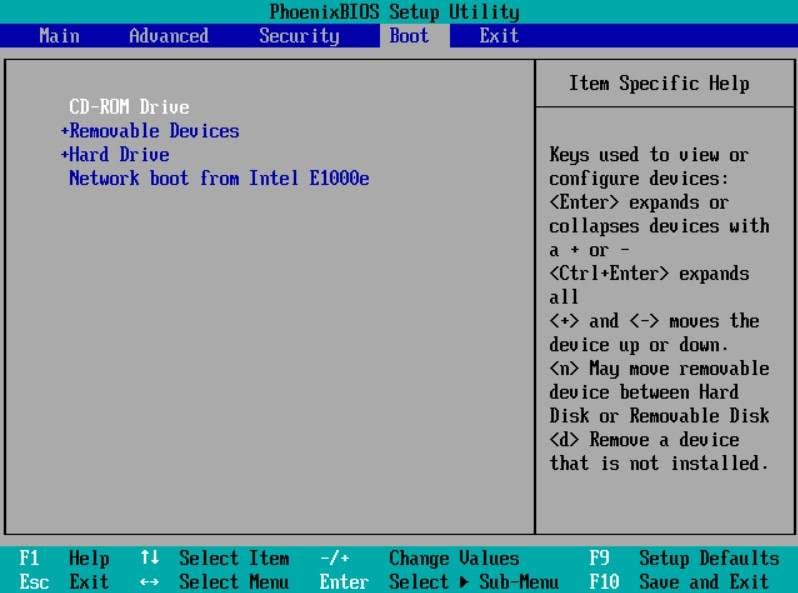
You are required to change the boot sequence to a USB drive before beginning with the process of recovering data. You can do this by going into BIOS by clicking F2 or another specific key.
Step 4: Recover Data
Restart your computer or laptop and launch Recoverit with the created bootable drive. Now all you have to do is to proceed with the Data Recovery.
Solution 2: Check Boot Order Sequence
Sometimes the fix is simple but we make it complicated. You can fix the issue by changing the boot order sequence. For this follow some simple steps.
Step 1: Restart your PC and as the manufacturing logo starts to appear press F2 or another specified key immediately to enter the BIOS setup.
Step 2: Once entered successfully go to the Boot tab and arrange the boot order. You are required to make sure that the hard drive is at the top. If not, make it on top.
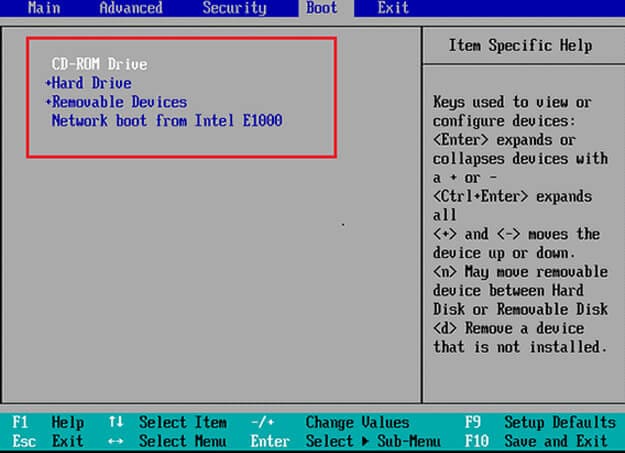
You can also go for changing boot mode from UEFI to Legacy. Once done save the changes and restart your system. If the error is gone, it is good. If not follow solution 3.
Solution 3: Set the Primary Partition as Active
If the primary partition is not active then also you may see this kind of error. In this case, you simply need to activate the primary partition.
Step 1: Boot your PC from the Windows Installation media and select the language, time, and keyboard input.
Step 2: Click on “Repair your Computer” followed by “Troubleshoot” and then “Command Prompt”.
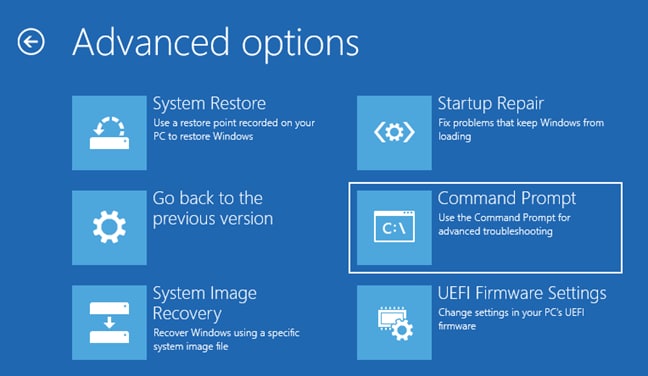
Step 3: Type the following commands
diskpart > list disk > select disk 0 (0 = disk number where OS is installed) > list partition > select partition 1 (1 = primary partition where OS is installed) > active.
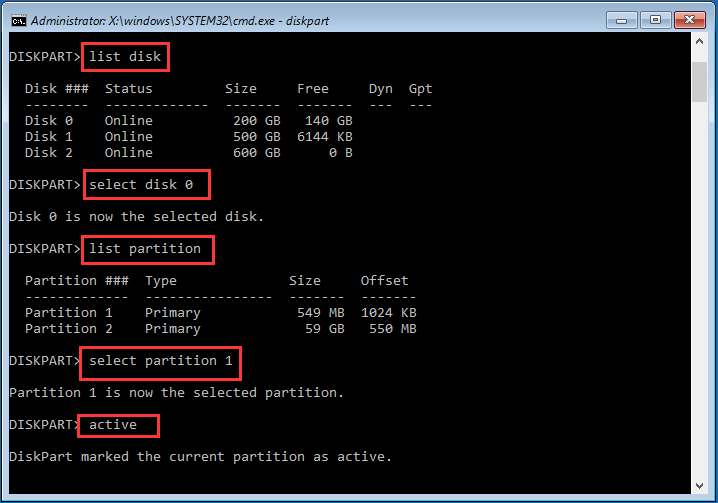
Finally, exit the command window. Now all you have to do is to remove Windows installation media and reboot your PC. If still the issue is not fixed, go for solution 4.
Solution 4: Run Startup Repair
Windows Startup repair is known for fixing common errors. It can also fix Default Boot Device Missing or Boot Failed error. Just follow some steps to fix the error.
Step 1: Start by booting your PC from the Windows installation media and select the language, time, and keyboard input. Once done, click on the “Repair your computer”. Then you have to click on “Troubleshoot” followed by “Startup Repair”.
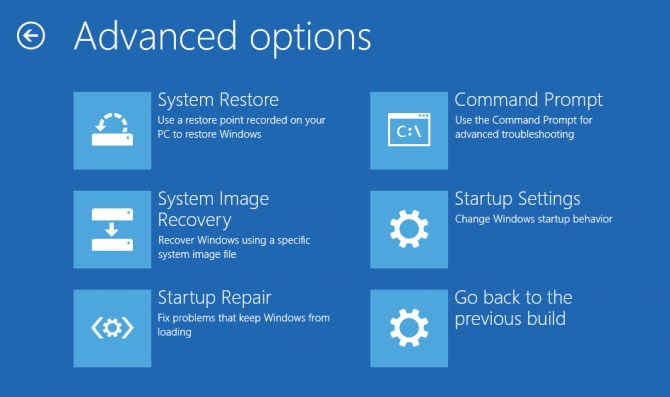
Step 2: On selecting “Startup Repair” the process of scanning and fixing errors will start. When the process is finished, you have to reboot your PC.
If still the error exists, you have to go with solution 5.
Solution 5: Replace a Hard Drive
Yes, you heard it right. If none of the solutions does a job for you then it is the issue with the hard drive. It can have SMART errors or bad sectors. In this case, you have to replace the hard drive with a new one.
Conclusion
Default Boot Device Missing or Boot Failed Error is a common error especially with Acer or Lenovo laptops or computers. It is even an issue with other brands. So if you are facing any such issue, the solutions provided to you in this dossier are capable enough to do a job for you. All solutions are trusted and tested so you need to drop your worries. Moreover, you need not fear data loss as you can easily recover your data using Wondershare Recoverit.
People Also Ask
How do I fix boot menu problems?
- Change BIOS settings
- Activate primary partition
- Go for Startup Repair
- Replace hard drive
What do I do if my Acer laptop says no bootable device?
- Disconnect all USB peripherals
- Set hard drive as a first boot device
- Reset primary partition as active
- Run SFC command
- Recover lost partition
What does no bootable device mean on my laptop?
It means the hard drive is not detected or found.
What is UEFI boot mode?
UEFI boot mode can be said as an advanced version of BIOS boot mode. It is low-level software that starts when your PC is booted before booting OS. It supports larger hard drives, faster boot times, and more security features in comparison to BIOS.
“Default Boot Device Missing or Boot Failed” – What Now?
My laptop recently experienced a complete failure of its boot device. “Default Boot Device Missing or Boot Failed” was the error message.
In this article, I’ll walk you through the steps I took to diagnose and eventually repair it.
Boot device missing
- Booted from external media to see if the machine was working at all.
- Removed and tested the machine’s SSD to see whether it or the motherboard had failed.
- Replaced the SSD and reinstalled Windows.
Though there was no data loss, restoring an image backup would have been faster than reinstalling.
This is just one scenario
I want to be clear that “Default Boot Device Missing or Boot Failed” can happen for many different reasons .
If you’re experiencing it, your problem will probably be different than mine. While I was able to diagnose and repair my situation, I can’t guarantee you’ll be able to do so in yours.
However, the steps I followed may help you at least narrow down the range of possibilities.
Worst possible timing
I had taken my laptop with me to a training session for which I was to assist. 1 I didn’t expect to need it, but because I am who and what I am, it comes with me anyway, just in case.
And, indeed, when we needed to refer to something online, and I pulled it out, booted it up, and …

Default Boot Device Missing or Boot Failed error message. Click for larger image. (Screenshot: askleo.com)
Definitely a pit-in-the-stomach feeling.
There was nothing I could do right then to diagnose it. It went back into my backpack, and we used the smaller screen on my phone for our needs instead.
Initial attempts
- Entering the UEFI/BIOS told me little. From what I could tell, the BIOS didn’t even see that a disk was installed at all. There should have been a 1TB SSD visible.
- Booting from a Windows setup USB stick in the hope of running Startup Repair or using the recovery console to explore the machine failed. And by failed, I mean Windows setup blue-screened with an unrecoverable error. 2
- Booting from a Ubuntu Linux USB stick got me a working Linux operating system, but once again, there was no disk to be found.
Even though this seems like a string of failures, it told me a lot about what was going on with the machine. Most importantly, it told me the problem seemed isolated to the disk , and that the rest of the machine — most notably the motherboard — seemed to be working OK.
However, even though the motherboard was working, there were still two possibilities:
- The SSD had failed.
- The motherboard interface to the SSD had failed.
Determining which had happened involved opening up the machine.
The world inside
I chose this laptop last year in part for this very reason: it’s designed to be opened and repaired. So I opened it up.
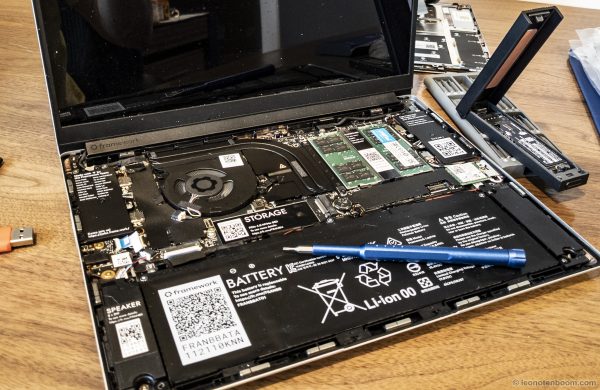
My laptop, opened up. Click for larger image. (Photo: askleo.com)
My plan was simple: remove the SSD, put it into an external enclosure, and see if it would be recognized on another computer. If the drive was recognized and working properly, this would point to a motherboard problem. If the drive failed, then I’d take the next step and replace the drive.
The SSD, in this case, is the “m.2” form factor – an SSD as a single, small, circuit board. It’s removed from the laptop in the image above; it normally sits in the area labelled “Storage” roughly in the middle of the machine.
I had to order a different external enclosure for this type of SSD.
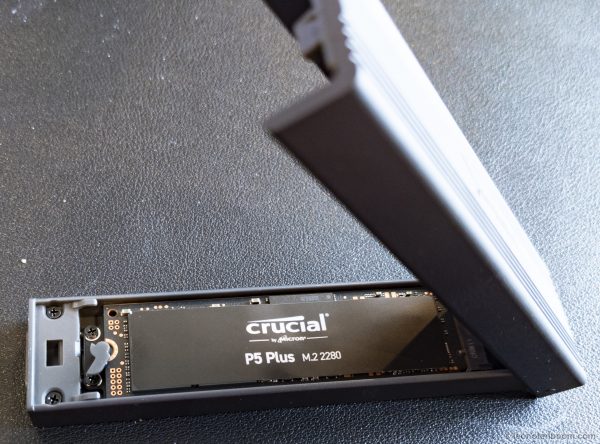
External m.2 SSD enclosure. Click for larger image. (Photo: askleo.com)
That’s a Sabrent USB 3.2 Type-C Tool-Free Enclosure for M.2 PCIe NVMe and SATA SSDs, purchased through Amazon, with an m.2 SSD shown installed.
If it seems a bit odd to pay for an external enclosure just to diagnose something, my thinking was that I’ll need it again in the future. Also, if I do have an extra m.2 SSD, it would make for a fine external drive.
The test worked in that it failed.
By that, I mean the SSD removed from my laptop could not be read on another machine. In fact, it didn’t even show up. Chances are it was seriously broken.
Replacement
This was probably the best possible outcome. Replacing an SSD is much easier, and presumably less costly, than replacing a motherboard.
I ordered a replacement SSD, taking advantage of the situation to upgrade from 1TB to 2TB.
When I received the replacement, I first tested it using the external enclosure. (That’s actually it in the photo above.) When it worked there, this not only validated that the new drive was working, but also that my approach to testing using the external enclosure was valid. 3
I installed the SSD into the laptop and booted from the Windows Setup disk. This time it didn’t bluescreen, but instead came up normally.
I proceeded to install Windows 10 from scratch. Since it had previously been running Windows 10 Pro, the digital license activated transparently.
Wait, what? I installed Windows 10 from scratch?
Where was my image backup?
I’d made a conscious decision some time ago not to prioritize an image backup for this specific machine.
Even though the original SSD was unrecoverable, I suffered no data loss . Everything on that machine was either redundant or automatically backed up to cloud storage services like Dropbox and OneDrive.
The only thing I “lost” was time.
If I’d had an image backup of the machine taken prior to the failure, I could have restored that image to the replacement SSD, adjusted the partition size to take advantage of the larger drive, and carried on as if nothing had happened.
As it was, I needed to reinstall.
As is my approach, I only install those things I actually use so the net result will be a cleaner machine. The machine was ready to use within a couple of hours, and additional installs will happen as needed over the coming weeks.
I haven’t decided yet whether to add an image backup to this mix. Whether or not I do, however, it’s a good example of the difference having one might have made.
Do this
Realize that failures happen — often suddenly and without warning. There were no clues that my hard disk was about to die; it just did. And yes, the SSD was under a year old. “Stuff” happens.
Perhaps my diagnostic experience will help you when the time comes. What’s most important is to take the time to consider your backup strategy for a scenario like this. What would you lose if your machine’s hard disk died without warning? If it’s anything more than time, you probably want to re-evaluate how you’re backing up.
For more tips, experiences, solutions and more, subscribe to Confident Computing, my weekly email newsletter! Less frustration and more confidence in your inbox every week.
Podcast audio
Related Video
Footnotes & References
1 : I’m a volunteer for Washington State Animal Response Team, and the training was a basic training for new members.
2 : In my opinion, this was a bug in Windows Setup, failing to handle the case where the machine it’s installing to has no disk drive.
3 : Since I’d never done this test using an external m.2 enclosure before, there was a possibility that my assumptions about how to test were wrong.
Leo Who?
20 comments on ““Default Boot Device Missing or Boot Failed” – What Now?”
And, unless you know you won’t lose anything if your drive fails, make sure you are performing regular system image backups and daily incrementals.
I laughed out loud at your comment that your laptop had failed “at the worst possible time”. I have yet to figure out what the *best possible time* would be… which just reinforces your gospel regarding backups.
Excellent timing on this particular article.
My n-1 laptop has one of the oldest SSD “disks” that I own – a Samsung 2 TB that is over 8 years old.
It’s a physically huge laptop with 2 spaces for SATA drives – this SSD and a 2 TB HDD. Lately the SSD has just been disappearing – I end up in a BIOS setup screen.
A common aspect of our computer existences – that many people don’t share – is having multiple machines (over 12 in my case) so the decisions about whether to have an IMAGE backup are similar.
This is NOT my primary system any more and having a regular image backup is not needed – so I didn’t have one. Frankly it would be absurd to have image backups of every system – so I don’t.
BUT… when it was working for awhile, I managed to grab a fresh system image. So, now I’m ready to go through the same process that you did (albeit with an external SATA adapter instead of M.2).
Thanks for inspiring me to get this working again.
Heck, even though this is not needed to change the disk, I might even try to reseat the ribbon cables for the built-in keyboard. It stopped working correctly after the last major disassembly – to replace the hard to reach battery. Before that I had it apart THREE times to diagnose and then replace a failed CPU fan. There are over 40 screws and plugs that have to be removed to get into it for the fan or battery – not a good design.
Hey Leo, you mentioned that your laptop was under a year old. Was it not still under warranty, or did you just decide to not bother with that and take care of it yourself?
The latter. By the time I had diagnosed it, repairing it would take a few days, whereas warranty work would have probably taken a few weeks? (Guessing on that.) And it also made for good Ask Leo! fodder.
Leo,
If it’s still under warranty can’t you just request a replacement of the M2 SSD and send them the defective one? I just built 3 PC’s with 4 M2 SSD drives and I hope the last a lot longer than 1 yr, but only time will tell if the newer technology will last longer than the old tech.
Thanks for the external M2 idea.
Are you reconsidering your decision not to make an image backup?
I haven’t decided yet. (And, indeed, I’m travelling as I type this, on the very laptop in question.) I’ll likely not bother, but it’s not an obvious decision for me either way. The experience of not having one was instructive.
I’ve just gone through this exact scenario TWICE in one month. The internal SSD failed to boot. I’m losing faith in SSD drives.
I had a relatively current USB drive image so I replaced the internal drive in minutes (not so easy if at all in most of the new PCs 🙁
I rebooted and immediately created a new backup drive image.
Rebuilding a PC is a lengthy pain in the butt.
I can’t stress the ease of having available swappable imaged drives. (sometimes several)
Macrium Reflect is my go to for imaging drives.
To all: i have an hp laptop, model N-284ca ; product # F9H15UA#ABL. This is a sealed unit. So i searched online, and found where the physical hard-drive was located, beneath the underside cover.
Used my soldering gun, with the vertical tip, for on plastics. This was used, to burn through the cover, bottom right hand corner; revealing the hard drive. 9.5 cm from the botton edge, and 13 cm from the end. Removed it, and replaced the old one, crashed. Still works good. Used duct tape, to hold the 8 x 11 cm ” home made ” cover in place. Good luck, folks. Most ‘stuff’ nowadays, is made to use until it DOESN’T, then your supposed to buy new. Not me, i will use whatever is available, until it goes for sure.
Thanks for your lifetime of service, Dr. Leo Notenboom !
Leo:
This brings up a loosely-related question. Let’s say I have an Acer laptop W- 11 with a 256 gb SSD with a good Macrium image backup. Say it dies, so I buy a Dell W-11 laptop with a 256 gb SSD (or maybe a 512 gb SSD). Can I just install Macrium in the new Dell and restore the Acer image? Wouldn’t that create problems? What kind of problems? I assume I would then have to go to the Dell web=site and install missing drivers? What else? There must be other proprietary software?
I had this issue and was afraid to use the image b/u. Instead I spent 2-3 days reinstalling stuff and tweaking assorted settings and eliminating bloatware. I’m not really complaining as I like doing that stuff. But was there a better way?
It’s extremely unlikely that it would work.
The drivers for the peripherals of the new would, in most cases, be incompatible with the peripherals of the new computer.
Restoring an Image Backup from One Computer to Another
Hi Leo, This may be a totally irrelevant comment, but I hope it will also be helpful to you. I have noticed in recent presentations by you that you are probably sitting next to a blue screen or light. Whilst most of the time this manifests itself as a small blue dot close to the left lens of your (rather smart!) rimless glasses, as you move your head while talking it moves around and sometimes completely eclipses the left lens. Although quite a small thing, I find this gets very irritating after watching for a few minutes and wondered if there is anything you can (or perhaps that shoud be should!) do about it.
In general, as a 92 year old with slowly failing eyesight, I must emphasise how very helpful your comments are. Keep up the good work.
John
Thanks for the feedback. I’ve been struggling with the best placement for lights in my new setup. Glasses definitely add complexity to the equation.
I purchased two Dell Inspiron 17″ Dell 3793 with 500gb SSDs with our stimulus cheques, The first one mine, I set up with no problems and it is running fine. The second one my wife’s came up with the error message “Default Boot Device Missing or Boot Failed”. I had never used an SSD before, despite 30 yrs. or more experience, after a day trying to get help from Dell, I realised the SSD did not exist, it took some agravation trying to convince the Dell agent, they eventually shipped me a new one and I returned the defective one.
I must admit I am happy with the speed of the computer. I have used and recommended Dell’s for many years and will continue to do so.
Dell has great customer service. We once had a Dell power adaptor die on us while still under warranty. The replacement arrived 2 days later, and they didn’t want the defective one back. I’ve dealt with other companies, and I had to ship the item back at my own cost before they replaced the defective item. It all took about 2 weeks.
Hi Leo – Been reading your fine journalism for 20 years, at least. So: I’ll by you a latte or beer if you re-enable this feature. Or a bottle of the finest California champagne? You deserve it.
As to a catastrophic failure you refer to, yes SSD’s go down with an unrecoverable thunk due to the nature of the memory: skip sequential or, in effect, bubble. Whereas a hard drive is made up of semi-independent blocks. Blocking in the old days was 256bytes per sector, if I remember right. But Norton disk recovery utility could start at track 0 and chug along all subsequent tracks and “see” the good sectors. And, with luck, recover some files entirely or partially by seeing how the sectors were addressed.
Even then, I had at least 2 parallel machines networked to mirror each other. Hence one fails, switch to the other and continue to march. NASA has triple backup at the hardware level. Maybe quadruple for mission-critical hardware.
Yes, this will double your hardware cost. But machines are cheap now.
Few readers would be able to do the fix you show here. Not me. 40yrs in IT. Just get 2 cheap machines and mirror them.
Respectfully submitted to all!
There’s no need to have 2 parallel computers. It’s much cheaper to get a couple of USB hard drives and perform regular system image backups. Why 2 hard drives? To back up your backup.
As Leo said in the article, the drive that failed wasn’t backed up. If he had backed up, this wouldn’t have been such a major issue.
This article and the comments were so interesting.
Main thing I learned was to stop feeling sad about still having rotating-disk hard drives. I haven’t had one fail since the first day of 2000. (Y2K related?) I’ll gladly give up speed for reliability.
About 4 months ago I replaced a single 2 TB HDD with a Crucial 2 TB SSD, inside a Dell Inspiron running Windows 10 Pro. A direct copy got everything up and running, with a great performance boost. However, ever since then there has been a substantially annoying problem. The system will no reliably re-boot unattended, usually on Sunday morning, and likely in response to a Windows update, and while running a EaseUS TODO backup.
I find the system hung with the message “No boot device available.” The SATA list shows 1 and 3 installed, and the rest None. Any attempt to retry (F1 or F2 key) produces the sequence “Checking media presence,” “Media Present,” “Start PXE over IPv6.” At this point, it is hung again.
In other words, it’s not finding the SSD card boot information. However, powering off and back on always boots perfectly. Further, any manual Start/Power/Restart always works perfectly. Testing the SSD finds no problems. Put another way, I don’t think there is anything wrong with the SSD. It acts like either a timing issue, or some other setting that is not correct. FWIW, the boot mode is set to UEFI, with the sequence USB Storage, ODD, HDD, USB Floppy, EUFI IP4.
Any ideas, guesses? Thanks!
Leave a reply:
- Read the article.
- Comment on the article.
- No personal information.
- No spam.
Comments violating those rules will be removed. Comments that don’t add value will be removed, including off-topic or content-free comments, or comments that look even a little bit like spam. All comments containing links and certain keywords will be moderated before publication.
I want comments to be valuable for everyone, including those who come later and take the time to read.
 report this ad
Linux Mint Forums
[SOLVED] "Default Boot Device Missing or Boot Failed"
[SOLVED] "Default Boot Device Missing or Boot Failed"
Post by lnwlf177 » Fri May 11, 2018 11:47 pm
Re: "Default Boot Device Missing or Boot Failed"
Post by catweazel » Fri May 11, 2018 11:55 pm
That’s a hardware issue.
<Star Trek voice on>
It’s dead, Jim!
<Star Trek voice off>
Re: "Default Boot Device Missing or Boot Failed"
Post by lnwlf177 » Sat May 12, 2018 12:03 am
Re: "Default Boot Device Missing or Boot Failed"
Post by catweazel » Sat May 12, 2018 12:59 am
Re: "Default Boot Device Missing or Boot Failed"
Post by lnwlf177 » Sat May 12, 2018 1:21 am
Re: "Default Boot Device Missing or Boot Failed"
Post by lnwlf177 » Sat May 12, 2018 1:24 am
Re: "Default Boot Device Missing or Boot Failed"
Post by lsemmens » Sat May 12, 2018 1:53 am
Re: "Default Boot Device Missing or Boot Failed"
Post by lnwlf177 » Sat May 12, 2018 11:11 am
Re: "Default Boot Device Missing or Boot Failed"
Post by lnwlf177 » Sat May 12, 2018 3:51 pm
Re: "Default Boot Device Missing or Boot Failed"
Post by lnwlf177 » Sat May 12, 2018 4:38 pm
When I try to do partitioning on my in order to reinstall, I get this message:
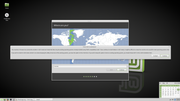
But I am unable to continue. As much as I click on ‘Continue’, the screen just stays there. In fact, even if I press ‘Back’, I remain stuck on that screen.
Re: "Default Boot Device Missing or Boot Failed"
Post by lnwlf177 » Sat May 12, 2018 10:40 pm
SOLVED
Here is what I did:
1. Reset all BIOS settings to default
2. In the BIOS under SECURITY, I selected SELECT AN UEFI FILE AS TRUSTED FOR EXECUTING
3. I pressed enter on the two files that showed up in the <ubuntu> folder («fwupx64.efi» and «grubx64.efi»)
4. Typed YES for each of them (i.e. told the BIOS to trust them)
5. Save, Exit, Boot
Re: [SOLVED] "Default Boot Device Missing or Boot Failed"
Post by zidgear1357 » Mon Jan 28, 2019 1:16 pm
[SOLVED] Unable to boot after failed mint19 install/Won’t boot after install
[SOLVED] Acer Aspire ES 13 «No bootable device»
Successfully solved on LinuxMint 19 fresh install
Thanks to https://itsfoss.com/no-bootable-device-found-ubuntu/
Restore factory default settings as boot settings
Keep hitting F2 upon reboot
into BIOS
Turn Secure Boot on
Go to Security tab and look for “Select an UEFI file as trusted for executing” and click enter.
Select your hard disk like HDD0. Press Enter
Select <EFI> here. Press enter.
Select <Ubuntu>. Press enter
Select shimx64.efi. Press enter
in boot order, put shimx64.efi as 1st priority.
Asked «do you wish to add this file . «. type Yes and select enter.
Save settings and exit BIOS