8.8.8.8 – что за адрес? Как заменить DNS на Google Public DNS
8.8.8.8 и 8.8.4.4 – это бесплатные, публичные DNS-серверы от Google. Называются они Google Public DNS. Эти DNS-серверы разработала компания Google. Они с закрытым исходным кодом. Их может использовать любой желающий, просто прописав их на своем компьютере, телефоне, роутере.
Я уже написал большое количество статьей по решению разных проблем с подключением к интернету, в которых советовал заменить DNS-адреса своего провайдера на 8.8.8.8 и 8.8.4.4. Это очень часто помогает избавится от проблемы, когда не открываются сайты в браузере и появляется ошибка типа не удается найти DNS-адрес сервера, или DNS-сервер не отвечает. Это самое рабочее и популярное решение.
Если вы зашли на эту страницу, только чтобы найти ответ на вопрос, прописывать ли DNS от Google, или нет, то мой ответ – прописывать. В этом нет ничего страшного. Работают эти сервера быстро и стабильно. А это главные показатели, если мы говорим о ДНС.
Дальше в статье я подробнее расскажу об этих адресах, и покажу как указать Google Public DNS на своем компьютере с Windows 10, 8, и Windows 7. Так же покажу, как указать альтернативные DNS-адреса на iPhone, iPad, Android смартфонах и планшетах.
Что такое DNS, адрес 8.8.8.8 и как все это работает?
DNS-сервер отвечает за преобразование доменных адресов (понятных для нас адресов сайтов, например, vk.com) в IP-адреса (из цифр) . Если домен по какой-то причине не преобразовался в IP-адрес, то сайт не откроется в нашем браузере. И мы увидим ошибку, о которой я писал в начале статьи.
К интернету мы подключаемся через интернет-провайдера. А это значит, что по умолчанию используем его DNS-сервера. И в этом нет ничего плохого. Но эти сервера не всегда работают стабильно. Иногда вообще не работают, и из-за этого не открываются сайты в браузере. При этом подключение к интернету есть, и как правило программы получают доступ к интернету, а страницы в браузере не открываются.
Поэтому, в такой ситуации можно просто заменить DNS-адреса сервера, которые мы чаще всего получаем автоматически от своего интернет-провайдера на альтернативные DNS от Google.
Есть так же IPv6-адреса:
Если ДНС-серверы вашего провайдера частенько глючат, и вы видите ошибку «Не удается преобразовать DNS-адрес сервера», или что-то типа этого, то пропишите Гугловские адреса и продолжайте пользоваться интернетом.
Так же смена этих адресов позволяет обходить блокировку сайтов, если провайдер блокирует их на уровне DNS. Такой способ блокировки легко обойти, поэтому, провайдеры часто используют более серьезные способы, чтобы ограничить нам доступ к сайтам.
Как сменить DNS на адреса от Google в Windows 10, 8, 7
Обновление: как изменить DNS-серверы в Windows 11. Если у вас Windows 11 – переходите по ссылке.
Сначала нам нужно открыть сетевые подключения. Для этого можно нажать правой кнопкой мыши на значок подключения к интернету и выбрать «Центр управления сетями и общим доступом». В новом окне перейдите в «Изменение параметров адаптера». Или нажать сочетание клавиш Win + R и выполнить команду ncpa.cpl.

Дальше открываем свойства нашего подключения к интернету. Я подключен по Wi-Fi к маршрутизатору. Поэтому, открываю свойства беспроводного соединения. Если подключение по кабелю, это это «Ethernet», или «Подключение по локальной сети».
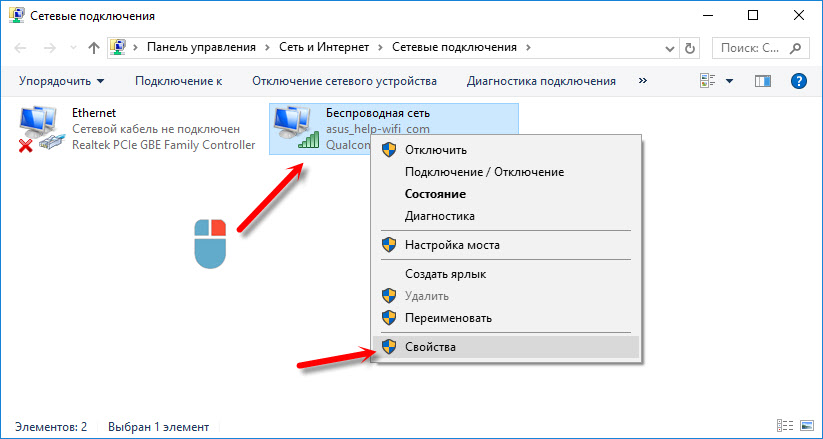
Выделяем «IP версии 4 (TCP/IPv4)» и нажимаем «Свойства». Дальше прописываем DNS от Гугл:
- Предпочитаемый DNS-сервер: 8.8.8.8
- Альтернативный DNS-сервер: 8.8.4.4

Нажимаем Ok и работаем через Google Public DNS.
Как прописать ДНС от Гугл на iPhone и iPad?
Очень просто. Зайдите в настройки, в раздел Wi-Fi. Нажмите на свою сеть Wi-Fi. Дальше нажмите на поле «DNS» и пропишите 8.8.8.8.

Можно прописать еще этот адрес на вкладке «Статичн.» Не очень понятно, где правильно менять адрес.
Как сменить DNS на Android?
На телефоне, или планшете который работает на Android нужно так же зайти в настройки, в раздел «Wi-Fi». Нажмите на свою сеть и подержите. В появившемся меню выберите «Изменить сеть». Дальше поставьте галочку возле «Дополнительные параметры». Появится пункт «Настройки IP», выберите «Статические». Пропишите DNS: 8.8.8.8 и 8.8.4.4.

В зависимости от модели вашего смартфона, или планшета, настройки могут немного отличатся. Но не сильно. Думаю, вы без проблем найдете необходимые настройки.
Теперь вы знаете, что это за адреса, откуда взялись эти цифры, и как прописать их на своем устройстве. Остались вопросы? Спрашивайте в комментариях!
Настройка DNS серверов на Windows

Каждый, наверняка, не раз уже слышал или читал о настройке DNS, которая помогает разрешать проблемы, связанные с Интернет-подключением. В этой статье рассматривается ряд вопросов: что такое DNS-сервера, для чего используют адреса DNS, что такое публичные адреса Google, и как настраивать DNS-сервер в windows.
DNS — протокол, который преобразовывает доменные имена веб-ресурса в IP-адрес. Каждый провайдер использует индивидуальный DNS-сервер, который работает по принципу, указанному выше. Однако, люди сталкиваются с случаями, когда на стороне провайдера возникают проблемы, неполадки, сбои и ошибки, из-за чего, при выполнении входа на ресурс, появляется сообщение, в котором будет значиться «DNS-адрес ****** не найден» или сообщение аналогичного характера. Если возникла подобная проблема, то не стоит опускать руки и ждать неизвестное количество времени, пока провайдер решит все-таки заняться проблемами, связанными с DNS-сервером. Гораздо проще воспользоваться публичными DNS-серверами.
Публичные сервера Google
Публичные сервера Google или Google Public DNS — сервера DNS, которыми пользуются при возникновении проблем с доступом к интернет ресурсам, при этом использование DNS сервера Google не требует оплаты. Главный плюс использования DNS-серверов Google — работа без перебоев.
DNS 8.8.8.8. и DNS 8.8.4.4. — это те самые знаменитые адреса DNS-сервера от компании Google.
Возникает вопрос: «Какой же сервер лучше использовать — провайдера или публичный?». Ответ: в теории разницы нет, но публичные сервера рекомендуется использовать в том случае, если на стороне провайдера возникли неполадки с DNS, либо если нет доступа к интернет ресурсу. Переход на публичный DNS — грамотное решение при возникших проблемах с сетевым подключением.
Как перейти на публичный DNS Google?
В настройках сетевого подключения у большинства пользователей указано автоматическое получение адреса DNS-сервера, но это легко изменить и выставить статический адрес DNS-сервера. В нашем случае это будут публичные DNS-сервера компании Google.
Чтобы выставить публичные адреса DNS-серверов для сетевого подключения в Windows, потребуется сделать следующие шаги:
1. Первым делом требуется открыть "Центр управления сетями и общим доступом". Это делается несколькими способами:
- Кликнув правой кнопкой мыши на значок «монитор» или «уровень сигнала» в области уведомлений, увидим меню с пунктом «Центр управления сетями…».
- Либо нажмите на клавиатуре Windows+R. Напишите в пустую строку "ncpa.cpl" без кавычек и нажмите Enter.
2. Далее ищем "Изменение параметров сетевого адаптера". Это в том случае, когда не видны значки сетевых подключений.
3. Дважды кликаем на иконку используемого подключения и переходим в свойства.
.png)
4. Выбираем протокол «Протокол Интернета версии 4 (TCP/IPv4)» и переходим в свойства протокола.
5. Поставьте галочку возле опции с наименованием "Использовать следующие адреса DNS-серверов", которая позволит ввести нужные адреса DNS-сервера.
.png)
6. В поле "Предпочитаемый DNS-сервер" прописываем 8.8.8.8 DNS сервер, а в "Альтернативный DNS-сервер" – 8.8.4.4. Обратите внимание на точки-разделители между цифрами.
7. Подтверждаем изменения нажатием на «ОК».
.png)
Если пользуетесь роутером, то следует иная комбинация настроек:
- В поле "Предпочитаемый DNS-сервер" прописываем DNS сервер роутера, который используется на устройстве, а в "Альтернативный DNS-сервер" – DNS-сервер Google (8.8.8.8).Адрес устройства указывается на нижней (или задней) части корпуса.
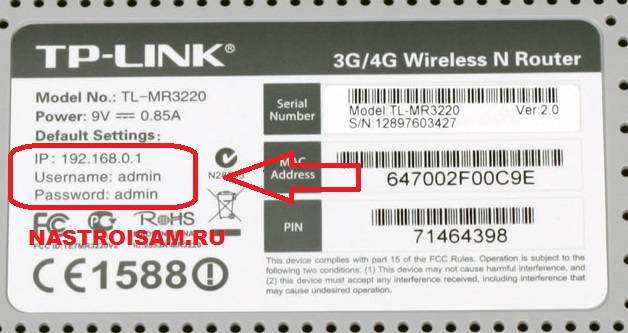
Хочется упомянуть, что в статье рассматривались только DNS 8.8.8.8 и DNS 8.8.4.4 компании Google, но также возможно использование адреса и других публичных DNS-серверов, например, Securly или Comodo Secure DNS. Выбор не ограничен только Google.
Get Started
Configure your network settings to use Google Public DNS
When you use Google Public DNS, you are changing your DNS "switchboard" operator from your ISP to Google Public DNS.
In most cases, the Dynamic Host Configuration Protocol (DHCP) automatically configures your system to use the IP addresses of your ISP's domain name servers. To use Google Public DNS, you need to explicitly change the DNS settings in your operating system or device to use the Google Public DNS IP addresses. The procedure for changing your DNS settings varies according to operating system and version (Windows, Mac, Linux, or ChromeOS) or the device (computer, phone, or router). We give general procedures here that might not apply for your OS or device; consult your vendor documentation for authoritative information.
Depending on your system you may also have the option of enabling a new privacy-oriented feature called DNS-over-TLS. This feature provides privacy and security for the DNS messages sent between your device and Google's DNS servers. Details on configuring this optional feature are in specific sections for each system.
Important: Before you start
Before you change your DNS settings to use Google Public DNS, be sure to write down the current server addresses or settings on a piece of paper. It is very important that you keep these numbers for backup purposes, in case you need to revert to them at any time.
We also recommend that you print this page, in the event that you encounter a problem and need to refer to these instructions.
Google Public DNS IP addresses
The Google Public DNS IP addresses (IPv4) are as follows:
The Google Public DNS IPv6 addresses are as follows:
Some devices require explicit values for all eight fields of IPv6 addresses and cannot accept the abbreviated :: IPv6 address syntax. For such devices enter:
Expand the 0 entries to 0000 if four hexadecimal digits are required.
You can use either address as your primary or secondary DNS server.
You can configure Google Public DNS addresses for either IPv4 or IPv6 connections, or both. For IPv6-only networks with a NAT64 gateway using the 64:ff9b::/96 prefix, you can use Google Public DNS64 instead of Google Public DNS IPv6 addresses, providing connectivity to IPv4-only services without any other configuration.
Change your DNS servers settings
Because the instructions differ between different versions/releases of each operating system, we only give one version as an example. If you need specific instructions for your operating system/version, please consult your vendor's documentation. You may also find answers on our user group page.
Many systems let you to specify multiple DNS servers, to be contacted in priority order. In the following instructions, we provide steps to specify only the Google Public DNS servers as the primary and secondary servers, to ensure that your setup correctly uses Google Public DNS in all cases.
Windows
DNS settings are specified in the TCP/IP Properties window for the selected network connection.
Example: Changing DNS server settings on Windows 10
- Go to the Control Panel.
- Click Network and Internet > Network and Sharing Center > Change adapter settings.
Select the connection for which you want to configure Google Public DNS. For example:
- To change the settings for an Ethernet connection, right-click the Ethernet interface and select Properties.
- To change the settings for a wireless connection, right-click the Wi-Fi interface and select Properties.
If you are prompted for an administrator password or confirmation, type the password or provide confirmation.
Select the Networking tab. Under This connection uses the following items, select Internet Protocol Version 4 (TCP/IPv4) or Internet Protocol Version 6 (TCP/IPv6) and then click Properties.
Click Advanced and select the DNS tab. If there are any DNS server IP addresses listed there, write them down for future reference, and remove them from this window.
Click OK.
Select Use the following DNS server addresses. If there are any IP addresses listed in the Preferred DNS server or Alternate DNS server, write them down for future reference.
Replace those addresses with the IP addresses of the Google DNS servers:
- For IPv4: 8.8.8.8 and/or 8.8.4.4 .
- For IPv6: 2001:4860:4860::8888 and/or 2001:4860:4860::8844 .
- For IPv6-only: you can use Google Public DNS64instead of the IPv6 addresses in the previous point.
Test that your setup is working correctly; see Test your new settings.
Repeat the procedure for additional network connections you want to change.
macOS
DNS settings are specified in the Network window.
Example: Changing DNS server settings on macOS 10.15
- Click Apple menu > System Preferences > Network.
- If the lock icon in the lower left-hand corner of the window is locked, click the icon to make changes, and when prompted to authenticate, enter your password.
- Select the connection for which you want to configure Google Public DNS. For example:
- To change the settings for a Wi-Fi connection, select Wi-Fi, and click Advanced.
- To change the settings for an Ethernet connection, select Built-In Ethernet, and click Advanced.
- Select the DNS tab.
- Click + to replace any listed addresses with, or add, the Google IP addresses at the top of the list:
- For IPv4: 8.8.8.8 and/or 8.8.4.4 .
- For IPv6: 2001:4860:4860::8888 and/or 2001:4860:4860::8844 .
- For IPv6-only: you can use Google Public DNS64instead of the IPv6 addresses in the previous point.
- Click OK > Apply.
- Test that your setup is working correctly; see Test your new settings.
- Repeat the procedure for additional network connections you want to change.
Linux
In most modern Linux distributions, DNS settings are configured through Network Manager.
Example: Changing DNS server settings on Ubuntu
- Click System > Preferences > Network Connections.
- Select the connection for which you want to configure Google Public DNS. For example:
- To change the settings for an Ethernet connection, select the Wired tab, then select your network interface in the list. It is usually called eth0 .
- To change the settings for a wireless connection, select the Wireless tab, then select the appropriate wireless network.
- Click Edit, and in the window that appears, select the IPv4 Settings or IPv6 Settings tab.
- If the selected method is Automatic (DHCP), open the dropdown and select Automatic (DHCP) addresses only instead. If the method is set to something else, do not change it.
- In the DNS servers field, enter the Google Public DNS IP addresses, separated by a comma:
- For IPv4: 8.8.8.8 and/or 8.8.4.4 .
- For IPv6: 2001:4860:4860::8888 and/or 2001:4860:4860::8844 .
- For IPv6-only: you can use Google Public DNS64instead of the IPv6 addresses in the previous point.
- Click Apply to save the change. If you are prompted for a password or confirmation, type the password or provide confirmation.
- Test that your setup is working correctly; see Test your new settings.
- Repeat the procedure for additional network connections you want to change.
If your distribution doesn't use Network Manager, your DNS settings are specified in /etc/resolv.conf .
Example: Changing DNS server settings on a Debian server
If any nameserver lines appear, write down the IP addresses for future reference.
Replace the nameserver lines with, or add, the following lines:
For IPv6-only, you can use Google Public DNS64 instead of the above IPv6 addresses.
Restart any Internet clients you are using.
Test that your setup is working correctly; see Test your new settings.
Additionally, if you are using DHCP client software that overwrites the settings in /etc/resolv.conf , you need to configure the DHCP client by editing the client's configuration file.
Example: Configuring DHCP client software on a Debian server
Back up /etc/resolv.conf :
Edit /etc/dhcp/dhclient.conf (or /etc/dhcp3/dhclient.conf ):
If there is a line following request with only domain-name-servers, remove that line.
If there is a line containing domain-name-servers with IP addresses, write down the IP addresses for future reference.
Replace that line with, or add, the following line:
For IPv6-only, you can use Google Public DNS64 instead of the above IPv6 addresses.
Restart any Internet clients you are using.
Test that your setup is working correctly; see Test your new settings.
ChromeOS
DNS settings are specified in the Network section of the Settings menu for the selected network connection.
Example: Changing DNS server settings on ChromeOS 71
- Open the Settings menu.
- In the Network section, select the connection for which you want to configure Google Public DNS. For example:
- To change the settings for an Ethernet connection, click on the Ethernet section.
- To change the settings for a wireless connection, click on the Wi-Fi section and select the appropriate network name.
- Changing the DNS settings for a mobile data connection established with Instant Tethering isn't possible. For mobile Wi-Fi hotspots that are manually set up, however, you can change the DNS settings using the instructions for a wireless connection.
- Expand the Network section for the selected connection.
- In the Name servers section:
- For IPv4: Select the Google name servers button (or alternatively, select the Custom name servers button and enter 8.8.8.8 and 8.8.4.4 ).
- For IPv6: Select the Custom name servers button and enter 2001:4860:4860::8888 and/or 2001:4860:4860::8844 .
- For IPv6-only: you can use Google Public DNS64instead of the IPv6 addresses in the previous point.
- Click outside the Network section to apply the settings.
- Test that your setup is working correctly; see Test your new settings.
- Repeat the procedure for additional network connections you want to change.
Routers
Every router uses a different user interface for configuring DNS server settings; we provide only the generic procedure. For more information, please consult your router documentation.
To change your settings on a router:
- In your browser, enter the IP address of your router to view the router's administration console. Most routers are manufactured to use a default address such as 192.168.0.1 , 192.168.1.1 , 192.168.2.1 , or 192.168.1.100 . If none of these work, try to find the default gateway address in the network settings panel of your system.
- When prompted, enter the password to edit network settings.
- Find the screen in which DNS server settings are specified.
- If there are IP addresses specified in the fields for the primary and seconday DNS servers, write them down for future reference.
- Replace those addresses with the Google IP addresses:
- For IPv4: 8.8.8.8 and/or 8.8.4.4 .
- For IPv6: 2001:4860:4860::8888 and/or 2001:4860:4860::8844 .
- For IPv6-only: you can use Google Public DNS64instead of the IPv6 addresses in the previous point.
- Save and exit.
- Restart your browser.
- Test that your setup is working correctly; see Test your new settings.
Some routers require explicit values for all eight fields of IPv6 addresses and cannot accept the abbreviated :: IPv6 address syntax. For such routers enter:
Expand the 0 entries to 0000 if four hexadecimal digits are required.
You can change DNS settings on iPhone, iPad, or iPod touch with the following steps.
- Go to Settings > Wi-Fi.
- Tap the ⓘ icon next to the Wi-Fi network that you want to change DNS servers for. Scroll down to find the DNS section and tap Configure DNS.
- Tap Manual and add Google IP addresses. Optionally you can also remove all default DNS servers in the list.
- For IPv4: 8.8.8.8 and/or 8.8.4.4
- For IPv6: 2001:4860:4860::8888 and/or 2001:4860:4860::8844
Switching back to Automatic will restore the DNS server specified by the Wi-Fi network.
Android
Android 9 (Pie) or higher
Android 9 supports "Private DNS" which uses DNS-over-TLS to provide security and privacy for your DNS queries. You can configure it with the following steps.
- Go to Settings > Network & Internet > Advanced > Private DNS.
- Select Private DNS provider hostname.
- Enter dns.google as the hostname of the DNS provider.
- Click Save.
For more information see the Android blog post announcing the feature. Please note that in Android P, the default mode for Private DNS is "Automatic" which means it uses the network specified DNS server and it attempts a TLS connection to port 853 before falling back to UDP on port 53.
Older Android versions
Devices running versions older than Android 9 do not support DNS-over-TLS and cannot configure private DNS for all networks. You can configure DNS for each individual Wi-Fi network you use. This requires configuring all network information manually and is only recommended for advanced users.
Mobile or other devices
DNS servers are typically specified under advanced Wi-Fi settings. However, as every mobile device uses a different user interface for configuring DNS server settings, we provide only the generic procedure. For more information, please consult your mobile provider's documentation.
To change your settings on a mobile device:
- Go to the screen in which Wi-Fi settings are specified.
- Find the screen in which DNS server settings are specified.
- If there are IP addresses specified in the fields for the primary and secondary DNS servers, write them down for future reference.
- Replace those addresses with the Google IP addresses:
- For IPv4: 8.8.8.8 and/or 8.8.4.4 .
- For IPv6: 2001:4860:4860::8888 and/or 2001:4860:4860::8844 .
- For IPv6-only: you can use Google Public DNS64instead of the IPv6 addresses in the previous point.
- Save and exit.
- Test that your setup is working correctly; see Test your new settings.
Test your new settings
To test that the Google DNS resolver is working:
From your browser, enter a hostname URL (such as http://www.google.com/ ). If it resolves correctly, quit the browser, load the page again and refresh it for several times to make sure the result is not from a cached web page.
- If you are using Google Public DNS64 on an IPv6-only system, repeat the above test with an IPv4-only hostname URL (such as http://ipv4.google.com/ ).
If all of these tests work, everything is working correctly. If not, go to the next step.
From your browser, type in a fixed IP address. You can use http://216.218.228.119/ (which points to the test-ipv6.com website) as the URL. 1
If you are using Google Public DNS64 on an IPv6-only system, use http://[64:ff9b::d8da:e477]/ as the URL instead. If this test does not work, you do not have access to a NAT64 gateway at the reserved prefix 64:ff9b::/96 and cannot use Google Public DNS64.
If you are using an IPv6-only system without Google Public DNS64, use http://[2001:470:1:18::119]/ as the URL instead.
If this works correctly, reload the page with a new opened browser to make sure the page is loaded from scratch. If these tests work (but step 1 fails), then there is a problem with your DNS configuration; check the steps above to make sure you have configured everything correctly. If these tests do not work, go to the next step.
Roll back the DNS changes you made and run the tests again. If the tests still do not work, then there is a problem with your network settings; contact your ISP or network administrator for assistance.
If you encounter any problems after setting Google Public DNS as your resolver, please run the diagnostic procedure.
1 Google thanks Jason Fesler for granting permission to use test-ipv6.com URLs for browser DNS testing purposes.
Switch back to your old DNS settings
If you had not previously configured any customized DNS servers, to switch back to your old settings, in the window in which you specified the Google IP addresses, select the option to enable obtaining DNS server addresses automatically, and/or delete the Google IP addresses. This reverts your settings to using your ISP's default servers.
If you need to manually specify any addresses, use the procedures above to specify the old IP addresses.
Restart your system if necessary.
Except as otherwise noted, the content of this page is licensed under the Creative Commons Attribution 4.0 License, and code samples are licensed under the Apache 2.0 License. For details, see the Google Developers Site Policies. Java is a registered trademark of Oracle and/or its affiliates.
Как прописать DNS 8.8.8.8 и 8.8.4.4 от Гугл
Часто на форумах и блогах в Интернете советуют в случае появления проблем с сетью прописать DNS 8.8.8.8 от Гугл в качестве основного или альтернативного сервера. Для обычных пользователей, коих в сети большинство, это как китайская грамота — ничего не понятно: что это за цифры, куда их прописывать и вообще зачем?!
В этой статье я хочу подробнее рассказать зачем нужны ДНС серверы 8.8.8.8 и 8.8.4.4 и как ими пользоваться в настольных операционных системах Windows, Linux, Mac OS, а так же в мобильной операционной системе Android.
Что такое DNS 8.8.8.8 и 8.8.4.4
Если выражаться максимально простым языком, то DNS это такой специальный компьютер в сети — сервер , который содержит базу данных общедоступных IP-адресов и связанных с ними имен сайтов. По запросу от клиента он выдаёт IP того или иного сайта в Интернете. Например, Вы вводите в адресной строке браузера имя сайта — google.ru, операционная система отправляет запрос к ДНС и в ответ получает IP сайта — 64.233.165.94.
DNS-серверы используют специальное программное обеспечение и обмениваются данными друг с другом с использованием специальных протоколов. Без них мы не смогли бы сейчас комфортно работать в глобальной паутине.
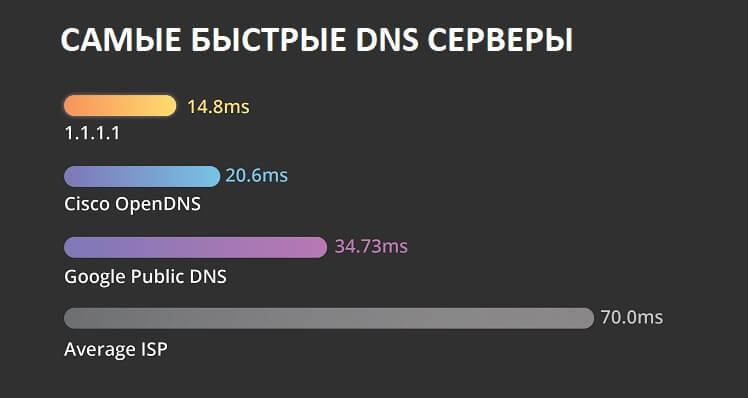
Не так давно компания Google запустила и поддерживает свой бесплатный сервис Google Public DNS. Он входит в тройку самых быстрых ДНС серверов в мире и в первую очередь нацелен на то, чтобы сделать просмотр веб-страниц в Интернете как можно быстрее. Как правило, если ваш интернет-провайдер занимает 3 секунды для определения IP-адреса по имени домена , то публичный DNS-сервер Google 8.8.8.8 и 8.8.4.4 сделает это за секунду и Вы будете экономить 2 секунды на каждом запросе, который вы делаете в Интернете.
Настройка DNS Google 8.8 8.8
Как поменять DNS в Windows 10
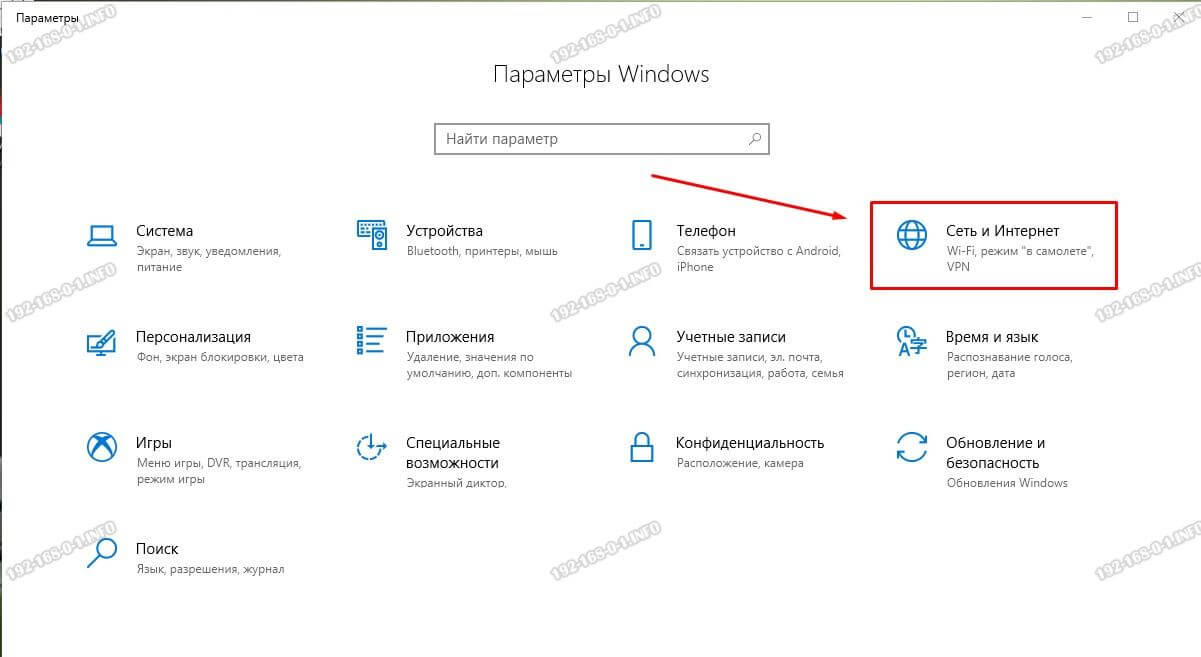
Для того, чтобы прописать ДНС от Гугл в операционной системе Windows 10, надо нажать а кнопку «Пуск» и зайти в Параметры системы. Далее откройте раздел Сеть и Интернет.
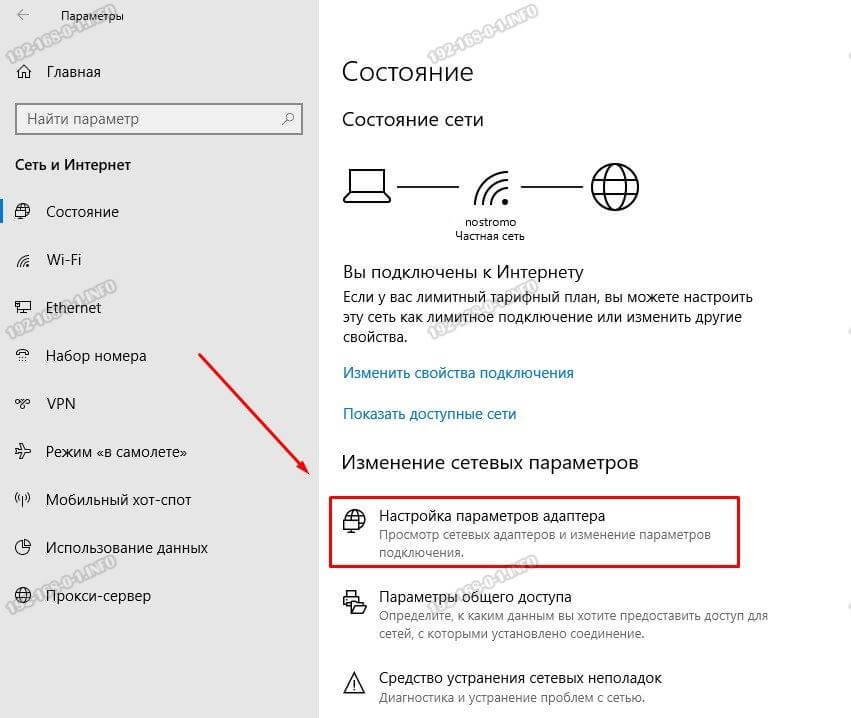
Дальше в подразделе Состояние найдите пункт «Изменение сетевых параметров» кнопку Настройка параметров адаптера и нажмите на неё:
Откроется окно сетевых подключений, в котором будет список доступных адаптеров. Обычно их два. Первый — обычная сетевая карта для кабельного подключения. Второй — адаптер WiFi. Выбираем тот их них, через которых компьютер подключен к Интернету и кликаем по нему правой кнопкой мыши:
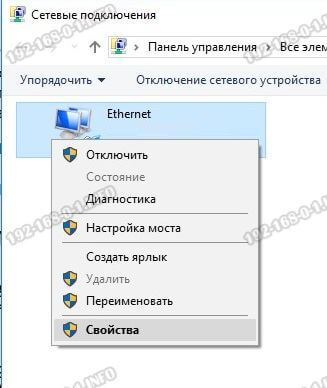
Выбираем пункт меню Свойства чтобы открыть параметры адаптера. Откроется окно, в котором будет список компонентов, среди которых найдите и кликните дважды левой кнопкой мыши на пункт IP версии 4 (TCP/IPv4). После этого должно появиться ещё одно окно свойств протокола IP.
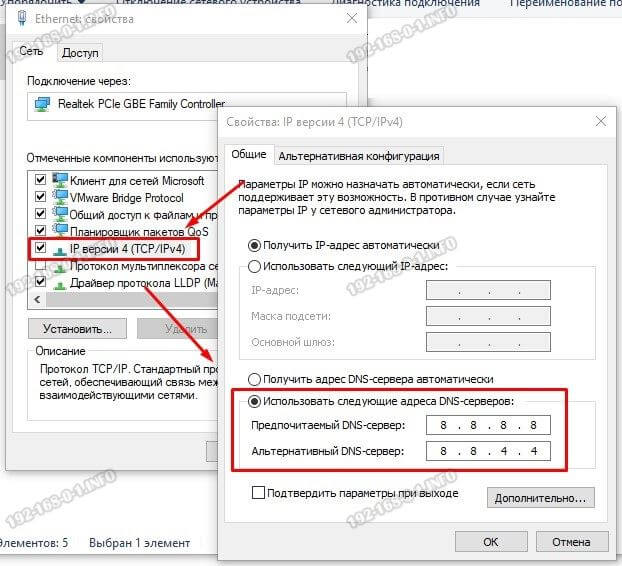
Здесь надо поставить жирную точку на пункт «Использовать следующие адреса DNS-серверов» чтобы стали активными поля для ввода предпочитаемого и альтернативного ДНС-серверов. В эти поля надо прописать Google DNS — 8.8.8.8 и 8.8.4.4. После этого надо по очереди нажать на кнопку «ОК» в каждом из открытых окон, чтобы сохранить и применить настройки.
Примечание:
Если Вы используете протокол IP версии 6 (TCP/IPv6), то в списке компонент надо выбрать соответственно этот протокол и прописать DNS уже вот такого вида:
Не забудьте сохранить настройки после внесения изменений.
Настройка DNS от Гугл в Android
Linux — Ubuntu:
1) Перейдите в раздел «Система»>>»Администрирование»>>»Сетевые подключения».
2) Выберите соединение, которое вы хотите настроить.
3) Нажмите кнопку «Изменить».
4) Выберите вкладку «Настройки IPv4» или «Настройки IPv6».
5) Введите IP-адреса Google Public DNS в поле «DNS-серверы».
2001: 4860: 4860 :: 8888
2001: 4860: 4860 :: 8844
6) Нажмите кнопку «Применить», чтобы сохранить изменения.
7) Перезапустите соединение.
Linux — Debian
1) Отредактируйте файл ‘/etc/resolv.conf’ в консоли используя команду:
2) Замените IP-адрес DNS в поле сервера имен.
nameserver 8.8.8.8
nameserver 8.8.8.4
nameserver 2001: 4860: 4860 :: 8888
nameserver 2001: 4860: 4860 :: 8844
3) Сохранить и выйти.
4) Перезапустите клиент Интернета, который вы используете.