Разборка и чистка ноутбука ASUS VivoBook S15 S531FL
Это говнище не стоит вобще никаких денег,(брал чисто фильмы в дороге посмотреть).
HP Compaq 530
У ноутбуков с номерами KD092AA, KE666AA, KP477AA, KP479AA процессоры Intel Core.
Acer Extensa 5620
У меня полетела матрица, какие видеовыходы можно использовать?
ATI Mobility Radeon HD 5470
Ноут sony vaio VPCEC1M1R . Видеокарта ATI MOBILITY RADEON HD 5470. После установ.
HP ProBook 455 G8 – классика на службе у бизнеса
Dell XPS 9510 — стремиться к идеальности
Lenovo P11 Pro – оправданная цена
ASUS ROG Zephyrus S17 GX703 — дельная игровая машина
Honor MagicBook 16 – к сотрудничеству готов
NOTEBOOK-CENTER — ноутбуки © 2006-2023
Полное или частичное использование материалов сайта возможно только после согласия автора или администрации сайта.
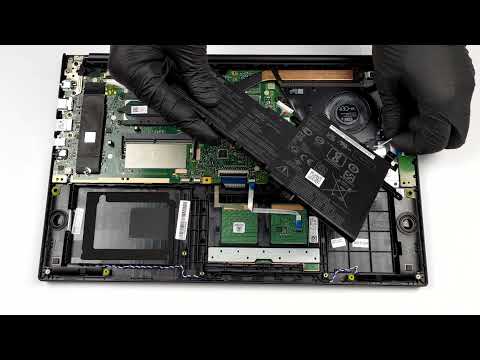
��️ ASUS VivoBook 15 OLED K513 — disassembly and upgrade options
�� In-depth Review: ��laptopmedia.com/review/asus-vivobook-15-oled-k513/ �� �� Specs and Prices: ��laptopmedia.com/series/asus-vivobook-15-oled-k513-m513/ ✅ LaptopMedia.com �� Please SUBSCRIBE to our new channel for GAMING BENCHMARKS: ����youtube.com/channel/UCLJ-FnaQC5P7DAJnZz9YZFQ?sub_confirmation=1 ASUS VivoBook 15 OLED K513 — disassembly and upgrade options


how to install 32gb ram in this loptop? should i disconnect 8 ram on board?
Hello. How to disable integrated ram? It have match errors
First you need to disconnect the battery, and then do all the other operations inside the laptop 0qnyiDs1Epk&t=1m47s 1:47
This is the best laptop disassembly channel I've ever seen. Can you please disassemble the ASUS Vivobook 15 X1502ZA
7hr of video playback haha seriously?it doesn't last even 3hr.��
Спасибо за видео
Why did you take the battery out yet didn't even mention the m.2 slot that holds windows, u pointed out where an ssd could go but didn't tell us what we will need to plug it in to the board and said you can increase the memory but left out what type of memory ram to buy is it ddr3 ddr4 and at what speed? Because if you do not match the speed of the ram soldered to the board with the ram to buy u may have a problem claiming true 40gb.
Was having trouble running VMS on 8gb of ram, but now i'm happy that i can upgrade 🙂
Can the laptops able to upgrade their graphics card?
What type of M.2What is the manufacturer?
pry tool purchased! without it not getting in! want to be able to blow out the cooling fan one day! or upgrades, battery. This is a great laptop, it is very difficult in this price range to find a OLED screen that is a non gaming or creative content creators laptop, I believe 400-500 nits brightness. This is a great option for people who aren't gamers, that appreciate a beautiful screen for streaming HD content, or anything else. I wish it has a dedicated gpu, but with 16 gigs shared RAM at this price its ok. I use it for non work things when at work, I have and love apple phones, but for me I can get a lot more done with a PC laptop than an apple ipad pro with everything added. Not bashing apple in any way, I just can't afford and apple ipad pro with added keyboard and mouse. But for 690.00 the K513 on amazon compared to others at this price point it's a no brainer.
u can upgrade untill 12 gb ram recomended and thats is not 40 gb of ram
I was just wondering if anyone could possibly give advice on how the Asus vivobook 15 laptop ( ASUS VivoBook, AMD Ryzen 5, 8GB RAM, 512GB SSD, 15.6 Inch OLED Laptop, M513UA-L1188W)
compares / how would you rate it against the Lenovo IdeaPad 5 which has AMD Ryzen 7 5700U processor with same 8GB ram (memory), and same 512GB SSD storage, 15.6 inch screen, model 82LN00ENUK. only reason is that I am completely new to laptops having still owning only very old over 10 years now still with an outdated Windows 8 Toshiba Satellite Pro L850 laptop which although back in its day very good/ possibly nearly top of the line laptop in Toshiba range; is now nearly on the brink of breaking down/ nearly stop working due to it's age and issues such as slow booting time and turning off randomly at times by itself, making files I have saved very vulnerable of loosing once it crashes completely unfortunately. It would be very useful if somebody could possibly give advice on which laptop is best as not looking specifically for a very expensive high end laptop but just good enough to do daily buisness tasks. In my understanding despite the Asus vivobook laptop nowadays comes with the Ryzen 5 5500U processor which is slightly lower performance than the Lenovo ideapad 5 which comes with the Ryzen 7 5700U processor but seems like now Asus comes already pre- installed with Windows 11 Home or is it the Windows 11 S edition anyways, wheras the Lenovo despite having slightly better processor has only Windows 10 Home/ or Windows 10 S installed at least according to my research.
Also was wondering as not much knowledge regarding these two/ 2 laptops I was wondering if these laptops come with the older type of 2.5inch SSD or the M.2 drive SSD?
Thank you,
Tom.
Asus VivoBook Pro 15 N580VD Disassembly (SSD, RAM, HDD Upgrade Options)
In this guide, I will disassemble an Asus VivoBook Pro 15 N580VD. I will remove the bottom case in order to access the battery, SSD, Wi-Fi card, RAM, cooling fan, heat sink and motherboard.
For the freshest produce, find us on Facebook for the latest teardown news.
First of all, remove 11 screws from the bottom cover.
Lift up and remove the bottom cover. 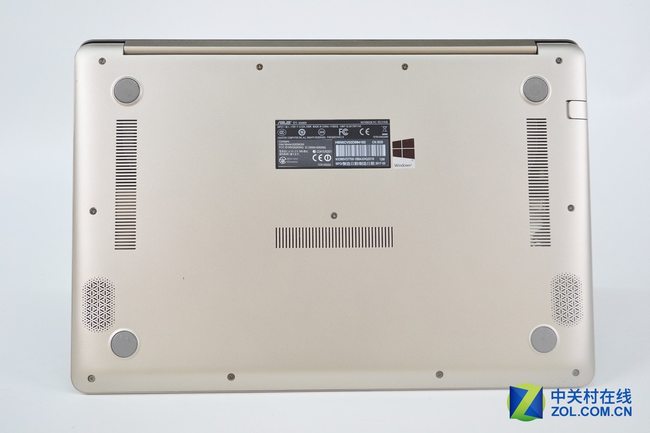
With the bottom cover removed, you can get access to the battery, HDD, SSD, RAM, speaker, Wi-Fi card, heat sink, cooling fan and motherboard. 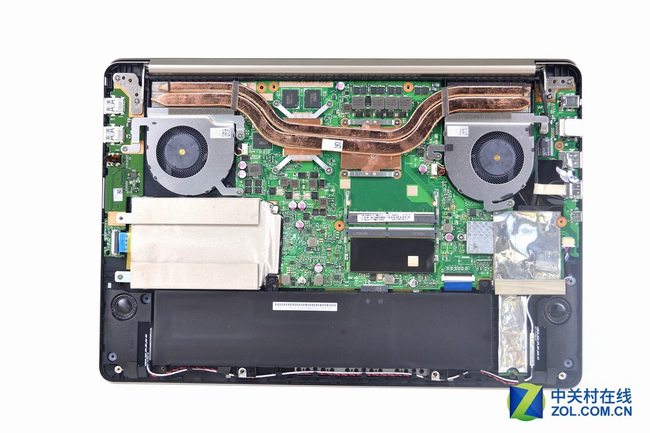
Near the cooling fan, we can see the flash memory of the graphics card.
Below the heat sink is the Nvidia GeForce GTX 1050 graphics card. 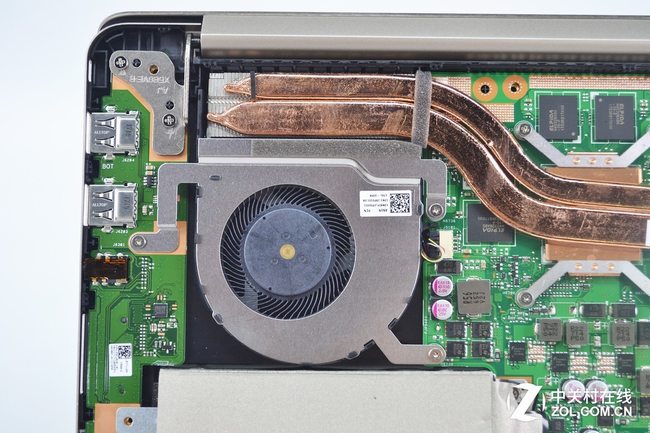
The cooling system uses a classic implementation with two fans and two long heat pipes that go over both the CPU and the GPU. The fans are not individually controlled and both spin at the same time. 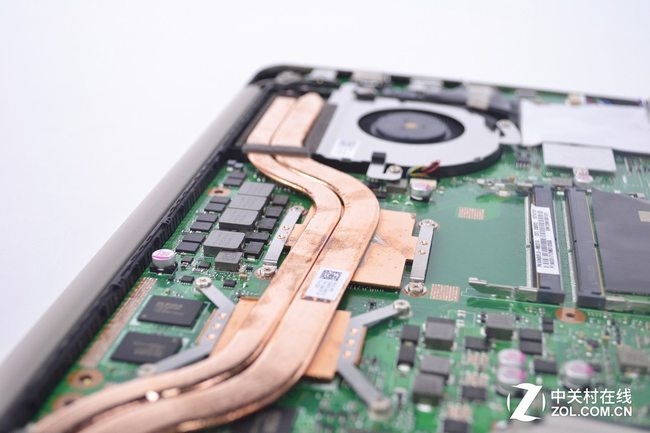
Asus VivoBook Pro 15 N580VD provides two RAM slots, and only one RAM was installed so that you can add another RAM to the laptop.
The laptop supports up to 16GB RAM, that means you can add two 8GB RAM to the laptop. 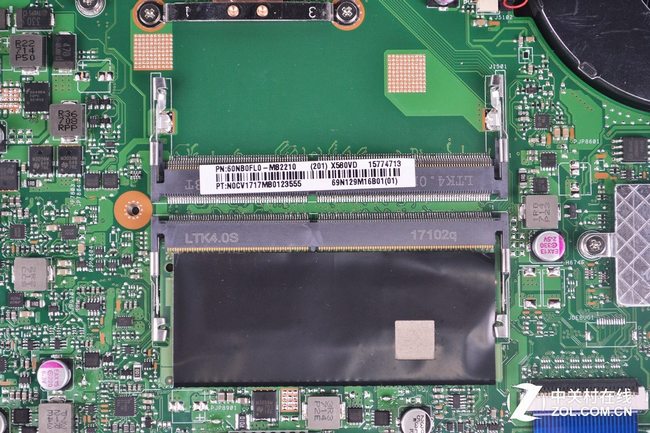
Here’s the hard drive, it is covering by the shockproof sponge. 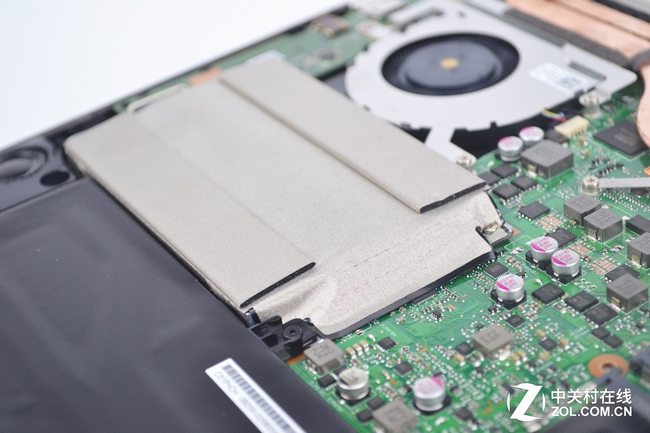
The 128GB SATA3 M.2 SSD is wrapped in a metal shield. If necessary, you can replace it with a 512GB SATA3 SSD. On Asus official website we only see the laptop comes with SATA3 SSD, so I think it should be not compatible with NVMe SSD. 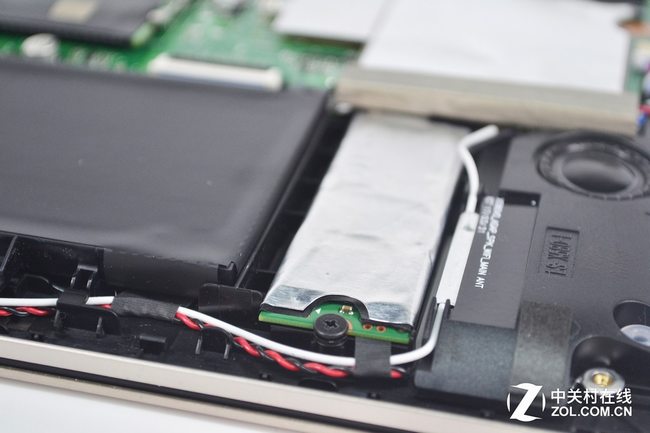
Here’s speaker module. 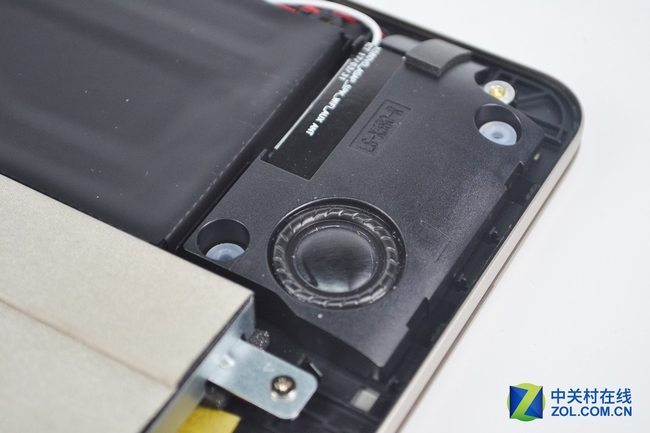
From the overall dismantling point of view, in detail processing, Asus VivoBook Pro 15 N580VD still doing a good job, and the internal workmanship is relatively neat, important parts have been protective measures. The CPU and GPU are soldered on the motherboard, but the RAM, SSD, HDD, Wi-Fi chip and battery are replaceable.
How to disassemble Asus VivoBook 15 F512 X512

In this tutorial I show how to disassemble an Asus VivoBook 15 F512 or X512 laptop. This disassembly guide should work for one of the following Asus VivoBook 15 models: F512DA, F512FA, X512F, X512DA, X512DK, X512FA, X512FB, X512FL, X512FJ, X512UA, X512UB, X512UF and probably some other models too.
Here are some Asus VivoBook 15 F512 X512 design highlights:
– The laptop can support two storage drives: 2.5″ SATA drive and M.2 SATA SSD.
– There is only one RAM slot available for upgrades.
– The cooling fan easily removable.
– The DC power jack soldered to the motherboard.
– The keyboard permanently attached to the top case.
For this disassembly you will need only three basic tools: Phillips #1 screwdriver, case opener tool and tweezers.
Removing the base cover
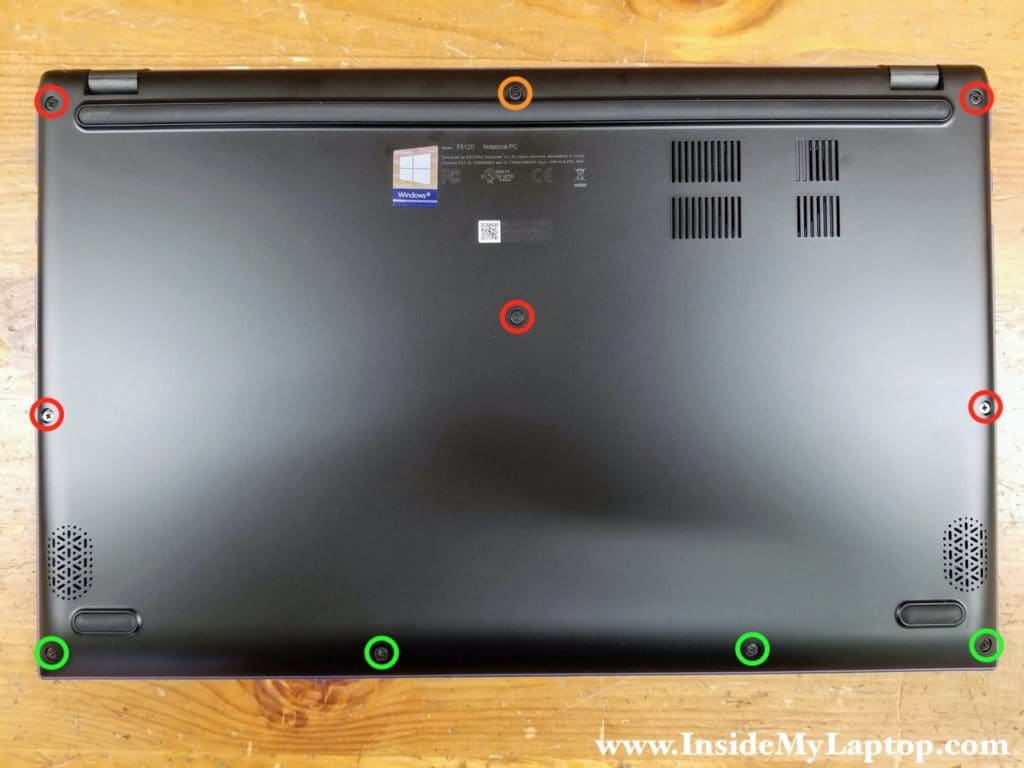
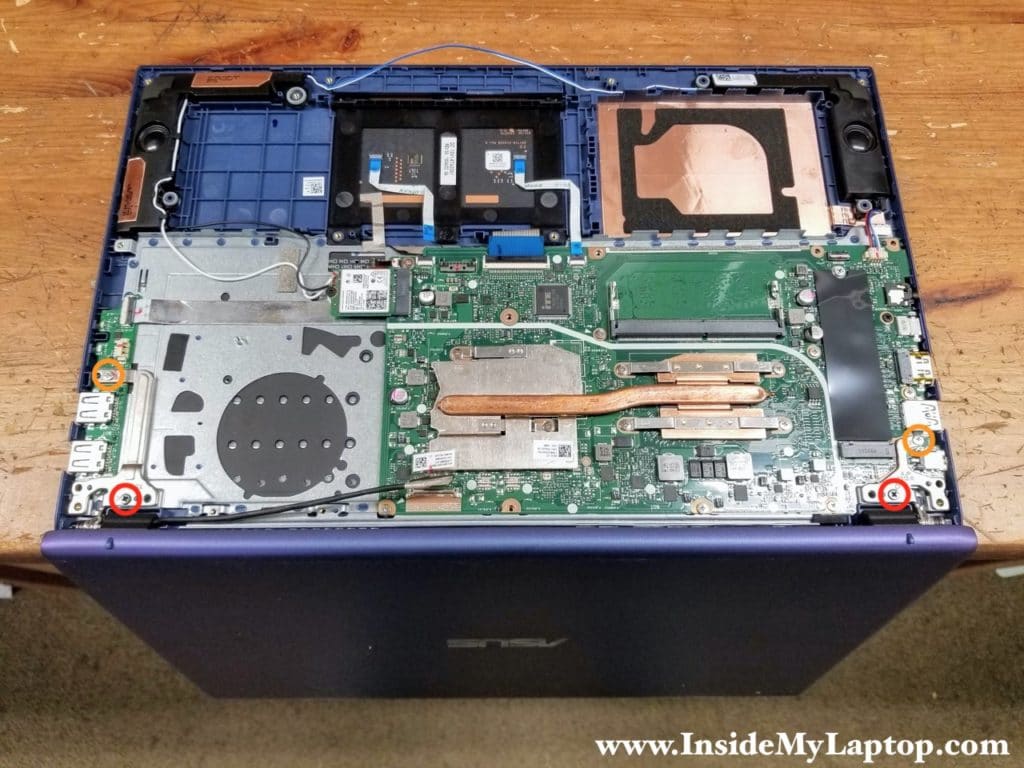
STEP 1.
Remove ten screws securing the base cover. There are three types of screws: orange – the longest screw, red – medium length screws, green – short screws.
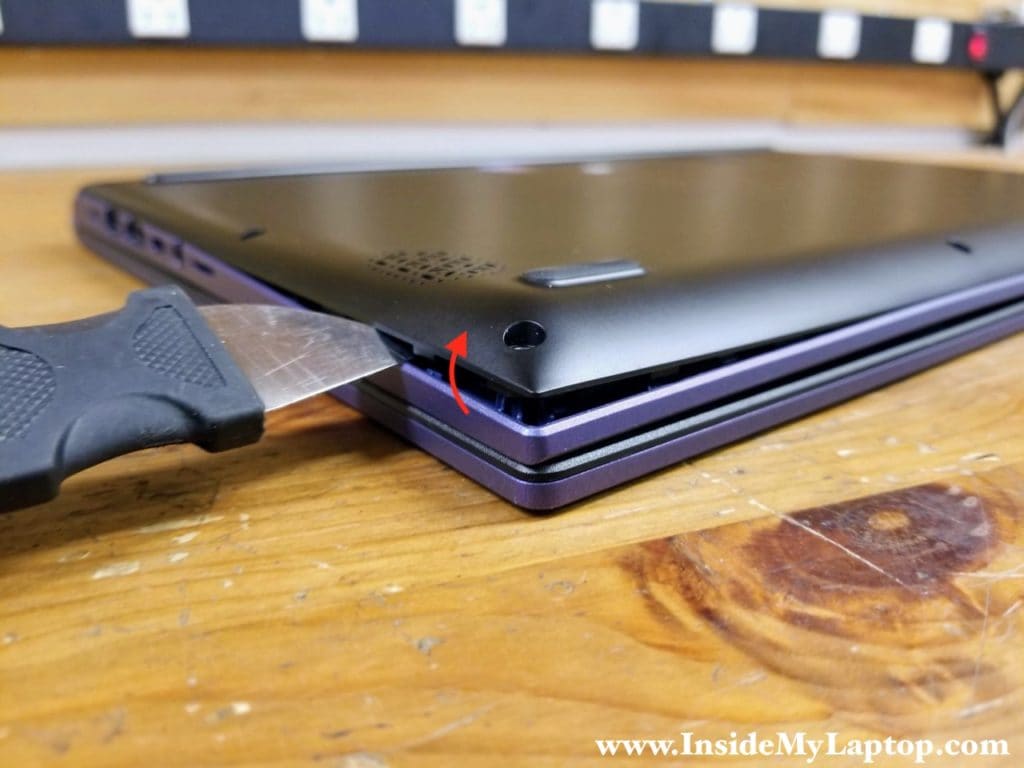
STEP 2.
Pry up the base cover and start separating it from the top case assembly.
STEP 3.
Continue removing the base cover with your hands. You’ll have to apply some reasonable force to remove the cover. There are multiple hidden latches attaching it to the top case.

Disconnecting and removing the battery
STEP 4.
Remove four screws securing the battery and the battery mounting bracket. Remove the bracket.
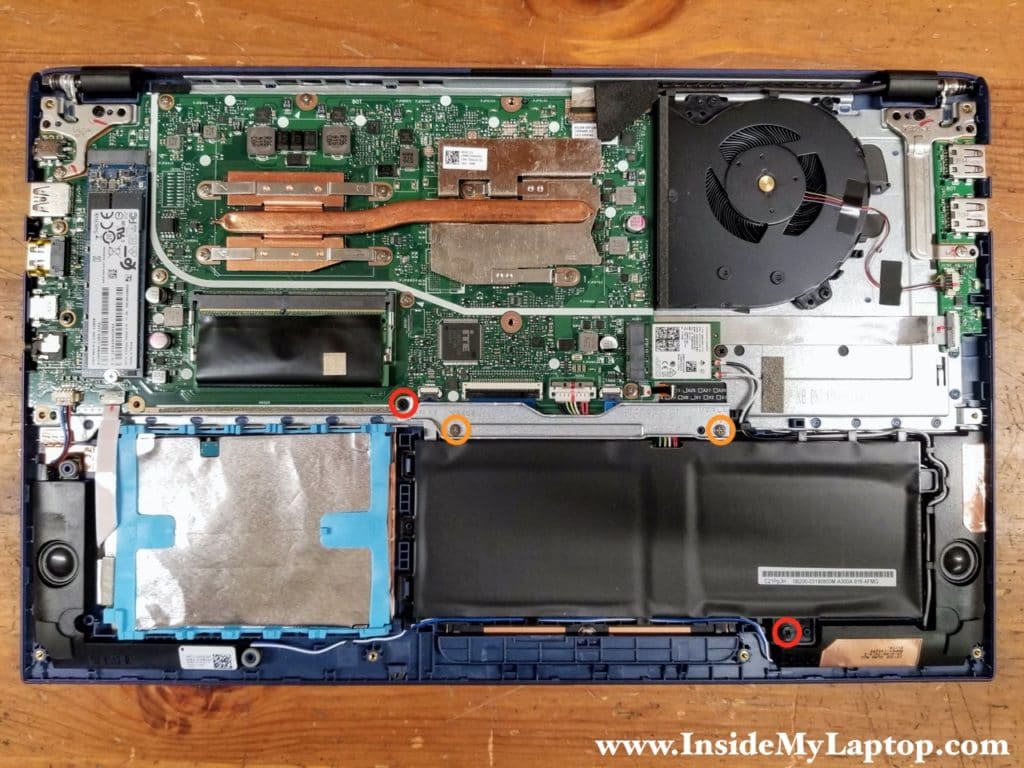
The battery cable is routed under the touchpad cable which has to be disconnected first.
STEP 5.
Disconnect the touchpad cable from the motherboard.
The connector has to be unlocked before removing the cable. Lift up the locking tab (red arrow) to unlock the connector.
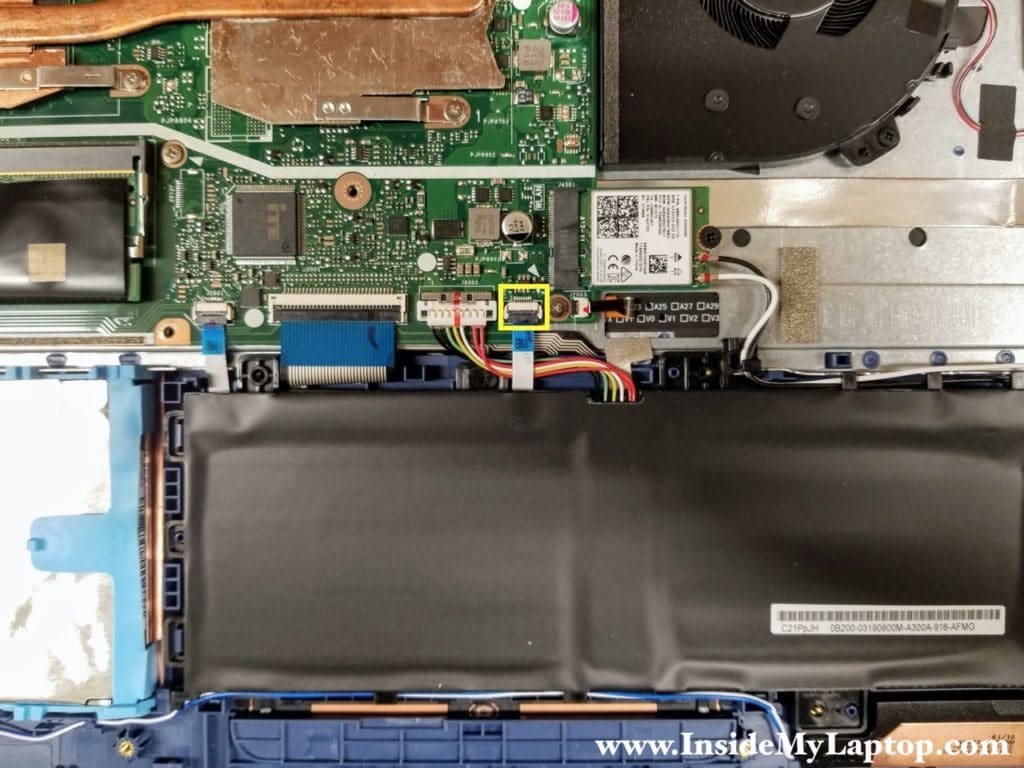
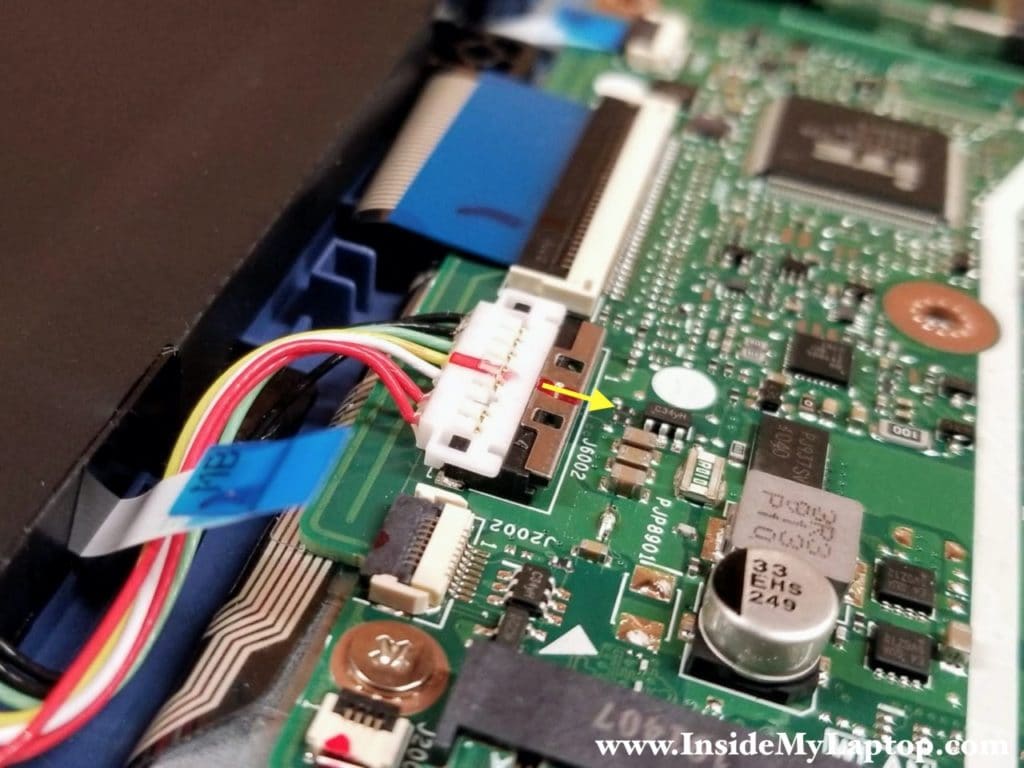
STEP 6.
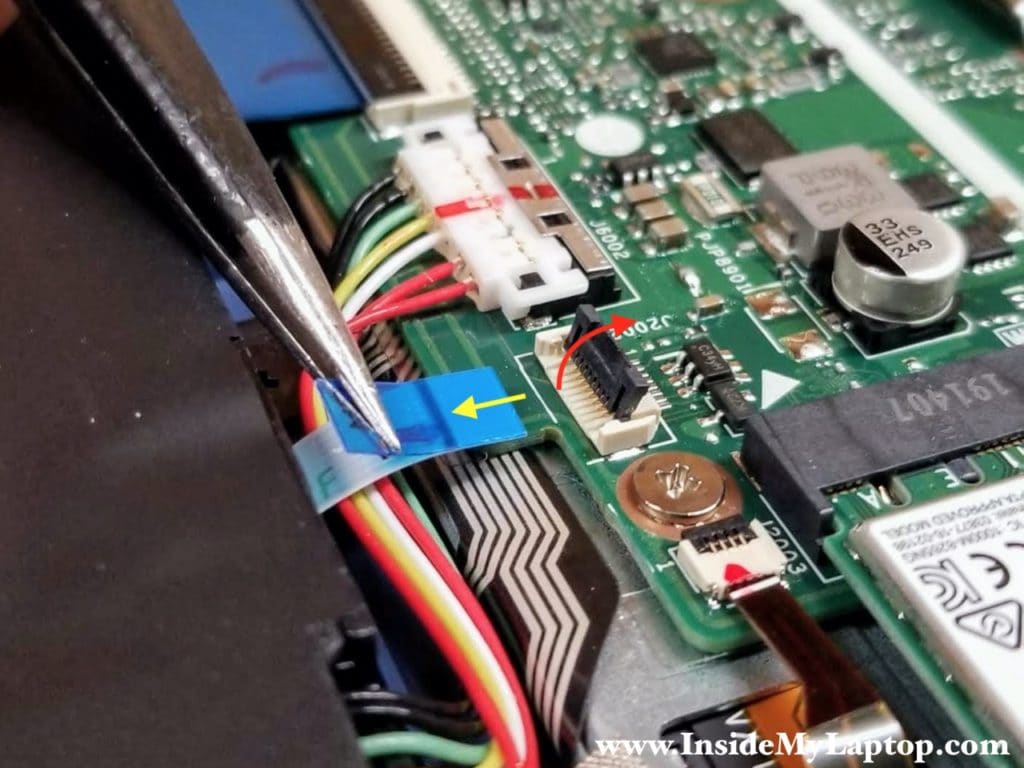
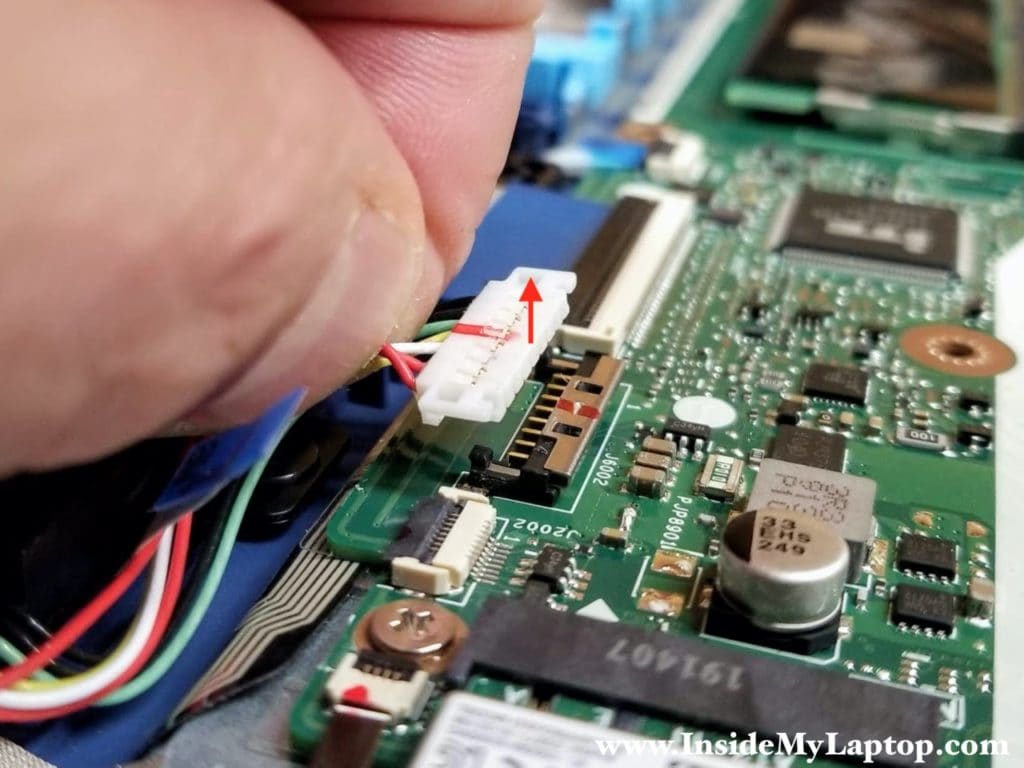
Unlock the battery cable connector and disconnect the battery cable from the motherboard.
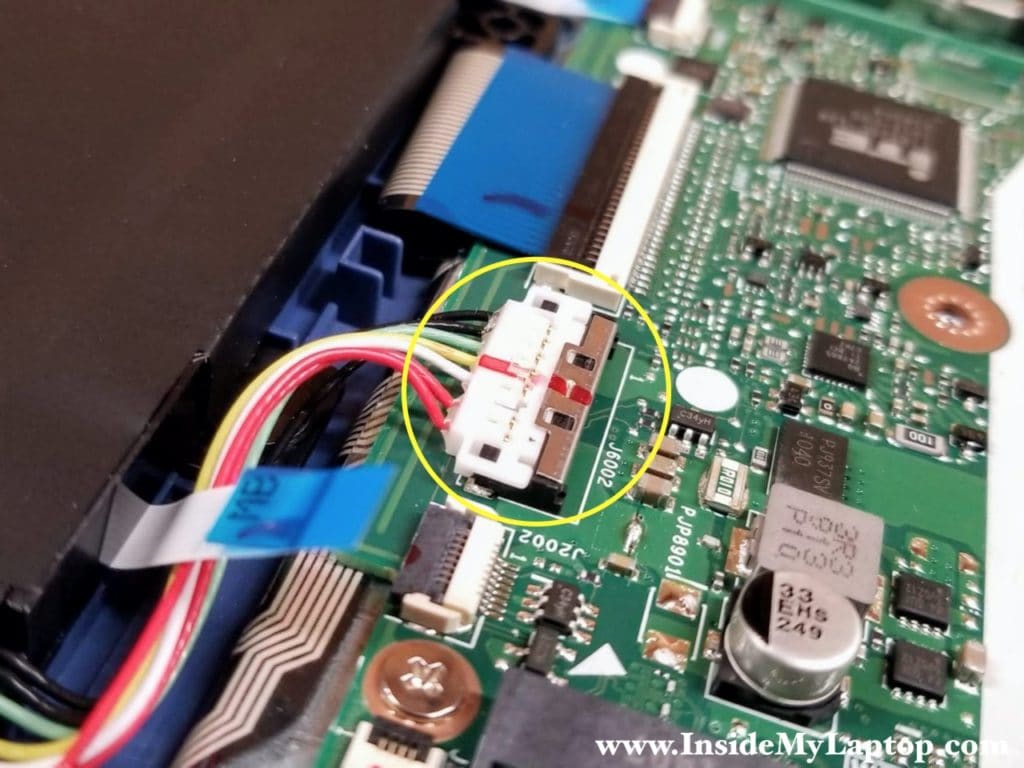
Slide the metal clip to the shown direction (yellow arrow). This clip covers the battery cable to secure the connection.
Now you can lift up the battery cable and unplug it from the motherboard. Do not use metal tools to lift up the connector. You can accidentally short the pins and damage the battery or the motherboard. Use your fingernails instead.
STEP 7.
The speaker cables and the Wi-Fi antenna cables are routed in the guided path on the side of the battery. Separate all cables from the battery.
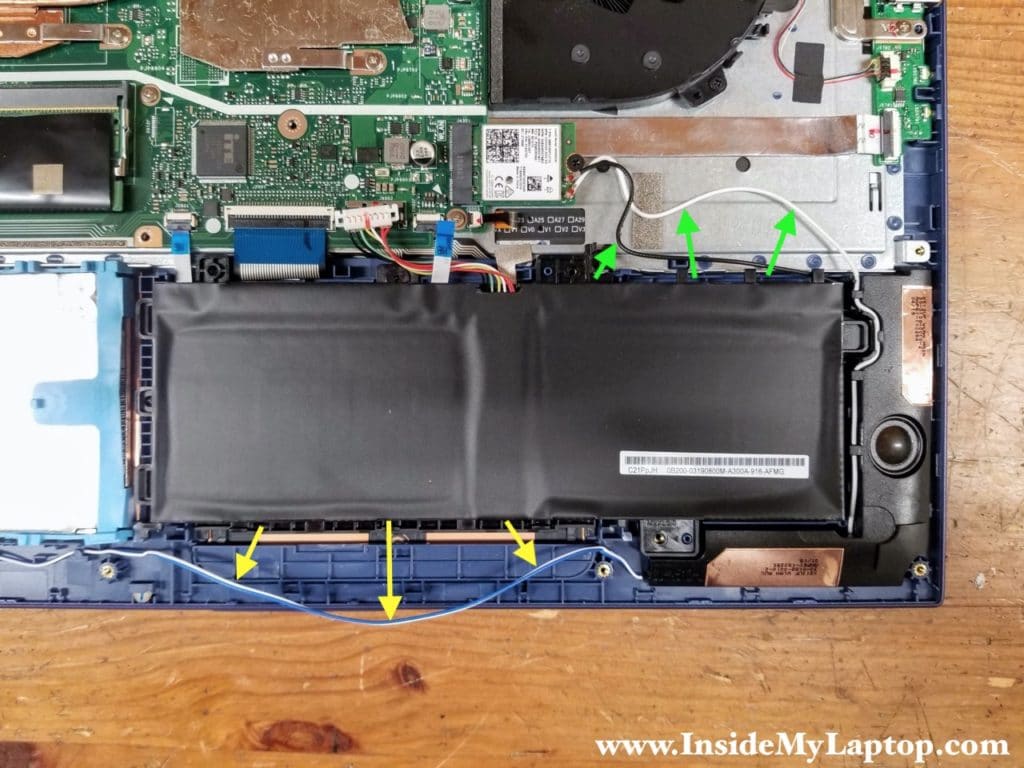
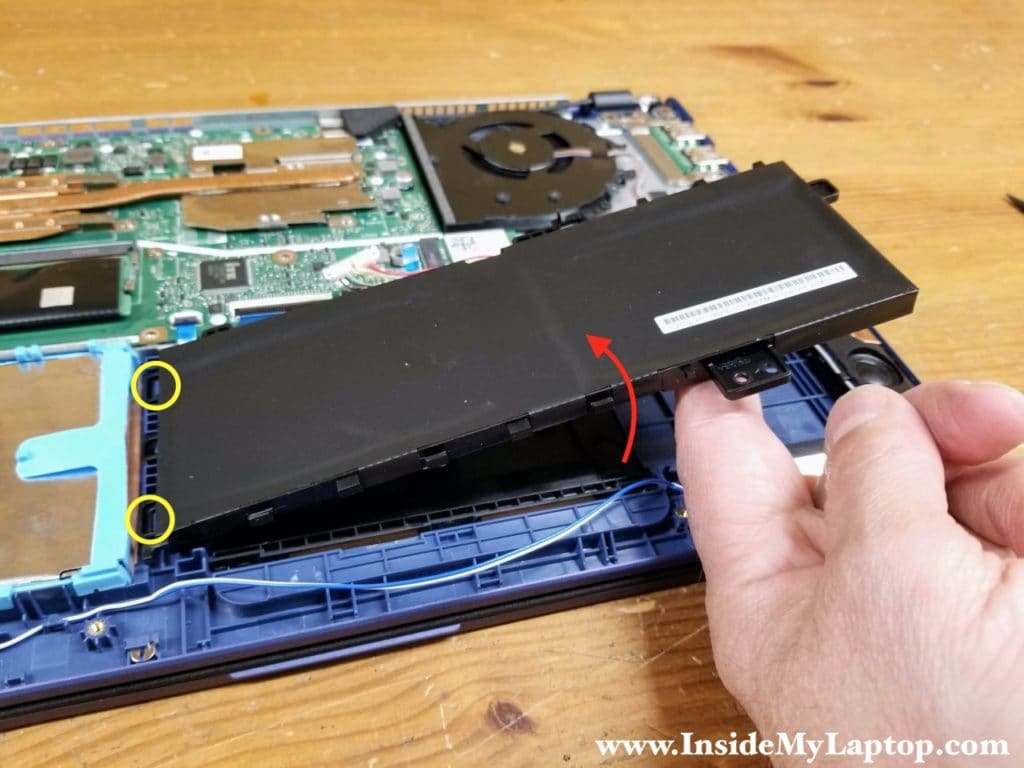
STEP 8.
Lift up the battery and remove it from the top case. The battery hinges on two knobs on the left side. Make sure to put it back in place properly during the re-assembly process.
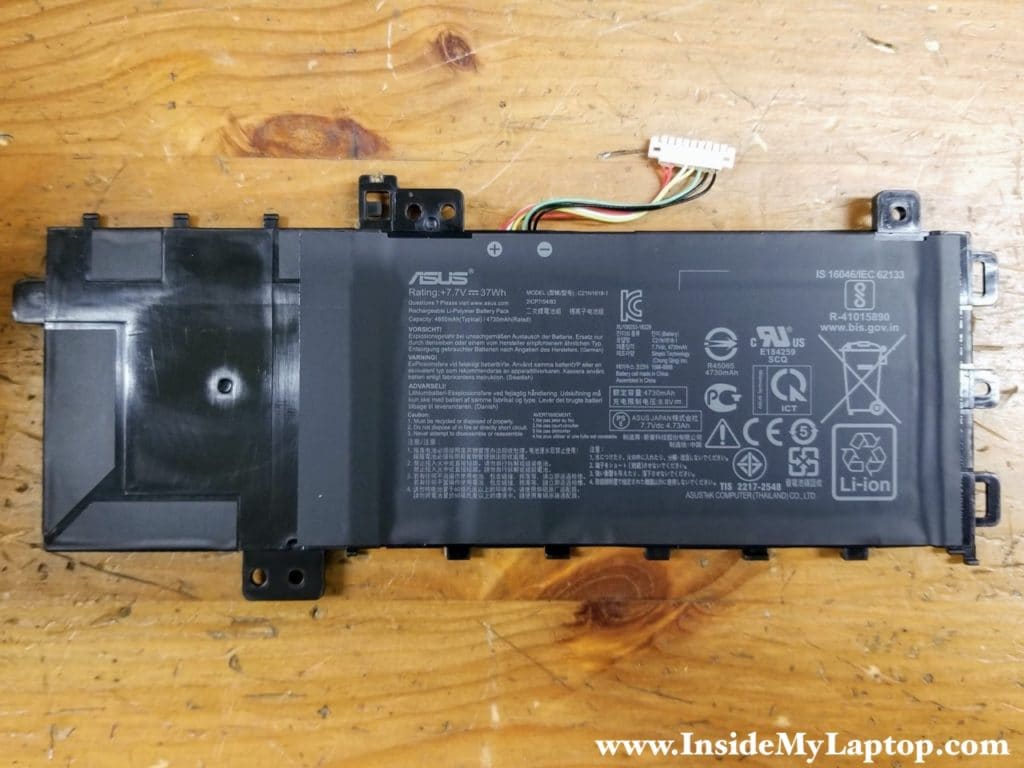
Here’s the other side of the battery.
Asus VivoBook 15 F512 X512 battery model: C21N1818-1.
Removing RAM, 2.5″ HDD and M.2 SSD
Asus VivoBook 15 F512 X512 motherboard has 4GB non-removable memory (soldered) and one RAM slot which can take up to 16GB DDR4 memory module. Maximum memory for this laptops is 20GB.
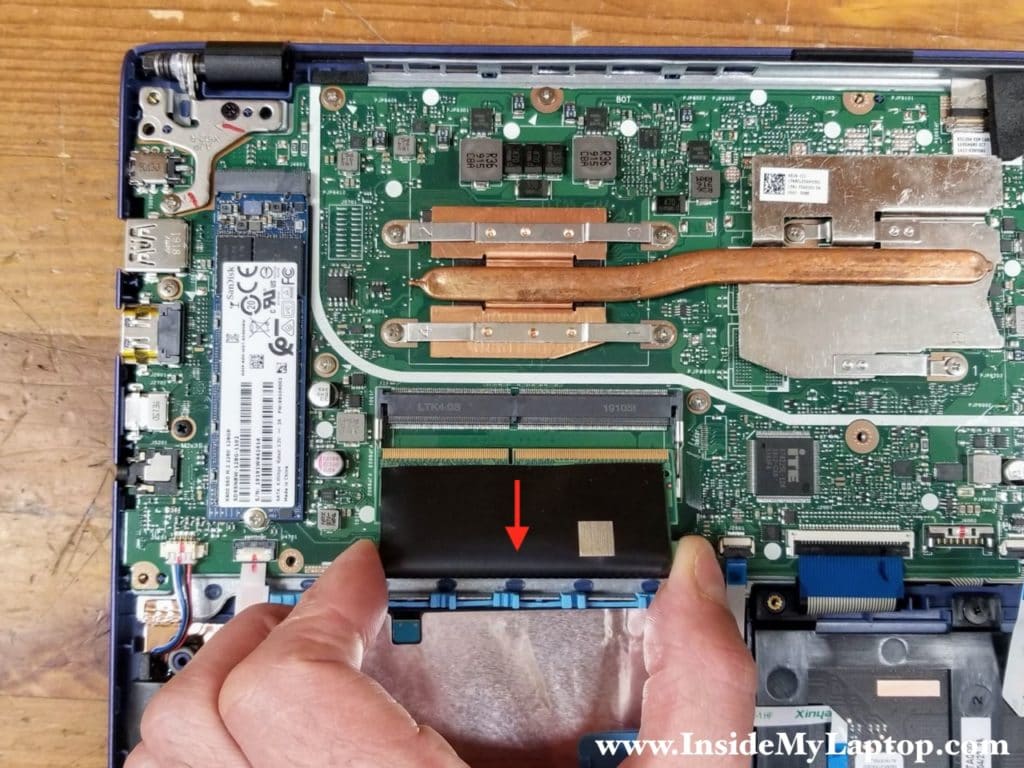
STEP 9.
Remove the memory module and replace it with a larger capacity module if necessary.
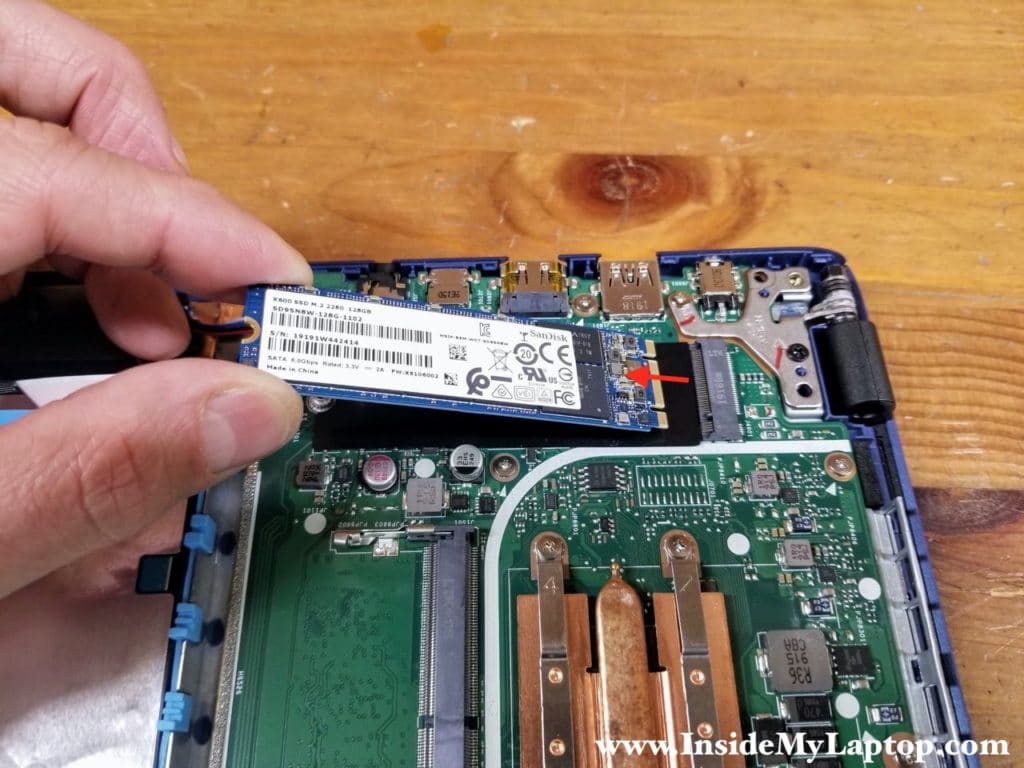
STEP 10.
Remove one screw securing the M.2 SATA SSD and pull the SSD out. This is type 2280 M.2 SSD.
STEP 11.
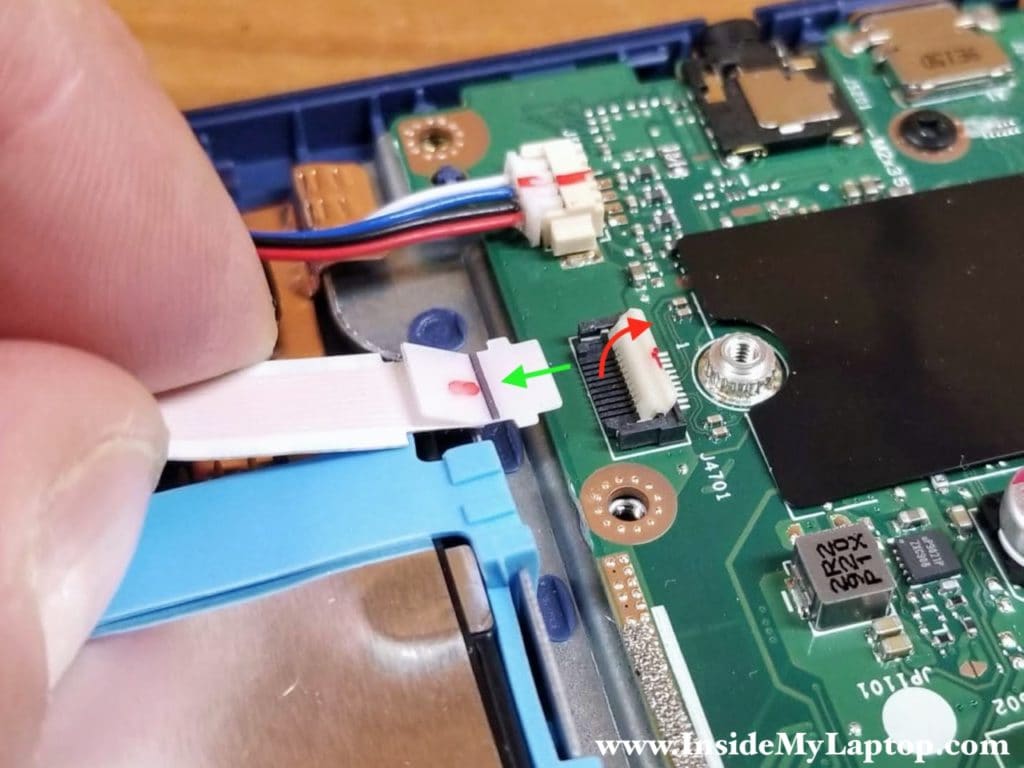
Disconnect the 2.5″ SATA hard drive cable from the motherboard.
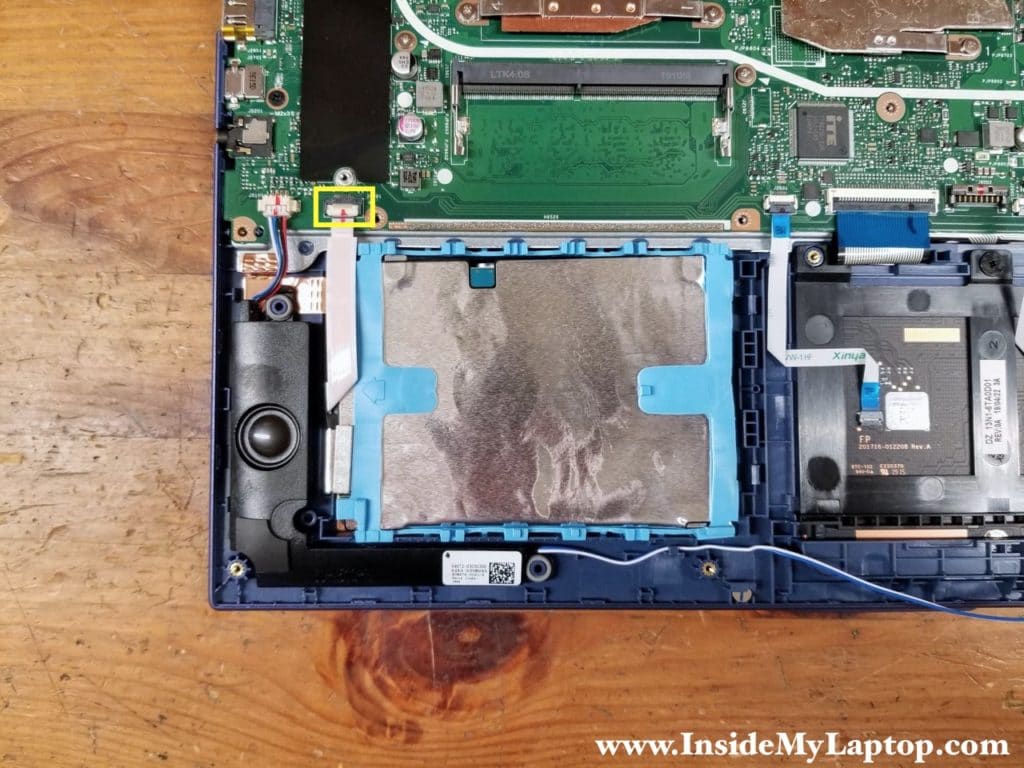
Unlock the connector before removing the cable.
STEP 12.
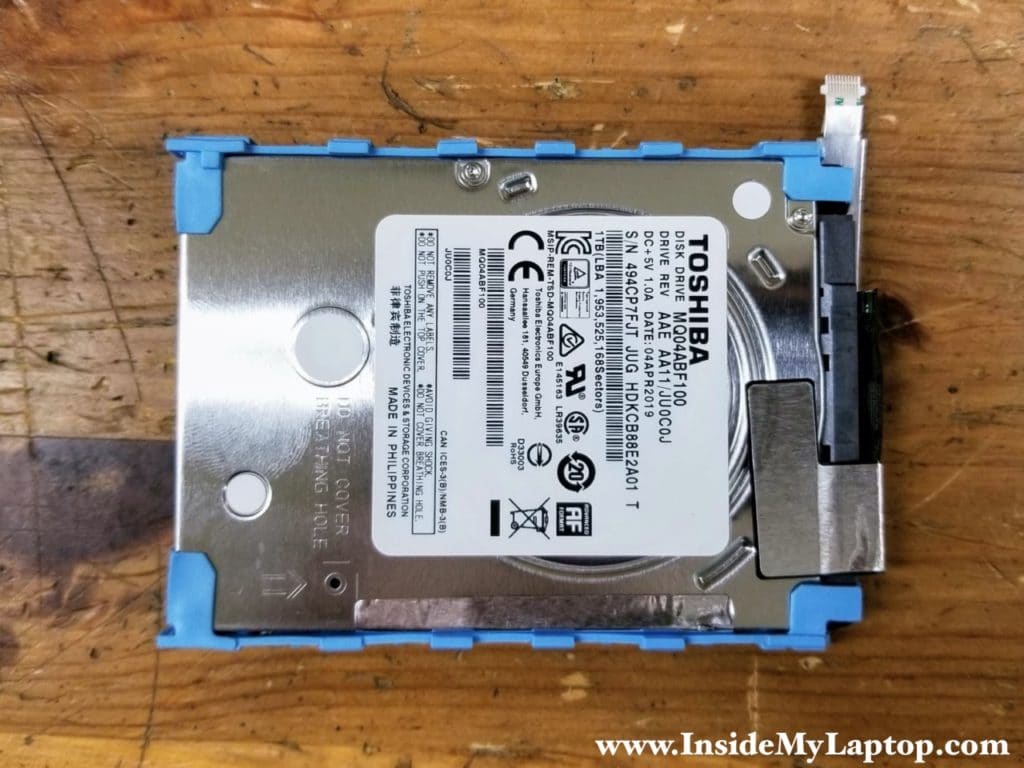
Remove the 2.5″ hard drive from the laptop.
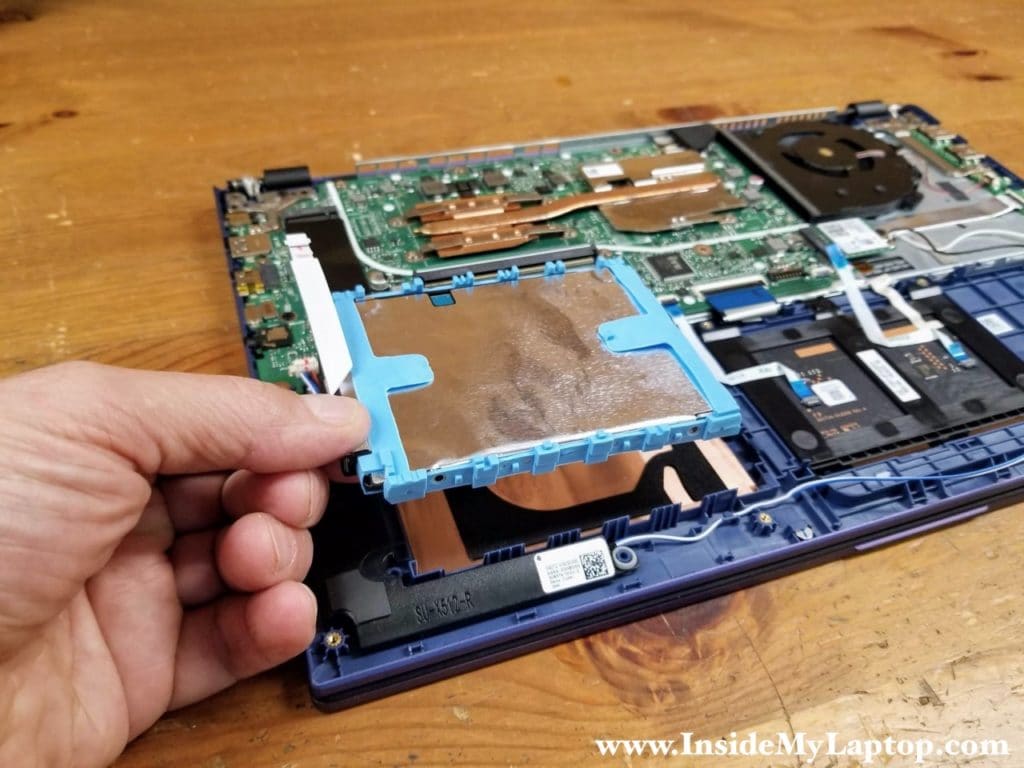
This is a regular 1TB 2.5″ spinning SATA hard drive. I would strongly recommend replacing it with a 2.5″ solid state drive which is much faster. When you upgrade the hard drive, you’ll have to transfer the SATA cable and the rubber sleeve to the new drive.
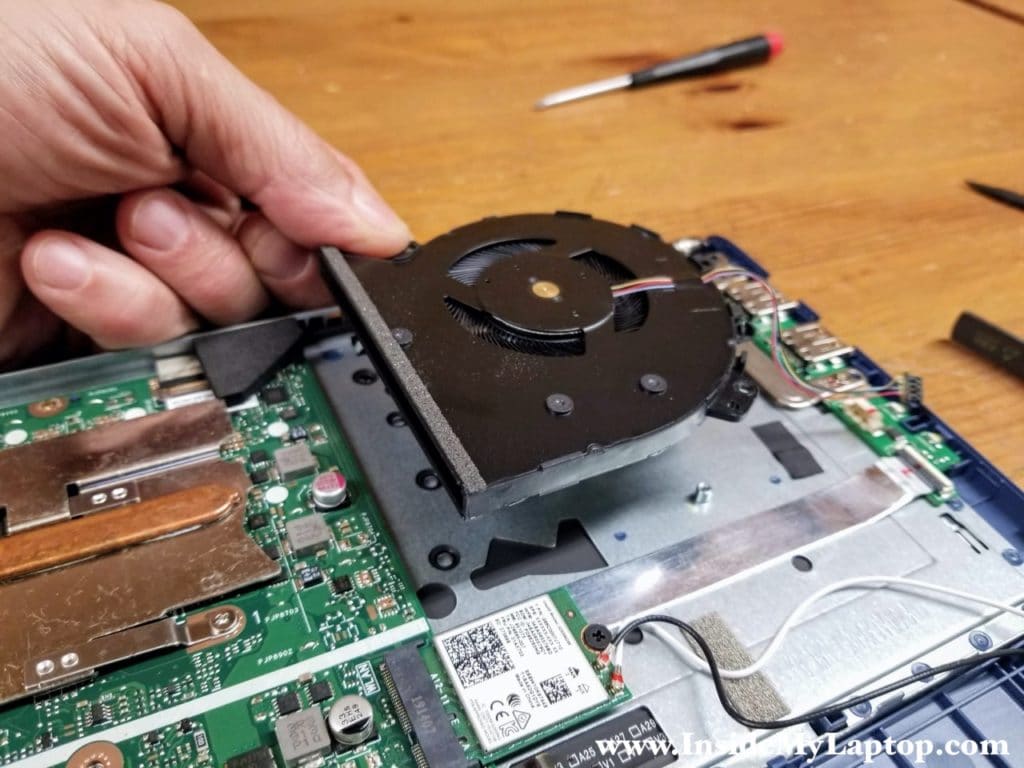
Removing the cooling fan
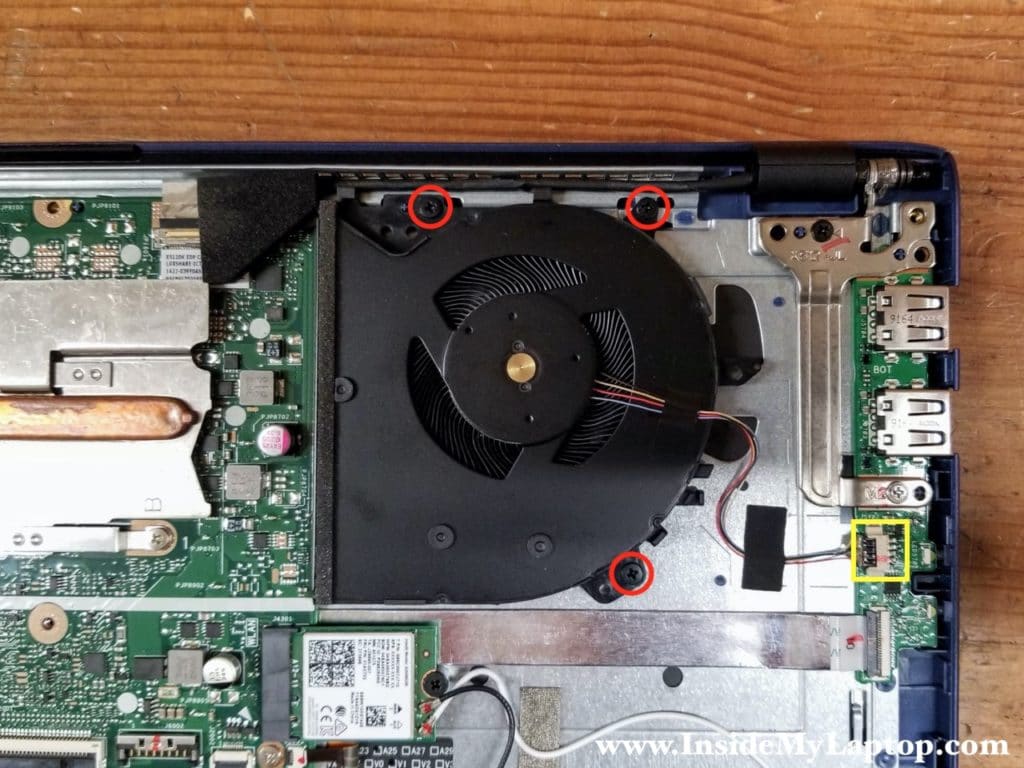
STEP 13.
Remove three screws securing the cooling fan. Disconnect the fan cable from the USB board.
STEP 14.
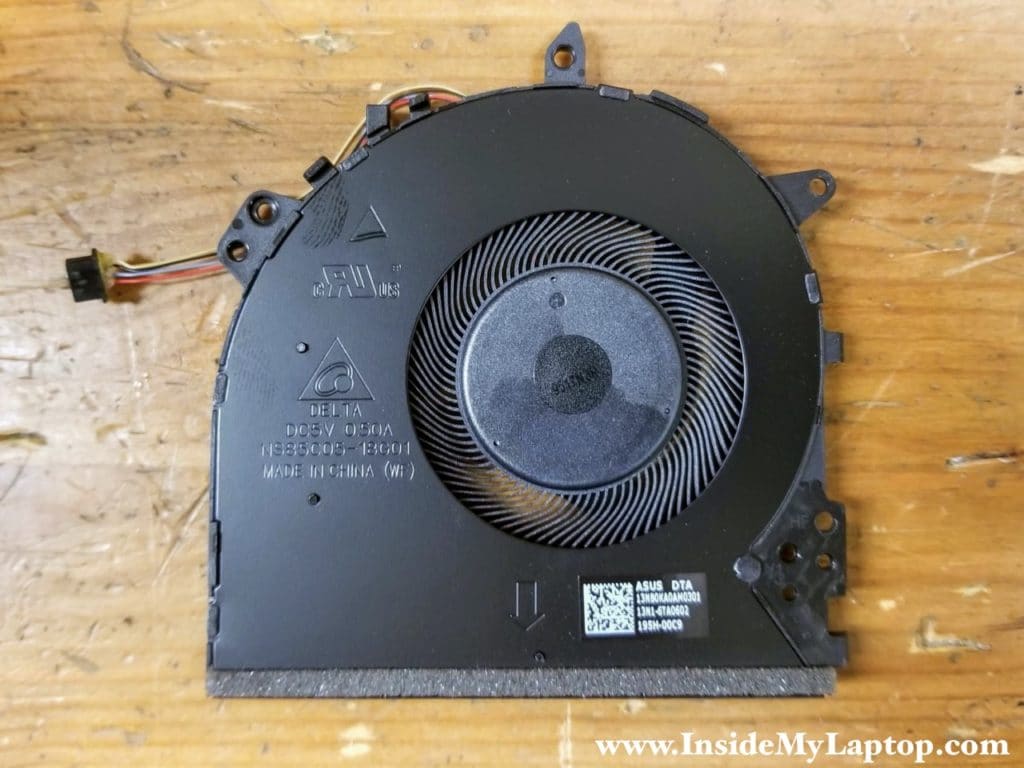
Lift up and remove the cooling fan.
Here’s the other side of the fan (part number 13NB0KA0AM0301).
Removing the display panel
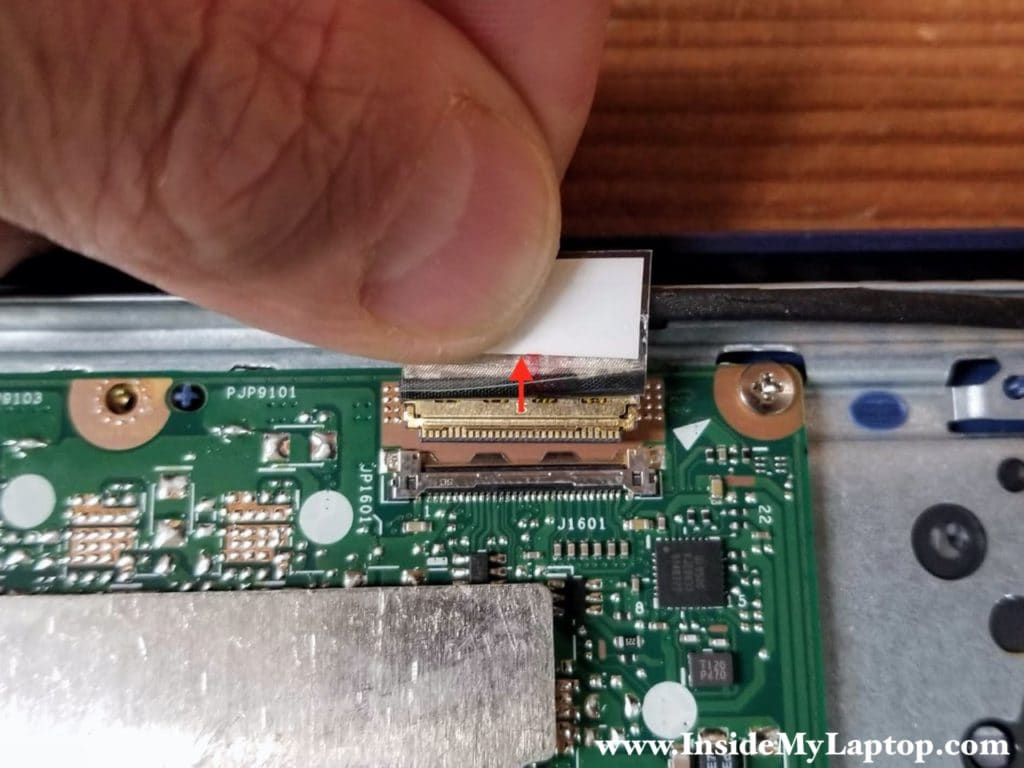
STEP 15.
Disconnect the display video cable which is hidden under the padding foam.
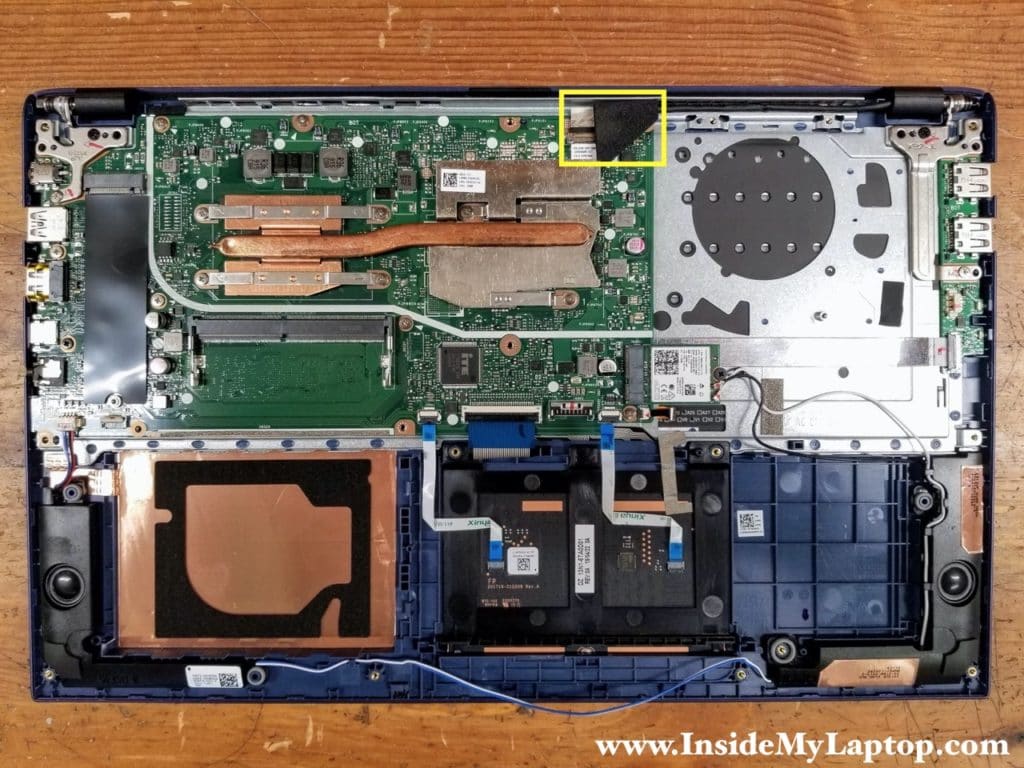
Lift up and remove the padding foam which has an adhesive tape on the bottom.

Peel off the clear tape and unplug the display video cable from the motherboard.
STEP 16.
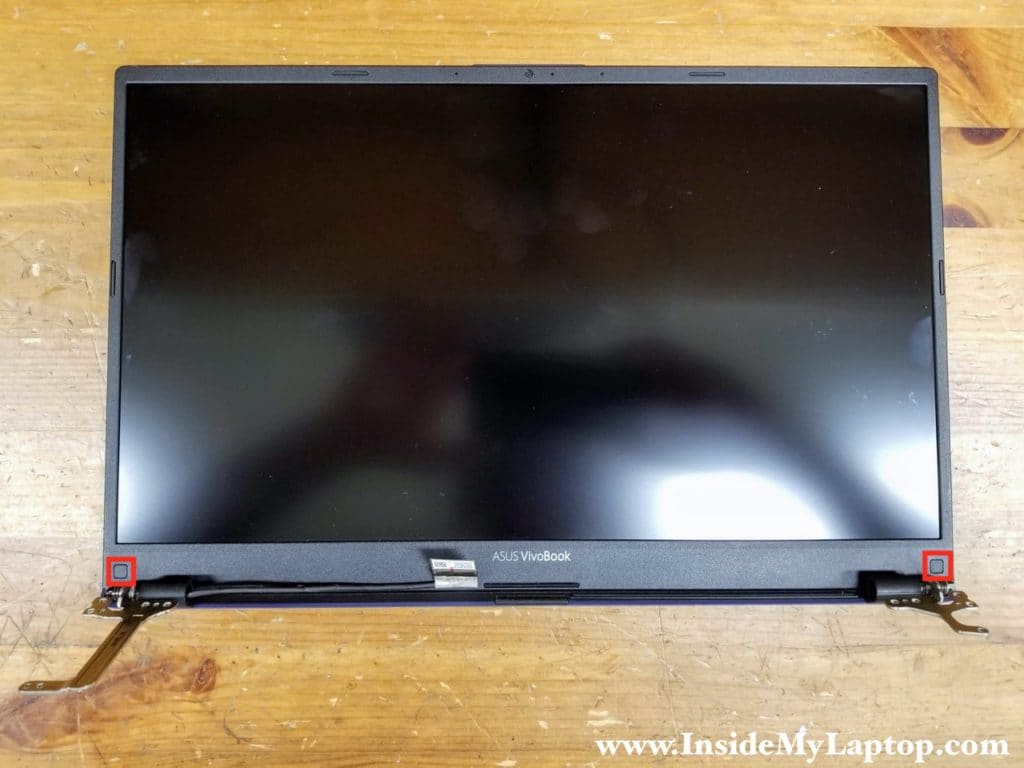
Open the display panel 90 degrees and place the laptop upside down on the edge of your desk.
Remove four screws securing the display hinges.
STEP 17.
Now you can separate the display panel from the top case assembly and remove it.

I don’t show how to remove the LCD screen in this guide but it shouldn’t be difficult. I believe the screen removal procedure is pretty much standard:
1. Remove two screws from the lower left and right corners of the display assembly.
2. Remove the screen bezel.
3. Remove all screws securing the screen.
4. Disconnect the display cable from the back of the screen.
Removing the USB board and the motherboard
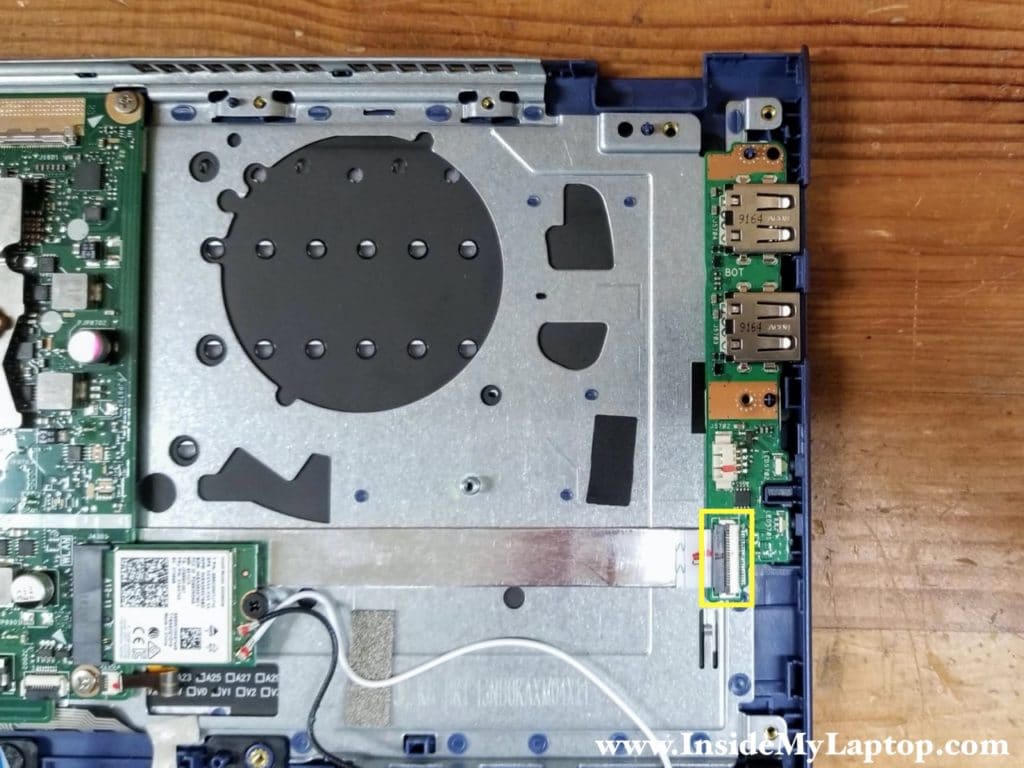
STEP 18.
Disconnect the I/O cable from the USB board.
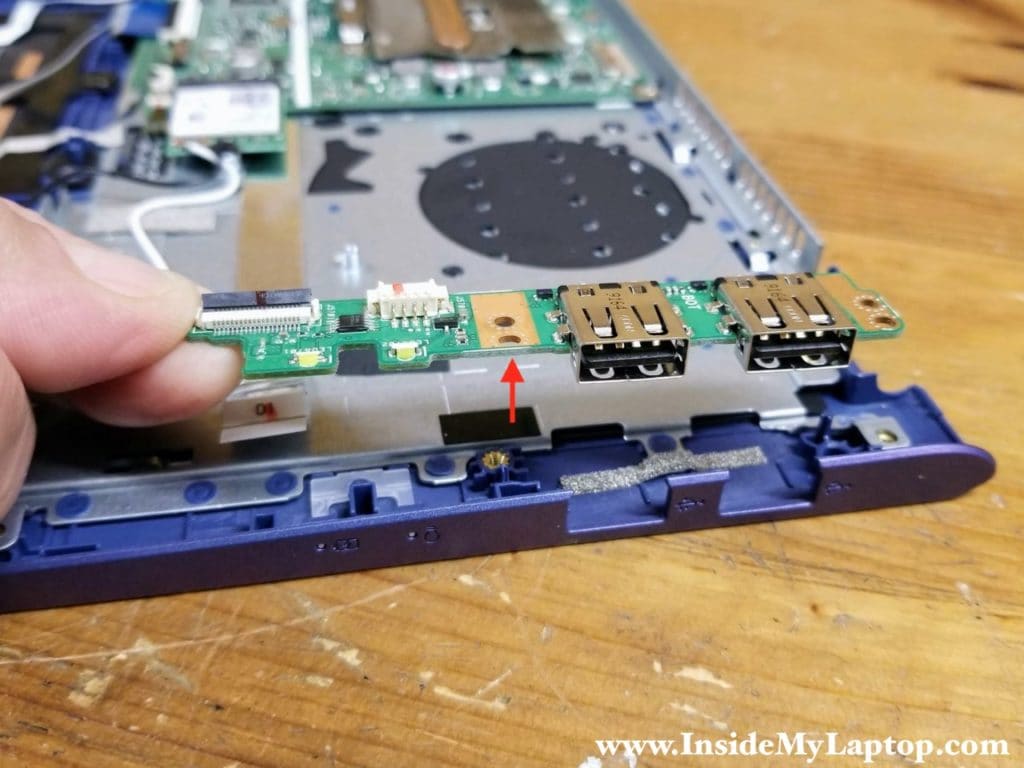
STEP 19.
Lift up and remove the USB board.
STEP 20.
Remove all screws securing the motherboard and disconnect the following color-coded cables:
– Speaker cable (yellow).
– Touchpad cable (green).
– Keyboard cable (blue).
– Keyboard backlight cable (pink).
Also, its necessary to remove the Wi-Fi card.
Now you can separate the motherboard from the top case and remove it.
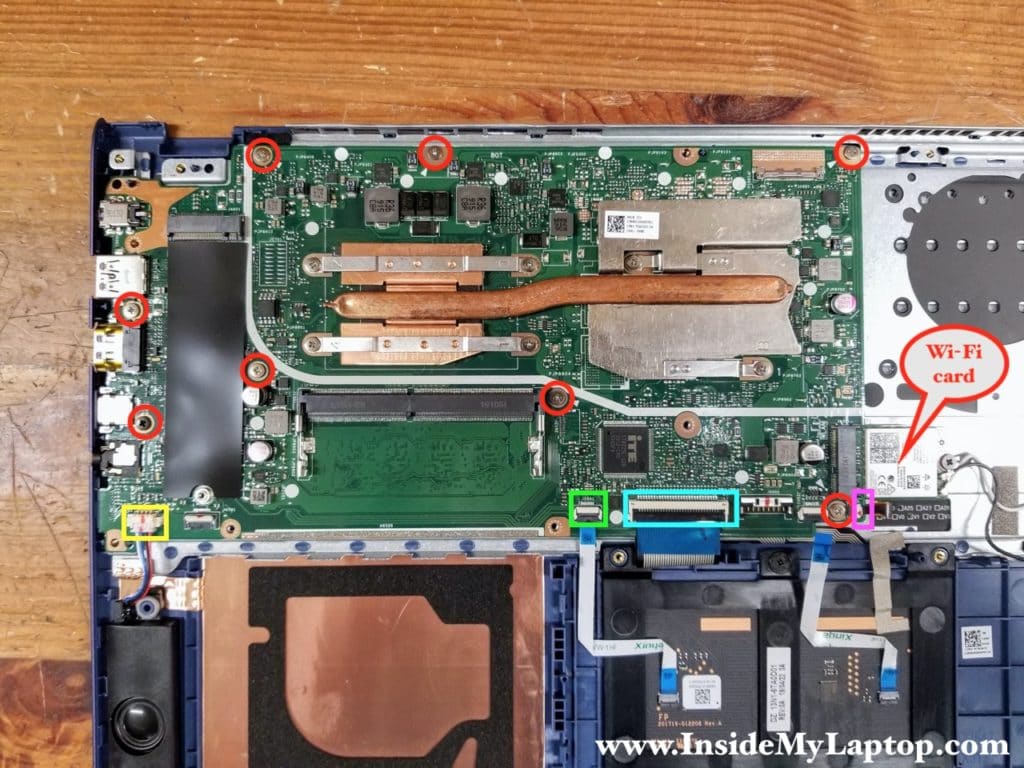
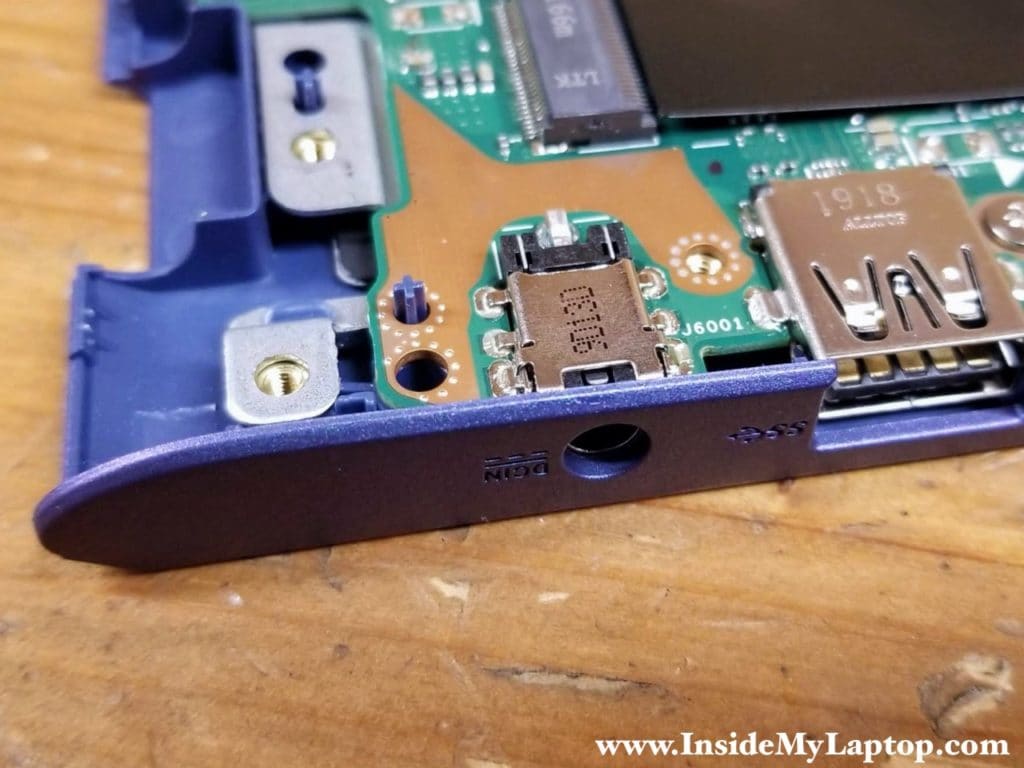
The DC-IN power jack soldered to the motherboard. If it fails, you’ll have to unsolder the failed DC jack and replace it with a new one.
Removing the touchpad
STEP 21.
Remove one screw securing the touchpad and disconnect two cables. Remove the touchpad.
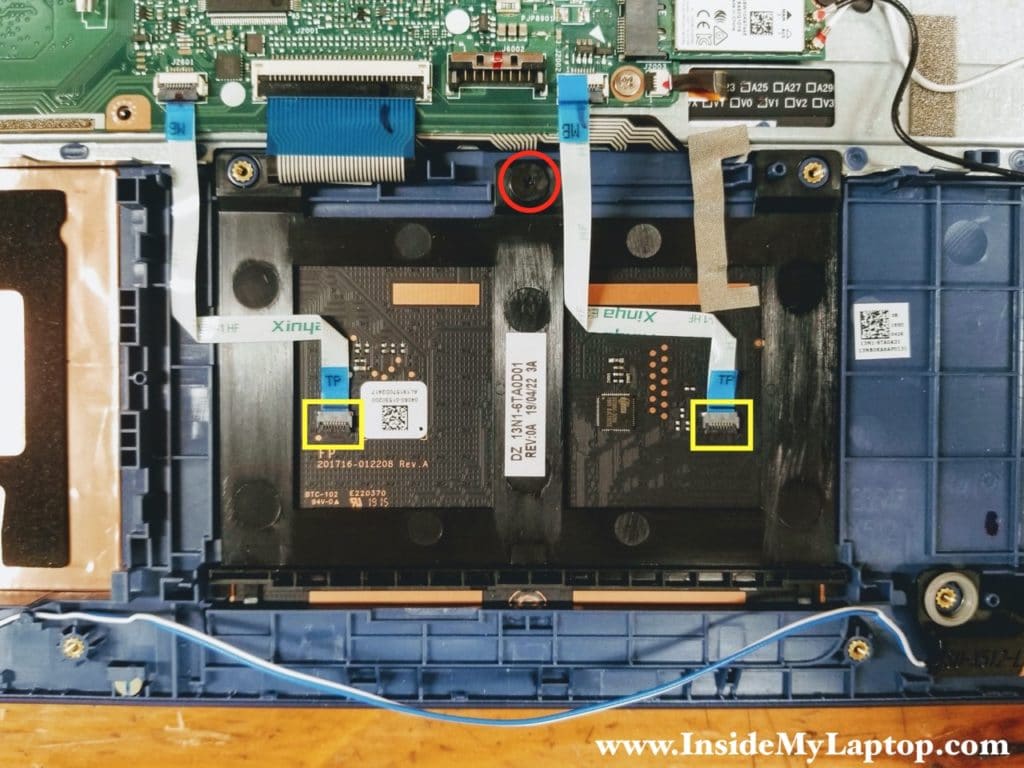
The keyboard is not removable because it’s permanently attached (riveted) to the top case. If the keyboard fails, you’ll have to replace the entire top case assembly.