Как удалить Java на Mac
How to Install Java on Mac (2020) | Install Java JDK on macOS
Оглавление:
Многие пользователи Mac не нуждаются в Java на своем компьютере, но если у вас установлена Java и вы хотите удалить ее с Mac, вы можете удалить Java и JRE, приложив немного усилий.
Удаление Java и JRE с Mac немного сложнее, чем его установка, поскольку нет специального приложения или инструмента для удаления, и это не так просто, как удаление других приложений Mac, так как компоненты разбиты по разным местам. Вместо этого вы либо обратитесь к командной строке, либо сами покопаетесь в Finder и файловой системе, чтобы удалить Java в Mac OS. Мы покажем вам, как удалить Java, используя оба метода.
Обратите внимание, что удалив Java, вы потеряете возможность запуска любых приложений Java или зависимых от Java приложений и апплетов, как по отдельности, так и через Интернет. Очевидно, вы не захотите удалять Java, если для приложения или веб-приложения, которое вы используете, требуется Java. Альтернативный вариант — просто отключить Java, который отключает его, но не удаляет его с компьютера.
Удаление Java на Mac
Удаление Java с Mac — это трехэтапная попытка, включающая ручное удаление различных подключаемых модулей java и файлов, найденных в macOS / Mac OS / Mac OS X, как в папке system / Library, так и в папке users
/ Library. Перед удалением любого элемента, найденного в системном каталоге, вы всегда должны сделать резервную копию своего Mac. Вот что вы хотите делать и искать через Finder:
- Выйдите из любого активного веб-браузера или любого другого приложения, использующего Java
- В Mac Finder откройте меню «Перейти», выберите «Перейти в папку» и введите следующий путь:

Java будет удалена полностью таким образом.
Подход на основе Finder — это более простой и безопасный способ удаления Java с Mac, хотя пользователи Mac также могут удалять Java и JRE с помощью командной строки.
Удаление Java и JRE из командной строки Mac OS
Вы также можете удалить Java из командной строки с помощью команды rm, это предназначено для опытных пользователей, которые понимают последствия использования rm с привилегиями суперпользователя. Это не для начинающих пользователей, использование командной строки требует точного синтаксиса, а неправильный синтаксис может привести к ошибочным командам или непреднамеренной потере данных.
По очереди выполните каждую из следующих команд в отдельности:
sudo rm -rf "/Library/Internet Plug-Ins/JavaAppletPlugin.plugin"
sudo rm -rf "/Library/PreferencePanes/JavaControlPanel.prefPane"
Это требует аутентификации с помощью sudo. Убедитесь, что у вас правильный синтаксис на 100%, если вы не уверены, что синтаксис правильный, не выполняйте команды, и вместо этого вы, скорее всего, захотите использовать вместо этого основанный на Finder подход удаления java.
Обратите внимание, что независимо от того, удаляете ли вы Java и JRE с помощью командной строки или с помощью графического интерфейса Mac Finder, результат один и тот же, вы специально удаляете плагины Java, панели управления и поддержку приложений для Java с Mac.
Вы всегда можете переустановить Java на Mac позже, если захотите или решите, что это необходимо. Большинство пользователей Mac не нуждаются в Java на своих компьютерах и, следовательно, не нуждаются в установке.
Как удалить Java на Mac?

Технический эксперт по написанию текстов, который умеет писать сообщения об устранении неполадок в любой проблеме Mac и помог многим читателям спасти свои компьютеры Mac.
Удаление Java на Mac состоит всего из трех шагов. Но это следует делать вручную, а также удалять различные связанные плагины, обнаруженные в macOS.
Узнайте, как вы можете удалить Java на Mac быстро, легко и полностью.
Советы:
Часть 1. Что такое Java?
Большинство браузеров и программ, которые мы обычно используем, нуждаются в Java работать плавно. Java — это программное обеспечение, предназначенное для того, чтобы мы могли играть в онлайн-игры, 3D-контент, платформы социальных сетей и многое другое.
Однако Mac прекратил использование java в своей операционной системе из-за проблем с безопасностью.
Часть 2. Удалить Java на Mac с помощью PowerMyMac
Существует одна надежная программа, которая может легко выполнить задачу.
PowerMyMac — Программа удаления приложений это мощный инструмент, созданный специально для пользователей Mac. У этого есть множество наборов инструментов, которыми могут воспользоваться пользователи.
Один из его инструментов — Удалить, этот инструмент легко находит все приложения во всей ОС и позволяет вам выбрать, какое из них удалить. После выбора нужной программы для удаления PowerMyMac также удалить все аффилированные и связанные приложения и плагины для полного удаления.
Вот как пользоваться PowerMyMac:
- Скачайте и установите PowerMyMac на свой компьютер
- Запускаем и выбираем App Uninstaller
- Нажмите Scan и подождите
- Внимательно прокрутите отсканированные результаты и найдите плагины, связанные с Java
- Отметьте нужные элементы и нажмите «Очистить».
- Подождите, пока запрос не будет выполнен
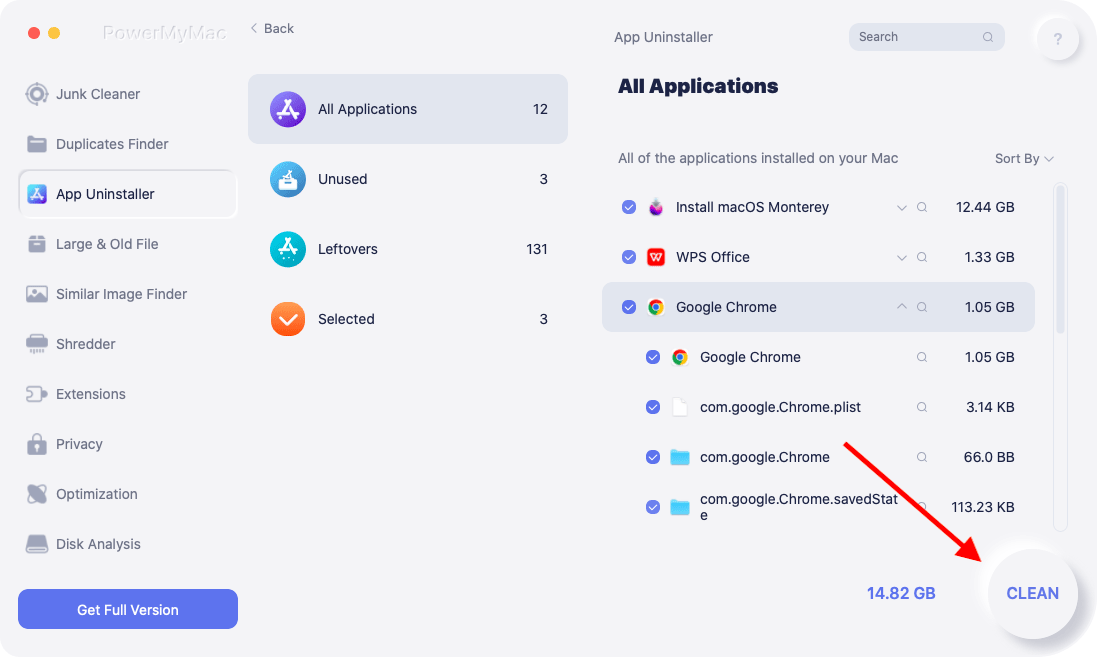
Часть 3. Как удалить Java на Mac с помощью Finder
Хотя удаление java занимает всего несколько шагов, процесс отличается от обычных приложений, которые мы обычно делаем, когда полностью удаляем его с наших Mac. Java — очень полезное программное обеспечение, но оно было помечено как уязвимое и даже часто используется злоумышленниками.
Теперь, если это касается вас, вы, возможно, захотите дистанцироваться от участия и использования этими хакерами. Если вы намерены удалить Java на Mac, используйте это руководство:
- Закройте все запущенные приложения или браузер и перейдите в Finder
- Под Перейти к папке введите: /Library/Internet Plug-ins/
- Поиск JavaAppletPlugin.plugin (это найдет файл JavaAppletPlugin.plugin)
- Щелкните правой кнопкой мыши и выберите «Переместить в корзину».
- Вернитесь в папку «Перейти к папке» и введите: /Library/PreferencePanes/
- Найдите JavaControlPanel.prefPane из этой папки и удалите
- Вернитесь в папку «Перейти к» и введите:
Убедитесь, что вы являетесь администратором или имеете права администратора для выполнения этого процесса.
Часть 4. Удалить Java на Mac с помощью терминала
Хакеры найдут способы проникнуть в вашу систему и вызвать хаос. Связанные с Java плагины распространены и могут быть сложными, чтобы найти каждый из них.
Существует еще один способ удалить Java на Mac и это использовать терминал.
- Выберите значок Finder и нажмите «Перейти» в меню.
- Нажмите на Утилиты и дважды щелкните на значке терминала
- В окне терминала скопируйте и вставьте эти команды:
Предупреждение: убедитесь, что вы вводите команды правильно. После
не должно быть пробелов, иначе может возникнуть опасность удаления всех файлов! И не подлежит восстановлению!
Этот процесс будет включать аутентификацию с помощью инструмента sudo, поэтому вы должны тщательно скопировать и вставить правильный синтаксис, иначе он не будет выполнять ваши команды.
Помните, что для удаления Java требуется доступ администратора.
Часть 5. Как отключить Java на Mac
Удаление Java может вызвать неудобства при использовании приложений, зависящих от Java, как в автономном режиме, так и через Интернет. Если вы используете такие приложения, вам не нужно полностью удалять Java. Вы можете просто отключить его.
Отключая Java, вы также защищаете свой Mac от вирусов и вредоносных программ. Для Mac OS X фактически требуется установить Java, чтобы уменьшить угрозы такого рода, если они поддерживают свои версии в актуальном состоянии.
У вас есть возможность отключить Java в веб-браузерах, и вы можете полностью отключить его в Mac OS X.
Отключить Java в веб-браузерах
На Firefox
- Перейти к настройкам Firefox
- На вкладке «Общие» нажмите «Управление надстройками».
- Выберите Плагины и найдите Java / Java Applet
- Нажмите на кнопку Отключить
В Google Chrome
- Откройте Google Chrome и введите строку поиска URL: chrome: // plugins /
- Найдите Java среди плагинов и нажмите Отключить
На сафари
- Перейдите в Настройки в меню Safari.
- Снимите флажок «Включить Java» на вкладке «Безопасность».
Отключить Java полностью в Mac OS X
- Запустите настройки Java, перейдя в /Applications/Utilities/
- Перейти к General
- Найдите плагин Enable applet и Web Start Applications и снимите флажок рядом с ним.
- Снимите флажок рядом с Java SE 6 в разделе Вкл.
Если необходимо включить Java в любом из упомянутых браузеров и во всей Mac OS X, вы можете вернуться к настройкам и просто обратить вспять процессы, которые мы сделали.
Наконечник:
Вы можете оставить один браузер с включенным подключаемым модулем Java, чтобы в случае необходимости он позже можно было просто открыть и использовать этот конкретный браузер.
Могу ли я переустановить Java на Mac?
Да. Просто скачайте файл и запустите его на своем Mac.
Там у вас есть это; мы наконец обсудили, как удалить Java на Mac используя различные варианты, которые мы сделали. Мы представили три варианта удаления Java с помощью Finder, окна терминала и, конечно, с помощью мощной программы под названием PowerMyMac.
Теперь вы можете свободно дышать, чтобы ваша система не пострадала из-за уязвимости Java. В этом программном обеспечении нет ничего плохого; Эти киберпреступники использовали его только для нанесения вредоносных программ и вирусов.
Пока вы осторожны, вы можете просто отключить его из браузера и из системы. Это может быть проще, так как вам не нужно переустанавливать Java позже. Я надеюсь, что эта статья помогла вам во многих отношениях, особенно с точки зрения удаления нежелательных приложений на вашем Mac.
Не забудьте поделиться этим с друзьями, чтобы они тоже могли учиться! Дайте мне знать ваши мысли в комментариях ниже!
How To Remove Java From Mac (Step-By-Step)

Java is an outdated software package which used to run online games and web pages.
Security issues have led programmers and web browsers to discontinue using it, so you most probably don’t need it and don’t need to have it installed on your computer.
If you still have Java installed on your Mac, you may want to know how to uninstall it.
This article explores all possible methods that help uninstall Java on Mac, reinstall and update Java if needed, and clear cache and other residual files after uninstalling the application.
How To Remove Java From Mac (Step-By-Step)

Since there’s no automatic installer to uninstall Java from Mac, you have to uninstall it manually.
Remember that you need administrative privileges because most of the methods described will require you to enter your username and password.
1. The Manual Method

Since Java isn’t a standard app, you can’t find it in your Mac’s Launchpad or the Applications folders.
That’s why you can only locate its native installation folder in the System Preferences.
Before taking any measures, close all browsers and any application that uses Java to run.
Go to the “Downloads” folder, where the Java installation file goes by default.
If you can’t find this installation file, head to the official developer’s website (java.com) and download it from there.
After the download completes, click on the downloaded package file and type in your username and password to continue.
It will open a new window where you need to click “Remove.”
This way, you can easily remove Java from your Mac, and you’ll see a message showing its successful removal.
2. Use System Preferences

If you can’t locate or use Java’s native installation files, or you can’t remove Java from your Mac for any reason, you can use the system preferences to uninstall Java from your Mac.
Before uninstalling Java, you may want to know which version of Java you have on your Mac.
Go to “System Preferences” in the Apple menu or Launchpad.
Right-click on the Java icon to open a list of options.
Find “Remove Java Preference Pane” and click on it.
Find “General” and click it.
Under the “About” line, you can see the version of Java you’re using.
Now, here’s how to Uninstall Java.
Open the “Applications” folder, type “Java” in the Finder’s search field, and hit “Enter.”
Find a file named “JavaAppletPlugin.plugin” and right-click on it.
Click on “Move to Trash.”
Now, open your trash and empty it.
To ensure Java is completely gone, look for the Java icon in the “System Preferences.”
If it’s completely gone, you can’t find the icon there.
After uninstalling Java, you can make sure your computer is secure by disabling it in Safari.
Open Safari and click on “Preferences.”
Find “Security” and uncheck the “Enable Java” option to ensure this plugin is completely gone from your computer.
3. Use The Terminal Command Line

Another method that allows you to remove Java from your Mac is Terminal, a default Mac application that allows you to perform certain actions by entering command lines.
Go to Applications > Utilities and find the Terminal application.
Alternatively, you could find it in Launchpad by typing “Terminal” in the search box and clicking on “Terminal.”
Before trying to uninstall Java, check how many and which versions of Java you have installed on your system.
That’s because when you uninstall an older version to install a new version, the residual files may remain undeleted.
Enter this command in Terminal to see which version Java you have:
“java -version”
If you think you have several versions of Java installed on your computer, run the following command to see them:
ls /Library/Java/JavaVirtualMachines
After launching the Terminal application, enter the below command and hit Enter.
sudo rm -rf /Library/Java/JavaVirtualMachines/jdk1.8.0_251.jdk
Enter the password of your account, which should have administrative privileges.
Java will be uninstalled simply by entering this command.
If you want to perform a clean uninstall and remove all the Java files from your system, you can run the following commands:
To remove the applet plugin, type in:
sudo rm -rf /Library/Java/JavaVirtualMachines/jdk1.8.0_251.jdk
To remove JCP, type in:
sudo rm -rf “/Library/PreferencePanes/JavaControlPanel.prefPane”
To remove Java files:
sudo rm -rf “/Library/Application Support/Oracle/Java”
And to remove JDKs, type in:
sudo rm -rf “/Library/Java/JavaVirtualMachines”
Remember to enter these commands correctly, or you’ll end up getting error messages or, worse, losing your data.
To make sure you’ve removed all the Java files from your Mac, type “java” in Terminal (without quotation marks) and press Enter.
If no Java files are on your computer, you’ll see the message, “No Java runtime present, requesting install.”
4. Use Third-Party Applications

You can also use some third-party applications that help you uninstall applications on Mac.
These simple and easy-to-use applications take the guesswork out of the process and ensure the cleaning process is done neatly.
One of these applications is PowerMyMac-Mac Uninstaller, specifically developed for the Mac operating system.
It identifies all the apps installed on your Mac and allows you to choose which programs you want to uninstall.
When you choose the program, the cleaner app will uninstall it, all its affiliated apps, and plugins, leaving no trace of the program.
To use PowerMyMac, go to this link and download it.
The installation process is straightforward, so launch the app after installing it.
After opening the app, click on the “Scan” button and wait for the app to find the installed applications.
Locate Java in the list of the scanned results, choose your desired items and click on the “Clean” button.
Wait until the app does its job, and you’re good to go.
Another great application is the App Cleaner & Uninstaller.
It comes in paid and free versions with different features and capabilities.
It allows you to uninstall apps on Mac easily and safely, manage your system and browser plugins and extensions, and remove the leftovers from uninstalled apps.
If you use this tool to uninstall Java, it will leave no trace of the app, and you don’t need to worry about cleaning the remaining files.
The app allows you to choose which residual files to delete, from service files to extensions, plugins, or preferences panes.
After downloading the app, launch it.
Locate and click on “Extensions” and go to “Preference Panes.”
Find Java in the list, select it, and click “Remove.”
Now, you’ve easily removed Java and its extensions from your Mac.
How To Clear The Java Cache On Mac

When you uninstall Java on your Mac, you should also clear its cache to ensure the uninstall is completely clean.
The above methods may clean everything belonging to Java, but you can delete the cache manually if you want to be 100% sure.
Go to “System Preferences,” click on the ‘Java” icon, and choose “Other.”
Click on “Java Control Panel” and find the “General” tab.
Locate and click on “Temporary Internet Files” and choose “Settings.”
Click on “Delete File” to open a dialog box, choose “Cached Applications and Applets.”
Click “OK” to remove these cached files from your Mac.
How To Update Java On Mac

Whenever you open a Java applet, the Java control panel, or a JWS application, the system looks for new updates in the background.
If there’s an update available, the system shows you a “Software Update” window in which you should select “Next.”
Then, enter your username and password to download and install the latest update.
Alternatively, you can update Java manually by going through the following steps:
Go to Java Control Panel in the “System Preferences.”
Click on the “Update” tab and select the “Update Now” option.
Click “Install Update” and then “Install and Relaunch.”
When the system completes installing new updates, it relaunches the Java application.
Should You Uninstall Java On Mac?

As mentioned earlier, Java isn’t a standard Mac OS app, and you don’t need it on your system.
It’s an outdated technology that you don’t need to access modern internet websites.
However, some applications or old websites may need Java to run.
Still, you may need to uninstall Java from your Mac computer for different reasons.
The biggest one is security issues.
For example, a few years ago, an attack through a Java vulnerability affected Java 7 users.
In such cases, Java users are advised to uninstall the plugin from their systems.
You may also need to uninstall an older version of Java to replace it with a newer version.
Java always recommends having the latest version installed on your system because those versions fix any vulnerabilities or bugs and come with enhanced performance.
But generally speaking, if you don’t use any applications that run on Java, it’s better to uninstall it to remain safe.
And as mentioned above, disable Java on your web browser to block any possible attacks.
How To Reinstall Java On Mac

After uninstalling Java from your Mac, you may decide to reinstall it, either because you need the latest version, or you need it for new applications.
The system requirements for installing Java 7 and later versions include:
- macOS 10.7.3 and above
- Intel core
- Admin privileges
The first thing required for installing Java is the installer program developed by Oracle.
Head to Java’s download page and click on the Java version for macOS.
You’ll need to agree to the terms and conditions of the license agreement so that the wizard allows you to continue.
Once you download the file, Safari automatically saves the folders in the downloads folder.
You can see the download’s progress in the small “Downloads” icon in the upper right corner of the screen.
After the download is complete, click on the small magnifying glass to show the downloaded file in Finder and the Downloads folder.
Find the installer file with a “dmg” extension and double-click it.
The installer automatically runs to install the new package and leads you through the installation process with on-screen prompts.
Read the prompts carefully to make sure you’re installing the right package and version.
Since the installer program doesn’t have permission to install system files on your Mac, you need to grant it permission.
Enter the username and password of the account with administrative privileges.
After starting the installation process, follow the commands until it finishes and the installer asks you to press “Close.”
Once you hit “Close,” Safari will open to verify Java is running properly.
You’ll also see a button in the new window that says, “Verify Java Version,” which verifies the installation of Java.
Then, Safari asks you to allow it to install and run the Java plugin.
Again, Java will ask you to confirm if you want to use this plugin, which is important because you’ll give unrestricted access to your system.
This unrestricted access means you need to be careful about the applications you download and run with Java.
Always get these applications from trusted sources and publishers.
After making sure everything is okay, click on the “Run” button to start Java.
Then, you’ll see a message that confirms the installation process has been completed successfully.
As mentioned earlier, when you have Java installed on your Mac, it will automatically check for new updates and install new patches when they’re available.
That’s vital since Java is notorious for its security breaches and bugs, so you need to make sure you always have the latest version installed.
JRE Vs. JDK Vs. JVM

If you have Java installed on your Mac or want to install or reinstall it, you’ll most probably come across the terms JDK, JRE, and even JVM.
You may be wondering what these are and if you need to install them or not.
Here’s what they are:
1. JRE
Java Runtime Environment (JRE) is a software bundle designed to run other Java software.
In other words, if you want to run a Java program, you’ll need JRE, which contains supporting files such as class libraries and loader classes.
JRE is for general internet use, for websites that need Java to run or offer specific features.
Also known as the Oracle Java, JRE is only for running applications, not programming them.
If you’re not a programmer, you’ll be fine just downloading JRE.
2. JDK
Java Development Kit (JDK) is an environment for software development that programmers use for developing applets and Java applications.
While you use JRE for running applets, you need JDK for developing them.
All JDK packages contain JRE, too, because you need the latter to run the programs you make with the former.
When you download JDK, you’ll get JRE automatically.
Unlike JRE, you can install multiple versions of JDK on your computer.
However, if you’re not a programmer, you don’t need it.
3. JVM
Java Virtual Machine (JVM) is a runtime environment in the form of an engine that drives Java code or applications.
As a part of JRE, it can’t be downloaded separately.
You need to install JRE to access JVM.
It has lots of tools, libraries, and frameworks that enable executing the Java source code.
If you’re a general internet user, you don’t need to worry about this being installed on your computer.
This is because, firstly, it comes bundled with JRE, and secondly, you don’t need it to run applications that require Java.
About Casper Feeney
I’ve always had a passion for everything related to technology and innovation. I have a bachelor’s degree in Information technology, and I built my first PC when I was 12. I enjoy riding my bike, cooking, and reading business books.
Removing Java 8 JDK from Mac
So I installed the beta of JDK 8 a while ago to look at some of the examples. I thought for sure by now, it’s easy to change between versions.
Doing some Play development with IntelliJ. For some reason, IntelliJ is compiling with 8 even though:
- I have the compiler set in Preferences to use 1.6
- Supposedly it’s using SBT through external build, but sbt from the command line works
- JAVA_HOME is pointing to JDK 6.
If I go to the Java Preferences page, it does show 8 installed, but there is no option to uninstall it and it doesn’t see any of the other versions.
When I do which java , it tells me /usr/bin/java and I do /usr/bin/java -version and it returns 1.6.
Note: with a little fiddling, you can use IntelliJ and JDK7, see here.
14 Answers 14
I was able to unistall jdk 8 in mavericks successfully doing the following steps:
Run this command to just remove the JDK
Run these commands if you want to remove plugins


You just need to use these commands
Managing Java versions on Mac OSX is a nightmare. I recently switched over to using JDK 1.7, deleting JDK 6 from my MacBook entirely (I also had traces of JDK 5 — this laptop has been updated a few times).
Here’s what I did to move to JDK 7.
2) Remove (using rm — if you’ve got backups, you can revert if you make a mistake) all the JDK6 and JRE6 files.