Как создать чат бота бесплатно

В этой статье мы с вами поговорим о создании автоматической обратной связи для сайта. Она является очень важной составляющих любого сайта. Общение с клиентами — главная цель любого сайта, особенно продающих landing-page.
Некоторые сайты, которые содержат огромную аудиторию и большую клиентскую базу. У некоторых из них нет возможности нанять большое количество администраторов и модераторов для ответа на вопросы покупателей. Это может снизить количество клиентов, а также не дать появиться новым.
В таких ситуациях на помощь приходят чат-боты. Программы, которые содержат в себе определенное количество возможных вопросов и ответов посетителей. Они гораздо упрощают работу с клиентами, а также могут заменить людей, которые будут требовать определенную плату за работу. В каком-то смысле это даже экономит средства.
Их можно купить у специальных компаний по разработке веб-приложений, а можно и сделать самостоятельно. Сегодня мы покажем один из способов создания чат-бота для сайта, преимущественно через JavaScript.
Разметка страницы и подключение скриптов. HTML
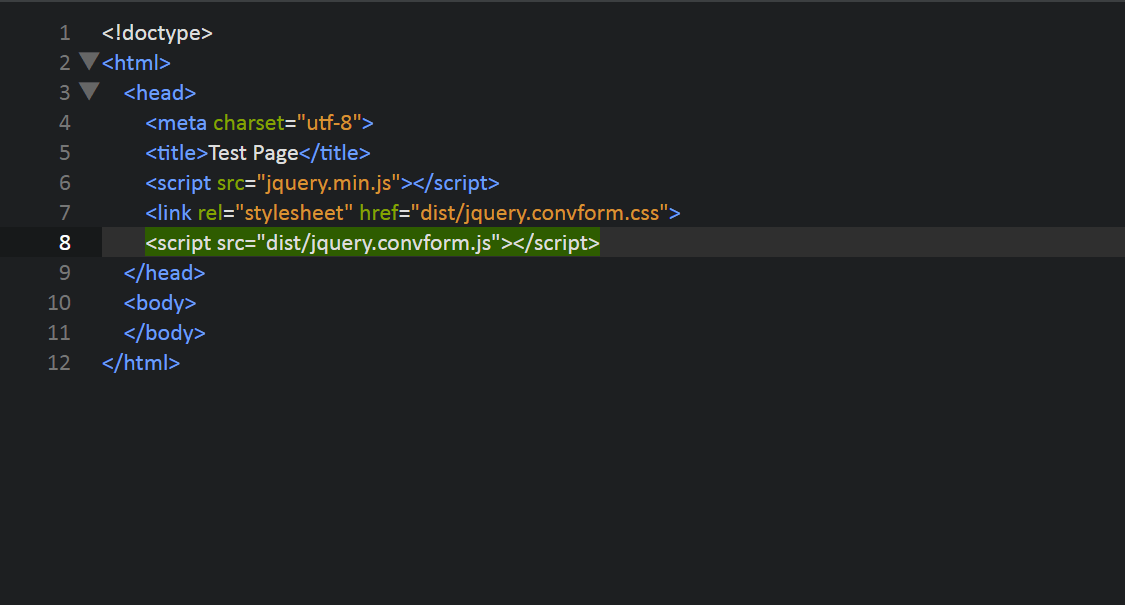
В нашей работе мы будем использовать JavaScript и его библиотеку JQuery. Чтобы все записанные нами функции загружались и работали нам нужно подключить все плагины и скрипты, с помощью парного тега < script >. Создадим 2 тега < script >, в первом будет указана ссылка на основной JavaScipt документ, в котором мы и будем работать, а во втором подключим библиотеку JQuery.
Также для корректной работы плагина нужно подключить его стили. Для этого создадим тег < link >. В нем указываем ссылку, идентичную той, что находится в теге < script >.
Для проверки работы чат-бота создаем форму. Записываем тег input с типом text и именем question. Можете поменять имя на любое другое, это не имеет особого значения.
Ниже можем создать блоки с вопросами. Создаем несколько списков select, в его атрибуте con-question вводим сам вопрос. Далее в элементах списка (option) записываем наши ответы. Вот пример:
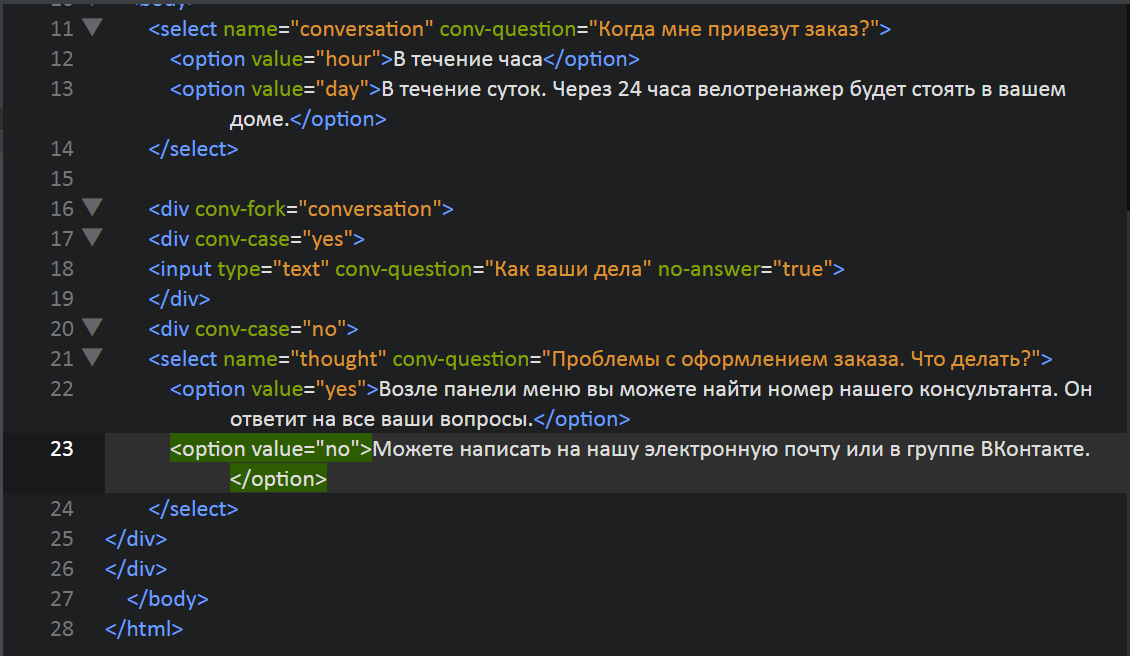
Итак, мы создали небольшую структуру, содержащую вопросы с ответами. На неё мы будем ссылаться при работе с JavaScript.
Пару слов об атрибутах. Как вы наверное заметили в тегах < select > содержится атрибут " conv-question ". Он содержит в себе необходимый вопрос, ответы на которые находятся в атрибуте " select ". При желании можете поменять его на любой другой.
Если хотите поменять количество ответов и их содержимое, просто добавляйте теги <option> и задавайте значение атрибута <value>, то, которое вам нужно.
Работа с JavaScript
В нашем примере будем использовать один плагин, который используется для создания чат-бота. Он имеет свои определенные настройки, которые можно изменить. Не рекомендуем вам самостоятельно менять значения или записанные команды, если вы не разбираетесь в JavaScript, можно вписать некорректные значения, которые не позволят чат-боту работать.
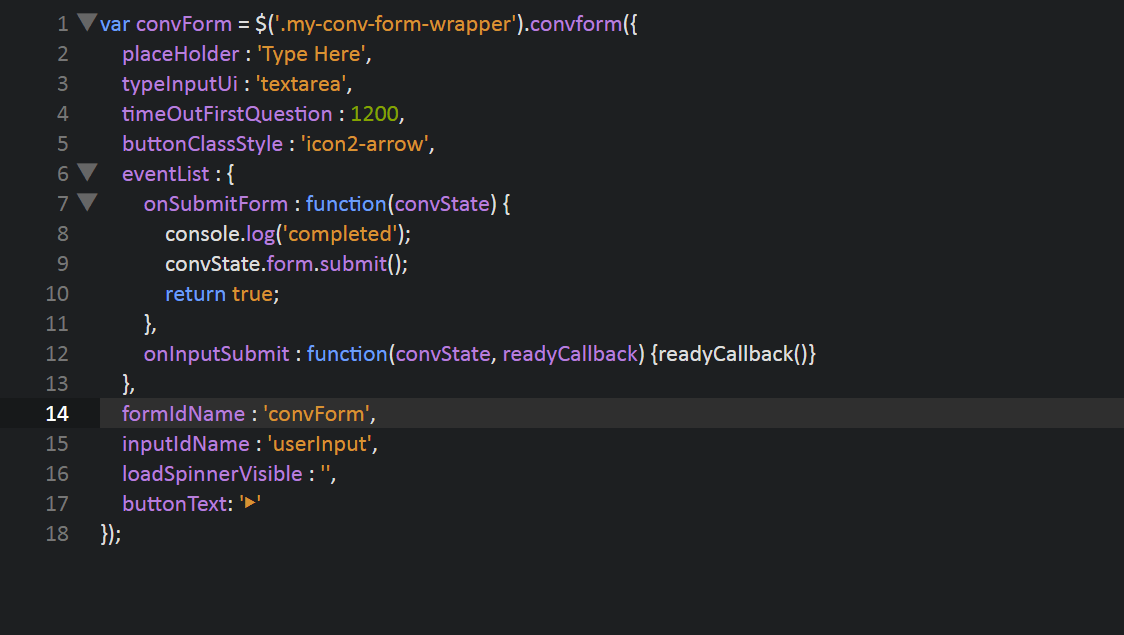
Если хотите, то можете поменять названия некоторых функций. Также можно поменять значение " typeInputUi " на обычный " text ". Вы заметите небольшую разницу в отображении. Как вы могли понять эта команда задает тип поля ответа. По умолчанию стоит значение " textarea ", что равно тегу < textarea >.
Заключение
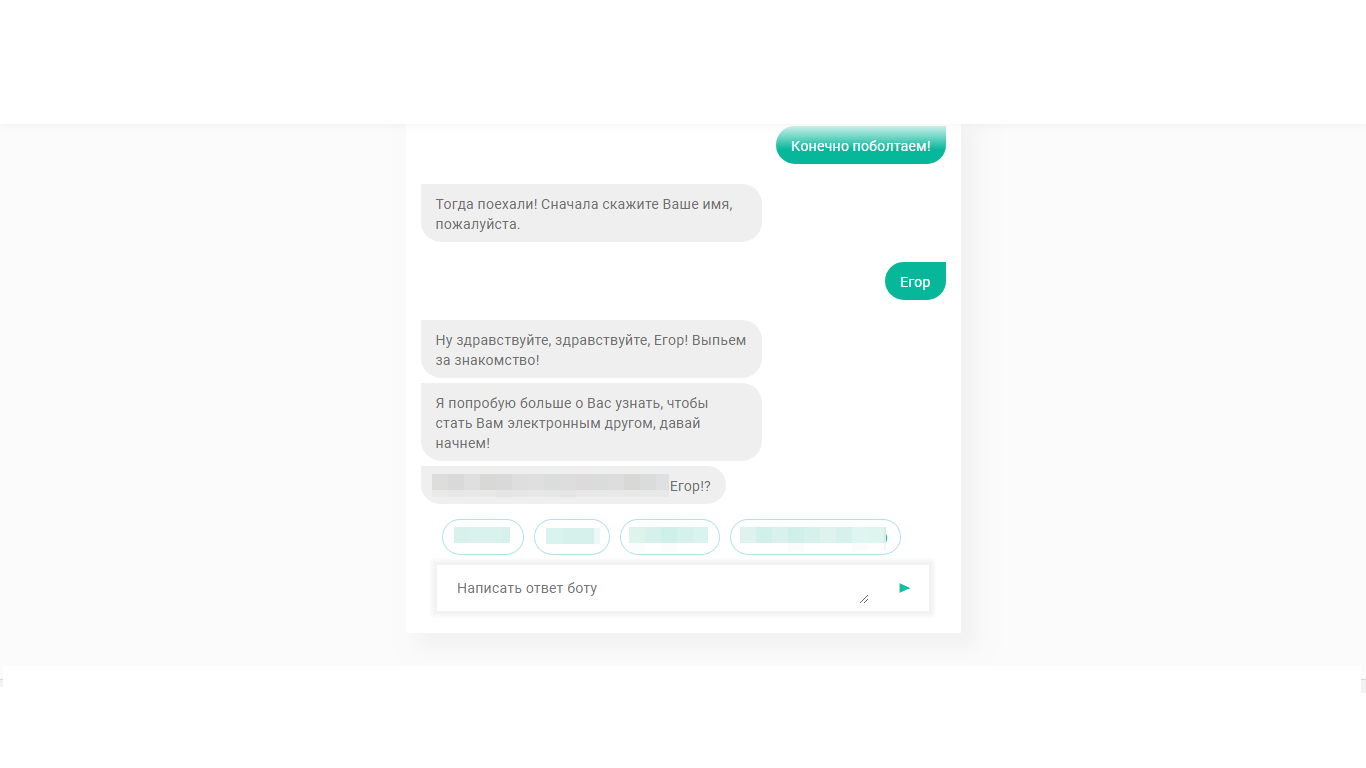
Вы только что создали чат-бота для своего сайта, можем вас поздравить. Можете заменить список вопросов на более подходящий, а также поменять стилизацию. Данный бот универсален и подойдет для многих сайтов.
Если же что-то пошло не так, то скачайте предлагаемые исходники и попробуйте поработать с ними. Можете разобраться в их значениях, но это, скорее всего, займет определенное время.
6 комментариев для “ Как создать чат бота бесплатно ”
Спасибо, здорово!
А можно его обучать под свои задачи?
Здравствуйте, как установить на OpenCart?
все здорово и все понравилось, но не могли бы вы меня поправить,
я так понял два скрипта это движок, другие файлы стиль а вот это то что надо:
function SingleConvState(input) <
this.input = input;
this.answer = »;
this.next = false;
return this;
>;
SingleConvState.prototype.hasNext = function() <
return this.next;
>;
function ConvState(wrapper, SingleConvState, form, params) <
this.form = form;
this.wrapper = wrapper;
this.current = SingleConvState;
this.answers = <>;
this.parameters = params;
this.scrollDown = function() <
$(this.wrapper).find(‘#messages’).stop().animate(
>.bind(this);
>;
ConvState.prototype.next = function() <
if(this.current.input.hasOwnProperty(‘callback’)) <
window[this.current.input.callback](this);
>
if(this.current.hasNext()) <
this.current = this.current.next;
if(this.current.input.hasOwnProperty(‘fork’) && this.current.input.hasOwnProperty(‘case’)) <
if(this.answers.hasOwnProperty(this.current.input.fork) && this.answers[this.current.input.fork].value != this.current.input.case) <
return this.next();
>
if(!this.answers.hasOwnProperty(this.current.input.fork)) <
return this.next();
>
>
return true;
> else <
return false;
>
>;
ConvState.prototype.printQuestion = function() <
var questions = this.current.input.questions;
var question = questions[Math.floor(Math.random() * questions.length)]; //get a random question from questions array
var ansWithin = question.match(/\<(.*?)\>(\:(\d)*)?/g); // searches for string replacements for answers and replaces them with previous aswers (warning: not checking if answer exists)
for(var key in ansWithin) <
if(ansWithin.hasOwnProperty(key)) <
var ansKey = ansWithin[key].replace(/\<|\>/g, «»);
var ansFinalKey = ansKey;
var index = false;
if(ansKey.indexOf(‘:’)!=-1) <
ansFinalKey = ansFinalKey.split(‘:’)[0];
index = ansKey.split(‘:’)[1];
>
if(index!==false) <
var replacement = this.answers[ansFinalKey].text.split(‘ ‘);
if(replacement.length >= index) <
question = question.replace(ansWithin[key], replacement[index]);
> else <
question = question.replace(ansWithin[key], this.answers[ansFinalKey].text);
>
> else <
question = question.replace(ansWithin[key], this.answers[ansFinalKey].text);
>
>
>
var messageObj = $(this.wrapper).find(‘.message.typing’);
setTimeout(function() <
messageObj.html(question);
messageObj.removeClass(‘typing’).addClass(‘ready’);
if(this.current.input.type==»select») <
this.printAnswers(this.current.input.answers, this.current.input.multiple);
>
this.scrollDown();
if(this.current.input.hasOwnProperty(‘noAnswer’) && this.current.input.noAnswer===true) <
if(this.next()) <
setTimeout(function() <
var messageObj = $(»);
$(this.wrapper).find(‘#messages’).append(messageObj);
this.scrollDown();
this.printQuestion();
>.bind(this),200);
> else <
this.parameters.eventList.onSubmitForm(this);
>
>
$(this.wrapper).find(this.parameters.inputIdHashTagName).focus();
>.bind(this), 500);
>;
ConvState.prototype.printAnswers = function(answers, multiple) <
this.wrapper.find(‘div.options div.option’).remove();
if(multiple) <
for(var i in answers) <
if(answers.hasOwnProperty(i)) <
var option = $(»+answers[i].text+»)
.data(«answer», answers[i])
.click(function(event) <
var indexOf = this.current.input.selected.indexOf($(event.target).data(«answer»).value);
if(indexOf == -1) <
this.current.input.selected.push($(event.target).data(«answer»).value);
$(event.target).addClass(‘selected’);
> else <
this.current.input.selected.splice(indexOf, 1);
$(event.target).removeClass(‘selected’);
>
this.wrapper.find(this.parameters.inputIdHashTagName).removeClass(‘error’);
this.wrapper.find(this.parameters.inputIdHashTagName).val(»);
if(this.current.input.selected.length > 0) <
this.wrapper.find(‘button.submit’).addClass(‘glow’);
> else <
this.wrapper.find(‘button.submit’).removeClass(‘glow’);
>
>.bind(this));
this.wrapper.find(‘div.options’).append(option);
$(window).trigger(‘dragreset’);
>
>
> else <
for(var i in answers) <
if(answers.hasOwnProperty(i)) <
var option = $(»+answers[i].text+»)
.data(«answer», answers[i])
.click(function(event) <
this.current.input.selected = $(event.target).data(«answer»).value;
this.wrapper.find(this.parameters.inputIdHashTagName).removeClass(‘error’);
this.wrapper.find(this.parameters.inputIdHashTagName).val(»);
this.answerWith($(event.target).data(«answer»).text, $(event.target).data(«answer»));
this.wrapper.find(‘div.options div.option’).remove();
>.bind(this));
this.wrapper.find(‘div.options’).append(option);
$(window).trigger(‘dragreset’);
>
>
>
var diff = $(this.wrapper).find(‘div.options’).height();
$(this.wrapper).find(‘#messages’).css(
>;
ConvState.prototype.answerWith = function(answerText, answerObject) <
//console.log(‘previous answer: ‘, answerObject);
//puts answer inside answers array to give questions access to previous answers
if(this.current.input.hasOwnProperty(‘name’)) <
if(typeof answerObject == ‘string’) <
if(this.current.input.type == ‘tel’)
answerObject = answerObject.replace(/\s|\(|\)|-/g, «»);
this.answers[this.current.input.name] =
this.current.answer =
//console.log(‘previous answer: ‘, answerObject);
> else <
this.answers[this.current.input.name] = answerObject;
this.current.answer = answerObject;
>
if(this.current.input.type == ‘select’ && !this.current.input.multiple) <
$(this.current.input.element).val(answerObject.value).change();
> else <
$(this.current.input.element).val(answerObject).change();
>
>
//prints answer within messages wrapper
if(this.current.input.type == ‘password’)
answerText = answerText.replace(/./g, ‘*’);
var message = $(»+answerText+»);
//removes options before appending message so scroll animation runs without problems
$(this.wrapper).find(«div.options div.option»).remove();
var diff = $(this.wrapper).find(‘div.options’).height();
$(this.wrapper).find(‘#messages’).css(
$(this.wrapper).find(this.parameters.inputIdHashTagName).focus();
if (answerObject.hasOwnProperty(‘callback’)) <
window[answerObject.callback](this);
>
setTimeout(function() <
$(this.wrapper).find(«#messages»).append(message);
this.scrollDown();
>.bind(this), 100);
$(this.form).append(this.current.input.element);
var messageObj = $(»);
setTimeout(function() <
$(this.wrapper).find(‘#messages’).append(messageObj);
this.scrollDown();
>.bind(this), 150);
this.parameters.eventList.onInputSubmit(this, function() <
//goes to next state and prints question
if(this.next()) <
setTimeout(function() <
this.printQuestion();
>.bind(this), 300);
> else <
this.parameters.eventList.onSubmitForm(this);
>
>.bind(this));
>;
(function($) <
$.fn.convform = function(options) <
var wrapper = this;
$(this).addClass(‘conv-form-wrapper’);
var parameters = $.extend(true, <>, <
placeHolder : ‘Написать ответ боту’,
typeInputUi : ‘textarea’,
timeOutFirstQuestion : 1200,
buttonClassStyle : ‘icon2-arrow’,
eventList : <
onSubmitForm : function(convState) <
console.log(‘completed’);
convState.form.submit();
return true;
>,
onInputSubmit : function(convState, readyCallback)
>,
formIdName : ‘convForm’,
inputIdName : ‘userInput’,
loadSpinnerVisible : »,
buttonText: ‘▶’
>, options);
if(inputs.length) <
//hides original form so users cant interact with it
var form = $(wrapper).find(‘form’).hide();
var inputForm;
parameters.inputIdHashTagName = ‘#’ + parameters.inputIdName;
switch(parameters.typeInputUi) <
case ‘input’:
inputForm = $(»+parameters.buttonText+’ ‘);
break;
case ‘textarea’:
inputForm = $(»+parameters.buttonText+’ ‘);
break;
default :
console.log(‘typeInputUi must be input or textarea’);
return false;
>
//appends messages wrapper and newly created form with the spinner load
$(wrapper).append(»);
$(wrapper).append(inputForm);
Простой чат-бот для сайта на чистом JavaScript
SimpleChatbot — это простой чат-бот для сайта, сценарий диалога которого определяется JSON-файлом или данными, расположенными непосредственно в скрипте. Состоит он из 2 частей: клиентской и северной. Первая написана на чистом JavaScript, вторая — на PHP.
SimpleChatbot очень прост в настройке и установке на сайт. Он не зависит от сторонних сервисов и библиотек. Для его работы (серверной стороны) нужен веб-сервер Nginx, Apache или любой другой, умеющий выполнять php-скрипты.
На клиентской стороне кроме самого скрипта чат-бота ( «chatbot.js» ) используется ещё FingerPrint JS . Он применяется для создания отпечатка браузера (выполнение анонимной идентификации клиента). Сам чат-бот непосредственно от него не зависит. Его действие заключается в формировании некоторого идентификатора, который затем сохраняется в LocalStorage и используется чат-ботом для передачи его на сервер. А серверу он нужен только для создания файла с соответствующим именем, в который он будет сохранять всю переписку бота с этим пользователем. По умолчанию файлы сохраняются в папку chats .
Пример содержимого каталога chats :
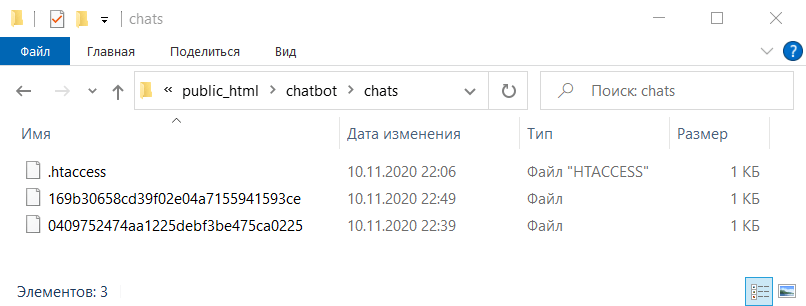
В этом примере имеются 2 файла. Каждый из них – это некий диалог бота с определённым клиентом.
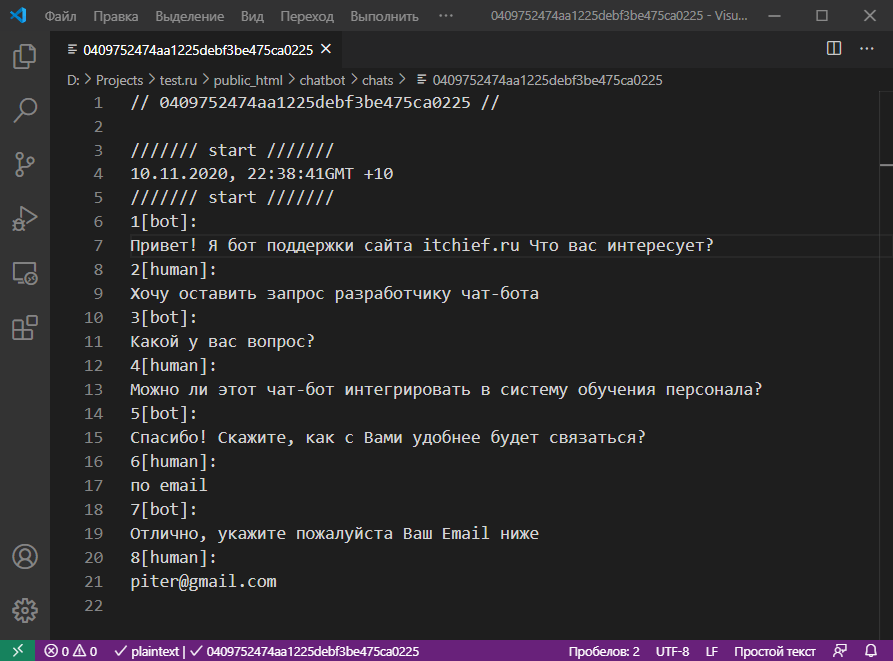
Если его открыть, то мы увидим весь контент «разговора».
Если обратно вернуться к FingerPrint JS и немного углубиться в эту тему, то увидим, что значение, которое он генерирует сохраняется в LocalStorage. При этом в качестве имени ключа используется значение configChatbot.key . По сути, здесь не важно, что использовать, FingerPrint JS , или какую-то другую библиотеку, или свой код, главное, чтобы он создавал некий идентификатор клиента и помещал его в хранилище.
Исходный код этого чат-бота является открытым и находится на GitHub. Текущая версия 1.3.2. В качестве лицензии, используется MIT. Эта лицензия позволяет данное программное обеспечение использовать как в бесплатных, так и в коммерческих проектах (при условии, что текст лицензии поставляется вместе с этим программным обеспечением).
Установка чат-бота на сайт
1. Скачать последний релиз SimpleCatbot (v. 1.3.2) с GitHub и распаковать его.
2. Загрузить папку «chatbot» в корень вашего сайта или любое другое место. Если вы выбрали последнее, то в этом случае необходимо будет ещё в определённых местах изменить отредактировать пути к файлам.
3. Добавить стили (файл «chatbot.css») к странице:
4. Подключить скрипты («fp2.js» и «chatbot.js»):
Код «chatbot.js» написан на синтаксисе, который поддерживается всеми используемые в данное время браузерами включая IE11.
5. Поместить в HTML документ кнопку, посредством которой будем вызывать окно чат-бота:
Далее необходимо поместить на страницу скрипт после подключения этих файлов.
1 вариант скрипта – с загрузкой сценария диалога из JSON файла («/data/data-1.json») посредством AJAX.
Настройка чат-бота выполняется посредством установки определённых ключей configChatbot :
- configChatbot.btn — селектор кнопки, посредством которой будем вызывать окно диалога с чат-ботом;
- configChatbot.key — имя ключа LocalStorage, в котором будет храниться отпечаток браузера;
- configChatbot.replicas — URL json-файла, содержащего сценарий диалога для чат-бота;
- configChatbot.root — ссылка, на корневой элемент чат-бота;
- configChatbot.url — путь к файлу chatbot.php .
Инициализация чат-бота в коде выполняется так:
2 вариант скрипта – с помещением данных для чат-бота непосредственно в сценарий.
Настройка чат-бота в этом варианте практически ничем отличается от способа с JSON за исключением того, что данные здесь уже находятся непосредственно в скрипте (в configChatbot.replicas ), и их не нужно дополнительно загружать через AJAX.
Составление диалога для чат-бота
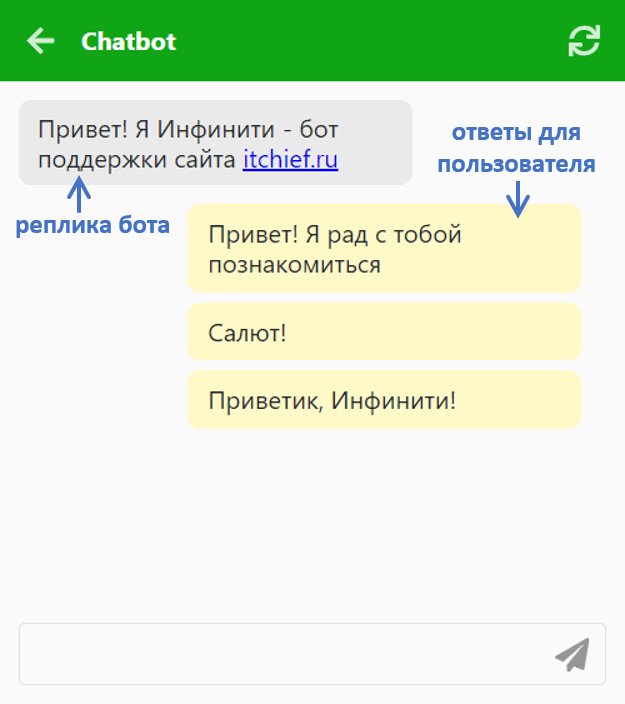
Написание реплик для чат-бота выполняется в формате объекта. При создании объекта необходимо определить 2 ключа. Первый ключ ( bot ) отвечает за сообщения бота, а второй ( human ) — пользователя.
Далее в bot необходимо поместить сами реплики. Описание их также выполняется в формате объекта. В качестве ключа используется число, а в роли значения – объект, состоящий из свойств content и human . В content помещаем сам контент, а в human – массив ответов для пользователя.
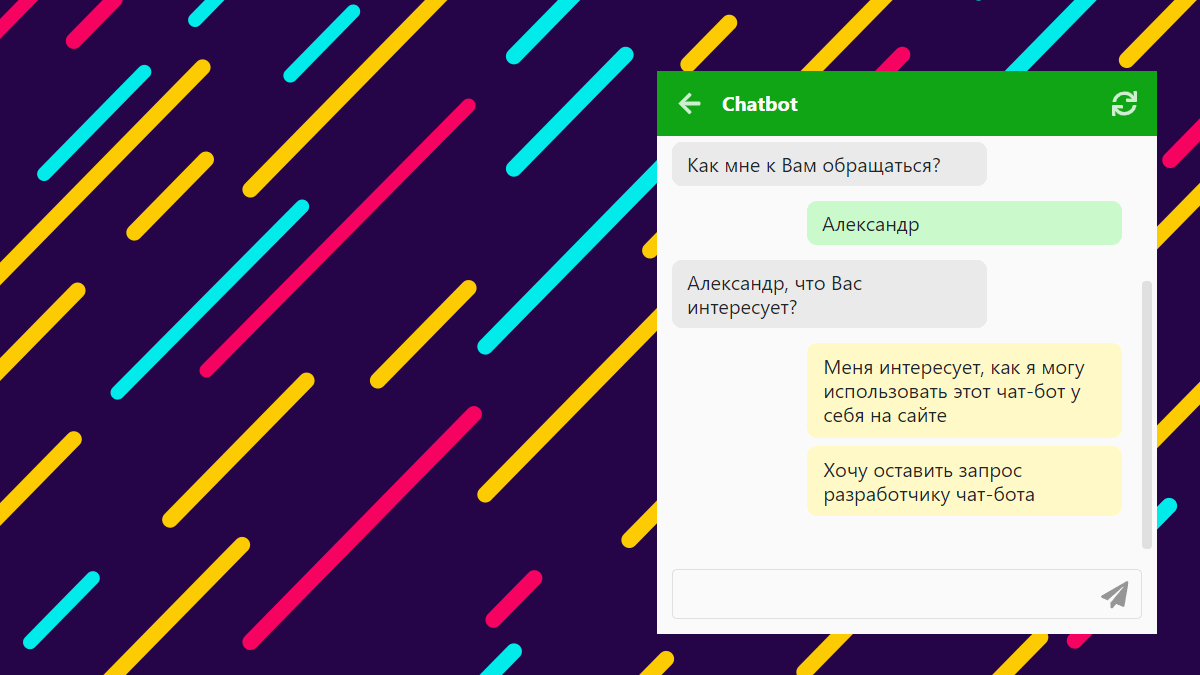
Кстати, работа чат-бота всегда стартует с приветственного сообщения бота, заданного в 0 . После показа этой реплики и некоторой паузы будет выведены варианты ответов для пользователя, указанные в human .
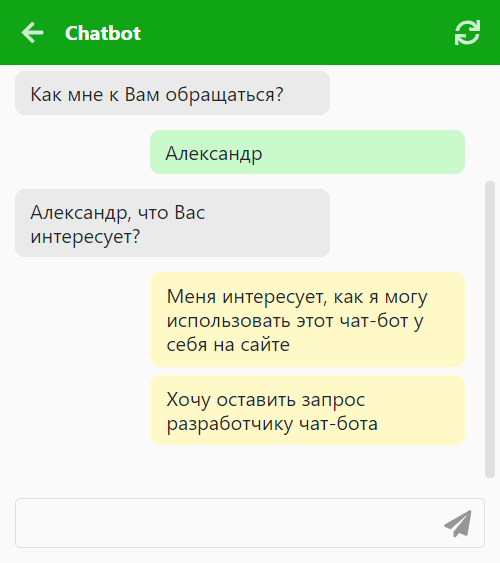
Создание ответов для пользователя выполняется аналогичным образом. Т.е. в content помещаем ответ пользователя, который будет выведен в виде кнопки, а в bot – номер следующей реплики бота при выборе этого ответа пользователем.
Но если нужно, чтобы пользователь не просто выбрал один из предоставленных ему ответов, а ввёл некоторые данные. То в этом случае в качестве значения content нужно указать пустую строку. В этом сценарии пользователю станет доступно поле для ввода ( input ) информации и кнопка, с помощью которой её можно будет отправить.
Если данные, которые ввёл пользователь вы хотите использовать в репликах, то им необходимо задать имя. Осуществляется это с помощью свойства name .
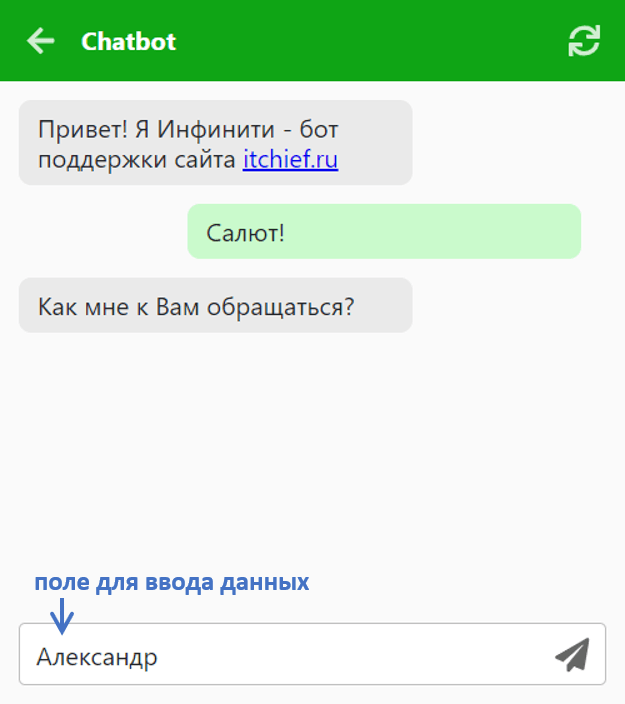
Например, в этом примере, мы установили данным, которые введёт пользователь, имя name . Далее эти данные мы можем использовать в репликах бота используя это имя, заключенное в двойные фигурные скобки (например, {{name}} ).
Далее, придерживаясь этих правил при написании реплик составляем нужный диалоговый сценарий чат-бота для своего сайта.
Когда сценарий у вас готов, его следует, если вы используете 2 вариант скрипта, поместить вместо этой строчки:
При использовании 1 варианта скрипта, его необходимо перевести в строку JSON. Для этого можно воспользоваться каким-нибудь онлайн сервисом или стандартным JavaScript методом stringify :
Если вы воспользовались последним советом, то после открытия страницы из консоли браузера нужно скопировать полученную строку (без обрамляющих её кавычек). После этого вставить её в файл с расширением json и загрузить его на сервер.
Новые возможности чат-бота
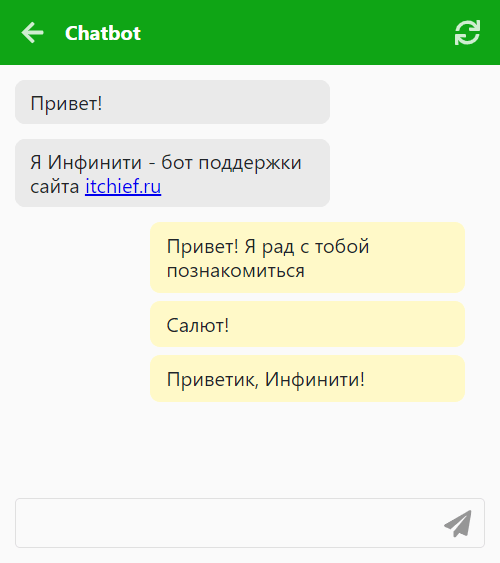
В SimpleChatbot начиная с версии 1.2.0 для бота можно указывать сразу несколько сообщений. Для этого их необходимо передать в формате массива. Такие сообщения будут выведены последовательно друга за другом в виде отдельных реплик.
В версии 1.3.0 добавлена возможность отправки сообщения клавишей Enter, метод reset для очистки (сброса) чата и кнопка для вызова этого метода.
Name already in use
Work fast with our official CLI. Learn more about the CLI.
Sign In Required
Please sign in to use Codespaces.
Launching GitHub Desktop
If nothing happens, download GitHub Desktop and try again.
Launching GitHub Desktop
If nothing happens, download GitHub Desktop and try again.
Launching Xcode
If nothing happens, download Xcode and try again.
Launching Visual Studio Code
Your codespace will open once ready.
There was a problem preparing your codespace, please try again.
Latest commit
Git stats
Files
Failed to load latest commit information.
readme.md
Пилим бота на JS ��
Привет, тут рассказано как сделать quest-like game на JS с помощью чат-бота.
как это скачать?
Можешь склонировать репозиторий
или просто скачать его себе (кнопка справа вверху). Разархивируй скачанные файлы.
Прежде всего тебе понадобится ноут и на него нужно поставить необходимый софт.

Скачиваем Node JS И устанавливаем. Перезагрузись после установки!
Чтобы убедиться что всё установилось, открой командную строку и напиши там

Если в ответ ты увидел версию, то всё отлично!
Следующий шаг — это подготовка группы
10 шагов к успеху 😀
Заходим в вк и создаём там сообщество. Имя и картинка и прочие поля нас не интересуют, так что заполняй по желанию.

Заходим в настройки => работа с API. Жмём создать ключ

Отмечаем там все галочки и жмём создать

После, сохраняем созданный ключ куда-нибудь в файлик txt

Заходим в раздел Long Poll API и включаем его. Ставь версию 5.80

Теперь подписываемся на события — чтобы бот мог получать сообшения.

Включаем возможность писать нашему боту. В настройках сообщества заходим в сообщения

Спускаемся в подраздел Настройки для бота и включаем там возможности ботов

Теперь нужно получить ID сообщества. Его можно взять в главных настройках. Сохрани его тоже в файлик
А теперь пора запустить бота ��
Код удобнее писать в Visual Studio Code

Открываем папку с этим проектом на компьютере. Открываем этот проект в VS Code

Открываем файл index.js И вставляем токен и ID группы в файл бота.

Чтобы его запустить — нужно ему скомандовать, а для этого — открыть терминал.
How to Make a Chatbot Using JS

Imagine yourself in a world where all you have to do to interact with a company is drop a line to an intelligent humanoid who can resolve all your problems, have a chat with you, and crack a couple of jokes while handling any of your requests. Sounds cool, right?
Well, we’re not in that world. But we are in a similar one thanks to chatbots (who aren’t so great at cracking jokes, alas). They are actually useful in various tasks from making an appointment with a doctor to persuading your robot vacuum not to chase your cat.
< rel="nofollow" target="_blank" .default-md>*)» width=»» /></p>
<p>If you’d like to know how to make a chatbot, read on to find the answer (<em>image by Imrah Aliev ������</em>)</p>
<p>According to this research, businesses can save up to 30% on serving customer requests with a chatbot. That’s because you no longer have to hire humans to do repetitive tasks like answering basic questions or handling monotonous requests. A chatbot will do it way quicker and cheaper.</p>
<p>But for your chatbot to be truly responsive and human-like, it needs a couple of things prehistoric people (<2010s) didn’t have — AI and Machine Learning (ML). They allow the chatbot to perform operations that cannot be described as a simple algorithm or a sequence of actions, therefore providing a greater degree of personalization.</p>
<p>So, in case you’re willing to integrate a chatbot into your business processes — you’re welcome!</p>
<blockquote>
<p>Feel free to jump to sections 4 and 5 if you’re interested in the technical side of the issue to see how we implement a chatbot using Node.js.</p>
</blockquote>
<h3>�� Rule-based Chatbot VS AI Chatbot Development</h3>
<p>When talking about chatbots, it’s important to understand the difference between a rule-based and AI-powered chatbot. A rule-based chatbot has pre-written options for a user to choose from, meaning that you can’t type anything that’s not on the list.</p>
<p>You can think of it as a bunch of buttons on a player, where you can’t actually press anything but the buttons themselves.</p>
<p><img decoding=](https://cdn.sanity.io/images/ordgikwe/production/d5e589fde42e7e8926c53df8b057305c39022526-850x537.jpg?w=850&h=537&auto=format)
< rel="nofollow" target="_blank" .default-md>*)» width=»» /></p>
<p>This is a fully connected neural network that represents conversation flow needed to create a chatbot with an ability to improve conversational chat skills (<em>image by NN SVG</em>)</p>
<p>Here, you can see how the embeddings are input in the first layer and then are forward-propagated, or fed in, through the many connections that are between the layers of the network. When the embeddings reach the final, or output layer, they choose the most likely intent. This intent is passed on to generate the response of the model.</p>
<p><img decoding=](https://cdn.sanity.io/images/ordgikwe/production/529cf2571f4805620e2f094bd8c8c7e38cb89a91-1387x861.jpg?w=1387&h=861&auto=format)
< rel="nofollow" target="_blank" .default-md>*)» width=»» /></p>
<p>Building a chatbot with help of of services like this requires extra attention to make sure that you enable all features that you want in you chatbot (<em>image by Wit.ai</em>)</p>
<p>They are also a great option if you don’t want to run your bot on your server. You can use their APIs to get answers to users’ requests. For example, connecting to Wit.ai in Node.js to get a response is as easy as this:</p>
<p>However, there might be reasons for deciding against any of the platforms:</p>
<ul>
<li>Security. If you use a platform, you can’t make sure that no one else has access to the data your users pass to the chatbot.</li>
<li>Prices. Most of the platforms utilize a subscription-based model. It means that in a long-term run it may not be the most cost-efficient solution.</li>
<li>Lack of flexibility. If you build a chatbot from scratch, you can use literally any tool the programming world has, while platforms usually limit the choice.</li>
</ul>
<p>If any of these reasons resonate with you, or you just feel like building a chatbot from scratch (which is certainly fun), check out the next section.</p>
<h4>The harder way: Node + NLP.js</h4>
<p>In order to implement a chatbot from scratch, we first have to choose an NLP/ML framework to process the text and create a neural network. Since this article focuses on Node implementation of chatbots, NLP.js is a good choice for this task.</p>
<p>It has the following features:</p>
<ul>
<li>Custom entities in addition to the built-in ones like dates, names, etc.</li>
<li>Built-in fully connected neural networks for classification.</li>
<li>Language recognition.</li>
<li>Tokenization, stemming, and other basic NLP tasks.</li>
</ul>
<p><img decoding=](https://cdn.sanity.io/images/ordgikwe/production/4be8a2ac6c9e83481589cabc35d3769d358200f8-1600x735.jpg?w=1600&h=735&auto=format "Component java что это такое") Component java что это такое
Component java что это такое