About pages and spreads
When you select the Facing Pages option in the File > Document Setup dialog box, document pages are arranged in spreads. A spread is a set of pages viewed together, such as the two pages visible whenever you open a book or magazine. Every InDesign spread includes its own pasteboard, which is an area outside a page where you can store objects that aren’t yet positioned on a page. Each spread’s pasteboard provides space to accommodate objects that bleed, or extend past the edge of a page.
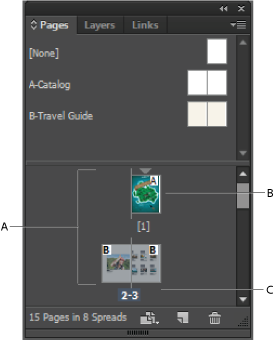 Pages panel
A. Page icons B. Page with parent “A” applied C. Selected spread
When you set the Binding option to Right To Left in the Document Setup dialog box, numbers are attached to the page icons from right to left in the Pages panel.
In a long document, you can move to a page quickly by choosing Layout > Go To Page.
Change the page and spread display
The Pages panel provides information about and control over pages, spreads, and parents (pages or spreads that automatically format other pages or spreads). By default, the Pages panel displays thumbnail representations of each page’s content.
If the Pages panel isn’t visible, choose Window > Pages.
Choose Panel Options in the Pages panel menu.
In the Icons section, specify which icons appear next to the page thumbnails in the Pages panel. These icons indicate whether transparency or page transitions have been added to a spread, and whether the spread view is rotated.
In the Pages and Parents sections:
Select an icon size for pages and parents.
Select Show Vertically to display spreads in one vertical column. Deselect this option to allow spreads to be displayed side-by-side.
Select Show Thumbnails to display thumbnail representations of the content of each page or parent. (This option is not available if certain options are selected for Icon Size.)
In the Panel Layout section, select Pages On Top to display the page icon section above the parent icon section, or select Parents On Top to display the parent icon section above the page icon section.
Choose an option in the Resize menu to control how the sections are displayed when you resize the panel:
To resize both the Pages and Parents sections of the panel, choose Proportional.
To maintain the size of the Pages section and resize only the Parents section, choose Pages Fixed.
To maintain the size of the Parents section and resize only the Pages section, choose Parents Fixed.
Target or select a page or spread
You either select or target pages or spreads, depending on the task you are performing. Some commands affect the currently selected page or spread, while others affect the target page or spread. For example, you can drag ruler guides only to the target page or spread, but page-related commands, such as Duplicate Spread or Delete Page, affect the page or spread selected in the Pages panel. Targeting makes a page or spread active and is helpful when, for example, several spreads are visible in the document window and you want to paste an object onto a specific spread.
In the Pages panel:
To both target and select a page or spread, double-click its icon or the page numbers under the icon. If the page or spread is not visible in the document window, it shifts into view.
Tip: You can also both target and select a page or spread by clicking a page, any object on the page, or its pasteboard in the document window.
The vertical ruler is dimmed alongside all but the targeted page or spread.
To select a page, click its icon. (Don’t double-click unless you want to select it and move it into view.)
To select a spread, click the page numbers under the spread icon.
Some spread options, such as those in the Pages panel menu, are available only when an entire spread is selected.
Add new pages to a document
Do any of the following:
To add a page after the active page or spread, click the New Page button in the Pages panel or choose Layout > Pages > Add Page. The new page uses the same parent as the existing active page.
To add multiple pages to the end of the document, choose File > Document Setup . In the Document Setup dialog box, specify the total number of pages for the document. InDesign adds pages after the last page or spread.
To add pages and specify the document parent, choose Insert Pages from the Pages panel menu or choose Layout > Pages > Insert Pages. Choose where the pages will be added and select a parent to apply.
Create color labels for page thumbnails
You can assign colored labels to the page thumbnails in the Pages panel. For example, you can use color labels to indicate the status of the pages, such as a green label for complete spreads, a yellow label for spreads being worked on, and a red label for unstarted spreads.
In the Pages panel, select the pages to which you want to apply the color labels.
From the Pages panel menu, choose Color Label, and then choose the color to assign.
The color label appears below the thumbnail in the Pages panel.
Applying a color label to parent pages affects all pages to which the parent is applied. However, when you apply a color label to individual document pages, the color label for the document pages is used. To use a color label for parent pages, select the document pages you want to change and choose Color Label > Use Parent Color from the Pages panel menu.
Preflight! для полиграфии
Ошибки и советы по подготовке файлов для офсетной печати
InDesing: Начинаем и кончаем правильно
Неправильно созданная публикация в InDesing создает проблемы в дальнейшем экспорте в pdf. У вас могут быть правильные установки экспорта в pdf, но из-за того что изначальная публикация сделана неправильно результаты экспорт могут быть проблемными.

Наш любимый спонсор!

Итак, задаем размер готового (обрезного) изделия, начальную страницу, количество страниц. С этим кажется все ясно. Facing Page это показ страниц разворотом. Margin это расстояния от полосы набора до края страницы. Здесь вы можете поставить либо безопасное (2 мм) расстояние до подрезки если верстаете листовую продукцию, либо расстояние до колонтитула и колонцифры если верстаете многостраничное издание. Bleed — это выходы за обрез, очень важные цифры. На примере, выходы за обрез для брошюры на скрепку. Справа, слева, с торца подрезаем 2 мм, с корешка ничего не подрезаем и ставим 0 мм. Если листовка, то со всех сторон по 2 мм.
- листовки: 2 мм со всех сторон
- многостраничные издания на скрепку до 40 страниц: внутри 0 мм, сверху-снизу по 2 мм, с торца 2 мм. Рекомендую 4 мм.
- многостраничные издания на скрепку до 80 страниц: внутри 0 мм, сверху-снизу по 2 мм, с торца 3-4 мм. Рекомендую 5 мм.
- многостраничные издания на термопереплет: внутри 0 мм, сверху-снизу минимум по 4 мм, с торца 4 мм. Рекомендую 5 мм.

Вот такая примерно картинка у вас получится в InDesign:

Теперь экспортируем в pdf (File|Export). В установках «Mark and bleed» в поле «Use Documents Bleed Setting» ставим галочку. Это значит что будут использоваться установки блидов из настроек документа, и файл будет выведен с дообрезными полям. Значения блидов взяты из установок размеров страницы (File|Document Setup).

Вот как файл выглядить в pdf. Как видите изображение за пределами полей не вошло в pdf, тогда как обрезные поля сохранились.
How to Turn Off Facing Pages in InDesign

Ashlee Harrell Last updated Oct 6, 2022
«Facing pages» is a setting that automatically arranges Adobe InDesign pages in a spread format. Facing pages are best used with documents like magazines, books, and reports. In this tutorial, you will learn how to turn off facing pages in InDesign.
What You Will Learn in This Tutorial
- How to turn facing pages off in InDesign
- How to turn on facing pages in InDesign
What You’ll Need
1. How to Turn Facing Pages Off in InDesign
Step 1
Open the cookbook document, install the fonts, and place (Command-D) the image of the steak on spread 6/7.


Step 2
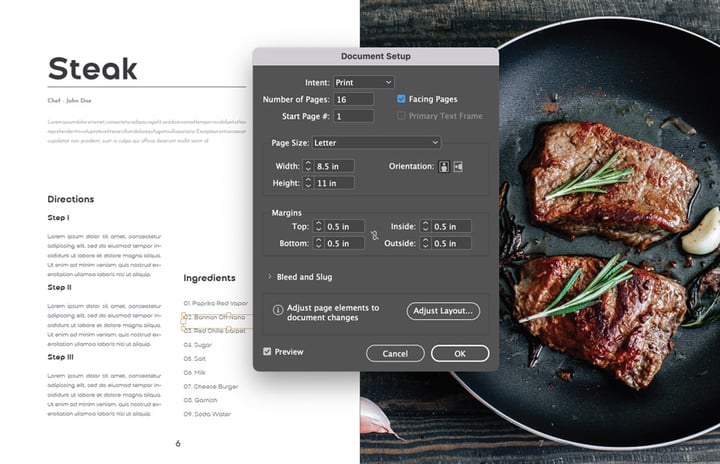
Go to File > Document Setup and uncheck Facing Pages. Select OK.


Step 3
There’s another way you can turn off facing pages in InDesign, and that’s by doing it manually. This method can be a bit tedious, if you have multiple spreads. Select all of the spreads in the Pages panel.


Step 4
Right-Click any one of the spreads and select Allow Selected Spreads to Shuffle.


Step 5
Select Page 7 and drag it so that it’s below Page 6 in the Pages panel.


2. How to Turn on Facing Pages in InDesign
Go to File > Document Setup and check Facing Pages. Select OK.


But Wait, There’s More!
After learning how to turn off facing pages in InDesign and how to turn on facing pages, you’re probably ready for your next lesson. Check out this collection of tips and trips that will help you dive deeper into InDesign.
InDesign. Facing Pages для начинающих
При создании нового документа в InDesign CS2 по умолчанию отмечен галочкой параметр Facing Pages. Это значит что в многостраничном документе сначала будет одна страница, а затем пойдут развороты. Но бывают случаи, когда хотелось бы иметь сразу разворот на первом месте. Вот простой способ как это сделать.
1. Создайте новый 3-страничный документ в Индизайне. Facing Pages д.б. отмечено при этом.
2. Перейдите к панели Pages и выделите страницы 2-3 (разворот).
3. Из меню панели Pages выберите <Keep Spread Together>.
4. Выделите и удалите страницу 1.
Вот мы и получили разворот на первом месте. Если надо еще добавить разворот в документ — из меню панели Pages выбираем <Duplicate Spread>.
Дальше можно сохранить результат как шаблон, чтоб в будущем не пришлось повторять эти действия.
Есть еще простой способ: создайте новый документ с тремя или более страницами. После этого зайдите в меню Layout > Numbering & Section Options, где установите начало нумерации с цифры 2 (Start Page Numbering at: 2).
Для Adobe InDesign CS3 последовательность действий другая. Создайте новый документ из 8 страниц. Из меню панели Pages снимите галочку с пункта Allow Document Pages to Shuffle.
После этого можете тасовать ваши страницы как вам заблагорассудится. Можете 8-ю приставить к первой с любой стороны, можете разворот [4-5] приставить к развороту [2-3], и тогда получится комбинация [2-5] — разворот из 4-х страниц, можете выстроить страницы тройками.