Удаляем разрывы разделов в Word

Любой раздел в Word можно удалить вручную – делается это по следующей инструкции:
- Перейдите в раздел меню «Главная», нажмите на кнопку «Отобразить все знаки» в блоке «Абзац». Все пробелы, разрывы, табуляции, переносы строк и прочие невидимые символы должны отобразиться.

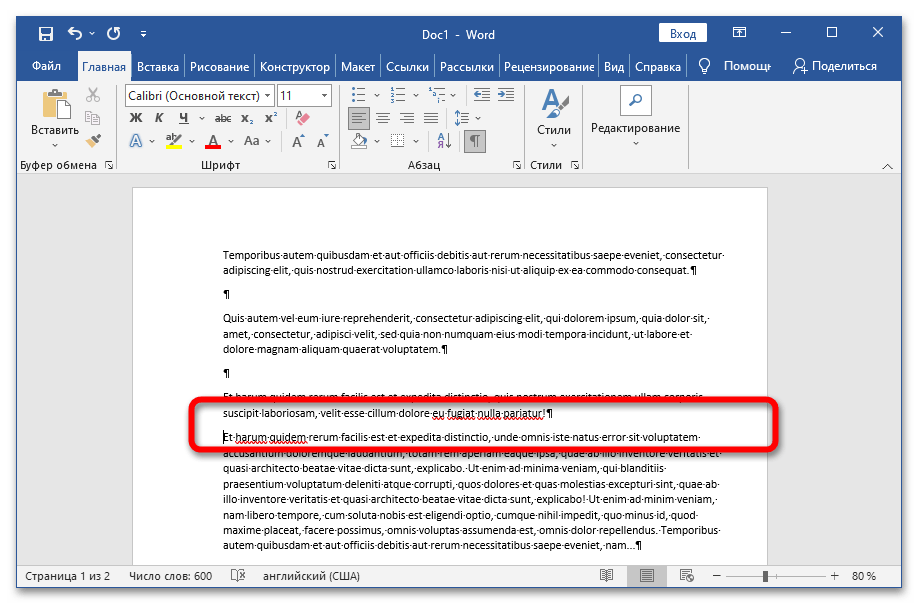
- Найдите строку «Разрыв раздела», установите курсор перед ней, нажмите на клавишу «Del».
Обратите внимание! После избавления от разрыва объединённый раздел примет форматирование части текста, последующей за удалённым разрывом.
Способ 2: Использование средства замены
Если нужно удалить сразу все разрывы в объёмном документе, можно воспользоваться функцией «Найти и заменить»:
-
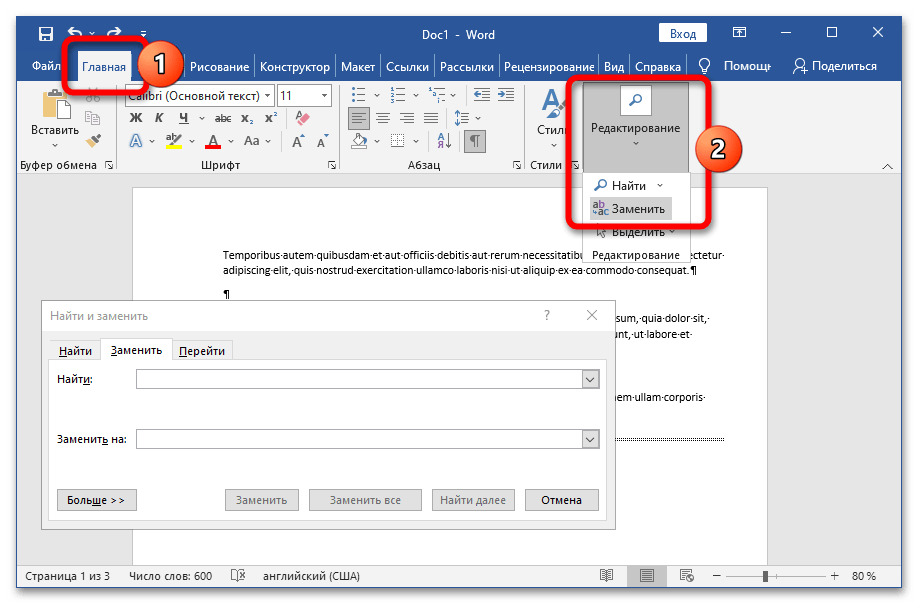
Кликните по кнопке «Заменить» во вкладке «Главная» или воспользуйтесь сочетанием клавиш Ctrl + H.
После завершения работы Word выведет информацию о количестве удалённых разделов.
Способ 3: Создание макроса
Для ускорения процедуры удаления разделов можно создать специальный макрос, который в дальнейшем будет доступен для использования в любом документе:
-
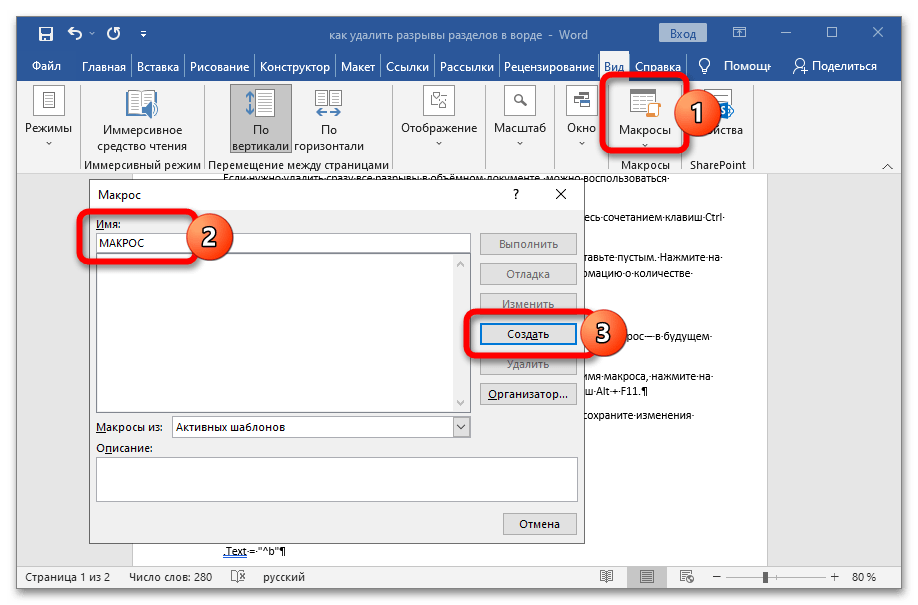
Перейдите во вкладку «Вид», нажмите на кнопку «Макросы». Задайте имя макроса, нажмите на «Создать». Для быстрого доступа можно использовать комбинацию клавиш Alt + F11.
How to Remove Section Breaks in Word Documents
While Microsoft Word can be a pretty intuitive application for many of the documents that you edit, you will inevitably find situations where you can’t fix a problem.
These issues are typically related to formatting choices that you made in the past, or that were made by someone else who has edited the document.
These problems often manifest when you are trying to make layout changes or adjustments to your entire document, but one small part of the document is not being affected by the changes.
One of the more common problems you might encounter can be resolved by following our how to remove section breaks in Word method outlined below.
Our guide continues below with additional how to delete section break in Word information, including pictures of these steps.
I like to use section breaks when I am making a document that contains information on a lot of topics. This allows me to use some additional navigation options, plus it gives me to option to change the formatting for different parts of my document.
Microsoft Word provides many tools that allow you to format the text that you have added to a document. But it also includes some formatting options for the document itself. This can range from things like columns, to other features like section breaks.
A section break in a Word document lets you split up your document into separate parts, which you can then format without affecting the rest of the document. A common use for this is to change the orientation for a single page of your document, while leaving the rest of the document in the current orientation.
But if you have previously created a section break that you no longer need, or if you are editing someone else’s document and wish to remove one of the section breaks they’ve added, then our guide below on how to remove section breaks in Word can help you out.
Full Guide – Removing a Section Break in Word (Guide with Pictures)
The steps in this article were performed in the Microsoft Word for Office 365 version of the application but will also work in most other recent versions of Word.
The next section of this article below provides a quick overview of how to remove a Word section break, but you can continue below to see the full guide with pictures.
Step 1: Open your document in Word.
Step 2: Select the Home tab at the top of the window.
Step 3: Click the Show/Hide button in the Paragraph section of the ribbon.
Step 4: Locate a section break in your document, then use your click your mouse on the left side of the break, hold it down, then drag to the right end of the break to select the entire thing.
Alternatively, you can place your mouse cursor at the left end of the break, but you may find that part of the break may remain after deletion.
Step 5: Press the Delete key (not the Backspace key) on your keyboard to remove the section break.
If you wish to add another section break to a document, click at the point where you wish to add the break, select the Layout tab, then click the Breaks button and choose the desired type of section break.
Deal of the Day

- 1080p HD video doorbell with enhanced features that let you see, hear, and speak to anyone from your phone, tablet, or PC.
- An update from the original Ring Video Doorbell, enjoy improved motion detection, privacy zones and audio privacy, and crisper night vision.
Last update on 2023-06-09 / Affiliate links / Images from Amazon Product Advertising API | As an Amazon Associate, I earn from qualifying purchases.
Now that you are familiar with the how to remove section breaks in Word steps, you will be able to fix random spacing issues that might crop up in documents that you are creating or documents that you are editing which came from other people.
How to Delete a Section Break in Word
Learn how to locate a section break in a Word document and delete that break if you no longer wish to include it in your document.
Materials
- Microsoft Word document with section break
Tools
- Microsoft Word
Instructions
- Open your document in Word.
- Select the Home tab.
- Click the Show/Hide button in the Paragraph section.
- Select the section break you wish to delete.
- Press the Delete key on your keyboard.
Notes
New section breaks can be added by clicking the Breaks button on the Layout tab.
You can also delete a section break by placing your cursor to the left of the break, then pressing the Delte key on your keyboard.
Once you delete a section break, Word will use the formatting from the section after the combined sections. You will need to use the “Link to previous” option instead of deleting the section if you want to use the headers and footers from an earlier section instead.
How to Get Rid of a Section Break in Word on an iPhone
The mobile version of the Microsoft Word application that you use on your iPhone or Android device has most of the features that you would find in the desktop version of the application.
Luckily, this means that you can use this phone version of the app if you want to remove section breaks from a document.
Step 1: Open the Word app on your iPhone.
Step 2: Open the document.
Step 3: Touch the pencil icon at the top of the screen.
Step 4: Tap the three dots in the horizontal bar in the middle of the screen.
Step 5: Choose the Home option in the horizontal menu bar.
Step 6: Scroll down and select Paragraph Formatting.
Step 7: Tap Paragraph Marks.
Step 8: Tap and hold on to the section break, then touch Select.
Step 9: Choose the Delete option to remove the break.
The next section discusses how to insert a section break in your document.
How to Insert a Section Break in Microsoft Word
While this article has focused on how to delete section breaks from documents, you may be curious about how they got there in the first place if you weren’t the person who added the break to a document.
Step 1: Open your document in Microsoft Word.
Step 2: Click at the point in the document where you want the break.
Step 3: Select the Layout tab at the top of the window.
Step 4: Click the Breaks button in the Page Setup group in the ribbon, then select the desired type of section break.
As you can see in the image above, the types of section breaks you can add to a Word document include:
- Next Page – this type of break lets you start the new section on the next page of the document.
- Continuous – this adds a new section on the current page.
- Even Page – this will start the next section on the next even-numbered page.
- Odd Page – this will start the next section on the next odd-numbered page.
Our article continues below with more about these breaks, as well as answers to some common questions about them.
More Information on How to Delete Microsoft Word Section Breaks
When you have displayed the formatting marks in your document, the section break that you are trying to remove will be identified with a word in parentheses after the section break indicator.
If you actually do want a section break in your document, but the one that is there currently isn’t correct, then you will need to delete that section break and replace it with one of the options from the list that you see when you expand the breaks drop down menu.
One other type of similar formatting mark that you might need to remove involves manual page breaks.
These are very similar in that a page break appears at a point within the document where it wouldn’t normally be. These can be seen if a paragraph in your document should be displayed on the same page as the previous paragraph, but has been forced to the next page.
If you would like to remove a page break in Microsoft Word then you can use the steps above to display the paragraph marks in your document, then you can place your cursor below the page break and press Delete on your keyboard. You can also read our how to remove a page break in Word guide for more information.
One other way to remove section breaks, especially if you have more than one that you want to get rid of, is with the Find and Replace dialog box. You can find this by selecting the Home tab at the top of the window, then clicking the Editing button in the ribbon and choosing the Replace option.
You can then select the More button to expand the Find and Replace box. Next, you will click inside the Find what field, then you will click the Special drop down menu at the bottom of the window and choose the Section Break option.
Finally, you will need to make sure that the Replace with field is empty, then you can click the Find Next button and navigate between the different section breaks in your document and delete them individually. Or you could choose the Replace All button which will delete all of the section breaks in the document by replacing them with nothing, as indicated by the empty “Replace with” field.
If you are having trouble removing your section breaks, then it might be because you currently have “Track Changes” enabled. You can turn this off by selecting the Review tab at the top of the window, then clicking the Track Changes button in the Tracking group of the ribbon.
If you work with Google Docs in addition to Microsoft Word, then you may want to know how to remove space in Google Docs when the standard options aren’t working.
Does your document have a lot of formatting that is proving difficult to remove? Find out how to clear all formatting in Word if you would rather start over with plain text.
Frequently Asked Questions When Working With Microsoft Word Section Breaks
Why can’t I delete a section break in Word?
After you create a new section break in your document and start making changes or formatting adjustments, you might discover that you no longer actually need to use section breaks.
I’ve run into this problem in the past, and it can be a little frustrating when it seems like you’re doing everything right and it’s still not working.
The main reason why many people can’t delete a section break is that they have the “Track Changes” feature enabled.
You can turn this off by going to the Review tab and clicking the Track Changes button in the Tracking group of the ribbon.
How do I delete all section breaks in a Word document?
If you’ve added more than one section break to your document and you want to get rid of all of them, then you can do so with the Find and Replace tool.
1. Press the F5 key on your keyboard.
2. Select the Replace tab at the top of the Find and Replace window.
3. Type ^b into the Find what field.
4. Click the Replace All button.
You can find the ^ key by holding down Shift on your keyboard and pressing the “6” key.
You can also open the Find and Replace window by selecting the Home tab at the top of the window, then clicking the Editing button and choosing Replace.
How do I delete a section break in Word for Mac?
Select the Home tab at the top of the window, then click the Show/Hide button to display the formatting marks.
You can then click the section break character that you wish to remove, then press the Delete key on your keyboard.
How do I select all sections in Microsoft Word?
If you want to select everything in your document, then you can press Ctrl + A on your keyboard to quickly select all content.
What are the different types of section breaks?
When you start to create different sections in your documents, such as when you want to use different formatting, margins, or other types of section formatting, you might be wondering which one to use.
Microsoft Word has four types of section breaks:
– Next Page – the next section will start on the next page
– Continuous – the next section starts on the current page
– Even Page – the next section will begin on the next even-numbered page
– Odd Page – the next section will begin on the next odd-numbered page
Can I delete a section break in Word Online?
No, unfortunately, the Web version of Microsoft Word does not support the removal of a section break from a document.
You will need to open the Word doc on a desktop or mobile version of the Microsoft Word application if you would like to remove an existing section break from one of your Word documents.
If you have a Microsoft Excel spreadsheet that contains a lot of links, then visit our how to break Excel links guide and learn about a quick way to remove all of them at once.
Removing the page break is another formatting choice you have.
In the event that your papers include any manual page breaks, the next section will explain how to delete them.
Page Breaks in Google Docs: Removing Them
You can manually insert page breaks in Google Docs by choosing Insert > Break > Page break, even though automated page breaks in Google Docs might be useful in a variety of situations.
See our remove page break in Google Docs tutorial for more details.
However, this page split can become problematic if the document’s layout changes.
Fortunately, by taking the following actions, a page break can be avoided:
- First, open the file.
- Place your cursor at the beginning of the first line, just below the page break.
- Hit the Backspace button.
The page break should have disappeared by this point, and the document’s content should flow naturally.
Matthew Burleigh has been writing tech tutorials since 2008. His writing has appeared on dozens of different websites and been read over 50 million times.
After receiving his Bachelor’s and Master’s degrees in Computer Science he spent several years working in IT management for small businesses. However, he now works full time writing content online and creating websites.
His main writing topics include iPhones, Microsoft Office, Google Apps, Android, and Photoshop, but he has also written about many other tech topics as well.
Section break word как убрать
Разрыв раздела полезен, если вы хотите изменить форматирование в слове. Вставить разрыв раздела, чтобы начать новый раздел, легко, но знаете ли вы, как быстро удалить все разрывы разделов в длинном документе? Ниже приведены несколько советов по удалению всех разрывов разделов в слове 2007/2010.
- Удалить один разрыв раздела вручную
- Удалите все разрывы разделов с помощью функции поиска и замены
- Удалите все разрывы разделов с помощью VBA
- Один щелчок, чтобы удалить все разрывы разделов с помощью Kutools for Word
Удалить один разрыв раздела вручную в слове
Этот метод поможет вам отобразить все знаки абзаца и скрытые символы форматирования в документе Word, а затем легко вручную удалить указанный разрыв раздела. См. Следующие шаги:
1. Нажмите Главная >  (Показать / скрыть отметки редактирования), чтобы отобразить все знаки абзаца и скрытые символы форматирования в текущем документе.
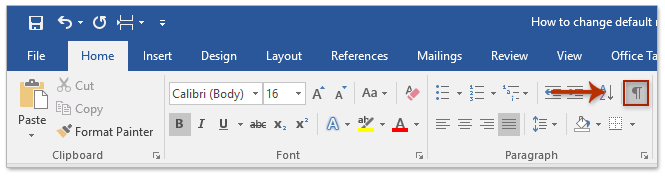
2. Поместите курсор перед указанным разрывом раздела, а затем нажмите Удалить ключ, чтобы удалить его. Смотрите скриншот: 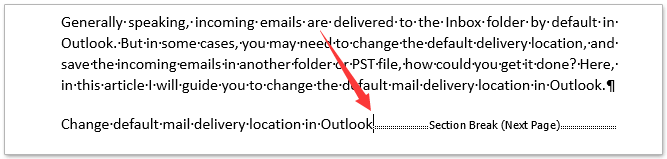
3. Чтобы удалить дополнительные разрывы разделов, повторите шаг 2 выше.
Один щелчок, чтобы удалить все разрывы (страницы / столбца / раздела) из выделения или всего документа в Word
По сравнению с отображением символов форматирования и удалением каждого разрыва вручную по одному, Kutools for Word поддерживает ряд функций для удаления разрывов одним щелчком мыши: (1) Удалите все виды разрывов из выделенных или целых документов; (2) удалить все разрывы страниц / столбцов / разделов из выделенных или целых документов.
Удалите все разрывы разделов с помощью Найти и заменить функция в Word
Вы также можете удалить все разрывы разделов из текущего документа Word с помощью функции «Найти и заменить» в Word. Пожалуйста, сделайте следующее:
1. Нажмите Главная > Замените (или нажмите Ctrl + H одновременно), чтобы открыть диалоговое окно «Найти и заменить». Смотрите скриншот: 
2. В появившемся диалоговом окне «Найти и заменить», пожалуйста (1) напишите ^b в Найти то, что коробка, (2) ничего не вводите в Заменить поле, а затем (3) щелкните значок Заменить все кнопка. Смотрите скриншот: 
3. Появится диалоговое окно Microsoft Word, в котором будет указано, сколько разрывов разделов было удалено. Пожалуйста, нажмите на OK чтобы закрыть его. 
4. Закройте диалоговое окно «Найти и заменить».
На данный момент все разрывы разделов уже удалены из текущего документа.
Удалите все разрывы разделов с помощью VBA
Помимо вышеуказанной функции поиска и замены, вы также можете быстро удалить все разрывы разделов из текущего документа с помощью VBA в Word. Пожалуйста, сделайте следующее:
1, нажмите Alt + F11 , чтобы открыть Microsoft Visual Basic для приложений окно;
2. Нажмите Вставить > Модули, а затем вставьте следующие коды VBA в новое окно модуля.
VBA: удалить все разрывы разделов в Word
3. Затем нажмите Run или нажмите F5 ключ для запуска кода. И тогда разрывы разделов сразу уберут сразу.
Удалите все разрывы разделов с помощью Kutools for Word
Если у вас есть Kutools for Word установлен, вы можете быстро удалить все разрывы разделов из текущего документа одним щелчком мыши. Удалить разрывы разделов характерная черта. Пожалуйста, сделайте следующее:
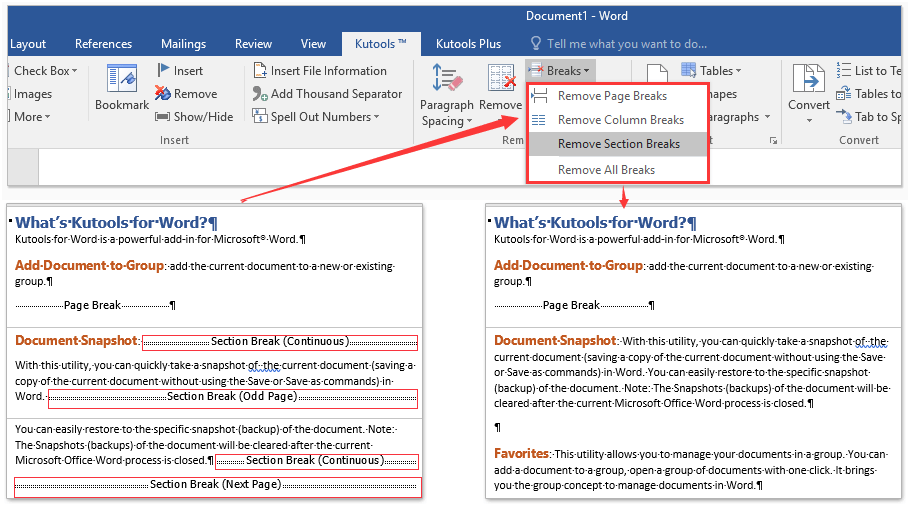
Нажмите Kutools > Перерывы > Удалить разрывы разделов. Смотрите скриншот: 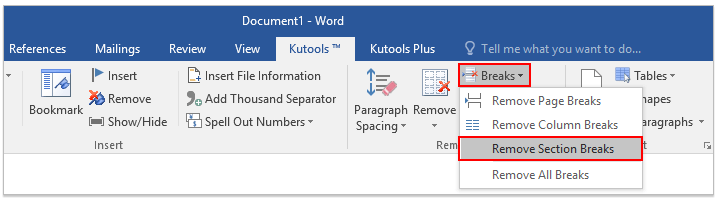
Затем появится диалоговое окно с запросом на повторное подтверждение. Щелкните значок Да кнопку, чтобы продолжить. 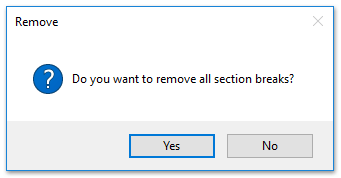
Теперь все разрывы разделов сразу удаляются из текущего документа сразу.
Внимание: Это Удалить разрывы разделов функция также поддерживает удаление всех разрывов разделов из выделения: (1) выберите часть, в которой вы удалите разрывы разделов, и (2) нажмите на Kutools > Перерывы > Удалить разрывы разделов.
Просмотр и редактирование нескольких документов Word с вкладками в Firefox, Chrome, Internet Explore 10!
Возможно, вы привыкли просматривать несколько веб-страниц в Firefox/Chrome/IE и легко переключаться между ними, щелкая соответствующие вкладки. Здесь, Office Tab поддерживает аналогичную обработку, которая позволяет вам просматривать несколько документов Word в одном окне Word и легко переключаться между ними, щелкая их вкладки. Нажмите, чтобы получить полную бесплатную пробную версию!
How to Remove Section Breaks in Word

In our Windows 10 tutorial today, you will learn how to remove all section breaks in MS Word. If you are not familiar with this feature, here’s a summary of everything you need to know about section breaks.
There are different types of section breaks, namely:
- Next page – When applied, this type of section break forces the text to the right of your cursor to a new section on the following page. Additionally, all the formatting associated with the text is transferred to the new section.
- Continuous – This type of section break creates a new section but keeps the text on the same page. That is to say, you can have two different sections on the same page with different formatting (like in our example below, where we have a single-column paragraph and a two-column paragraph on the same page).
- Even page – This type of section break moves the text to the right of the cursor to the top of the next even-numbered page. So, if you are on page 10, and you insert an Even Page Section Break, the new section will begin on page 12, leaving page 11 blank.
- Odd page – This is the opposite of an Even Page Section Break, where the text to the right of your cursor is moved to the next odd-numbered page.
How to View Existing Section Breaks in MS Word
In MS Word, section breaks and page breaks are invisible by default, and you can only see the changes in formatting and pagination for each section. The reason being that the breaks are not supposed to appear on your document when you print them.
However, when you are editing your .doc file, you may want to see the section and page breaks. To do so, select the Home button, and click on the “Show/Hide ¶,” option (the pilcrow, ¶, sign).
Sometimes, you may want to know how to remove all section breaks in Word. If that’s the case, below are some useful tips.
How to Remove All Section Breaks in MS Word at Once
- Before you start, make sure the section breaks are visible by clicking the Home > Show/Hide ¶ option as explained above. To manually remove a section break, scroll until you find it.
- Once you do, select the section break by dragging your cursor from the left edge all the way to the right edge and press the Delete key. Alternatively, place your cursor just before the section break and press Delete.
The above steps can be applied if you have just a few section breaks in your .doc file. However, if you are dealing with multiple pages, an easier way to quickly delete the entire section break in Word is by using the “Find and Replace” tool.
Here are the steps to follow:
- Repeat step 1 above, and open the Find and Replace box. It’s located in the far-right corner of your Word document. Alternatively, use the Ctrl + H shortcut keys.
- Once it opens, click the More button in the left corner of the window.
- This operation will reveal advanced settings. Click on the Special button and select Section Break from the drop-down list that appears.
- You should see “^b” in the “Find what:” text box. Alternatively, you can enter “^b” directly in the “Find what:” text box after Step 2.
- Finally, click the Replace All button. You don’t have to input anything in the Replace With text box.
- When you see a confirmation window, click OK.
That’s it! This operation will delete all section breaks in a .doc file.
Is MS Word Loading Slowly or Freezing Frequently?
Have you noticed MS Word and other apps on your computer running slow of late? It could be caused by junk files. Normally, your PC collects a lot of junk files whenever you install or uninstall an application, surf the internet using your favorite browsers, use applications like Microsoft Word, and even when Windows installs updates.
With time, these junk files accumulate, taking up valuable disk space and preventing some Windows functions from running optimally. If left unchecked, your system may become unstable, and you may start experiencing a myriad of computer issues like constant lag, system glitches, and, in worst-case scenarios, Blue Screen of Death (BSOD) errors.
However, you don’t have to panic. We recommend installing the ultimate PC optimization tool, Auslogics BoostSpeed. This program is dedicated to cleaning out all kinds of PC junk, tweaking system settings, and resolving stability and performance issues on your computer. As a result, it leaves your PC running as if it were new.
Among other functions, Auslogics BoostSpeed cleans the registry, gets rid of duplicate files, defrags your disks, optimizes your internet settings for faster browsing and download speeds, and removes unnecessary applications, leaving you with a compact and efficient system.
We recommend running system maintenance at least once every week. However, since you have so much to do, we know you can easily forget. That’s why there is the Scheduler function to let you set automatic scans to run at regular intervals.