How to Mail Merge from MS Word and Excel (Updated Guide)

A mail merge is a handy way to send personalized mass letters and bulk emails quickly.
It works by automatically adding personalization data from a data file (for example, a spreadsheet) to a template file (like a letter or an email).
In this article, I’ll first cover what a mail merge is and explain how it works. Then, I’ll go over how to mail merge using an Excel spreadsheet and a Word document.
This Article Contains:
(Click on links to jump to specific sections)
Let’s jump right in.
What Are Mail Merges?
A mail merge lets you create personalized documents that are automatically customized on a recipient-by-recipient basis. This spares you the trouble of manually personalizing each document yourself!
You can use mail merges to create personalized messages automatically for:
- Marketing emails. .
- Custom catalogs.
- Form letters, and more.
Note: A form letter is a template file used to create mass letters. Instead of typing a letter for each recipient, you can use a form letter to make quick, unique, personalized letters for each person.
Essentially, if there’s a document you need to personalize at scale, mail merges can take care of it for you!
Let’s now explore how a mail merge works.
How Does Mail Merge Work?
First, you need to understand the two essential components of every mail merge.
- TemplateFile: the document that holds the message you’ll be sending out (like a letter or an email). It specifies the places where the personalization data will go. And that data (names, addresses, etc.) is fetched from a data file.
- Data File: a data source like a Microsoft Excel spreadsheet or a Google Sheets file. Each cell in the data file contains different information (first name, last name, email address, etc.) that will be placed in your template file in the corresponding space.
Essentially, a mail merge automatically adds the personalization data from your data file to your template file.
For example, let’s say you want to perform a mail merge to create mass letters.
Here, your letter is the template file — it has placeholders for your contacts’ names and addresses.
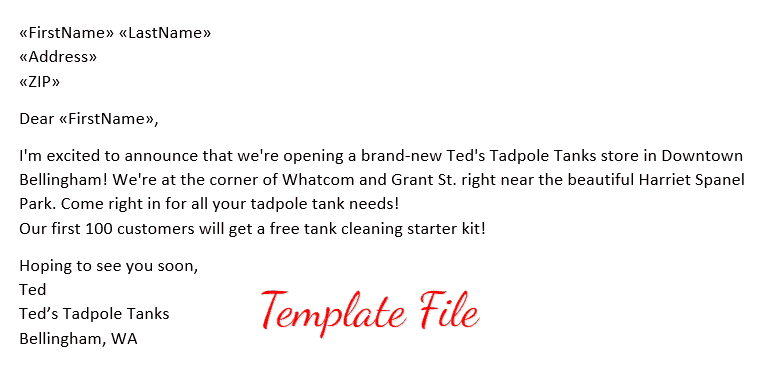
Notice the «FirstName», «Address» and other tags in the letter?
These are placeholders for your recipient’s details, also known as mail merge fields.
A mail merge field draws the personalization information from your data file (spreadsheet) to help you create your personalized letter.
But to make this work, the name of the mail merge field in your personalized letter template must match the name of the column header in your spreadsheet.
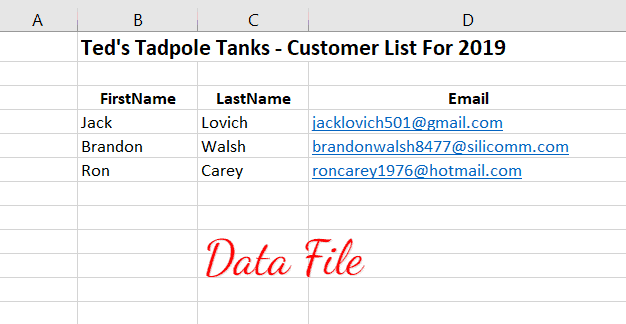
If the name of the merge fields and column headers match, the mail merge function would then merge your data file and your letter template to generate a personalized letter for each person.
Next, I’ll go over the steps involved in using mail merge to automatically personalize individual letters.
How to Use Mail Merge to Send Bulk Letters
You can use the mail merge feature in Word and Excel to create auto-personalized individual letters quickly.
- The mail merge template is a form letter in Microsoft Word.
- The data file is an Excel spreadsheet containing your recipients’ details.
Let’s now explore the steps involved in using mail merge for bulk letters:
Step 1: Create and format your address list in Microsoft Excel
Here’s a step-by-step guide on how to set up an Excel data file:
Step A
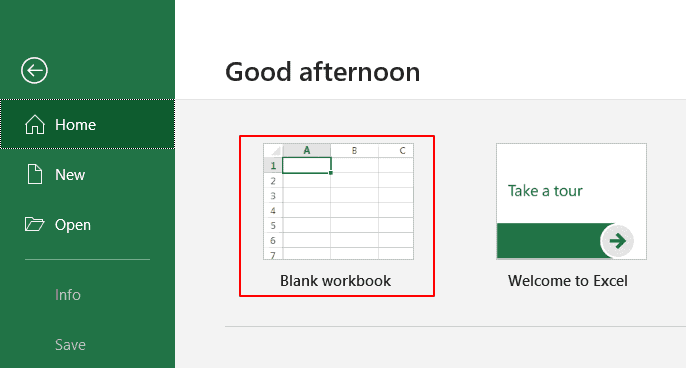
Open MS Excel and click on Blank workbook to open a blank Excel workbook (or document).
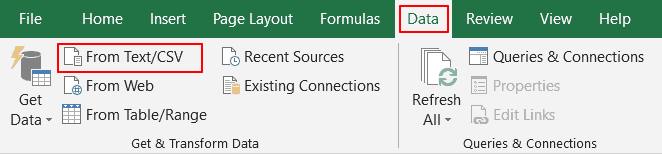
Note: If your contact data is readily available as an Excel spreadsheet, open the file and format it. If the data is present in a TXT or CSV file, go to Data → From Text/CSV to open the file in Excel.
Step B
Now you can start entering the details of your address list into the Excel workbook.
Only enter your column headers in the first row, starting in cell A1.
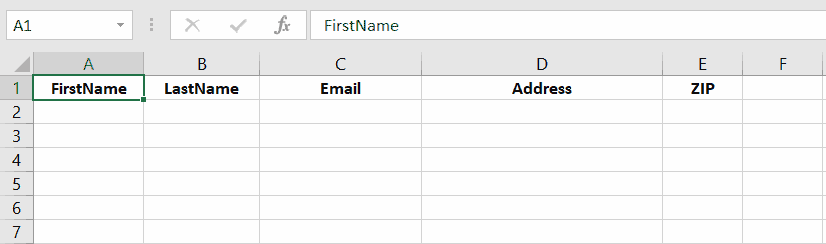
Check your header row to make sure the column headers in your Excel spreadsheet are exactly the same as the field names (or placeholder names) you want to use in your Word template document.
For example, if the column names in your Excel sheet are “FirstName”, “LastName”, and “Email”, the field names in your Microsoft Word document should also be “FirstName”, “LastName”, and “Email”.
Step C
Enter your contact information in your Excel database as one record per row, starting from cell A2.
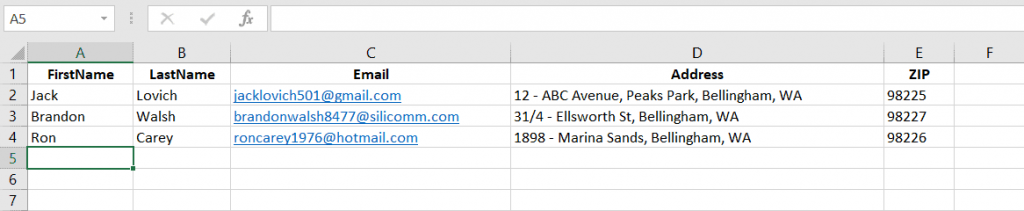
Quick Tip
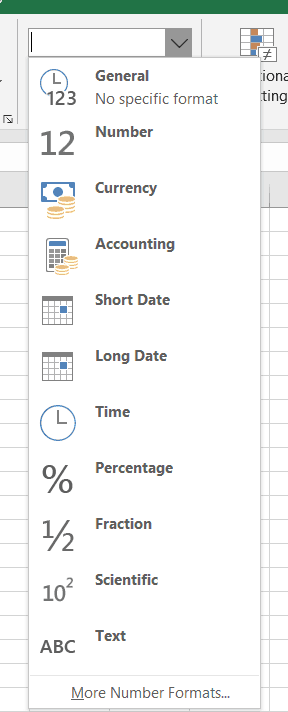
Data entries such as ZIP codes, percentages, currencies, etc., must be in the correct numeric format. To ensure this, you need to:
1. Select a column that has numeric data entries.
2. Go to the Home → Number section.

3. Click on the Number Format box and choose the correct format from the drop-down list that appears.
4. Repeat steps 1–3 for all columns containing numeric values.
Step D
Once you’ve created the contact sheet, you can save your Excel document by pressing Ctrl+S or going to File → Save or File → Save As.
Bonus Tip for Gmail Users
If you’re creating your first mail merge data file, you can export all your existing Gmail contacts (or “Google Contacts”) to get started quickly. Read my guide on how to export contacts from Gmail to learn how.
Note: Ensure that you finish all edits to the Excel spreadsheet before starting the mail merge process. Making edits to an Excel sheet once you’ve already begun a mail merge is a complicated additional step.
Step 2: Create the main mail merge document in MS Word
The next step is to create the form letter (or mail merge template — your main document) in MS Word. You can create a different mail merge template for every bulk email campaign, and you can save the templates for future use.
A favorite time-saving technique of mass email managers is to choose an old email template that worked well, update the content where necessary, and give the mail merge template a new name.
As a result, when you create your mail merge document, try writing it in a way that will let you adapt and reuse it in future bulk mailings.
Here’s a step-by-step guide on how to create a mail merge template in MS Word:
Step A
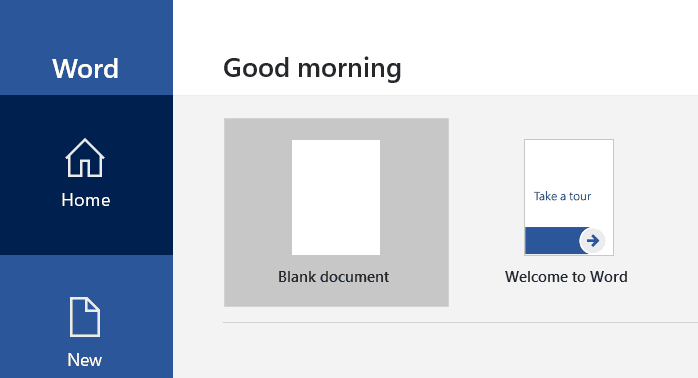
Open a new document (blank document) in Word.
This is the main document for your mail merge.
Step B
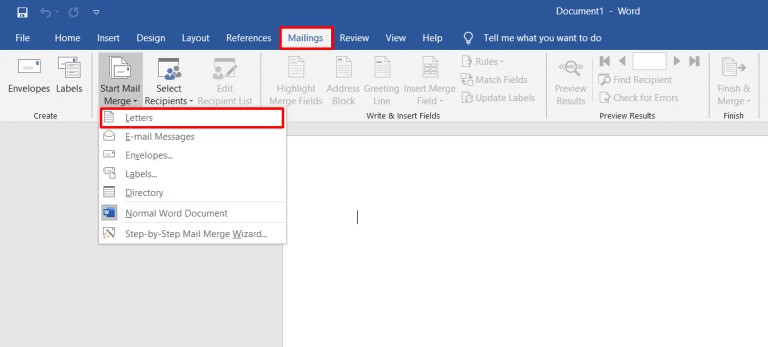
Click on the Mailings tab and select Start Mail Merge. A drop-down menu displaying every different mail merge document type will appear.
You can select the document type for letters, emails, envelopes, mailing labels, or a directory. Since we’re using the Word mail merge feature for sending letters, choose Letters as your merge document.
Step C (Optional)
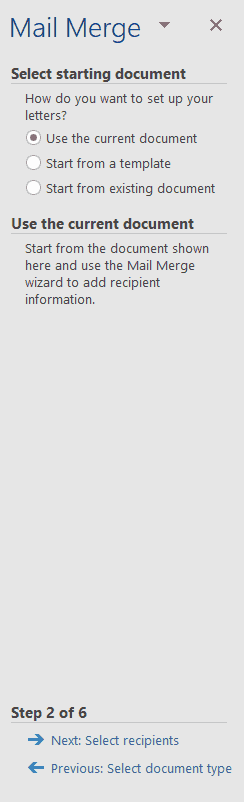
You can also use the Step-by-Step Mail Merge Wizard (from the Start Mail Merge drop-down menu) to streamline the Word mail merge process.
The wizard lets you quickly select the starting mail merge document.
For example, it lets you use the current document, which is the mail merge letter you’re creating now. Or you could choose a starter template or another existing document as your mail merge template.
Step D
Write the body of the letter.
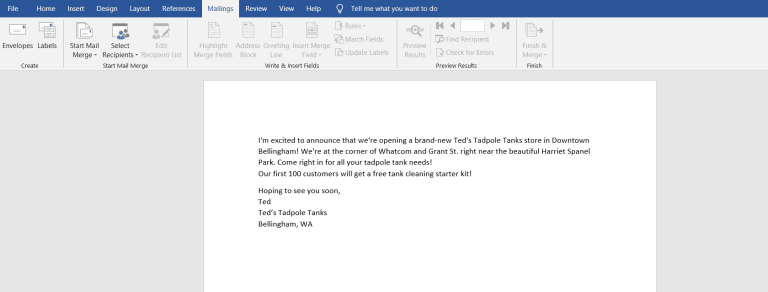
(Don’t worry about manually adding placeholders in your letter yet.)
Step 3: Select the recipient list
Now you can select the list of mail merge recipients (from your Excel file) who will receive your letter.
Here’s a step-by-step guide on how to do this:
Step A
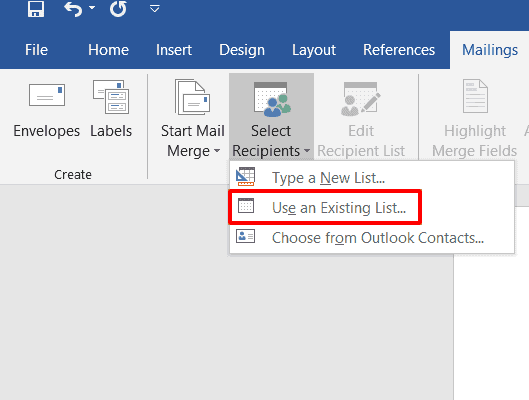
Click on the Select Recipients option in the Mailings tab. A drop-down menu appears, showing different mail merge list sources.
As your contact information is already available as an Excel file, click on Use an Existing List.
Note: You can also include your Outlook Contact list if you have Outlook connected to Word.
Step B
In the dialog box that pops up, select the Excel sheet you created earlier and click Open.
Step C
A Select Table window appears. Choose the Excel worksheet you want to merge with the Word template and click OK.
Note: If your Excel spreadsheet has only one worksheet, you’ll only see Sheet1 in the Select Table window.
Step D
If you want to edit your mail merge recipients list, click on the Edit Recipient List tab.
In the Mail Merge Recipients window that pops up, clear the checkbox of the person you don’t want in your mailing list.
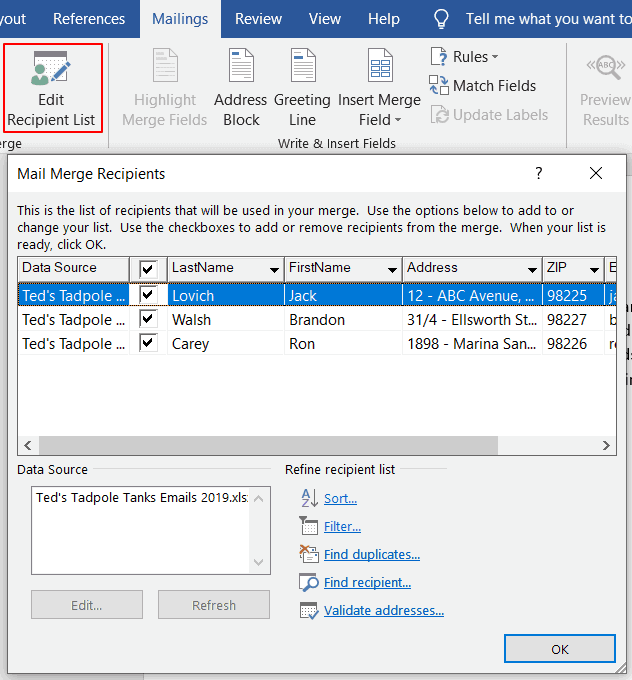
Anyone you remove from your recipient list in this step will be removed from any mail merge project that uses this data file in the future.
Step 4: Add personalized messages
The next step is to add personalized content (like contact names and addresses) to your form letter template (Word mail merge document).
In Word, you can insert three personalization variables into your document:
- Insert Address Block — add a recipient’s address to your document.
- Insert Greeting Line — include a personalized greeting or salutation in your letter.
- Insert Merge Field — insert other mail merge fields from your Excel file.
Here’s a walkthrough on how to add all three personalization variables to your merge document (form letter):
Note: You can add a personalization variable at an insertion point of your choice in the Word document. For example, to add a greeting line before the body of your letter, simply place the text cursor at the point you want to add it.
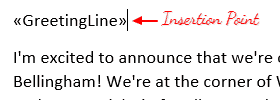
A. Insert an Address block
To insert a recipient’s address from your Excel worksheet, click on Address Block from the Write & Insert Fields section. In the window that appears, choose an address block format of your choice and click OK.
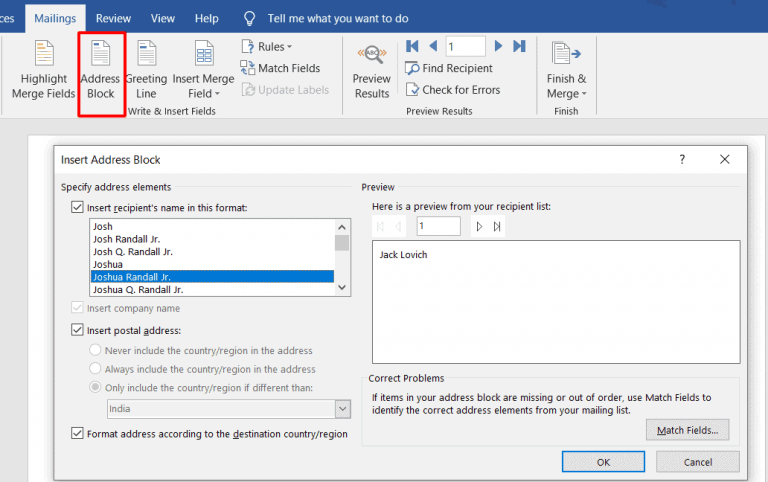
An address placeholder («AddressBlock») will be inserted automatically into your letter.
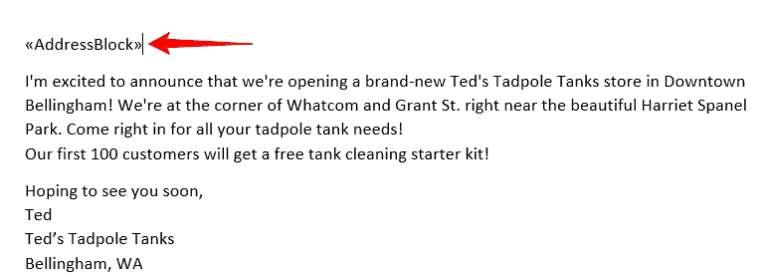
B. Insert a Greeting Line
To insert a greeting line, click on Greeting Line from the Write & Insert fields section.
In the dialog box that pops up, select the format you want to use and click OK.
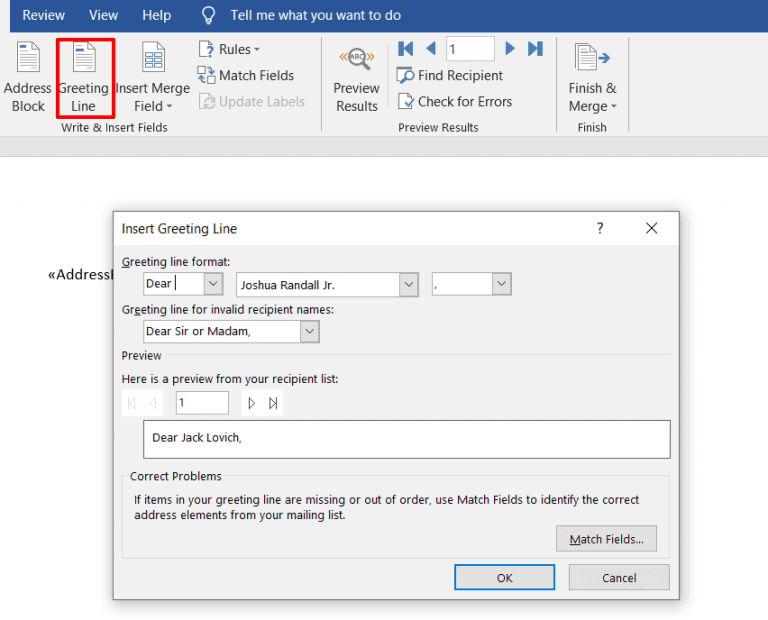
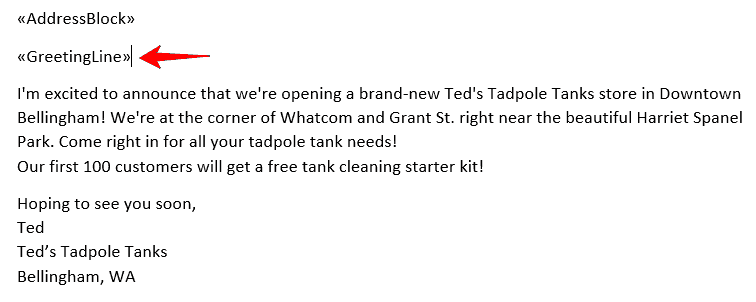
A greeting placeholder («GreetingLine») will be automatically added to your document.
C. Insert a Merge Field
You can also add other mail merge fields, like your contact’s first name, company name, email id, etc., from your Excel worksheet to your Word template.
To do this, click on Insert Merge Field from the Write & Insert fields group.
You can see a drop-down list of some mail merge labels. These labels are the column names in your Excel spreadsheet.
If you want to create a custom field, the easiest way is to add a column to your spreadsheet with the name of the custom field you want to make, like “birthday” or “pet name”. But you must do this before starting the mail merge process since you can’t edit your spreadsheet during mail merge.
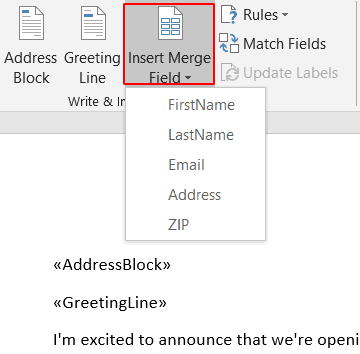
Click on the mail merge fields you want to add to your letter.
Here’s how my form letter looks after inserting the placeholders (mail merge fields) I needed:

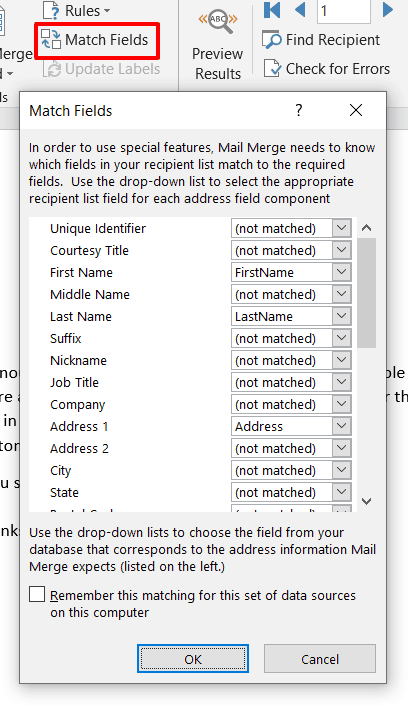
Note: You can also use the Match Fields feature to manually match your Excel column fields with the Word placeholders. This way, you can ensure that all the mail merge fields are accurately mapped to your Excel column names.
Step 5: Preview and finish the mail merge process
After personalizing the form letter for each recipient, you can preview the letters to see how they look with the data inserted from your Excel worksheet.
Here’s a step-by-step guide on how to do this:
Step A
Click on Preview Results under the Mailings tab.
Step B
To preview the result for each recipient, you can enter the recipient number (the corresponding row number in your Excel spreadsheet) in the text box.
For example, to preview the form letter for my second recipient — Brandon Walsh, I type “2” in the text box and click the Preview Results button.
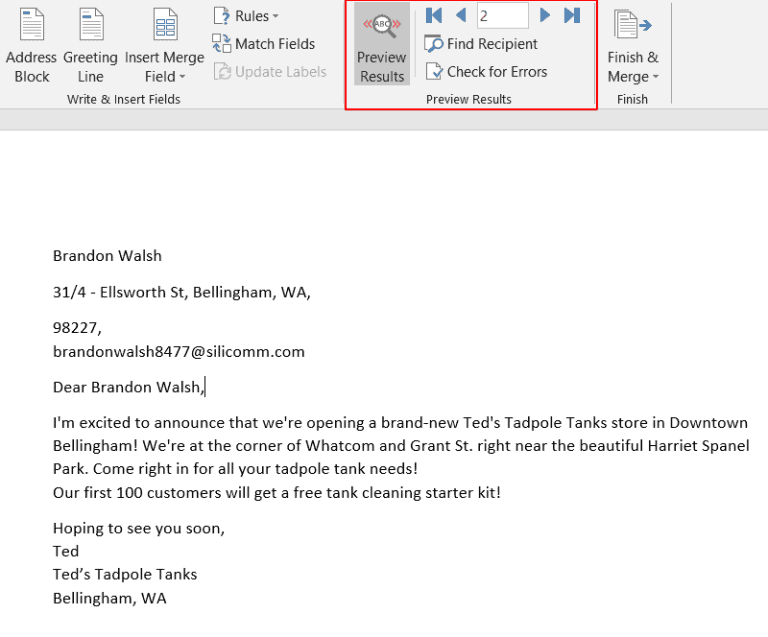
Note: You can also click on the Next and Previous buttons to quickly scroll through your mailing list to preview the letter for each person.
If you realize someone who is scheduled to receive your bulk email should be removed from the recipient list, refer to Step 3 (D) for instructions.
Step C
After previewing the form letter, click on Finish & Merge to finish the Word mail merge process.
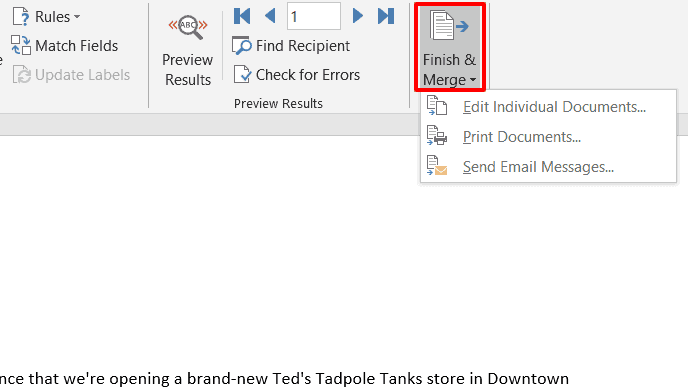
From the drop-down list that appears, you can choose to:
- Edit Individual Documents — if you want to edit each letter further, separately.
- Print Documents — if you want to print the letters.
- Send Email Messages — if you want to send the letters as emails.
Note: If you want to send the letters as email messages to a Gmail or Outlook contact, you must manually set up Gmail/Outlook with Word.
Step 6: Save the form letter
After you’ve finished working with the merged document, you can save it by pressing the Ctrl+S keys or by going to the File menu and clicking Save or Save As.
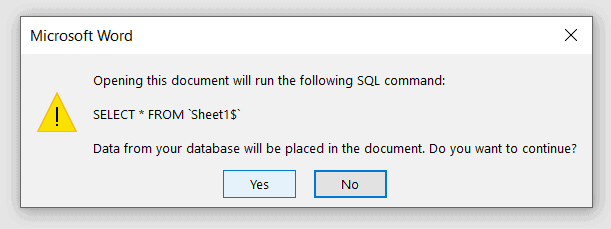
You can also reuse the merged document for sending additional letters — just open it and click Yes when Word prompts you with this alert:
How to Use Mail Merge to Send Mass Emails
You can use mail merge to quickly create personalized emails for newsletters, promos, and other email marketing messages.
Here, your mailing list is the data file, while the email is the mail merge template.
We’ve seen how to use Excel and Word to create personalized form letters.
Just follow the same steps to send merged emails to your mailing list.
However, I don’t recommend using Microsoft Word to send personalized emails at scale. Here’s why…
2 Problems of Using Microsoft Word to Send Mass Emails
While you can use a Microsoft Word document to create merged emails, there are two major drawbacks with this approach:
- To send the merged document as an email message, you must manually set up Microsoft Outlook or Gmail with Word. This can be time-consuming and confusing for most users.
- Microsoft Word isn’t well-equipped to handle mail merges. If your personalization tags are mismatched and there are hundreds of recipients (you can’t preview every email, can you?), you could end up sending something like this:
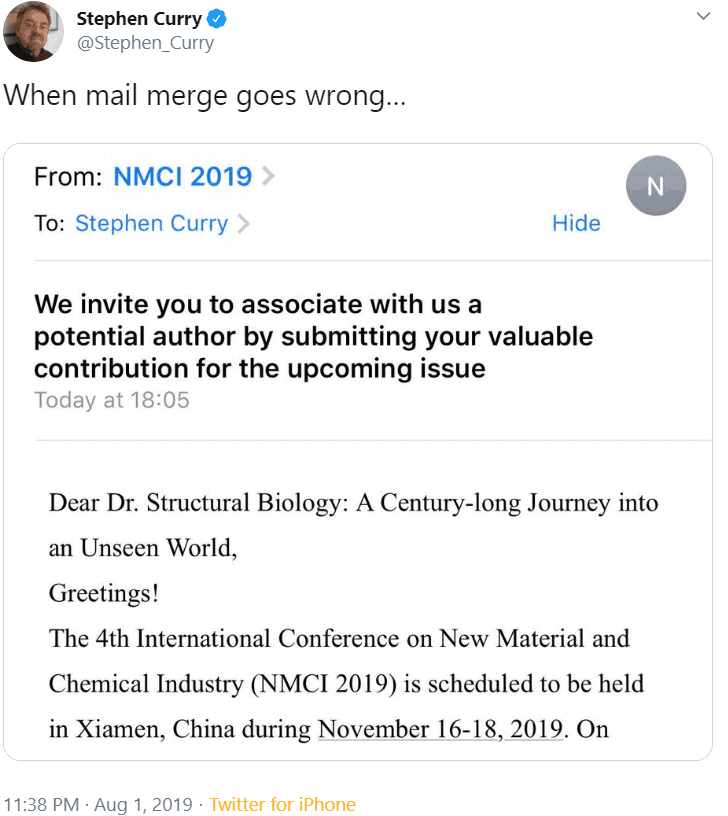
Now, imagine sending hundreds of such embarrassing emails!
That’s why it’s smarter to use a dedicated mail merge tool like GMass to send mass emails.
How to Use Mail Merge with GMass to Send Mass Emails
GMass is a powerful mail merge tool that lets you easily create and send tons of emails from your Gmail account.
Its advanced mail merge features have made it a popular tool used by employees from LinkedIn, Uber, Google, and Twitter. GMass is also perfect for individuals and groups like clubs, schools, churches, and other institutions to send emails to a target audience.
With GMass, you can easily create a mail merge with a data file stored as an Excel spreadsheet or a Google Sheet.
Step 1: Import your Excel spreadsheet into Google Sheets
The first step is to import your Excel file into Google Sheets (this takes only a few seconds).
Why would you want to do this?
Because Google Sheets is far more powerful than Microsoft Excel for mail merging. Its automatic cloud-sync feature auto-saves your work with each edit made in the spreadsheet.
Plus, if you’re sending emails, it makes sense to have your spreadsheet online, right?
Additionally, Google Sheets is completely free and can be used by anyone with a Google (Gmail or Google Workspace) account. You won’t need a Microsoft Office subscription!
Note: If your data file is a CSV file, you can also import it into Google Sheets.
Here’s a step-by-step guide on how to import your Excel document into Google Sheets:
Note: I’ll be using the Excel sheet shown in the screenshot below for the walkthrough.
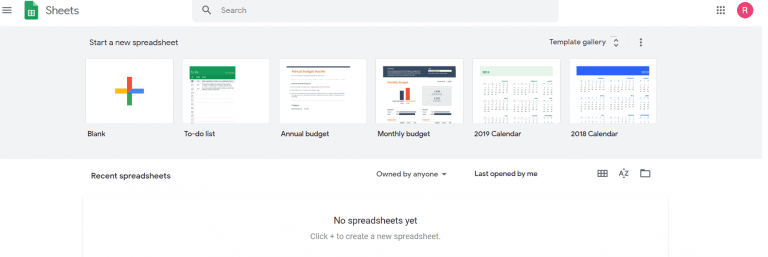
Step B
Select the folder icon to open the Google Sheets File Picker.
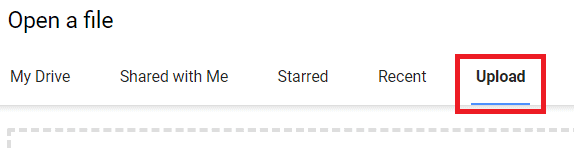
Step C
In the window that appears, click on the Upload tab to import your Excel sheet.
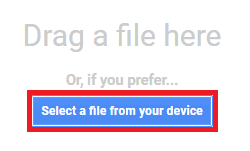
Step D
You can now choose the file you want to import from your computer. To select the file, click on the Select a file from your device button.
Step E
Choose the Excel file you want to import from your computer and click on the Open button.
Step F
Your file will be automatically imported as a new Google spreadsheet, which becomes your mail merge recipient list and data file.
Step 2: Format your Google Sheet
Your Google Sheet must be well-formatted before you use it with GMass.
But don’t worry, it’s not as complicated as formatting your Excel spreadsheet.
Here are some guidelines to ensure it works well:
- Your column names must be in plain text — they shouldn’t contain spaces, codes, or special characters.
- Your column names must begin from cell A1. If there are any blank rows or additional text (like a sheet title) above the column names, you must delete them.
- The actual personalization data must begin from the second row onward.
- There must be at least one column that has your recipients’ email addresses.
GMass will auto-detect all column names during the mail merge process. It will automatically use the column labels in your Google Sheet as the placeholders in your email template.
Step 3: Install GMass and connect it to your Gmail account
If you haven’t installed the GMass Chrome extension yet, here’s a step-by-step guide on how to install and connect it to your Gmail account quickly:
Step B
Click on the Add to Chrome button.
Step C
A dialog box pops up:
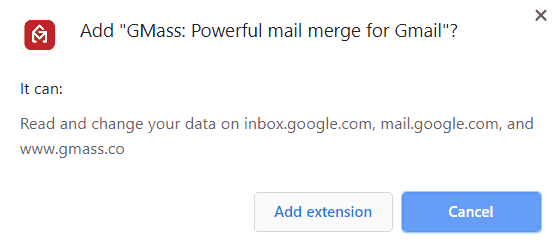
Click on the Add extension button to add GMass to Chrome.
Step D
Log in to the Gmail account you want to use with GMass.
After logging in, you can see three new GMass buttons next to your Gmail search box.
Click on one of these buttons, and you’ll be prompted to link your Gmail account to GMass:
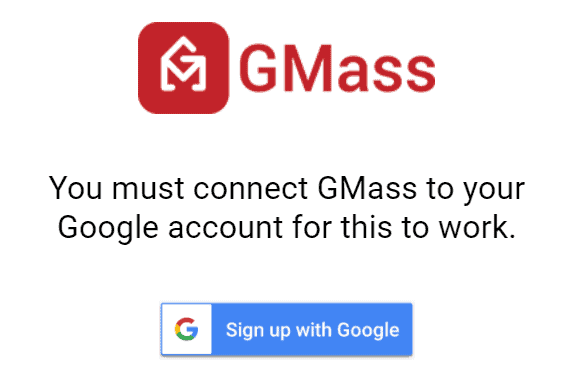
Click on the Connect GMass Now! button to connect your Gmail account with GMass.
Note: Simply installing the GMass extension doesn’t create a GMass account. It only makes the buttons appear in your Gmail account. You have to link it to your Gmail account (as above) to activate it.
Step 4: Connect your Google Sheet to GMass
Here’s a step-by-step guide on how to perform this last step:
Step A
Open your Gmail account and click on the GMass spreadsheet button near your Gmail search box.

Step B
A dialog window appears:
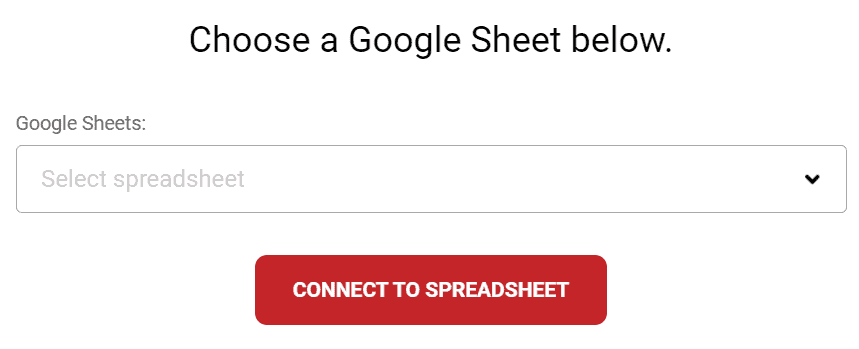
Step C
You can now use the drop-down menu to choose the Google sheet you want to use for the mail merge.
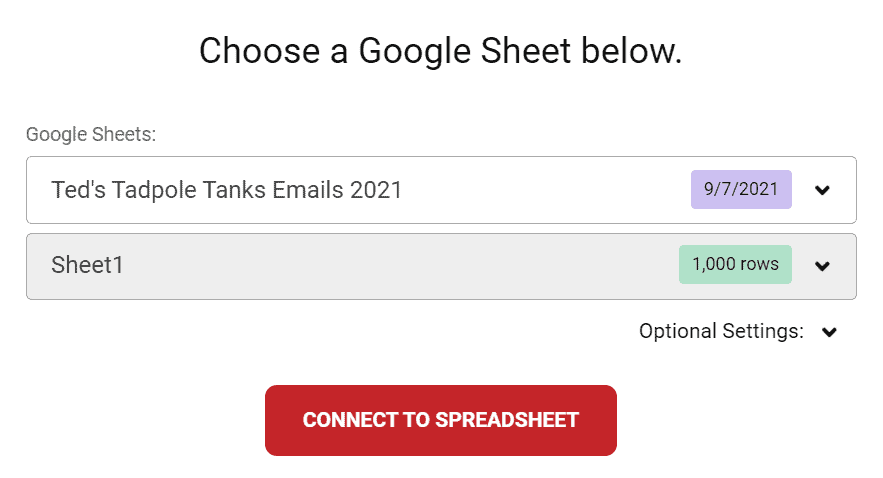
Note: If you have only one sheet (Sheet1) in your Google spreadsheet, that sheet gets chosen by default. However, if your spreadsheet has multiple sheets, you can select the sheet you want from the drop-down list.
Once you’ve chosen a spreadsheet, click on the CONNECT TO SPREADSHEET button.
Step D
Now, GMass will auto-read all your recipients’ data from your Google sheet. It will also automatically insert their email addresses in the To field of a new email.
Note: GMass replaces the list of individual email addresses with a single alias address.
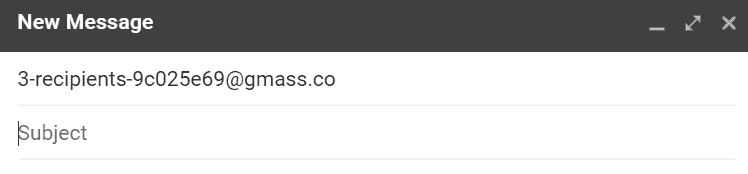
However, you can choose to display the email addresses individually. This way, you’ll be able to see the email IDs of everyone on your recipient list — but don’t worry, each recipient will see only their email address (just like when you add recipients to the BCC field).
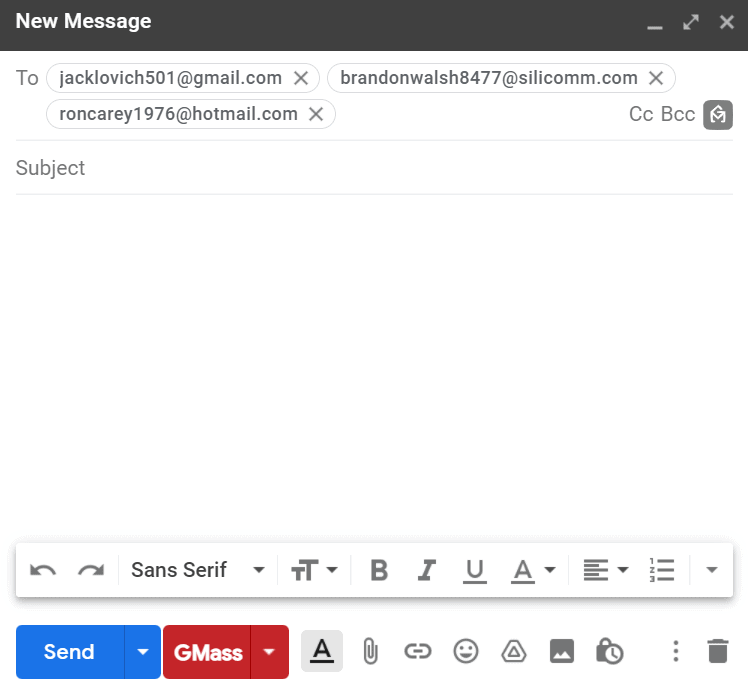
Step E
After a new email window appears, you can compose your email with GMass’ powerful personalization features. To use these personalization settings, click on the settings arrow near the GMass button.
Click on the Personalize drop-down list button to see all the column names present in your Google sheet.
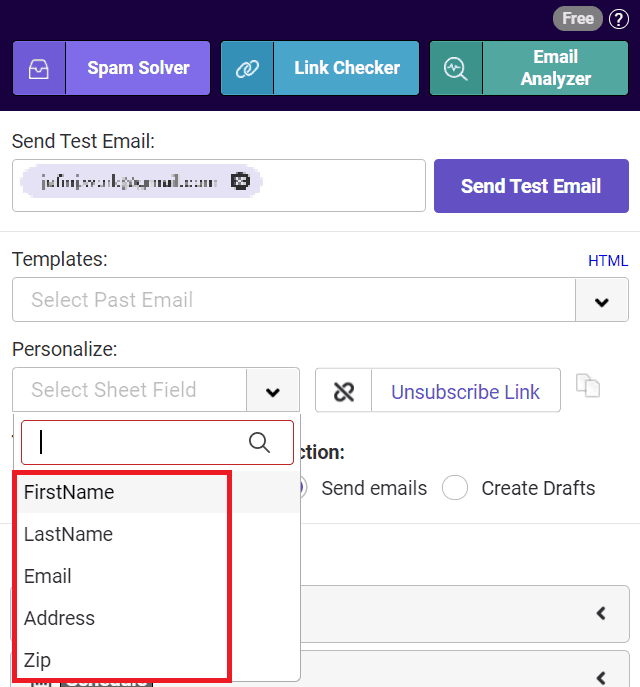
To personalize your email, select the column labels from the drop-down list. You can add these placeholders anywhere in your email message and subject line.
Here’s how my personalized email looks like with placeholders:
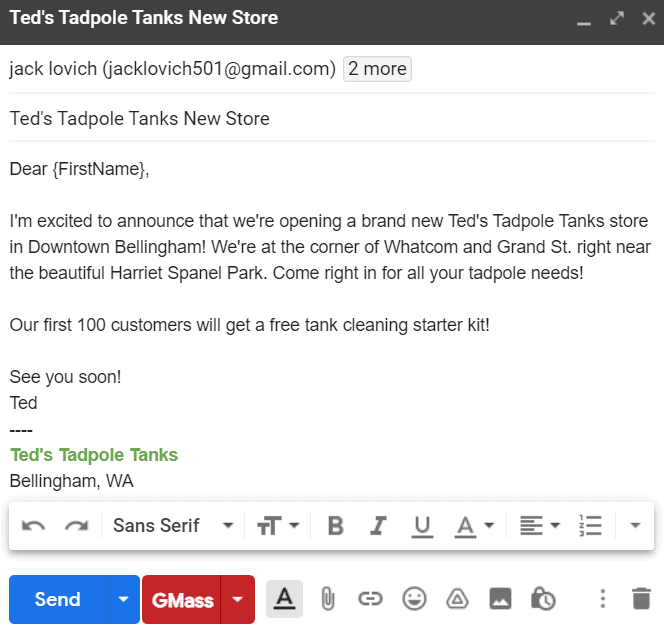
Notice the
Step F
After composing your email, click on the GMass button to send it to all your recipients.
Note: GMass will auto-personalize the email for each person based on the mail merge labels you’ve used in your message.
For example, the third recipient of my email, Ron Carey, will receive an email that starts with “Dear Ron,” as the
Now that we’ve seen how to use mail merge to send mass emails let’s check out some important mail merge FAQs.
7 Mail Merge FAQs
Here are the answers to seven commonly asked questions regarding mail merge:
1. What are the advantages and disadvantages of email mail merge?
Mail merge for your email marketing or cold emailing has several strong advantages, such as:
- Personalization: Mail merge personalization makes your form letter sound like individual correspondence, so it’s more likely to be read.
- Saves time: Once you set up your mail merge template, it takes relatively little time to create a large number of personalized messages because it’s tied to your Excel data — the single spreadsheet where all personalized information is kept.
- Controls the appearance of your message: A mail merge template lets you manage how the type and images look, so your email is attractive even where the personalized content is different.
- Allows for testing: You can quickly adapt a template to create two versions of the message for A/B testing. This way, you can effortlessly know what version of your message works best.
On the other hand, a mail merge also has some disadvantages for email campaigns:
- May require additional software: To go beyond the features of Microsoft Word, you may need email merge software, like GMass, with advanced features to automate data collection or add conditional formatting.
- Requires accuracy: If your Microsoft Excel database is incomplete, inaccurate, out of date, or saved under a new name, then mail merge may not work.
- Risk of error: If you make a mistake in your mail merge template or personalization data, that error will get reproduced on all the emails that use those elements. As a result, it’s essential to allow time to test your email before sending it to your entire list.
2. Can you perform an email merge with an attachment?
When you’re using Word, you don’t have the option to include an attachment with a standard mail merge message, but you can if you use the Mail Merge Toolkit add-in for Microsoft Office.
However, if you’re after a better solution, use a purpose-built mail merge platform like GMass that not only lets you include an attachment but even allows you to choose different attachments for each recipient.
3. How do you use a Mail Merge Toolkit in Word?
The Mail Merge Toolkit for Word is a third-party add-in that lets you do more personalization than the standard Word mail merge alone (for example, including attachments).
You can download a free trial and view an online toolkit tutorial to get started. Once you have the program, go to the Start Mail Merge selection under the Mailings tab and follow the prompts.
4. Can you send a mail merge from a shared mailbox?
If you want to send a mail merge from a shared mailbox (such as from an email address named for a department, company, or event instead of a person), you can arrange it in Outlook.
Start by finding the “Other User’s Folder” and open it to navigate to the shared mailbox. Associate that mailbox with the spreadsheet that contains your recipients’ data and prepare the mail merge as usual.
5. How do you do a mail merge in Word for labels?
One of the coolest features of MS Word’s mail merge functionality is the ability to drive printed labels with placement designed in Word and data-driven by your personalization datasheet.
If you know how to do a letter or email mail merge in Word, labels are very easy.
Under the Mailings tab in Word, click the Start Mail Merge selection and then the Step-by-Step Mail Merge Wizard. Choose Label as your template document type, and under Label Options, select a label manufacturer and style number (for example, Avery 5160, etc.).
From there, follow the wizard’s prompts.
6. How do you do a mail merge with Outlook?
To create an Outlook mail merge, you’ll need to use Microsoft Word, Excel, and Outlook.
Starting in Word, choose the Mailings menu, then Start Email Merge, and then Email Messages.
When your message is ready, click Select Recipients to link to the Excel spreadsheet with your data. Then, select Finish & Merge to send your email to your list using Outlook.
7. What is extended mail merge?
If you’re a Salesforce user, you have two options for mail merge — standard and extended.
Standard mail merge is the preferred approach for those with specific CRM software and operating systems, such as Luminate CRM and Windows 10.
Extended mail merge is a mail merge tool for all other Salesforce users. Although the tools are different, the results are the same — personalized emails to recipients listed in Salesforce.
Final Thoughts
Mail merging isn’t rocket science.
While you can use Microsoft Word to perform mail merges for letters, you need to follow a large number of steps correctly. Additionally, for sending mass emails, you have to set up a webmail client with Word manually.
Instead, why not use a powerful mail merge tool like GMass for sending mass emails?
Its advanced mass mailing features help you to perform mail merges and send out bulk emails effortlessly.
Why not try GMass today and simplify your mail merge experience?
Ready to send better emails and save a ton of time?
GMass is the only tool for marketing emails, cold emails, and mail merge — all inside Gmail. Tons of power but easy to learn and use.
TRY GMASS FOR FREE
Download Chrome extension — 30 second install!
No credit card required

Ajay is the founder of GMass and has been developing email sending software for 20 years.
1.2. Слияние писем
Многие финансовые и другие организации общаются со своими клиентами или сотрудниками с помощью писем, рассылок и рекламных буклетов, которые рассылают всем людям, состоящим в списке рассылок.
Самый простой способ создать набор документов, полностью идентичных, за исключением определенной части информации – такой как имя, адрес и обращение в письме – использовать процесс, называемый слиянием.
Чтобы легко объединить основной документ с источником данных, в Word можно использоватьмастер Слияния (Mail Merge).
Слияние применяется, когда нужно создать набор документов, к примеру, наклейки с адресами или письма на бланках, которые рассылаются большому числу заказчиков. Каждое письмо или наклейка содержат как общие, так и индивидуальные сведения. Например, в письме должно быть обращение к заказчику по фамилии. Индивидуальные сведения для каждого письма или наклейки поступают из источника данных.
Процесс слияния писем объединяет статичную информацию из одного документа и меняющуюся информацию из другого документа следующим образом.
— Основной документ. Это такой документ как письмо или электронное сообщение, содержащий статичный текст, который будет находиться во всех документах для слияния, и метка-заполнители, называемые полями слияния, которые сообщают приложению Word, в какое место следует вставить меняющуюся информацию.
— Источник данных. Это структурный документ, такой как список покупателей, он может быть в виде таблицы Word, рабочего листа Microsoft Office Excel, таблицы базы данных Microsoft Office Access или списка контактов Microsoft Office Outlook, содержащий наборы информации (называемыезаписями) в соответствующем формате. Можно использовать существующий источник данных или создать новый в процессе слияния писем.
Процесс слияния состоит из нескольких общих действий:
1. Настройка основного документа. Основной документ содержит текст и графику, которые являются общими для всех версий составного документа, например, обратный адрес или приветствие на бланке письма.
2. Подключение документа к источнику данных. Источником данных является файл, содержащий сведения, которые должны вставляться в документ, например, фамилии и адреса получателей письма.
В процессе слияния писем необязательно использовать все записи из источника данных. Можно фильтровать данные и исключить некоторые записи.
3. Уточнение списка получателей или элементов. Приложение Microsoft Office Word создает копию основного документа для каждого элемента или записи файла данных. Если файл данных — это список рассылки, то элементами, вероятно, являются получатели этой рассылки. Если нужно создать копии только для определенных элементов файла данных, элементы (записи), которые требуется включить в список, можно выбрать.
4. Добавление в документ текстовых заполнителей (полей слияния). При слиянии поля слияния заполняются данными из файла данных.
5. Предварительный просмотр и завершение слияния. Перед тем как печатать весь комплект копий документа, каждую из копий можно предварительно просмотреть.
Конечным результатом является одна копия объединенного документа для каждой записи из источника данных.
Также можно объединить основной документ и источник данных в новый документ, в котором каждый из объединенных документов отделен от другого разрывом страницы. Затем можно персонализировать объединенные документы перед печатью и сохранить документ для последующего использования. Если не нужно изменять или сохранять объединенные документы, можно объединить основной документ и источник данных непосредственно в принтере или в сообщении электронной почты.
Подготовка данных для слияния
Перед тем, как выполнить слияние документов, нужно указать на существующий источник данных или создать новый. Источник данных состоит из матрицы строк и столбцов, в которой каждая строка содержит одну запись, например, полное имя и адрес клиента, а каждый столбец содержит определенный тип информации, называемый полем, например, имя клиента. Каждое поле определяется в источнике данных заголовком столбца, называемым именем поля, который располагается в первой строке источника данных (см. рис.1.1.).
Так как имена полей также используются как поля слияния в основном документе, они не могут содержать пробелов. Чтобы имена полей были читабельны и при этом не содержали пробелы, следует начать каждое слово с большой буквы или заменить пробелы подчеркиваниями.
Если источник данных содержит много записей, которые часто меняются, можно создать их в программе, предназначенной для работы с большими объемами данных, например, в Excel или в Access. Также можно использовать список контактов из Outlook, Microsoft Windows Mail или Microsoft Express.
Если источник данных содержит лишь несколько записей, которые не будут
часто обновляться, можно создать их в Word в виде таблицы или в виде списка, в котором поля разделены табуляцией. Или можно создать их в процессе слияния писем.
Может понадобиться осуществить слияние документов только части данных из источника данных. Например, если необходимо оповестить о распродаже в магазинах клиентов из определенной области. После того, как указан источник данных и создан основной документ, можно сделать следующее:
— фильтровать источник данных, чтобы создать документы только части данных;
— создать запрос (набор критериев выбора), чтобы выделить только нужную информацию, например, все почтовые коды нужной области;
— сортировать источник данных, например, по почтовому коду.
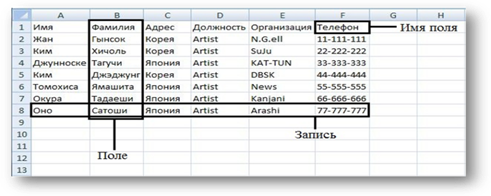
Рис.1.1. Пример источника данных
При использовании фильтра или запроса все данные, отвечающие заданным требованиям, используются при слиянии писем.
Технология создания письма при помощи инструмента слияния:
Начальными этапами будут создание двух документов: источника данных и основного документа.
Для слияния с почтой используются команды вкладки Рассылки.
Слияние можно также выполнить с помощью области задач Слияние, которая позволяет шаг за шагом осуществить весь процесс. Чтобы воспользоваться областью задач, в группе Начать слияниена вкладке Рассылки необходимо выбрать пункт Начать слияние, а затем пункт Пошаговый мастер слияния (см. рис.1.2.).
По умолчанию открывается пустой документ. Пусть он остается открытым. Если его закрыть, команды, которые нужно будет выполнить на следующем шаге, окажутся недоступными.
После выбора Пошагового мастера слияния, откроется область задач Слияние, в которой представлен Этап 1 из шести этапов мастера.
Дальше, необходимо щелкнуть по типу документа, который нужно создать.
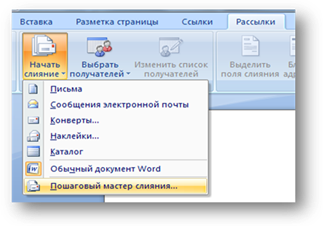
Рис.1.2. Выполнение слияния при помощи Пошагового мастера слияния
Можно, например, создать следующие типы документов:
1. Комплект конвертов. Обратные адреса на всех конвертах одинаковы, однако адрес получателя в каждом случае является уникальным;
2. Комплект наклеек с адресами. На каждой наклейке приводятся фамилия и адрес, которые являются уникальными;
3. Комплект документов на бланке или сообщений электронной почты. Основное содержимое всех писем или сообщений является одинаковым, но каждое из них содержит сведения, предназначенные для определенного получателя, например, фамилию, адрес или какую-либо другую информацию;
4. Каталог или папка. Для каждого элемента отображаются сведения одного и того же типа, например имя или описание, однако для каждого элемента они уникальны.
В области задач Слияние, когда выбрана опция, необходимо щелкнуть внизу области на Далее. Открытие документа.
В области задачи Слияние отобразится Этап 2.
На этом этапе предстоит выбрать основной документ, который и будет основой для слияния.
Мастер слияния на выбор предлагает три варианта:
1. Текущий документ. Активный документ, который используется в момент выполнения слияния. Подразумевается, что нужно начать с указанного документа и использовать мастер слияния для добавления сведений о получателях;
2. Шаблон. Предлагает начать с готового шаблона слияния, который может быть настроен для определенных целей.
Далее нужно нажать на Выбор шаблона и выбрать необходимый для дальнейшей работы шаблон;
3. Существующий документ. Предлагает начать с имеющегося слияния и выполнить изменения в его содержании или в списке получателей.
Нужно выбрать из списка ранее использованных для слияния документ или щелкнуть на Обзор и указать путь к месту расположения нужного документа.
После выбора, нужно щелкнуть на Далее. Выбор получателей.
Этап 3, необходимо выбрать получателей.
Также это можно сделать на вкладке Рассылки в группе Слияние, щелкнув по команде Выбрать получателей.
Предлагается выполнить одно из следующих действий:
1. Если нужно использовать список «Контакты» приложения Outlook, необходимо выбрать пунктКонтакты Outlook.
2. При работе с электронной таблицей Microsoft Office Excel, базой данных Microsoft Office Access или с другим типом файла данных нужно щелкнуть по параметру Использовать существующий список и найти этот файл в диалоговом окне Выбор источника данных (см. рис.1.3.).
3. Если файла данных еще не существует, предстоит выбрать команду Создание списка и использовать открывшуюся форму для создания списка. Этот список сохраняется в виде файла базы данных, который можно использовать многократно.
Нужно щелкнуть на Создать запись, а затем ниже записи ввести необходимые данные, нажимая на клавишу Tab, чтобы перемещаться от поля к полю.
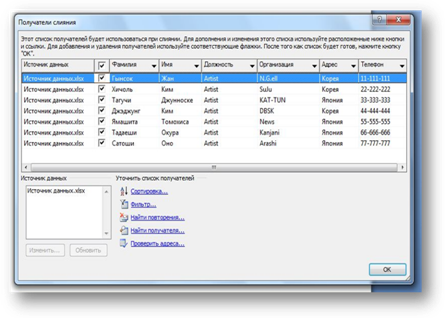
Рис.1.3. Получатели слияния
При подключении к определенному файлу данных, возможно, не требуется переносить данные всех записей файла данных в основной документ.
Чтобы ограничить список получателей или использовать подмножество элементов файла данных, нужно выполнить следующие действия:
На вкладке Рассылки в группе Слияние нужно выбрать команду Изменить список.
В диалоговом окне Адресаты слияния необходимо выполнить одно из следующих действий:
1. Выделение отдельных записей. Этот метод наиболее полезен, если список короткий. Устанавливаем флажки напротив тех получателей, которые должны быть включены в список, и снимаем флажки напротив тех получателей, которые должны быть исключены из списка.
Если известно, что в составной документ нужно включить лишь несколько записей, можно снять флажок в строке заголовка, а затем выделить только нужные записи. Аналогично, если нужно включить в документ большую часть списка, устанавливаем флажок в строке заголовка, а затем снимаем флажки с тех записей, которые не нужно включать.
2. Сортировка записей. Щелкаем заголовок столбца элемента, по которому требуется выполнить сортировку. Список отсортируется в алфавитном порядке по возрастанию (от A до Я). Снова щелкните заголовок столбца, чтобы отсортировать список в алфавитном порядке по убыванию (от A до Я).
Если необходима более сложная сортировка, стоит выбрать команду Сортировка в группе. Уточнив список получателей, предстоит перейти на вкладку Сортировка записей диалогового окна Фильтр и сортировка и выбрать свои критерии сортировки.
3. Фильтрация записей. Эта функция полезна, если список содержит записи, которые не требуется видеть или включать их в составной документ. После фильтрации списка можно использовать флажки для включения и исключения записей.
В группе Уточнить список получателей нужно выбрать пункт Фильтр. На вкладке Отбор записей диалогового окна Фильтр и сортировка необходимо выбрать условия, которые нужно использовать для фильтрации. Для дальнейшего уточнения действия фильтра нужно щелкнуть на оператор И или Или и указать дополнительные условия.
Чтобы закрыть диалоговое окно Получатели слияния, предстоит щелкнуть на ОК.
Подготовка стандартного письма
Одним из основных типов основного документа, используемого в процессе слияния, является стандартное письмо. Документ этого типа обычно содержит поля слияния для имени и адреса каждого получателя, а также текст, одинаковый для всех писем. В стандартном письме каждое поле слияния заключено в двойные угловые скобки, также называемые шевроны.
Текстовые заполнители, такие как адрес или приветствие, называются полями слияния. Поля в приложении Word соответствуют выделенным заголовкам столбцов в файле данных.
Если письмо уже написано, можно вставить поля слияния во время процесса слияния, а если письмо еще не написано, во время процесса слияния его можно написать. В любом случае сначала необходимо ввести текст, который будет общим для всех писем, а затем вставить поля слияния, которые будут заменяться меняющейся информацией из источника данных.
Поля слияния можно вставлять двумя способами:
— в область задач Слияние в Этапе 4 мастера Слияния;
— щелкая на кнопку в группе Составление документа и вставка полей на вкладке Рассылки.
В любом случае, щелкая на Блок адреса или строка приветствия открывается диалоговое окно, в котором можно поменять установки полей, в то время как при щелчке на отдельном поле оно будет вставлено с использованием установок по умолчанию.
Столбцы файла данных представляют собой категории данных. Поля, добавляемые к основному документу, являются текстовыми заполнителями для этих категорий.
Строки файла данных представляют собой записи данных. При выполнении слияния приложение Word создает копию основного документа для каждой записи.
При помещении поля в основной документ подразумевается, что в месте его расположения должна появиться определенная категория данных, например фамилия или адрес (см. рис.1.4.).

Рис. 1.4. Пример заполнения основного документа полями слияния
При слиянии данные первой строки файла данных замещают поля в основном документе, тем самым, образуя первый составной документ (см. рис.1.5.). Данные
второй строки файла данных замещают поля, образуя второй составной документ, и т. д.
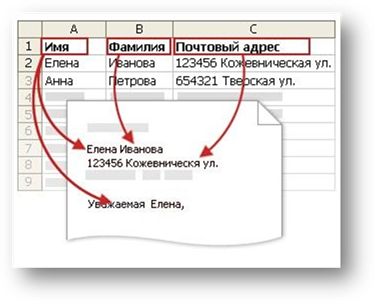
Рис.1.5. Распределение данных из источника данных в поля слияния основного документа
Для установления соответствия полей нужно выбрать пункт Подбор полей в группе Составление документа и вставка полей на вкладке Рассылки.
Откроется диалоговое окно Подбор полей (см. рис.1.6.).
Элементы адреса и приветствия приводятся слева. Заголовки столбцов из файла данных приводятся справа.
Word подыскивает соответствующий столбец для каждого элемента. На иллюстрации показано, что Word автоматически нашел соответствие столбца Фамилия файла данных полю Фамилия.
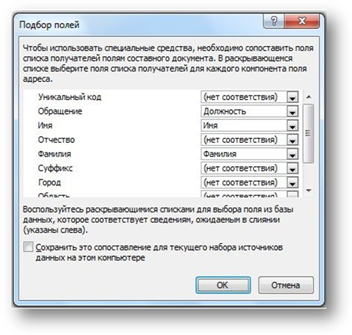
Рис.1.6. Диалоговое окно подбора полей
Функция ввода содержимого и добавление полей позволяет добавить поля, не выявленные подбором полей.
Для этого нужно в основном документе щелкнуть место, где необходимо вставить поле. Пользуясь группой Составление документа и Вставка полей слияния на вкладке Рассылки.
Необходимо подтвердить все выбранные варианты и завершить процедуры, щелкнув на ОК.
Приложения для работы с базами данных и электронными таблицами, такие как Microsoft Office Access и Microsoft Office Excel, хранят в своих ячейках лишь введенные исходные данные. Параметры форматирования, применяемые в Access и Excel, например шрифты и цвета, не хранятся совместно с исходными данными. При слиянии информации из файлов данных в документ Word попадают только исходные данные без учета того, как они форматировались ранее.
Чтобы отформатировать данные, содержащиеся в документе, необходимо выделить поле слияния и отформатировать его точно так же, как форматируется любой другой текст.
Выделение обязательно должно включать двойные кавычки — шевроны,
После того, как все поля добавлены в основной документ, можно просмотреть предварительные результаты слияния. Если эти результаты соответствуют ожиданиям, можно завершить слияние.
В области просмотр щелкаем по кнопке Следующая запись, чтобы просмотреть добавленные поля слияния для каждого получателя в связанном источнике данных.
Последним итоговым является Этап 6 Завершение слияния.
Завершение процесса слияния
После выбора источника данных, который хотим использовать, и ввода в стандартное письмо полей слияния, появляется возможность просмотреть письма, предназначенные для слияния, перед тем, как выполнить слияние. Во время просмотра можно исключить некоторых получателей. Когда все будет готово, мы можем либо отправить объединенные письма непосредственно на принтер, либо объединить их последовательно в новый документ, причем каждое письмо будет отдельно от последующего разрывом страницы. Если мы поместим письма в новый документ, мы сможем еще раз просмотреть их и при необходимости изменить (перед отправкой на печать).
Составные документы можно печатать или видоизменять по отдельности. Это может быть сделано как для всех документов, так и для подмножества документов.
Печать составных документов. На вкладке Почта в группе Завершение выбираем пункт Завершить и объединить, а затем щелкаем Печать документов.
Предстоит выбрать, следует ли печатать весь набор документов, только копию, отображаемую в настоящий момент, или подмножество документов, определяемое по указанному номеру записи.
Изменение отдельных копий документа. На вкладке Почта в группе Завершение необходимо выбрать пункт Завершить и объединить, а затем щелкнуть по Изменить отдельные документы.
Нужно выбрать, следует ли редактировать весь набор документов, только копию, отображаемую в настоящий момент, или подмножество документов, определяемое по указанному номеру записи. Приложение Word сохраняет копии, которые требуется отредактировать, в виде единого файла, где они отделены друг от друга с помощью разрывов страницы.
Сохранение основного документа. Нужно помнить, что составные документы сохраняются отдельно от основного. Основной документ удобно хранить отдельно, поскольку он может оказаться полезен при выполнении последующих слияний.
При сохранении основного документа сохраняется и его подключение к файлу данных. В следующий раз, когда документ будет открыт, приложением будет задан вопрос, нужны ли сведения из этого файла данных для нового слияния в основной документ.
В случае ответа Да документ открывается с данными из первой записи, полученными в результате слияния.
В случае ответа Нет подключение между основным документом и файлом данных разрывается. Основной документ становится стандартным документом Word.
Mail merge word как пользоваться

Many day-to-day applications require similar documents containing similar text to be sent to a number of persons. These documents also have a typical common layout. Invitation letters sent to guests have a more-or-less common content and layout. Only the names of the recipients are different in these letters. One obvious way to generate such letters is to type all of them individually, putting the same amount of effort again and again. Another solution could be to copy the same block of text again and again onto the new letters. The names and addresses etc., which are different from each letter, can be entered separately in the documents. Though this method saves a lot of effort, it still requires proper caution. There should be a way where these kinds of documents can be prepared automatically. This task can be easily automated if we use the mail merge feature of a word processor. So, it is time we learnt the mail-merge feature of the word.
Components of mail merge:
The three main components of the merging process are the main document, the data source, and the merged document.
- The main document contains the main body of your letter, field names, and merges instructions. The basic information within the main document remains equivalent.
- The data source (or Recipients’ list) stores the knowledge that changes for every document. This information is inserted in the main document one by one. An example of the data source is a name and address list from which the program gets what you want to include in the main document.
- The merged document contains the main text from the main document and data from a data source.
Steps for mail merger:
Step 1:
- Open MS Word and click on the command sequence: Mailings tab → Start mail merge group → Select recipients button → Type new List.
- A dialog namely “New Address List” will pop up(as shown in the below image). Type here the desired data under the given headings. To add a new record, click on the “New Entry” button at the bottom of the dialog and click OK when you are done.
Step 2: Prepare Master Letter
The second step is to prepare our master letter for use in the mail merge. Before we enter all the letter text we’d like to link this Word file to our list of names.
- Create a blank word document.
- Click Mailings tab → Start Mail Merge group → Start Mail Merge → Letters command.
- Then click the Mailings tab → Start Mail Merge group → Select Recipients button → Use Existing List command.
- Now we can start typing the letter.
- Now we would like to add the name and address and other details for the people on the list.
- Mailings tab→ Write & Insert Field group → Insert Merge Field button.
- A pop-down will appear showing all the table headings, so choose Title and press the spacebar to create a space.
Then do this again and choose FirstName, followed by a space (i.e., press only spacebar key and no other key); then choose LastName but this time press the Enter key to create a new line. Then repeat the steps to choose the Address field, and press enter key.
Step 3:
Before we actually carry out the merge, we must first preview what the merged letters will look like.
- Mailings tab→ Preview Results group → Preview Results button
- Once we are happy with the preview, you can carry out the actual mail merge.
- To do this you click the Mailings tab → Finish group → Finish & Merge button and choose Edit Individual Documents.
- In the Merge to New Document panel, click All to create a separate letter for each person on the Names list. Word then creates a fresh document with as many pages as there are names on your list, and every page contains a wonderfully merged letter with all the correct individuals’ details.
- We can save this with an appropriate name, such as ABC.docx
Sample Problems
Question 1: What is a mail merge?
Solution:
Mail Merge, a popular tool for personalizing printed letters, is nowadays also available for emails. Google Mail, Google Sheets make it happen for all Google domain-based emails.
Question 2: what are the uses of mail merge?
Solution:
- Writing a letter to a customer to tell them about upcoming offers or inform about some changes in business context.
- Mailshot for sending out a survey to a large number of people.
- Invoices
- School names on to the certificate
- Personal
Question 3: Give the advantage of mail merge?
Solution:
- Once the merge has been found out , thousands of letters are often produced very quickly.
- Easier to check for spelling errors as we need to check and correct at one place only; all letters will show the changes.
- Letters can be personalized.
- A standard letter can be saved and reused.
- In male merge, we can reuse the same data source, and it reduces the risk of errors.
Question 4: What are the main components of the Mail Merge process?
Solution:
- The main document.
- The data source.
- The merged document.
Question 5: How many files are created in Mail Merge?
Solution:
There are two files created in Mail Merge. The first file is called the source file that contains the content of the main document and the second file is known as the data source file that contains the name, address and other important details of the beneficiary.
Question 6: Can we insert an attachment when performing a merge to an e-mail message?
Solution:
No, we cannot insert an attachment when performing a merge to an email message.
Question 7: In Mail Merge, multiple copies of the merged document are often printed.
Word: Mail Merge
Mail Merge is a useful tool that allows you to produce multiple letters, labels, envelopes, name tags, and more using information stored in a list, database, or spreadsheet. When performing a Mail Merge, you will need a Word document (you can start with an existing one or create a new one) and a recipient list, which is typically an Excel workbook.
Optional: If you'd like to work along with the lesson, you can download the examples below.
-
(Word document) (Excel workbook)
Watch the video below to learn more about using the Mail Merge feature.
To use Mail Merge:
- Open an existing Word document or create a new one.
- From the Mailings tab, click the Start Mail Merge command and select Step-by-Step Mail Merge Wizard from the drop-down menu.
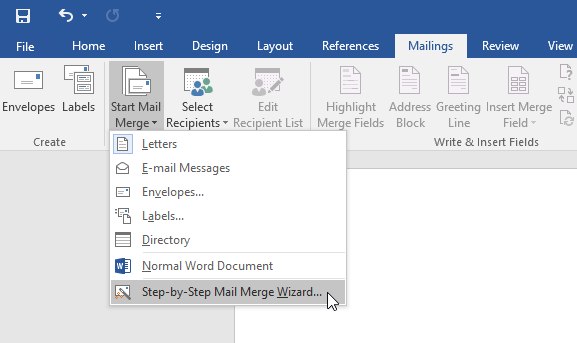
The Mail Merge pane will appear and guide you through the six main steps to complete a merge. The following example demonstrates how to create a form letter and merge the letter with a recipient list.
Step 1:
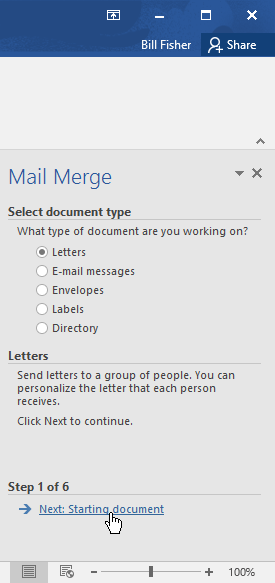
- From the Mail Merge task pane on the right side of the Word window, choose the type of document you want to create. In our example, we'll select Letters. Then click Next: Starting document to move to Step 2.
Step 2:
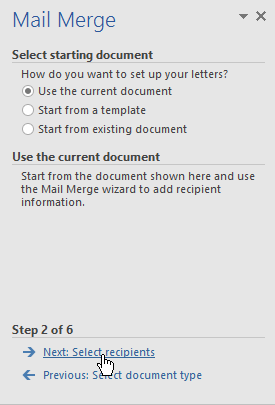
- Select Use the current document, then click Next: Select recipients to move to Step 3.
Step 3:
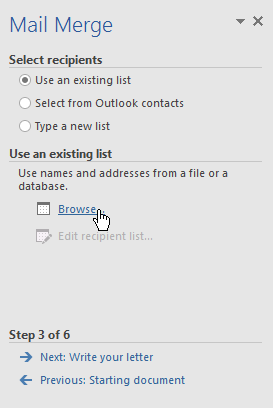
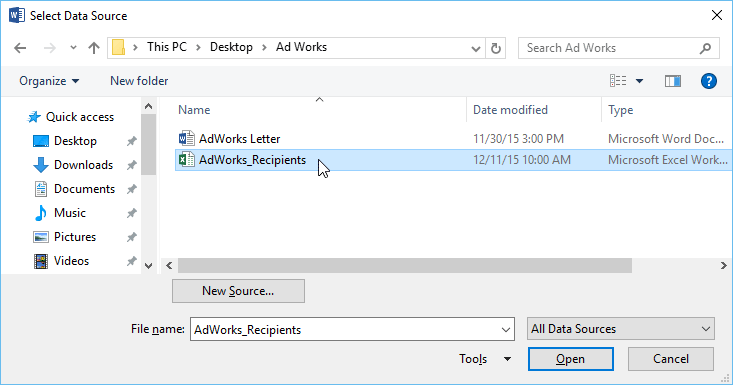
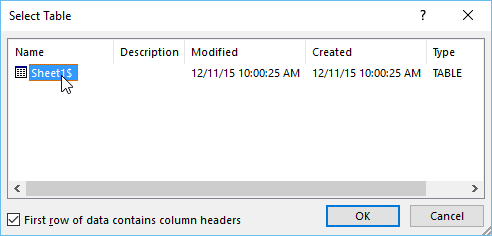
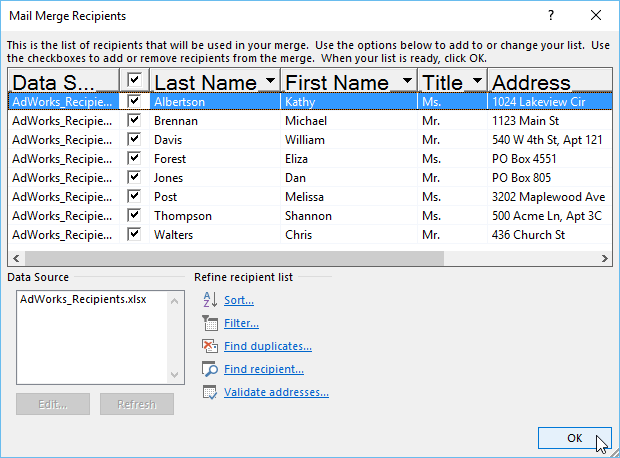
Now you'll need an address list so Word can automatically place each address into the document. The list can be in an existing file, such as an Excel workbook, or you can type a new address list from within the Mail Merge Wizard.
-
Select Use an existing list, then click Browse to select the file.
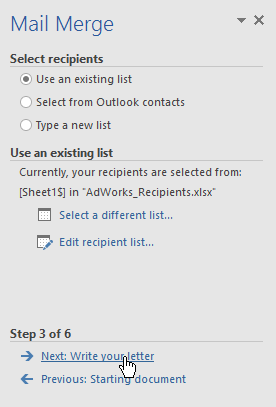
If you don't have an existing address list, you can click the Type a new list button and click Create, then type your address list manually.
Step 4:
Now you're ready to write your letter. When it's printed, each copy of the letter will basically be the same; only the recipient data (such as the name and address) will be different. You'll need to add placeholders for the recipient data so Mail Merge knows exactly where to add the data.
To insert recipient data:
- Place the insertion point in the document where you want the information to appear.
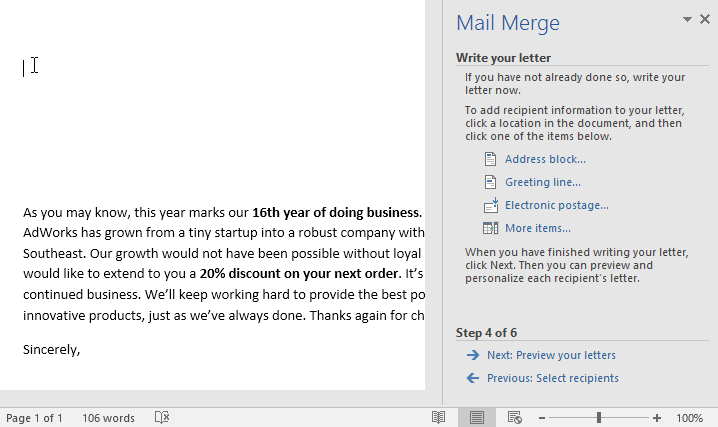
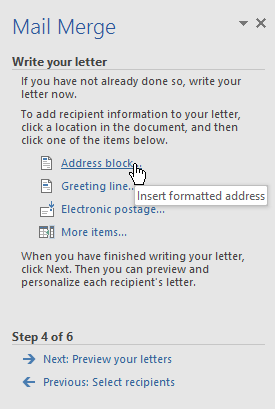
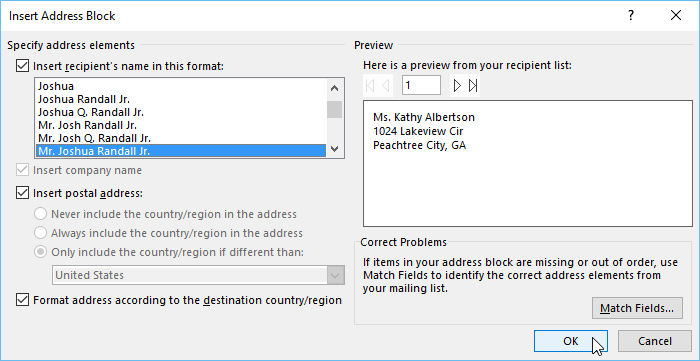
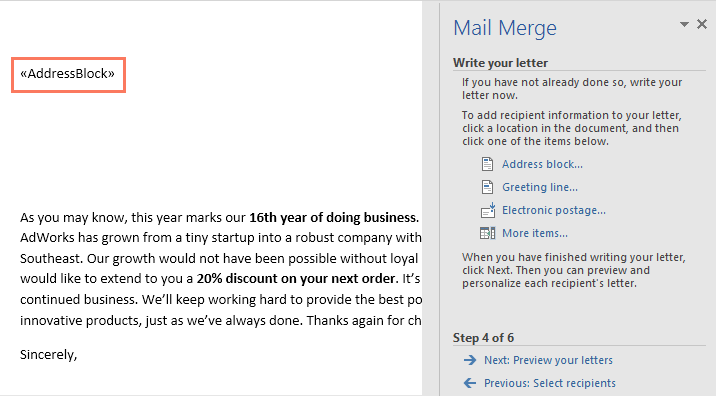
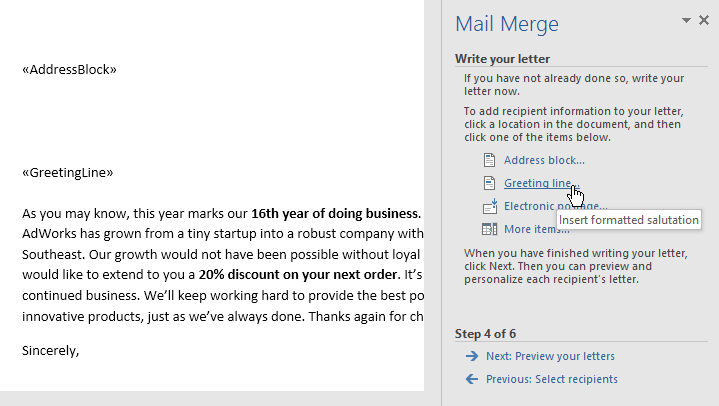
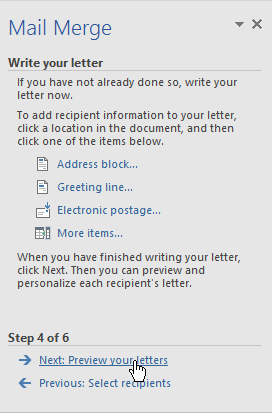
For some letters, you'll only need to add an Address block and Greeting line. But you can also add more placeholders (such as recipients' names or addresses) in the body of the letter to personalize it even further.