IDENTITY Column in SQL Server: Everything you need to know

The IDENTITY property is a very common property to see in SQL Server tables. It’s important to understand what it is, and how it can help you maintain data in your tables.
In this tutorial, we will discuss everything you need to know about the IDENTITY property, including:
1. What is the IDENTITY property?
2. How to add the IDENTITY property to a column
3. How can the IDENTITY property help us?
4. How to find the last IDENTITY value that was created
5. What are the limitations of the IDENTITY property?
6. Resetting the IDENTITY value, and other tips, tricks and links.
Make sure you Download your FREE 1-page Simple SQL Cheat Sheet on the IDENTITY property!
1. What is the IDENTITY property?
The IDENTITY property is set on a column in a table to automatically generate a new integer value every time a row is inserted into that table. It is a good solution if you are looking to create an integer surrogate key on new rows that are inserted into a table.
The IDENTITY property is great to use on an integer column you have set to be your primary key column, for example. This is because a new IDENTITY value will be generated for you automatically. In that scenario, you don’t need to worry about specifying a unique number when you do inserts into that table.
2. How to add the IDENTITY property to a column
It’s simple. When you create your column in your CREATE TABLE statement, you would just put the keyword IDENTITY next to your column you want to add the property to. Like so:
There is also something called a seed and step value you can choose to specify when you use the IDENTITY property on a column. Here is the same example, but using a seed and step value with the IDENTITY property:
Let’s talk about what this means. The first number in parentheses represents the seed value. This is the number at which the IDENTITY property will start. The second number is the step value, meaning how many digits are skipped between the previous identity number generated and the next identity number to be generated.
If you exclude the seed and step values (like I did in my first example), both the seed and step values will be 1.
We’ll see some examples in the next section.
3. How can the IDENTITY property help us?
Now that you know how to set up the IDENTITY property on a column, let’s look at some examples of using it.
Here is that CREATE TABLE statement again, where we add the IDENTITY property to our BookID column:
Again, we’re leaving off the seed and step values, which means both values default to 1.
If we need to add a new book to our new BookCollection table, the INSERT statement would look like this:
Here’s the result set:
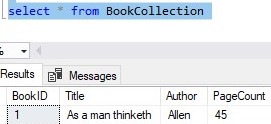
Notice we do NOT need to specify a value for BookID. Since there is an IDENTITY property on this column, a number will be generated for us automatically.
Let’s add several books now:
Here’s the result set:
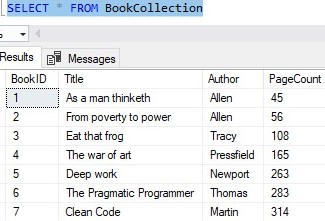
Notice they were all given a new BookID value automatically!
I should note that if you try to specify an IDENTITY value manually, you will get an error message:
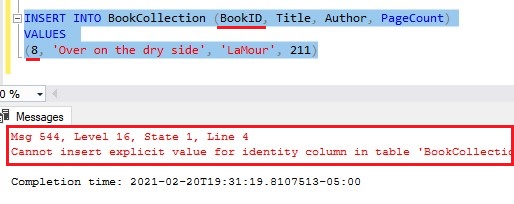
The IDENTITY property doesn’t want any help. It wants you to leave it alone.
The IDENTITY_INSERT tool
That being said, there is a way to basically turn off the IDENTITY property on a column, which would allow you to specify a value for the column on inserts. The setting is called IDENTITY_INSERT . We’ll talk about how to enable this setting in the ‘Tips and Tricks‘ section of this tutorial.
To reiterate something I said earlier, since we didn’t specify a seed or step value when we added the IDENTITY property, the seed value defaulted to 1 and the step value also defaulted to 1. This is why the first row (aka the ‘seed’ row) had a BookID of 1, and all subsequent rows are increased by 1 (aka ‘stepped up by 1’) from the previous row inserted.
To show you what I mean, let’s drop the BookCollection table, then re-create it and specify a seed and step value in my IDENTITY column:
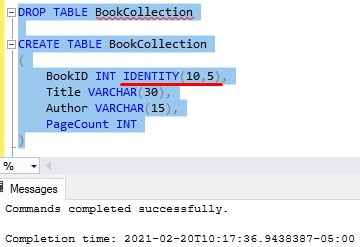
Now when we insert rows, the first row starts with 10 (my ‘seed’ value), and all subsequent rows are increased by (‘skipped by’) 5 from the previous row that was inserted. Here’s the insert statement:
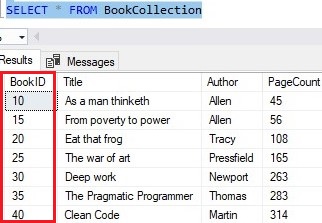
Going back to how the IDENTITY property can help us, it basically comes down to one fact:
The next identity value is generated for you when a new row is inserted.
4. How to find the last IDENTITY value that was created
There are three functions you should use to determine the last IDENTITY value that was created:
- SCOPE_IDENTITY ()
- @@IDENTITY
- IDENT_CURRENT ( ‘<tablename>’ )
Which one you use depends on your needs. Let’s walk through how to use each one.
SCOPE_IDENTITY () will tell you the last IDENTITY value that was created in the current scope. The scope of your code is important most of the time, so this function should be the one you’ll want to think about using first.
@@IDENTITY will tell you the last IDENTITY value that was generated in the current session, regardless of scope.
As an example, think about a stored procedure that calls another stored procedure, each doing inserts into different tables that each have the IDENTITY property. When you call the first procedure, it will be in a different scope than the second. In that case, SCOPE_IDENTITY () will return a different value depending on which procedure you’re in. The @@IDENTITY tool, on the other hand, will return the last identity value that was created overall, regardless of where it came from.
In that scenario, @@IDENTITY will tell you the identity value created from the second procedure because it was more recent.
Scope usually matters
But again, I don’t want to get too bogged down with @@IDENTITY . It’s more likely your scope will matter, so SCOPE_IDENTITY () should be your go-to function to use if you need to know the last identity value created.
Finally, there is the IDENT_CURRENT ( ‘<tablename>’ ) function. This function very simply tells you the last identity value that was created for a table whose name you pass in as an argument. Here is an example:
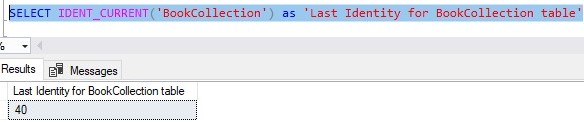
As an example of when you might need to know the last identity value generated, think about two tables that have a foreign key link to one another.
Let’s say we have a Customers table with a CustID column that has the IDENTITY property. Here is an example of the rows in that table:
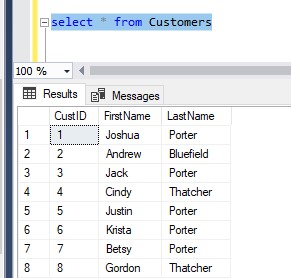
Then we have a ContactInfo table that has a foreign key column also called CustID.
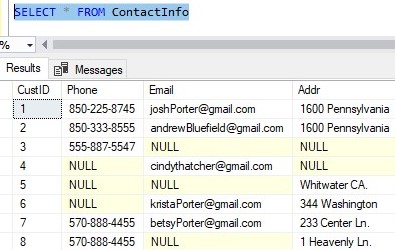
The number in this column matches back to the CustID column back in the Customers table.
This CustID column in the ContactInfo table does NOT have the IDENTITY property.
So in other words, we can find everything we need to know about a customer by using their CustID. We can get their first name and last name from the Customer table, and we can get their phone number, email address, and home address from the ContactInfo table.
Inserting corresponding rows into multiple tables is difficult
Great, but what must we do if we need to add a new Customer?
We need to add a new row to the Customers table (of course), but we also need to add a corresponding row to the ContactInfo table. And again, the way we correspond them is through the CustID column.
So, first we do our insert into the Customer table, which is easy:
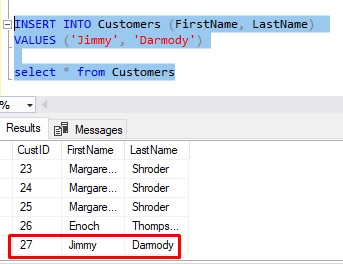
Great. We see the row that was inserted, and we see it’s identity value, which appears to be 27. If we’re doing things the hard way, we can manually enter that identity value into our next insert statement into ContactInfo, like so:
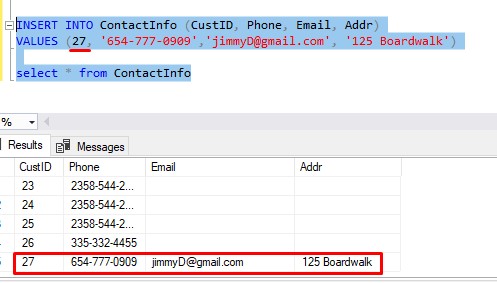
But again, that’s the hard way. Who has time to run an insert statement, figure out the key, type it into a second insert, then run the second insert?
Not me.
What if we could do it all at once?:
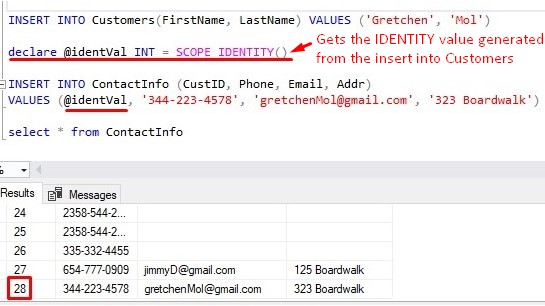
SCOPE_IDENTITY : A very useful function
We can use SCOPE_IDENTITY () to basically skip a couple steps, which means we’re less likely to make a mistake. We use SCOPE_IDENTITY () to figure out the last identity value created from our first INSERT into the Customers table, then we write that value to a variable (@identVal), then use that variable in our second INSERT statement.
Pretty slick, right?
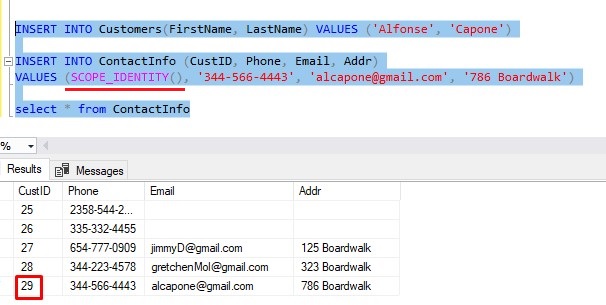
If you’re being really cool, you could use SCOPE_IDENTITY () directly in your second INSERT statement. That way you don’t even need to use a variable:
To make this process even easier, you could contain all this work into a simple stored procedure :
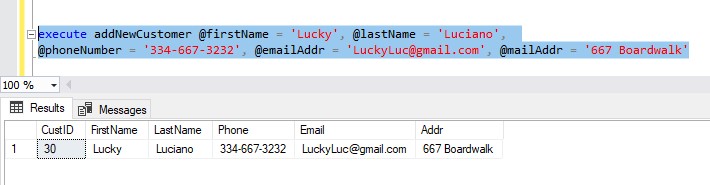
See how this is done in my Stored Procedure tutorial here:
SQL Server Stored Procedures: The Ultimate Guide for Beginners
5. What are the limitations of the IDENTITY property?
The IDENTITY property isn’t flawless. There are some things you need to be aware of when choosing whether or not to use the IDENTITY property on a column.
The first thing to discuss isn’t really a limitation, it’s just something to be aware of:
Limitation # 1: The IDENTITY property does not enforce uniqueness.
It’s completely possible to have an IDENTITY column that contains duplicate values. This could happen if you set the IDENTITY property on a column that is NOT the primary key column. In this scenario, you could definitely reset the last identity value, resulting in rows that will have the same identity value as other rows.
For example, remember when we created the ‘BookCollection‘ table:
Notice there is no primary key constraint on the BookID column. Here is the list of rows currently in the table:
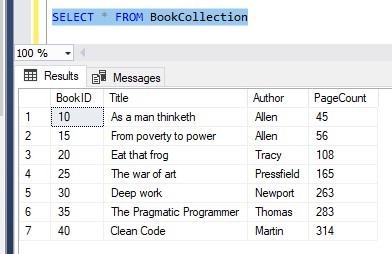
If we reset the IDENTITY value to zero, then insert two new rows, we see those two new rows are given BookID values 5 and 10:
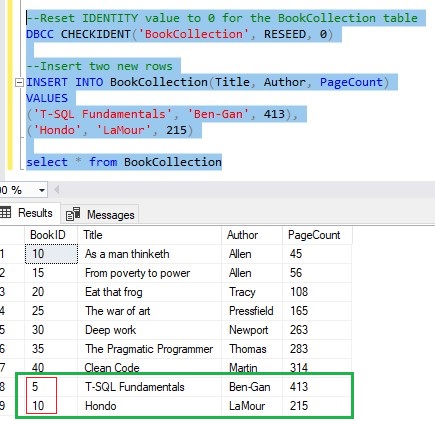
Now, we have two books with an ID of 10.
The IDENTITY property on a primary key column
Most of the time, however, you are going to set the IDENTITY property on a primary key column. When you do, you just need to be aware that the thing that enforces uniqueness in the column is the primary key constraint, and NOT the IDENTITY property.
Another thing to be aware of is that you can have gaps in your IDENTITY values. This might happen if an INSERT into your table failed, for whatever reason. In that case, a new IDENTITY value would have been created, but not actually used. In other words, the identity value would get wasted.
Let’s look at an example. Say again that our BookCollection table has these rows:
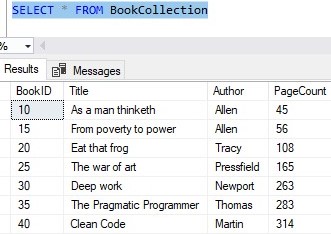
I’m going to attempt two insert statements that both have an author name that is too big to fit into the Author column of the table (this column can only hold 15 characters):
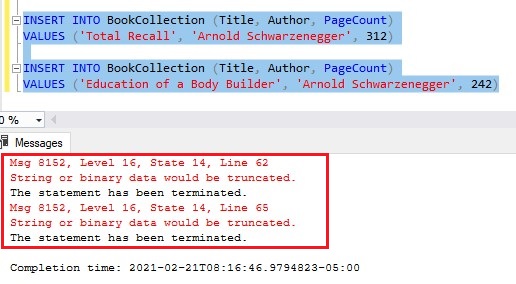
Now, let’s attempt a third insert that isn’t too big, then see the table results:
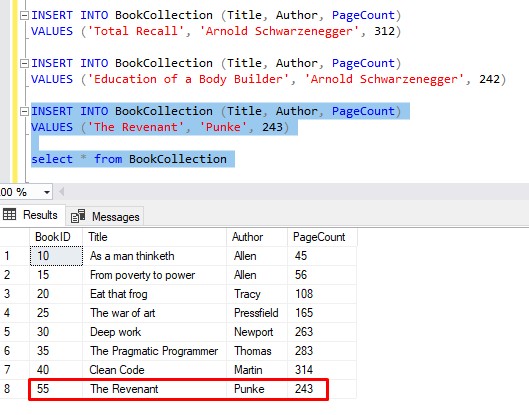
What just happened here?
Limitation # 2: Sometimes ID values get wasted
BookID 45 would have been used for our book ‘Total Recall‘, but the insert failed, which wasted that ID.
Then, the next BookID of 50 would have been used for our book ‘Education of a Body Builder‘, but the insert failed, which wasted that ID also.
Finally, the next BookID of 55 is used for our book ‘The Revenant‘ which doesn’t violate any rules and gets inserted successfully.
Is this a problem? I mean, not really. The BookID is a surrogate key anyway, so maybe we don’t care about gaps.
However, in the real world, I’m sure there are situations where we don’t want gaps, so we need to know how to reset the IDENTITY property in a column and how to manually insert a new IDENTITY value into a row. We’ll talk about how to do that in the ‘Tips and Tricks‘ section of this tutorial.
Limitation # 3: You can only set up the IDENTITY property on a column when creating a table
The final limitation of the IDENTITY property is it must be set up when creating a table. You cannot alter a table to add the IDENTITY property to a column, nor can you remove the IDENTITY property from a column once it has been established.
So think hard about whether or not you want the IDENTITY property on your column. You can literally only set it up when the table and column is created.
6. Resetting the IDENTITY value, and other tips, tricks and links.
Here is a list of some helpful tips and tricks you should know when working with the IDENTITY property:
Tip # 1: Resetting the IDENTITY value
I showed you how to reset the IDENTITY property in one of my screenshots earlier, but we’ll go into more detail now. Basically, it comes down to one statement:
DBCC CHECKIDENT( ‘<tableName>’ , RESEED, <Reseed value>)
Let’s walk through this. The first argument is the name of the table for which you want to reset the IDENTITY property. The second argument is just the ‘RESEED‘ keyword. The third argument is the new number you want set to be the last IDENTITY value generated.
Let’s go through an example. Remember my BookCollection table with a gap?:
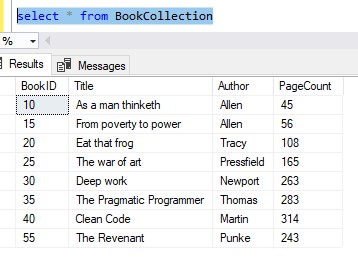
Say we want to eliminate the gap between the last two rows. In other words, we want ‘The Revenant‘ to have a BookID of 45.
Basically, this means we will need to delete the existing row for ‘The Revenant’, reset our IDENTITY property, then re-insert ‘The Revenant’. Here is the code:
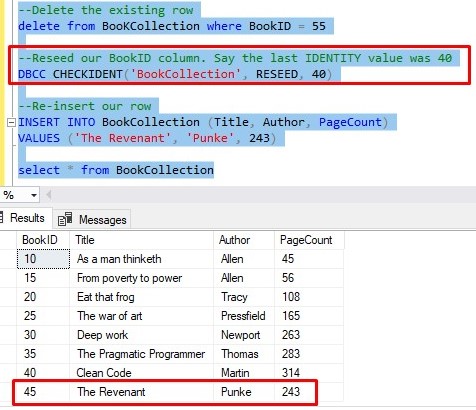
No more gap!
But again, most of the time your IDENTITY column is going to be a surrogate key, so maybe you don’t care about gaps. But if you do, now you know how to fix it.
Tip # 2: You can’t UPDATE an IDENTITY value
You might be thinking “Why didn’t he just do an UPDATE statement to change the BookID to 45, then reseed to 45?” .
Because you can’t UPDATE an IDENTITY column.
This could be considered another limitation. This is just another rule about SQL Server you need to remember. You can’t perform an UPDATE statement against an IDENTITY column.
The closest you can get is by doing a poor man’s update, where you do two things:
- Delete the row with the wrong IDENTITY value
- Re-insert the row, and manually specify the correct IDENTITY value
I have a full tutorial on the topic of how to “change” an IDENTITY value (but again, we’re not really changing it, right?). Make sure you check it out:
Tip # 3: The IDENTITY_INSERT tool
Another common setting you can use with the IDENTITY property is called IDENTITY_INSERT . With this setting, you can disable the automatic creation of ID’s, allowing you to manually create an ID. Let’s think about an example.
Here are my rows in my BookCollection table again:
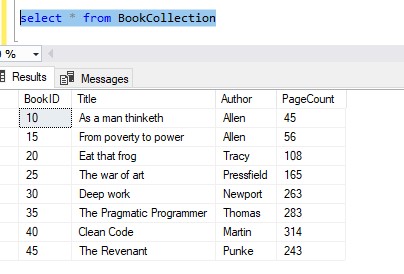
Let’s say we need to insert a new row, and it needs to have a BookID of 43, for whatever reason.
We can use the IDENTITY_INSERT setting to allow us to specify a BookID when we do our INSERT statement.
Remember earlier, I said you normally can’t specify a value for an IDENTITY column when you do an INSERT . With this setting enabled, you can.
Here is the syntax for enabling IDENTITY_INSERT :
SET IDENTITY_INSERT <tableName> ON
So for our example, we can turn on IDENTITY_INSERT for our ‘BookCollection‘ table, then insert our row with a BookID of 43 just fine:
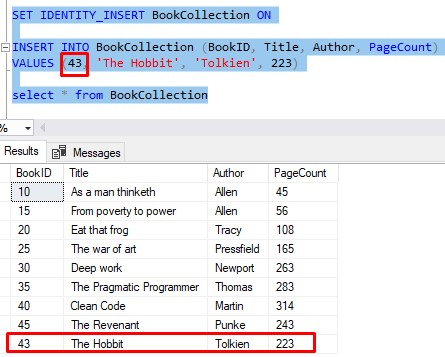
Remember to turn IDENTITY_INSERT back OFF when you are done. If you forget, you won’t be able to insert rows like normal again (where you do not specify an ID). Here is me trying to do a normal INSERT again while the setting is still on:
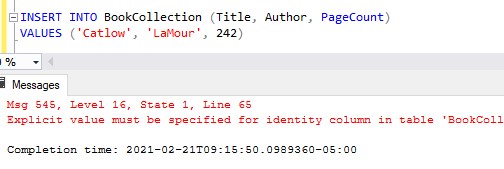
Here is that full error message:
Explicit value must be specified for identity column in table ‘BookCollection’ either when IDENTITY_INSERT is set to ON or when a replication user is inserting into a NOT FOR REPLICATION identity column.
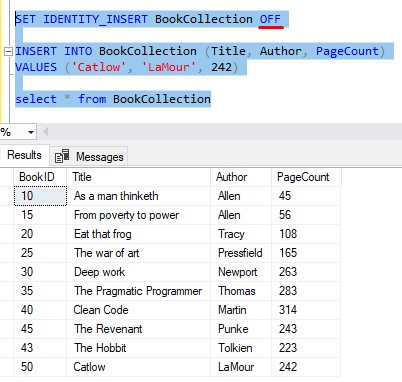
So remember to turn IDENTITY_INSERT back off:
Tip # 4: Automatic reseeding can occur
Something else to remember about IDENTITY_INSERT is if you turn it ON , and you perform an INSERT specifying an ID that is greater than the most recent value automatically generated, your IDENTITY value will be reseeded to this new ID.
Let’s see an example.
From the previous point, the most recent IDENTITY value automatically generated was 50. Great, but what if we want to manually enter a row with an ID of 67? Again, for whatever reason, this new row needs to have an ID of 67.
Let’s see that in action:
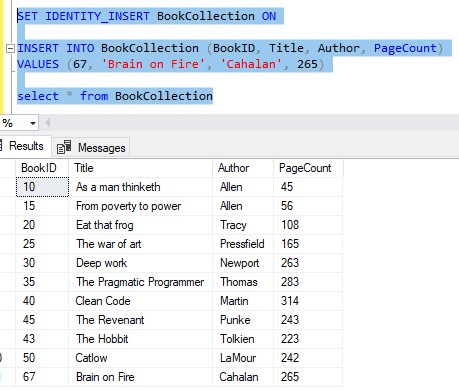
So we manually added an ID that is greater than the most recent automatically generated value. By the rules of SQL, this means our IDENTITY value has been officially reseeded.
It has been reseeded to 67.
So if we turn off IDENTITY_INSERT , then insert another row like normal, we’re going to see how the new row will have an ID of 72 (the step value of 5 still applies):
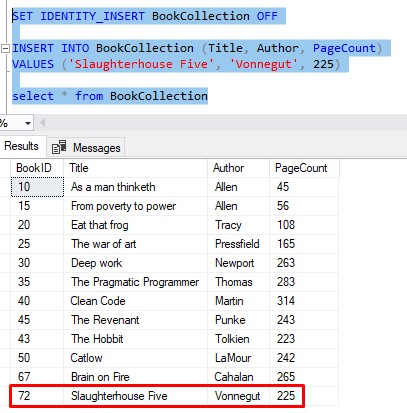
Pretty crazy, right? Just something else to be aware of. This could also be considered another limitation of the IDENTITY property.
Tip # 5: The IDENTITY property is typically used in a Primary Key column
The last tip I wanted to share was how you would add an IDENTITY property to a primary key column. I talked a lot about how the IDENTITY property is normally tied to a primary key column, but I never actually showed you how it’s done. It’s simple:
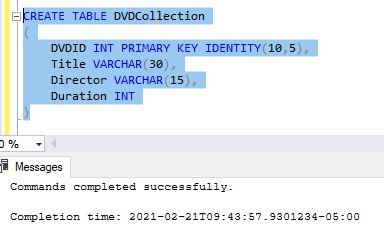
Links
In my BookCollection table example, I referenced several books that would be great to own for anyone trying to be a better programmer. Writing code is more than just knowing the language. It’s also about following proper coding techniques, and learning how to focus and prioritize tasks throughout your day.
The books Clean Code and The Pragmatic Programmer are especially good to read. Here are links to all the books if you are interested in buying them:
Identity в sql что это
При создании столбцов в T-SQL мы можем использовать ряд атрибутов, ряд которых являются ограничениями. Рассмотрим эти атрибуты.
PRIMARY KEY
С помощью выражения PRIMARY KEY столбец можно сделать первичным ключом.
Первичный ключ уникально идентифицирует строку в таблице. В качестве первичного ключа необязательно должны выступать столбцы с типом int, они могут представлять любой другой тип.
Установка первичного ключа на уровне таблицы:
Первичный ключ может быть составным (compound key). Такой ключ может потребоваться, если у нас сразу два столбца должны уникально идентифицировать строку в таблице. Например:
Здесь поля OrderId и ProductId вместе выступают как составной первичный ключ. То есть в таблице OrderLines не может быть двух строк, где для обоих из этих полей одновременно были бы одни и те же значения.
IDENTITY
Атрибут IDENTITY позволяет сделать столбец идентификатором. Этот атрибут может назначаться для столбцов числовых типов INT, SMALLINT, BIGINT, TYNIINT, DECIMAL и NUMERIC. При добавлении новых данных в таблицу SQL Server будет инкрементировать на единицу значение этого столбца у последней записи. Как правило, в роли идентификатора выступает тот же столбец, который является первичным ключом, хотя в принципе это необязательно.
Также можно использовать полную форму атрибута:
Здесь параметр seed указывает на начальное значение, с которого будет начинаться отсчет. А параметр increment определяет, насколько будет увеличиваться следующее значение. По умолчанию атрибут использует следующие значения:
То есть отсчет начинается с 1. А последующие значения увеличиваются на единицу. Но мы можем это поведение переопределить. Например:
В данном случае отсчет начнется с 2, а значение каждой последующей записи будет увеличиваться на 3. То есть первая строка будет иметь значение 2, вторая — 5, третья — 8 и т.д.
Также следует учитывать, что в таблице только один столбец должен иметь такой атрибут.
UNIQUE
Если мы хотим, чтобы столбец имел только уникальные значения, то для него можно определить атрибут UNIQUE .
В данном случае столбцы, которые представляют электронный адрес и телефон, будут иметь уникальные значения. И мы не сможем добавить в таблицу две строки, у которых значения для этих столбцов будет совпадать.
Также мы можем определить этот атрибут на уровне таблицы:
NULL и NOT NULL
Чтобы указать, может ли столбец принимать значение NULL, при определении столбца ему можно задать атрибут NULL или NOT NULL . Если этот атрибут явным образом не будет использован, то по умолчанию столбец будет допускать значение NULL. Исключением является тот случай, когда столбец выступает в роли первичного ключа — в этом случае по умолчанию столбец имеет значение NOT NULL.
DEFAULT
Атрибут DEFAULT определяет значение по умолчанию для столбца. Если при добавлении данных для столбца не будет предусмотрено значение, то для него будет использоваться значение по умолчанию.
Здесь для столбца Age предусмотрено значение по умолчанию 18.
CHECK
Ключевое слово CHECK задает ограничение для диапазона значений, которые могут храниться в столбце. Для этого после слова CHECK указывается в скобках условие, которому должен соответствовать столбец или несколько столбцов. Например, возраст клиентов не может быть меньше 0 или больше 100:
Здесь также указывается, что столбцы Email и Phone не могут иметь пустую строку в качестве значения (пустая строка не эквивалентна значению NULL).
Для соединения условий используется ключевое слово AND . Условия можно задать в виде операций сравнения больше (>), меньше (<), не равно (!=).
Также с помощью CHECK можно создать ограничение в целом для таблицы:
Оператор CONSTRAINT. Установка имени ограничений.
С помощью ключевого слова CONSTRAINT можно задать имя для ограничений. В качестве ограничений могут использоваться PRIMARY KEY, UNIQUE, DEFAULT, CHECK.
Имена ограничений можно задать на уровне столбцов. Они указываются после CONSTRAINT перед атрибутами:
Ограничения могут носить произвольные названия, но, как правило, для применяются следующие префиксы:
«PK_» — для PRIMARY KEY
«FK_» — для FOREIGN KEY
«UQ_» — для UNIQUE
«DF_» — для DEFAULT
В принципе необязательно задавать имена ограничений, при установке соответствующих атрибутов SQL Server автоматически определяет их имена. Но, зная имя ограничения, мы можем к нему обращаться, например, для его удаления.
SQL Identity

A SQL identity column is a column whose values are generated automatically when a new row is added to the table.
In this tutorial I will demonstrate how to use GENERATE ALWAYS AS IDENTITY
This scenario occurs frequently when you create a table and forget to include an identity column, which can be a primary key with integer values. Then you must add an additional column and specify its numerical values.
To explain this I am using this data table called employees.
[ Note that here enterprise_id column is not present ]
Now, I’ll add an extra column to the table by making a column called enterprise id primary key (it can’t be null) and using the GENERATED ALWAYS AS IDENTITY statement.
Identity function tutorial in SQL Server

This article explores the Identity function in SQL Server with examples and differences between these functions.
Overview of IDENTITY columns
In SQL Server, we create an identity column to auto-generate incremental values. It generates values based on predefined seed (Initial value) and step (increment) value. For example, suppose we have an Employee table and we want to generate EmployeeID automatically. We have a starting employee ID 100 and further want to increment each new EmpID by one. In this case, we need to define the following values.
- Seed: 100
- Step: 1
Let’s insert a few records in this table and view the records.
You can see the first employee gets an ID value 100 and each new records ID value gets an increment of one.

We have a few useful Identity functions in SQL Server to work with the IDENTITY columns in a table. Let’s explore the following IDENTITY functions with examples.
- SQL @@IDENTITY Function
- SQL SCOPE_IDENTITY() Function
- SQL IDENT_CURRENT Function
- SQL IDENTITY Function
SQL @@IDENTITY Function
We use system function @@IDENTITY to return the maximum used IDENTITY value in a table for the IDENTITY column under the current session. Once we insert a row in a table, the @@IDENTITY function column gives the IDENTITY value generated by the statement. If we run any query that did not generate IDENTITY values, we get NULL value in the output. The SQL @@IDENTITY runs under the scope of the current session. We cannot use it on a remote or linked server.
Let’s understand it with the following example.
- Step 1: We have a current maximum identity value 110 in EmployeeData table
- Step 2: In the current session, we insert a record in the EmployeeData table. It increments the identity value by one
- Step 3: We can verify that the maximum used identity value is 111
- Step4: We use theSELECT @@IDENTITY function in the current session to get the identity value generated in this session
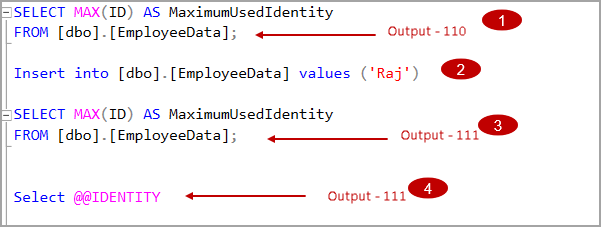
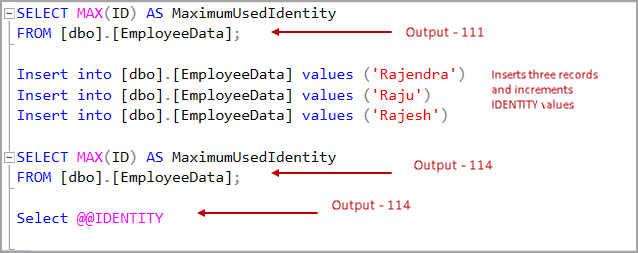
Let’s insert multiple records in this table and execute the SELECT @@IDENTITY.
If we insert multiple records in a session, SELECT @@Identity returns the maximum IDENTITY value generated in this session. In the following example, we insert three records, and it increments IDENTITY values by three from the current identity value 111.
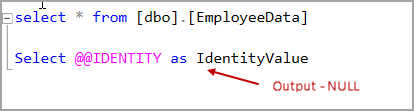
If the statement did not generate any identity values, it returns NULL values in the output.
SQL SCOPE_IDENTITY() function
We use SCOPE_IDENTITY() function to return the last IDENTITY value in a table under the current scope. A scope can be a module, trigger, function or a stored procedure. We can consider SQL SCOPE_IDENTITY() function similar to the @@IDENTITY function, but it is limited to a specific scope. It returns the NULL value if this function is involved before an insert statement generates value under the same scope.
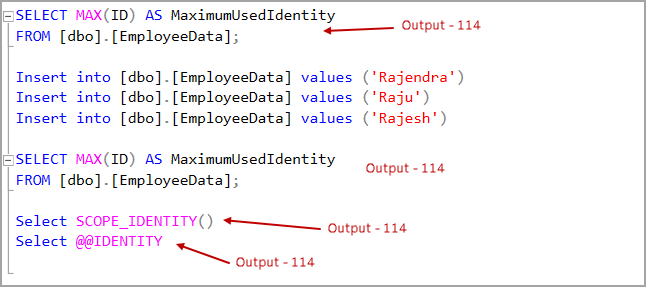
In the following example, we see that both the @@IDENTITY and SCOPE_IDENTITY() return the same value in the current session and similar scope.
Let’s understand the difference between SCOPE_IDENTITY() and @@IDENTITY with another example.
Let’s consider we have two tables EmployeeData and Departments table. We create an INSERT trigger on the EmployeeData table. Once we insert any row on EmployeeData, it calls to defined trigger for inserting a row in Departments.