Как зайти в Boot Menu на ноутбуке Acer
В сегодняшней статье я хочу вам рассказать о том, как зайти в Boot Menu на ноутбуке Acer.
Boot Menu (меню загрузки) является опцией BIOS или UEFI, которая позволяет быстро выбрать, с какого накопителя загрузить компьютер в этот момент. Очень удобно при установке Windows с USB накопителя.
Чтобы запустить Boot Menu, следует нажать клавишу « F12 » при включении ноутбука. То есть, как только вы видите первые буквы на черном экране, жмите « F12 », пока не увидите панельку с выбором загрузки.
Но как быть, если при нажатии на клавишу « F12 » Boot Menu не вызывается?
По этой причине я и решил написать вот эту статью.
Итак, бывает, что по умолчанию на ноутбуках Acer отключают вызов Boot Menu клавишей « F12 ».
Нам следует ее включить, чтобы при следующей необходимости вызвать Boot Menu клавишей « F12 ».
Для того чтобы клавиша « F12 » заработала, необходимо сначала зайти в БИОС. Для этого жмите на клавишу « F2 » при включении ноутбука. То есть, как только вы видите первые буквы на черном экране, жмите « F2 », пока не увидите панельку BIOSа.
Во вкладке « Main » найдите параметр « F12 Boot Menu »:

Чтобы активировать клавишу « F12 » для вызова Boot Menu, нужно переключить с « Disabled » на « Enabled »:

Внимание для тех, кто не знает, как переключить с « Disabled » на « Enabled »:
Стрелочками выбираете « F12 Boot Menu » и жмете на клавишу «Enter». Откроется окошко, где вы стрелочками выбираете « Enabled ». Жмите снова на клавишу «Enter».
Теперь, когда у вас в параметре « F12 Boot Menu » выставлено состояние « Enabled », остается только сохранить настройки в БИОСе.
Чтобы сохранить настройки, нажмите на клавишу « F10 ».
Пробуйте при запуске жать на кнопку « F12 ».
Та-дам-мммм! У вас появится Boot Menu, и теперь вы можете быстро выбрать загрузку с дисковода или с флешки.
Как зайти в Boot Menu на ноутбуке и компьютере – таблица с клавишами
Для выполнения отдельных манипуляций, приходится работать с ПО до загрузки Windows. Для этого нужно правильно настроить очередность считывания носителей после запуска компьютера. В этом нам поможет boot menu – часть BIOS и UEFI. В этой статье разберём как войти в Boot Menu на ноутбуке или ПК перед загрузкой системы.
Как зайти в Boot Menu
Способов изменить Device Priority много. С появлением UEFI производители компьютеров начали приходить к общему подходу в этой сфере. Тем не менее до сих пор, есть варианты, которые проходить методом перебора или отсеивать благодаря информационным источникам. Начните запуск boot menu с F12 , Escape или F11 .
Чтобы сделать перебор немного быстрее, рассмотрим тему на конкретных примерах.
Предварительная настройка
Желающие запустить бут меню до загрузки ОС на новых компьютерах могут столкнуться с проблемой – система не дает такой возможности вообще. Чтобы ускорить загрузку операционной системы, устройства используют не полноценную, а ускоренную перезагрузку, которая исключает ряд этапов.
Чтобы отключить ускоренный режим, придется вызывать Панель Управления:
- Нажмите Win+R .
- Введите « control » и нажмите на кнопку ввода.

- Откройте элемент « Электропитания » в нижней части списка.
- Выберите « Действие кнопок питания » в левом боковом меню.

- Нажмите на гиперссылку « Изменение параметров, которые сейчас недоступны », если такая присутствует.

- Уберите галочку напротив надписи: « Включить быстрый запуск » в блоке «Параметры завершения работы».

- Примените сделанные изменения с помощью кнопки в нижней части окна.
Важно! Все действия, предложенные ниже, нужно реализовывать с уже подключенным CD, DVD или USB-накопителем. Система дает возможность выбирать устройство только из списка подключенных на данный момент.
Указанные в следующих разделах кнопки нужно беспрерывно нажимать сразу после запуска устройства. Окончить процесс следует после загрузки нужного раздела или ОС Windows в случае неудачи.
Boot menu на ноутбуке Lenovo
Производители техники Lenovo креативно подходят разработке. В отличие от конкурентов, они предпочитают для некоторых функций выделять отдельные кнопки. Так, на некоторых моделях ноутбуков вы обнаружите механический рычажок отключения Wi-Fi. На компьютерах этой марки может быть и отдельная кнопка для входа в раздел Device Priority – чаще она обозначена изогнутой стрелкой и находится отдельно от остального ряда кнопок.
 Клавиша загрузки BIOS и Boot Menu на ноутбуках Lenovo
Если такой клавиши нет, используйте для входа в Boot menu F12 .
Boot menu на ноутбуке Asus
Для запуска boot меню на устройствах, которые продаются под брендом Asus, используйте клавиши Escape или F8. Также в меню можно попасть через BIOS. Чтобы это сделать используйте кнопки Delete или F9.
Boot menu на ноутбуке Acer
Тайваньская компания Acer предусмотрела блокировку прямого запуска загрузочного меню. Отключать её придется через Биос или Уефи. В этом поможет клавиша F2. Далее следуйте по сценарию:
- Откройте раздел «Main».
- Найдите пункт, начинающийся с «F12…» и переключите его во включенное состояние.
- Сохраните сделанные изменения.
 После этого Acer Boot menu должен запускаться через клавишу F12 .
Boot menu на ноутбуке HP
На ноутбуке HP запуск нужного раздела производят в 2 этапа:
- После запуска устройства нажмите Escape.
- Нажмите на F9.
- Выполните необходимые действия в HP Boot menu.

Boot menu на ноутбуке Huawei
В отличие от предыдущих марок, эта стала популярной относительно недавно. Boot Menu в случае с Huawei также придется запускать в 2 этапа:
- Перезапустите компьютер.
- Нажимайте на клавишу F2, пока не загрузится UEFI.
- Убедитесь, что ваш накопитель присутствует в разделе «Portable Devices».

- Откройте пункт с наименованием вашего накопителя.
- Выберите вариант «Enable».
- Нажмите F10, чтобы сохранить изменения и перезагрузить компьютер.
- Нажимайте на кнопку F12, пока не увидите окно бут меню.

- Выберите интересующее устройство из списка.
Интересно! Включить UEFI на ноутбуках Huawei можно и с помощью комбинации клавиши питания с кнопкой увеличения громкости. Последняя присутствует не на всех моделях.
Загрузка Boot Menu на других ноутбуках и материнских платах
Производителей компьютерной техники немногим меньше, чем вариантов клавиш, которые пригодятся для запуска Boot Device Priority. Обозначим ещё несколько вариантов в виде двух таблиц.
Таблица 1 – алгоритма входа в boot menu для материнских плат ПК
| Модель устройства | Кнопки запуска | |
| Boot meu | UEFI/ BIOS | |
| MSI | F11 | Delete |
| Gigabyte | F12 | |
| Asus | F8 | |
| Intel | Escape | |
| ASRock Ami | F11 | |
Таблица 2 – алгоритм входа в boot menu на ноутбуке, нетбуке или ультрабуке
| Модель устройства | Кнопки запуска | |
| Boot menu | UEFI/ BIOS | |
| Dell | F12 | F2 |
| Packard Bell | F12 | |
| Fujitsu | F12 | |
| Samsung | Esc | |
| Sony Vaio | F11 | |
| Toshiba | F12 | |
Особенности загрузки на ОС Windows 10
С появлением UEFI пропала необходимость играть в подбор нужной клавиши для бут меню. Теперь Device Priority запускается прямо на Windows 10:
- Запустите ОС.
- Кликните по кнопке меню Пуск.
- Откройте меню выключения.
- Зажмите Shift.
- Нажмите «Перезагрузка».

- После выключения компьютера отпустите Shift.
- Выберите «Использовать устройство».

- Откройте пункт меню, соответствующий типу накопителя, который подключен.

- Дождитесь окончания процесса загрузки.
В случае, если система не сможет найти и прочитать выбранный тип устройства, вас перенаправят в Boot Option Menu. Останется повторно выбрать интересующий накопитель из списка. 
Если вышеперечисленные варианты не помогли при загрузке Boot menu или BIOS на компьютере, оставляйте свой комментарий ниже, обязательно вам ответим.
Горячие клавиши для входа в меню BIOS, Boot Menu, восстановления из скрытого раздела
 Доброго всем дня!
При установке Windows (например), очень часто необходимо выбрать загрузочный носитель, отличный от жесткого диска. Сделать это можно двумя путями:
- 👉 зайти в BIOS и изменить очередь загрузки (т.е. поставить в очередь загрузки флешку перед HDD — таким образом ПК будет сначала проверять флешку на наличие загрузочных записей, а только потом жесткий диск);
- 👉 вызвать Boot Menu и в нем выбрать конкретный носитель для загрузки в данный момент. На мой взгляд, этот вариант даже лучше первого: быстрее и не нужно заходить туда-сюда в BIOS менять очередь загрузки.
Ч тобы войти в BIOS (вызвать Boot Menu) в большинстве случаев используется клавиши: F2, Del, Esc, F12 (в зависимости от производителя устройства). Кнопку нажимать нужно сразу же после включения компьютера (можно несколько раз, чтобы не пропустить нужный момент.
Кстати, если приглядеться на первый экран, который виден сразу после включения компьютера, то на нем часто пишут кнопку для входа в нужные настройки (вызова меню). Пример на скрине ниже. 👇
Войти в UEFI (BIOS) можно из интерфейса Windows 11, 10, 8 (без использования спец. клавиш F2, Del и др.)!
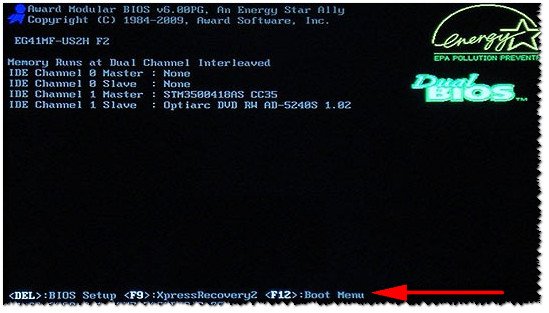
Рис. 1. Dual Bios. Кнопка DEL — вход в настройки BIOS, кнопка F12 — Вызов Boot Menu.

Справочная: «горячие» клавиши
Модель мат. платы (ноутбука) и пр.
Чтобы пользоваться таблицами ниже — Вам необходимо точно знать какая у вас материнская плата (модель ноутбука). Узнать это можно несколькими путями, приведу самые быстрые:
- воспользоваться 👉 документацией, которая шла к вашему ПК/ноутбуку (если она еще сохранилась 😉);
- воспользоваться какой-нибудь спец. утилитой 👉 для определения характеристик компьютера. Порекомендую Speccy .
- прочитать мои примеры по определению 👉 модели мат. платы // 👉 модели ноутбука.
Speccy
Простая бесплатная программа, которая расскажет о вашем железе довольно много. Например, можно узнать информацию о: процессоре (CPU), оперативной памяти (Ram), материнской плате (Motherboard), видеокарте (Graphics), накопителях HDD, SSD (Storage) и пр.
Кроме этого, можно узнать и контролировать в режиме онлайн температуру основных компонентов: жесткого диска, видеокарты, процессора.
Скриншот работы данной утилиты показан на рис. 2. 👇
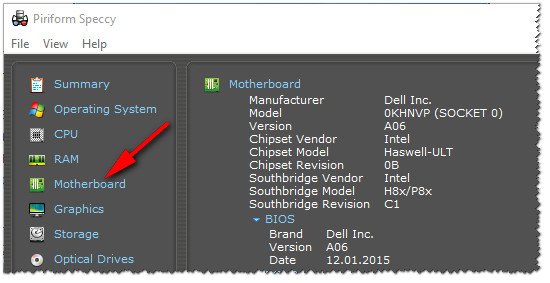
Рис. 2. Speccy — получение информации о материнской плате
Таблица №1: для компьютеров (по производителю мат. платы)
| Материнская плата | Версия BIOS | Горячая клавиша | Какое меню будет открыто |
|---|---|---|---|
| Acer | Del | Enter Setup | |
| F12 | Boot Menu | ||
| ASRock | AMI | F2 or DEL | run Setup |
| F6 | Instant Flash | ||
| F11 | Boot Menu | ||
| TAB | switch Screen | ||
| Asus | Phoenix-Award | DEL | BIOS Setup |
| TAB | Display BIOS POST Message | ||
| F8 | Boot Menu | ||
| Alt + F2 | Asus EZ Flash 2 | ||
| F4 | Asus Core Unlocker | ||
| BioStar | Phoenix-Award | F8 | Enable System Configuration |
| F9 | Select Booting Device after POST | ||
| DEL | Enter SETUP | ||
| ChainTech | Award | DEL | Enter SETUP |
| ALT+F2 | Enter AWDFLASH | ||
| ECS (EliteGrour) | AMI | DEL | Enter SETUP |
| F11 | BBS POPUP | ||
| FoxConn (WinFast) | TAB | POST Screen | |
| DEL | SETUP | ||
| ESC | Boot Menu | ||
| GigaByte | Award | ESC | Skip memory test |
| DEL | Enter SETUP/Q-Flash | ||
| F9 | Xpress Recovery Xpress Recovery 2 | ||
| F12 | Boot Menu | ||
| Intel | AMI | F2 | Enter SETUP |
| MSI | F2, Del (реже F1) | Enter Setup | |
| F11 | Boot Menu |
Таблица №2: для ноутбуков (BIOS + Boot Menu, и пр.)
Примечание : на современных ноутбуках также работает комбинация клавиш в Windows: зажать кнопку SHIFT + выбрать мышкой кнопку перезагрузки.
Boot Menu представляет из себя небольшое окно, в котором при помощи мышки (стрелок на клавиатуре) вы сможете выбрать устройство, с которого произвести загрузку. Пример такого меню показан на рис. 3. 👇
В зависимости от производителя вашего устройства — меню может несколько отличаться, но принцип работы везде одинаков. 😉
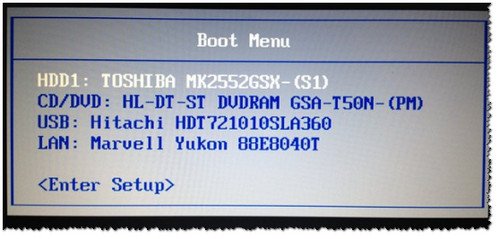
Рис. 3. Классическое Boot Menu (Ноутбук Toshiba)
Таблица №2
Таблица №3: восстановление из скрытого раздела (для ноутбуков)
В большинстве современных ноутбуков встроен специальный скрытый раздел с возможностью восстановления ОС Windows с помощью «пары» клавиш (нет необходимости подготавливать загрузочную флешку, скачивать ISO образы с Windows и пр.).
Как правило, чтобы запустить функцию восстановления — после включения ноутбука достаточно нажать одну клавишу (F9, например, на ноутбуках Asus). Далее появиться окно, в котором нужно следовать указанию мастера восстановления.
Примечание : при восстановлении информации, системный диск «C:\» часто форматируется и вся информация с него удаляется. Сделайте заранее копию важных данных с него.
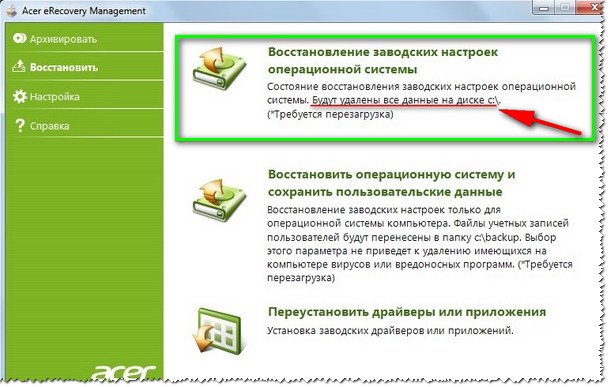
Рис. 4. Ноутбук ACER — сервисная утилита восстановления
Таблица №3
| Производитель ноутбука | Сочетание кнопок | Примечание |
|---|---|---|
| Acer | Alt+F10 | Сначала необходимо войти в Bios ноутбука, и включить функцию D2D Recovery. В системе восстановления, по умолчанию, установлен пароль: 000000 или AIM1R8. |
| Asus | F9 | |
| Dell Inspiron | Ctrl + F11 | |
| Fujitsu Siemens | F8 | |
| HP | F10, F11 | |
| LG | F11 | |
| Lenovo ThinkPad | F11 | |
| MSI | F3 | |
| Packard Bell | F10 | |
| RoverBook | Alt | |
| Samsung | F4 | |
| Sony VAIO | F10 | |
| Toshiba | F8, F11 |
📌 PS: если не получилось зайти в BIOS
Рекомендую ознакомиться с руководством (спецификацией) вашего устройства на его офиц. сайте. Также можете посм. одну мою предыдущую инструкцию: в ней я разобрал основные варианты проблем + привел рекомендации. Ссылочка ниже. 👇
Кстати, таблицы будут пополняться (со временем 😉). За дополнения по теме статьи — заранее большое вам мерси!
What Is Acer Boot Menu? How To Access/Change Acer BIOS [MiniTool Tips]
Acer is one of the most famous brands for computers (desktops, laptops, tablets) and other related products (smartphones, monitors, cloud solutions, etc.). Acer computer is used widely around the world. In this post on MiniTool, let’s talk about the Acer boot menu, which is responsible for starting up a device. What’s included in the boot menu? How can you access it? How to change the boot order on Acer laptop?
What Is Acer Boot Menu
What is the boot menu? Literally, it’s a menu in charge of computer boot. By default, you can’t see the boot menu (also called the startup menu) when starting up your computer normally. But if you are careful enough, you’ll find that there’s an on-screen prompt telling you which key to press to access the boot menu easily.
A lot of options are included in an Acer boot menu: system information, boot device options, BIOS setup, etc., just like the boot menu on other computers. These options are very useful when you have special needs (booting from USB/CD/DVD instead of the hard drive) or run into problems that need to be fixed by changing settings in the boot menu.

Booting to safe mode, startup repair, and other states have been proving to be very useful to help users accessing systems & repair related issues.
SEE! Here’s how to effectively recover data when PC won’t boot and how to fix the “PC won’t boot” issue.
How to Access Acer Boot Menu & Acer BIOS
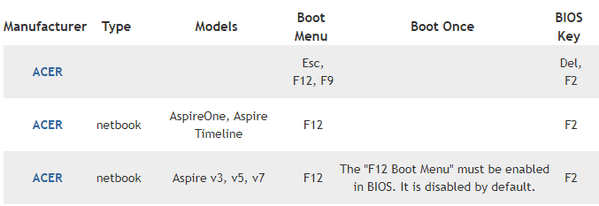
Acer offers a series of models (such as Aspire One, Aspire Timeline, and Aspire v3/v5/v7) to meet users’ different requirements. Though they have a lot in common, the Acer boot menu key is not the same. F12 is the most common key to press in order to access the boot menu on your Acer laptop (and desktop).
How do I get to the boot menu on an Acer?
- Please shut down your Acer laptop.
- Keep pressing the F12 key on your keyboard from the start. (Though pressing F12 is only required when the Acer logo appears, you’d better keep pressing it in case you miss the window; it disappears in a flash.)
- After entering the boot menu, you can navigate to the corresponding boot options and make changes to them by pressing the arrow keys. (Please remember to save changes when you exit the boot menu.)
The other two commonly used keys to access Acer boot menu Windows 10 are Esc and F9.
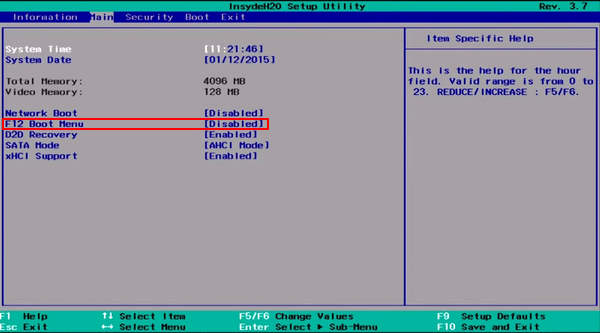
How to enable the F12 Boot Menu on Acer?
- Press F12 to access the Acer boot menu.
- Go to the Main menu tab by pressing the right arrow button.
- Press the down arrow to select F12 Boot Menu.
- Press Enter to change the status from Disabled to Enabled.
What is the Acer BIOS?
In fact, Acer BIOS (Basic Input/Output System) is a part of the Acer boot menu; it’s included in it. You can define which device to use, the boot order, and the setup of BIOS related features in the BIOS setup menu. The most common Acer BIOS key to press in order to access the BIOS settings menu is F2. If this didn’t work, you can try to access the BIOS menu by pressing Del, which is another commonly used key on Acer computers.
How to access Acer BIOS?
You can press the F2, the commonly used Acer BIOS key, after starting/restarting a computer to pause the startup sequence. This is an easy way to trigger the Acer BIOS menu (setup menu), but you need to keep pressing the button to avoid missing the correct window and time. Once the Acer laptop boot menu shows up on your computer screen, you can get the information you want or change some settings by using the left, right, up, and down arrow keys.
Can you update Acer BIOS?
- Make sure your Acer laptop is fully charged or insert the Acer desktop adapter into an electrical outlet.
- Start your Acer computer.
- Press Windows + S and type information into the search box.
- Select System Information from the search result.
- Look for the BIOS Version/Date option under the Item column.
- Take a screenshot or take a picture of the Version/Date information (you can also write down the information manually).
- Open a Web browser and go to the Acer official site.
- Search for the BIOS for your Acer model.
- Click Download and wait.
- Open or ZIP file and double click on the bat.
- Follow the on-screen instructions to update BIOS on your Acer computer.

Some people said their computer can’t boot after the BIOS update. Please don’t worry too much since there are several solutions to it.
Don’t know how to retrieve deleted files on a PC? The following content will show you how to get them back from devices in different situations.
Acer Boot from USB
By default, the Acer computer boots from a hard drive. If you want to boot Acer from USB on Windows 10, you’ll need to change the boot order in BIOS.
Steps to change boot order Windows 10:
- Shut down your Acer computer.
- Press the Acer BIOS key, F2 or Del, to access the BIOS setup window.
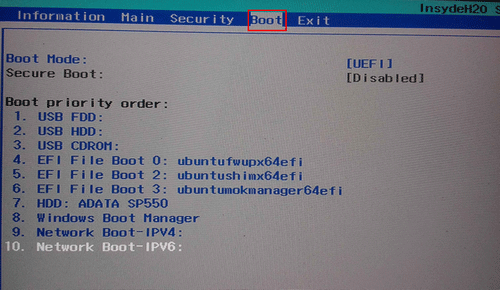
- Press the rightarrow on the keyboard to select the Boot menu tab.
- Adjust the boot priority order by using the up and down arrows. (Put the target USB option first in the list.)
- Exit the setup utility and remember to save changes (shift to Exit and press Yes).
How to Boot from USB on Acer Laptop
The guide on how to boot from USB below also works for how to boot from CD.
- Connect the USB drive properly to your Acer laptop.
- Restart the Acer computer and press the Acer BIOS key to enter the BIOS menu.
- Change the boot order, making the USB option the first item in the boot priority list.
- Exit BIOS and save changes.
- Your Acer laptop will start successfully if the USB boot drive is fine and the BIOS settings are correct.
Boot from USB Not Working
Some people said that they have tried to boot Windows from USB in a laptop, but failed neither using UEFI nor Legacy. This also happens to Acer laptop users; and there are many reasons that should be responsible for the boot failure (PC ignoring the boot order is one of the common causes). In this case, you’d better follow the steps below to create a bootable USB disk yourself and use it to recover data from the corrupted internal hard drive on Acer.
Force Boot from USB & Recover Data
You have tried the above methods (accessing & modifying the Acer boot menu and Acer BIOS) to boot Acer from USB but failed? Don’t worry; there’s another solution to Acer boot from USB: creating a bootable USB disk or CD/DVD manually and booting Acer with it.
Get an edition of MiniTool Power Data Recovery that includes the Snap-in WinPE Bootable Builder.
- Several licenses are provided for users; please choose a suitable one after browsing the license comparison page.
- Save the setup program on another computer -> double click on it -> follow the instructions to install this data recovery software properly.

How to create a bootable USB disk (it also works for creating a bootable CD/DVD)?
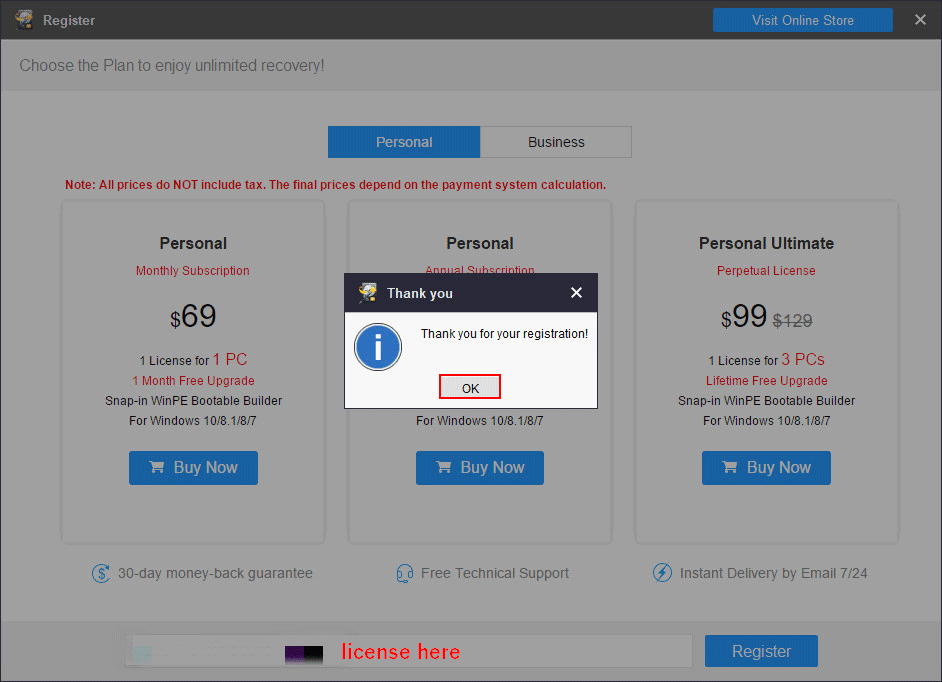
- Double click on the icon to launch the software -> copy & paste your license into the textbox of the Register window -> click on the Register button to continue.
- Wait for a couple of seconds until you see the Thank you window -> click on the OK button to get into the software.
- Connect a USB flash drive to the PC (make sure it has no data or the data on it is not needed anymore) -> click on the Bootable Edition icon in the upper right part.
- Please select the media type by clicking WinPE-based media with MiniTool plug-in.
- Follow the on-screen instructions to choose a media destination and then wait for the USB disk building process to finish.
- Click Finish and now you can remove the USB drive properly from the PC.


Data loss from external hard drive? MiniTool provides an effective solution and detailed steps for external hard drive recovery.
How to force boot from USB (works for Acer Aspire and other series)?
- Turn off your Acer laptop.
- Insert the bootable USB disk you have made just now into the laptop and turn the Acer back on.
- Press the F12 button on the keyboard quickly after the splash screen.
- Use the arrow keys to select the USB drive as the first boot device.
- Press Enter and wait for the laptop to boot automatically.
How to recover data with the bootable USB drive?
- Press any key to boot the PC from the bootable disk you’ve made, as prompted.
- Wait for a few seconds until you see the screen resolution changing window.
- You can wait for the countdown to complete or click on the OK button to continue.
- In the next software launching window, you can also wait for the countdown or click OK.
- Click on the first option in the MiniTool PE Loader window to launch MiniTool Power Data Recovery correctly.
- Please select Logical Drives from the left sidebar when you enter the main software interface.
- Specify the Acer drive that keeps your needed data in the right pane. Then, double click on it to start a full scan.
- Wait for the scan to process; it may take some time depending on the drive capacity, amount of data, and other factors.
- Browse the files and folders found on your hard drive on Acer; pick out the ones you really need by adding a checkmark into the square box in front of each item.
- Click on the Save button.
- Select a storage path for the selected files waiting to be recovered on the Acer laptop. You need to connect an external drive to the Acer computer and select it as the target storage destination.
- Click OK to confirm and wait until you see a congratulations window saying that the files have been recovered successfully.


Bonus tip:
Your USB flash drive may not be recognized by or showing up on the computer. There are many reasons for this problem; please find them and the corresponding solutions on this page.
In this post, I’ll mainly tell you how to recover files after factory reset and how to restore laptop to factory settings.
Acer Secure Boot
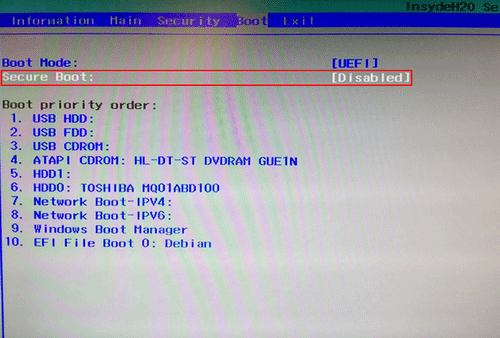
If you’re careful enough, you’ll find there’s a Secure Boot option in the Acer Boot menu. Actually, it’s a unique and innovative feature designed to stop malicious software or unauthorized media from loading during the startup process.
The Secure Boot is enabled by default, but you may need to disable it when you want to set dual boot. Here’s how to disable Secure Boot in BIOS for Acer notebooks running Windows 8:
- Shut down your Acer laptop completely.
- Turn it on and press F2 repeatedly until you enter the BIOS.
- Use the right arrow key to select Security.
- Use the down arrow key to select Set Supervisor Password; then, press Enter.
- Create a password & hit Enter; confirm the password & hit Enter.
- Use the right arrow key to select Boot.
- Use the down arrow key to select Secure Boot; then, press Enter.
- Select Disabled and press Enter.
- Press F10 and click Yes.
This also works for disabling Secure Boot on the Acer tablet.
How to disable Secure Boot in UEFI/BIOS for Acer desktops running Windows 8:
- Shut down Acer desktop.
- Press Delete to enter UEFI/BIOS.
- Choose Authentication by using the right arrow key.
- Select Secure Boot -> press Enter -> select Disabled.
- Choose Boot Options with the right arrow.
- Select Launch CSM -> press Enter -> select Always.
- Press Enter -> press F10 -> click Yes.
For some models, there’s a Boot Filter option and you should change it to Legacy.

Troubleshoot Security Boot Fail
Acer security boot fail is a hot topic among Acer desktop/laptop/tablet users; it could occur on any Acer models. The following methods show you how to troubleshoot security boot fail on Acer.
#1. Disable Secure Boot
The steps are mentioned in the above section.
#2. Run SFC
- Turn off your Acer computer and then turn it back on.
- Hold down the Shift key when you see the sign-in screen.
- Click Start -> click Power -> choose Restart.
- Select Troubleshoot in the Choose an option window.
- Select Advanced options -> click Command Prompt.
- Type sfc/ scannow and hit Enter.
- Wait for the scan to complete.
You may also try to run DISM if running SFC is not working (how to fix when DISM failed?).

#3. Startup Repair
- Repeat step 1
Laptop repair is very necessary since there are always a series of problems found on the laptop due to different reasons.
#4. System Restore
- Repeat step 1

#5. Reset This PC
- Repeat step 1

Besides, you can also try to recover the system from a system image or by performing a clean install.
Verdict
Acer computers (desktops, notebooks/laptops, and tablets) are used widely around the world. The boot menu is very significant in booting Acer for you. You should get to know the Acer boot menu and Acer BIOS especially when you need to change boot order (to boot from another device) or run into boot failure cases.
This post introduces the Acer boot menu and options, teaches you how to boot Acer from USB, and shows you how to troubleshoot when Acer security boot fails. Please pick up the part you’re most interested in to read.
About The Author
Sarah has been working as an editor at MiniTool since she graduated from university. Sarah aims at helping users with their computer problems such as disk errors and data loss. She feels a sense of accomplishment to see that users get their issues fixed relying on her articles. Besides, she likes to make friends and listen to music after work.