Установка ОС Linux в Windows 11 с использованием WSL 2
На текущий момент ОС MS Windows 11 позволяет запустить следующие дистрибутивы Linux:
- Debian
- Kali Linux Rolling
- OpenSUSE Leap 42
- SUSE Linux Enterprise Server v12
- Ubuntu 16.04 LTS
- Ubuntu 18.04 LTS
- Ubuntu 20.04 LTS
В новой версии Windows 11 разработчиками Microsoft упрощен механизм установки компонентов WSL. С использованием лишь одной команды можно установить подсистему Windows для Linux, платформу виртуальной машины, ядро WSL, а также дистрибутив Linux.
- Запустить командную строку или Windows Терминал от имени администратора
- Ввести следующую команду
- Нажать Enter

Рис.1 Установка WSL
Команда —install позволяет выполнить следующие действия:
- установить дополнительные компоненты WSL
- установить платформу виртуальной машины;
- загрузить и установить ядро WSL;
- скачать и установить дистрибутив Linux (по умолчанию устанавливается Ubuntu)
- По окончании данной процедуры перезагрузить компьютер.

Рис.2 Установка WSL
- После перезагрузки продолжится инсталляция и осуществится запуск Ubuntu 20.04 LTS (именно эта версия устанавливается на момент написания статьи) с последующей первоначальной настройкой, где необходимо будет создать имя пользователя и пароль.
Для каждого установленного дистрибутива Linux в среду Windows создается уникальное имя пользователя и пароль. Уникальная учетная запись будет использоваться для входа в конкретный дистрибутив. Эта учетная запись обладает возможностью брать права администратора Linux.

Рис.3 Создание пользователя и пароля в ОС Ubuntu
Установка определенного дистрибутива Linux ОС MS Windows 11 с использованием WSL2
- Запустить командную строку или Windows Терминал от имени администратора
- Для получения списка доступных дистрибутивов Linux необходимо ввести следующую команду
- Нажать Enter

Рис.4 Список доступных дистрибутивов Linux
- После выбора нужной операционной системы ввести команду (операционная система может быть выбрана другая):

Рис.5 Установка Kali Linux
- По окончании установки запуститься выбранная операционная система.

Рис.6 Создание пользователя и пароля в ОС Kali Linux
Несколько способов запуска дистрибутивов Linux
Для последующего запуска установленного дистрибутива Linux можно воспользоваться одним из вариантов:
- открыть меню Пуск > Все приложения и выбрать, например, Ubuntu

Рис.7 Запуск ОС Linux
- в командной строке или Windows Терминал ввести название установленной Linux системы, например, ubuntu и нажать Enter

Рис.8 Запуск ОС Linux
- в командной строке или Windows Терминал ввести команду wsl . Будет запущен дистрибутив Linux по умолчанию. Если установлено несколько дистрибутивов, ввести, например команду wsl -d Kali-Linux
Удаление дистрибутивов Linux и отключение компонента Подсистема Windows для Linux
- Открыть Параметры ОС MS Windows 11
- Перейти в раздел Приложения >Приложения и возможности

Рис.9 Удаление дистрибутивов Linux
- Выбрать дистрибутив Linux, который необходимо удалить, нажать на пиктограмму справа и выбрать Uninstall

Рис.10 Удаление дистрибутивов Linux
- Если в дальнейшем не планируется устанавливать дистрибутивы Linux, можно также удалить WindowsSubsystemforLinuxUpdate и WindowsSubsystemforLinuxUpdateWSLgPreview

Рис.11 Удаление дополнительных файлов WSL
- При необходимости отключения компонента ПодсистемаWindows дляLinux открыть окно КомпонентыWindows, снять соответствующий флажок в чекбоксе и перезагрузить компьютер.

Рис.12 Компоненты Windows
Чтобы открыть данное окно можно воспользоваться одним из вариантов:
- Открыть Параметры ОС MS Windows 11, выбрать Приложения >Optionalfeatures > Другие компонентыWindows

Рис.13 Запуск компонентов Windows
- открыть Панель управления > Программы и компонентыWindows
- в окне Выполнить ввести OptionalFeatures
Если в автоматическом режиме ядро подсистемы Windows для Linux не обновляется (например, есть возможно обновить только вручную, с использованием команды wsl —update), необходимо включить параметр центра обновления Windows Получать обновления для других продуктов Microsoft при обновлении Windows.

Рис.14 Настройка дополнительных параметров обновлений

Рис.15 Включение параметра Получать обновления для других продуктов Microsoft при обновлении Windows
Ошибка запуска ОС Linux может быть вызвана отсутствием включенной опции поддержки виртуализации в BIOS или UEFI
Если запуск подсистемы Windows для Linux выполняется в виртуальной среде, например с использованием платформы VMware Workstation, то необходимо:
- выключить гостевую систему Windows 11
- открыть настройки гостевой системы Windows 11
- в разделе Hardware выбрать Processors и установить флажок в чекбоксе Virtualize Intel VT-x/EPT or AMD-V/RVI

Рис.16 Настройка поддержки виртуализации в VMware Workstation
Выше упомянуты только 2 причины, по которым могут возникнуть проблемы с корректной работой WSL. Другие причины будут рассмотрены в дальнейшем.
Ta180m / WSL 2 GNOME Desktop.md
NOTE: If you want the ultimate Linux desktop experience, I highly recommend installing Linux as your main OS. I no longer use Windows (except in a VM) so I will not be maintaining this guide anymore.
Think Xfce looks dated? Want a conventional Ubuntu experience? This tutorial will guide you through installing Ubuntu’s default desktop environment, GNOME.
GNOME is one of the more complex — and that means more difficult to run — desktop environments, so for years people couldn’t figure out how to run it on WSL 2. On WSL 1 it could only run using very complicated methods that didn’t transfer to well WSL 2. Any forlorn attempts to run it on WSL 2 only resulted in a smoldering heap of error messages.
But now you can!
- WSL 2
- Ubuntu 20.04 (other distros not tested)
- An X server for Windows, such as VcXsrv
- Basic knowledege on how to run GUI apps with WSL 2 (not required but highly recommended)
You’ve been regularly updating your distro, haven’t you?
Install GNOME: (maybe go eat a snack while it’s installing?)
And paste this in at the end and save:
If you try to start GNOME now, you’ll get a lot of errors. Something along the lines of this, but a ton more errors:
The trick is to enable systemd : (note that this does break a lot of stuff such as Visual Studio Code Remote)
Now shut down WSL 2: (run this in Windows)
First, fire up your X server on Windows. Make sure you let it through your firewall and disable access control.
Now, start up Ubuntu again and start GNOME:
If you don’t get any error messages, you should be good. Wait a few seconds for GNOME to start up.
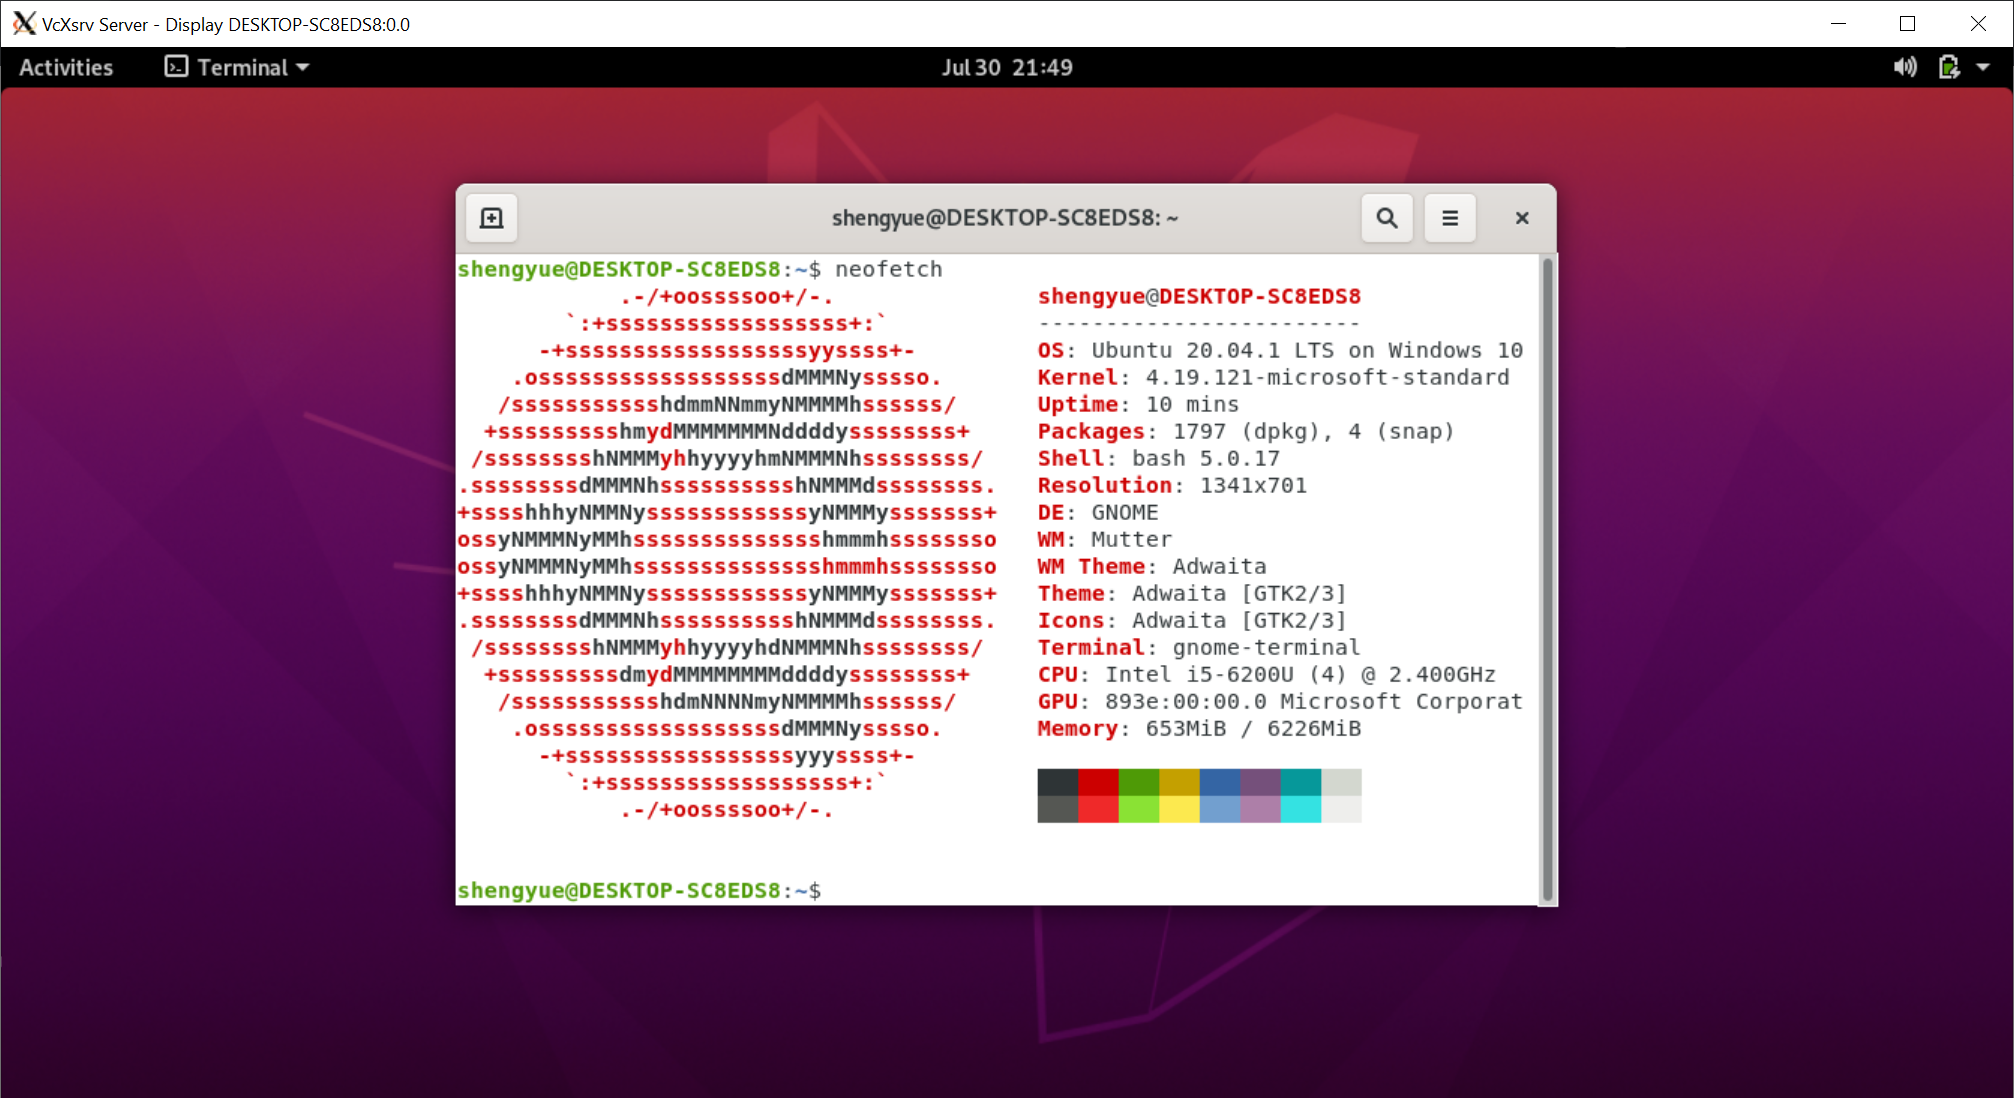
Now you have a great GUI desktop and you won’t need any intensive virtual machines anymore!
- You can disable the screensaver with gsettings set org.gnome.desktop.session idle-delay 0 .
- You can also try KDE Plamsa using a similar method! Just sudo apt install kde-plasma-desktop instead and start it with startplasma-x11 .
If you can’t get this to work, try Xfce.
If you still can’t get it to work, you can ask for help on an online forum such as r/bashonubuntuonwindows.

what’s this error?
It’s very, very slow when doing this with Cinnamon. Does anyone know what drivers I would need for ubuntu 20.04?
Did you find a solution? Its really slow for me too.
Hello,
I think I’m dabbling in something over my head, but.
Has anyone persued this with Ubuntu and Distrod to provide systemd?
I have seen discussions about genie, but have attempted to use Distrod as a first step.
I am using VcXsrv also.
After successfully installing Distrod and starting VcXsrv, an attempt to start gnome-session yields the following Debug:
$ sudo gnome-session —debug
gnome-session-binary[957]: DEBUG(+): Enabling debugging
gnome-session-binary[957]: GLib-DEBUG(+): posix_spawn avoided (fd close requested)
gnome-session-binary[957]: DEBUG(+): Could not make systemd aware of QT_IM_MODULE=ibus environment variable: GDBus.Error:org.freedesktop.DBus.Error.Spawn.ChildExited: Process org.freedesktop.systemd1 exited with status 1
gnome-session-binary[957]: DEBUG(+): Could not make systemd aware of XMODIFIERS=@im=ibus environment variable: GDBus.Error:org.freedesktop.DBus.Error.Spawn.ChildExited: Process org.freedesktop.systemd1 exited with status 1
gnome-session-binary[957]: DEBUG(+): Could not make systemd aware of GNOME_DESKTOP_SESSION_ID=this-is-deprecated environment variable: GDBus.Error:org.freedesktop.DBus.Error.Spawn.ChildExited: Process org.freedesktop.systemd1 exited with status 1
gnome-session-binary[957]: DEBUG(+): Could not make systemd aware of XDG_MENU_PREFIX=gnome- environment variable: GDBus.Error:org.freedesktop.DBus.Error.Spawn.ChildExited: Process org.freedesktop.systemd1 exited with status 1
gnome-session-binary[957]: DEBUG(+): Finding a graphical session for user 0
gnome-session-binary[957]: WARNING: Could not get session id for session. Check that logind is properly installed and pam_systemd is getting used at login.
gnome-session-binary[957]: DEBUG(+): Using systemd for session tracking
gnome-session-binary[957]: GLib-GIO-DEBUG(+): _g_io_module_get_default: Found default implementation dconf (DConfSettingsBackend) for ‘gsettings-backend’
gnome-session-binary[957]: DEBUG(+): GsmManager: setting client store 0x7ff5e800f420
gnome-session-binary[957]: DEBUG(+): Could not make systemd aware of SESSION_MANAGER=local/DESKTOP-6OBTGF6:@/tmp/.ICE-unix/957,unix/DESKTOP-6OBTGF6:/tmp/.ICE-unix/957 environment variable: GDBus.Error:org.freedesktop.DBus.Error.Spawn.ChildExited: Process org.freedesktop.systemd1 exited with status 1
gnome-session-binary[957]: DEBUG(+): GsmXsmpServer: SESSION_MANAGER=local/DESKTOP-6OBTGF6:@/tmp/.ICE-unix/957,unix/DESKTOP-6OBTGF6:/tmp/.ICE-unix/957
gnome-session-binary[957]: DEBUG(+): emitting SessionIsActive
gnome-session-binary[957]: DEBUG(+): fill: *** Getting session ‘gnome’
gnome-session-binary[957]: DEBUG(+): fill: *** Looking if /root/.config/gnome-session/sessions/gnome.session is a valid session file
gnome-session-binary[957]: DEBUG(+): Cannot use session ‘/root/.config/gnome-session/sessions/gnome.session’: non-existing or invalid file.
gnome-session-binary[957]: DEBUG(+): fill: *** Looking if /etc/xdg/gnome-session/sessions/gnome.session is a valid session file
gnome-session-binary[957]: DEBUG(+): Cannot use session ‘/etc/xdg/gnome-session/sessions/gnome.session’: non-existing or invalid file.
gnome-session-binary[957]: DEBUG(+): fill: *** Looking if /usr/local/share/gnome-session/sessions/gnome.session is a valid session file
gnome-session-binary[957]: DEBUG(+): Cannot use session ‘/usr/local/share/gnome-session/sessions/gnome.session’: non-existing or invalid file.
gnome-session-binary[957]: DEBUG(+): fill: *** Looking if /usr/share/gnome-session/sessions/gnome.session is a valid session file
gnome-session-binary[957]: DEBUG(+): Cannot use session ‘/usr/share/gnome-session/sessions/gnome.session’: non-existing or invalid file.
gnome-session-binary[957]: CRITICAL: We failed, but the fail whale is dead. Sorry.
rjolbrich@DESKTOP-6OBTGF6:
Like I said I may be over my head. Is this a Distrod/systemd problem or a VcXsrv problem?
I don’t really recommend adopting this method to set up the gnome desktop for your WSL2 if your windows is not new enough to get the builtin WSL2 GNOME desktop support. I tried this way yesterday and it ruined my network setting since the systemd daemon will initialize some socks and occupy some ports, then somehow both my neovim and ms store in windows were broken. 🙁
It took me nearly a whole afternoon to narrow down this issue, cause I didn’t realize it could have anything to do this system hack at all. However, after removing this systemd hack stuff, my neovim and MS store came back right away.
Install Ubuntu on WSL2 and get started with graphical applications
Windows Subsystem for Linux (WSL) allows you to install a complete Ubuntu terminal environment in minutes on your Windows machine, allowing you to develop cross-platform applications without leaving windows.
What you will learn:
- How to enable and install WSL on Windows 10 and Windows 11
- How to install and run a simple graphical application that uses WSLg
- How to install and run a much more advanced application that uses WSLg
Note: As of November 2022, WSL is now available as a Windows Store app for both Windows 10 and Windows 11. This means previous tutorials related to installing WSL as a Windows feature are no longer required.
What you will need:
- A Windows 10 or Windows 11 physical or virtual machine with all the updates installed
Note: This tutorial doesn’t cover GPU acceleration which is covered in a tutorial of its own.
2. Install WSL
WSL can be installed from the command line. Open a powershell prompt as an Administrator (we recommend using Windows Terminal) and run:
This command will enable the features necessary to run WSL and also install the default Ubuntu distribution of Linux available in the Microsoft Store. It is recommended to reboot your machine after this initial installation to complete the setup.
You can also install WSL from the Microsoft Store.
Installation of WSL from the Microsoft Store
The WSL app is availble to install directly from the Microsoft Store like other Windows applications.
To install the WSL application from the Microsoft Store, open it and search for Windows subsystem.
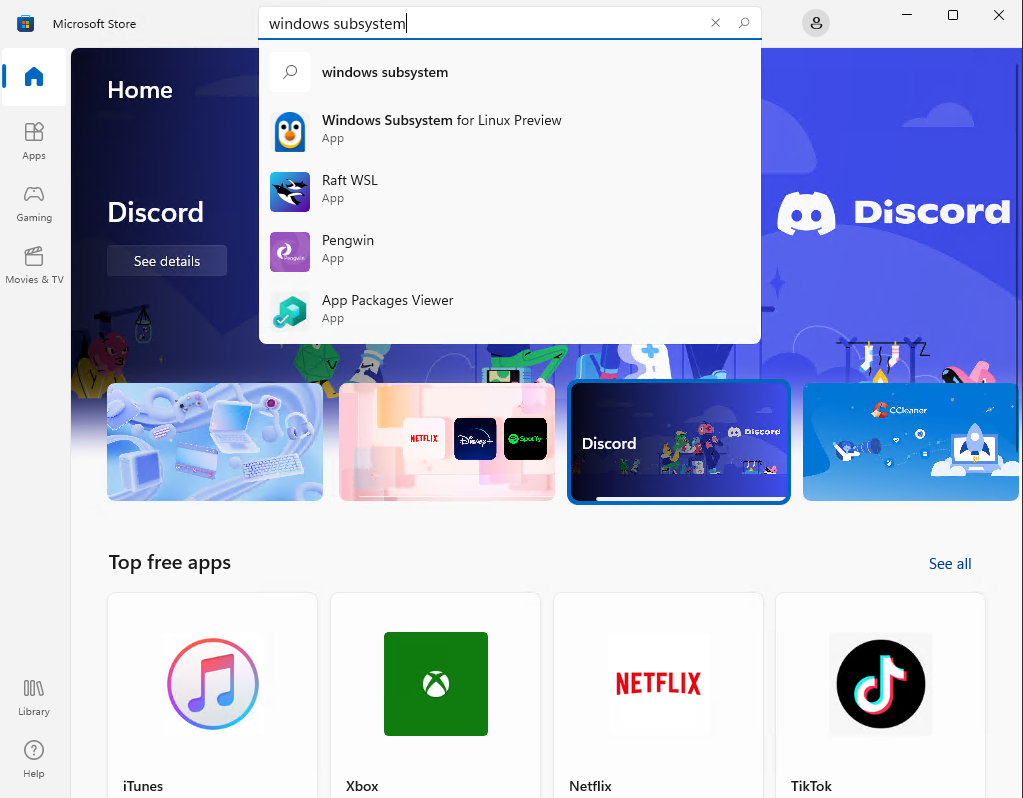
Click on the item Windows Subsystem for Linux to open the corresponding application page.
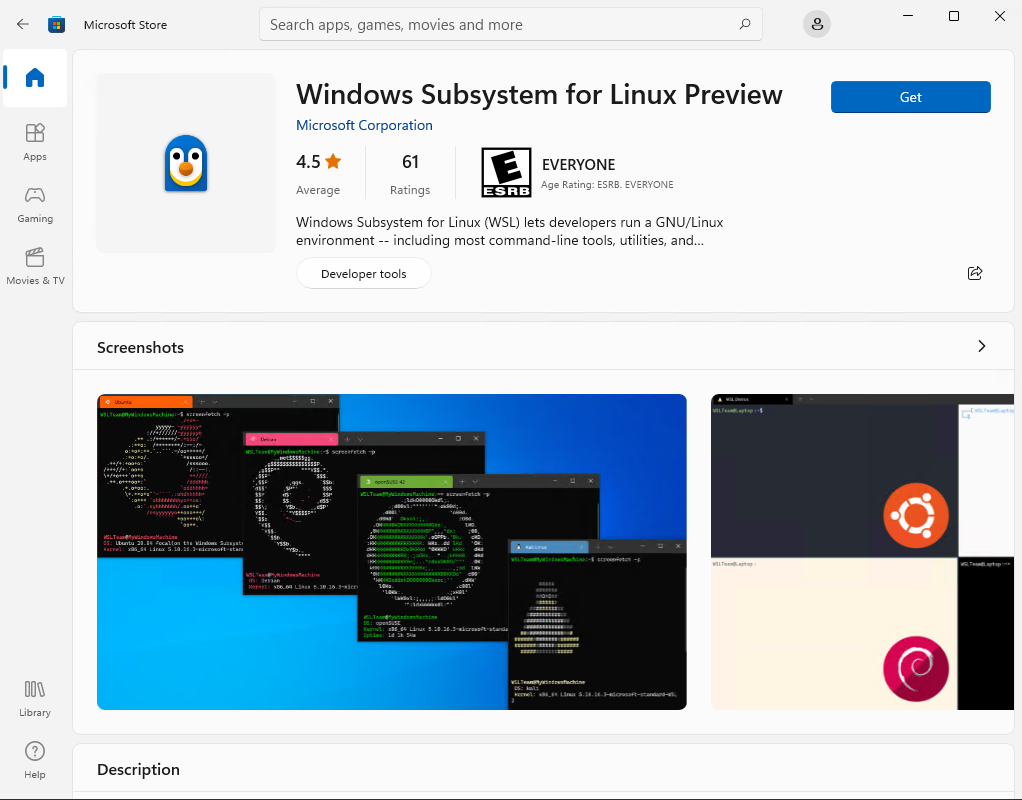
Click on Get to download and install the application.
Upon installation, you can click on Open, but it will not do much since there is no Linux distribution installed.
However, if you really want to open the WSL application without installing a distribution, you’ll see a nice and short help message that you must follow in order to make something useful with WSL:
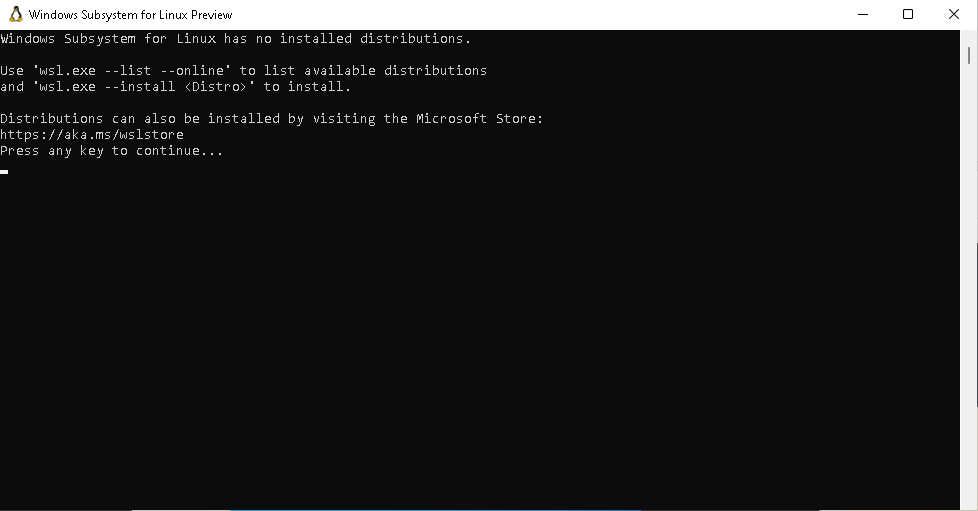
You can now proceed with the installation of Ubuntu.
3. Download Ubuntu
WSL supports a variety of Linux distributions including the latest Ubuntu release, Ubuntu 20.04 LTS and Ubuntu 18.04 LTS. You can find them by opening the Microsoft Store app and searching for Ubuntu.
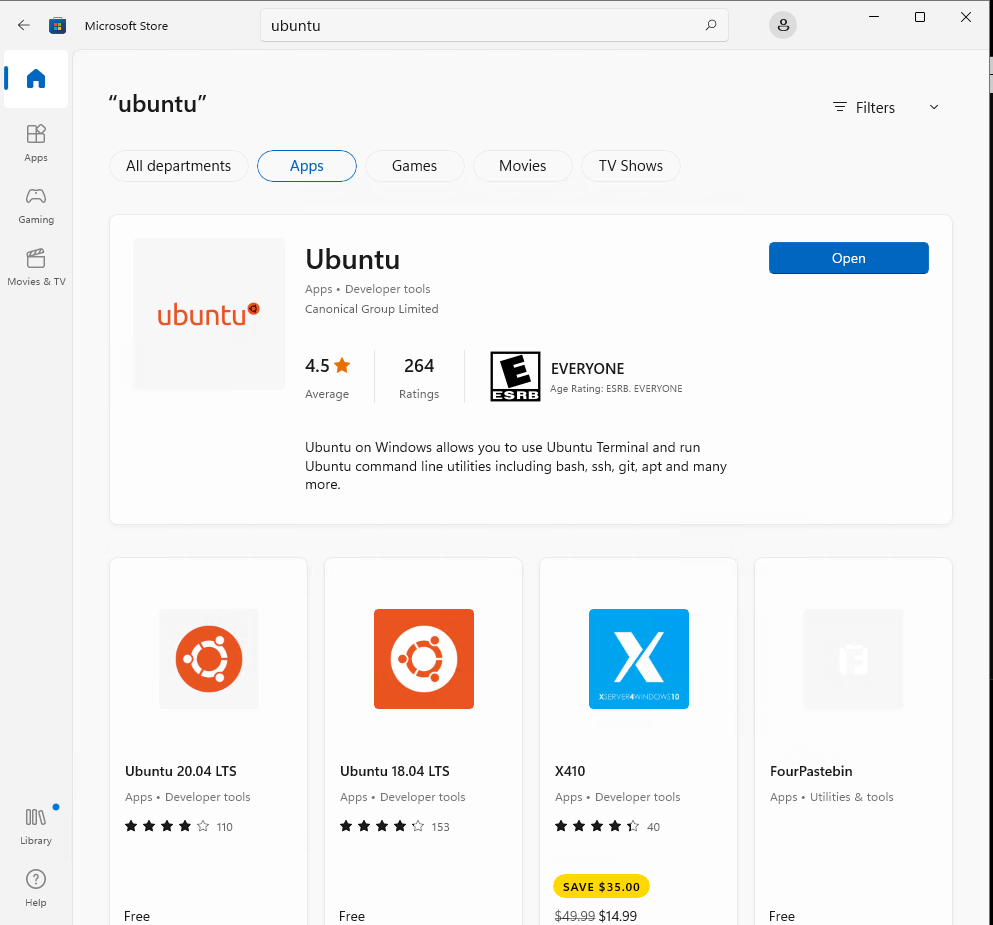
Choose the distribution you prefer and then select Get.
Which version should I choose?
There are three types of Ubuntu releases published to the Microsoft Store:
- Ubuntu with a version number e.g. Ubuntu 20.04.x. This will always be 20.04 and upgrades won’t be proposed.
- Ubuntu without a version number. This is the latest LTS version of Ubuntu after the first point release. At the time of writing, it is Ubuntu 22.04. It will remain Ubuntu 22.04 until the first point release of the next LTS release of Ubuntu, for example 24.04.1 in 2024.
- Ubuntu Preview is a daily build of the latest development version of Ubuntu. You should install it if you want to live on the edge but not for production workload as it doesn’t receive the same amount of QA as stable releases and may break at any time.
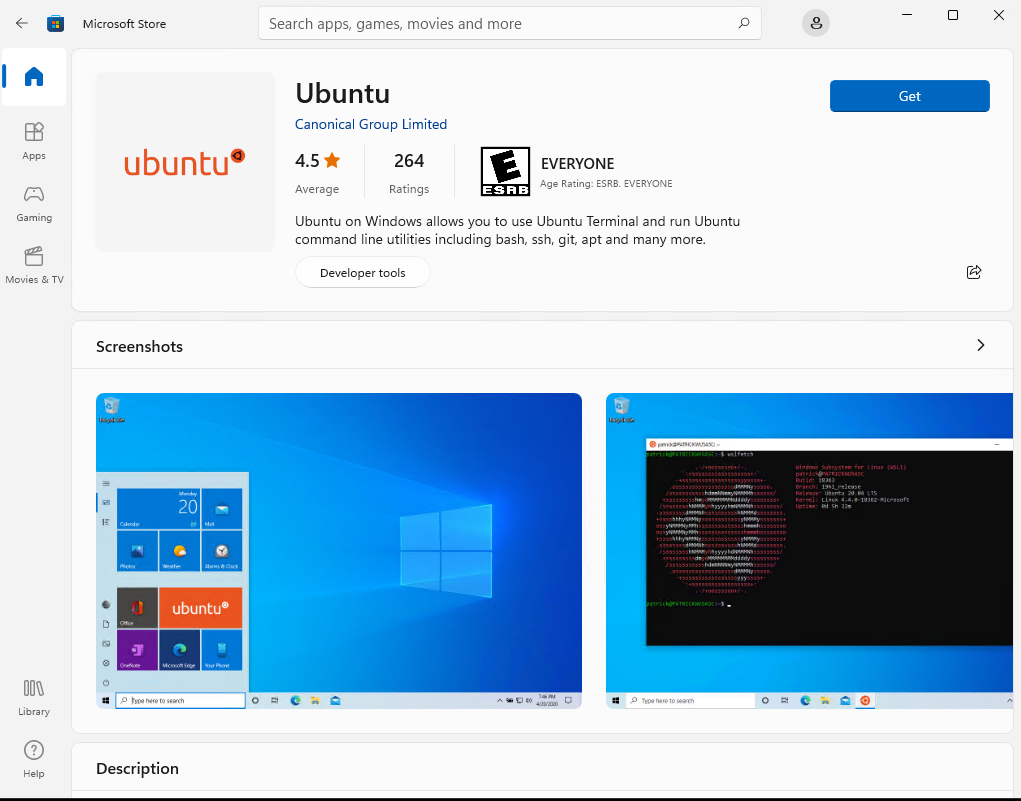
Ubuntu will then install on your machine.
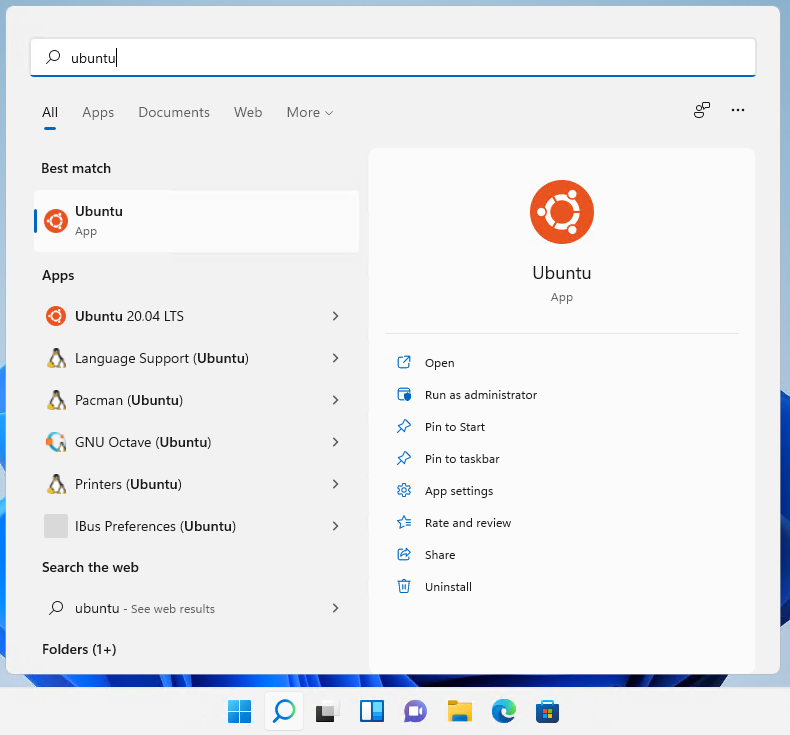
Once installed, you can either launch the application directly from the store or search for Ubuntu in your Windows search bar.
Install Ubuntu from the command line
It is possible to install the same Ubuntu applications available on the Windows Store directly from the command line.
In a Powershell terminal you can run:
wsl —list —online to see all available distros.

You can install a distro using the NAME by running:
wsl —install -d Ubuntu-20.04

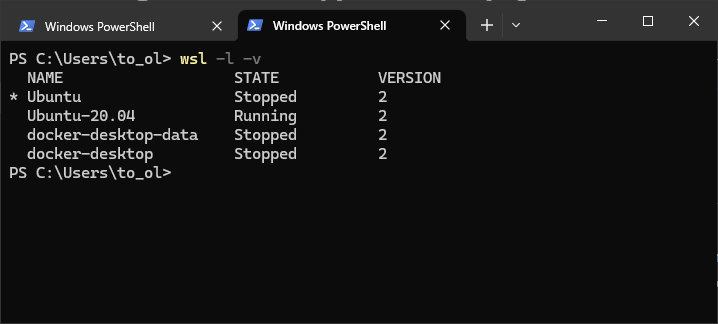
Use wsl -l -v to see all your currently installed distros and which version of WSL they are using:
4. Configure Ubuntu
Congratulations, you now have an Ubuntu terminal running on your Windows machine!
Once it has finished its initial setup, you will need to create a username and password (this does not need to match your Windows user credentials).

Finally, it’s always good practice to install the latest updates with the following commands, entering your password when prompted.
sudo apt update
sudo apt full-upgrade
Press Y when prompted.
(Optional) Enable systemd
In September 2022, Microsoft announced support for systemd in WSL. This long-awaited upgrade to WSL unlocks a huge number of quality of life features for managing processes and services. This includes snapd support, which enables users to take advantage of all of the tools and apps available on snapcraft.io.
To enable systemd you will need make a small modification to /etc/wsl.conf in your Ubuntu distribution.
Run `sudo nano /etc/wsl.conf’ to open the file and insert the following lines:
Then restart your distro by running wsl —shutdown in powershell and relaunching.
Systemd is enabled by default in the Ubuntu Preview application.
5. Install and use a GUI package
WSL2 comes with WSLg enabled by default. WSLg allows you to run graphical linux applications.
To check that you have the latest package lists, type:
sudo apt update
Then, start with some basic X11 applications:
sudo apt install x11-apps
To run the xeyes, a “follow the mouse” application, type:
The & at the end of the line will execute the command asynchronously. In other words, the shell will run the command in the background and return to the command prompt immediately.
The first launch of a GUI application takes a few seconds while WSL is initializing the graphics stack. Next executions of GUI applications are much faster.
Leave xeyes opened and run the calculator xcalc with:
When you move the cursor over the calculator, xeyes follows the cursor. This shows that several GUI applications can interact together.
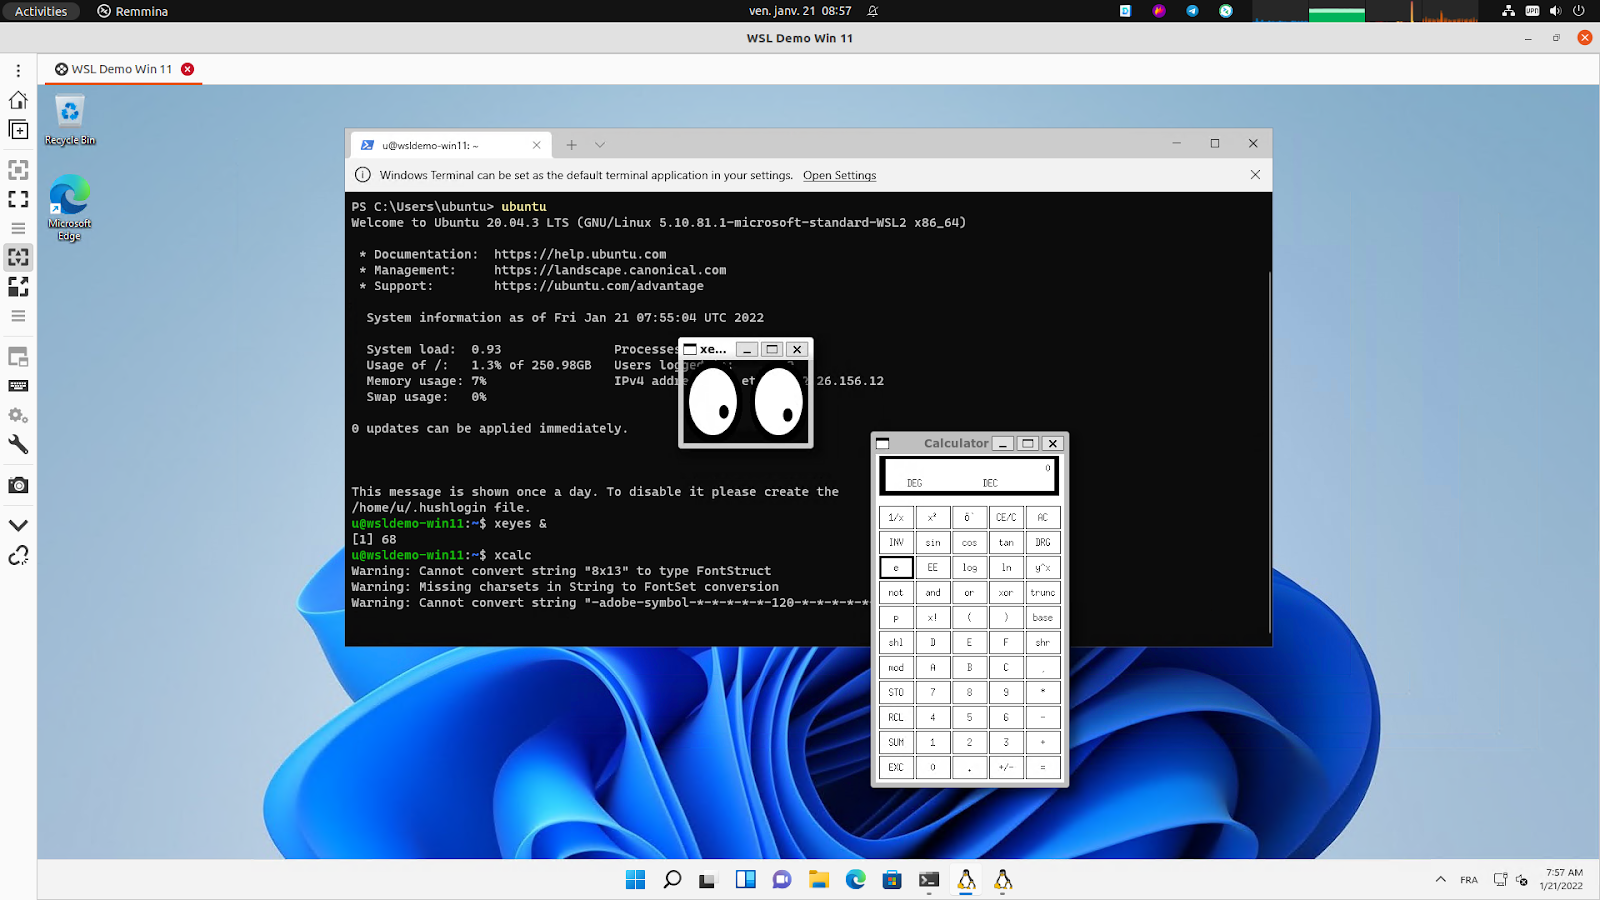
Note that applications running under WSLg display a little penguin at the bottom right corner of their icons in the Windows taskbar. That’s one way you can distinguish applications running on Windows or Ubuntu (besides the window decoration and styling).
Close xeyes and xcalc by pressing the cross icon on the top right corner of each X application window.
Xcalc and xeyes are very basic X Windows applications but there are plenty of choices in the Linux ecosystem corresponding to your needs and available out of the box on Ubuntu.
In the following example, we will use GNU Octave to perform numerical computation.
GNU Octave is software featuring a high-level programming language, primarily intended for numerical computations. Octave helps in solving linear and nonlinear problems numerically, and for performing other numerical experiments using a language that is mostly compatible with MATLAB. [GNU / Octave ]
We will use it to calculate and draw a beautiful Julia fractal. The goal here is to use Octave to demonstrate how WSLg works, not to go through the theory of fractals.
First thing is to install the software like we did for x11-apps, from the terminal prompt run:
sudo apt install octave
Then start the application:
Do not forget the ampersand & at the end of the line, so the application is started in the background and we can continue using the same terminal window.
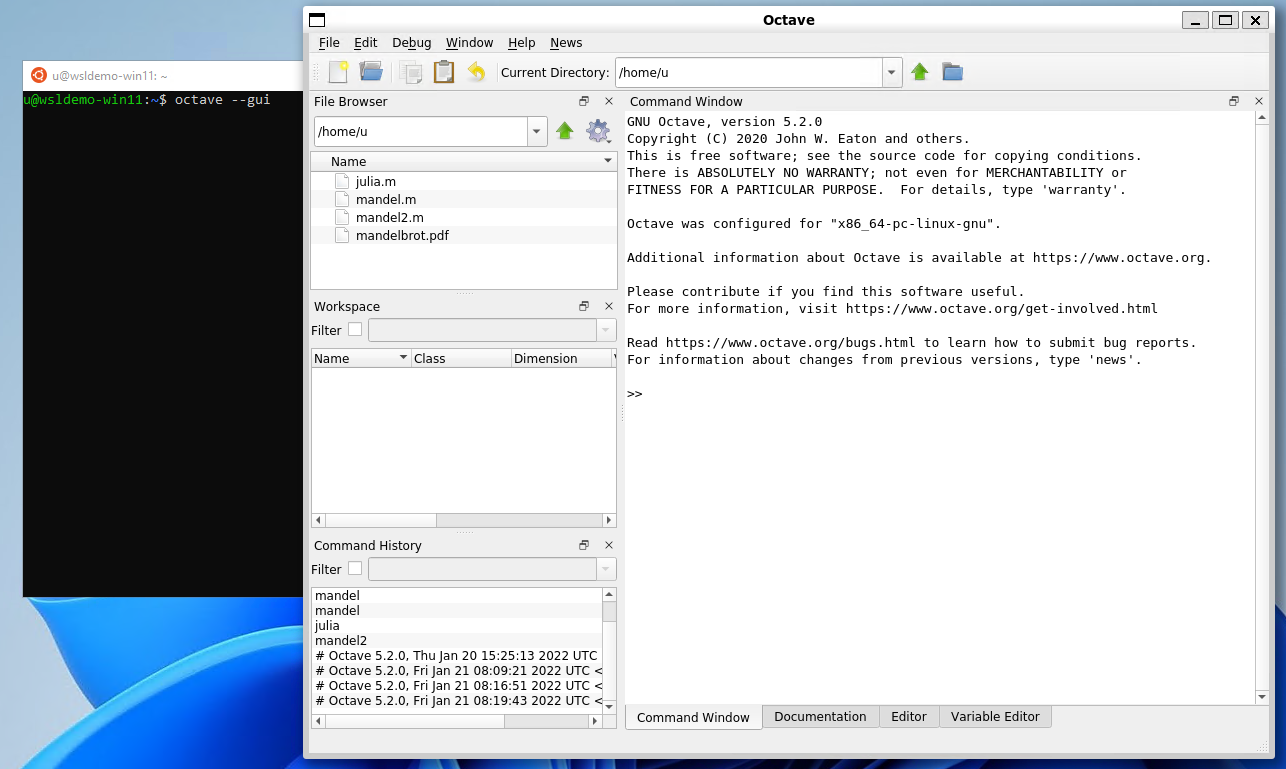
In Octave, click on the New script icon to open a new editor window and copy/paste the following code:
This code is the function that will calculate the Julia set.
Save it to a file named julia.m. Since it is a function definition, the name of the file must match the name of the function.
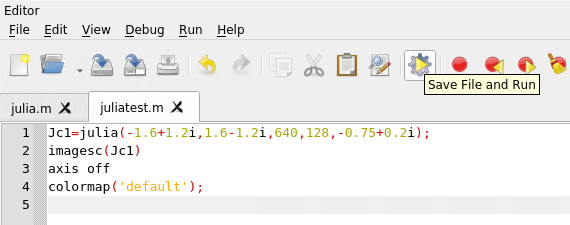
Open a second editor window with the New Script button and copy and paste the following code:
This code calls the function defined in julia.m. You can later change the parameters if you want to explore the Julia fractal.
Save it to a file named juliatest.m.
And finally, press the button Save File and Run.
After a few seconds, depending on your hardware and the parameters, a Julia fractal is displayed.
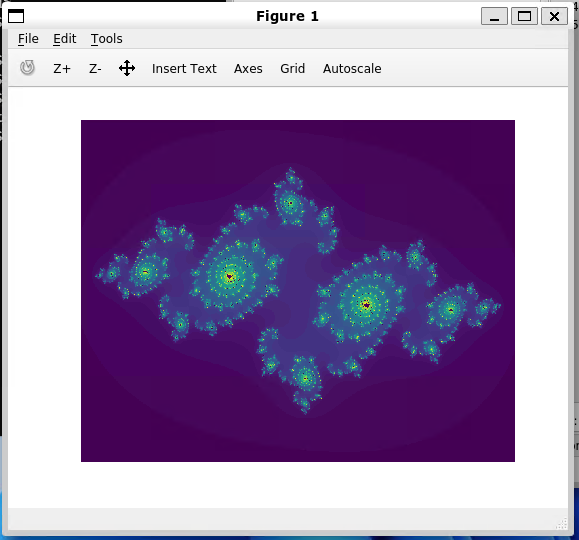
Like Octave, this window is displayed using WSLg completely transparently to the user.
6. Enjoy Ubuntu on WSL!
That’s it! In this tutorial, we’ve shown you how to install WSL and Ubuntu on Windows 11, set up your profile, install a few packages, and run a graphical application.
We hope you enjoy working with Ubuntu inside WSL. Don’t forget to check out our blog for the latest news on all things Ubuntu.
Как установить Ubuntu с графическим интерфейсом на Windows благодаря WSL2 или, что еще лучше, Kali Linux
Один мой друг между шутками и по причинам, которые я не буду рассказывать, твердил мне: «кто много места занимает, тот меньше затягивает«. Это вполне применимо к Windows, системе Microsoft, поклонником которой я никогда не был (я убежал от нее, как только открыл для себя Linux) и которая в последние годы настаивала на том, чтобы делать все. Среди этого у нас есть то, что мы можем установить ядро Linux в Windows с его WSL, и это позволяет нам установить Ubuntu и другие дистрибутивы.
Я также сказал о том, что многое покрывает, потому что в Windows 11 приложения Android также могут запускаться «нативно», а WSL улучшится до такой степени, что сможет запускать Linux. с графическим интерфейсом без больших усилий. В этой статье объясняется, как сделать более или менее то же самое с системами, основанными на Debian/Ubuntu и Windows 10, системой, которую многие по-прежнему предпочитают, если им приходится использовать «окна».
Ubuntu как система, Xfce как рабочий стол
Хотя Ubuntu также называет дистрибутив или основной вариант, операционная система, на которой основаны многие другие. Основной вариант — это Ubuntu с рабочим столом GNOME, тогда как Kubuntu — это Ubuntu с рабочим столом KDE/Plasma, Xubuntu — это Ubuntu с Xfce… хотя все они разные, все они — Ubuntu.
Здесь мы собираемся объяснить, как установить Ubuntu на WSL2, и как получить доступ к своему рабочему столу благодаря собственному инструменту удаленного рабочего стола. Следующие шаги будут такими:
- Прежде всего вам нужно установить WSL, в настоящее время в его версии 2. Поскольку все улучшается, больше не нужно запоминать много команд, а одну. В Windows мы открываем Powershell в режиме администратора и набираем wsl —install .
- Принимаем все, что появляется на экране, до завершения установки.
- Затем идем в Microsoft Store, ищем Ubuntu и устанавливаем.
- После установки мы открываем приложение, что мы можем сделать прямо из Магазина Microsoft или из меню «Пуск».
- При первом запуске требуется некоторое время для настройки, но вскоре он просит нас добавить имя пользователя и пароль. Делаем это (пароль дважды).
- После установки мы войдем в «подсказку». Здесь мы должны обновить систему с помощью обычного sudo apt update && sudo apt upgrade .
- Теперь собираемся установить интерфейс и сделать некоторые настройки, для чего напишем:
- С учетом вышеизложенного мы установили программное обеспечение, чтобы иметь возможность подключаться к удаленному рабочему столу, рабочему столу Xfce и некоторым приложениям с того же рабочего стола. Последнее необязательно, но рекомендуется, если есть место. На этом этапе мы настроим xrdp с помощью этих команд.
Последние шаги
- Теперь мы редактируем файл xrdp, добавляя, как он будет запускаться. Для этого пишем sudo nano /etc/xrdp/startwm.sh и мы комментируем (решёткой впереди) строки «test» и «exec», чтобы они выглядели так #test -x /etc/X11/Xsession && exec /etc/X11/Xsession и так #exec /bin/sh /etc/X11/Xsession .
- На следующем шаге, не выходя из редактора, добавляем две строчки для запуска startxfce4. В первую кладем #xfce4 , чтобы помочь нам вспомнить, что будет дальше. Во втором, без комментариев, добавляем startxfce4 .
- Наконец, мы набираем sudo /etc/init.d/xrdp start .
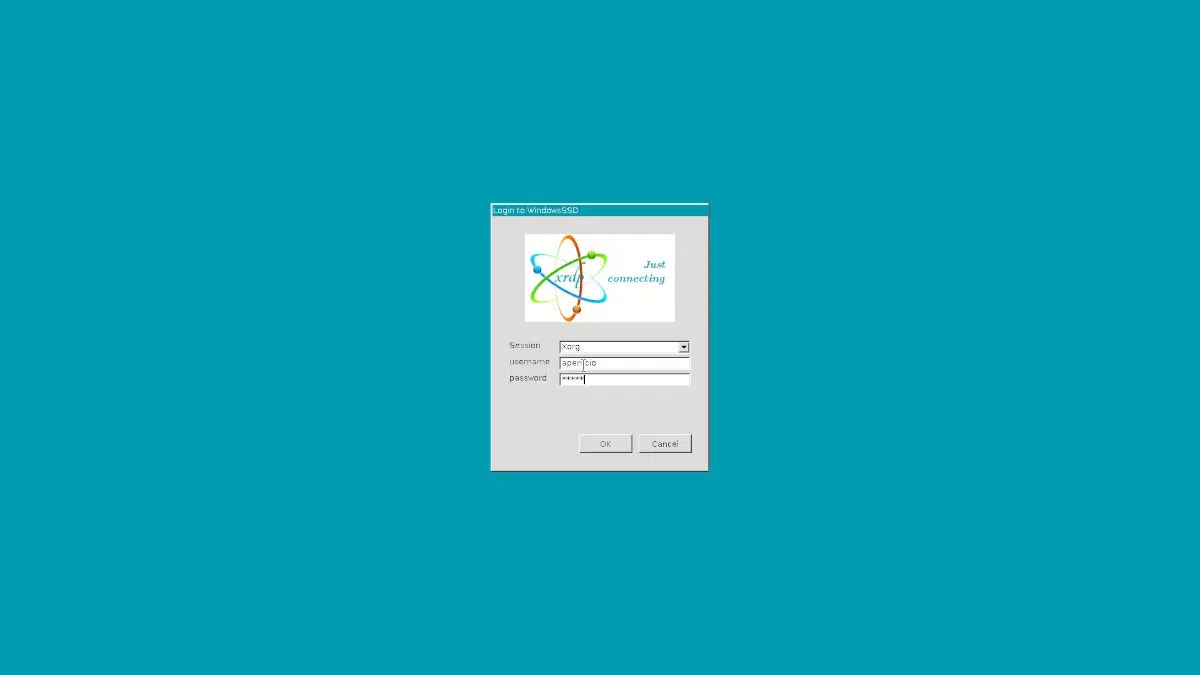
- У нас еще остался один шаг: мы открываем инструмент удаленного рабочего стола Windows и вводим localhost: 3390, который мы добавили на шаге 8. Если нет, мы можем ввести ip addr, скопировать IP-адрес, перед которым стоит имя INET. и использовать этот адрес. Откроется окно, в котором нам нужно будет авторизоваться. Если видим, что файрвол прыгает, даем принять.
И какое отношение Kali Linux имеет к статье Ubuntu?
Ну, пока его не загрузят в Windows 11 и ситуация не улучшится, Kali Linux — лучший выбор по одной причине: Выиграй Кекс. Это инструмент, разработанный самой Offensive Security, с помощью которого мы можем подключаться к рабочему столу Kali Linux, не полагаясь на другие пакеты или программное обеспечение, такое как xrdp или удаленный рабочий стол. Мы просто запускаем сеанс Kali Linux, устанавливаем Win-Kex (sudo apt install kali-win-kex), а затем запускаем один из вариантов.
Win-Kex предлагает три возможности: в первой мы выполним рабочий стол в окне. Во втором панель откроется вверху, и мы сможем открывать приложения, как если бы они были частью Windows. Третий больше рассчитан на ARM.
Полноэкранная версия запускается командой kex —win -s , будучи первой опцией «окно», а второй «звук». Для верхней панели, хотя у меня это не работает, вы должны использовать kex —sl -s . Потому что другая причина выбрать Kali Linux заключается в том, что звук также работает без необходимости усложнять себе жизнь. В основном, это Ubuntu с легким интерфейсом и звуком, хотя правда в том, что он перестает работать, если мы закроем сеанс и не перезапустим операционную систему хоста (Windows).
и зачем все это?
Что ж, этот блог посвящен Linux в целом и Ubuntu в частности. В статье говорится об Ubuntu, но это не единственная причина. Я призываю своих знакомых попробовать Linux, в последнее время есть люди, которые хотят использовать PHP в Windows, а в Linux все проще. Я оставляю это предложение, и ознакомление с дистрибутивом может быть хорошей отправной точкой, даже через WSL.
Содержание статьи соответствует нашим принципам редакционная этика. Чтобы сообщить об ошибке, нажмите здесь.
Полный путь к статье: Убунлог » Ubuntu » Как установить Ubuntu с графическим интерфейсом на Windows благодаря WSL2 или, что еще лучше, Kali Linux