Что внутри "head"? Метаданные в HTML
Элемент head HTML-документа не отображается на странице в веб-браузере. Он содержит такую информацию, как:
-
страницы
- ссылки на файлы CSS (если вы хотите применить к вашему HTML стили CSS)
- ссылки на иконки
- другие метаданные (данные о HTML: автор и важные ключевые слова, описывающие документ.)
В этой статье мы рассмотрим всё вышеперечисленное и многое другое, чтобы дать вам хорошую основу для работы с разметкой.
| Предварительные требования: | Базовое знакомство с HTML , описанное в Начало работы с HTML. |
|---|---|
| Задача: | Узнать о заголовке HTML, его значении, важнейших элементах, которые содержатся в нём, и о том, как он может повлиять на HTML-документ. |
Что такое <head>?
Содержимое <head> , в отличие от содержимого элемента <body> , не отображается на странице. Задача <head> — хранить метаданные документа. В приведённом выше примере <head> совсем небольшой:
Однако на больших страницах блок <head> может быть довольно объёмным. Попробуйте зайти на какие-нибудь из ваших любимых сайтов и посмотреть содержимое <head> с помощью инструментов разработчика. Наша цель сейчас — не в том, чтобы показать вам, как использовать всё, что только можно добавить в head, а дать представление и научить вас, как использовать основные элементы. Давайте начнём.
Название страницы (title)
Мы уже видели, как работает элемент <title> : его используют для добавления заголовка (названия страницы) в документ. Элемент <h1> (en-US) тоже иногда называют заголовком страницы. Но это разные вещи!
- Элемент <h1> (en-US) виден на странице, открытой в браузере, — его используют один раз на странице, чтобы выделить название содержимого. Это может быть название истории, заголовок новости или что-то в этом роде.
- Элемент <title> — метаданные, название всего HTML-документа, а не заголовок внутри его содержимого.
Активное изучение: разбор простого примера
- Чтобы приступить к активному изучению, скачайте страницу title-example.html из нашего GitHub-репозитория. Это можно сделать двумя способами:
- Скопируйте и вставьте код страницы в новый текстовый файл в своём редакторе кода, затем сохраните его в любом удобном месте.
- Нажмите на странице кнопку «Raw», нажмите Файл > Сохранить Как. в меню браузера и выберите папку для сохранения.
Содержимое элемента <title> используется и в других местах. Например, при добавлении страницы в избранное (Bookmarks > Bookmark This Page в Firefox), текст из <title> предлагается в качестве названия закладки.

Текст из <title> также появляется в результатах поиска, как мы скоро увидим.
Метаданные: Элемент <meta>
Метаданные — данные, которые описывают данные. У HTML есть «официальное» место для метаданных документа — элемент <meta> . Конечно, другие вещи, о которых мы говорим в этой статье, тоже можно назвать метаданными. Существует множество разновидностей <meta> . Не станем пытаться охватить их все сразу — так недолго и запутаться, а рассмотрим несколько самых популярных, чтобы разобраться, что к чему.
Указываем кодировку текста документа
В заголовке примера выше есть следующая строка:
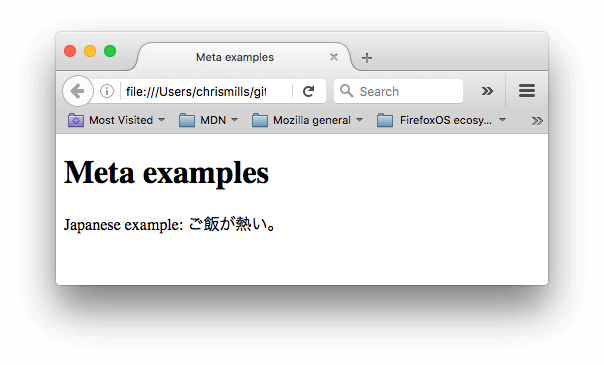
В этом элементе указана кодировка документа — набор символов, которые в нём можно использовать . utf-8 — универсальный набор символов, который включает почти все символы со всех языков человечества. Такая веб-страница сможет работать с любым языком. Установить эту кодировку на всех веб-страницах, которые вы создаёте — отличная идея! Страница в такой кодировке прекрасно отображает как английские, так и японские символы:
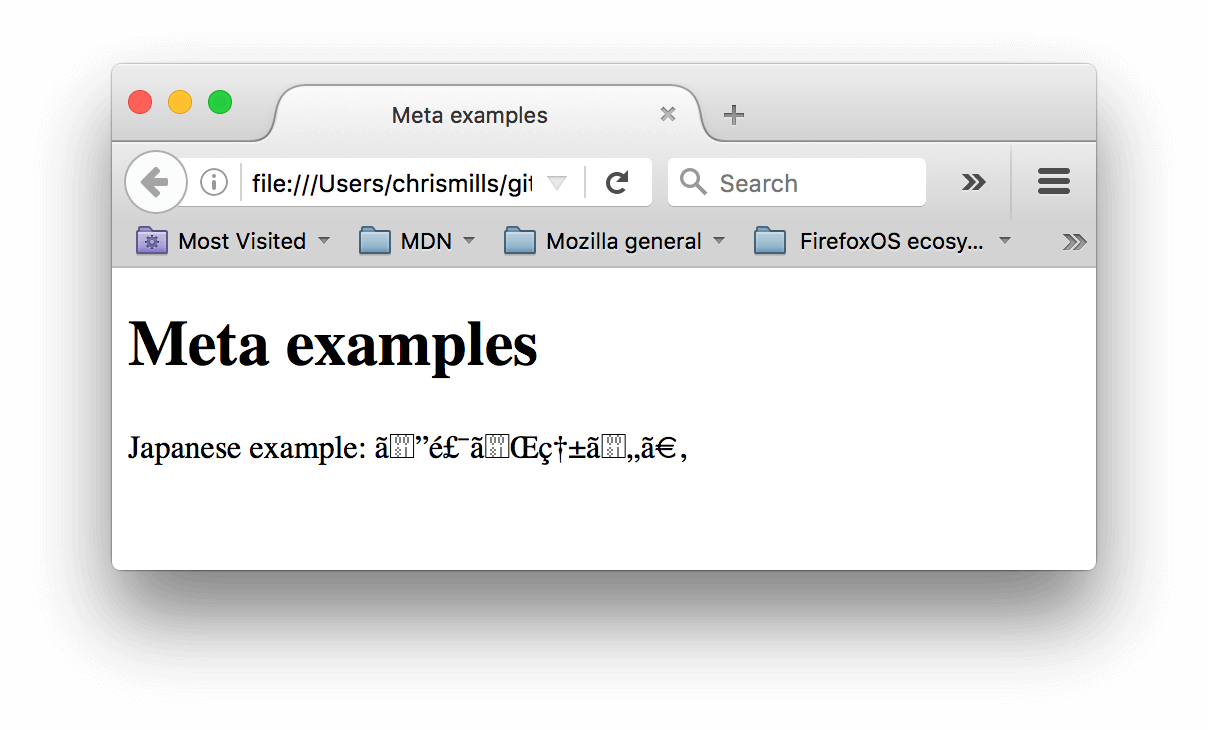
Если использовать, скажем, кодировку ISO-8859-1 (набор символов для латиницы), текст страницы испортится:
Примечание: Некоторые браузеры (например, Chrome) автоматически исправляют неправильную кодировку, поэтому, в зависимости от используемого вами браузера, вы можете не увидеть эту проблему. Несмотря на это вам всё равно необходимо указывать кодировку UTF-8 для вашей страницы, чтобы избежать возможных проблем в других браузерах.
Активное изучение: экспериментируем с символьными кодировками
Чтобы проверить это, вернитесь к HTML из примера <title> (странице title-example.html), поменяйте meta charset на ISO-8859-1 и попробуйте написать что-нибудь на японском или русском. Вот текст из нашего примера (кстати, там написано «рис горячий»):
Указываем автора и описание
У элементов <meta> часто есть атрибуты name и content :
- name — тип элемента, то есть какие именно метаданные он содержит.
- content — сами метаданные.
Два полезных элемента метаданных — указание автора страницы и краткое описание её содержимого. Рассмотрим эти элементы на примере:
По указанному имени автора (author) можно найти человека, который написал страницу, и связаться с ним. Некоторые системы управления содержимым (CMS) автоматически обрабатывают эту информацию и делают её доступной для таких целей.
Краткое описание (description) содержимого страницы учитывается поисковыми системами при совпадении ключевых слов. Такое называют поисковой оптимизацией, или SEO.
Активное изучение: как поисковые системы используют описание
Описание из <meta name=»description»> используется на страницах поисковой выдачи. Проведём небольшое исследование такого сценария.
- Перейдите на главную страницу Mozilla Developer Network.
- Откройте исходный код страницы (кликните правой кнопкой мыши и выберите Просмотреть код в контекстном меню.)
- Найдите тег meta с описанием. Он выглядит так:
Примечание: Google также показывает важные страницы MDN под ссылкой на главную страницу. Такие ссылки называются sitelinks, и их можно настроить через Google Search Console, чтобы пользователи могли сразу перейти к ним со страницы поиска.
Примечание: Многие типы <meta> больше не используются. Так, поисковые системы больше не используют данные из элемента <meta type=»keywords» content=»ваши, ключевые, слова, введите, здесь»> , в котором указывали ключевые слова, по которым можно найти страницу: спамеры засовывали туда все слова, какие могли придумать, чтобы их сайты почаще появлялись в поиске.
Другие виды метаданных
В сети вы найдёте также другие типы метаданных. Многие из них — это собственные форматы, созданные для предоставления определённым сайтам (например, социальных сетей) специальной информации, которую они могут использовать.
Например, Протокол Open Graph создан Facebook чтобы предоставить сайтам дополнительные возможности использования метаданных. В исходном коде MDN Web Docs вы можете найти строки:
Один из результатов добавления этих метаданных в том, что когда вы добавите ссылку MDN Web Docs на facebook, она отобразится с изображением и описанием, улучшая опыт взаимодействия (User eXperience, UX).

У Twitter также есть собственный формат метаданных, с помощью которого создаётся аналогичный эффект, при отображении URL сайта на twitter.com:
Добавление иконок
Чтобы добавить своему сайту узнаваемости, можно указать в метаданных разные иконки.
Favicon, один из старожилов интернета, стал первой из таких иконок. Браузеры показывают её в заголовке вкладки и в списке избранных страниц.
Чтобы добавить на страницу favicon:
- Сохраните изображение в формате .ico (многие браузеры поддерживают и в более привычных форматах, таких как .gif или .png ) в папку со своим документом. Старые браузеры, например, Internet Explorer 6, поддерживают только формат .ico
- Добавьте ссылку на иконку в <head> документа:
Для разных устройств можно указывать разные иконки. Например, на главной странице MDN:
В комментариях указано, для чего используется каждая иконка — например, при добавлении страницы на домашний экран iPad будет использована иконка в высоком разрешении.
Не беспокойтесь о реализации всех этих типов значков — это довольно продвинутая функция, и мы не станем возвращаться к ней в курсе. Основная цель — показать вам, что это такое, если вы столкнётесь с ними при просмотре исходного кода других веб-сайтов.
Подключение CSS и JavaScript
Современные сайты используют CSS, чтобы выглядеть привлекательнее, и добавляют интерактивные функции через JavaScript: видеоплееры, карты, игры. Обычно связанные стили добавляют на страницу через элемент <link> , а скрипты — через элемент <script> .
-
Элемент <link> помещают в заголовок документа. У него есть два атрибута: rel=»stylesheet» показывает, что мы указываем стиль документа, а в href указан путь к файлу:
Активное изучение: добавляем на страницу CSS и JavaScript
- Для этого упражнения скачайте файлы meta-example.html, script.js и style.css и положите их в одну папку на своём компьютере. Проверьте, что они сохранились с правильными именами и расширениями.
- Откройте HTML в браузере и текстовом редакторе.
- Следуя изученному материалу, добавьте на страницу скрипт и стиль с помощью элементов <link> и <script> .
Если всё получилось, когда вы сохраните HTML и обновите страницу в браузере, вы увидите кое-что новенькое:
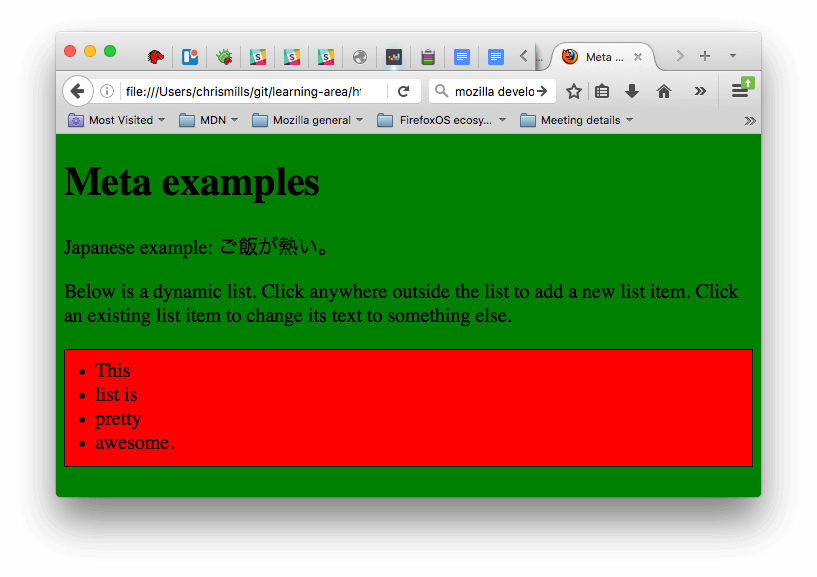
- JavaScript добавил на страницу пустой список. При нажатии на красную область появляется окно, в которое можно ввести текст нового пункта списка. При нажатии на кнопку OK пункт добавляется на страницу. Текст существующих пунктов списка можно редактировать, нажимая на них.
- CSS покрасил фон зелёным и увеличил размер шрифта, а также стилизовал элементы, добавленные JavaScript. Красный прямоугольник и рамка вокруг списка — тоже его рук дело.
Примечание: Если вам никак не удаётся подключить CSS или JS, посмотрите на наш готовый пример — страницу css-and-js.html.
Основной язык HTML страницы
Наконец, стоит отметить, что вы можете (и действительно должны) установить язык для своей страницы. Это можно сделать, добавив атрибут lang в открывающий HTML-тег (как в примере meta-example.html: и как показано ниже):
Это полезно во многих случаях. Ваш HTML-документ будет более эффективно индексироваться поисковыми системами, если его язык установлен (что позволяет ему правильно отображаться в языковых результатах), и он полезен людям с нарушением зрения, которые используют программы, читающие страницы вслух (например, слово «шесть» пишется одинаково как на французском, так и на английском языках, но произносится по-разному.).
Можно также указать язык для части документа. Например, мы могли бы установить язык для части страницы на японском:
Коды языков определены в стандарте ISO 639-1. Подробнее о работе с языками можно узнать в Языковые тэги в HTML и XML.
Заключение
На этом заканчивается наш беглый обзор по HTML-блоку head — с его помощью вы можете делать гораздо больше, но исчерпывающий обзор будет скучным и запутанным на этом этапе, мы же сейчас хотели дать вам представление о самых распространённых вещах, которые вы можете там найти! В следующей статье мы рассмотрим основы разметки текста в HTML.
Name already in use
content / files / en-us / learn / html / introduction_to_html / the_head_metadata_in_html / index.md
- Go to file T
- Go to line L
- Copy path
- Copy permalink
- Open with Desktop
- View raw
- Copy raw contents Copy raw contents
Copy raw contents
Copy raw contents
The <
Prerequisites: Basic HTML familiarity, as covered in Getting started with HTML. Objective: To learn about the HTML head, its purpose, the most important items it can contain, and what effect it can have on the HTML document. What is the HTML head?
The HTML head is the contents of the <
In larger pages however, the head can get quite large. Try going to some of your favorite websites and use the developer tools to check out their head contents. Our aim here is not to show you how to use everything that can possibly be put in the head, but rather to teach you how to use the major elements that you’ll want to include in the head, and give you some familiarity. Let’s get started.
We’ve already seen the <
- The <
- The <
Active learning: Inspecting a simple example
To start off this active learning, we’d like you to go to our GitHub repo and download a copy of our title-example.html page. To do this, either
- Copy and paste the code out of the page and into a new text file in your code editor, then save it in a sensible place.
- Press the «Raw» button on the GitHub page, which causes the raw code to appear (possibly in a new browser tab). Next, choose your browser’s Save Page As… menu and choose a sensible place to save the file.
Now open the file in your browser. You should see something like this:

It should now be completely obvious where the <h1> content appears and where the <title> content appears!
You should also try opening the code up in your code editor, editing the contents of these elements, then refreshing the page in your browser. Have some fun with it.
The <title> element contents are also used in other ways. For example, if you try bookmarking the page (Bookmarks > Bookmark This Page or the star icon in the URL bar in Firefox), you will see the <title> contents filled in as the suggested bookmark name.

The <title> contents are also used in search results, as you’ll see below.
Metadata: the <meta> element
Metadata is data that describes data, and HTML has an «official» way of adding metadata to a document — the <
Specifying your document’s character encoding
In the example we saw above, this line was included:
This element specifies the document’s character encoding — the character set that the document is permitted to use. utf-8 is a universal character set that includes pretty much any character from any human language. This means that your web page will be able to handle displaying any language; it’s therefore a good idea to set this on every web page you create! For example, your page could handle English and Japanese just fine:

If you set your character encoding to ISO-8859-1 , for example (the character set for the Latin alphabet), your page rendering may appear all messed up:

Note: Some browsers (like Chrome) automatically fix incorrect encodings, so depending on what browser you use, you may not see this problem. You should still set an encoding of utf-8 on your page anyway to avoid any potential problems in other browsers.
Active learning: Experiment with character encoding
To try this out, revisit the simple HTML template you obtained in the previous section on <title> (the title-example.html page), try changing the meta charset value to ISO-8859-1 , and add the Japanese to your page. This is the code we used:
Adding an author and description
Many <meta> elements include name and content attributes:
- name specifies the type of meta element it is; what type of information it contains.
- content specifies the actual meta content.
Two such meta elements that are useful to include on your page define the author of the page, and provide a concise description of the page. Let’s look at an example:
Specifying an author is beneficial in many ways: it is useful to be able to understand who wrote the page, if you have any questions about the content and you would like to contact them. Some content management systems have facilities to automatically extract page author information and make it available for such purposes.
Specifying a description that includes keywords relating to the content of your page is useful as it has the potential to make your page appear higher in relevant searches performed in search engines (such activities are termed Search Engine Optimization, or <
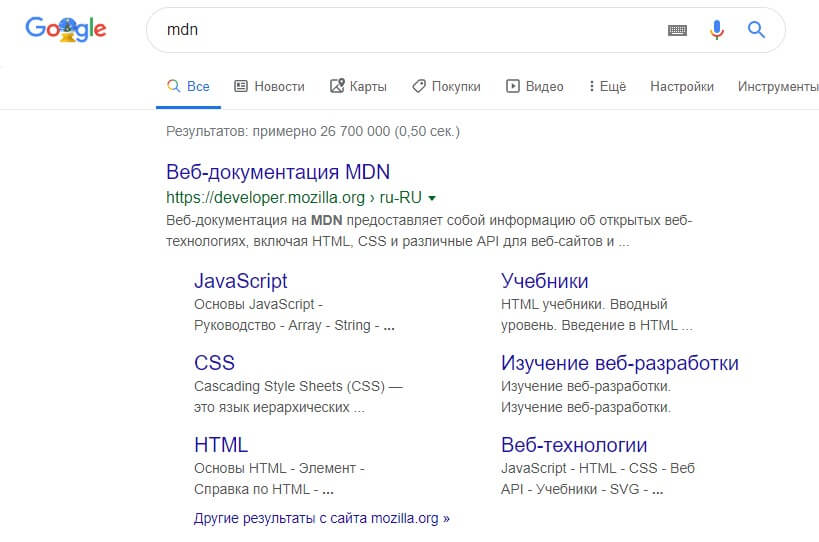
Active learning: The description’s use in search engines
The description is also used on search engine result pages. Let’s go through an exercise to explore this
View the page’s source (right-click on the page, choose View Page Source from the context menu.)
Find the description meta tag. It will look something like this (although it may change over time):
Now search for «MDN Web Docs» in your favorite search engine (We used Google.) You’ll notice the description <meta> and <title> element content used in the search result — definitely worth having!

Note: In Google, you will see some relevant subpages of MDN Web Docs listed below the main homepage link — these are called sitelinks, and are configurable in Google’s webmaster tools — a way to make your site’s search results better in the Google search engine.
Note: Many <meta> features just aren’t used anymore. For example, the keyword <meta> element ( <meta name=»keywords» content=»fill, in, your, keywords, here»> ) — which is supposed to provide keywords for search engines to determine relevance of that page for different search terms — is ignored by search engines, because spammers were just filling the keyword list with hundreds of keywords, biasing results.
Other types of metadata
As you travel around the web, you’ll find other types of metadata, too. A lot of the features you’ll see on websites are proprietary creations, designed to provide certain sites (such as social networking sites) with specific pieces of information they can use.
For example, Open Graph Data is a metadata protocol that Facebook invented to provide richer metadata for websites. In the MDN Web Docs sourcecode, you’ll find this:
One effect of this is that when you link to MDN Web Docs on Facebook, the link appears along with an image and description: a richer experience for users.

Twitter also has its own similar proprietary metadata called Twitter Cards, which has a similar effect when the site’s URL is displayed on twitter.com. For example:
Adding custom icons to your site
To further enrich your site design, you can add references to custom icons in your metadata, and these will be displayed in certain contexts. The most commonly used of these is the favicon (short for «favorites icon», referring to its use in the «favorites» or «bookmarks» lists in browsers).
The humble favicon has been around for many years. It is the first icon of this type: a 16-pixel square icon used in multiple places. You may see (depending on the browser) favicons displayed in the browser tab containing each open page, and next to bookmarked pages in the bookmarks panel.
A favicon can be added to your page by:
Saving it in the same directory as the site’s index page, saved in .ico format (most also support favicons in more common formats like .gif or .png )
Adding the following line into your HTML’s <
Here is an example of a favicon in a bookmarks panel:
There are lots of other icon types to consider these days as well. For example, you’ll find this in the source code of the MDN Web Docs homepage:
The comments explain what each icon is used for — these elements cover things like providing a nice high resolution icon to use when the website is saved to an iPad’s home screen.
Don’t worry too much about implementing all these types of icon right now — this is a fairly advanced feature, and you won’t be expected to have knowledge of this to progress through the course. The main purpose here is to let you know what such things are, in case you come across them while browsing other websites’ source code.
Note: If your site uses a Content Security Policy (CSP) to enhance its security, the policy applies to the favicon. If you encounter problems with the favicon not loading, verify that the <
Applying CSS and JavaScript to HTML
Just about all websites you’ll use in the modern day will employ <
The <
The <
Note: The <script> element may look like a <
Active learning: applying CSS and JavaScript to a page
- To start this active learning, grab a copy of our meta-example.html, script.js and style.css files, and save them on your local computer in the same directory. Make sure they are saved with the correct names and file extensions.
- Open the HTML file in both your browser, and your text editor.
- By following the information given above, add <
If done correctly, when you save your HTML and refresh your browser you should be able to see that things have changed:

- The JavaScript has added an empty list to the page. Now when you click anywhere outside the list, a dialog box will pop up asking you to enter some text for a new list item. When you press the OK button, a new list item will be added to the list containing the text. When you click on an existing list item, a dialog box will pop up allowing you to change the item’s text.
- The CSS has caused the background to go green, and the text to become bigger. It has also styled some of the content that the JavaScript has added to the page (the red bar with the black border is the styling the CSS has added to the JS-generated list.)
Note: If you get stuck in this exercise and can’t get the CSS/JS to apply, try checking out our css-and-js.html example page.
Setting the primary language of the document
Finally, it’s worth mentioning that you can (and really should) set the language of your page. This can be done by adding the lang attribute to the opening HTML tag (as seen in the meta-example.html and shown below.)
This is useful in many ways. Your HTML document will be indexed more effectively by search engines if its language is set (allowing it to appear correctly in language-specific results, for example), and it is useful to people with visual impairments using screen readers (for example, the word «six» exists in both French and English, but is pronounced differently.)
You can also set subsections of your document to be recognized as different languages. For example, we could set our Japanese language section to be recognized as Japanese, like so:
These codes are defined by the ISO 639-1 standard. You can find more about them in Language tags in HTML and XML.
That marks the end of our quickfire tour of the HTML head — there’s a lot more you can do in here, but an exhaustive tour would be boring and confusing at this stage, and we just wanted to give you an idea of the most common things you’ll find in there for now! In the next article, we’ll be looking at HTML text fundamentals.
7 The global structure of an HTML document
7.1 Introduction to the structure of an HTML document
An HTML 4 document is composed of three parts:
- a line containing HTML version information,
- a declarative header section (delimited by the HEAD element),
- a body, which contains the document’s actual content. The body may be implemented by the BODY element or the FRAMESET element.
White space (spaces, newlines, tabs, and comments) may appear before or after each section. Sections 2 and 3 should be delimited by the HTML element.
Here’s an example of a simple HTML document:
7.2 HTML version information
A valid HTML document declares what version of HTML is used in the document. The document type declaration names the document type definition (DTD) in use for the document (see [ISO8879]).
HTML 4.01 specifies three DTDs, so authors must include one of the following document type declarations in their documents. The DTDs vary in the elements they support.
-
The HTML 4.01 Strict DTD includes all elements and attributes that have not been deprecated or do not appear in frameset documents. For documents that use this DTD, use this document type declaration:
The URI in each document type declaration allows user agents to download the DTD and any entity sets that are needed. The following (relative) URIs refer to DTDs and entity sets for HTML 4:
- «strict.dtd» — default strict DTD
- «loose.dtd» — loose DTD
- «frameset.dtd» — DTD for frameset documents
- «HTMLlat1.ent» — Latin-1 entities
- «HTMLsymbol.ent» — Symbol entities
- «HTMLspecial.ent» — Special entities
The binding between public identifiers and files can be specified using a catalog file following the format recommended by the Oasis Open Consortium (see [OASISOPEN]). A sample catalog file for HTML 4.01 is included at the beginning of the section on SGML reference information for HTML. The last two letters of the declaration indicate the language of the DTD. For HTML, this is always English («EN»).
Note. As of the 24 December version of HTML 4.01, the HTML Working Group commits to the following policy:
- Any changes to future HTML 4 DTDs will not invalidate documents that conform to the DTDs of the present specification. The HTML Working Group reserves the right to correct known bugs.
- Software conforming to the DTDs of the present specification may ignore features of future HTML 4 DTDs that it does not recognize.
This means that in a document type declaration, authors may safely use a system identifier that refers to the latest version of an HTML 4 DTD. Authors may also choose to use a system identifier that refers to a specific (dated) version of an HTML 4 DTD when validation to that particular DTD is required. W3C will make every effort to make archival documents indefinitely available at their original address in their original form.
7.3 The HTML element
Start tag: optional, End tag: optional
version = cdata [CN] Deprecated. The value of this attribute specifies which HTML DTD version governs the current document. This attribute has been deprecated because it is redundant with version information provided by the document type declaration.
Attributes defined elsewhere
After document type declaration, the remainder of an HTML document is contained by the HTML element. Thus, a typical HTML document has this structure:
7.4 The document head
7.4.1 The HEAD element
Start tag: optional, End tag: optional
profile = uri [CT] This attribute specifies the location of one or more meta data profiles, separated by white space. For future extensions, user agents should consider the value to be a list even though this specification only considers the first URI to be significant. Profiles are discussed below in the section on meta data.
Attributes defined elsewhere
The HEAD element contains information about the current document, such as its title, keywords that may be useful to search engines, and other data that is not considered document content. User agents do not generally render elements that appear in the HEAD as content. They may, however, make information in the HEAD available to users through other mechanisms.
7.4.2 The TITLE element
Start tag: required, End tag: required
Attributes defined elsewhere
Every HTML document must have a TITLE element in the HEAD section.
Authors should use the TITLE element to identify the contents of a document. Since users often consult documents out of context, authors should provide context-rich titles. Thus, instead of a title such as «Introduction», which doesn’t provide much contextual background, authors should supply a title such as «Introduction to Medieval Bee-Keeping» instead.
For reasons of accessibility, user agents must always make the content of the TITLE element available to users (including TITLE elements that occur in frames). The mechanism for doing so depends on the user agent (e.g., as a caption, spoken).
Titles may contain character entities (for accented characters, special characters, etc.), but may not contain other markup (including comments). Here is a sample document title:
7.4.3 The title attribute
title = text [CS] This attribute offers advisory information about the element for which it is set.
Unlike the TITLE element, which provides information about an entire document and may only appear once, the title attribute may annotate any number of elements. Please consult an element’s definition to verify that it supports this attribute.
Values of the title attribute may be rendered by user agents in a variety of ways. For instance, visual browsers frequently display the title as a «tool tip» (a short message that appears when the pointing device pauses over an object). Audio user agents may speak the title information in a similar context. For example, setting the attribute on a link allows user agents (visual and non-visual) to tell users about the nature of the linked resource:
The title attribute has an additional role when used with the LINK element to designate an external style sheet. Please consult the section on links and style sheets for details.
Note. To improve the quality of speech synthesis for cases handled poorly by standard techniques, future versions of HTML may include an attribute for encoding phonemic and prosodic information.
7.4.4 Meta data
Note. The W3C Resource Description Framework (see [RDF10]) became a W3C Recommendation in February 1999. RDF allows authors to specify machine-readable metadata about HTML documents and other network-accessible resources.
HTML lets authors specify meta data — information about a document rather than document content — in a variety of ways.
For example, to specify the author of a document, one may use the META element as follows:
The META element specifies a property (here «Author») and assigns a value to it (here «Dave Raggett»).
This specification does not define a set of legal meta data properties. The meaning of a property and the set of legal values for that property should be defined in a reference lexicon called a profile. For example, a profile designed to help search engines index documents might define properties such as «author», «copyright», «keywords», etc.
Specifying meta data
In general, specifying meta data involves two steps:
- Declaring a property and a value for that property. This may be done in two ways:
- From within a document, via the META element.
- From outside a document, by linking to meta data via the LINK element (see the section on link types).
Note that since a profile is defined for the HEAD element, the same profile applies to all META and LINK elements in the document head.
User agents are not required to support meta data mechanisms. For those that choose to support meta data, this specification does not define how meta data should be interpreted.
The META element
Start tag: required, End tag: forbidden
For the following attributes, the permitted values and their interpretation are profile dependent:
name = name [CS] This attribute identifies a property name. This specification does not list legal values for this attribute. content = cdata [CS] This attribute specifies a property’s value. This specification does not list legal values for this attribute. scheme = cdata [CS] This attribute names a scheme to be used to interpret the property’s value (see the section on profiles for details). http-equiv = name [CI] This attribute may be used in place of the name attribute. HTTP servers use this attribute to gather information for HTTP response message headers.
Attributes defined elsewhere
The META element can be used to identify properties of a document (e.g., author, expiration date, a list of key words, etc.) and assign values to those properties. This specification does not define a normative set of properties.
Each META element specifies a property/value pair. The name attribute identifies the property and the content attribute specifies the property’s value.
For example, the following declaration sets a value for the Author property:
The lang attribute can be used with META to specify the language for the value of the content attribute. This enables speech synthesizers to apply language dependent pronunciation rules.
In this example, the author’s name is declared to be French:
Note. The META element is a generic mechanism for specifying meta data. However, some HTML elements and attributes already handle certain pieces of meta data and may be used by authors instead of META to specify those pieces: the TITLE element, the ADDRESS element, the INS and DEL elements, the title attribute, and the cite attribute.
Note. When a property specified by a META element takes a value that is a URI, some authors prefer to specify the meta data via the LINK element. Thus, the following meta data declaration:
might also be written:
META and HTTP headers
The http-equiv attribute can be used in place of the name attribute and has a special significance when documents are retrieved via the Hypertext Transfer Protocol (HTTP). HTTP servers may use the property name specified by the http-equiv attribute to create an [RFC822]-style header in the HTTP response. Please see the HTTP specification ([RFC2616]) for details on valid HTTP headers.
The following sample META declaration:
will result in the HTTP header:
This can be used by caches to determine when to fetch a fresh copy of the associated document.
Note. Some user agents support the use of META to refresh the current page after a specified number of seconds, with the option of replacing it by a different URI. Authors should not use this technique to forward users to different pages, as this makes the page inaccessible to some users. Instead, automatic page forwarding should be done using server-side redirects.
META and search engines
A common use for META is to specify keywords that a search engine may use to improve the quality of search results. When several META elements provide language-dependent information about a document, search engines may filter on the lang attribute to display search results using the language preferences of the user. For example,
The effectiveness of search engines can also be increased by using the LINK element to specify links to translations of the document in other languages, links to versions of the document in other media (e.g., PDF), and, when the document is part of a collection, links to an appropriate starting point for browsing the collection.
Further help is provided in the section on helping search engines index your Web site.
META and PICS
This example illustrates how one can use a META declaration to include a PICS 1.1 label:
META and default information
The META element may be used to specify the default information for a document in the following instances:
- The default scripting language.
- The default style sheet language.
- The document character encoding.
The following example specifies the character encoding for a document as being ISO-8859-5
Meta data profiles
- As a globally unique name. User agents may be able to recognize the name (without actually retrieving the profile) and perform some activity based on known conventions for that profile. For instance, search engines could provide an interface for searching through catalogs of HTML documents, where these documents all use the same profile for representing catalog entries.
- As a link. User agents may dereference the URI and perform some activity based on the actual definitions within the profile (e.g., authorize the usage of the profile within the current HTML document). This specification does not define formats for profiles.
This example refers to a hypothetical profile that defines useful properties for document indexing. The properties defined by this profile — including «author», «copyright», «keywords», and «date» — have their values set by subsequent META declarations.
As this specification is being written, it is common practice to use the date formats described in [RFC2616], section 3.3. As these formats are relatively hard to process, we recommend that authors use the [ISO8601] date format. For more information, see the sections on the INS and DEL elements.
The scheme attribute allows authors to provide user agents more context for the correct interpretation of meta data. At times, such additional information may be critical, as when meta data may be specified in different formats. For example, an author might specify a date in the (ambiguous) format «10-9-97»; does this mean 9 October 1997 or 10 September 1997? The scheme attribute value «Month-Day-Year» would disambiguate this date value.
At other times, the scheme attribute may provide helpful but non-critical information to user agents.
For example, the following scheme declaration may help a user agent determine that the value of the «identifier» property is an ISBN code number:
Values for the scheme attribute depend on the property name and the associated profile .
Note. One sample profile is the Dublin Core (see [DCORE]). This profile defines a set of recommended properties for electronic bibliographic descriptions, and is intended to promote interoperability among disparate description models.
7.5 The document body
7.5.1 The BODY element
Start tag: optional, End tag: optional
background = uri [CT] Deprecated. The value of this attribute is a URI that designates an image resource. The image generally tiles the background (for visual browsers). text = color [CI] Deprecated. This attribute sets the foreground color for text (for visual browsers). link = color [CI] Deprecated. This attribute sets the color of text marking unvisited hypertext links (for visual browsers). vlink = color [CI] Deprecated. This attribute sets the color of text marking visited hypertext links (for visual browsers). alink = color [CI] Deprecated. This attribute sets the color of text marking hypertext links when selected by the user (for visual browsers).
Attributes defined elsewhere
- id , class (document-wide identifiers)
- lang (language information), dir (text direction)
- title (element title)
- style (inline style information)
- bgcolor (background color)
- onload , onunload (intrinsic events)
- onclick , ondblclick , onmousedown , onmouseup , onmouseover , onmousemove , onmouseout , onkeypress , onkeydown , onkeyup (intrinsic events)
The body of a document contains the document’s content. The content may be presented by a user agent in a variety of ways. For example, for visual browsers, you can think of the body as a canvas where the content appears: text, images, colors, graphics, etc. For audio user agents, the same content may be spoken. Since style sheets are now the preferred way to specify a document’s presentation, the presentational attributes of BODY have been deprecated.
DEPRECATED EXAMPLE:
The following HTML fragment illustrates the use of the deprecated attributes. It sets the background color of the canvas to white, the text foreground color to black, and the color of hyperlinks to red initially, fuchsia when activated, and maroon once visited.Using style sheets, the same effect could be accomplished as follows:
Using external (linked) style sheets gives you the flexibility to change the presentation without revising the source HTML document:
Framesets and HTML bodies. Documents that contain framesets replace the BODY element by the FRAMESET element. Please consult the section on frames for more information.
7.5.2 Element identifiers: the id and class attributes
id = name [CS] This attribute assigns a name to an element. This name must be unique in a document. class = cdata-list [CS] This attribute assigns a class name or set of class names to an element. Any number of elements may be assigned the same class name or names. Multiple class names must be separated by white space characters.
The id attribute has several roles in HTML:
- As a style sheet selector.
- As a target anchor for hypertext links.
- As a means to reference a particular element from a script.
- As the name of a declared OBJECT element.
- For general purpose processing by user agents (e.g. for identifying fields when extracting data from HTML pages into a database, translating HTML documents into other formats, etc.).
The class attribute, on the other hand, assigns one or more class names to an element; the element may be said to belong to these classes. A class name may be shared by several element instances. The class attribute has several roles in HTML:
- As a style sheet selector (when an author wishes to assign style information to a set of elements).
- For general purpose processing by user agents.
In the following example, the SPAN element is used in conjunction with the id and class attributes to markup document messages. Messages appear in both English and French versions.
The following CSS style rules would tell visual user agents to display informational messages in green, warning messages in yellow, and error messages in red:
Note that the French «msg1» and the English «msg1» may not appear in the same document since they share the same id value. Authors may make further use of the id attribute to refine the presentation of individual messages, make them target anchors, etc.
Almost every HTML element may be assigned identifier and class information.
Suppose, for example, that we are writing a document about a programming language. The document is to include a number of preformatted examples. We use the PRE element to format the examples. We also assign a background color (green) to all instances of the PRE element belonging to the class «example».
By setting the id attribute for this example, we can (1) create a hyperlink to it and (2) override class style information with instance style information.
Note. The id attribute shares the same name space as the name attribute when used for anchor names. Please consult the section on anchors with id for more information.
7.5.3 Block-level and inline elements
Certain HTML elements that may appear in BODY are said to be «block-level» while others are «inline» (also known as «text level»). The distinction is founded on several notions:
Content model Generally, block-level elements may contain inline elements and other block-level elements. Generally, inline elements may contain only data and other inline elements. Inherent in this structural distinction is the idea that block elements create «larger» structures than inline elements. Formatting By default, block-level elements are formatted differently than inline elements. Generally, block-level elements begin on new lines, inline elements do not. For information about white space, line breaks, and block formatting, please consult the section on text. Directionality For technical reasons involving the [UNICODE] bidirectional text algorithm, block-level and inline elements differ in how they inherit directionality information. For details, see the section on inheritance of text direction.
Style sheets provide the means to specify the rendering of arbitrary elements, including whether an element is rendered as block or inline. In some cases, such as an inline style for list elements, this may be appropriate, but generally speaking, authors are discouraged from overriding the conventional interpretation of HTML elements in this way.
The alteration of the traditional presentation idioms for block level and inline elements also has an impact on the bidirectional text algorithm. See the section on the effect of style sheets on bidirectionality for more information.
7.5.4 Grouping elements: the DIV and SPAN elements
Start tag: required, End tag: required
Attributes defined elsewhere
- id , class (document-wide identifiers)
- lang (language information), dir (text direction)
- title (element title)
- style (inline style information)
- align (alignment)
- onclick , ondblclick , onmousedown , onmouseup , onmouseover , onmousemove , onmouseout , onkeypress , onkeydown , onkeyup (intrinsic events)
The DIV and SPAN elements, in conjunction with the id and class attributes, offer a generic mechanism for adding structure to documents. These elements define content to be inline ( SPAN ) or block-level ( DIV ) but impose no other presentational idioms on the content. Thus, authors may use these elements in conjunction with style sheets, the lang attribute, etc., to tailor HTML to their own needs and tastes.
Suppose, for example, that we wanted to generate an HTML document based on a database of client information. Since HTML does not include elements that identify objects such as «client», «telephone number», «email address», etc., we use DIV and SPAN to achieve the desired structural and presentational effects. We might use the TABLE element as follows to structure the information:
Later, we may easily add style sheet declarations to fine tune the presentation of these database entries.
For another example of usage, please consult the example in the section on the class and id attributes.
Visual user agents generally place a line break before and after DIV elements, for instance:
which is typically rendered as:
7.5.5 Headings: The H1 , H2 , H3 , H4 , H5 , H6 elements
Start tag: required, End tag: required
Attributes defined elsewhere
- id , class (document-wide identifiers)
- lang (language information), dir (text direction)
- title (element title)
- style (inline style information)
- align (alignment)
- onclick , ondblclick , onmousedown , onmouseup , onmouseover , onmousemove , onmouseout , onkeypress , onkeydown , onkeyup (intrinsic events)
A heading element briefly describes the topic of the section it introduces. Heading information may be used by user agents, for example, to construct a table of contents for a document automatically.
There are six levels of headings in HTML with H1 as the most important and H6 as the least. Visual browsers usually render more important headings in larger fonts than less important ones.
The following example shows how to use the DIV element to associate a heading with the document section that follows it. Doing so allows you to define a style for the section (color the background, set the font, etc.) with style sheets.
This structure may be decorated with style information such as:
Numbered sections and references
HTML does not itself cause section numbers to be generated from headings. This facility may be offered by user agents, however. Soon, style sheet languages such as CSS will allow authors to control the generation of section numbers (handy for forward references in printed documents, as in «See section 7.2»).Some people consider skipping heading levels to be bad practice. They accept H1 H2 H1 while they do not accept H1 H3 H1 since the heading level H2 is skipped.
7.5.6 The ADDRESS element
Start tag: required, End tag: required
Attributes defined elsewhere
- id , class (document-wide identifiers)
- lang (language information), dir (text direction)
- title (element title)
- style (inline style information)
- onclick , ondblclick , onmousedown , onmouseup , onmouseover , onmousemove , onmouseout , onkeypress , onkeydown , onkeyup (intrinsic events)
The ADDRESS element may be used by authors to supply contact information for a document or a major part of a document such as a form. This element often appears at the beginning or end of a document.
For example, a page at the W3C Web site related to HTML might include the following contact information:
Базовая структура HTML документа — Основы современной верстки
Как театр начинается с вешалки, так и любой HTML-документ начинается с базовой структуры. Она включает в себя теги, которые есть в любом HTML-файле. Эти теги и служебная информация нужны браузеру для корректного отображения информации.
Взглянем на базовую структуру любого HTML-документа:
Этот набор кажется не очень большим, но браузеру он сообщает множество полезной информации. В этом уроке разберемся с каждой строчкой этой структуры.
DOCTYPE
Первая конструкция в любом HTML-документе — элемент <!DOCTYPE> . Он не относится к тегам и никаким образом не может отображаться на странице. Его задача — указать браузеру, какой стандарт HTML используется в этом документе. Сейчас это везде стандарт HTML5. Записывается он следующим образом:
С приходом стандарта HTML5 элемент <!DOCTYPE> немного упростился. Если вы встретитесь с сайтами, созданными пять-десять лет назад, то сможете увидеть совершенно другие записи. Они были больше и напрямую влияли на то, как браузер обработает информацию. Неправильное указание элемента <!DOCTYPE> могло привести к некорректному отображению. Сейчас такой проблемы нет, поэтому вы можете без всяких опасений использовать конструкцию, которая указана в данном уроке. Использование старых значений <!DOCTYPE> необходимо только при разработке с поддержкой очень старых браузеров.
Парный тег html
Тег <html></html> является основой основ. Именно внутри него располагается вся информация. Благодаря этому тегу браузер понимает, где начинается контент, который необходимо обработать как HTML.
Важной частью тега html является наличие атрибута lang . В нем указывается язык, на котором отображается веб-страница. С помощью этого атрибута браузеры могут корректно считать множество специфичных символов, которые присутствуют в разных языках. Помимо этого, атрибут lang начинает использоваться и в CSS, с которым вы познакомитесь в следующих уроках. В новых стандартах CSS появляются свойства, которые опираются на данный атрибут. Например, позволяют корректно переводить слова в тексте.
В качестве значения атрибут lang принимает знакомые всем сокращения языков. Для русского — lang="ru" , для английского — lang="en" , для немецкого — lang="de" .
Парный тег head
Тег <head></head> служит для хранения служебной информации. Здесь возможны самые разные сочетания тегов, которые подсказывают браузеру название страницы, описание, ключевые слова и так далее. Такая информация называется метаинформацией. В современном вебе она отвечает не только за служебную информацию для браузера, но и активно используется при продвижении сайта. Поисковые системы считывают всю эту информацию и на основе множества алгоритмов определяют место сайта при разных поисковых запросах.
Любые данные, которые указаны внутри тега <head> , не видны при отображении страницы в браузере. Это значит, что нет необходимости располагать там информацию, которая предназначена для отображения.
Хоть различной информации внутри <head> может быть множество, в этом уроке разберем несколько основных тегов, которые пригодятся при создании любой веб-страницы:
Метаинформация
Метатег <meta> . Он принимает множество разных атрибутов, с которыми вы познакомитесь при создании своих сайтов. В настоящее время важным является метатег <meta> с атрибутом charset . Он позволяет установить кодировку документа.
Кодировка — таблица символов. В ней каждый символ имеет уникальный код, благодаря чему программы, в том числе и браузеры, могут одинаково отображать один и тот же текст. У разных пользователей может стоять различная кодировка по умолчанию. Это приводит к тому, что у некоторых пользователей текст может отображаться в виде «кракозябр», хотя у вас он будет отображаться правильно. Универсальной кодировкой, которая содержит большинство необходимых символов из разных языков, является кодировка UTF-8 . Именно ее рекомендуется устанавливать в качестве значения атрибута charset . Теперь браузер будет отображать все символы именно в этой кодировке.
Заголовок страницы
На любом веб-сайте вы можете заметить заголовок, который отображается на вкладке вашего браузера. Например, на странице курса «Основы современной верстки» вкладка в браузере Google Chrome выглядит следующим образом:
Для указания заголовка страницы используется специальный парный тег <title></title> , внутри которого указывается нужная информация.
Тело документа
После тега <head> в документе указывается парный тег <body></body> , который является «телом» всей страницы. Именно здесь размещается вся информация, которая будет выведена на странице.
Используем один из примеров прошлого урока и добавим все недостающие теги.
Чтобы полностью соответствовать всем стандартам HTML, добавим необходимую базовую структуру документа.
Хоть данный набор и является основным, но на самом деле браузеры могут обработать HTML-информацию и без базовой структуры документа. Но не стоит отдавать все на откуп браузеру. Он постарается автоматически обернуть контент в <body> , добавит современный <!DOCTYPE> , но при этом нет уверенности в том, что все это он добавит корректно.
Самостоятельная работа
Создайте базовую структуру документа и попробуйте разные варианты текста внутри тега <title> . Можете попробовать добавить туда даже эмодзи и посмотреть, как браузер выведет такой заголовок
Дополнительные материалы

Остались вопросы? Задайте их в разделе «Обсуждение»
Вам ответят команда поддержки Хекслета или другие студенты.
Об обучении на Хекслете
- Статья «Как учиться и справляться с негативными мыслями»
- Статья «Ловушки обучения»
- Статья «Сложные простые задачи по программированию»
- Урок «Как эффективно учиться на Хекслете»
- Вебинар «Как самостоятельно учиться»
Открыть доступ
Курсы программирования для новичков и опытных разработчиков. Начните обучение бесплатно