How To Create A Public VPN Server On Windows 11
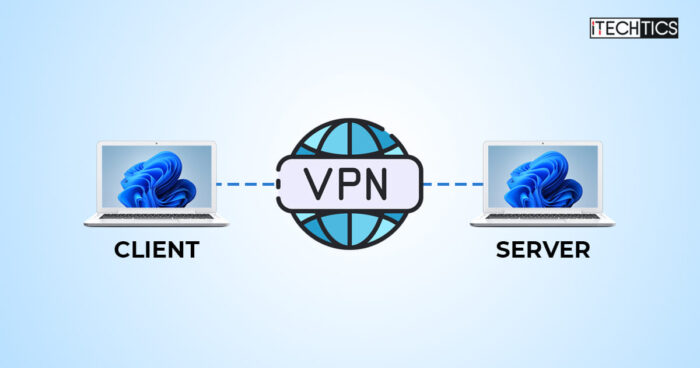
A Virtual Private Network (VPN) encapsulates your online traffic to secure it from digital threats. In other words, it extends your private network onto the public internet. If you are not familiar with the concept of VPNs, then this article is just what you need.
If you have ever used a third-party VPN service, like NordVPN or VyprVPN, you would know that it not only secures your data going back and forth, but also changes your geographic location. This is because you connect to a remote server using the third-party VPN service, and your public IP address is replaced by that of the server. Once connected to a remote server, a private network is established, making it seem like a private network entirely.
Using the same concept, you can make your Windows 11 computer into a VPN server. If you configure your computer as a VPN server, you can access it over the internet from anywhere in the world as if it was a part of your local network.
This is an excellent approach when you want to access your home computer from your workplace, or vice versa.
On This Page
Setting up your Windows PC as a VPN server involves multiple steps and configurations at different levels of the local network. This article covers every step you need to perform to successfully configure your PC as a VPN server so that you can connect to it from anywhere in the world.
This sort of VPN server is also known as a “Public VPN server” – because it can be accessed by the public if given the correct credentials/digital certificates.
Set Up Public VPN Server on Windows 11
There are multiple steps to configure a VPN server on a Windows computer, which comprise the following:
- Set a static IP address for the PC
- Finding your public IP address
- Configure DDNS (in case the public IP address is dynamic)
- Configure port forwarding on your router
- Set up a VPN server
- Allow VPN connections through the Windows Firewall
Note: Do not confuse setting up a VPN server with setting up a VPN connection. Although Windows natively supports VPN connections, it is used to connect to a remote VPN server. In this article, we are going to discuss how to create a VPN server so another computer can connect to it.
Set Static IP Address
By default, most routers are set to Dynamic Host Configuration Protocol (DHCP). This protocol automatically allots vacant IP addresses to all connected devices to avoid any IP conflict. However, in a further step down the article, we will require to forward a port onto the IP address of this target PC. For that, we need the IP address of this machine to be static, i.e. not continuously changing.
Therefore, we must set a static IP address for this right now. Before we do that, let us see what the current IP address of the machine is so that we allocate the same static IP address to avoid an IP address conflict with any of the other devices on the network.
Find Current Local IP Address
To identify the current allotted IP address, open Command Prompt and run the following cmdlet:
This command will display all the IP configurations of all network ports on the PC, including virtual ones.
You need to look for the “IPv4 address” under the network adapter that is connected to the router, it may be wired or wireless. In our case, we are using Wi-Fi to connect to the router:

Find local IP address
In the image above, the IP of our target PC is 192.168.55.125. We will be assigning the same IP address manually to make it static.
We suggest that you do not close the Command Prompt as some information will be needed from this window.
Configure Static IP Address
To configure a static IP address on a Windows 11 PC, use these steps:
Open the Network Connections applet by typing in “ncpa.cpl” in the Run Command box.
Right-click the network adapter connected to the router and click “Properties.”
Select “Internet Protocol version 4 (TCP/IPv4)” and then click “Properties” again.
Select “Use the following IP address” and then fill out the given fields:
- IP address: As noted in the Command Prompt above.
- Subnet mask: Should be automatically filled, or as noted in the Command Prompt above.
- Default gateway: IP address of the router, or as noted in the Command Prompt above.
- Preferred DNS server: As noted in the Command Prompt above
- Alternate DNS server: As noted in the Command Prompt above
Click Ok on the windows to save and close them.
You have now successfully set up a static IP address on your computer. Make sure that you are still connected to the internet to ensure that all configurations are done correctly.
Finding Public IP Address
The public IP address is provided by your Internet Service Provider (ISP). You can check your public IP address via command line, or simply type in “What’s my IP address” on Google’s website to find out.
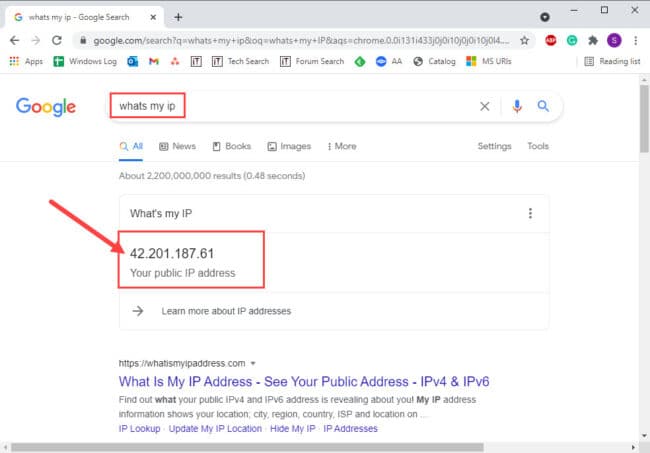
Find public IP address using Google
This IP address will be needed when establishing a VPN connection to this VPN server.
Usually, this IP is static. But often ISPs tend to provide dynamic public IP addresses which change from time to time. If that is the case, you need to contact your ISP and ask for a static IP address, which may cost a little extra as these IP addresses are primarily reserved for businesses.
Alternatively, you can also configure the Dynamic Domain Name System (DDNS) on your router to assign your router a name it will track regardless of the change in the public IP address. Note that this only requires to be done if your public IP address keeps changing.
Configure DDNS on Router
Dynamic DNS keeps track of your changing public IP address and works like a regular Domain Name Server. The name you set for the domain will keep still while the public IP address keeps changing. This will be required when further configuring the VPN server.
Note: Not all routers have this option. Please check whether the setting is supported on your router via the manufacturer’s website.
Enter the IP address of the router’s interface into a web browser‘s Omnibox.
This IP address is usually found on the back of the router unless explicitly changed.
Log into the console.
The credentials are usually available on the back of the router, if not changed by a net admin.
Look for “DDNS configuration.”
This setting is usually under Network Application, but each router can have its own different layout.
Configure the DDNS settings according to your requirements and set a name for the domain.
Remember the domain name as it will be required when you are connecting to this VPN server remotely.
Apply and save the changes.
Configure Port Forwarding
Network ports are used by Windows services and applications to send and receive data over the network. When accessing a networked device over the public internet, the router needs to understand which port to forward the incoming traffic on, as one router may have many internally connected devices.
You must forward the port for “Point to Point Tunneling Protocol (PPTP)” to Port number 1723.
Use the following steps to perform port forwarding on your router:
Enter the IP address of the router’s interface into a web browser‘s Omnibox and log in using the admin credentials.
Look for “Port forwarding” or “Port mapping” settings within the router.
These are usually found under Forward Rules.
Now make the following configurations:
- Enable port mapping: Check
- Type: Application
- Application: PPTP
- Mapping Name: Enter any name for the rule
- Internal host: IP address of the computer to configure as VPN server
- Protocol: TCP
- Internal port: 1723
- External port: 1723
Once these configurations are done, save/apply the changes and restart the router.
Set Up VPN Server on Windows
It is now time to configure the Windows 11 PC to be used as a VPN server. Up until now, all of the steps were prerequisites to allow the VPN server to be accessible.
Use the following steps to create a VPN server on the Windows PC:
Open the Network Connections applet by typing in “ncpa.cpl” in the Run Command box.
Please the Alt key from the keyboard to expand the menu, and then click “New Incoming Connection.”
Select the user account to grant connection permissions and click Next.
Check the box next to “Through the Internet” and click Next.
Now select “Internet Protocol Version 4 (TCP/IPv4)” and click Properties.
Check the box next to “Allow callers to access my local area network.”
Select “Specify IP address” and then provide the IP address range for the incoming connections. Then, click Ok.
Click “Allow access.”
When configured, click Close.
The VPN server will now be created. As you will notice, a new (virtual) network adapter will appear in the Network Connections applet. However, our work is not one yet. There are still some configurations that need to be made.
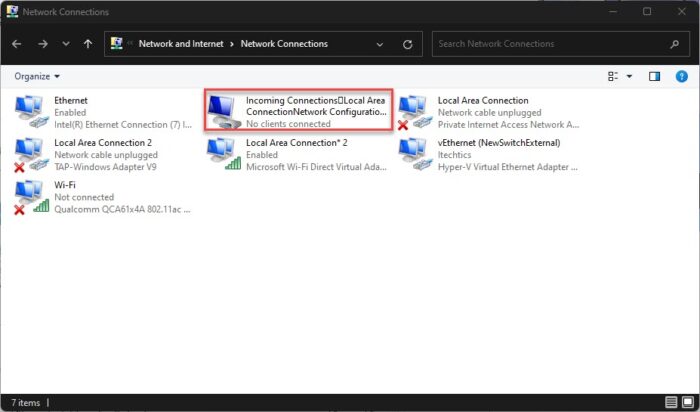
New VPN adapter created
Allow VPN through Firewall
The local Windows Firewall is blocking ports by default. You must allow a remote VPN connection through the firewall to be able to connect to the VPN server remotely.
Open the Firewall applet by typing in “firewall.cpl” in the Run Command box.
Click “Allow an app through Windows Defender Firewall” on the left.
Click “Change settings.”
Check that both Private and Public network types are selected in front of “Routing and Remote Access,” and then click Ok.
Now, the Windows 11 VPN server will be able to receive connections remotely from other computers over the internet.
Connecting to the Windows VPN Server
The VPN server is now set for the connection. Now, you can connect to it using the built-in VPN client on a Windows computer. Learn how to establish a VPN connection on a Windows 11 computer.
Note that you will need to use the public IP address to establish the remote VPN connection to this server.
Closing Thoughts
This article covers how to set up a Windows computer as a VPN server to connect to it remotely from any location in the world. This approach not only allows you to connect to a remote PC over the internet but also secures your communication with it. Any data being transferred to and from the VPN server will now be secure over the public internet.
If you are a sysadmin who has set up multiple Virtual Machines (VMs) on a server at their office, you can set up the host computer as a VPN server and then access the VMs from your home without compromising your cyber security.
Инструкция
1. Нажать сочетание клавиш Win + R
2. В появившемся окне ввести powershell и нажать ОК


3. Появится окно с синим фоном

4. Скопировать и вставить в это окно Команды:
Дополнительные блоки команд для Лахты, Никольского, итд в конце статьи
5. После вставки команд, вывод должен быть похожий на скрин ниже
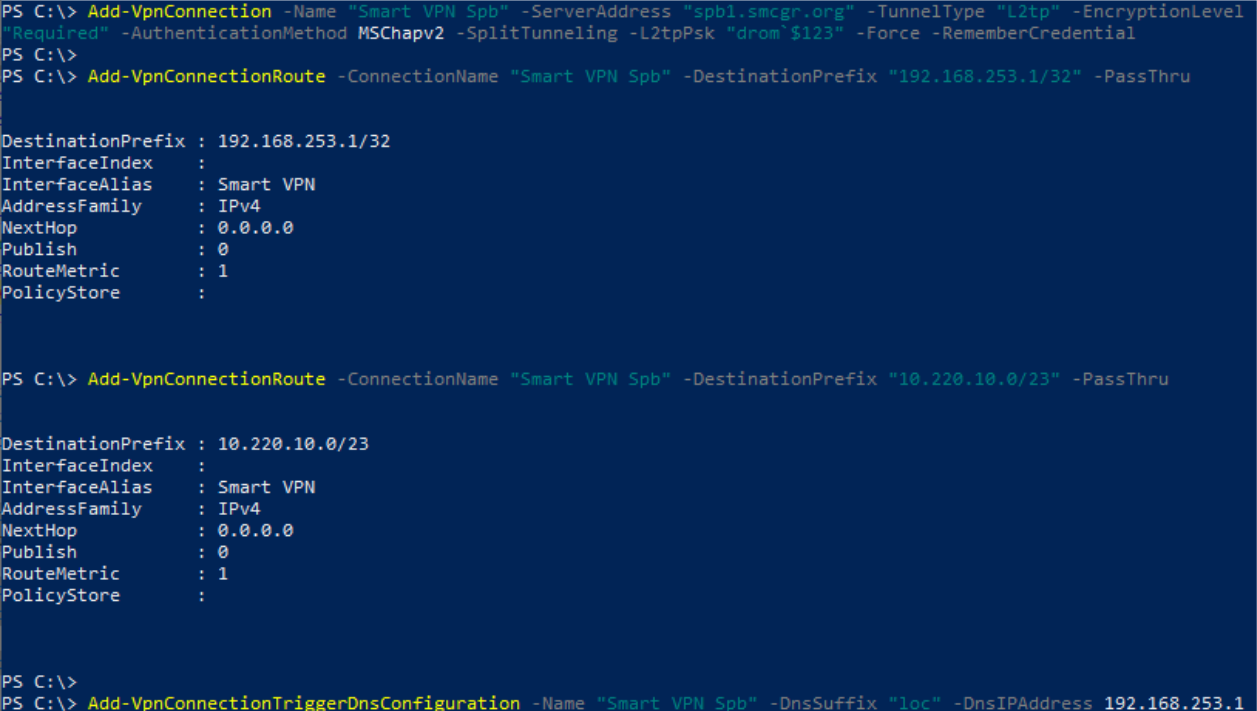
6. Можете закрыть окно. Возле часов нажмите на иконку сети. Она может быть в виде «компьютера» или в виде значка вайфая.
У Вас появится новое подключение Smart VPN . Нажмите подключиться.
7. Появится окно, куда нужно ввести ваш логин и пароль от удалёнки .
если ваш логин smart \ username , то вводить нужно username
После успешного ввода ВПН подключится, а введенные данные запомнятся


После настройки и подключения к VPN вы можете подключаться к серверам.
Инструкции по подключению к удаленным рабочим столам:
Альтернативные команды для ввода
Основной VPN (повтор из блока 4)
Настройка VPN (L2TP/IPsec) для Windows и MacOS. Бесплатные серверы VPN Gate
Данная инструкция демонстрирует, как подключиться к серверу ретрансляции VPN Gate с помощью L2TP/IPsec VPN клиента, встроенного в операционные системы Windows 11, 10, 8.1, 8, 7, Vista, XP, RT, Server 2019, 2016 и 2003, 2008, 2012.
Предварительная конфигурация
- Чтобы открыть Центр управления сетями и общим доступом (также доступен в меню Панель управления > Сеть и Интернет), нажмите сочетание клавиш Windows + R и в окне «Выполнить» введите следующую команду:
- Нажмите ОК.

- Выберите опцию Создание и настройка нового подключения или сети на основной странице Центра управления сетями.
- Выберите вариант Подключение к рабочему месту.

- Затем выберите Использовать мое подключение к Интернету (VPN).

- Откройте список публичных серверов ретрансляции http://www.vpngate.net/en/ и выберите VPN-сервер, к которому хотите подключиться.

Важная информация
Для столбца L2TP/IPsec Windows, Mac, iPhone, Android No client required в списке серверов должна быть отмечена галочка, которая сообщает о поддержке настраиваемого протокола L2TP/IPsec.
Вы можете применить фильтр поиска серверов Apply search filters, оставив галочку L2TP/IPsec и нажав кнопку Refresh Servers List, как показано на скриншоте выше
- Скопируйте имя узла DDNS (идентификатор, который заканчивается на «.opengw.net») или IP-адрес (цифровое значение xxx.xxx.xxx.xxx) и введите его в поле “Адрес в Интернете”.
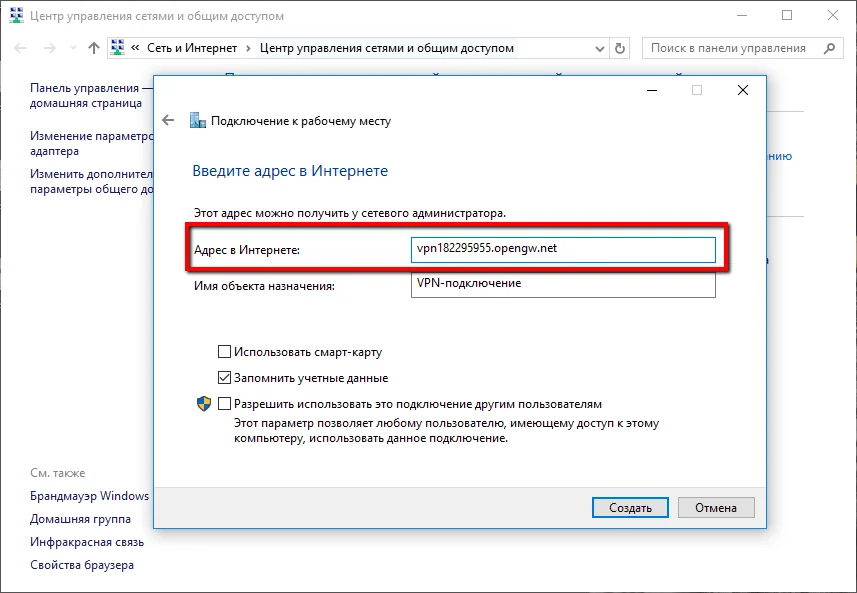
Примечание
Рекомендуется использовать имя DDNS – его можно продолжать использовать, даже если соответствующий DDNS IP-адрес в будущем изменится. Тем не менее, в некоторых странах у вас не получиться использовать имя узла DDNS – в этом случае следует использовать IP-адрес.
- Если появится экран ввода имени пользователя и пароля, то введите vpn в оба поля. Также можно отметить галочку “Запомнить пароль”.
- Затем перейдите в Центр управления сетями и общим доступом и нажмите ссылку Изменение параметров адаптера, или нажмите сочетание клавиш Windows + R и в окне «Выполнить» введите следующую команду:
- Будет показан список настроенных подключений. Щелкните правой кнопкой мыши по иконке VPN-подключения, созданного на предыдущем шаге и нажмите “Свойства”.

- Перейдите на вкладку Безопасность и в поле «Тип VPN» из выпадающего списка выберите вариант Протокол L2TP с IPsec (L2TP/IPsec). Для параметра «Шифрование данных» выберите обязательное (отключиться, если нет шифрования).

- Затем нажмите кнопку Дополнительные параметры. Появится новое окно, на котором нужно выбрать опцию “Для проверки подлинности использовать общий ключ” и введите vpn в поле “Ключ”.

- После завершения конфигурации дважды нажмите кнопку “ОК”, чтобы закрыть экран настроек подключения VPN.
Подключение к VPN-серверу
- Нажмите по значку значку Сеть (интернет) в области уведомления панели задач (системном трее) и выберите созданное VPN подключение. Нажмите кнопку “Подключиться”.

- Если Имя пользователя и Пароль не заполнены автоматически, то введите vpn в оба поля и нажмите ОК.
- При попытке подключения будет показываться сообщение “Подключение к [выбранный VPN-сервер]”. Если при попытке произойдет ошибка, то убедитесь, что в качестве типа VPN используется «L2TP/IPsec», а ключ проверки подлинности задан правильно.
- Если VPN-соединение будет успешно установлен, то в списке сетей появится новый пункт “VPN-подключение” с состоянием “Подключено».

- Теперь вы сможете быстро и просто устанавливать VPN-подключение с помощью соответствующей иконки в списке сетей.
Интернет без ограничений
Когда соединение установлено, весь сетевой трафик будет проходить через VPN-сервер. Убедиться в этом вы сможете с помощью команды tracert 8.8.8.8 в командной строке Windows.

Как показано на скриншоте выше, если пакеты проходят через «10.211.254.254», а значит ваше подключение ретранслируется через один из серверов VPN Gate.
Вы также можете перейти на основную страницу VPN Gate, чтобы посмотреть глобальный IP-адрес. Вы сможете посмотреть видимое из сети местоположение, которое будет отличаться от вашей фактической локации.
При подключении к VPN вы сможете посещать заблокированные веб-сайты и играть в заблокированные игры.
Настройка VPN (L2TP/IPsec) для MacOS
Данная инструкция демонстрирует, как подключиться к серверу ретрансляции VPN Gate с помощью L2TP/IPsec VPN клиента, встроенного в операционную систему MacOS.
Предварительная конфигурация
- Нажмите по иконке сетевого подключения в верхнем-правом углу экрана Mac. Выберите Открыть настройки сети. в меню.

- Нажмите кнопку + на экране настройки сети.

- Выберите интерфейс «VPN», тип подключения «L2TP через IPsec» и нажмите кнопку «Создать».
- Будет создана новая конфигурация VPN (L2TP) и появится экран настроек соединения.

- На данном экране нужно ввести либо имя узла, либо IP-адреса сервера из пула открытых серверов VPN Gate.
- Откройте список публичных серверов ретрансляции http://www.vpngate.net/en/ и выберите VPN-сервер, к которому хотите подключиться.
Важная информация
Для столбца L2TP/IPsec Windows, Mac, iPhone, Android No client required в списке серверов должна быть отмечена галочка, которая сообщает о поддержке настраиваемого протокола L2TP/IPsec.
Вы можете применить фильтр поиска серверов Apply search filters, оставив галочку L2TP/IPsec и нажав кнопку Refresh Servers List, как показано на скриншоте выше
- Скопируйте имя узла DDNS (идентификатор, который заканчивается на «.opengw.net») или IP-адрес (цифровое значение xxx.xxx.xxx.xxx) и введите его в поле «Адрес сервера» на экране конфигурации.
Примечание
Рекомендуется использовать имя DDNS – его можно продолжать использовать, даже если соответствующий DDNS IP-адрес в будущем изменится. Тем не менее, в некоторых странах у вас не получиться использовать имя узла DDNS – в этом случае следует использовать IP-адрес.
- После того, как вы указали «Адрес сервера», введите vpn в поле «Имя учетной записи».

- Затем нажмите кнопку Настройки аутентификации.
- Появится экран настроек аутентификации. Введите vpn в поле «Пароль» и в поле «Общий ключ (Shared Secret)». После этого нажмите кнопку «ОК».

- Затем вернитесь на предыдущий экран, отметьте пункт Показывать статус VPN в строке меню и нажмите кнопку Дополнительно. .

- Откроется экран дополнительных настроек. Отметьте галочку Отправлять весь трафик через VPN и нажмите кнопку ОК.

- На экране настроек VPN-подключения нажмите кнопку «Применить», чтобы сохранить настройки соединение.

Запуск VPN -подключения
- Вы можете в любое время установить новое подключение к VPN-серверу, нажав кнопку «Подключить». Вы можете также запустить подключение к VPN, нажав иконку VPN на верхней панели инструментов MacOS.

- После установки VPN-подключения на экране настроек VPN будет отображаться статус «Подключено», а также вам новый IP-адрес и продолжительность подключения.

Интернет без ограничений
Когда соединение установлено, весь сетевой трафик будет проходить через VPN-сервер. Вы также можете перейти на основную страницу VPN Gate, чтобы посмотреть глобальный IP-адрес. Вы сможете посмотреть видимое из сети местоположение, которое будет отличаться от вашей фактической локации.

При подключении к VPN вы сможете посещать заблокированные веб-сайты и играть в заблокированные игры.
[2 Ways] How to Set up VPN on Windows 11 Step by Step? [MiniTool Tips]
This post created by MiniTool mainly teaches you how to build up a VPN for your new Windows 11 operating system. It offers two methods for you to choose from and both solutions with screenshots.
Update: The official Windows 11 is already available since October 5, 2021.
Windows changes from version 10 to version 11. The thing that doesn’t change is that you still need a VPN (virtual private network) service if you want to visit websites that are restricted by Internet access in certain districts or if you don’t want to be tracked.
How Does VPN Work?
The VPN extends a private network across public networks like the Internet. It allows a host computer to send and receive data across shared or public networks as if it is an integral part of the private network with all the functionality, security, as well as management policies of the private network.
How to Set up VPN on Windows 11?
Most VPN services have their own apps to automatically create a VPN for you. Yet, if you want to set it up manually by yourself, you can follow the below guides.
Way 1. Windows 11 VPN Setup from Settings
In general, there are three parts for setting up VPN through Windows Settings.
Part 1. Add VPN Account
1. Navigate to Start > Settings > Network & internet > VPN.
2. Click the Add VPN button behind the VPN connections.
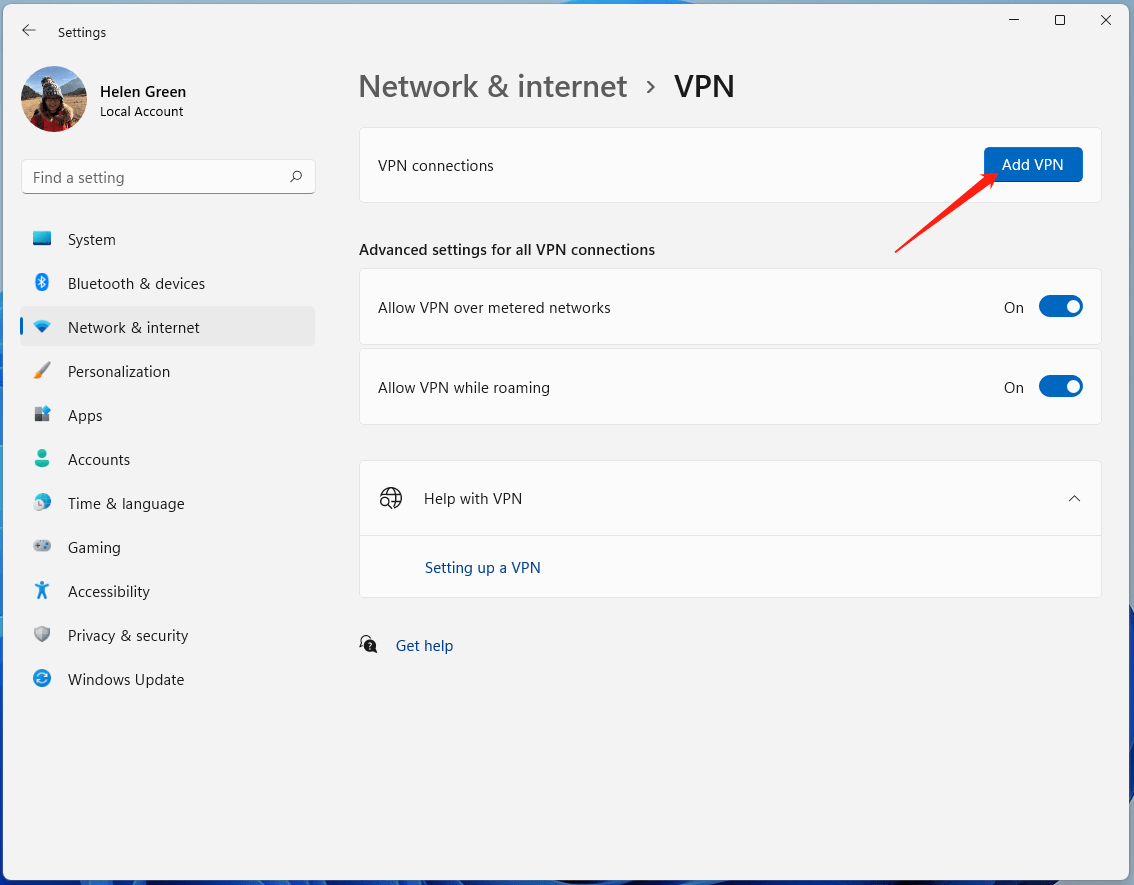
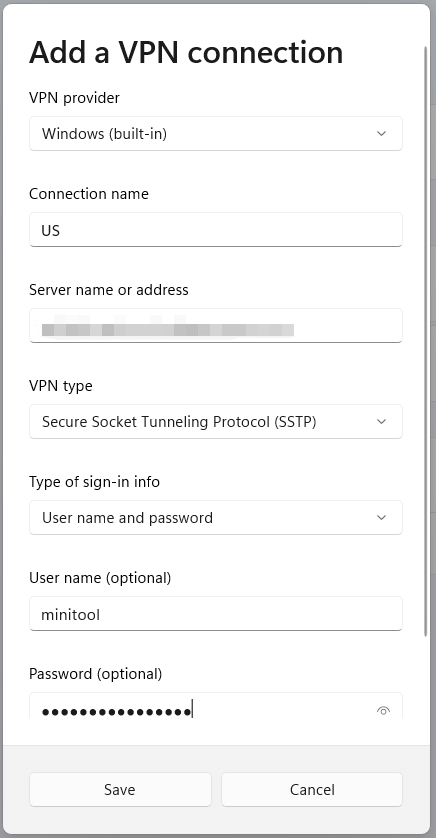
3. In the new popup, just specify the following parameters.
- VPN provider: The default selection is Windows (built-in).
- Connection name: It’s the name used to identify the VPN. Just name it whatever you like.
- Server name or address: This is provided by the VPN company and they might have multiple locations. Just enter one location.
- VPN type: If you know what exactly your VPN type is, you should specify it to get a faster speed. If not, just leave it as the default Automatic.
- Type of sign-in info: If it’s a free connection without any username or password, you can leave the rest of the boxes blank. If it has a username and password, just input them in the below boxes. You can also use a smart card.
Part 2. Add Certificate
1. Press Windows + R shortcut on your keyboard to launch the Windows Run dialog.
2. Type “mmc” and press Enter to open Microsoft Management Console.
3. Click File > Add/Remove Sanp-in.
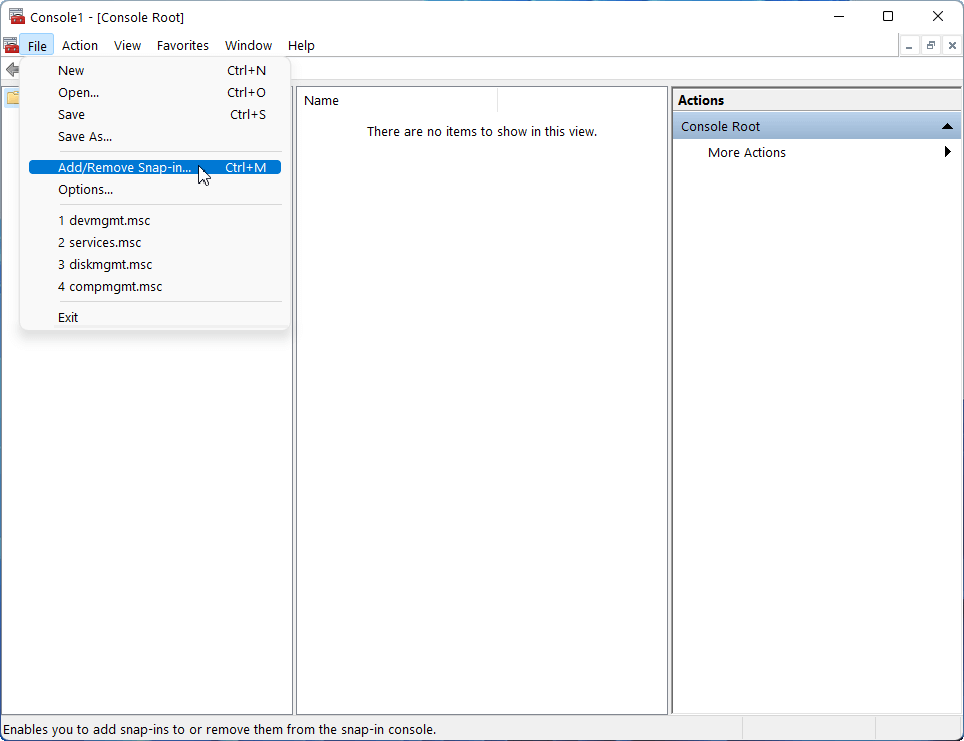
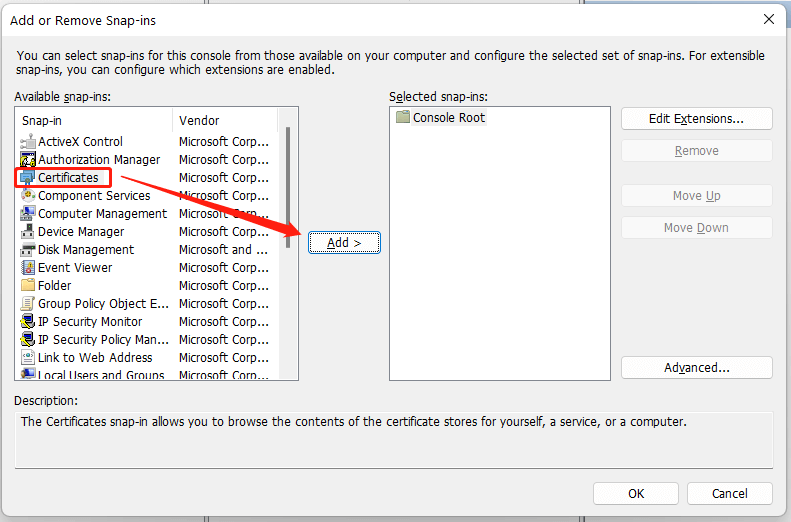
4. Select Certificates in the left list and click Add to add it to the right section.
5. Choose Computer account in the new popup.
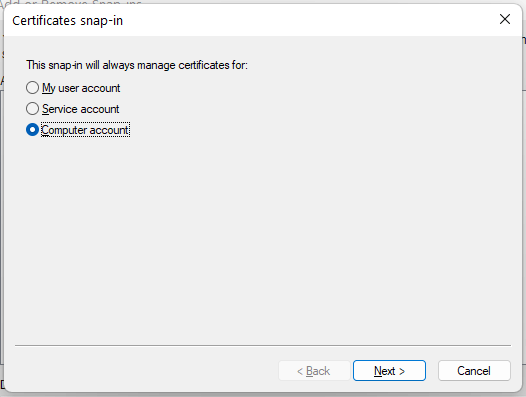
6. Keep the default setting and click Finish.
7. Click OK when you are redirected to the Add or Remove Snap-in window.
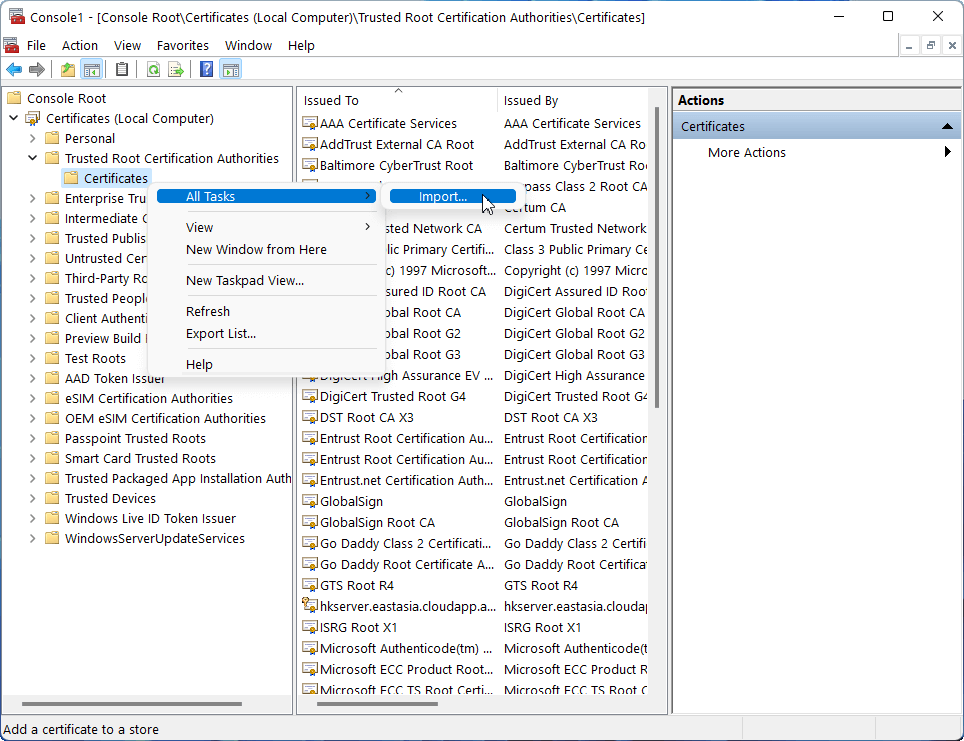
8. Then, unfold the Certificates (Local Computer) in the left panel of the Console window.
9. Further expand the Trusted Root Certification Authorities.
10. Right-click on the Certificates subfolder and select All Tasks > Import.
11. In the pop-up Certificate Import Wizard, click Next on the welcome screen.
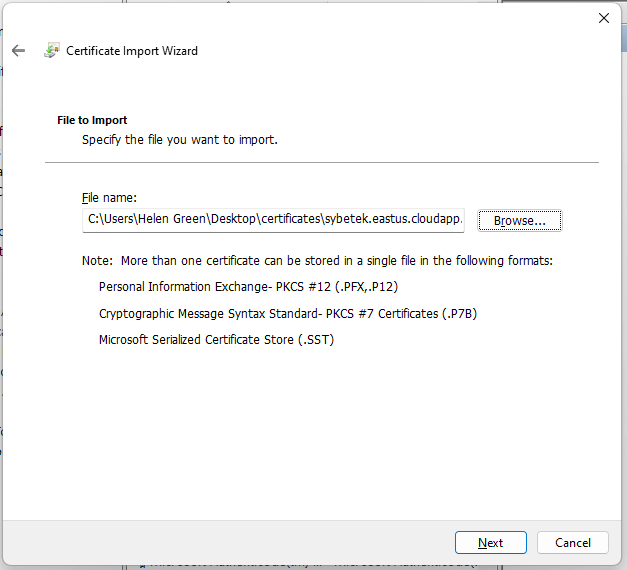
12. Browse to select the correct certificate file. You may need to set to show all file types to make the certificate file be detected.
13. Input the password for the selected certificate file and click Next to continue.
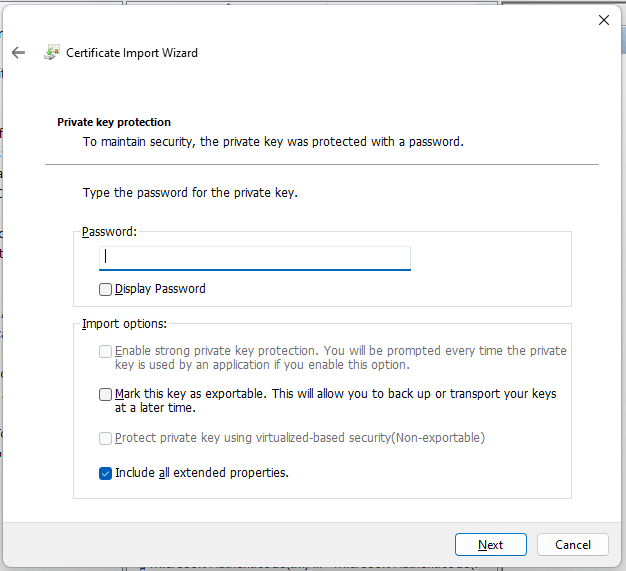
14. Keep the default selection and click Next.
15. Click Finish.
16. When it pops up saying the import was successful, click OK.
17. Close the Console window and click No to not save console settings.
Part 3. Change Network Properties
1. Go to Control Panel and set to view its item in icons in the upper right.
2. Select Network and Sharing Center.
3. Click Change adapter settings in the left menu.
4. Right-click on the added VPN and choose Properties.
5. In the new popup, switch to the Networking tab. There, click on Internet Protocol Version 4 (TCP/IPv4) and click Properties.
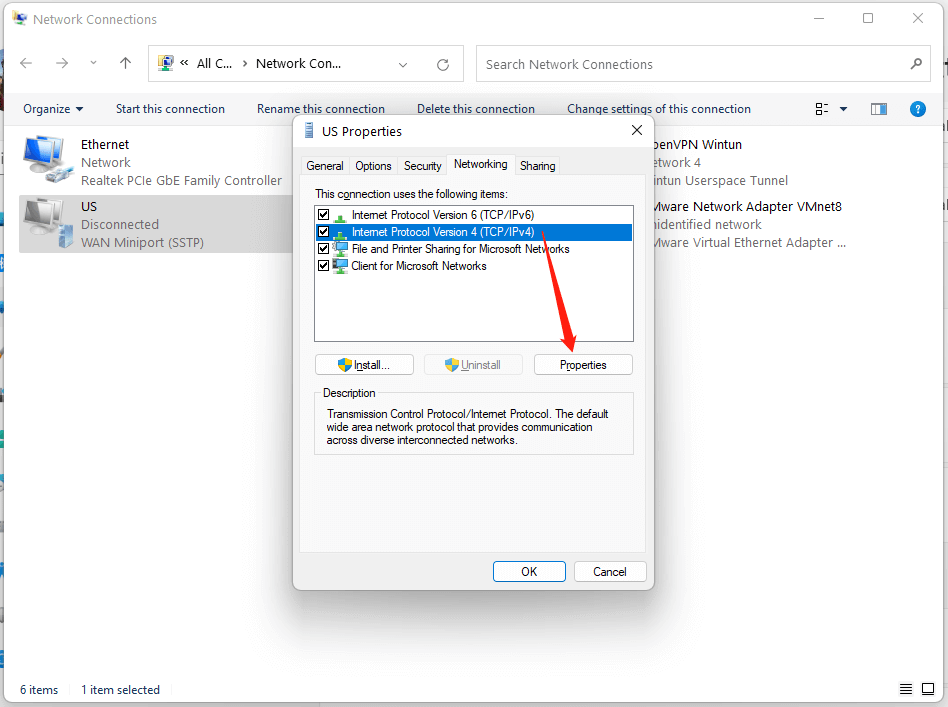
6. Next, select Use the following DNS server addresses, input your preferred and alternate DNS server, and click OK.
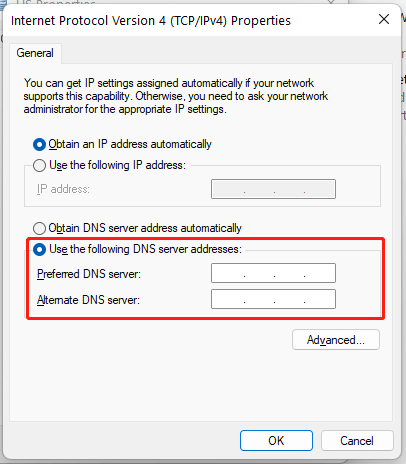
7. Click OK and close the Network Connections window.
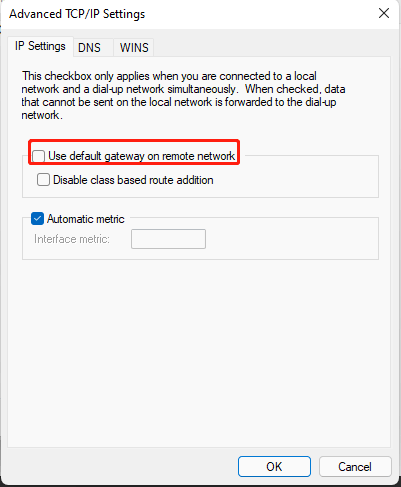
8. If you don’t want all your network connections through the VPN, just click the Advanced button under the DNS server settings and uncheck Use default gateway on remote network.
Way 2. How to Set up a VPN on Windows 11 from Network and Sharing Center
Or, you can directly build up your VPN in the Network and Sharing Center.
1. Click on the Start menu in the center of the taskbar and select Settings.
2. In Windows 11 Settings, choose Network & internet in the left panel.
3. Move to the right part, scroll down to find and click on the Dial-up option.
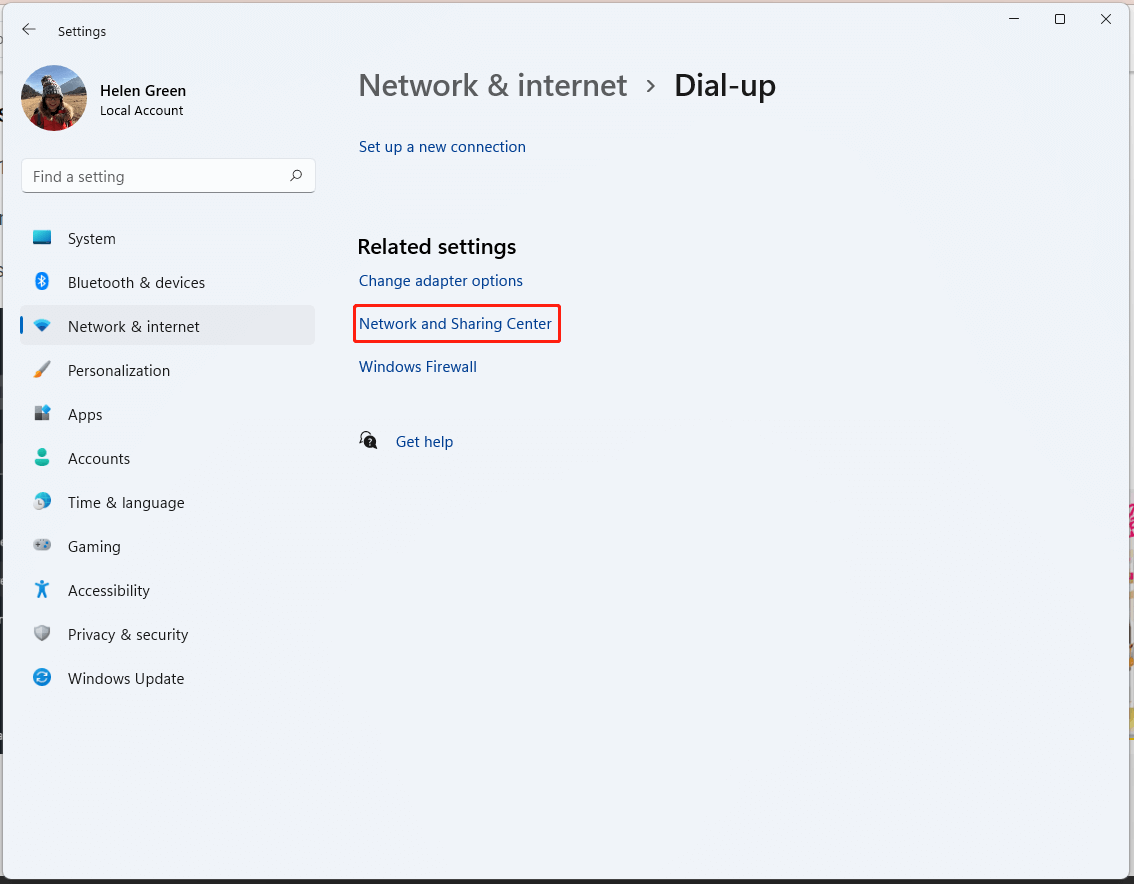
4. On the next screen, choose Network and Sharing Center.
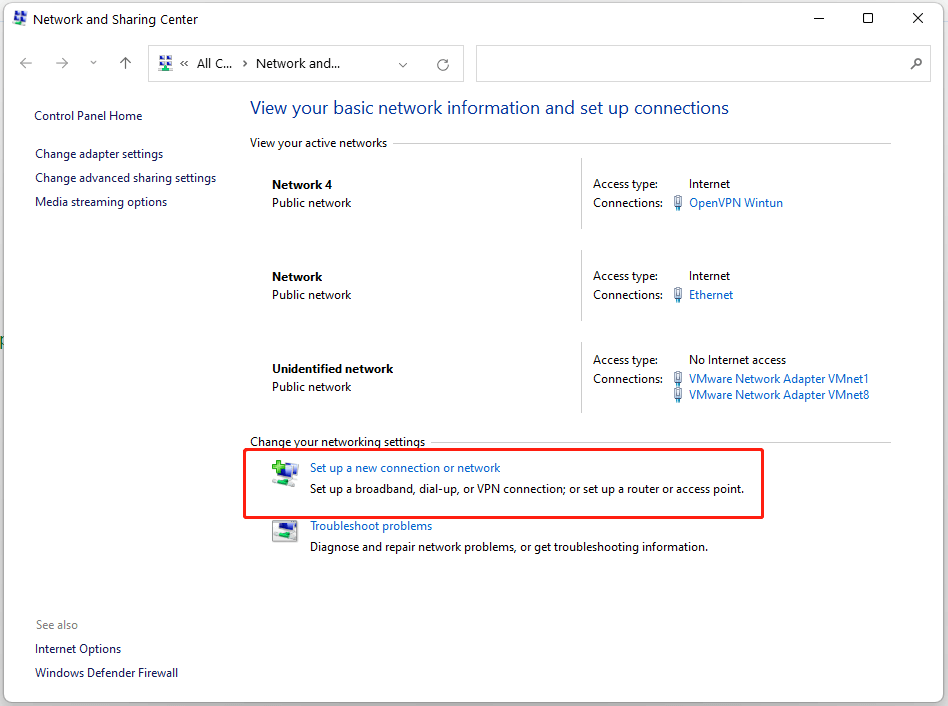
5. In the Network and Sharing Center, click the Set up a new connection or network.
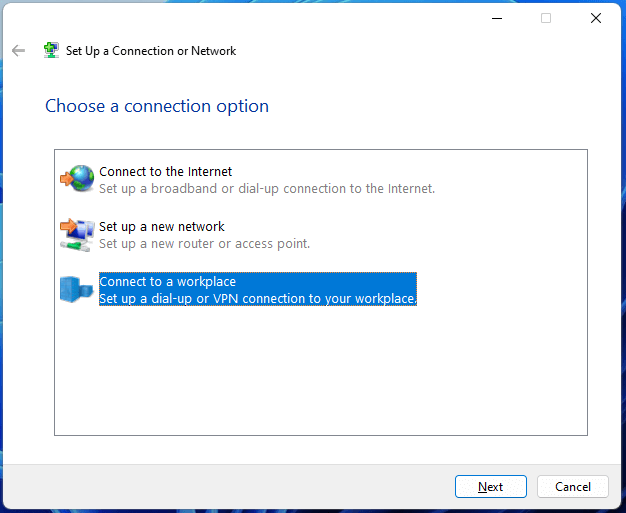
6. In the new window, choose a connection option. You should select Connect to a workplace to set up a dial-up or VPN connection to your workplace.
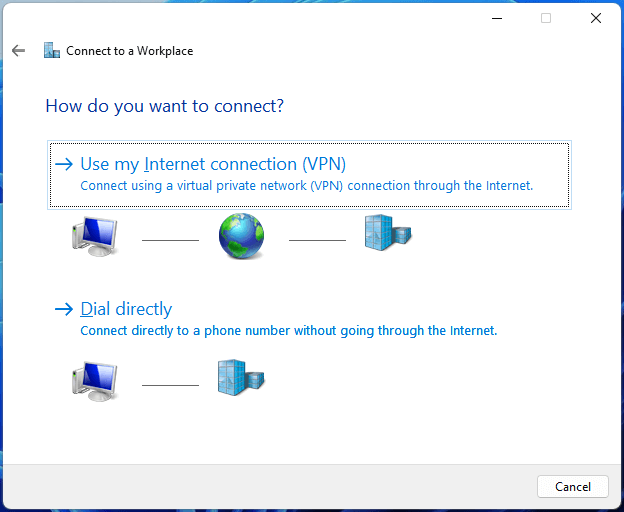
7. Next, click Use my Internet connection (VPN).
8. Then, you will be asked to fulfill the Internet address (IP address or IP name) and Destination name (it can be the same as the Internet address).
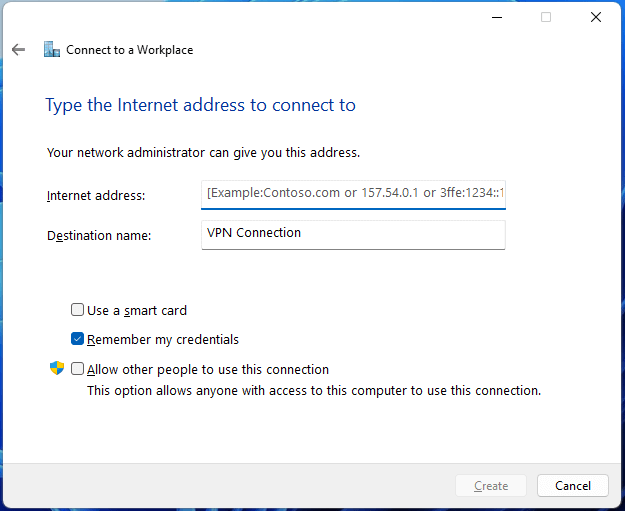
9. Return to select Change adapter settings in the left menu in the Network and Sharing Center. Then, just change the properties of the added VPN as in Way 1.
Finally, you have your Windows 11 VPN set up and it is available for connection.
How to Connect to Your Added VPN in Windows 11?
After you have successfully added the VPN, you can find that it is listed under the VPN connections in the Network and internet settings. You can click the Connect button to connect your computer to this VPN.
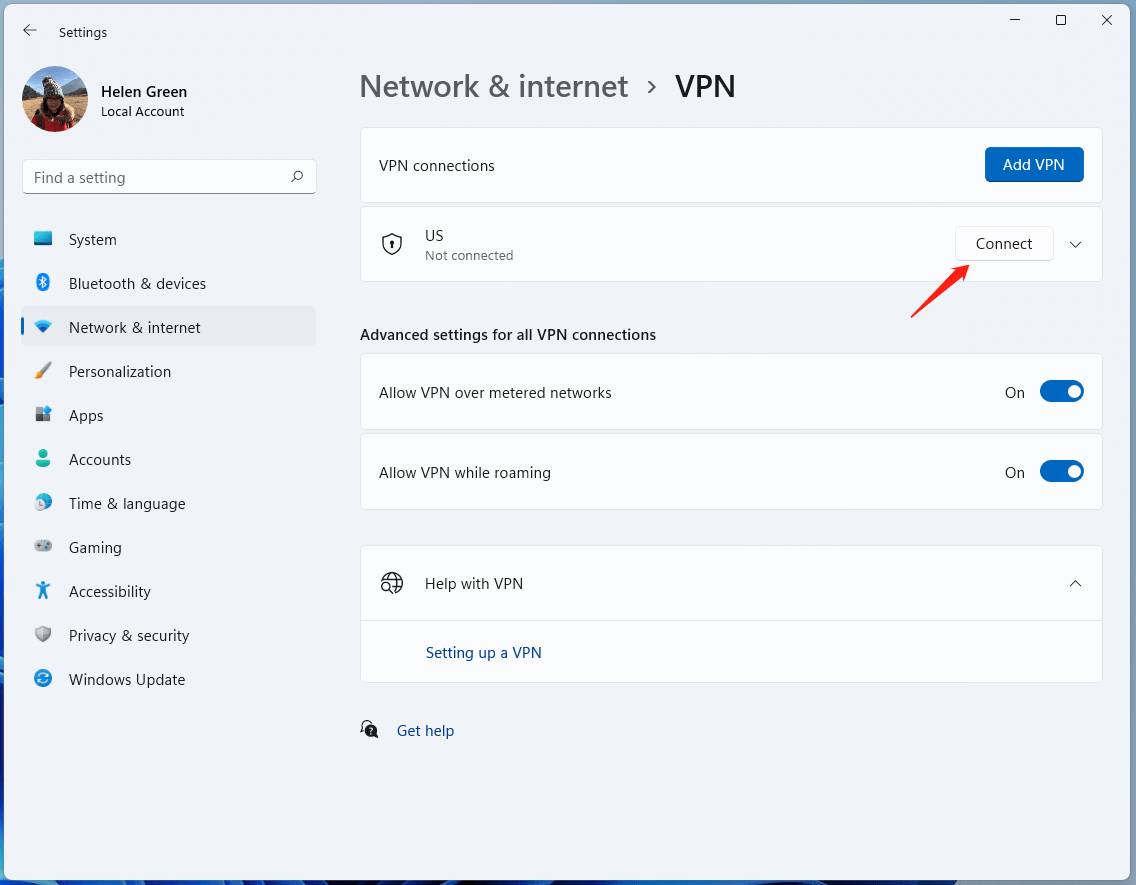
Or, you can click on the network icon on the taskbar, select VPN in the pop, click on the target VPN, and select Connect.

To disconnect the VPN, just click Disconnect either in Settings or from taskbar.
To remove the added VPN, you need to firstly disconnect it, then click on the VPN in Network and internet settings, and finally click Remove.