Java Core для самых маленьких. Часть 1. Подготовка и первая программа
Как-то давно мы с моим товарищем и коллегой Егором готовили обучающий курс по Java Core. Но как-то не срослось и это дело не было доведено до какого-либо логического конца. И вот, спустя время, я решил, что не стоит пропадать добру и по-этому запускаю серию статей про Java Core для самых маленьких.
Начало разработки языка было положено еще в 1991 году компанией Sun Microsystems, Inc. Вначале язык был назван Oak (Дуб), но в 1995 он был переименован в Java. Публично заявили о создании языка в 1995 году. Причиной создания была потребность в независящем от платформы и архитектуры процессора языке, который можно было бы использовать для написания программ для бытовой электротехники. Но поскольку в таких устройствах применялись различные процессоры, то использование популярных на то время языков С/С++ и прочих было затруднено, поскольку написанные на них программы должны компилироваться отдельно для конкретной платформы.
Особенностью Java, которая решила эту проблему, стало то, что компилятор Java выдает не машинный исполняемый код, а байт-код — оптимизированный набор инструкций, которые выполняются в так называемой виртуальной машин Java (JVM — Java Virtual Machine). А на соответствующую платформу предварительно устанавливается JVM с необходимой реализацией, способная правильно интерпретировать один и тот же байт-код. У такого подхода есть и слабые стороны, такие программы выполняются медленнее, чем если бы они были скомпилированы в исполняемый код.
Установка программного обеспечения — JDK
В первую очередь, нам нужно установить на компьютер так называемую JDK (Java Development Kit) — это установочный комплект разработчика, который содержит в себе компилятор для этого языка и стандартные библиотеки, а виртуальную машину Java (JVM) для вашей ОС.
Для того чтобы скачать и установить JDK открываем браузер, и в строке поиска Google вводим “download JDK” или переходим по этой ссылке.

Скролим ниже и находим таблицу с вариантами скачивания JDK. В зависимости от нашей операционной системы выбираем файл для скачивания.
Процесс установки для ОС Windows имеет несколько этапов. Не стоит пугаться, все очень просто и делается в несколько кликов. Вот здесь подробно описан процесс установки. Самое важное для пользователей Windows это добавить системную переменную JAVA_HOME. В этой же статье достаточно подробно расписано как это сделать (есть даже картинки).
Для пользователей MacOS также стоит добавить переменную JAVA_HOME. Делается это следующим образом. После установки .dmg файла JDK переходим в корневую папку текущего пользователя и находим файл .bash_profile. Если у вас уже стоит zsh то ищем файл .zshenv. Открываем этот файл на редактирование и добавляем следующие строки:
Здесь обратите внимание на версию JDK указанную в пути — jdk1.8.0_271.jdk. Могу предположить, что у вас она будет отличаться, поэтому пройдите по указанному пути и укажите свою версию. Сохраняем изменения и закрываем файл, он нам больше не понадобится.
Теперь важно проверить правильность установки JDK. Для этого открываем командную строку, в случае работы на Windows, или терминал для MacOS. Вводим следующую команду: java -version Если вы все сделали правильно, вы увидите версию установленного JDK. В ином случае вы, скорее всего, допустили где-то ошибку. Советую внимательно пройтись по всем этапам установки.

Установка IDE
Теперь нам нужно установить среду разработки, она же IDE (Integrated development environment). Что собой представляет среда разработки? На самом деле она выглядит как текстовый редактор, в котором мы можем вводить и редактировать текст. Но помимо этого, этот текстовый редактор умеет делать проверку синтаксиса языка на котором вы пишете. Делается это для того чтобы на раннем этапе подсказать вам о том, что вы допустили ошибку в своем коде.
Также среда разработки содержит в себе компилятор. Компилятор — это специальный инструмент, который будет превращать код, который вы пишете, в машинный код или близкий к машинному коду.
Кроме этого, среда разработки поддерживает отладчики которые помогают править и отлаживать ваш код в случае ошибки. Скажем так, это были описаны основные возможности IDE. Современные IDE предоставляют огромное количество инструментов, которые могут помочь в написании, отладке, автоматической генерации кода и решить множество других проблем.
Для начала нам нужно выбрать и среду разработки. Их довольно таки много, и самыми популярными из них являются: IntelliJ IDEA, NetBeans, Eclipse. Для себя я выбираю IntelliJ IDEA. Она является самой удобной на мой взгляд, и хоть она и платная, на официальном сайте можно найти бесплатную версию которая называется Community. Этой версии будет вполне достаточно для изучения основ Java. Вообщем будем работать в IntelliJ IDEA.
Итак, открываем браузер, в поисковой строке вводим «Download IntelliJ IDEA Community» или переходим по этой ссылке. Выбираем версию ОС и качаем версию Community.

В установке IntelliJ IDEA нет ничего военного. На крайний случай на ютубе есть множество видео о том, как установить эту программу.
Первая программа
Теперь мы готовы создать нашу первую программу. В окошке запустившийся IDE нажимаем New Project.

В новом окошке в левой панели выбираем Java.

Обратите внимание! В верхнем окошке, справа, возле надписи «Project SDK:» должна находится версия Java, которую вы установили вместе с JDK. Если там пусто, то вам нужно будет указать путь к вашему JDK вручную. Для этого в выпадающем списке нажмите «Add JDK. « и укажите путь к вашему JDK, который был предварительно установлен.
Теперь можем нажать на кнопку Next. В следующем окошке, вверху, поставьте галочку “Create project from template” и выберите “Command Line App”. И снова нажимаем Next.

Дальше нам нужно указать имя программы. У меня это будет Hello World, желательно чтобы имя проекта было введено латиницей, и на английском языке.
Примечание. Все программы, имена программ, принято писать на английском языке, и желательно придерживаться такого стиля, что является хорошим тоном в программировании.
После указываем путь к проекту программы.
Далее, нам нужно указать базовый пакет нашей программы. О пакетах я расскажу вам позже, обычно компании используют свое имя Интернет-домена в обратном порядке, но вы можете написать, например, свои имя и фамилию через точку в нижнем регистре (маленькими буквами), тоже латиницей. Я же использую псевдоним. Когда все поля будут заполнены — нажимаем “Finish”.

После этого вы увидите главное окно IDE, в котором уже будет создана ваша первая, почти готовая консольная программа.
Это окно, то что вы будете видеть 80-90%, а иногда и 100% времени, работая программистом.
Для того чтобы закончить ваше первое приложение, останется добавить строчку кода System.out.print(«Hello world!»); как показано на скриншоте.

Чтобы скомпилировать и запустить на выполнение вашу программу, вам нужно нажать кнопочку с зеленым треугольничком на верхней панели справа, или в меню найти пункт Run -> Run “Main”. И внизу на нижней панели, под окном редактора, в консоли, вы увидите результат выполнения вашей программы. Вы увидите надпись Hello World! Поздравляю, вы написали свою первую программу на Java.

Разбираем первую программу
В своем первом приложении вы можете увидеть много непонятных символов и слов, но на данном этапе вы должны воспринять их как данность, позже, в следующих частях, я расскажу о каждом из них, и зачем они нужны. На данном этапе вам нужно понять что это стандартные составляющие любого Java-приложения, и в последующих приложениях эти компоненты будут изменяться минимально.
Пройдемся по порядку:
В начале мы видим package com.zephyr.ventum; — это объявление пакета, и это постоянный атрибут файлов с исходным кодом в Java. Простыми словами, это локация вашего файла в проекте и любой .java файл должен начинаться с подобной строки.
Ключевое слово — это слово зарезервированное языком программирования. Например, package — это тоже ключевое слово.
Фигурные скобки <> у метода main обозначаю начало и конец тела метода, весь код метода должен располагаться между этими скобками. Аналогичные скобки есть и у класса Main.
Следующая строка является // write your code here однострочным комментарием.
Комментарием является текст который игнорируется компилятором. По-этому с помощью комментариев вы можете оставлять в коде подсказки для себя и других, кто будет читать ваш код, или же для документирования вашего кода. Существует несколько видов комментариев, основными из них являются однострочный, и многострочный.
Многострочный комментарий будет выглядеть следующим образом:
Мы просто располагаем несколько строк между символами /* и */
System.out.print(«Hello world!»); — строка которая находится внутри метода main является командой, которая выводит в консоль строку «Hello world!»
Обратите внимание что в конце стоит точка с запятой, в языке Java команды должны заканчиваться точкой с запятой.
Затем мы закрываем тело нашего метода main > а также закрываем класс Main > .
На этом статья подходит к концу. Автором конкретно этого материала является Егор и все уменьшительно ласкательные формы слов сохранились в первозданном виде.
Создание и запуск первого Java-приложения (часть 2)
Создание и запуск первого Java-приложения (часть 1)  Итак, установка JDK завершена, пакет создан, класс создан, время приступить к собственно написанию кода. После создания класса соответствующий ему файл HelloWorld.java открывается в редакторе.
  Обратите внимание на оператор пакета в начале файла, а также объявление класса. При создании класса, IntelliJ IDEA использует файл шаблона для класса Java. (IntelliJ IDEA предоставляет ряд предопределенных шаблонов для создания файлов различных типов. Дополнительные сведения см. в разделе File Templates в IntelliJ IDEA Help.) Также обратите внимание на желтую лампочку. Эта лампа указывает, что в IntelliJ IDEA есть предложения для текущего контекста. Нажмите на лампочку или ALT + ENTER, чтобы увидеть список доступных действий.
 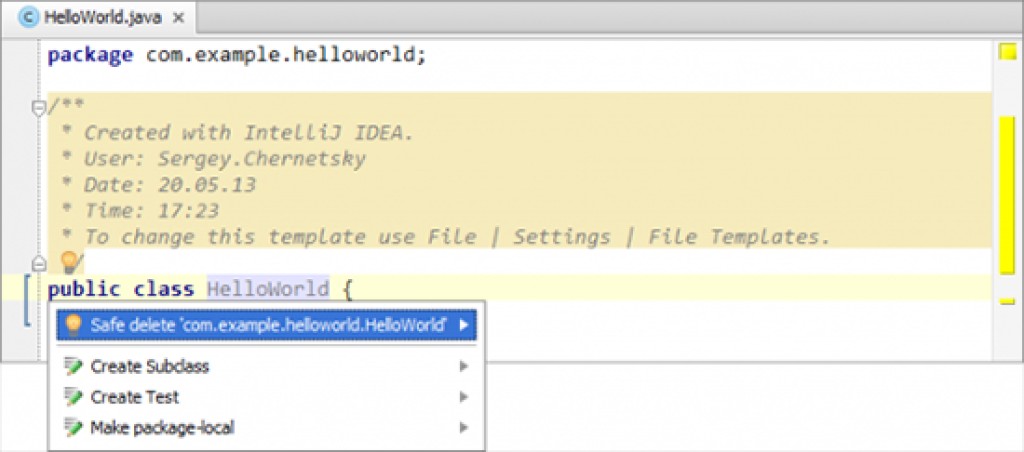 В данный момент мы не собираемся выполнять действия, предложенные IntelliJ IDEA (такие действия называются intention actions — «действия-намерения», подробнее о них см. в разделе Intention Actions в IntelliJ IDEA Help.) Заметим, однако, что эта функция IntelliJ IDEA иногда может быть очень полезной. Наконец, есть маркеры сворачивания кода рядом с комментариями. Нажмите одну из них, чтобы свернуть соответствующий блок, если действительно не хотите видеть эту часть кода в данный момент. (Вы можете также поместить курсор в коде блока, а затем нажать сочетание клавиш CTRL + NumPad- или CTRL + NumPad+, чтобы свернуть или развернуть блок. Получить дополнительную информацию по сворачиванию кода можно в разделе Code Folding в IntelliJ IDEA Help.)
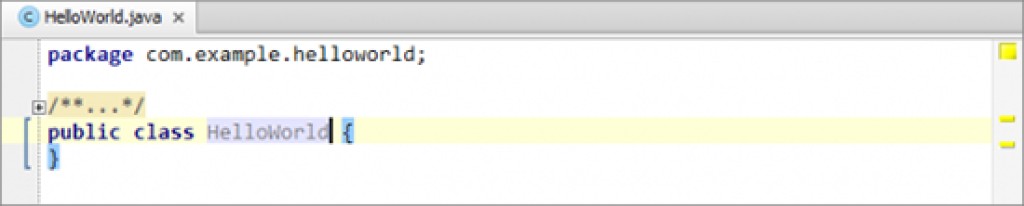
Написание кода для класса HelloWorld

Итак, наконец этот момент настал. Код в конечном состоянии (как вы, наверное, знаете) будет выглядеть следующим образом: Объявление пакета и класса уже есть, теперь добавим недостающие пару строк. Поместите курсор в конец текущей строки, после знака <, и нажмите ENTER, чтобы начать новую строку (На самом деле, можно сделать проще: независимо от позиции курсора, нажатие клавиш SHIFT + ENTER начинает новую строку, сохраняя предыдущие строки без изменений).
Использование активного шаблона для метода Main()
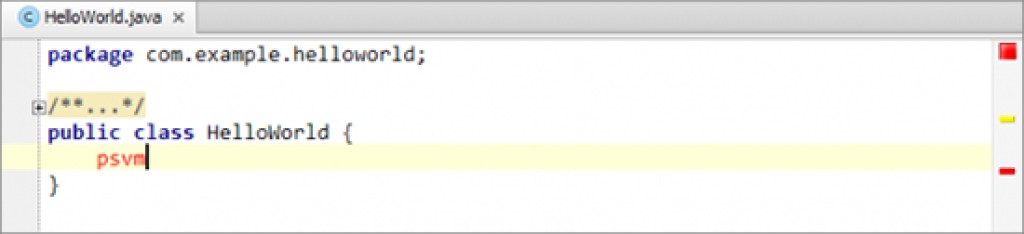
Строку: вполне можно и просто напечатать. Однако рекомендовал бы вам другой метод. Печатаем: psvm и нажимаем TAB. В результате получаем: alt=»Создание и запуск первого Java-приложения (часть 2) — 7″ width=»550″ />В данном случае мы использовали активный шаблон генерации кода объекта. Активный шаблон имеет аббревиатуру- строку, определяющую шаблон (PSVM = public static void main в этом примере) и клавишу для вставки фрагмента в код (TAB в данном случае). Дополнительную информацию можно найти в разделе Live Templates в IntelliJ IDEA Help.
Использование автоматического завершения кода
Теперь пришло время добавить оставшиеся строки кода ( System.out.println («Hello, World!»); ). Мы сделаем это с помощью операции автоматического завершения кода в IntelliJ IDEA. Печатаем: Sy Автоматическое завершение кода предлагает нам варианты: 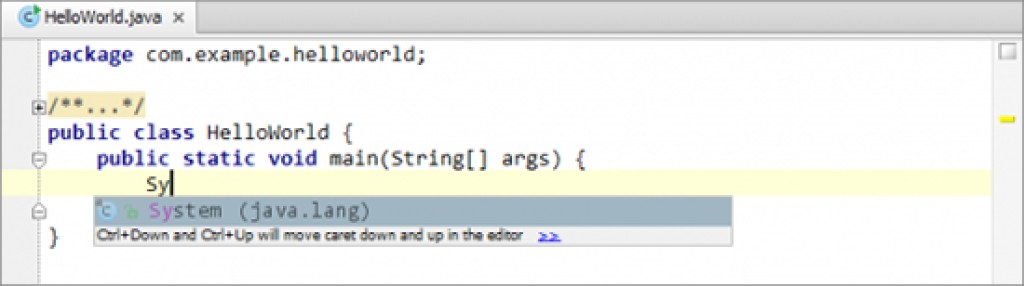 В данном случае вариант только один: System (java.lang) . Нажимаем ENTER, чтобы выбрать его.
 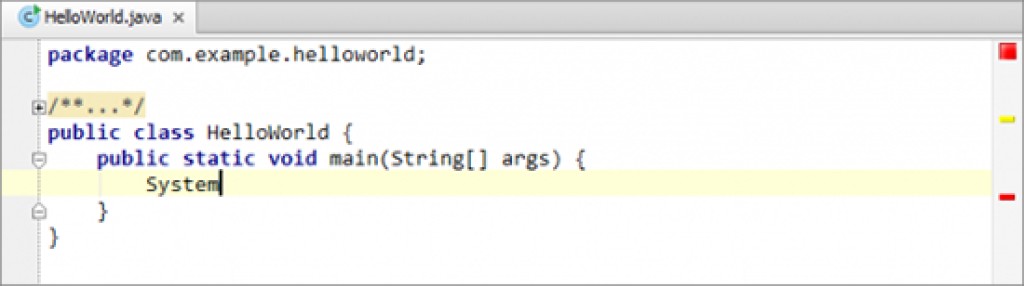 Печатаем точку и букву «о«: .о Функция автоматического завершения кода снова предлагает нам варианты:
  Нажимаем ENTER, чтобы выбрать out.
  Печатаем: .printl Обратите внимание, как изменяется список вариантов в процессе ввода. Метод, который мы ищем — Println (String х) .
 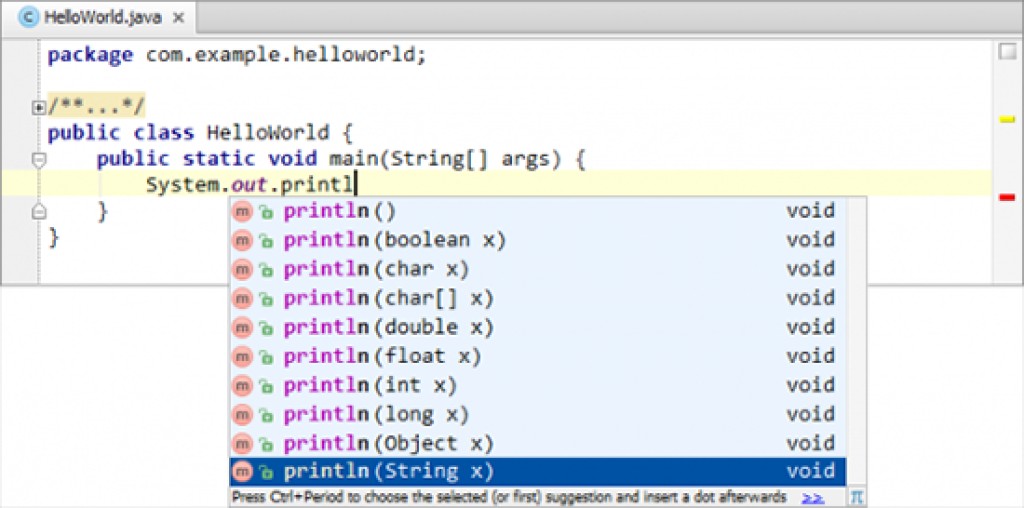 Выбираем println(String x) . Код принимает следующий вид:
 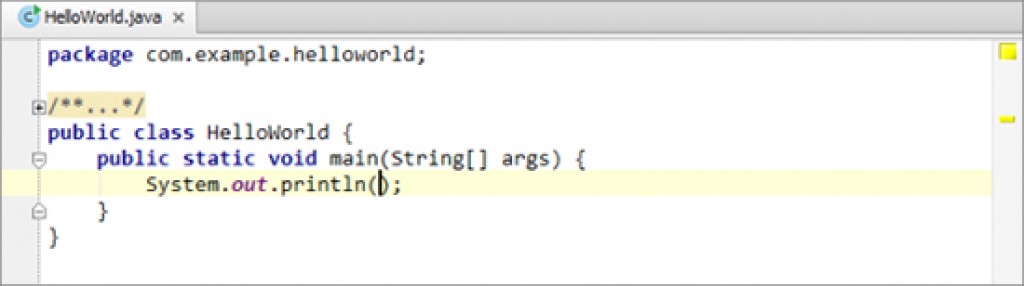 Печатаем кавычки: » Как видите, вторые кавычки появляются автоматически, а курсор перемещается в место, где должен быть наш текст. Печатаем: Hello, World!
  Этап написания кода завершен.
Использование активного шаблона для Println ()
Строительство проекта

Опции построения проекта или его части доступны в меню Build. Многие из этих опций доступны также в контекстном меню в окне Project и в редакторе для HelloWorld.java. Также есть значок на панели инструментов, которая соответствует команде Make Project. Теперь давайте построим проект. Строительство в данном конкретном случае- просто компиляция исходного файла Java в файл класса. Таким образом, любой из вариантов в меню Build (Make Project, Make Module ‘HelloWorld’, или Compile ‘HelloWorld.java’) могут быть использованы для этой цели. Давайте попробуем построить проект. (Клавиатурный эквивалент для этой команды CTRL + F9. Обратите внимание, что эта ссылка отображается прямо в меню как полезный намек.) Подождите, пока IntelliJ IDEA завершит компиляцию. Когда этот процесс будет завершен, соответствующая информация отображается в строке состояния. alt=»Создание и запуск первого Java-приложения (часть 2) — 16″ width=»550″ />Теперь, если вы перейдете в папку модуля вывода (по умолчанию это папка
\out\production\ , в нашем случае, и папка

и называются HelloWorld), вы увидите там структуру папок для пакета com.example.helloworld и HelloWorld.class файл в папке HelloWorld. Если вы хотите разобраться в строительстве приложения лучше, обратитесь к разделам IntelliJ IDEA Help: Build Process, Compilation Types, Configuring Module Compiler Output и Configuring Project Compiler Output.
How to write, compile and run a hello world Java program for beginners
To start, all you need is a fresh computer without any Java software installed, a text-based editor and a good internet connection.
NOTES: This beginner tutorial is targeted for Windows environment.
1. Download and install Java Development Kit
-
- JRE(Java Runtime Environment): is the core of the Java platform that enables running Java programs on your computer. The JRE includes JVM(Java Virtual Machine) that runs Java programs by translating from bytecode to platform-dependent code and executes them (Java programs are compiled into an intermediate form called bytecode), and other core libraries such as collections, File I/O, networking, etc.
- Tools and libraries that support Java development.
-
- javac.exe : is Java compiler that translates programs written in Java code into bytecode form.
- java.exe : is the Java Virtual Machine launcher that executes bytecode.
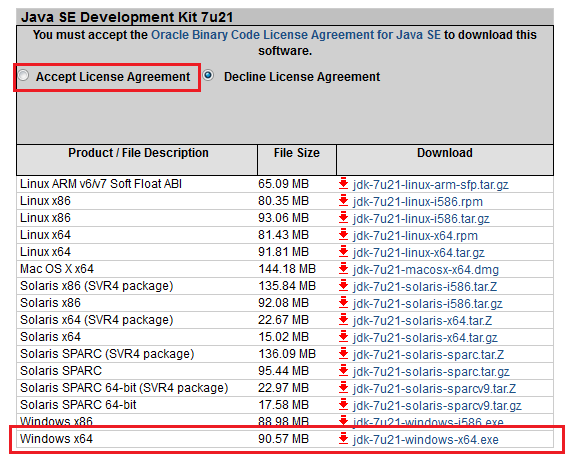
Check the option “Accept License Agreement”, and choose an appropriate version for your computer from the list. Here we choose the version for Windows x64:
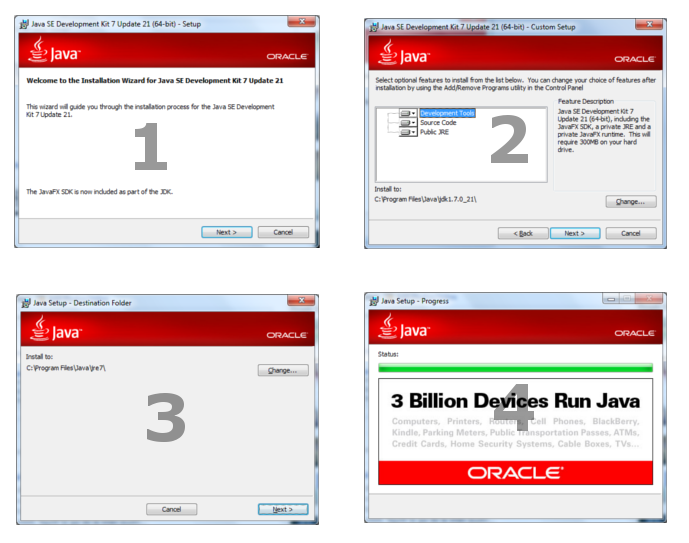
You would see the JDK is installed in the following directory, for example: C:\Program Files\Java\jdk1.7.0_21. The following screenshot describes the JDK’s directory structure:

Now let’s test if Java runtime is installed correctly. Open a command prompt window and type:
java -version
You would see the following result:

That shows version of the JRE, e.g. “1.7.0_21” — Congratulations! Your computer is now capable of running Java programs.
Now try to type the following command:
javac -version
You would see the following error:

That’s because Windows could not find the javac program, so we need to set some environment variables which tell the location of javac.exe .
2. Set up environment variables
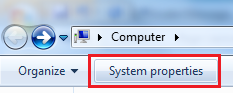
Then click Advanced system settings:
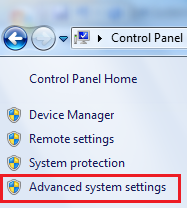
The System Properties dialog appears, select Advanced tab and click Environment Variables. :

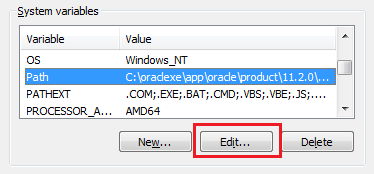
The Environment Variable dialog appears, click on the New… button under the System variables section.
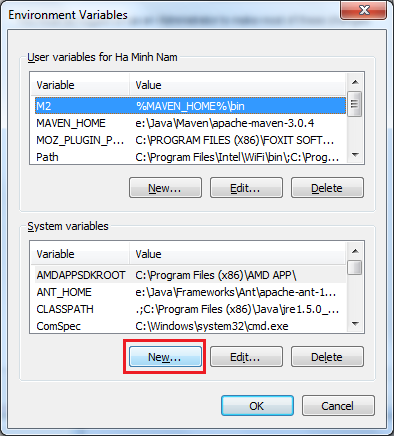
That opens up the New System Variable dialog. Type the following information:

The field Variable name must be JAVA_HOME , and the field Variable value must point to JDK’s installation directory on your computer. Here it is set to c:\Program Files\Java\jdk1.7.0_21. Click OK to close this dialog.
Now back to the Environment Variables dialog, look for a variable called Path under the System Variables list, and click Edit…:
In the Edit System Variable dialog, append the following to the end of the field Variable value:
;%JAVA_HOME%\bin
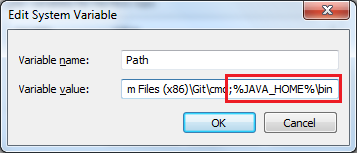
Note that there is a semicolon at the beginning to separate this value from other ones. Click OK three times to close all the dialogs.
Now we have to quit the current command prompt and open a new one to see the changes takes effect. Type the following command again in the re-opened command prompt window:
javac -version
You would see the following output:

Congratulations! You have completed the setup for essential Java development environment on your computer. It’s now ready to write your first Java program.
3. Code a Java hello world program
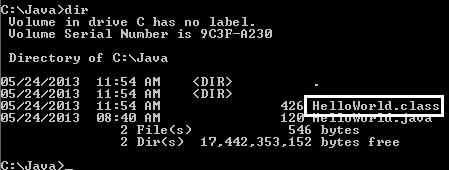
Save the file as HelloWorld.java (note that the extension is .java ) under a directory, let’s say, C:\Java.
Don’t worry if you don’t understand everything in this simple Java code. The following picture explains it nicely:
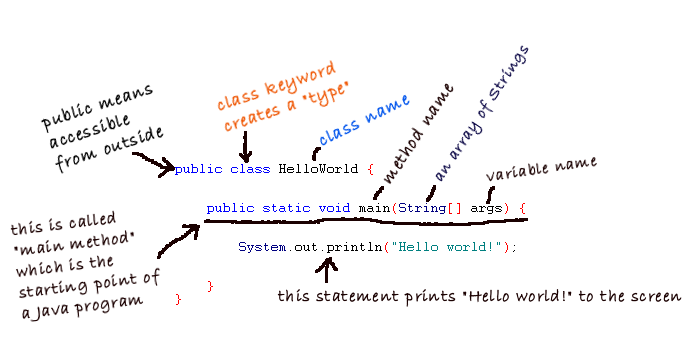
Every Java program starts from the main() method. This program simply prints “Hello world” to screen.
4. Compile your first Java program
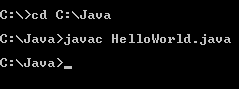
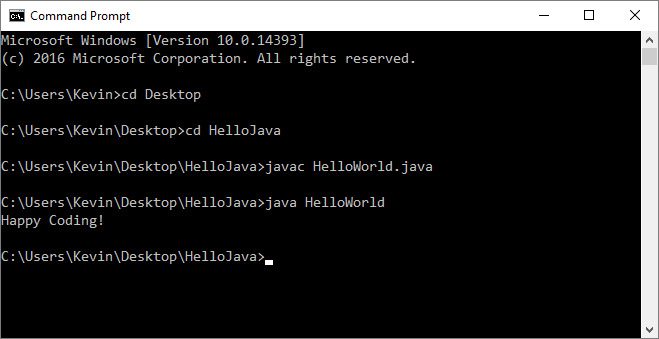
cd C:\Java
And type the following command:
javac HelloWorld.java
That invokes the Java compiler to compile code in the HelloWorld.java file into bytecode. Note that the file name ends with .java extension. You would see the following output:
If everything is fine (e.g. no error), the Java compiler quits silently, no fuss. After compiling, it generates the HelloWorld.class file which is bytecode form of the HelloWorld.java file. Now try to type dir in the command line, we’ll see the .class file:
So remember a Java program will be compiled into bytecode form (.class file).
5. Run your first Java program
java HelloWorld
That invokes the Java Virtual Machine to run the program called HelloWorld (note that there is no .java or .class extension). You would see the following output:
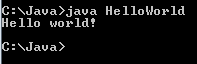
It just prints out “Hello world!” to the screen and quits. Congratulations! You have successfully run your first Java program!
6. What we have learnt so far
-
- JDK is the Java SE Development Kit that contains tools and libraries for Java development.
- JRE is the Java Runtime Environment that enables running Java programs on your computer.
- JVM is the Java Virtual Machine that actually executes Java programs. With JVM, programs written in Java can run on multi-platforms (thus Java is called cross-platform language).
- How to install JDK and configure environment variables. is the Java compiler. It translates Java source code into bytecode. is the JVM launcher which we use to run our program.
- Every Java program starts from the main() method.
- When compiling, the compiler generates a .class file from a .java file.
You can also watch the video version of this tutorial:
Next, I recommend you to read this article: Understand Classes and Objects in Java
Related Java Hello World Tutorials:
About the Author:
 Nam Ha Minh is certified Java programmer (SCJP and SCWCD). He started programming with Java in the time of Java 1.4 and has been falling in love with Java since then. Make friend with him on Facebook and watch his Java videos you YouTube.
Hello World
 Java Tutorials
 Java Setup
 Hello World
 Higher Lower (Human Player)
 Higher Lower (Random Computer Player)
 Free Paycheck Calculator
 Creating Classes
Errors
 Inheritance
 Swing
Swing
Circle Button
Higher Lower
 Libraries
 Mastodon Bot
 Eclipse
 Exporting Jar Files
 Processing in Java
 Swing Control Window
Processing Showcase
 Unit Testing
 p5.js Tutorials
 JavaScript Tutorials
Processing Tutorials
Java Tutorials
 Server Tutorials
Google Cloud
 Android Tutorials
 LibGDX Tutorials
 How-To Guides
 Gallery
Blog
 Teaching


 Tutorials
Java Tutorials
Hello WorldHello World
Now that you installed Java, it’s time to write some code!
This tutorial assumes that you’ve already been through the Processing tutorials and understand what code is, and what objects and classes are.
In Processing, we used the Processing editor to write and run our sketches. The Processing editor makes that easy, but it hid a lot of the details from us. To better understand what’s going on behind the scenes, we’re going to create our files using a basic text editor, and we’re going to compile and run our files using the command prompt. Eventually we’ll use a fancier editor, but for now let’s stick with doing things the “manual” way.
Creating a .java File
Open up your basic text editor. I use jEdit, but you can use Notepad or whatever came with your computer. You don’t want to use a fancy word processor like Microsoft Word though, because that kind of editor adds formatting and stuff that we don’t want in our code. Just use a basic text editor!
Type this into your editor:
And then save that to a file named HelloWorld.java . (Note that you can save files with any extension, and they’re still just basic text files. But we need to use the .java extension so the next step works.)
Compiling
Even though we’re writing code, the computer can’t actually understand the code yet. So we have to translate it into a language that the computer does understand. This is called compiling the code. The Java Development Kit (the JDK) contains a bunch of programming tools, and one of them is a compiler that converts .java files (which are just basic text files that contain Java code) into files that the computer can run.
So now that you have a .java file, you need to compile it.
- Open the command prompt and cd to the directory that contains the .java file.
- Type javac HelloWorld.java and press enter.
That should create a new file named HelloWorld.class in that same directory.
This is a Java class file, and it contains Java bytecode, which is instructions that the computer (specifically, the Java runtime environment) can read and execute. You can try to open the .class file in your basic text editor, but it will look like gibberish- that’s because it’s designed for the computer to understand, not humans!
Running
Now that you have a .class file, you can tell Java to run that file. From the command prompt, type java HelloWorld and press enter. Notice that you don’t include the .class part!
That command runs our program, which for now just prints a message to the console. Here’s what the whole process looks like from start to finish:
Java Classes
Remember that you can create a class to organize variables and functions into a single unit.
In Processing, you can also have “sketch-level” code: variables and functions that aren’t inside a class. But Java doesn’t have sketch-level code, so everything must be inside a class!
That’s why our file starts with a class definition:
The public keyword just means that other classes can uses this class. We’ll talk more about this later.
The main() Function
Remember that Processing automatically calls the setup() and draw() functions for you, so any code you put in them is run for you. Instead of setup() and draw() , Java uses a function named main() .
The main() function is public (which means other classes can call it) and static (we’ll talk more about what that later), and it doesn’t return anything (it has a void return type). It also takes a String[] array as an argument. So its declaration looks like this:
Finally, inside the main() function we place any code we want to run when the program is executed. For now we’re just printing out a message to the console (the command prompt), so we just call the System.out.println() function:
Putting it all together, it looks like this:
Command Line Arguments
(I’m assuming that you remember arrays from the Processing arrays tutorial. If you don’t remember, you might want to read through that again.)
Notice that the main() function takes a String[] array argument. Let’s write a program that prints out the values of that array:
Type this program into your basic text editor, save it as a file named ArgsPrinter.java , then open a command prompt to that directory. Type javac ArgsPrinter.java and press enter to compile that code into a class file, and then type java ArgsPrinter and press enter to run this code.
If you run this code, you’ll notice that it just prints out one line:
So the args argument is just an empty array. That doesn’t seem very useful!
Command line arguments are a way for a user to provide input to a command line program. They’re usually just a set of words listed after the command. You’ve actually already used them! When you type javac HelloWorld.java , you’re running the javac command and passing in HelloWorld.java as an argument.
So let’s run the program again, and this time let’s pass in command line arguments by adding them after the class name. Type this into your command prompt and press enter:
This runs our ArgsPrinter program, and gives it command line arguments one , two , and three . If we hit enter, we see this:
So, the args variable is an array that holds any command line arguments the user gives to the program. This is the most basic way we can get input from a user.
The Java API
The Java API is a webpage that lists every class, function, and variable that you can use in Java. It’s a lot like Processing’s reference page, but the Java API is much, much larger.
This should be your first stop whenever you have a question about how something in Java works. This might seem overwhelming at first, but you don’t have to know every class or memorize anything. Instead, you can search for a specific class and get more info about it when you need it.
For example, let’s say you want to use the ArrayList class. Find the ArrayList class in the list on the left, then click it to get more info about it. That page will give you a general description and tell you about the constructors and functions you can call.
Import Statements
Let’s say you created a program that uses the Scanner class, which lets you get user input from the command prompt. You can read more about the Scanner class in the Java API.
For now, type this code into your basic text editor and save it to a file named Greeter.java :
Now try to compile your program by opening a command prompt to the directory that contains this file, then typing javac Greeter.java and pressing enter. You’ll get an error:
We’ll talk more about how to read this error later, but for now just know that this error says it can’t find the Scanner class. It’s in the Java API, so what’s going on?
In the Java API webpage, notice that the Scanner class is inside the java.util package:
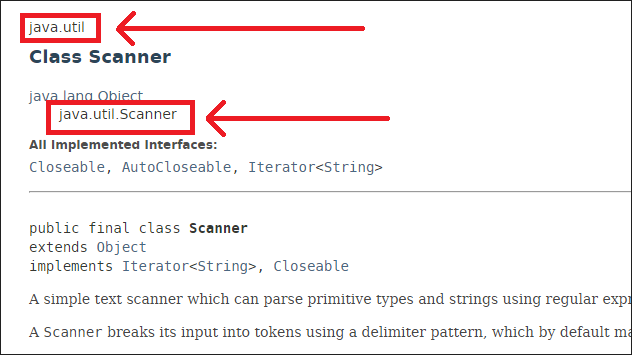
This means that we have to import the class before we can use it. Import statements go at the top of our code:
Now we can compile and run this code, and it works! Hooray!
This program prompts the user for their name, which they can enter by typing into the command prompt and pressing enter. Then the code uses the Scanner class to read what the user typed. You can use the Scanner class to interact with the user, even without a fancy user interface!