How to make my font bold using css?
I’m very new to HTML and CSS and I was just wondering how I could make my font bold using CSS.
I have a plain HTML page that imports a CSS file, and I can change the font in the CSS. But I don’t know how to make the font bold, can anyone help me?
10 Answers 10
You can use the CSS declaration font-weight: bold; .
I would advise you to read the CSS beginner guide at http://htmldog.com/guides/cssbeginner/ .
You can use the strong element in html, which is great semantically (also good for screen readers etc.), which typically renders as bold text:
Or you can use the font-weight css property to style any element’s text as bold:
You’d use font-weight: bold .
Do you want to make the entire document bold? Or just parts of it?
Sine you are new to html here are three ready to use examples on how to use CSS together with html. You can simply put them into a file, save it and open it up with the browser of your choice:
This one directly embeds your CSS style into your tags/elements. Generally this is not a very nice approach, because you should always separate the content/html from design.
The next one is a more general approach and works on all «p» (stands for paragraph) tags in your document and additionaly makes them HUGE. Btw. Google uses this approach on his search:
You probably will take a couple of days playing around with the first examples, however here is the last one. In this you finally fully seperate design (css) and content (html) from each other in two different files. stackoverflow takes this approach.
In one file you put all the CSS (call it ‘hello_world.css’):
In another file you should put the html (call it ‘hello_world.html’):
Hope this helps a little. To address specific elements in your document and not all tags you should make yourself familiar with the class , id and name attributes. Have fun!
CSS Basics for Typography
![]()
In 2020 there are a lot of developers and designers who want to learn the basics of CSS. In this series of articles, I will teach you those main topics. In this specific article, I will review the essential CSS properties of typography while using many visual examples.
font-family
This font-family property is used to declare what font we want to use. It can receive an array of fonts. This can be useful to us for two reasons:
- If the first font isn’t working in a specific operating system, the browser will use the next font until something matches it.
- If the font has missed some of the characters, it will fill in the missing characters from the next font at the list.
font-weight
This property, like his name, is for declaring the font-weight of the text. The default value of this property is normal , and the second common value of it is bold .
In more advanced fonts there are more than two states. Instead of using names in the values, these fonts are using numeric values: 100 / 200 / 300 / 400 / 500 / 600 / 700 / 800 / 900 and 950 . Which are equal to the common mapping names (in design apps), see table:
The normal keyword is equal to 400 value, and the bold keyword is equal to 700 value. Examples:
font-size
This property, like his name, is for declaring the font-size of the text. Even today, the most common sizing unit is pixels. Example:
From my perspective, it is better to control the font-size with rem units. If you want to know more about how to work with rem units, you can read my article “Update your font-size to REM units”.
line-height
This property is telling the browser the height of the line in ratio to the text-size . This property can get fixed value like pixel, but the most common way is to give it a value of ratio without any unit.
The line-height property, is a type of inherited property, which usually means you declare it one time in the root element, and it will affect all the elements on our website. This way if we have different font-size in inner elements, the line-height will stay with the same ratio, and we won’t need to declare it multiple times. Example:
font-style
We use it to update the text font into an italic variant state.
Text color property
The color property is used to color the text. It can receive color keywords, for example, red , magenta . It can receive a HEX color code and color functions like RGB and HSL. If you want to know more about CSS colors, you can read my article “Why CSS HSL Colors are Better!”.
text-align
This property, like his name, is to control the alignment of text in its reading axis(inline-axis). Besides the possibilities to align left and right , we have the center value and the less known justify value, which aligns the text in both ways.
Besides, there is an extensive property, text-align-last , which allows you to differentiate the last line from all the other lines. For more info: text-align-last in MDN.
direction
The direction property sets the direction of text, table columns, flexbox, grids, and more. It has two values:
- ltr value — for Latin languages that are read from left to right.
- rtl value — for Semitic languages that are read from right to left.
When using the direction property the text-align property is being updated automatically as well in the same direction unless it is defined otherwise. Example:
vertical-align
This property is used mainly for vertical inline text content. The main common values are baseline (default value), text-top , and text-bottom which are relative to the line-height of the text in the container.
There are more values like top and bottom that can act differently only if the line-height of to row is different from the line-height of the inline elements.
This property can be used even unit values which are positioned according to the baseline value, which means 0px = baseline , with this, you can play with negative & positive values, for example -2px or 2px .
Note: this vertical alignment is good for text elements. For vertical alignment of boxes, it is better to use CSS flexbox.
text-decoration
This property’s most used case is for adding underline to links, and it could also be used for creating overline and line-through . Example:
But in the last years, this property has been given a lot of extensions, and now you can use all the values together, for example:
Another possibility we now have is to play with the style of the lines and with their color.
text-transform
The text-transform property specifies how to capitalize on texts. We use it to make text appear in all-uppercase or all-lowercase, or to make each word capitalized.
letter-spacing
The letter-spacing property, as his name is, decreases or increases the spacing between the letters of the words. When using this property with px units, you can use fragments of pixels for example 0.1px . To decrease the spacing, this property can get negative values as well, like -1.5px , for example.
word-spacing
The letter-spacing property, as his name, allows us to define the space between the words.
text-indent
The indent property is used to indent the first line in a paragraph. Inside with a positive value or outside with a negative value.
::first-letter
The ::first-letter pseudo-element selector allows us to style the first letter in different styles from the regular text in paragraphs, for example.
Besides the ::first-letter pseudo-element, there is the ::first-line pseudo-element, which allows you to style the first-line of a paragraph differently. Because I haven’t seen a common use for it, I have decided not to give it a big stage in my article, but just to notify you that it exists.
text-shadow
The text-shadow property allows us to add shadow to text. For it to work, we need to provide it with at least the offset-x and the offset-y of the shadow. If we provide only these two values, the shadow will be left without a spread and with the same color of the text.
The third numeric value will be the spread of the shadow. We can also give it a different color value, in the beginning, or the end of the value.
Besides, we can add multiple text-shadows, using a comma in the value.
text-stroke
The text-stroke property is a non-standard property that works in all main browsers. It works with the -webkit prefix, even on Firefox & old Edge. The property receives two values, stroke-width and stroke-color.
More and More and More!
There are more properties of CSS for typography and big new topics like Variable Fonts, which are dynamic. But in this article, I have tried to show the main basic elements to control typography with CSS.
If this topic interests you, you can continue and explore this vast topic in CSS. Here some more properties and topics we haven’t talked about: Variable Fonts, font-variant , text-justify , unicode-bidi , all the ways of breaking words in CSS, and I may have missed several more��.
To Summarize
In this article, my primary purpose was to show the most useful properties for CSS typography and to provide you with this knowledge.
Final Words
I hope I inspired you and showed you some new possibilities.
If you like this post, I would appreciate applause and sharing ��.
I create lots of content on CSS. Be sure to follow me via Twitter, Linkedin, and Medium.
Also, you can see all of my content on my website: eladsc.dev.
Who Am I?
I am Elad Shechter, a Web Developer specializing in CSS & HTML design and architecture.
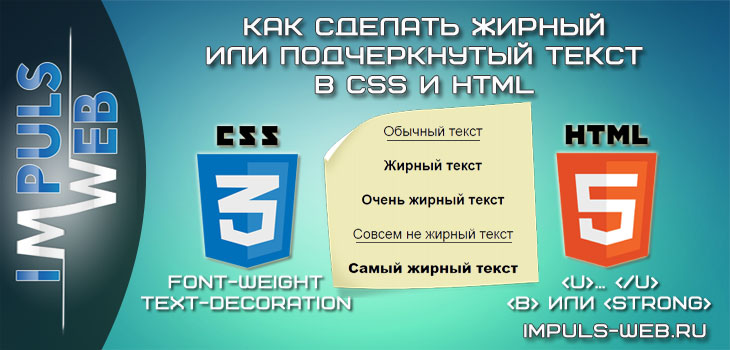
Как сделать жирный или подчеркнутый текст в CSS и HTML
Заполняя свой сайт, мы обязательно сталкиваемся с необходимостью форматирования контента, для того, что бы придать ему более наглядный вид или обратить внимание читателя на какие-то основные моменты.
В сегодняшней статье мы рассмотрим с вами как сделать подчеркнутый и жирный текст CSS-стилями и HTML-тегами. Хорошо, когда как в WordPress есть визуальный редактор и можно легко придать любому фрагменту необходимый стиль написания.
Навигация по статье:
Но бывают случаи, когда даже для сайта, сделанного с помощью CMS, приходится задавать форматирование CSS-стилями или HTML-тегами. В WordPress это касается заполнения виджетов «Текст», например, или редактирования текста в отдельных плагинах, которые не поддерживают визуальный редактор.
Как сделать подчеркнутый текст CSS-стилями
Чтобы как-то выделить фрагмент, и сделать его более заметным, мы можем сделать подчеркнутый текст css-стилями, используя свойство text-decoration:underline;
Подчеркнутый текст CSS
Так же это CSS-свойство имеет и другие интересные значения:
- blink — позволяет сделать слово или предложение мерцающим,
- line-through — перечёркивает слово или предложение,
- overline — позволяет провести линию над словом.
Это свойство так же используется для стилизации отображения ссылок по умолчанию. Поэтому, если вы хотите что бы ссылки на страницах вашего сайта отображались без подчеркивания, вам нужно задать для нее text-decoration: none;
Подчеркнутый текст HTML-тегами
Если вы столкнулись с необходимостью сделать подчеркивание в единичном случае, то конечно писать стили для этого одного фрагмента не целесообразно. В таких ситуациях вы можете сделать подчеркнутый текст средствами HTML. Для этого вам всего лишь нужно поместить нужный фрагмент между тегами <u>… </u>
Как сделать жирный текст CSS-стилями
Для выделения жирным в CSS предусмотрено свойство font-weight, которое в свою очередь имеет достаточно большое количество принимаемых значений, используя которые, вы можете подобрать для своей ситуации наиболее подходящий жирный текст css-стилями.
Итак, свойство font-weight может принимать фиксированные значения:
- bold – жирный
- bolder – еще жирнее
- normal – начальный вид
- lighter – делает буквы тоньше, по сравнению с normal
Кроме этого, можно использовать числовые значения, что бы подобрать степень жирности на свое усмотрение. Для этого можно задать число от 100 до 900, при этом 100 будет соответствовать значению lighter, а 900 будет иметь наибольшую жирность, на порядок выше, чем у значения bolder.
WEBTEORETIK

Когда человеку тяжело,
это часто означает,
что он идёт к успеху.

- Главная
- О сайте
- Карта сайта
- Обратная связь
- Главная
- >>
- Раздел >> Уроки CSS
- >>
- Материал >>
- Создание жирного и курсивного шрифта средствами CSS
Создание жирного и курсивного шрифта средствами CSS
Категория: Уроки CSS Просмотров: 7977 Коментариев: 0 Дата: 2017-11-09 Добавил: admin
Продолжаем работать со шрифтами и в этом уроке мы рассмотрим то, как задаются свойства придающие шрифту жирный или курсивный вид. До этого мы уже рассматривали, как создать жирный или курсивный шрифт с помощью HTML тегов. Но как мы уже знаем, HTML не должен использоваться для оформления документа, он предназначен только для создания разметки, структуры страницы, поэтому надо оформлять все через таблицу стилей CSS. И теперь давайте рассмотрим, как задаются такие свойства.
Курсивный шрифт CSS
Оформлять текст курсивом помогает свойство font-style: ;, которому прописывается значение italic, что обозначает «Стиль шрифта — курсивный».
Теперь давайте представим, что на странице много абзацев и одни из них нужно выделить курсивным шрифтом. Что мы делаем, для нужного абзаца создаем класс, а затем укажем, что элемент с таким классом должен быть курсивным.
Задаем свойство для курсивного шрифта.
Если Вы создали такие абзацы и задали для них свойство, то у второго абзаца текст стал курсивным. Это мы задали свойство для всего абзаца, а теперь давайте усложним и зададим курсив только для двух слов в четвертом абзаце. Как такое сделать? В HTML уроке мы разбирали тег логического уровня <span>. Данный тег как раз используется для таких ситуаций, когда для какой-то части элемента нужно задать какой-то класс. И так в четвертый абзац встраиваем тег <span> </span> и ему прописываем класс <span class=«italic»></span>. В результате получаем вот такую запись:
Теперь второй абзац и часть четвертого абзаца отображаются курсивом. В демо это наглядно показано.
Жирный шрифт CSS
Чтобы задать жирный шрифт используется другое свойство, с именем font-weight: ; другими словами его еще называют насыщенностью шрифта. Изначально насыщенность установлена в значение normal то есть насыщенность шрифта нормальная, а задав значение bold он примет полужирный вид.
Так же можно задавать значение насыщенности цифрами от 100 до 900 с шагом 100. Значение normal приравнивается цифре 400, а значение bold цифре 700. Значение 900 поддерживается не всеми шрифтами, поэтому задав это значение, Вы можете не заметить отличия от значения 700. Выглядит такое условие следующим образом.
В html коде поступают точно также: если нужно выделить весь абзац то задаем ему новый класс, если часть текста, то используем тег <span class=«italic»></span>. Рассмотрим маленький пример:
В результате мы выделили в жирный текст часть четвертого абзаца, где он в то же время и курсивный, и весь пятый абзац. Вот такие еще два свойства мы изучили. Они достаточно часто используются, поэтому стоит запомнить, что:
- Курсивный шрифт задается: font-style:italic;.
- Жирный шрифт задается: font-weight:bold;.
- Для возврата шрифту нормальной насыщенности устанавливается значение: font-weight:normal; или значение font-weight:400;, что в данном случае означает одно и тоже.
Вот мы с вами рассмотрели еще два свойства шрифтов. Смотрите в Демо то, что должно было у Вас получиться в конечном итоге, а мы переходим к изучению следующих свойств.