Design a simple Login & Signup form with validation using HTML, CSS & JavaScript
![]()
Hello readers! Welcome to my first blog. Since this is my first blog let me introduce myself first. I am Melani Sandalika an undergraduate of the Faculty of Information Technology, University of Moratuwa.
By going through this blog, you will be able to get an idea to create a simple login and signup form with validation using HTML, CSS & JavaScript.
A signup form is an HTML form that enables users to register in order to access a website, social media, or any other system. Login forms enable users to access that particular system by identifying and authenticating themselves. Let’s see how I have created this Login & Signup form step by step.
1. Form Structure
First, we have to create the web page structure using HTML. As you can see, this Login form and Signup form consist in same web page. First, create them separately.
To create the form, we need to use the <form> tag. Login form is made up of three <input> elements, text field for the username, password field for the password and submit field for the login button. Other than these three elements, Signup form includes email field for the user email address. <input> tag does not have a closing tag.
Within the <input> tag there is an attribute called id. It is used to access and manipulate the element in JavaScript and it can be used to style elements in CSS. Placeholder attribute shows the expected value of an input field.
Sample HTML Code:
2. Styling
By using CSS, we can add more color to our web page. There are three ways to insert a style sheet. You can use inline CSS by adding a style attribute to the relevant element and including CSS properties. If not, you can use internal CSS which is used inside the <style> element, inside the <head> section. Other way is create an external CSS file with the .css extension and link in the <head> section of HTML file. It is a best practice to use external CSS file when developing a web page.
Then within the CSS file we can add styles to our web page using tag name, id and class. Here are some major CSS styles which I have used to style this web page.
Background image
We can add a background image to the body of the web page by using background-image property. Within the brackets mention the path to the background image.
Transparent box
Can be used the background-color property to add transparency to an element. Alpha parameter in the RGBA color value specifies the opacity of a color. 0.0 is full opacity and 1.0 is full opaque. We can change the alpha value as we want.
Login icon
We can use the following code sample to place the login icon at top of the form.
Input Elements
We can style the input fields using input[type= submit]. Within the square bracket, you have to mention the type of the input. By using the hover selector, we can change the property values smoothly when we mouse over them.
Sample CSS Code:
3. Animation
First create a JavaScript file with .js extension. Then link that JS file into the HTML file using <script> tag. If we include the <script> tag within the <head> section, JavaScript file will load before loading the HTML file and may occurs few problems. So, it is a best practice to include the <script> tag above the closing </body> tag to speed up the website response time.
In order to display Login form and Signup form on one web page, we have to add an animation part using JavaScript and jquery. Therefore, include the jquery CDN within the <script> tag.
As you can see on my web page, there are two links called “LOGIN” and “SIGNUP”. When you click LOGIN, Login form will appear on the web page. When you click “SIGNUP”, Login form will disappear, and Signup form will display on the web page.
Here we need to use onhashchange event which occurs when there have been changes to the hash. (hash is the anchor part of the URL which begins with # symbol) After that bind the hashchange event to $(window). Then when there is a change in hash, the callback will fire.
location.hash property return the anchor part of the URL and location.hash.slice(1) remove the # sign from hash data. When you click the SIGNUP link, the Signup page will appear and hash will change to #signup. Within the if condition check whether location.hash.slice(1) is equal to signup. Then move the Login form100% to right and display the Signup form on the web page.
4. Form Validation
User inputs can be validated by JavaScript. IN HTML file, within the <form> tag include the onsubmit event type. Then the function can be called when the user tries to submit the form. You can use GET or POST as the method. But it is better to use the POST method as it is more secure than GET method.
Next, go to your JavaScript file and create the function. Then within the function, grab the values input by the user in the form field and check those values using the if/else block. We can use documents.getElementbyID(“ID_name”).value to grab the values input by the user. Then we need to assign those values to variables in order to use those values to check the conditions.
variable_name.length can be used to get the length of the input. Now we can check the required conditions by using if/else conditions and return true or false. If the user inputs are not valid function will return false. When the function returns true only, the user can log in or signup. Otherwise, the user will receive an error message.
If the user inputs are valid, the user can successfully log in or sign up. Then an alert box with the relevant message will be displayed. After you read the error message, click ok. Otherwise, you can not access the other parts of the web page until the box is closed.
Sample JavaScript Code:
Okay, now we are done with our simple Login & Signup page. Try with yourself!
Your first form
The first article in our series provides you with your very first experience of creating a web form, including designing a simple form, implementing it using the right HTML form controls and other HTML elements, adding some very simple styling via CSS, and describing how data is sent to a server. We’ll expand on each of these subtopics in more detail later on in the module.
| Prerequisites: | Basic computer literacy, and a basic understanding of HTML. |
|---|---|
| Objective: | To gain familiarity with what web forms are, what they are used for, how to think about designing them, and the basic HTML elements you’ll need for simple cases. |
What are web forms?
Web forms are one of the main points of interaction between a user and a website or application. Forms allow users to enter data, which is generally sent to a web server for processing and storage (see Sending form data later in the module), or used on the client-side to immediately update the interface in some way (for example, add another item to a list, or show or hide a UI feature).
A web form’s HTML is made up of one or more form controls (sometimes called widgets), plus some additional elements to help structure the overall form — they are often referred to as HTML forms. The controls can be single or multi-line text fields, dropdown boxes, buttons, checkboxes, or radio buttons, and are mostly created using the <input> element, although there are some other elements to learn about too.
Form controls can also be programmed to enforce specific formats or values to be entered (form validation), and paired with text labels that describe their purpose to both sighted and visually impaired users.
Designing your form
Before starting to code, it’s always better to step back and take the time to think about your form. Designing a quick mockup will help you to define the right set of data you want to ask your user to enter. From a user experience (UX) point of view, it’s important to remember that the bigger your form, the more you risk frustrating people and losing users. Keep it simple and stay focused: ask only for the data you absolutely need.
Designing forms is an important step when you are building a site or application. It’s beyond the scope of this article to cover the user experience of forms, but if you want to dig into that topic you should read the following articles:
- Smashing Magazine has some good articles about forms UX, including an older but still relevant Extensive Guide To Web Form Usability article.
- UXMatters is also a very thoughtful resource with good advice from basic best practices to complex concerns such as multipage forms.
In this article, we’ll build a simple contact form. Let’s make a rough sketch.
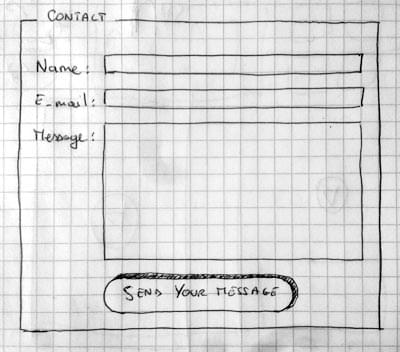
Our form will contain three text fields and one button. We are asking the user for their name, their email and the message they want to send. Hitting the button will send their data to a web server.
Active learning: Implementing our form HTML
Ok, let’s have a go at creating the HTML for our form. We will use the following HTML elements: <form> , <label> , <input> , <textarea> , and <button> .
Before you go any further, make a local copy of our simple HTML template — you’ll enter your form HTML into here.
The <form> element
All forms start with a <form> element, like this:
This element formally defines a form. It’s a container element like a <section> or <footer> element, but specifically for containing forms; it also supports some specific attributes to configure the way the form behaves. All of its attributes are optional, but it’s standard practice to always set at least the action and method attributes:
- The action attribute defines the location (URL) where the form’s collected data should be sent when it is submitted.
- The method attribute defines which HTTP method to send the data with (usually get or post ).
Note: We’ll look at how those attributes work in our Sending form data article later on.
For now, add the above <form> element into your HTML <body> .
The <label> , <input> , and <textarea> elements
Our contact form is not complex: the data entry portion contains three text fields, each with a corresponding <label> :
- The input field for the name is a single-line text field.
- The input field for the email is an input of type email: a single-line text field that accepts only email addresses.
- The input field for the message is a <textarea> ; a multiline text field.
In terms of HTML code we need something like the following to implement these form widgets:
Update your form code to look like the above.
The <li> elements are there to conveniently structure our code and make styling easier (see later in the article). For usability and accessibility, we include an explicit label for each form control. Note the use of the for attribute on all <label> elements, which takes as its value the id of the form control with which it is associated — this is how you associate a form control with its label.
There is great benefit to doing this — it associates the label with the form control, enabling mouse, trackpad, and touch device users to click on the label to activate the corresponding control, and it also provides an accessible name for screen readers to read out to their users. You’ll find further details of form labels in How to structure a web form.
On the <input> element, the most important attribute is the type attribute. This attribute is extremely important because it defines the way the <input> element appears and behaves. You’ll find more about this in the Basic native form controls article later on.
- In our simple example, we use the value text for the first input — the default value for this attribute. It represents a basic single-line text field that accepts any kind of text input.
- For the second input, we use the value email, which defines a single-line text field that only accepts a well-formed email address. This turns a basic text field into a kind of «intelligent» field that will perform some validation checks on the data typed by the user. It also causes a more appropriate keyboard layout for entering email addresses (e.g. with an @ symbol by default) to appear on devices with dynamic keyboards, like smartphones. You’ll find out more about form validation in the client-side form validation article later on.
Last but not least, note the syntax of <input> vs. <textarea></textarea> . This is one of the oddities of HTML. The <input> tag is a void element, meaning that it doesn’t need a closing tag. <textarea> is not a void element, meaning it should be closed with the proper ending tag. This has an impact on a specific feature of forms: the way you define the default value. To define the default value of an <input> element you have to use the value attribute like this:
On the other hand, if you want to define a default value for a <textarea> , you put it between the opening and closing tags of the <textarea> element, like this:
The <button> element
The markup for our form is almost complete; we just need to add a button to allow the user to send, or «submit», their data once they have filled out the form. This is done by using the <button> element; add the following just above the closing </ul> tag:
The <button> element also accepts a type attribute — this accepts one of three values: submit , reset , or button .
- A click on a submit button (the default value) sends the form’s data to the web page defined by the action attribute of the <form> element.
- A click on a reset button resets all the form widgets to their default value immediately. From a UX point of view, this is considered bad practice, so you should avoid using this type of button unless you really have a good reason to include one.
- A click on a button button does nothing! That sounds silly, but it’s amazingly useful for building custom buttons — you can define their chosen functionality with JavaScript.
Note: You can also use the <input> element with the corresponding type to produce a button, for example <input type=»submit»> . The main advantage of the <button> element is that the <input> element only allows plain text in its label whereas the <button> element allows full HTML content, allowing more complex, creative button content.
Basic form styling
Now that you have finished writing your form’s HTML code, try saving it and looking at it in a browser. At the moment, you’ll see that it looks rather ugly.
Note: If you don’t think you’ve got the HTML code right, try comparing it with our finished example — see first-form.html (also see it live).
Forms are notoriously tricky to style nicely. It is beyond the scope of this article to teach you form styling in detail, so for the moment we will just get you to add some CSS to make it look OK.
First of all, add a <style> element to your page, inside your HTML head. It should look like so:
Inside the style tags, add the following CSS:
Save and reload, and you’ll see that your form should look much less ugly.
Note: You can find our version on GitHub at first-form-styled.html (also see it live).
Sending form data to your web server
The last part, and perhaps the trickiest, is to handle form data on the server side. The <form> element defines where and how to send the data thanks to the action and method attributes.
We provide a name attribute for each form control. The names are important on both the client- and server-side; they tell the browser which name to give each piece of data and, on the server side, they let the server handle each piece of data by name. The form data is sent to the server as name/value pairs.
To name the data in a form, you need to use the name attribute on each form widget that will collect a specific piece of data. Let’s look at some of our form code again:
In our example, the form will send 3 pieces of data named » user_name «, » user_email «, and » user_message «. That data will be sent to the URL » /my-handling-form-page » using the HTTP POST method.
On the server side, the script at the URL » /my-handling-form-page » will receive the data as a list of 3 key/value items contained in the HTTP request. The way this script will handle that data is up to you. Each server-side language (PHP, Python, Ruby, Java, C#, etc.) has its own mechanism of handling form data. It’s beyond the scope of this guide to go deeply into that subject, but if you want to know more, we have provided some examples in our Sending form data article later on.
Summary
Congratulations, you’ve built your first web form. It looks like this live:
That’s only the beginning, however — now it’s time to take a deeper look. Forms have way more power than what we saw here and the other articles in this module will help you to master the rest.
How to create a registration form in HTML
 Eliza Frakes

If you’ve found yourself here, you’ve probably hit some roadblocks while trying to create a registration form in HTML. Don’t worry: you’re not alone. Coding even the simplest of registration forms in HTML can be a time-consuming, often frustrating process.
HTML5 is the standard code used to make most web pages work. It’s the language of the internet. But like any language, you’ll need to work hard (and get lost a few times) to become fluent.
We can’t get you to HTML fluency in 3,000 words. But we can give you the basic information you need to create a simple registration form for your website. In this post, we’ll do just that, and offer you an easier, more customisable no-code solution.
Summary
Here’s a summary of how to build an HTML registration form. If you’re more of a visual learner, we’ve also got a video tutorial below.
- Create a new HTML file and open it in a text editor.
- Inside the body element, create a form element with the action and method attributes set. (The action the attribute specifies where to send the form data, and the method attribute specifies how to send it).
- Create a label element for each field you want the user to fill out. The label should have a for attribute that matches the id of the corresponding input element.
- Inside each label element, create an input element with the type , id , name , and placeholder attributes set. The type attribute specifies the type of input (e.g. «text», «email», «password», etc.), the id attribute provides a unique identifier for the input, the name attribute specifies the name of the input field, and the placeholder attribute provides a hint for the user about what to enter in the field.
- Add a submit button to the form to allow the user to submit their information.
- Use CSS to style the form elements and make the form visually appealing.
Make your life easier by signing up to Paperform, which empowers you to build beautiful, smart forms in seconds without any code.
Want to build forms with no-code?
Start your 14-day free trial now. No credit card needed.
Creating an HTML registration form in 6 steps
Here’s how to create a simple HTML form in six steps—code included. Read on for a step-by-step walkthrough, or check out the video below.
Step 1. Choose an HTML editor
Just like you need a word processor to create a text document, you need a text editor to create HTML code. These development tools convert the weird and wonderful code you type into a registration form.
If you’re looking for the simplest solution, you could always write out your code in TextEdit on a Mac and save the file as a web page. This won’t give you any frills or additional features, but it’ll get the job done. Go to Format > Plain Text to make sure TextEdit doesn’t alter your symbols.
If you want a designated HTML editing tool, there are dozens (if not hundreds) to choose from. There’s no “best” option, but there are a few key features to look for if you’re going to download a new tool.
1. Error detection: Automatically highlight syntax errors to make fixes easier.
2. Auto-completion: Suggests relevant HTML elements based on previous changes (saves you a bunch of time with long code).
3. Syntax highlights: Applies colours to different HTML tags based on certain categories to make it easier to read and sort your code.
4. Search and replace: Locate and overwrite all instances of a particular code rather than editing each individually.
If you’re really getting into coding there are a few more features to look out for, but for making a basic registration form these four should be more than enough.
Now when it comes to picking an app, the choice is yours. There’s no right answer. Want something that you can use in your browser? Try Codepen. Barebones? Notepad++. A minimalistic UI and intuitive input field? Sublime Text all the way.
Our co-founder and resident code-geek, Dean, swears by VS Code.
If you’re overwhelmed by the options, we recommend downloading a relatively user-friendly and free option like Sublime Text and learning as you go.
It’s worth noting that most HTML editors won’t come with any form templates—they just give you the blank page. When it comes to creating the form itself, the artistry is all on you.
Step 2. Create your HTML file
Time to get down to business. Open your text editor of choice, create a new file, and save it with the .html extension. You can label your form however you like, like bestformever.html.
Once you’ve signposted to the editor that you’re creating HTML code, it should automatically generate the following code for you:
Some editors won’t autofill. That’s okay. Just copy and paste the code above and you’ll get the same effect.
Step 3. Add basic text fields
Alright. It’s time to start adding the relevant code and turn that barebones HTML file into a registration form. Here’s the code we’ll be using.
If you’re new to HTML, that might just look like a heap of letters and icons. You don’t need to understand what they mean, but troubleshooting is quite a bit easier if you have a handle on the basics.
We’ll break them down below if you’re interested. Feel free to skip ahead if not.
An HTML form is made up of form elements These are things like text boxes, radio buttons, checkboxes and dropdown menus that make it possible for folks to interact with your live form.
Each element has its own specific tag–that’s the word in between the chevrons. For example, the HTML <form> tag defines your code as a form, while <textarea> can be used to collect user inputs.
These elements are like shoes: they always come in pairs. All tags you want to include in your form must be inserted between the open <form> and closed </form> tags.
That’s the SparkNotes. The basic HTML code (above) will output something that looks like this:
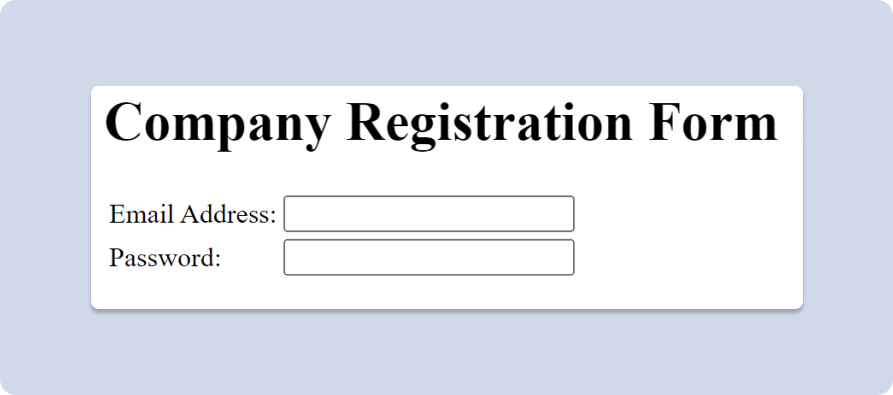
Image Source: Paperform
So how did the magic happen? The tag <tr> tells your form to arrange the responses in a row, while <td> (which stands for table data) signposts that you want to capture whatever respondents type. In this instance we added two fields for simplicity’s sake:
- Enter email address
- Enter passwords
In terms of the form itself, let’s be honest. It’s not winning any design awards. Unless you spend the time learning the ins and outs of HTML, your registration form will look pretty drab. Don’t shoot the messenger.
Step 4. Add additional fields
Emails and passwords are a good start, but most businesses need a little more from their registration form. Luckily, once you know how to add one field, adding another isn’t too hard.
Your options are diverse. You can add an image, a radio button, or an open text field based on what input you choose. Just copy the code below and insert the input type you want between the chevrons.
If you’re not sure how to label your input, W3Schools has a great list to guide you. For registration forms, you might consider adding the following fields.
- Name
- Username (if different)
- Password
- Email address
- Phone number
Selecting the correct input type is crucial. It tells the form how the text should be displayed on the screen, so if it’s done incorrectly, you’ll get an error message.
Step 5. Add placeholders
Placeholder text lives inside your form fields and prompts respondents to answer in a particular way. It’s mainly used as a nudge in the right direction, but it’s also a useful strategy to make forms more engaging or add a bit of flair.
Let’s say you’re adding a name field to your form. You could type «insert name» and be done with it, or you could spruce things up by adding «Bruce Wayne» as placeholder text. It adds a bit of personality and makes it clear to respondents how they should interact with the field.
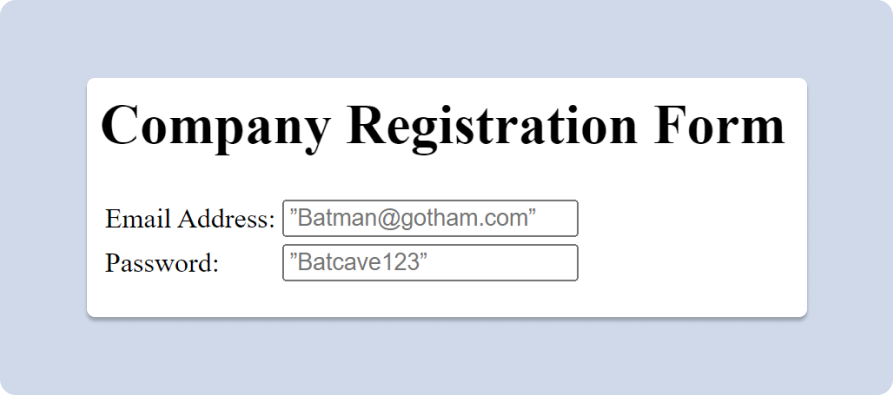
It’s fairly simple to add placeholders to your HTML registration form. After the input type, just insert «placeholder kg-card kg-image-card kg-card-hascaption»>Image Source: Paperform
Not exactly the grand reveal you were expecting, right? Can you imagine a potential customer searching for your business on Google and being met with this page? Or sharing this on social media? Not ideal.
It’s safe to say this kind of HTML login form wouldn’t exactly encourage clients to sign up for your business. When all is said and done, you might look at your HTML form and have one question on your mind…
Why is my HTML form so ugly?
So you’ve got an ugly form. It happens. In the grand scheme of things, beauty isn’t everything. But when it comes to enticing clients to fill out your online form, it kinda is.
At the end of the day, a clunky form doesn’t entice people to fill it out. And that’s an issue. HTML forms tend to be boring, difficult to customise, and a chore for form makers and takers alike.
This is down to the simple nature of HTML. It’s a framework that helps complete the necessary form actions. It’s a practical language—it’s not concerned about bells and whistles.
So what if you want a few bells and whistles? The best option is to use an online no-code online form builder like Paperform to do the heavy lifting for you.
You can build beautiful registration, feedback forms, booking pages, and even fully functional ecommerce stores, all without writing a lick of code. They’ve got the backend power you need to gather and organise all of your data and the design tools you want to make it look snazzy. Win-win.
Form a better life now.
But maybe you’re really set on the whole HTML thing (or you’re just a glutton for punishment). Either way, if you’re really committed to your HTML registration form you can improve its looks by using CSS.
Step 6. Customise your HTML form with CSS
CSS is a programming language you can use to style form elements in an HTML document. It customises how HTML elements are displayed on the screen and lets you change nearly anything.
There’s just one catch: you have to know how to do it. If you’re willing to learn the code, you can adjust font colours and opacity, add images, link to another page with a <href> tag, and do a lot more. If you want to know all your options, we recommend W3School’s CSS Reference list.
For the sake of our tutorial, we’ll be giving our HTML registration form a brief makeover with CSS. We’ll customise the text colour, and font style and tweak the margins for an all-around (slightly) better appearance.
To add colours, you’ll need to find and add your colour code. The one we used is highlighted below. You can use any online CSS colour picker tool (like this one) to find the HEX code that matches your colour scheme.
Here’s the code we’ll use to customise our form.
Pop that at the top of your CSS style sheet and your form will end up looking like the one below. It’s not much, but it’s a start. You can adjust the background colour and font however you like by adjusting the code above.
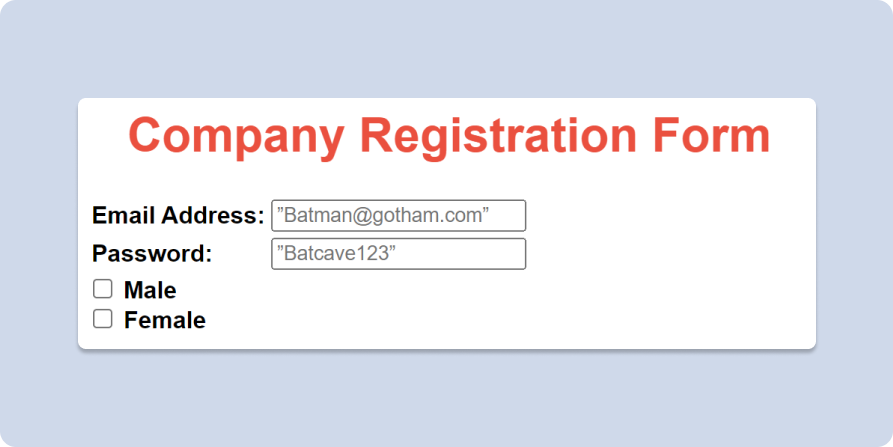
Image Source: Paperform
Challenges of creating a registration form in HTML
If you’re willing to learn how, it is possible to gather basic contact details with HTML. But just because you can do it, doesn’t mean it’s the most efficient way. You could fill a swimming pool with an eye dropper. But why would you?
Unless you’re already a coding wiz, you’ll likely hit a few roadblocks while making even a basic HTML contact form.
1. The setup is tedious and confusing
This is the most obvious gripe of the bunch. Coding, without prior understanding, is no easy feat. There’s a reason the no-code movement has been on the rise for years.
Learning how to create even the most basic contact form from scratch requires multiple tools, tons of trial and error, and a lot of time spent getting to grips with the language of HTML.
It’s a hassle. And when you’re just looking for a quick fix to embed on your website, the process can be a lot more trouble than it’s worth.
And that’s before you get into how to access, organise, and funnel the data you collect from your registration form. Without built-in integrations or data analysis, you’ll be on your own when it comes to figuring out how to make sense of your form submissions.
2. The results are boring
When you do manage to finish your simple contact form, you might be disappointed in your results. Amateur HTML forms tend to be dull. They all look about the same: mostly black and white, filled with the same old form fields, with no real branding to speak of.
Unless you know how to customise thoroughly with CSS, they’re going to stay looking dull. And let’s face it: learning one coding language is hard enough as it is. Learning two just to be able to adjust the colours of your form is next to impossible. Who has time for that?
3. There are no templates
Nobody likes the dread of a blank page. Form building is no different. Especially for those new to coding and web design, creating an entire form from nothing is intimidating.
Most text editors don’t come with any templates, which means it’s up to you to create everything from the first question to the final submit button. That’s a lot of work for a simple registration form.
Make beautiful registration forms effortlessly with Paperform
Learning how to code can be fun, empowering, and creative. But if you plan on using it to create long-term digital solutions, like creating a registration form for your business, HTML may not be the best solution.
Think of learning to code like learning how to woodwork. In a few weeks, you might get good enough to build yourself a simple table. But if you started tearing down the walls by yourself, your partner might wield the hammer on you.
If you’re not confident you know how to create, troubleshoot, and access all of your form data using HTML and CSS, you shouldn’t use it for your business. It’s just not worth the headache.
Luckily, you don’t have to. There are loads of online, no-code tools available to help small business owners create powerful, beautiful online solutions without ripping their hair out.
Of course, we think Paperform is the best of the bunch. We may be biased, but we really do believe it. Paperform was designed to help people exactly like you: scrappy entrepreneurs who crave the freedom and creativity coding provides, without the hassle of learning to code.
And in the past five years, we’ve gotten pretty good at doing just that. You can use our intuitive, doc-style editor to create contact forms, registration forms, booking pages, ecommerce sites, quizzes, surveys… we could go on all day. If it collects data online, you can build it in Paperform.
Paperform solves all of the roadblocks you’ll hit when building a registration form in HTML.
- It’s entirely no-code and easy for anyone to use. (Yes, even the tech-averse).
- It’s anything but drab. Paperform integrates with Unsplash, Giphy, and Adobe Creative Cloud so you can easily add your branding and personality to your form. Our doc-style editor has over 25 field types to choose from, a built-in image editor, and an intuitive design portal that makes tinkering a breeze.
- There are over 650 custom-made templates to choose from, each fitted to a specific use case. You can pick a template because it fits your use case, or just because you like the style. Once you pick your starting point, you can customise your template as much or as little as you want.
Just open up the editor and click anywhere to start building your form in minutes. Paperform is designed to be intuitive, but if you get stuck, you’re not alone. Our live customer support team is there to help at any time. Just click on that blue chat icon to find out.
We integrate with over 3,000 of your favourite apps to share form data across platforms and automate everyday processes, from updating customer profiles in your CRM to subscribing a respondent to your email newsletters. With all the design tools and advanced features you need, you can create a form your clients will actually want to fill out.
Once you’re happy with the registration form you’ve created, you can host it as a standalone site with a custom URL, share it on all your platforms, or embed it into your pre-existing site.
And when it’s time to analyse your results, we’ve made it easy. Just hop into our built-in analysis portal to view all your form responses and go over helpful visualisations of your form data.
Of course, you could also turn on automatic emails to have each response sent to you immediately, or organise the answers in the software of your choice automatically. You can also have email messages sent to your respondents automatically to confirm that you’ve received their information.
Registration forms are just the beginning of what you can make with our digital suite of tools. But don’t take our word for it. Give it a go yourself with our 14-day free trial, no credit card required.
Save time, save headaches, and rest easy knowing your registration form will work great and look great doing it. It’s possible with Paperform.
Формы в HTML
Форма в HTML — раздел документа, позволяющий пользователю вводить информацию для последующей обработки системой. Синтаксически форма в HTML задаётся с помощью элемента <form> и в дополнение к разметке обычных элементов содержит разметку для элементов управления.
Формы предназначены для пересылки данных от пользователя к Web – серверу .
Как обрабатываются данные форм на стороне Web – сервера рассмотрим при изучении языка PHP .
Рассмотрим пример создания формы :
Создание формы для регистрации сайта
Создание формы для регистрации сайта
 Создание формы для регистрации сайта
Структура документа с формами
Форма добавляется в HTML – документ при помощи парного тега <form> . Внутри тегов <form> и </form> могут располагаться теги <input> , <textarea> и <select> .
Атрибуты тега <form>
action – Задает URL – адрес программы обработки формы .
method – Определяет , как будут пересылаться данные из формы Web – серверу , имеет два значения – GET и POST :
GET – Данные формы пересылаются путем их добавления к URL – адресу после знака (?) в формате .
Метод GET применяется . Когда объем персональных данных невелик , так как существует придел длины URL – адреса . Длина не может превышать 256 символов .
POST — предназначен для пересылки данных большого объема , файлов и конфиденциальной информации ( например , паролей ):
enctype – задает MIME – тип передаваемых данных . Может принимать два значения :
application/x-www-form-urlencoded — применяется по умолчанию :
multipart/form-data — указывает при пересылке Web – серверу файлов :
name – задает имя формы :
target – указывает , куда будет помещен документ , являющийся результатом обработки данных формы Web – сервером . Атрибут может содержать имя фрейма или одно из зарезервированных значений — _blank , _self или _parent :
autocomplete – Этот атрибут помогает заполнять поля форм текстом, который был введён в них ранее.
Имеет два значения :
on – Включает автозаполнение текста.
Off – Отключает автозаполнение. Это значение обычно используется для отмены сохранения в браузере важных данных (паролей, номеров банковских карт), а также редко вводимых или уникальных данных (капча).
Тег <input>
Тег <input> позволяет вставить в форму элементы управления , например , текстовое поле , кнопку или флажок . Этот тег имеет следующие атрибуты :
type – задает тип элемента . В зависимости от значений этого поля создаются следующие элементы формы :
Значение атрибута type
text – текстовое поле ввода :
password – текстовое поле для ввода пароля , в котором все вводимые символы заменяются звездочками :
file – поле ввода имени файла с кнопкой Обзор . Позволяет отправить файл на Web – сервер :
checkbox – поле для установки флажка , который можно установить или сбросить :
radio — элемент — переключатель ( иногда их называют радио кнопками ) :
reset – кнопка , при нажатии которой происходит очистка данных , введенных в форму :
submit – кнопка , при нажатии который происходит отправка данных , введенных в форму :
button – обычная командная кнопка :
hidden – скрытый элемент , значение которого отправляется вместе со всеми данными формы . Элемент не показывается пользователю , но позволяет хранить , например , данные из предыдущий формы (если пользователь последовательно заполняет несколько форм ) или уникальное имя пользователя :
name – задает имя элемента управления . Имя должно обязательно указывается латинскими буквами (например , field ) или комбинаций латинских букв и цифр ( например , field1 ) . Имя элемента не должно начинаться с цифры :
disabled — запрещает доступ к элементу формы . При наличии атрибута элемент отображается серым цветом :
readonly – текстовое поле не может изменяться пользователем.
Текстовое поле и поле ввода пароля
Для текстового поля и поля ввода пароля применяются следующие атрибуты :
value – Задает текст поля по умолчанию :
maxlength – указывает максимальное количество символов , которое может быть введено в поле :
size – определяет видимый размер поля ввода :
readonly — указывает , что поле доступно только для чтения . При наличии атрибута значений поля изменить нельзя :
minlength – Задаёт минимальное число символов, которое может быть введено пользователем в текстовом поле. Если число символов меньше указанного значения, то браузер выдаёт сообщение об ошибке и не отправляет форму.
Кнопки Сброс , Отправить
Для кнопок используется один атрибут :
value – задает текст , отображаемый на кнопке :
Скрытое поле hidden
Для скрытого поля указывается один атрибут type :
Поле для установки флажка
Для полей — флажков используются следующие атрибуты :
value – задает значение , которое будет передано Web – серверу , если флажок отмечен . Если флажок снят , значение не передается . Если атрибут не задан , используется значение по умолчанию — on :
checked – указывает , что флажок по умолчанию установлен :
Элементы checkbox можно объединить в группу . Для этого необходимо установить одинаковые значение атрибут name . Чтобы получить все значения на сервере , после названия поля следует указать квадратные скобки ( тот признак массива в языке PHP ) :
Элемент-переключатель
При описании элемента — переключателя используются такие атрибуты :
value – указывает значение , которое будет передано Web – серверу , если переключатель выбран :
checked — обозначает переключатель , выбранный по умолчанию :
Элемент-переключатель может существовать только в составе группы подобных элементов , из которых может быть выбран только один . Для объедения переключателей в группу необходимо установить одинаковые значение атрибута name и разное значение атрибута value .
Текстовая область
Парный тег <textarea> создает внутри формы поле для ввода много строчного текста :
В окне Web – браузера поле отображается в виде прямоугольной области с полосами прокрутки .
Тег имеет следующие атрибуты :
name – уникальное имя поля :
cols – число столбцов видимого поля :
rows – число строк видимого текста :
disabled – Блокирует доступ и изменение поля . Оно в таком случае отображается серым и недоступным для активации пользователем.
Когда к тегу <input> добавляется атрибут readonly , текстовое поле не может изменяться пользователем .
Тег <select> Список с предопределенными значениями
Тег <select> создает внутри формы список с возможными значениями :
Тег <select> имеет следующие атрибуты :
name — задает уникальное имя списка :
size – определяет число одновременно видимых элементов списка :
По умолчанию size имеет значение 1 :
multiple – указывается , что из списка можно выбрать сразу несколько элементов одновременно . Чтобы получить все значения на сервере , после названия списка следует указать квадратные скобки ( это признак массива в языке PHP ) :
Внутри тегов < select> и </select> располагаются теги <option> , с помощью которых описывается каждый элемент списка .
Тег <option> имеет следующие атрибуты :
value – задает значения , которое будет передано Web – серверу , если пункт списка выбран . Если атрибут не задан , посылается текст этого пункта :
Если выбран пункт (элемент 1) , то посылается "select1" = Элемент1
Если выбран пункт (элемент 2) , то посылается "select2" = Элемент2
selected — указывает , который пункт списка выбран изначально :
Тег <optgroup>
С помощью тега <optgroup> можно объединить несколько пунктов в группу . Название группы указывается в атрибуте labe l :
Тег <label>
С помощью тега <label> можно указывать пояснительную надпись для элемента формы . Тег имеет два атрибута :
for – Позволяет указывать идентификатор элемента , к которому привязана надпись . Точно такой же идентификатор должен быть указан в атрибуте id элемента формы :
Атрибут id может иметь практически все теги . В большинстве случаев он предназначен для доступа к элементу из скрипа . Если элемент формы разместить внутри тега <label> , то надпись будет связана с элементом и без указания атрибута for :
Форма регистрации
Форма регистрации
 Форма регистрации