Как сделать переливающийся текст в html

Вы можете использовать свойство CSS background-clip и background-image в сочетании с linear-gradient , чтобы создать переливающийся текст в HTML.
Например, следующий код создаст текст, который переливается от красного до синего цвета:
Здесь мы установили фоновое изображение как линейный градиент, который идет от красного до синего цвета с помощью linear-gradient . Затем мы применили свойство background-clip к тексту, чтобы оно совпадало с фоном и стало переливаться в соответствии с ним. Свойство color было установлено на transparent , чтобы сделать текст невидимым и позволить фону показаться внутри текста.
Обратите внимание, что это свойство не поддерживается во всех браузерах. На сайте Can I use можно проверить реализовано ли данное свойство в конкретном браузере.
Creating Animated Gradient Texts (pure HTML and CSS!)
We’ll use plain HTML and CSS but feel free to use your favorite UI or styling
library as you follow along!
Creating gradient text (w/o animation)
First, we’ll create a text with a gradient background but no animation.
For starters, let’s put some HTML markup to work with together and apply some boilerplate CSS styles:
Exit fullscreen mode
If you’d like, you could use the fancy pants nth-child(. ) selectors instead of heading-line-first etc. ��
To add the gradients, we’ll set the color to transparent , the background-image to linear-gradient(. ) with our favorite colors, and background-clip to text to only render the gradient within the boundaries of the text. ����
Exit fullscreen mode
This is what you should end up with ����

Animating the gradient
In this section, we’re only going to animate the gradient background. To add some more spice to the animation, we’re also going to animate white background of each heading. That’s gonna be covered in the next section though!
We now have a solid foundation to implement the animation!
Let’s think about how the animation should look from a visual standpoint.
When the page loads, what colors should all the headings be? It should probably look like this, where the first heading has the gradient background and the rest have white backgrounds ����

Then, after a little while, the first gradient should start fading away and the second one should start fading in. ����

Finally, the first line should be white and the second should have the gradient. ����

The same applies to the third line. Once that’s finished, the first line’s gradient appears again and the cycle restarts.
You can see how the gradients are fading in and out as we move the slider ����
To make the animation, we want to divide it into 6 parts. In each part, either
- one heading will have the gradient background (the rest will have white background)
- two headings will be fading in/out
We can use the table below to know what exact behavior we want to model in CSS:
| Part | Heading 1 | Heading 2 | Heading 3 |
|---|---|---|---|
| 1 | Gradient | No gradient | No gradient |
| 2 | Fading out | Fading in | No gradient |
| 3 | No gradient | Gradient | No gradient |
| 4 | No gradient | Fading out | Fading in |
| 5 | No gradient | No gradient | Gradient |
| 6 | Fading in | No gradient | Fading out |
We have now done most of the hard work. Now it’s time to translate the table above into CSS.
The key thing we’ll be animating is the opacity of the gradient background.
When we want the gradient to be visible, we’ll set it to 1 and when we want it to be invisible, we’ll set it to 0 .
Before we can do that, however, we need to make sure that there is a white background underneath the gradient.
To do that, we’ll need to wrap the heading lines in span elements, add class heading-line-gradient to them and leverage the ::before pseudo-element.
Exit fullscreen mode
The .heading-line-gradient will have the gradient background and .heading-line::before will have the white background.
Exit fullscreen mode
Finally, let’s focus on the animation! We’ll start with the first heading. We’ll be animating the opacity of the heading-line-gradient class.
To define the animation, we’ll use the @keyframes rule and we’ll use the animation property to apply it.
We’ll set the animation duration to 8s and set infinite as the number of iterations. ����
Exit fullscreen mode
We’ll do the same for the second and third headings. ����
Exit fullscreen mode
This is what you should end up with ����
Animating white background
To make the animation stand out, we’ll have to animate the white background of the heading as well.
Take one more look the what we want to achieve ����
You can notice that the white background is sort of fading in when the gradient is fading out and vice versa.
The effect is subtle, but it gives the animation a little bit more spice.
We can’t, however, animate the white background for the whole duration of the gradient animation. That would look odd as the text would be almost invisible at one point.
Instead, we’ll only start fading the white background away when the gradient is halfway through its fade-in animation and vice versa.
Play around with this widget to see how the opacity of the gradient and white background should behave ����
Now that we have a better understanding of when to animate the white background, let’s create a table that we’ll later translate to CSS.
This table only deals with the first heading but the same logic applies to the second and third heading as well.
Now that we’re animating the white background as well, we’ll need to split the animation into 12 steps (instead of 6).
| Part | Gradient opacity | White background opacity |
|---|---|---|
| 1 | 1 | 0 |
| 2 | 1 (start to fade out) | 0 (start to fade in) |
| 3 | 0.5 (still fading out) | 1 (already faded in) |
| 4 | 0 (faded out) | 1 |
| 5 | 0 | 1 |
| 6 | 0 | 1 |
| 7 | 0 | 1 |
| 8 | 0 | 1 |
| 9 | 0 | 1 |
| 10 | 0 (start fading in) | 1 |
| 11 | 0.5 (halfway faded in) | 1 (start fading out) |
| 12 | 1 (faded in) | 0 (faded out) |
I know that this table seems to be a bit overwhelming and a bit tedious to put together
You can (and I highly encourage you to) create analogical tables for animating the second and third headings.
Anyways, we have done a lot of hard work, the last bit remaining is to express this table in CSS.
Let’s start with the first heading. ����
Exit fullscreen mode
Analogically, we want to animate the second and third headings’ white backgrounds. ����
Exit fullscreen mode
Source code
You can find the source code for this tutorial on CodeSandbox.
If you liked this tutorial, you can also check out and subscribe to my YouTube channel and my blog!
CSS Rainbow Text
In this article, we’ll talk about what is a Rainbow text and demonstrate building one through a basic example. If you are interested in generating code for text with any gradient color, check out our CSS Text Gradient Generator tool.
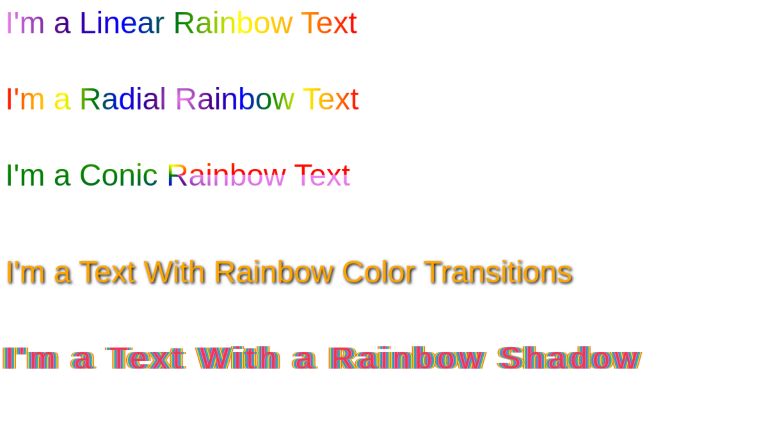
Rainbow Text is a text with a color pattern associated with it, representing the 7 colors of Rainbow; namely Violet, Indigo, Blue, Green, Yellow, Orange, and Red. Using different tricks, this pattern can be applied to any color property such as color, border, or shadow. Mostly, it is the color.
Let’s start writing basic HTML and CSS for building different types of Rainbow texts.
Hi, I’m a Rainbow Text
To give it a rainbow background, we will first give the whole element a background gradient.
Hi, I’m a Rainbow Text
We don’t want the background gradient to cover the entire element background gradient, rather be clipped to the text.
Hi, I’m a Rainbow Text
Setting the background-clip property to text is non-standard but happens to be well supported in modern browsers, with the exceptions of IE and Opera Mini, which aren’t widely used. You can find the support details here. The -webkit-background-clip prefix is required by some modern browsers and supported by the remainder so it’s OK to just use the prefix if you want minimal CSS. To be on the safe side, it’s probably best to futureproof it by including the unprefixed background-clip property as well.
The rainbow pattern is there but we can’t really see it until we set the text’s own color as transparent.
Hi, I’m a Rainbow Text
So our final CSS will be (along with other deemed-as-necessary adjustments)
The background-image property accepts the following types of gradients
- Linear (Takes direction as optional first arguments)
- Radial ( Takes shape, size and position as optional first arguments)
- Conic ( Takes rotation angle and centre position as optional first arguments)
More on background-image here.
Using this combination of background-image and background-clip property values, we can create countless variations of Rainbow texts. Some of them will be shown in the Codepen to follow.
In some cases, you may need to show rainbow colors one by one for a text, and loop it infinitely. This can be achieved by applying an animation that changes the colors and then repeats.
We can use the power of multiple text shadows to create a rainbow shadow pattern.
The shadows may not be very useful but there could be some possible use cases.
Conclusion
In this article, we went through how we can create variations of rainbow texts using powerful CSS properties. Note that the properties are generic, so the rainbow pattern is one of the many color patterns you can create using these properties.
UnusedCSS helps website owners remove their unused CSS every day. Sign Up to see how much you could remove.
Переливающийся текст при наведении
Подскажите как сделать эффект переливания цвета у текста при наведении?
Эффект должен быть похож на волну, пересекающую текст слева на право. В учебнике html не нашел как сделать.
Спасибо тем, кто поможет!
![]()
Такое нужно было?
![]()
Решение SVG + CSS
При наведении begin="svg1.mouseenter" заполнение многоцветным градиентом слева-направо.
При покидании курсора begin="svg1.mouseleave" возврат заполнения градиентом
Двухцветный градиент слева-направо и назад
Переход при наведении с одной пары градиентов на другую пару градиентов
Заполнение цветом с помощью JS
Вращение цветной градиентной полосы
![]()
Зачем вам эта вырвиглазная хрень?
![]()
Дизайн сайта / логотип © 2023 Stack Exchange Inc; пользовательские материалы лицензированы в соответствии с CC BY-SA . rev 2023.5.24.43458
Нажимая «Принять все файлы cookie» вы соглашаетесь, что Stack Exchange может хранить файлы cookie на вашем устройстве и раскрывать информацию в соответствии с нашей Политикой в отношении файлов cookie.