Введение в HTML импорты
Template, Shadow DOM, и Custom Elements позволяют вам строить UI компоненты проще и быстрее. Однако, это не самый эффективный способ загрузки ресурсов HTML, CSS и JavaScript по отдельности.
Для загрузки библиотек типа jQuery UI или Bootstrap требуются отдельные тэги для JavaScript, CSS, и Web шрифтов. Все становится проще при использовании Web Components с несколькими зависимостями.
HTML импорты позволяют загружать ресурсы как совокупность нескольких файлов этого типа.
Предлагаю вам ознакомиться с видео по данной теме.
Использование HTML импортов
Чтобы загрузить HTML файл, добавьте тэг link с import ‘ом в параметре rel и href , содержащий путь до нужного файла. К примеру, если вы хотите загрузить файл под названием component.html в index.html , то все должно выглядеть так:
index.html
Вы можете загружать любые ресурсы, включая скрипты, таблицы стилей и шрифты:
component.html
doctype , html , head , body необязательны. HTML импорты автомагически загрузят все указанные элементы, добавят их на страницу и запустят JavaScript, если имеется.
Порядок исполнения
Браузеры обрабатывают контент по порядку. Это означает, что script в начале HTML будет загружен раньше, чем то же самое, но в конце. Учтите, что некоторые браузеры ожидают завершения исполнения скрипта перед тем, как загружать следующие элементы.
Во избежание блокировки тэгом script оставшегося HTML можно использовать атрибуты async / defer (также можно переместить все скрипты в конец страницы). defer указывает на то, что код можно запустить лишь после загрузки HTML. async позволяет браузеру выполнять эти два действия параллельно.
Итак, как же работают импорты?
Скрипт внутри HTML импорта работает как обычный тэг script с атрибутом defer . В примере ниже index.html запустит script1.js и script2.js внутри component.html перед исполнением script3.js .
index.html
component.html
- Загружается component.html из index.html и ожидает исполнения;
- Загружается script1.js в component.html ;
- Загружается script2.js в component.html после script1.js ;
- Загружается script3.js в index.html после script2.js .
За рамками происходящего
На самом деле, HTML импорты не могут перенести полностью файл с другого источника. К примеру, вы не можете импортировать в http://example.com/ страницу http://webcomponents.org/.
Чтобы избежать этого ограничения, используйте CORS (Cross Origin Resource Sharing). Чтобы узнать больше об этой технологии, прочтите эту статью.
Объекты window и document в импортируемых файлах
Ранее я упоминал то, что импортируемые JavaScript будут запущены на странице. К сожалению, такое нельзя сказать об импортируемых HTML файлах. Чтобы такое происходило и с ними, надо дописать немножко скриптов.
Остерегайтесь того, что объект document в импортируемом файле будет ссылаться на страницу оригинала.
Используя написанный ранее код в качестве примера, заставим document в index.html и component.html ссылаться на document в index.html .
Внесем небольшие изменения в наши файлы.
index.html
Для получения document из component.html дополните ваш код с document.currentScript.ownerDocument .
component.html
Если вы используете webcomponents.js , воспользуйтесь document._currentScript вместо document.currentScript . Нижнее подчеркивание в currentScript используется для поддержания браузеров, не способных работать с этим компонентом без использования сего знака.
component.html
Написав вот это в начале вашего скрипта, можно легко получить доступ к document из component.html , даже если браузер не поддерживает HTML импорты.
Вопросы производительности
Один из плюсов использования импортов — возможность самостоятельно распределить нагрузку страницы и порядок обработки импортируемых объектов. Но это еще и означает, что HTML код увеличится. Вообще, есть несколько пунктов для сравнения:
Зависимости
Что делать, если несколько вставляемых документов ссылаются на одну и ту же библиотеку? Например:
Вы загружаете jQuery в обоих документах, из-за чего при импорте этих документов библиотека в конечном документе будет исполнена дважды.
index.html
component1.html
component2.html
Данная проблема крайне легко решается в импортах.
В отличие от тэга script , объекты нашей статьи не загружают повторно один и тот же материал. Смотря на последний пример, достаточно обернуть тэг script HTML импортом, и данный ресурс не будет загружен дважды. 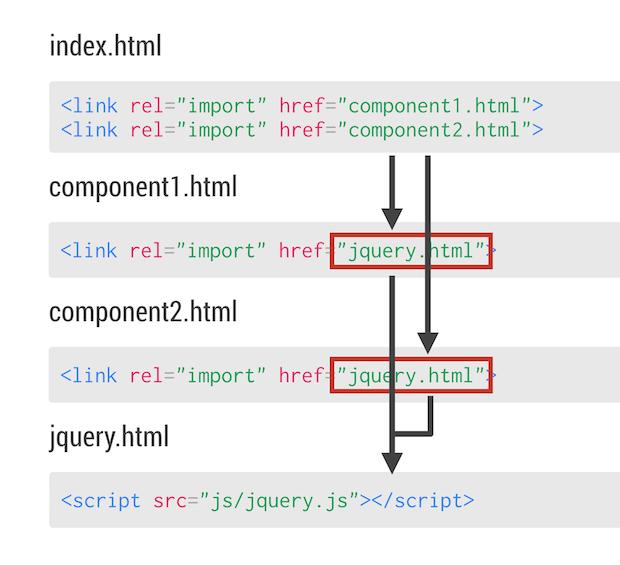
Но есть и другая проблема: теперь файлов для загрузки стало больше. Что делать, если таких будет не два, а гораздо больше?
К счастью, нам на помощь идет инструмент под названием «Vulcanize».
Объединение сетевых запросов
Vulcanize — инструмент объединения нескольких HTML файлов в один, с помощью чего число подключений к сети в целях загрузки необходимых документов сокращается. Вы можете установить его с помощью npm и использовать в командной строке. Также существуют аналоги для grunt и gulp , с помощью чего можно сделать «Vulcanize» частью вашего процесса сборки.
Для объединения файлов index.html используем следующий код:
При исполнении данной команды все зависимости index.html будут соединены в файле vulcanized.html .
Прочитать больше о данном инструменте можно здесь.
Сочетание импортов с Template, Shadow DOM и Custom Elements
Для тех, кто не знает о данных технологиях: С templates определение содержания пользовательского элемента может быть декларативным. С Shadow DOM styles , ID и classes элемента можно использовать немного иначе. С Custom Elements можно создать собственные HTML тэги. Неплохо, не так ли?
Объединение импортов с собственными веб-компонентами получит модульность и возможность многократного использования. Любой сможет их использовать, добавив лишь тэг link .
x-component.html
Обратите внимание, что объект document в x-component.html такой же, как и в index.html . Не нужно писать ничего сложного, все работает само и за вас.
Поддерживаемые браузеры
HTML импорты поддерживаются браузерами Chrome и Opera. Firefox на данный момент отложил добавление данной фичи, так как «у них есть более приоритетные задачи».
How to Link JavaScript to HTML
To link a JavaScript file to an HTML document, use the <script> tag. You can also use this tag to embed JavaScript code within the HTML document.
Linking to an External JavaScript File
To link to an external JavaScript file, use <script src=»https://www.qhmit.com/html/howto/myExternalFile.js»></script> where myExternalFile.js is the location of the external file.
The above example links to an external JavaScript file. The location of the JavaScript file is provided as the value for the src attribute. When the HTML file loads, the JavaScript file is also loaded.
Placement of the <script> Tags
External JavaScript files are often linked to from the document <head> but this is not a requirement. You can also place the link within the document <body> element. In fact, more and more developers are linking to their JavaScript files from the bottom of the HTML document (just before the closing </body> tag) for performance reasons. Doing this allows the rest of the HTML page to load without having to wait for external JavaScript resources to be downloaded first.
However, there may be times when placing it in the <head> is more appropriate (for example, if the JavaScript needs to be available to the page as it’s loading).
Embedded JavaScript
You can also use the <script> element to embed JavaScript code into the HTML page.
This second example uses exactly the same JavaScript as the first example (only the text has changed). The only difference is that the JavaScript is now embedded into the HTML document, as opposed to being located in an external file.
Again, this doesn’t necessarily need to be in the <head> element — it could be located anywhere within the HTML document.
The type Attribute
You can use the type attribute to explictly state the script type. If you omit this attribute the script will be treated as JavaScript. So there is no need to use this attribute if the script is in JavaScript.
If the script is not written in JavaScript, you should use the type attribute to explicitly state the type of script.
Link CSS and Js Files With an HTML File
![]()
When you’re working with HTML, styles, and scripts and you’re working on a big project, I really recommend separating files in different folders. Have all of your CSS files in one folder and all your JavaScript files in another folder. Do the same for your HTML files.
To link a CSS file with your HTML file, you have to write the next script on your HTML file inside the head tag.
<link rel=¨stylesheet¨ type=¨text/css¨ href=¨..\[folder_name]\[file_name].css¨>
If you have the CSS file in the same folder as your HTML file, you only have to write the name of your CSS file, like this (I recommend having the files in different folders associated by the type):
<link rel=¨stylesheet¨ type=¨text/css¨ href=¨[file_name].css¨>
If you’re working with a bootstrap theme, you can add the link of the file:
<link rel=¨stylesheet¨ type=¨text/css¨ href=¨[url_bootstrap_theme]¨>
To link a Js file with your HTML, you only have to add the source of the script inside the body tag or outside; it doesn’t matter.
If you have the Js file in the same folder as your HTML file you only have to write the name of your Js file, like this (I recommend having the files in different folders associated by the type):
If you are working with libraries, like jQuery, you can add the URL of the library in the source.
How to Link JavaScript to HTML
JavaScript is a very popular scripting language which is used both on the client-side as well as on the server-side. JavaScript is necessary for our web pages as it makes our web page interactive.
There are three basic requirements to become a front-end developer:
- HTML,
- CSS,
- JavaScript
HTML is shortened for Hyper text markup language that provides structure to our webpage and CSS gives style to our pages. Finally, JavaScript as mentioned earlier makes our webpage interactive. JavaScript also helps in altering Html and CSS.
Now a question arises that how can we link/connect JavaScript with HTML. Today in this article we will explore almost all the ways we can link JavaScript to HTML.
What is a script tag?
Before going into the solution of how to link JavaScript to HTML, let’s look at the script tag.
The <Script> tag is used to embed client-side scripts which are JavaScript. This tag has either scripting elements or references to another script file using the src attribute.
Syntax
This is a script tag with an src attribute in which we can provide a file name we want to reference.
Using JavaScript within HTML file
We can link JavaScript to HTML by adding all the JavaScript code inside the HTML file. We achieve this using the script tag which was explained earlier. We can put the <script></script> tag either inside the head of the HTML or at the end of the body. It is totally up to us where we want to put it and when we want JavaScript to load. Programmers usually call the script tag whenever they want to generate content or apply some action. So by looking at the following code, it is a good practice to load javaScript after the HTML body.
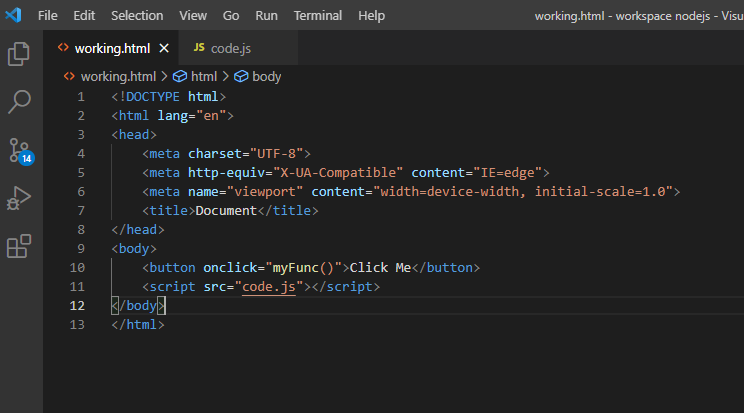
Let’s look at an example:
Example
In this example, first, we created a button in HTML. We set an event to click. Whenever a user clicks on this button the myFunc() function will get activated. After that we put a <script> tag. All the JavaScript code went here. We put a function with the name of myFunc() where we showed an alert.
Congratulations! We have successfully linked JavaScript with HTML by adding JavaScript code inside the script tag.
This method is good for small web pages or one webpage. However, as your web app grows bigger the script code will also get bigger and it will become really difficult to handle as well as to read. The solution is to write JavaScript in a dedicated separate javaScript file and provide the reference of the JavaScript file in the HTML file.
Using JavaScript in an external file
Using an external file for larger scripts is beneficial as we can divide our code into different JavaScript pages as well as in different files. It is achieved by referencing the JavaScript file name in the “src” attribute of the script tag in the HTML file.
Let us change the previous example a little. The code will remain the same. We will make another JavaScript file by the name of “code.js”. We will put all JavaScript code in the “code.js” file and provide the “code.js” reference in the HTML file.
For Example
We referenced the “code.js” file using the src attribute of <script> tag.
Now the code.js file:
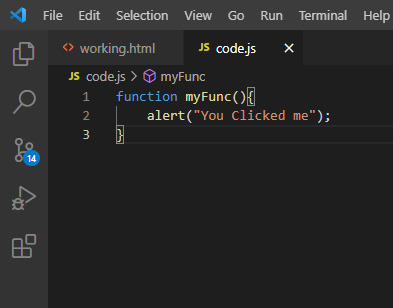
The result will be the same as the previous example i-e.
External JavaScript File Advantages
Let us formally state some of the advantages after discussing the external javaScript file:
- It separates our HTML code and JavaScript code
- JavaScript code becomes readable as well as maintainable.
- Another advantage is that cached JavaScript files act in speeding up page loading.
JavaScript Selectors
In the previous examples, we took the help of an event. Suppose, we don’t want to add an event and we want to select an element from the html file. JavaScript helps us by providing different options for this which are called JavaScript Selectors.
JavaScript Selectors main function is to select an HTML element and perform different actions on it according to our needs. JavaScript provides different options for this, one of them is the id.
We can give an element an id attribute in Html and then access it in JavaScript. We access in JavaScript by:
Id is unique and used for only one element.
JavaScript also gives us the option of selecting an element using a class attribute. We can use the class name for different elements. The Syntax is:
Another option JavaScript gives us is accessing JavaScript elements using tag names. Syntax for accessing tag names: