Как создать простой HTML сайт в блокноте
HTML-сайты не обязательно имеют примитивный дизайн. Существует множество бесплатных HTML шаблонов, ничем не уступающих по привлекательности тем, что используются в конструкторах сайтов или CMS. Но большие проекты на них неудобно делать. Много страниц – много мороки, поскольку редактирование каждой требует копания в коде. У них нет панели управления, также все страницы будут статическими – никаких блогов, форумов и т. д.
HTML-сайты чаще всего имеют формат лендингов и сайтов-визиток. В этих сценариях они себя более-менее оправдывают – работают быстро, не грузят сервер, не требуют подключения базы данных. Весь контент содержится в самих страницах. HTML отвечает за вёрстку, структуру блоков, а при помощи каскадных таблиц стилей (CSS) этим элементам можно придать необходимый внешний вид и формат (шрифт, цвет, фон, форма, отступы и т д.).
Вёрстка в HTML бывает табличной (table – устаревший стандарт) и блочной (div – именно её сейчас используют). Язык использует обширный набор тегов, почти все из которых используются парой – открывающий и закрывающий теги (например, <p> </p> — тег абзаца), внутри которых содержится контент. В CSS используются атрибуты, свойства и их значения, подключаемые к отдельным элементам HTML-каркаса страницы. То есть можно выборочно придавать желаемый вид каждому элементу на сайте по отдельности.
Мы не ставим своей целью обучить вас синтаксису языков – если нужно, то без труда сможете найти сотни уроков и справочников по ним в Сети. Покажем основу – как сделать простой сайт на HTML в блокноте, создать своими руками веб-страницу по тем же стандартам, что используют все посещаемые вами сайты. На примере вы сможете уловить суть процесса, оценить для себя, интересна ли вообще эта тема.
Шаг 1 – создание страницы формата HTML
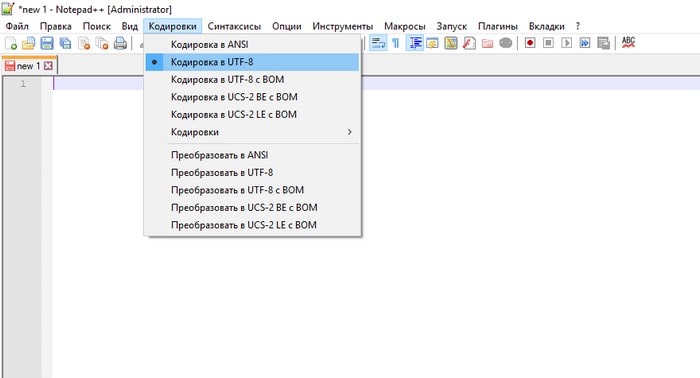
Откройте стандартный блокнот для Windows (или любой другой текстовый редактор – Notepad++, Sublime Text — неважно), откройте меню «Файл», выберите «Сохранить как», измените кодировку с ANSI на UTF-8 (для правильного отображения русских букв в браузере), впишите заголовок веб-страницы и измените расширение на html (оно идёт после точки), после чего сохраните изменения.
Шаг 2 – добавляем разметку веб-страницы
Теперь приступаем к редактированию файла. Первым делом необходимо добавить -веб-разметку – стандартный кусок кода, позволяющий браузерам распознавать контент, находящийся во внутренних тегах. Просто скопируйте и вставьте его:
- <!DOCTYPE html PUBLIC"-//W3C//DTD HTML 4.01 Transitional//EN">
- <html>
- <head>
- <meta http-equiv="Content-Type" content="text/html; charset=UTF-8">
- <title>Топовый сайт новичка</title>
- </head>
- <body>
- <h1>Это тег заголовка первого уровня для содержимого страницы</h1>
- <p>Первый абзац</p>
- <p>Второй абзац</p>
- <p>Третий абзац и т. д.</p>
- </body>
- </html>
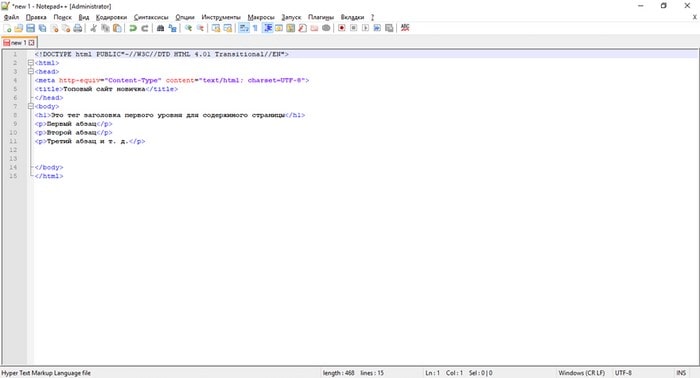
Это базовые элементы, которые есть на любом веб-ресурсе. Весь контент страницы должен находится между тегами <body></body> (это тело документа), всё, что выходит за их пределы выше и ниже, не будет отображаться на сайте.
Шаг 3 – работаем со стилями CSS
Допустим, вы добавили какой-то текст в параграфы, теперь нужно придать им стилистику – выбрать шрифты, фон, отступы, ширину области страницы и т. д. Это может выглядеть вот так:
- body <
- background: #F2F2F2;
- max-width: 900px;
- margin: 10px auto;
- padding: 30px;
- >
- h1 <
- color: #4C4C4C;
- padding-bottom: 20px;
- margin-bottom: 20px;
- border-bottom: 2px solid #BEBEBE;
- >
- p <
- font:italic;
- >
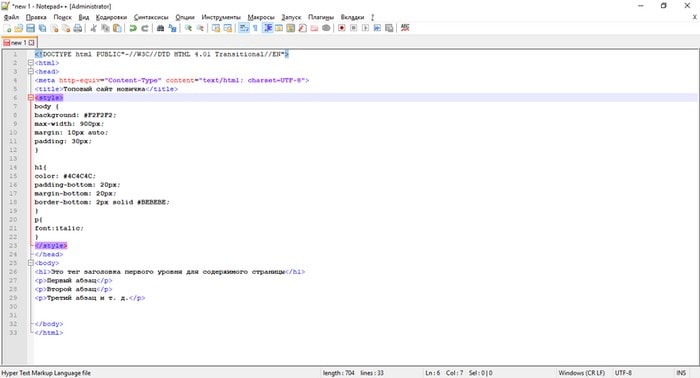
В примере вы видите цвет фона (background) и значение этого атрибута (#F2F2F2), ширину страницы (900 пикселей), отступы, цвет заголовка, отступы от основного текста и границ страницы (padding и margin), а также цветную границу нижней части сайта в 2 пикселя (border-bottom). Вся страница в сборе с разметкой, контентом и стилями будет выглядеть так:
- <!DOCTYPE html PUBLIC"-//W3C//DTD HTML 4.01 Transitional//EN">
- <html>
- <head>
- <meta http-equiv="Content-Type" content="text/html; charset=UTF-8">
- <title>Топовый сайт новичка</title>
- <style>
- body <
- background: #F2F2F2;
- max-width: 900px;
- margin: 10px auto;
- padding: 30px;
- >
- h1 <
- color: #4C4C4C;
- padding-bottom: 20px;
- margin-bottom: 20px;
- border-bottom: 2px solid #BEBEBE;
- >
- p <
- font:italic;
- >
- </style>
- </head>
- <body>
- <h1>Это тег заголовка первого уровня для содержимого страницы</h1>
- <p>Первый абзац</p>
- <p>Второй абзац</p>
- <p>Третий абзац и т. д.</p>
- </body>
- </html>
Как видите, свойства CSS мы добавили между тегами <style></style>. После завершения всех операций сохраните результат. Теперь, если вы попытаетесь открыть полученную страницу, то она автоматически запустится в браузере. Поздравляем, вы создали свой первый простенький сайт в блокноте.
Шаг 4 – загрузка сайта на хостинг
Понятно, что сайт из примера – не из тех, что публикуют в Интернете и тратятся ради этого на платный хостинг. Но, если вы по тем же принципам, изучив HTML и CSS, создадите действительно стоящий сайт для достижения каких-то целей, то для его отображения в Сети потребуются хостинг и домен.
Выбор хостинга – важная задача. Сайты на HTML легковесны и не требуют для своей работы каких-то суперских мощностей, но, тем не менее, мы рекомендуем использовать качественный хостинг, такой как Bluehost. Это один из самых надёжных и популярных зарубежных провайдеров с огромной базой клиентов (обслуживает более 2 млн доменов), впечатляющим количеством серверов по всему миру (около 120) и хорошими условиями. Стоит он $2.95/месяц, плюс ещё домен дают на первый год в подарок, бесплатный SSL и прочие интересные плюшки.
Скорость работы сайтов Bluehost в Рунете высокая, поскольку сервера находятся в облаке, используется CDN-технология. Провайдер абузоустойчивый – это означает, что ваш сайт не отключат ни при каких обстоятельствах – можете не бояться жалоб конкурентов и прочего. Всё будет работать надёжно. Техподдержка круглосуточная.
Для того, чтобы запустить HTML-сайт на хостинге, достаточно просто скопировать его файлы в директорию с названием домена. Можно использовать встроенный FTP-сервер либо программу вроде Filezilla, но, в таком случае, её придётся настраивать для работы с хостингом. База данных не нужна.
Выводы и рекомендации
Простейший HTML-сайт можно создать в блокноте за несколько минут. Для построения более сложных структур, способных выполнять конкретные задачи и выглядеть на уровне, потребуются углублённые знания HTML5 и CCS3. Этот подход полезен новичкам для обучения, приобретения базовых навыков веб-разработчика. В целом, особого смысла создавать такие сайты в других сценариях нет – гораздо эффективнее использовать конструкторы сайтов (например, uCoz, uKit и другие) или даже движок WordPress, если есть опыт.
Быстрый, простой и безопасный хостинг для HTML-сайтов и адекватной ценой. Включена БЕСПЛАТНАЯ регистрация домена на 1 год + SSL сертификат в подарок!
Тарифы: от $2.95
* Bluehost — самая привилегированная хостинг-компания в мире, обслуживает более 2 млн. сайтов, официально рекомендуемая компаниями WordPress, PrestaShop, WooCoomerce и др.!
Making a Website With HTML in 7 Simple Steps + Post Development Suggestions
Building a website nowadays is simple and doesn’t require coding knowledge. Platforms such as WordPress or website builder offer a simple visual interface and drag-and-drop features to ease the development process.
However, you may want to build websites from scratch with Hypertext Markup Language (HTML). While it is more difficult, HTML websites are more flexible and faster as they require fewer resources to run.
To help you get started, this article will explain the steps in making a website with HTML. We will also provide you with post-development practices to improve your HTML site’s appearance and functionality.
How to Make a Website With HTML
This section will provide step-by-step instructions to code a site with HTML. Before proceeding, refer to our HTML cheat sheet if you are unfamiliar with the standard markup language.
1. Pick an HTML Code Editor
A code editor is software used to write your website. While you can create an HTML page with a default text editor like Notepad, it lacks features that help simplify the development process, such as:
- Syntax highlighting – marks HTML tags in different colors based on their categories. This makes the code structure easier to read and understand.
- Auto-completion – automatically suggests HTML attributes, tags, and elements based on the previous value to speed up the coding process.
- Error detection – highlights syntax errors, allowing a web developer to quickly notice and fix them.
- Integration – some code editors integrate with plugins, Git, and FTP clients to make the deployment process more efficient.
- Live preview – instead of opening HTML files manually on browsers, you can install a plugin to get a live preview of the site.
Since there are many options, we have listed some of the best HTML code editors to help you find one that fits your needs:
- Notepad++ – a free, lightweight text editor with added features for coding and plugin support.
- Atom – an open-source HTML editor with a live website preview feature and extensive markup and scripting language compatibility.
- Visual Studio Code (VSCode) – a popular tool for web development with a comprehensive extension library to expand its functionalities.
2. Plan the Site Layout
Creating a layout plan allows you to better visualize your website’s look. You can also use it as a checklist to track what elements to include in your site.
In addition, a layout plan helps you determine your site’s usability and navigation, which affect user experience. Some elements to consider when planning include the sites’ header, footer, and navigation.
You can use pen and paper or web design software such as Figma to design a website layout. It doesn’t have to be detailed as long as it roughly represents the look and feel of your site.
3. Write the HTML Code
Once the tool and layout plan is ready, you can start writing your site’s code. The steps may vary depending on your code editor, but the general idea is similar.
In this tutorial, we will show you how to do it using VSCode:
- Create a new folder on your computer. It will be the directory for all of your site’s files.
- Open VSCode → File → Open Folder.
- Locate the new folder and click Select Folder.
- Select New File. Name the file index.html and press enter.
- Click Create File to confirm.
- Once prompted to the index.html editor tab, enter the following basic HTML document structure:
To help you understand the code, here’s an explanation of each tag:
- <!DOCTYPE html> – tells web browsers that the website is an HTML page.
- </html> – the HTML document opening tag indicating where the code starts.
- <head> – a tag containing the site’s metadata.
- <title> – defines the text shown on the browser tab when visiting the web page.
- <body> – contains all visible content on the web page.
Pro Tip
Learn the difference between making a website using WordPress vs HTML to know which technique suits you best.
4. Create Elements in the Layout
Add HTML code into the index.html file to create the elements of your planned layout. Depending on your website design, you will need different HTML semantic elements.
These elements will separate your site into multiple sections and become the containers for the content. Here are the tags we will use:
- <header> – container for introductory content or navigation.
- <main> – represents the primary content of a web page.
- <div> – defines a section in an HTML document.
- <footer> – contains the content displayed at the bottom of your website.
Put these elements within the <body></body> tags in your index.html file’s code. Ensure to close each element with a closing tag, or your code won’t work.
Here’s how the complete code looks:
5. Add the HTML Content
After the layout is ready, start filling them with your site’s content, like text, images, hyperlinks, or videos. If the content is not ready, use dummy content as a placeholder and replace it later.
Here are some tags we will use to add the website content:
- <h1> and <p> – contain heading and paragraph text. Use <br> tag to create a line break if the text is too long.
- <nav> and <a> – specify the navigation bar and its anchor element. Use the href attribute to specify the anchor’s linked URL.
- <img> – container for the image element. It contains the img src attribute, specifying the link or name of the image file.
Pro Tip
The tag also has an optional alt attribute. It describes the image in case the file doesn’t load.
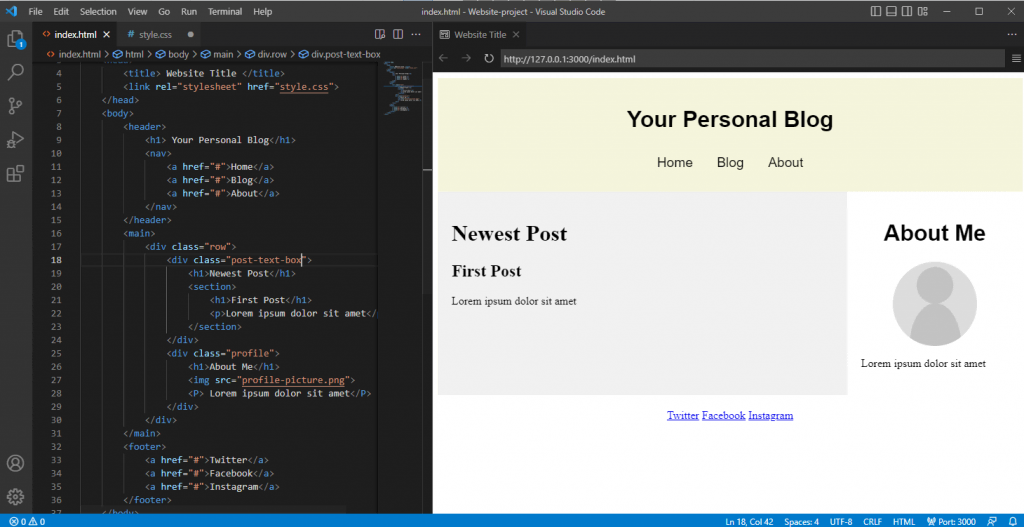
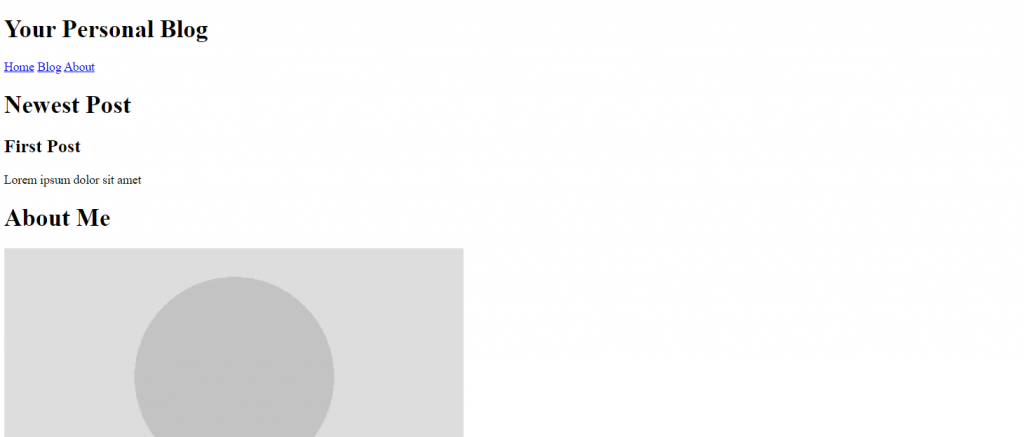
Here’s what the code looks like:
After adding the code, your HTML website will have an appearance. Here’s how it looks:
6. Include Layout CSS
Since HTML only lets you create the website’s structure and add basic content, use Cascading Style Sheets (CSS) to change its layout. CSS is a language that defines the style of your HTML document.
To do this, create a style.css file and link the stylesheet to the HTML document by adding the following code between the <head> opening and closing tags of index.html:
To make the two-column website layout, we will use the flex property. It arranges HTML elements using flexible containers, allowing them to adjust according to users’ screen size.
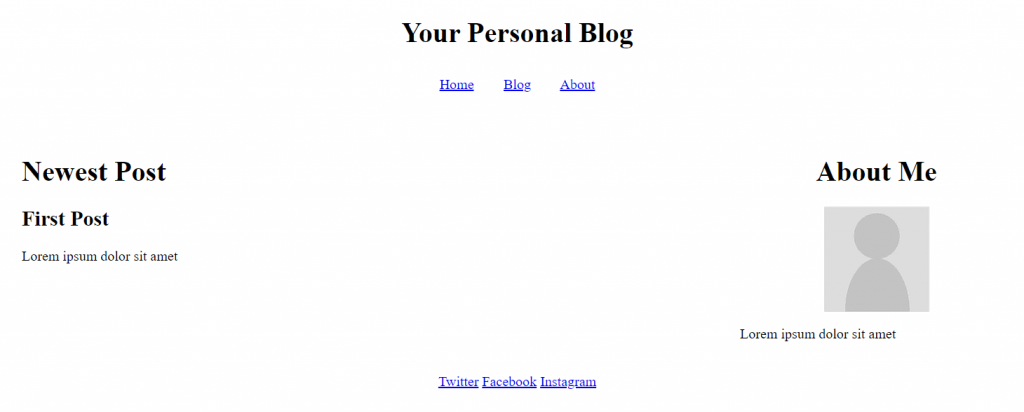
Here is what the complete code looks like:
After you add the code snippet to your CSS file, here’s how the website will look:
Suggested Reading
7. Customize Your Site
In addition to changing the layout, use CSS to customize other visual aspects of your website. For example, you can change the font family and background image.
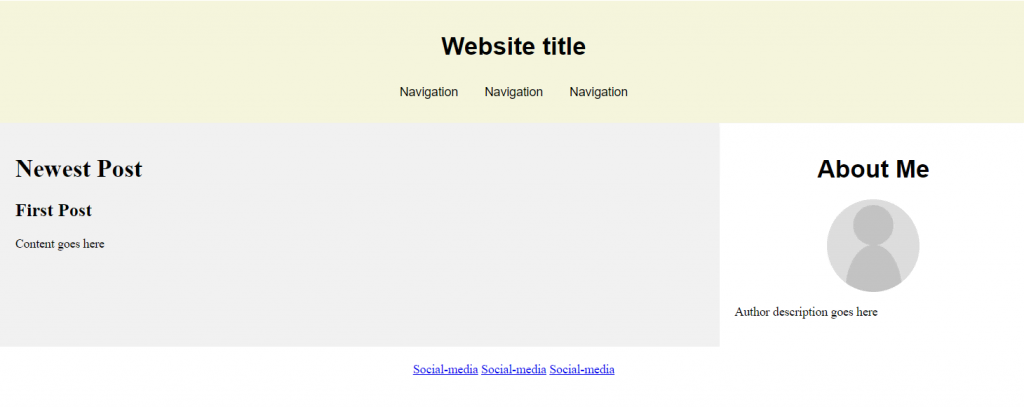
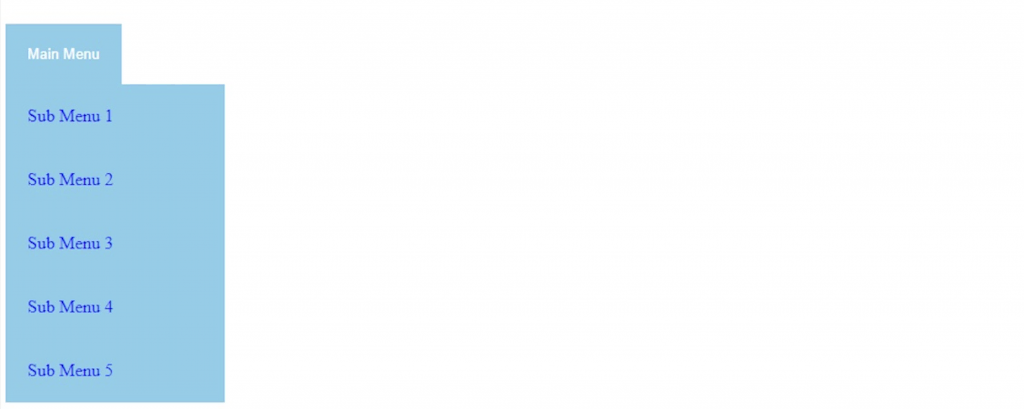
To change your website’s appearance, add the CSS properties in the element you want to customize. For instance, here is the code to style the background color and text elements of the navigation menu bar:
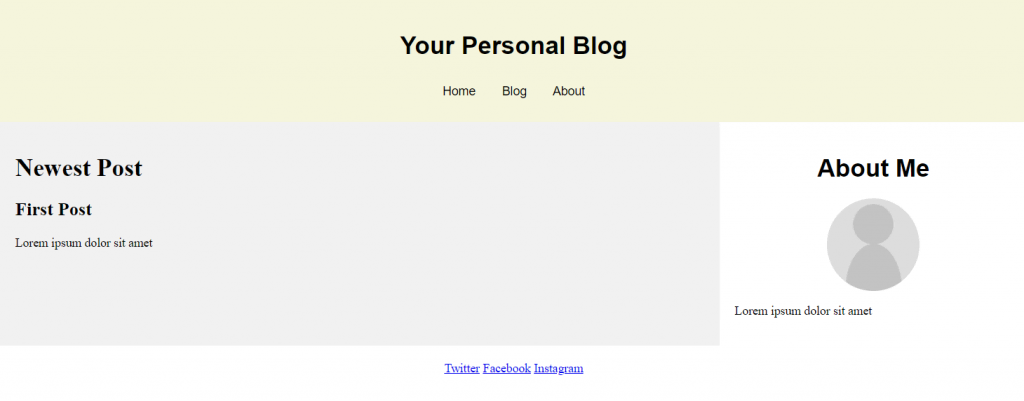
After adding CSS styling for every element, here is how the website looks:
Steps to Take After Creating an HTML Website
This section will explain the steps to take after creating a website using HTML and CSS. These steps will make your website accessible and more functional.
Host the Site on the Right Platform
To make your website accessible via the internet, use a web hosting service. Many hosting providers have different plans that cater to various user needs.
Since HTML web pages are lightweight and require few resources to load, a basic shared hosting plan is sufficient.
Alternatively, use a free static site hosting platform like GitHub Pages. However, avoid free static hosting platforms if you plan to add more code or make your site dynamic. Aside from potential compatibility issues, their limited server resources can slow down your website.
Add a Dropdown Bar for Better Navigation
Complex websites with multiple pages have many navigation buttons, links, and texts. You can create a simple dropdown menu using CSS to group these elements.
Users can expand the navigation bar to access the elements. It helps reduce clutter and improves the website’s usability for users with smaller screens.
Improve the Site Design With Advanced CSS
CSS lets you do advanced customization to enhance your site’s design for a better user experience. For example, enable scroll snapping, text animation, zoom on hover animation, and gradients.
In addition, you can build a responsive website with media queries, CSS rules, and flexboxes. The flexbox layout automatically adapts your site to the client’s screen size.
Make the Site More Interactive With JavaScript
JavaScript is a scripting language that lets you create interactive and dynamic website content. For example, enable animation, add countdowns, and include buttons, forms, or menus.
These features make your website more interesting and immersive, improving user experience. The steps to add JavaScript to your HTML website is similar to CSS. You can use a separate file or write it directly into the current code.
Do I Need to Learn HTML to Build a Website?
Users may not have the time or commitment to learn HTML for web development. Fortunately, some platforms let them create a functional website without writing code.
A website builder like Hostinger is an excellent option for beginners. It has a visual user interface and drag-and-drop editor, which makes customization easy.
Suggested Reading
To help you decide which method suits you better, read our tutorial to learn more about the benefits and downsides of using a website builder vs coding.
Maintaining a builder-based website is also simpler and less prone to error as you don’t need to manually update its source code. Simply select the elements you want to edit and apply the changes directly on one screen.
Since Hostinger Website Builder is included in all our hosting plans, you don’t need to purchase the service separately. It starts from $2.99/month and is upgradeable to higher-performance hosting services.
Conclusion
Instead of using platforms like WordPress or website builders, you can code a website from scratch with HTML. Although more complicated to build, HTML websites are more resource-efficient and flexible as you can edit the source code.
In this article, we have explained how to code a website using HTML and CSS in seven steps:
- Pick an HTML editor – choose the program for writing and editing your website’s code, like VSCode.
- Plan the site layout – make a mockup of the website’s layout using a program like Adobe XD or a pen and paper.
- Write the HTML code – create an index.html file and add HTML document structure tags.
- Create the layout elements – separate your website into multiple sections based on the layout by adding tags to the HTML file.
- Add the HTML content – add the heading title, body text, and images into each section.
- Include layout CSS – create a style.css file and add CSS code to change the column position, text alignment, and elements padding.
- Customize your site – use CSS style attributes to customize the website’s background color, font size, typefaces, and other visual elements.
After creating your HTML web page, you can add advanced CSS and JavaScript to improve navigation, interactivity, and overall design.
Too much to learn? Looking for a no-code builder? Check out Hostinger Website Builder:
Making a Website With HTML FAQ
To help you understand more about building a website with HTML, we will answer some commonly asked questions about it.
Is HTML Enough to Create a Website?
Yes, you can create a functional website with only HTML. However, it only displays static content such as text, links, images, and videos.
Use CSS to style the HTML element, like changing the background color and font size. To create a dynamic and interactive website, you also need PHP.
Is HTML Good for Creating Websites?
Yes, it is good for creating a static website. HTML websites require fewer resources to load and are flexible as you can modify the source code.
However, HTML is only suitable for complex websites if paired with CSS and JavaScript. If you’re only learning HTML, it’s better to use WordPress.
How Long Does It Take to Code an HTML Website?
More complex websites will take longer to build. The number of web developers working on the project, their skills, and resources can also affect the building time. Generally, an experienced developer can code a simple website from scratch in four to six weeks.
Aris is a passionate IT professional and WordPress enthusiast. He loves to share his knowledge and inspire people to start their online journey. When he’s not working or blogging, Aris enjoys watching gadget reviews and scribbling random doodles.
HTML 101
![]()
Hi!�� I’m Sofia, a veteran rookie from Generation Girl, and today I’ll be teaching you the basics of HTML. HTML, which stands for Hypertext Markup Language, is used to create websites, and it’s pretty easy to learn. Let’s get started!
Today, we’ll be making a super basic website, and along the way, you’ll learn the basics of HTML. My example website will be centered around my pet dog, Chewie. You can follow along by making one for your pet or by making one for you! Here are the things you’ll need:
- a text editor that supports HTML
- a .jpg square picture of your desired subject (pet, you, etc.)
- a browser to open your website on (I usually use Google Chrome)
- a list of your subject’s hobbies
1. Setting up the document
Okay, first, let’s make the HTML file. On your text editor, create a new file, then name it website.html
Once you’ve done that, place the file in a folder. In the folder, you want to also place the picture of your subject. Name the picture pic.jpg, so it’s easy to implement later on.
Let’s get back to the HTML file. Whenever you have an HTML file, you have to open it with <!DOCTYPE html>. This is called a document type declaration. The document then starts with <html>, and ends with </html>:
title
When you open a website on your browser, there’s the title of the website on your tab, right? Like, right now, on your tab, there should be HTML 101. To replicate that on your website, add a head, then a title:
Now that the document is all set up, we can start coding what people will actually see: the body.
First, you want to add <body> and </body> to your document, which outlines which part of the document is visible to the reader.
So far, there’s nothing visible on our browser pages when we open the file, this is just to set up!
2. Elements
To define different elements of HTML, we use tags. An example is headers. To open a header, you use <h1>, and to close it, you just use a slash; </h1>. Like this:
Tags can define links <a>, paragraphs, <p>, lists <li>, and many more. On the browser pages, these HTML tags won’t be visible, don’t worry! Only the content will be visible. These tags are used to tell the browsers how to display the content. Let’s try and use these tags! (All of the following should be contained within the <body> tag)
headers
To code a header, you can use <h1> all the way to <h6>. Use <h1> for the most important heading, and <h6> for the least important. For example, I’ll use <h1> to write the title of my website:
images
To add an image in your website, use the <img> tag, like this:
But if you want to control the width and height of the picture, add size attributes (this code means 500 pixels!):
Right now, our website looks like this:
It’s looking a bit empty, so let’s start putting in more information!
paragraphs
A paragraph is exactly what it sounds like. To make a paragraph, use the <p> tag, like so:
To make line breaks in a paragraph, you use the empty tag <br>. It’s called an empty tag because there’s no end tag. You have to use <br> to make line breaks because if you only enter to make a new line as you would in a Word document, the browser can’t read it.
lists
Lists are often put in either bullet point (unordered) or numbered format (ordered). They’re pretty similar, so let’s start with the unordered list.
Compile your desired list, make a title using the header tag we learned above (don’t use <h1> this time) and then you simply need to use the <ul> and <li> tags:
If you want the list to be numbered, simply replace <ul> and </ul> with <ol> and </ol>:
links
Links are really useful to implement in a website because they allow the site visitor to have access to everything they need on one page. For example, in Chewie’s Website, I’ll put a link to my Instagram, just in case the person visiting the website wants to see more adorable pictures of Chewie. Prepare your desired link: https://www.instagram.com/dj0jonegoro/ (Follow me!) Now, all you need to do is use the link tag <a>
This is the format:
Let’s try and implement it!
This is what our code looks like so far:
And this is what our website looks like so far:
Now let’s make the website look pretty!
3. Style
To set the style of an element, you can use the style attribute. Usually, if it’s a big website with multiple pages, I use a separate CSS document, and this is what I would usually recommend, but for the purpose of this simple tutorial, I’ll implement the styles within the HTML document.
Here’s the basic formatting of style:
“Property” and “value” are CSS properties and values. Let’s try this out!
background color
To set the background color for your website, you use the property background-color, like so:
You can choose any color you want, and to pick the color, I use hex codes. You can google hex color, and pick virtually any color you want, and then just put the hex code of the color into the code.
You can also input simple colors like red, blue, or green, but if you want a really specific color, hex code is the way to go!
text color
Now you can choose the color of the text. Find your color just like before, using hex code or using a simple color, and then input it like so:
I’m changing the color of my first header, but you can apply this code to your lists or paragraphs as well;
The default font for Google Chrome is Times New Roman, so if you like that font, skip this step! Personally, I like Verdana, so I’m going to be changing my whole website’s font into Verdana. What you need to do is just add the font-family property.
I’m going to add this property to the whole website by putting it in the <body> style next to the background-color property, but if you want different fonts for each text, you can put the property into each individual <h1>, <p>, or <ul> tag.
text alignment
Right now, all my text and images are smushed to the left, as per the default text alignment. To change this, I can use the text-align property.
I only want to place my header in the center, so I’m only going to use text-align for <h1>. If you want everything to be in the center, use the text-align property in the <body> tag.
Как создать простой HTML сайт в блокноте
HTML – это основа всех современных сайтов. По сути, это язык разметки, который помогает браузеру правильно отображать те или иные элементы. Чтобы создать свои первые web-страницы будет достаточно даже простого текстового блокнота (имеется ввиду программа-редактор для работы с текстом, а не бумажная записная книжка).
Какие именно шаги нужно пройти и как сделать свой первый сайт «бесплатно», «без регистрации и SMS» — ниже.
Пара слов об HTML
С одной стороны, создание универсального синтаксиса для разметки интернет-страниц позволило этому самому интернету перерасти из технологии объединения сетей до современного WEB’а со всем его многообразием. С другой стороны, так можно сказать про любой язык программирования – он помогает преобразовывать логические структуры в машинный код. Но для того, чтобы получить более-менее внятный результат нужно проделать огромный пласт работы: изучить и досконально знать синтаксис, а на это может уйти много времени и сил, накопить опыт по созданию своих скриптов и т.п., а это ещё больше времени.
HTML был призван добавить интерактивности к скучным «простыням» документов, которые были практически единственным видом контента на заре зарождения глобальной паутины (из-за низких скоростей).
Фактически это язык разметки, который позволяет выделять определённые элементы страницы и задавать для них специфичные параметры (размер, шрифт, тип: картинка это, текст, ссылка, видеофайл и т.д.).
Немного о синтаксисе
Например, комбинация <h1>Здесь текст</ h1> позволяет выделить заголовок первого уровня, она состоит из открывающего и закрывающего (с косой чертой) тегов. Некоторые теги, могут использоваться самостоятельно – без закрывающих элементов.
Любой HTML-документ может быть представлен в текстовом виде и должен иметь определённую структуру.
Обязательными тегами для любых HTML-страниц являются следующие:
Внутри тега <HTML></HTML> располагается вся разметка страницы.
Внутри тега HEAD описываются параметры заголовка страницы, включая так горячо любимые seo-атрибуты: title и description.
А внутри BODY располагается весь остальной контент.
В общей сложности в современной версии языка разметки HTML5 используется 125 основных элементов (тегов).
Простая web-страница в блокноте
Открываете любой доступный текстовый редактор (это может быть встроенное системное приложение, например, «Блокнот» в Windows, или сторонний софт, например, Notepad++, AkelPad и т.п.).
Алгоритм работы очень простой:
- Создаёте новый документ.
- Если ваш редактор поддерживает работу с разными кодировками, то выбираете по умолчанию utf-8.
- Вписываете в него нужную структуру документа (с использованием нужных тегов).
- Сохраняете документ как текст (с расширением .txt) и меняете расширение на .html. Или сразу сохраняете файл в формате .html, если это позволяет ваш редактор.
- Теперь документ можно открыть в любом браузере, он распознает в нём вашу разметку и отобразит содержимое.
Обратите внимание, блокнот Windows в устаревших версиях системы сохраняет текст в кодировке ANSI (в новых версиях он работает с UTF-8), это не преступление, но вместо кириллических символов в браузере вы можете увидеть кракозябры. Поэтому с помощью специального атрибута нужно просто «подсказать» браузеру, что ему нужно работать с ANSI:
<meta charset="windows-1251"> (тег вписывается внутри блока HEAD).
Хватит теории, пора переходить к делу. Давайте создадим в блокноте полноценную страницу. Просто скопируйте и вставьте следующий код в ваш блокнот.
Сохраните файл как index.html и откройте в браузере.

Вы получили типовой адаптивный шаблон, который можно наполнить своим контентом. Только править нужно наполнение, а не теги, нельзя их удалять или нарушать структуру (например, убирать закрывающие), так как в противном случае вся ваша «вёрстка» съедет и будет отображаться «криво».
Пошаговая инструкция для новичков по созданию сайта с нуля без навыков программирования.
Стили CSS, скрипты, картинки и другой контент
Как можно заметить, приведённый пример адаптируется под ширину окна браузера и может выстраиваться в одну вертикальную колонку на мобильных устройствах. Как так получилось? Всё дело в таблице каскадных стилей (они же CSS).
Вы можете задать для каждого HTML-тега свои параметры оформления: цвет заливки, текста, тип шрифта, его размер, отступы и многое другое. В нашем примере стили прописаны в блоке <style type="text/css"> (между открывающим и закрывающим тегом style).
Такое написание можно заменить ссылкой на внешний файл (причём файл стилей может располагаться как в каталоге на вашем сервере, так и на любом другом, главное, чтобы ссылка на него была правильной).
Например, <link rel="stylesheet" type="text/css" href="mysitestyle.css">.
mysitestyle.css можно заменить на полную (абсолютную) или даже относительную ссылку (отсчёт будет вестись относительно каталога, в котором будет лежать исходный html-файл).
Аналогичным образом вставляются js-скрипты, которые помогают анимировать страницу или добавить какие-либо специфические функции.
Изображение или видео тоже может располагаться на вашем сервере (в корне с html-файлом) или вообще на другом сайте. В первом случае можно использовать относительные ссылки, чтобы было просто сменить домен, а во втором, можно использовать ресурсы со сторонних сайтов (не нужно хранить изображение у себя и отнимать ресурсы сервера).
Пример вставки изображения со своего сайта (файл image.png должен лежать рядом с index.html):
<img src="image.png" alt="текст, который будет показан вместо изображения, если оно не загрузится" width="190" height="260">
Параметры ширины и высоты можно пропустить или задать в таблице стилей CSS.
В нашем примере вы можете заменить баннер:
- Вместо тега <div 1</div>
- Пишем <img src="image.png" alt="баннер-картинка">
- Рядом с index.html кладём любое изображение в формате .png и меняем имя на image.png
Обратите внимание на указание класса (class="banner"), этот параметр позволяет задать стиль оформления централизовано – через CSS. Поэтому изображение любого размера аккуратно впишется в имеющийся дизайн.
Точно также можно заменить все остальные баннеры на свои изображения или добавить их внутри других блоков (только в последнем случае уже без указания класса banner, иначе верстка «поедет»).
Многостраничные сайты в блокноте
Вы можете создать сколько угодно страниц, но, чтобы они были взаимосвязаны между собой, и пользователь мог переходить с одной на другую, нужно правильно прописать ссылки.
Например, вы создаёте страницу page1.html, а нужно попасть на page2.html. тогда нужно внутри страницы page1 прописать ссылку для перехода на page2. Это делается с помощью специального тега и его параметра:
<a href="page2.html">Нажмите для перехода на Страницу 2</a>
Файл page2.html должен лежать рядом с page1.html в одном каталоге, иначе нужно указывать более подробный относительный путь или абсолютную ссылку, если страница расположена на другом сайте.
Соответственно, если со Страницы 2 вам нужно вернуться на первую, то внутри второй страницы нужно прописать уже другой URL, который будет ссылаться на первую. И т.д.
Количество ссылок на другие страницы никак не ограничено, вы можете создавать столько страниц, сколько вам нужно.
Размещение на хостинге
Все созданные HTML-файлы и дополнительные ресурсы (изображения, скрипты, видео и т.д.) вы можете разместить на хостинге и открыть доступ к ним для любого желающего.
Любой web-хостинг работает с html-файлами, даже если у него нет поддержки PHP или баз данных. Хостинг-провайдеров безумное множество, для статичных (html) сатов даже встречаются бесплатные варианты, например, GitHub Pages. Но мы рекомендуем не тратить время, и выбрать проверенный сервис, такой как Bluehost (компания работает с 2002 года и позволяет размещать даже динамические сайты, например, на популярном движке WordPress, а ещё здесь есть возможность установки любой системы управления контентом прямо из панели управления в один клик и тарифы с полным безлимитом).
Как разместить HTML-сайт на хостинге, пошагово:
- Вы регистрируете новое доменное имя, если его ещё у вас нет.
- Перенаправляете его на DNS-сервера выбранного хостера.
- В панели управления хостинга создаёте новый сайт (имя задаётся в соответствии с доменом).
- Далее в веб-версии файлового менеджера или через FTP-протокол закачиваете ваши страницы в корень каталога сайта.
- После того, как обновятся данные в DNS-системе и ваш домен начнёт ссылаться на сервера хостинга, сайт можно будет открыть в любом браузере просто введя имя (домен).
Стоит учесть, что если вы введёте в адресной строке vash-sait.ru, то хостинг будет пытаться загружать главную страницу, которую он ожидает увидеть с именем index.html в корне каталога (http://vash-sait.ru/index.html).
Если такого файла не будет, отобразится ошибка. Но вы можете прописать полный путь, например, vash-sait.ru/page1.html, и если файл с таким именем в каталоге сайта есть, то станица будет отображена.
Стоимость создания сайта зависит от множества факторов. Узнайте сколько стоит создать свой сайт.
Выводы
Мы рассмотрели основы «олдскульного» подхода к созданию сайтов. Сейчас в блокнотах сайты делать просто бессмысленно, так как это очень сложно для новичков и очень нерационально для профессионалов (они работают со специальными средами разработки и другими инструментами).
Начинающим web-мастерам проще и быстрее воспользоваться онлайн-конструкторами, которые позволяют собрать сайт своими руками даже без знания основ вёрстки или погружения в HTML, а результат ничем не будет уступать профессиональным продуктам. Посмотреть на достойные сервисы можно в нашем рейтинге лучших конструкторов сайтов.
Кроме того, в большинстве случаев одним только HTML ограничиться не получится. Если вам нужна интерактивность (обратная связь от посетителей: формы заказа звонков, чат, функционал интернет-магазина и т.п.), то придётся подключать языки программирования и JavaScript или готовые CMS-системы/фреймворки.