CSS Padding
Padding is used to create space around an element’s content, inside of any defined borders.
CSS Padding
The CSS padding properties are used to generate space around an element’s content, inside of any defined borders.
With CSS, you have full control over the padding. There are properties for setting the padding for each side of an element (top, right, bottom, and left).
Padding — Individual Sides
CSS has properties for specifying the padding for each side of an element:
- padding-top
- padding-right
- padding-bottom
- padding-left
All the padding properties can have the following values:
- length — specifies a padding in px, pt, cm, etc.
- % — specifies a padding in % of the width of the containing element
- inherit — specifies that the padding should be inherited from the parent element
Note: Negative values are not allowed.
Example
Set different padding for all four sides of a <div> element:
Padding — Shorthand Property
To shorten the code, it is possible to specify all the padding properties in one property.
The padding property is a shorthand property for the following individual padding properties:
- padding-top
- padding-right
- padding-bottom
- padding-left
So, here is how it works:
If the padding property has four values:
- padding: 25px 50px 75px 100px;
- top padding is 25px
- right padding is 50px
- bottom padding is 75px
- left padding is 100px
Example
Use the padding shorthand property with four values:
If the padding property has three values:
- padding: 25px 50px 75px;
- top padding is 25px
- right and left paddings are 50px
- bottom padding is 75px
Example
Use the padding shorthand property with three values:
If the padding property has two values:
- padding: 25px 50px;
- top and bottom paddings are 25px
- right and left paddings are 50px
Example
Use the padding shorthand property with two values:
If the padding property has one value:
- padding: 25px;
- all four paddings are 25px
Example
Use the padding shorthand property with one value:
Padding and Element Width
The CSS width property specifies the width of the element’s content area. The content area is the portion inside the padding, border, and margin of an element (the box model).
So, if an element has a specified width, the padding added to that element will be added to the total width of the element. This is often an undesirable result.
Example
Here, the <div> element is given a width of 300px. However, the actual width of the <div> element will be 350px (300px + 25px of left padding + 25px of right padding):
To keep the width at 300px, no matter the amount of padding, you can use the box-sizing property. This causes the element to maintain its actual width; if you increase the padding, the available content space will decrease.
Example
Use the box-sizing property to keep the width at 300px, no matter the amount of padding:
More Examples
Set the left padding
This example demonstrates how to set the left padding of a <p> element.Set the right padding
This example demonstrates how to set the right padding of a <p> element.Set the top padding
This example demonstrates how to set the top padding of a <p> element.Set the bottom padding
This example demonstrates how to set the bottom padding of a <p> element.CSS Padding — Внутренний отступ
CSS свойства padding используются для создания пространства вокруг содержимого элемента внутри любых определенных границ.
Благодаря CSS у вас есть полный контроль над отступом. Есть свойства для установки отступов для каждой стороны элемента (вверху, справа, внизу и слева).
Padding — Отдельные стороны
CSS имеет свойства для указания отступа для каждой стороны элемента:
- padding-top
- padding-right
- padding-bottom
- padding-left
Все свойства padding могут иметь следующие значения:
- length — указывает отступ в пикселях, pt, см и т.д.
- % — указывает отступ в % от ширины содержащего элемента
- inherit — указывает, что отступ должен быть унаследован от родительского элемента
Примечание: Отрицательные значения не допускаются!
Пример
Установите разные отступы для всех четырех сторон элемента <div>
Padding — Сокращенное свойство
Чтобы сократить код, можно указать все свойства отступа в одном свойстве.
Свойство padding — это сокращенное свойство для следующих индивидуальных свойств отступа:
- padding-top
- padding-right
- padding-bottom
- padding-left
Т.о., вот как это работает:
Если свойство padding имеет четыре значения:
- padding: 25px 50px 75px 100px;
- верхний отступ 25px
- правый отступ 50px
- нижний отступ 75px
- левый отступ 100px
Пример
Используйте сокращенное свойство padding с четырьмя значениями:
Если свойство padding имеет три значения:
- padding: 25px 50px 75px;
- верхний отступ 25px
- правый и левый отступы 50px
- нижний отступ 75px
Пример
Используйте сокращенное свойство padding с тремя значениями:
Если свойство padding имеет два значения:
- padding: 25px 50px;
- верхний и нижний отступы 25px
- правый и левый отступы 50px
Пример
Используйте сокращенное свойство padding с двумя значениями:
Если свойство padding имеет одно значение:
- padding: 25px;
- все четыре отступа 25px
Пример
Используйте сокращенное свойство padding с одним значением:
Padding и Width
CSS свойство width определяет ширину области содержимого элемента. Область содержимого — это часть внутри отступа, границы и поля элемента (блочная модель).
Итак, если элемент имеет указанную ширину, добавленный к этому элементу отступ будет добавлен к общей ширине элемента. Часто это нежелательный результат.
Пример
Здесь элемент <div> имеет ширину 300 пикселей. Однако фактическая ширина элемента <div> будет 350 пикселей (300 пикселей + 25 пикселей слева + 25 пикселей справа):
Чтобы сохранить ширину 300 пикселей, независимо от количества отступов, вы можете использовать свойство box-sizing . Это заставляет элемент сохранять свою ширину; если вы увеличите отступ, доступное пространство содержимого уменьшится.
Пример
Используйте свойство box-sizing, чтобы ширина оставалась равной 300 пикселей, независимо от количества отступов:
Больше примеров
Установите левый отступ
Этот пример демонстрирует, как установить левый отступ элемента <p>.Установите правый отступ
Этот пример демонстрирует, как установить правый отступ элемента <p>.Установите верхний отступ
Этот пример демонстрирует, как установить верхний отступ элемента <p>.Установите нижний отступ
Этот пример демонстрирует, как установить нижний отступ элемента <p>.Проверьте себя с помощью упражнений!
Все CSS свойства отступа
Свойство Описание padding Сокращенное свойство для установки всех свойств отступа в одном объявлении padding-bottom Устанавливает нижний отступ элемента padding-left Устанавливает левый отступ элемента padding-right Устанавливает правый отступ элемента padding-top Устанавливает верхний отступ элемента ПАЛИТРА ЦВЕТОВ
ПРИСОЕДИНЯЙТЕСЬ!
Получите ваш
Сертификат сегодня!Связь с админом
Если вы хотите сообщить об ошибке, а также внести предложение о работе сайта, добавить объявление или рекламу на сайт, не стесняйтесь отправить админу электронное письмо на email:
Топ Учебники
Топ Справочники
Топ Примеры
Веб Сертификаты
Этот сайт оптимизирован для обучения и тестирования. Примеры могут быть упрощены для улучшения чтения и базового понимания. Учебные пособия, ссылки и примеры постоянно пересматриваются, чтобы избежать ошибок, но мы не можем гарантировать полную правильность и работоспособность всего контента. Используя этот сайт, вы соглашаетесь с тем, что прочитали и приняли условия использования, cookie и политику конфиденциальности.
Также вы можете абсолютно бесплатно скачать офлайн версию сайта W3Schools на русском архивом с GitHub и пользоваться локально на своём компьютере.
Также доступна версия сайта W3Schools на украинском языке.
Copyright 1999-2021 by Refsnes Data. All Rights Reserved.
Сайт работает на фреймворке W3.CSS.padding
Свойство padding устанавливает внутренние отступы/поля со всех сторон элемента. Область отступов это пространство между содержанием элемента и его границей. Отрицательные значения не допускаются.
Свойство padding краткая форма записи свойств, чтобы не писать отдельное правило для каждой стороны ( padding-top , padding-right , padding-bottom , padding-left ).
-
: 0 : 0 : 0 : 0
-
: процент, как указан, или абсолютная длина : процент, как указан, или абсолютная длина : процент, как указан, или абсолютная длина : процент, как указан, или абсолютная длина
Синтаксис
Значения
Укажите одно, два, три или четыре следующих значения:
Устанавливает неотрицательный, фиксированный размер. Подробнее в разделе <length> .
Padding vs Margin: What’s the Difference in CSS?

When editing a website using CSS, the most used properties for spacing out elements on a page are the padding and margin. For beginners, these terms may sound confusing. Plus, if applied incorrectly, they can lead to a messy web design.
Hence, this guide will explain in more detail the difference between padding and margin, how they work, and how to implement them in CSS. Extra tips are also available at the end of the article to help you use them properly.
What’s the Difference Between Padding and Margin?
The main difference between padding and margin is that padding is the space between the element’s content and its border, while margin is the space between the element’s border and the next element. Padding is used to create space within an element, while margin is used to create space between elements. Both can be adjusted using CSS, and understanding the difference is important for properly designing layouts.
Padding vs Margin: What Is It and When Should You Use It?
Both padding and margin are used to create a WordPress theme and customize the layout of a website. However, each has its own purposes and functions.
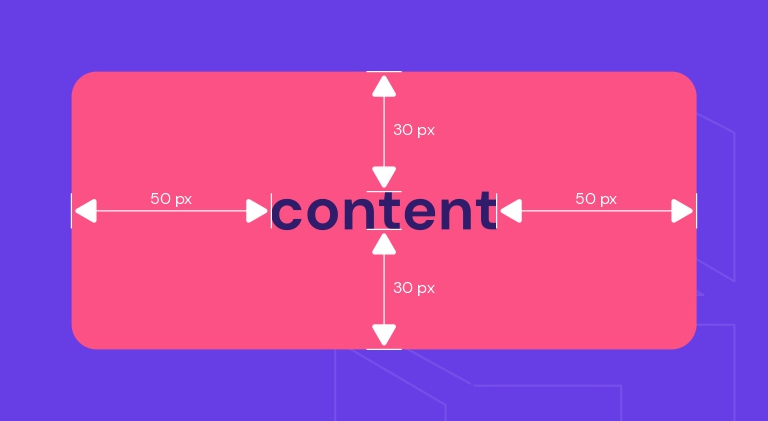
Padding
The padding property is what creates the space or area around an element’s content. It consists of the top, right, bottom, and left padding. In CSS they are written as padding-top:, padding-right:, padding-bottom:, and padding-left:. Their default values are 0.
To add padding to an element, you can set the values in:
- Length – a fixed value, usually in px, pt, or cm.
- Percentage – the size of the padding is relative to the width of the element.
- Inherit – sets the CSS padding properties to follow the parent element.
Keep in mind that you can’t use negative and auto values for paddings.
Here’s an example of a standard padding CSS code:
Padding has a shorthand property – padding:. It simplifies the above code to a one-line code. This is to prevent having a long CSS file, which can slow down your site’s loading time.
The padding shorthand property can have from one to four values:
- Four values – when you need to specify the values of the top, right, bottom, and left paddings. The above code, for example, could be written as:
- Three values – if the right and left padding have the same length, you can merge the right and left values into one. So, the code would be:
- Two values – the first value determines the top and bottom padding while the second value sets the right and left padding:
- One value – when you want to specify one length to all four sides of the padding. For instance:
Keep in mind that when you fix the width of an element, paddings will add to the total width. Take the following example:
The total width of the element is 300px, or 250px plus 25px of right padding and 25px of left padding. If you want an element to have a specific width, do take the padding length into consideration.
Use padding when you don’t want the content of an element to touch the edges of its container. You can also use it to increase and decrease the size of web elements.
Take the button element, for example. The padding is the area surrounding the button label or text. When you edit the padding, it will affect the size of the button because you will either have more or less space around the text.
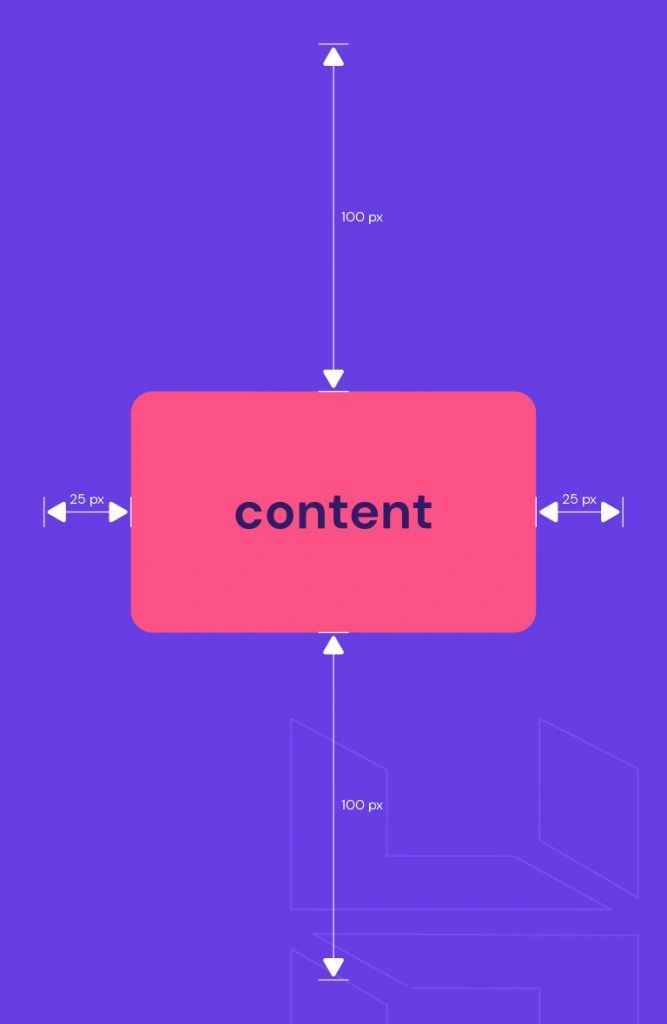
Margin
The margin property is the outermost layer of a web element. In other words, it creates space around the element. The property consists of margin-top:, margin-right:, margin-bottom:, and margin-left:.
Just like padding, margin can be set in length, percentage, and inherit values. However, it also supports:
- Auto – the browser will calculate a suitable margin value to use. It will usually center the web element.
- Negative values – sets elements closer to their neighbors.
The standard margin code is:
In CSS, margin also has a shorthand property – margin:. It’s determined by the number of values as well:
- Four values – if you want to determine all four sides of the margin. For instance:
Remember to write the values in order from the top, then move clockwise towards the left.
- Three values – applicable when the right and left margin have the same value:
- Two values – the first value applies to the top and bottom margin while the second value refers to the right and left margin:
- One value – when you want all four margins to have the same length. For example:
To auto set the margin, simply type the code:
It will horizontally center the element within its container. In other words, the element will take up the specified width, and the remaining space will be split equally between the left and right margin.
Use a margin when you want to move elements up, down, left, right, or center them. The distance between elements is also the work of margins. Other than that, margins can also be used to overlap elements.
For example, with the image element, you can use a margin to place another image on top of it. Alternatively, set a specific distance between the image and a text box.
CSS Padding vs. Margins vs. Borders: Differences
The main difference between CSS padding and margin is that padding is the space between the element’s content and border (within the element itself), while margin is the space around the border of an element.
Padding is a CSS property that works only on elements that have borders. It creates the space between the border and the content of an element. So, keep in mind that padding has no effect on elements that don’t have borders.
Margins form the space outside the borders of elements. Unlike padding, margins can still affect an element whether or not it has borders.
Another difference is that the background color of padding and borders can be customized, while margins are transparent – with them, the website’s theme background color will show.
The CSS Box Model
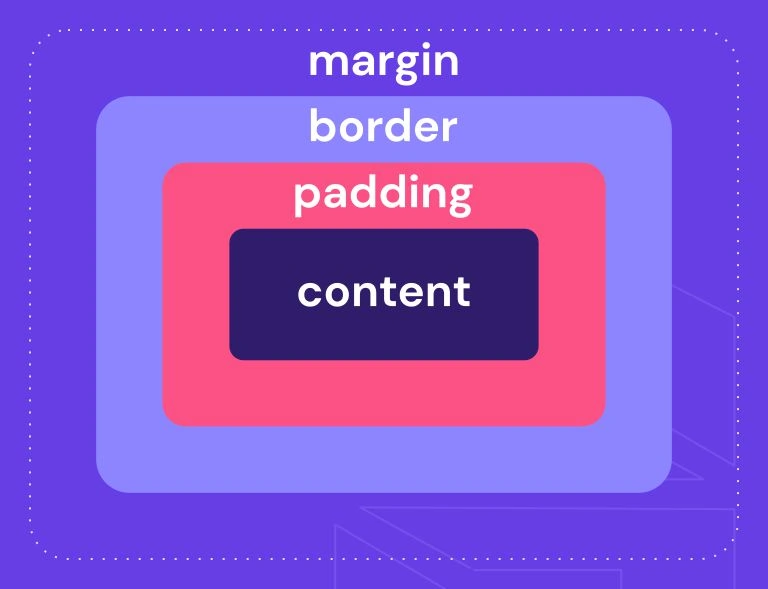
Every web page is made up of rectangular content blocks. They are arranged on top of, below, and next to each other. These blocks are what you call HTML elements.
The CSS box model is basically a container or box wrapped around every HTML element. It consists of:
- Content box – the area where your content is displayed, like texts and images.
- Padding box – it’s the space surrounding the content area.
- Border box – refers to the container between the padding and margin or the box wrapping the element.
- Margin box – the outermost layer or invisible space outside the border.
- Width – refers to the content area width of an element. Its value is 100% by default, but it can be set to a definite width.
- Height – it’s usually based on the length of the content, but setting a specific height is also possible.
Below is the code of a standard CSS box model with its preview:

How to Add Padding in CSS
The following tutorial will show you how to add padding to a heading element on a WordPress post.
- From the WordPress Dashboard, hover over Appearance and select Customize.
- Click on the page or post you want to edit. Then, scroll down the side menu and click on the Additional CSS tab.
- Input the padding values for the H1 element. For example:
h1 <
background-color: beige;
padding: 20px 100px;
>
- Save your changes.
How to Add Margins in CSS
Follow the steps below to add margins to an image element on a WordPress post.
- Navigate to WordPress Dashboard -> Appearance -> Customize.
- Select the post you want to edit. Find and click the Additional CSS tab from the side menu.
- Type in the margin value for the image element. For instance:
img <
margin: -20px 5px;
>
- Save the edits.
Tips When Using Margins and Padding
Different content elements may work better with margins or padding. So take that into account when choosing between the two. Here are some other tips you might find useful:
- To add space within a column, use padding instead of margins if you’re building a responsive grid.
- Use padding on the columns if a web page has multiple columns that will stack vertically on a smaller screen.
- Use margin properties when adding space around the text, image, and container elements.
- Add bottom margins first to create consistent spacing between elements.
- When a container sits inside a column, add a bottom margin to the container. It’ll add more space when content stacks vertically on smaller screens.
- Use margins to space around buttons instead of padding as it affects the button styling.
- When you have an interactive element, use margins to add space around it.
If manually editing a website’s layout using CSS is too complicated for you, try a page builder. It doesn’t require coding and offers easy customization, saving you a lot of time.
Plus, the design you create will automatically be responsive. You won’t need to worry about making difficult design decisions regarding margins and padding. The website will adjust flawlessly on various screen sizes.
Conclusion
In CSS, both margin and padding add space to web elements, but each brings different results. Padding is the space between the content of an element and the border.
On the other hand, the margin makes the outermost space of the element.
For beginners, it can be a bit confusing to decide which property to apply when designing your website. However, you’ll become more familiar with them as you play around and experiment.
Hopefully, the tips mentioned in this article helped you understand their differences and when to use padding vs margin.
Domantas leads the content and SEO teams forward with fresh ideas and out of the box approaches. Armed with extensive SEO and marketing knowledge, he aims to spread the word of Hostinger to every corner of the world. During his free time, Domantas likes to hone his web development skills and travel to exotic places.